In this chapter, we’ll take a look around the Photoshop interface and how to use the most common tools to manipulate and edit photographs.
Photoshop has a vast array of tools and can appear quite overwhelming at first, but in this chapter, we’ll explore what the various tools do and how to use them.
Let’s start by taking a look at the main screen.
The Main Screen Overview
At the very top of the screen, you’ll see Photoshop’s drop-down menu system. Here, you’ll find options to open files, save files, copy, paste, image adjustments, as well as type options, filters, and so on. Just click the appropriate menu along the bar, then select the option you want.
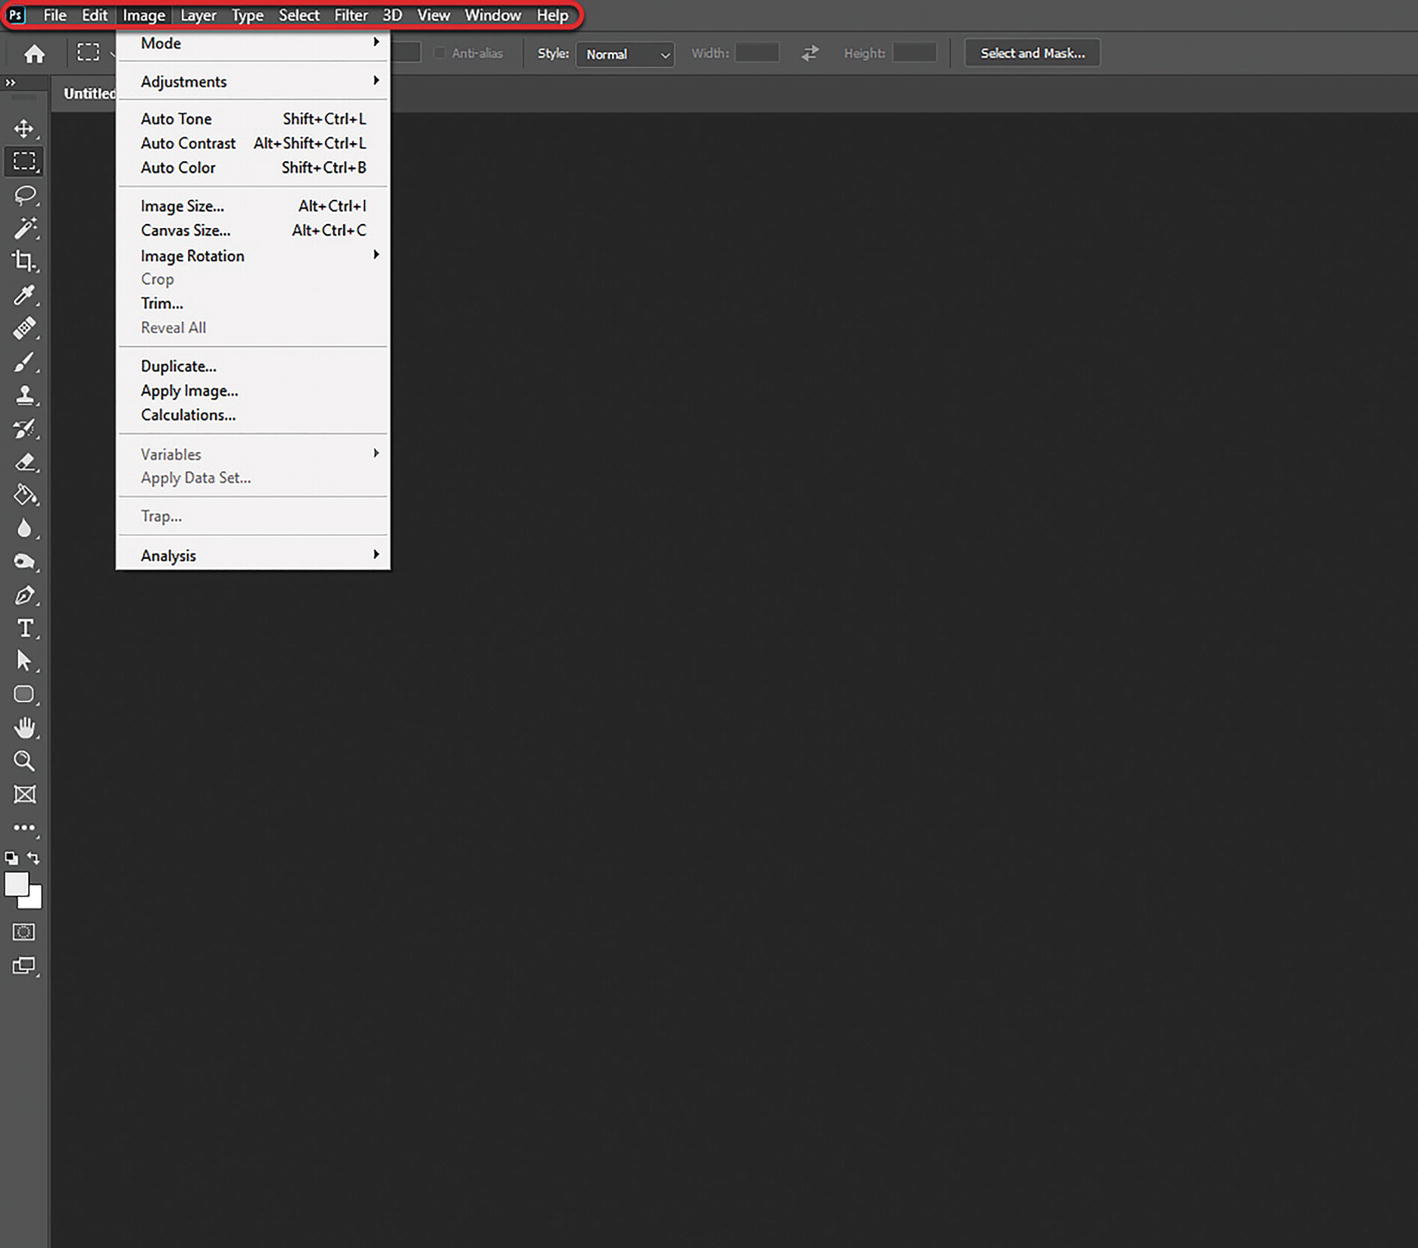
A screenshot of a photoshop window with a highlighted menu bar that contains a file, edit, image, layer, type, select, filter, 3 D, view, window, and help options.
Underneath the menus, you’ll see the options bar. This bar changes depending on which tool is selected from the toolbox (sometimes called the toolbar or tools panel). It allows you to change brush size, text size, color, and so on.

A highlighted toolbar panel indicates the adjustment of the size of the brush, the text size, and the color, among others.
Along the left-hand side of your screen is the tool box. This is where you’ll find all your tools, the paint brush, eraser, pen tool, text tool, crop tool, and so on.

A window indicates the highlighted left-hand side toolbox with tools such as the paintbrush, eraser, pen, text, and cropping tools, among others.
Right at the bottom of your tool box, you can select foreground color - this is the color of your paint brush, text, shape, and anything you draw. The background color is the color of the background layer, the color of the eraser tool and the end color of a gradient (gradients go from foreground to background color).
In the following illustration, the foreground color is black and the background color is white. The double-sided arrow on the top right swaps the colors around.

A screenshot indicates the foreground icon. The selector for the color assigned on the paintbrush and any text or shapes.
The Toolbox and Options Bar
In the Photoshop window, the toolbox appears on the left of the screen. As you can see, Photoshop has an enormous array of tools available. Many of these tools also have options that appear in the options bar at the top of the screen.
For example, if I select the horizontal text tool from the toolbox on the left-hand side, as we can see in the following screenshot.

A window indicates the toolbox on the left that exemplifies the use of the horizontal text tool to add up the words Planet Earth in a stock image.
Along the top of the screen, I have some options I can change, such as font, size, color, alignment, and so on.

A highlighted toolbar panel on the top indicates the alteration.
Just click the option you want to change. For example, if you wanted to change the font, click the first drop-down box (‘arial’ in the following example), then select a font from the list. If you want to change the font size, click the font size drop-down box (currently set to 19pt in the following example), then select or type in a size.

A toolbar panel indicates the purpose and uses of every icon including text orientation, selecting font typeface, bold, italic, and regular font, font size, anti-aliasing, aligning text, selecting font color, and wrapping text.
Similarly, if I selected the brush tool from the toolbox on the left-hand side.

A window indicates the toolbox on the left that exemplifies the use of the brush tool to draw.
From the options bar along the top of the screen, you can change the brush size using the brush preset drop-down. You can also change the hardness and softness of the brush.

An options bar on top exemplifies the usage of the drop-down menu next to the brush preset, altering the brush size.
Try different brush sizes, change the hardness, and see what happens.
Along the top of the options bar, I can also change the opacity, the flow rate (how fast or how much “paint” comes out), and the smoothing (helps smooth out your brush strokes).

An options bar on top exemplifies the usage of the varied sizes of the brush affects both the brush's hardness and its opacity.
The options bar will display the options related to the tool selected from the toolbox. Try out some of the settings on the text tool and paintbrush tools.
Give it a try, see what happens when you select different opacity, and flow settings.
Additional related tools are indicated by a small arrow at the bottom right of the tool icon.

A screenshot of the lasso tool icon with a small arrow on the bottom for additional option selections.
If you click a tool and hold your mouse button down for a second, you’ll see these additional tools.

A screenshot of the left-hand side toolbox indicates the objective of each tool icon and its sub-tool icons.
At the bottom of the toolbox, you can change the foreground and background colors. The foreground color is applied to painting, drawing, and text tools to set the color of that object. Background color is applied with the eraser tool and is the end color of a gradient.

A screenshot of the bottom toolbox indicates the foreground color sets object color in painting, drawing, and writing tools, and the background color ends a gradient.
Let’s explore the most commonly used tools.
Move Tool
 A move tool icon that allows the selected piece to be manually moved around the canvas to a new location.Once an area of an image is highlighted with the rectangular marquee tool, the move tool can be used to manually relocate the selected piece to anywhere on the canvas.

A screenshot of a canoe on the side of a lake. Using the move tool allows the selected piece to be manually moved around the canvas to a new location.
Marquee Tools
The marquee tools can make selections that are single row, single column, rectangular, and elliptical.

Four selections of the different marquee tools include rectangular, elliptical, single row, and single column.
An area that has been selected can be edited without affecting the rest of the image. Once you’ve selected the tool, click and drag your mouse across the desired area to select it. The selected area will be outlined by dotted lines, referred to as “marching ants.”

A screenshot of a canoe on the side of a lake. Using the rectangle marquee tool, it selects an area with dotted lines called marching ants.
Lasso Tool
The lasso tool is similar to the marquee tool; however, you can make a custom selection by drawing it freehand. There are three lasso tools – regular, polygonal, and magnetic.

Three selections of the different lasso tools include lasso, polygonal, and magnetic.
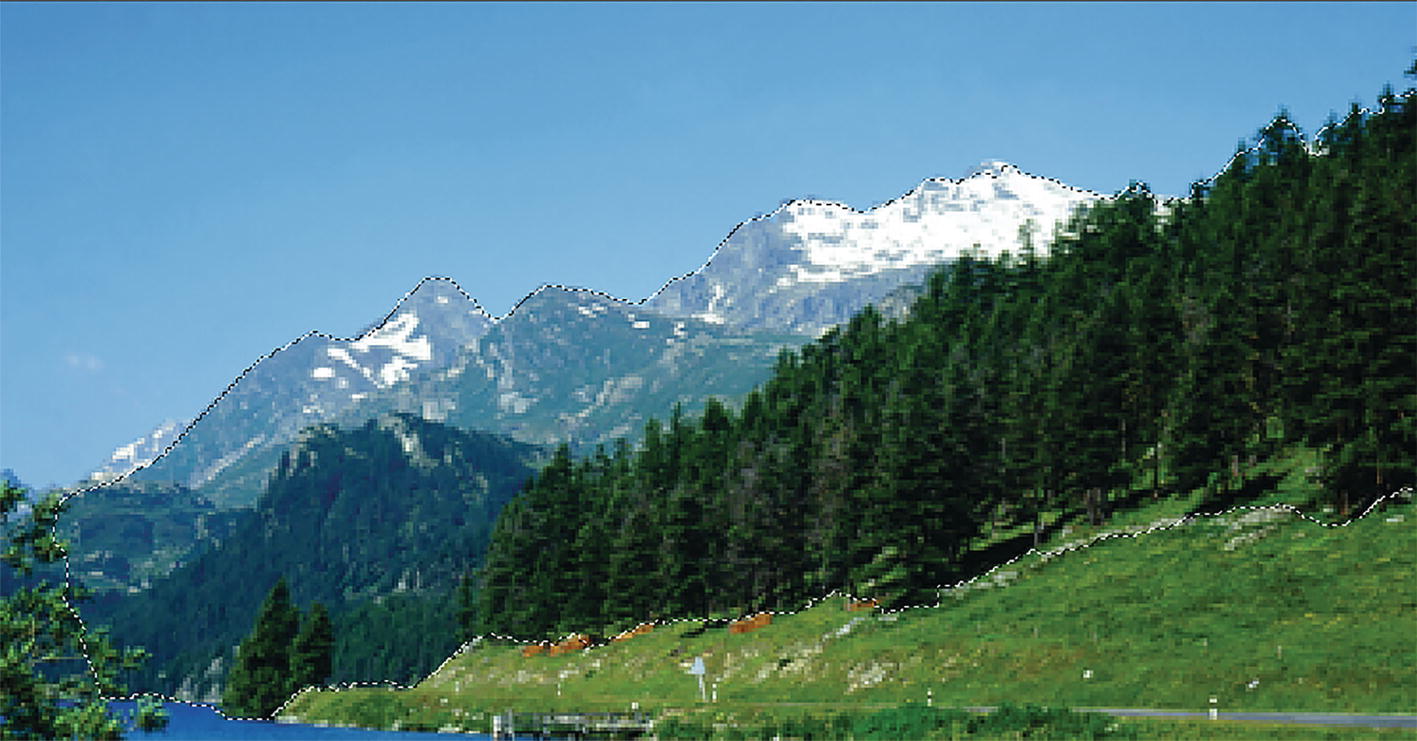
The regular lasso tool allows you to trace around your selection freehand. Photoshop will complete the selection once the mouse button is released. You can also complete the selection by connecting the end point to the starting point. The “marching ants” will indicate if a selection has been made.

A screenshot of a mountain range. Using the regular lasso tool permits a freehand path to be traced around the top of the mountain range area chosen.
The polygonal lasso tool will only draw straight lines, which makes it an ideal choice for images with many straight lines. Unlike the regular lasso tool, you must continually click around the image to outline the shape. To complete the selection, you must connect the end point to the starting point just like the regular lasso tool.

A screenshot of a canoe on the side of a lake. The polygonal lasso tool is only useful for outlining the lake's perimeter.
Magnetic lasso tool is considered a smart tool. It can do the same as the other two, but it can also detect the edges of an image once the user selects a starting point. It detects the edge of an object by examining difference in pixels as the cursor moves over the desired area. Closing the selection is the same as the other two, which should also display the “marching ants” once the selection has been closed.

A screenshot of a canoe boat on the side of a lake. The magnetic lasso tool covers the canoe's borders by comparing pixels as the pointer moves.
Quick Selection Tool
The quick selection tool selects areas based on edges, similarly to the magnetic lasso tool.

Three selections of quick selection tools include the object selection tool, quick selection tool, and magic wand tool.
The difference between this tool and the lasso tool is that there is no starting and ending point. Since there isn’t a starting and ending point, the selected area can be added on to as much as possible without starting over.
A screenshot of a mountain range. The edges of the mountain range can be located using the quick selection tool.
By dragging the cursor over the desired area, the quick selection tool detects the edges of the image. The “marching ants” tell you what is currently being selected. Once done, the selected area can be edited without affecting the rest of the image.
Magic Wand
The magic wand tool selects areas based on pixels of a similar color and intensity. You only need to click once, and this tool will detect pixels that are very similar to each other. When the image requires more than a few clicks, this tool doesn’t work particularly well.

A screenshot of a mountain range. Using the magic wand tool in the mountain range image lets the user select pixels with matching hue and intensity.
Crop Tool
The crop tool can be used to select a particular area of an image and discard the portions outside of the chosen section.
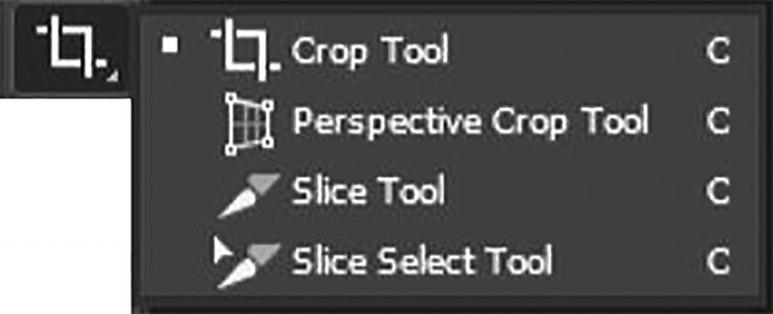
Four selections of crop tools include the crop tool, perspective crop tool, slice tool, and slice select tool.
A crop creates a focal point on an image, excluding unnecessary or excess space. Click and drag the cursor around the desired area, hit enter and the area outside of the rectangle is discarded.
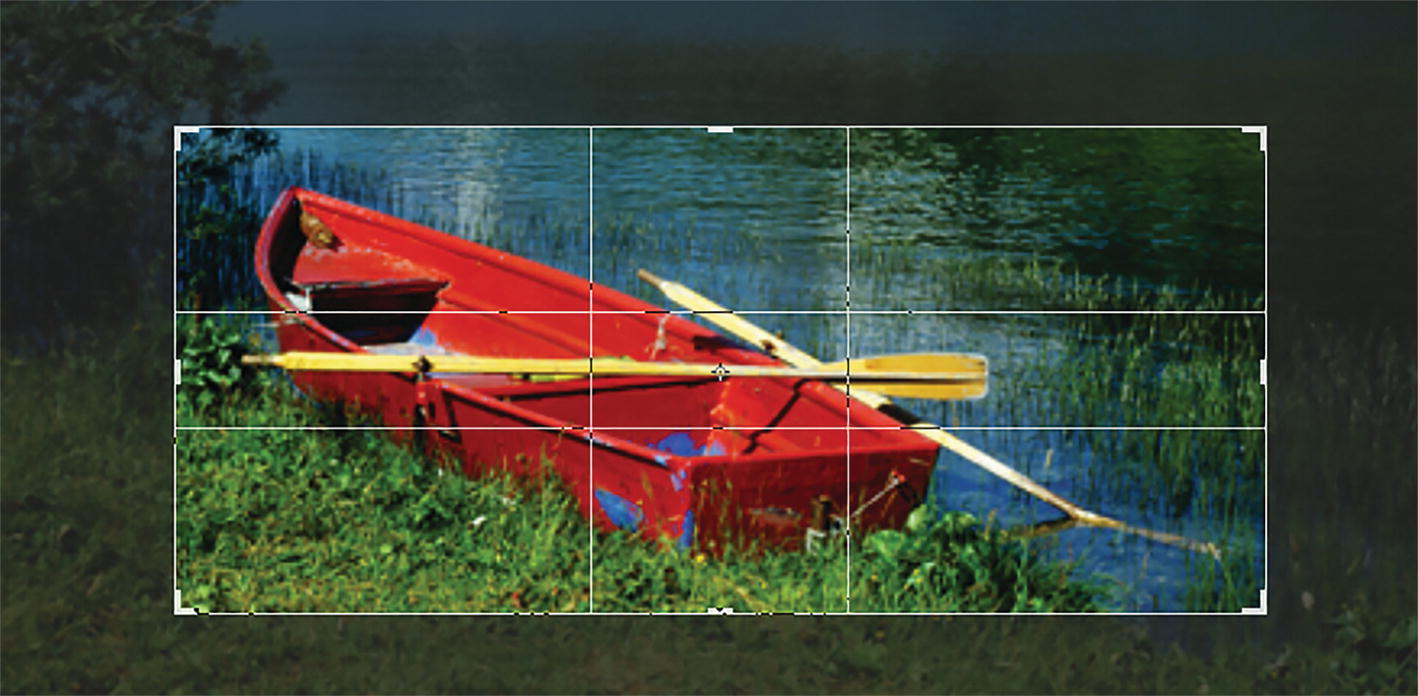
A screenshot of a canoe on the side of a lake. It uses the crop tool to create a focal point on an image by removing extra space from the image.
Slice Tool
The slice tool is used in isolating parts of an image. The slice tool can be used to divide an image into different sections, and these separate parts can be used as pieces of a web page.
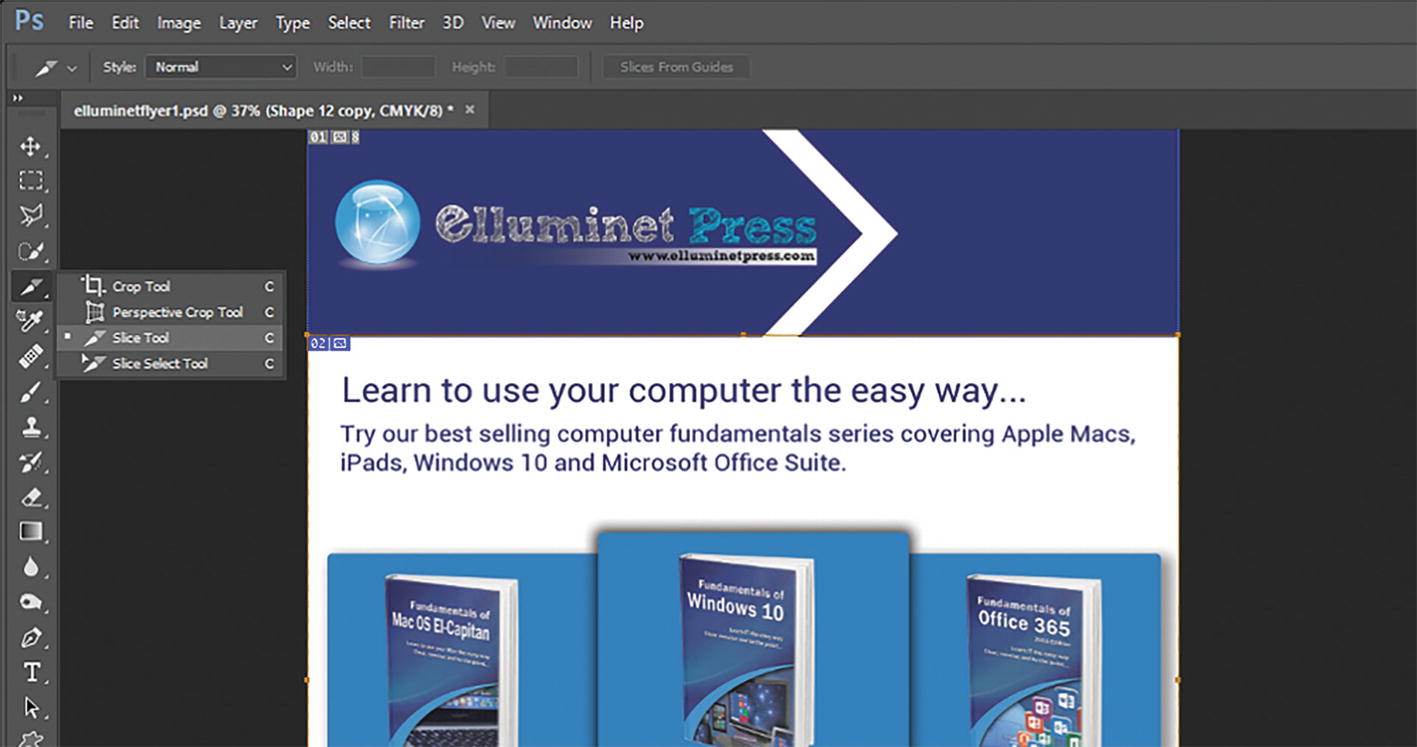
A window indicates the slice tool's use to isolate parts of the elluminet press image.
The slice select tool allows sliced sections of an image to be adjusted and shifted.
Eye Dropper
You can use the eye dropper tool to sample a color on an image, layer, or object.

A window indicates the process of taking a color sample from an image, layer, or object by means of the eye dropper tool.
Click and hold your mouse on a particular color you want to sample, and you’ll see the sample ring. The outside color is a neutral grey which is meant to help you distinguish the colors. On the inner ring, the top half is the color you just sampled, and the bottom half is the previous color you sampled. Your sampled color will appear as the foreground color on the bottom of your toolbox.
Healing Brush
The healing brush allows you to fix image imperfections such as scratches or blemishes by sampling the surrounding area or using a predefined pattern.

Five selections of healing tools include spot healing brush tool, healing brush tool, patch tool, content-aware move tool, and red eye tool.
You can blend the imperfections into the rest of the image.

Two images demonstrate the use of the healing brush tool can restore image flaws like scratches or blemishes.
Patch Tool
The patch tool is used to repair larger areas of an image or remove any unwanted objects or blemishes. The idea is, you draw around the bit you want to patch, then drag the selection onto a clean area of the image.

A window explains the removal of unwanted elements or defects in the image.
This will copy the clean area onto the bit you selected, patching it up.
Pencils and Brushes
The pencil and brush tools allow you to draw freehand illustrations and make minor touch ups to images.

Four selections of pencils and brushes. These are brush tools, pencil tools, color replacement tools, and mixer brush tools.
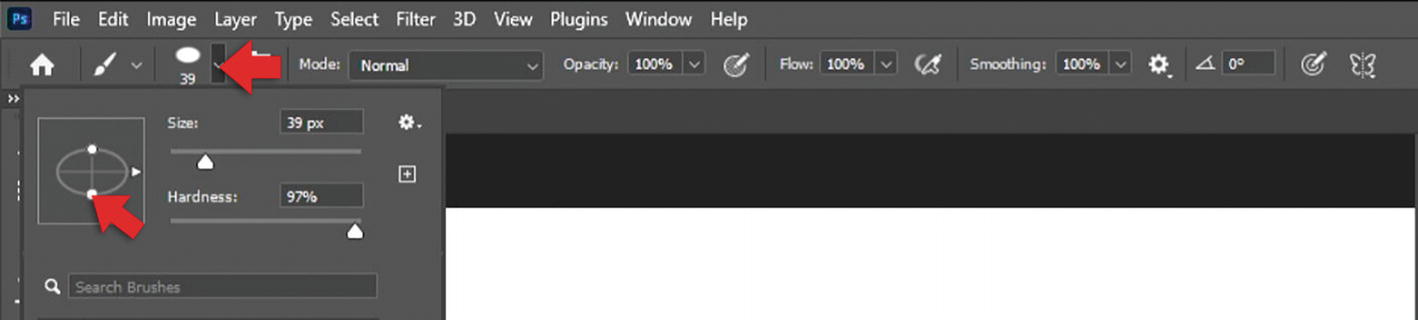
Select the paint brush tool from the tool box. You can change the size, shape, and hardness of the brush on the options bar at the top of the screen.

A window indicates the use of the paintbrush tool from the tool box. The top settings bar lets the user choose brush size, shape, and hardness.
Size is the thickness of the brush, while hardness is how much the brush feathers at the edges.

Two vertical lines were created through the brush tool with a soft brush and a hard brush.
Change the color of the brush using the color selector at the bottom of the toolbox on the left-hand side.
You can change the shape of the brush too. Open the brush panel from the options bar and on the top left, drag the two small white dots on the brush to change the shape.
A window indicates changing brush shape by dragging the two white dots on the brush's top left corner to modify its shape.
Underneath that you can select some preset brush styles. These are grouped into folders according to their type. Browse through the folders and try out some of the brushes.

A window indicates the brush styles that include general, dry media, wet media, special effects, and legacy brushes. The option special effects brushes are highlighted by an arrow.
There are some general brushes and also some special effect brushes. You can also use the “Search brushes” field to search.
Select one, then draw directly onto the canvas with your brush.
Try some of them out, see what happens.
A good accessory to use when drawing freehand is a graphics tablet or a laptop/tablet with a touch screen. You can run the Photoshop app on an iPad, or you can use Photoshop on a touchscreen PC. You can download Photoshop from the app store on your iPad or tablet.

A photograph of a graphic artist using a tablet to design a Halloween graphic.
Clone Stamp Tool
The clone stamp tool samples a selected portion of an image and duplicates it over another area using a brush that can be adjusted in size, flow, and opacity.

Two selections of stamp tools. These are clone stamp tool and pattern stamp tool.
Useful for “airbrushing” small parts of an image. If part of an original image is damaged, the damaged area can be restored by cloning a similar area from within the same image. This tool works great for removing unwanted blemishes.
Hold down the Alt key (or option if you’re on a mac), then click the area to sample. Select an area that is similar to the one you want to fix.
Once the sample area has been cloned, click the area of the photo to be edited - use the tool like a paint brush and “paint” over the blemishes.

An image of the forest range. Using the clone stamp tool duplicates an image using a brush with adjustable size, flow, and opacity.
You can change the size and softness of the brush using the tools along the top of the screen.

A window indicates the utilization of the tools along the top, where the user can alter the size as well as the softness of the brush.
Smudge
The smudge tool smudges the image when dragged over as if it was watercolor paint.

A window displays options for the blur tool, sharpen tool, and smudge tool.
Here you can see an example of how the flower petal is smudged

A photo of a flower petal. The petal is smudged using the smudge tool.
Blur
The blur tool softens portions of an image by blurring the area.
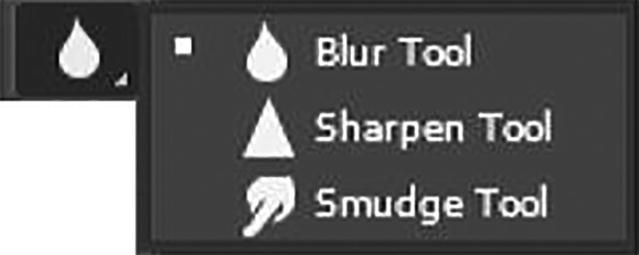
A window displays the blur tool icon along with the sharpen tool and smudge tool.
Here you can see an example of how the flower petal is blurred

A photo of a flower petal. The petal is blurred which makes certain parts of the image have a softer appearance using the blur tool.
Burn and Dodge
The burn and dodge tools, which are derived from traditional methods of adjusting the exposure on printed photos, have opposite effects.

Three selections of the burn and dodge tools. These are dodge tool, burn tool, and sponge tool.
The burn tool darkens selected areas, and the dodge tool lightens them.

A photo of a statue. Using the dodge tool brightens specific regions in the image.
Eraser
The eraser tool will convert the pixels to transparent unless it is the background layer. The size and style of the eraser can be selected in the options bar.

Three selections of different eraser tools. These are eraser tool, background eraser tool, and magic eraser tool.
This tool is unique in that it can take the form of the paintbrush and pencil tools. In addition to the straight eraser tool, there are two more available options – background eraser and magic eraser. The background eraser deletes any part of the image that is on the edge of an object. This tool is often used to extract objects from the background.

A photo of a canoe on the side of a lake. Using the eraser tool deletes the part of the lake behind the canoe.
The magic eraser tool deletes based on similar colored pixels. It is very similar to the magic wand tool.
A photo of a house near a lake. Using the magic eraser tool deletes pixels that are of the same color based on their proximity to one another.
This tool is ideal for deleting areas with the same color or tone that contrasts with the rest of the image.
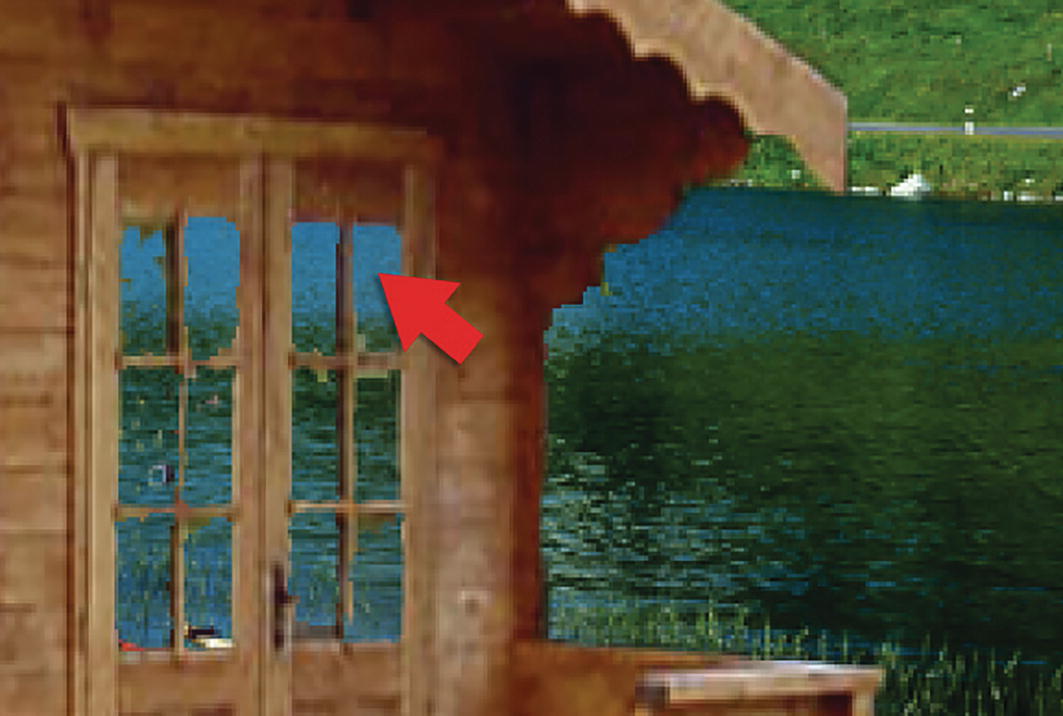
Pen Tool
The pen tool creates precise paths that can be manipulated using anchor points.
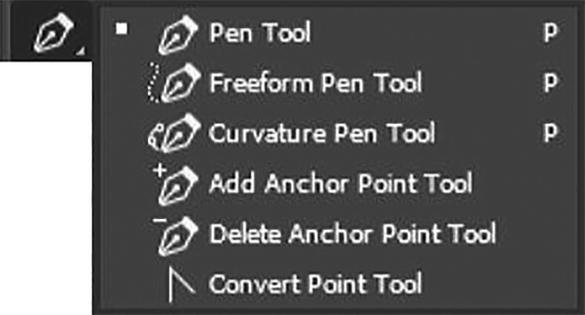
Six selections of the different pen tools. These are pen tool, freeform pen tool, curvature pen tool, add anchor point tool, delete anchor point tool, and convert point tool.
Here you can see we’ve added some anchor points around the edge of the boat.

A photo of a canoe on the side of a lake. The add anchor point tool is used at the edge of the boat.
Text Tool
The text tool creates an area on a new layer where text can be entered. Use the options bar along the top of the screen to change font, size, alignment, and color. There are two types, horizontal and vertical.

Four selections of the different text tools. These are horizontal type tool, vertical type tool, vertical type mask tool, and horizontal type mask tool.
Here we’ve added some text using the horizontal text tool.

A window indicates the utilization of the tool for horizontal text where the newly added four-line text was added.
Shapes
The shapes tool allows you to create different types of shapes such as squares, rectangles, and ellipses, as well as polygons with three sides or more such as triangles, pentagons, hexagons, and so on.
Select the polygon tool, it’s on the shapes tool - click and hold your mouse button on the icon on the toolbox for a second to reveal the menu. From this menu, you can select a standard square/rectangle, ellipse, or polygon. For this example, I’m going to select “Polygon tool.”

A window indicates the use of the shape tools in the toolbox to create squares, rectangles, ellipses, polygons, and many more.
Notice in the options bar at the top of the screen, you can change the fill color as well as the number of sides your polygon has. In this example, I’m going to add a pentagon. This shape has five sides, so enter 5 into “sides” field.

A window indicates the use of the shapes tool and the options bar that changes the fill color and polygon's sides.
Click on the canvas, then drag your mouse to size the shape.
You can change the fill color and outline (stroke). To do this, click the fill box on the left-hand side of the options bar, then select a color. Do the same for stroke. Click the drop-down box to the left to change the outline thickness (or stroke).

A window indicates the use of the options bar of the shapes tool that can select color, change fill color, change outline color, and change outline thickness.
Give it a try.
Custom Shapes
Photoshop also has some custom shapes such as arrows and decorative shapes you can use.
From the shapes tool on the toolbox, click and hold your mouse for a second to reveal the menu. Select “Custom shapes tool.”

A photo of the custom shape tool icon for custom arrows and decorative shapes.
Click the custom shape icon on the options bar on the top right.

An options bar indicates the custom shape icon on the upper right.
Open the folders underneath, then select a shape from the options.

A window contains an image of a flower and a highlighted custom shape icon on the toolbar that opens to different folders of shapes of wild animals, leaf trees, boats, and flowers.
Click and drag your mouse on the canvas to create your shape. To maintain the shape’s aspect ratio, hold down the shift key while you click and drag your mouse on the canvas to create your shape - this prevents the shape from being stretched or squashed.
Panels
You can find your panels displayed down the right-hand side of your screen. These panels contain adjustments and customizations for your tools. The default layout will look similar to the following ones.

A window indicates the Panels for color modifications, character styles, text alignment, and typefaces.
There is a panel for adjustments and controlling color, a panel for character styles, text alignment, and fonts. There is also a panel for managing layers and properties of objects among many others.
The panels are anchored to the panel dock on the right-hand side of the screen, but you can move them around if you need to.
Opening and Closing Panels
Most tools have a panel with adjustments and customizations, but they don’t all open up at the same time. You can open additional panels from the “Window” menu.

A window context menu indicates the available choices for opening and closing panels.
Panels that are currently open will have a tick next to the name in the “Window” menu.
If you need to close a panel, right click the tab, select close from the popup menu

A Properties popup menu includes the options, close, close tab group, and minimize, among others.
Layers Panel
One of the most important panels is the layers panel. On some workspaces, this doesn’t always show up.
To reveal the layers panel, click the “Window” menu, then select “Layers.”

A popup menu indicates the layers panel or a shortcut command of F 7.
You’ll see the panel open up on the right-hand side.

A window indicates the opened panel on the right-hand side.
The layers panel is where you’ll build up your design, graphic, collage, and effects in your projects.
Let’s have a look at the different parts of the layers panel.

A layer panel indicates the function of each icon including add new layer, add effect, show or hide layer.
We’ll take a closer look at layers in more detail later in this book, but for now, familiarize yourself with the icons on the panel and what they do.
Lab Exercises
- 1.
Open a new A4 Photoshop document.
- 2.
Use the text tool to add some text.
- 3.
Make the text larger.
- 4.
Change the text color to red.
- 5.
Change the font typeface.
- 6.
Use the paint brush tool to draw a picture below the text.
- 7.
Change the brush size and color.
- 8.
Take note of the layers panel as you add your text and drawings. What happens? What layers are created?
Summary
Photoshop tools are available from the toolbox on the left-hand side.
Options for tools show up along the top of the screen.
Click and hold your mouse pointer on a tool on the toolbox to open more tools.
Pen tool creates precise paths that can be manipulated using anchor points.
Crop tool can be used to select a particular area of an image and discard the portions outside of the chosen section.
The slice tool is used in isolating parts of an image to be used on a website.
The move or marquee tool is used to manually relocate the selected piece to anywhere on the canvas.
Lasso tool is similar to the marquee tool; however, you can make a custom selection by drawing it freehand.
Quick selection tool selects areas based on edges, similarly to the magnetic lasso tool.
The magic wand tool selects areas based on pixels of a similar color and intensity.
The eraser tool will convert the pixels to transparent unless it is the background layer.
The text tool creates an area on a new layer where text can be entered.
Clone stamp tool samples a selected portion of an image and duplicates it over another area using a brush that can be adjusted in size, flow, and opacity.
Custom shapes allow you to create different types of shapes such as squares, rectangles, and ellipses, as well as polygons with three sides or more such as triangles, pentagons, hexagons, and so on.
Pencils and brushes allow you to draw freehand illustrations and make minor touch ups to images.
You can use the eye dropper tool to sample a color on an image, layer, or object.
The layers panel is where you’ll build up your design, collage, and effects in your projects.