The Poco renderer is at the core of all graphics and user interface code in this book. As you learned in Chapter 8, the design and implementation of Poco are optimized for delivering high-quality, high-performance graphics on the inexpensive microcontrollers used in many IoT products. This chapter introduces all the major capabilities of the Poco API through a series of examples. The name Poco is a term from classical music meaning “a little,” reflecting the compact size and scope of the rendering engine.
Poco is part of Commodetto, a graphics library that provides bitmaps, instantiation of graphics assets from resources, offscreen graphics buffers, display drivers, and more. Some of the examples in this chapter use these Commodetto features. The name Commodetto, also a term from classical music, means “leisurely,” reflecting the ease of working with the graphics library.
Installing the Poco Host
You can run all of this chapter’s examples by following the pattern described in Chapter 1: install the host on your device using mcconfig, then install example applications using mcrun.
All the Poco examples require the use of a screen, making it essential for your mcconfig command line to specify a platform with a screen driver for your development board. The examples are intended to run on screens with 240 x 320 resolution. The following command lines are for Moddable One, Moddable Two, and M5Stack FIRE:
> mcconfig -d -m -p esp/moddable_one
> mcconfig -d -m -p esp32/moddable_two
> mcconfig -d -m -p esp32/m5stack_fire
If you’re wiring the screen to your development board using a breadboard and jumper wires, follow the instructions in Chapter 1. The wiring provided there for the ESP32 works with the esp32/moddable_zero target; likewise for the ESP8266 and the esp/moddable_zero target.
If your device doesn’t have a screen, you can run this chapter’s examples on the desktop simulator provided by the Moddable SDK. The following command lines are for macOS, Windows, and Linux:
> mcconfig -d -m -p mac
> mcconfig -d -m -p win
> mcconfig -d -m -p lin
The host for this chapter is in the $EXAMPLES/ch9-poco/host directory. Navigate to this directory from the command line and install it with mcconfig.
If you’re using the desktop simulator, make sure you change the dimensions of the screen to 240 x 320 before you install examples. You do this by selecting 240 x 320 from the Size menu in the application’s toolbar.
Preparing to Draw
To use the Poco renderer, you need to import the Poco class from the commodetto/Poco module:
import Poco from "commodetto/Poco";
Poco is a general-purpose renderer. The pixels it renders can be sent to a screen, a memory buffer, a file, or the network. Poco doesn’t know how to send pixels to any of these destinations; instead, it outputs pixels to an instance of the PixelsOut class, and each subclass of PixelsOut knows how to send pixels to a particular destination. For example, the display driver is a subclass of PixelsOut that knows how to send pixels to the screen. BufferOut, another subclass of PixelsOut, sends pixels to a memory buffer (as you’ll see in the “Efficiently Rendering Gradients” section of this chapter).
When you instantiate Poco, you provide an instance of a PixelsOut class for Poco to call with rendered pixels. The host for this chapter automatically creates an instance of PixelsOut for the display driver of your development board and stores it in the screen global variable. To work with the screen, you simply pass screen to the Poco constructor.
let poco = new Poco(screen);
The pixel format and display dimensions of the display driver are configured in the host’s manifest. The screen instance has width and height properties, but these do not include the effects of software rotation. Instead, when working with Poco, use the width and height properties of the Poco instance to get the bounds of the display with any rotation adjustments (hardware or software) applied.
trace(`Display width is ${poco.width} pixels.`);
trace(`Display height is ${poco.height} pixels.`);
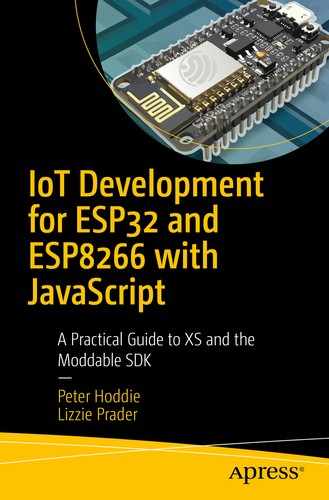
As noted in Chapter 8, Poco is a retained mode renderer, meaning that instead of executing drawing commands immediately, it builds up a list of drawing operations to render all at once. This display list requires memory. The default display list is 1,024 bytes. If your drawing overflows the display list allocation, you need to increase it. If your project doesn’t use all of the default display list allocation, you can decrease it to free memory for other uses. The following example adjusts the display list to 4 KB:
let poco = new Poco(screen, {displayListLength: 4096});
You can monitor how much of the display list your project is using by watching the “Poco display list used” row of the Instrumentation panel in xsbug (see Figure 9-1).
Figure 9-1
Monitoring display list use in xsbug Instrumentation panel
Poco also allocates memory for rendering. The default rendering buffer is two hardware scanlines. The width of one hardware scanline is available from screen.width. If memory is very tight in your product, you can reduce this to a single scanline, though no smaller.
let poco = new Poco(screen, {pixels: screen.width});
Poco is able to render faster when it renders several scanlines at once. The following code increases the rendering buffer to eight full scanlines, while setting the display list to 2 KB.
As an optimization, Poco shares the memory allocated for the display list and the rendering buffer. If the display list for the frame being rendered isn’t entirely full, Poco includes those unused bytes in the rendering buffer, often enabling it to render a little faster.
The three fundamental drawing operations Poco provides are those for drawing rectangles, bitmaps, and text. As mentioned in Chapter 8, this may not sound like much, but you can combine these elements to create a rich user experience. The next sections cover them in detail.
Drawing Rectangles
Drawing rectangles is the simplest of the three fundamental drawing operations that Poco provides. In introducing this first drawing operation, this section also presents some fundamentals about drawing with Poco.
Filling the Screen
The $EXAMPLES/ch9-poco/rectangle example simply fills the entire screen with a solid color. The code is shown in Listing 9-1.
The first line invokes the Poco constructor to create an instance of Poco. The instance delivers rendered pixels to screen. This step is common for all examples in this chapter and so will be omitted from the remaining examples shown here.
Let’s look in turn at each of the methods called in this example:
1.
The three arguments to poco.makeColor receive the red, green, and blue color components, each with a range from 0 (none) to 255 (full). Here the color specified is white, so the red, green, and blue components are each 255. The makeColor method combines these three values to a single value that’s optimal for rendering to the destination (screen in this example). Poco uses different algorithms to create the color value from the color components, depending on the destination. Therefore, you should only pass the value returned by makeColor to the same Poco instance that created it.
2.
The call to poco.begin tells Poco that you’re beginning to render a new frame. All drawing operations that occur after this are added to the display list for the frame.
3.
The poco.fillRectangle call adds a command to draw a full-screen white rectangle to the display list. The color is the first argument, followed by the x and y coordinates, and then the width and height. The coordinate plane puts (0, 0) at the top-left corner of the screen with the height and width progressing down and right.
4.
The call to poco.end tells Poco that you’ve completed issuing the drawing operations for this frame. Poco then renders the pixels and sends them to screen; this may take some time, depending on the size of the display, the speed of the microcontroller, and the difficulty of rendering the frame. On a Moddable One or Moddable Two, it finishes quickly.
Important
Poco doesn’t automatically fill the background with a color, because that would reduce rendering performance. This means your code must draw to every pixel in the frame. If you don’t specify a color for a pixel, Poco outputs an undefined color. Make sure your code fills the background with a color, as this example shows, or ensure that the combination of drawing calls you make covers every pixel.
Updating Part of the Screen
When you call the begin method, you have the option to specify the area of the screen to update. You may recall that updating smaller parts of the screen is one technique for achieving higher frame rates.
The following example fills a square of 20 x 20 pixels with red; the other pixels on the display are unchanged. If you append this code to the earlier rectangle example, the screen will be white except for a small red square in the top-left corner.
let red = poco.makeColor(255, 0, 0);
poco.begin(0, 0, 20, 20);
poco.fillRectangle(red, 0, 0, 20, 20);
poco.end();
Here the call to begin defines the area in which to draw—called the update area—to be only the 20 x 20 square in the top-left corner of the display. Only the pixels in the update area are drawn, so the white pixels outside the update area remain unchanged. When you call begin with no arguments, as in the rectangle example, the update area is the entire screen. In this example, the call to fillRectangle uses the same coordinates and dimensions as the call to begin, filling the entire update area with red pixels.
As noted previously, the code between begin and end must make drawing calls that cover every pixel to generate a correct result—but what happens if that code draws outside the area specified in the call to begin? Consider the following example, which calls fillRectangle with parameters specifying the full screen:
This example produces exactly the same result as the preceding example. Instead of responding to the request by fillRectangle to draw to the full screen, Poco limits the output of fillRectangle to the update area specified in the call to begin. This approach is convenient for many rendering situations—especially for animations—as it enables you to limit the area to update without changing your code to restrict its drawing to the update area.
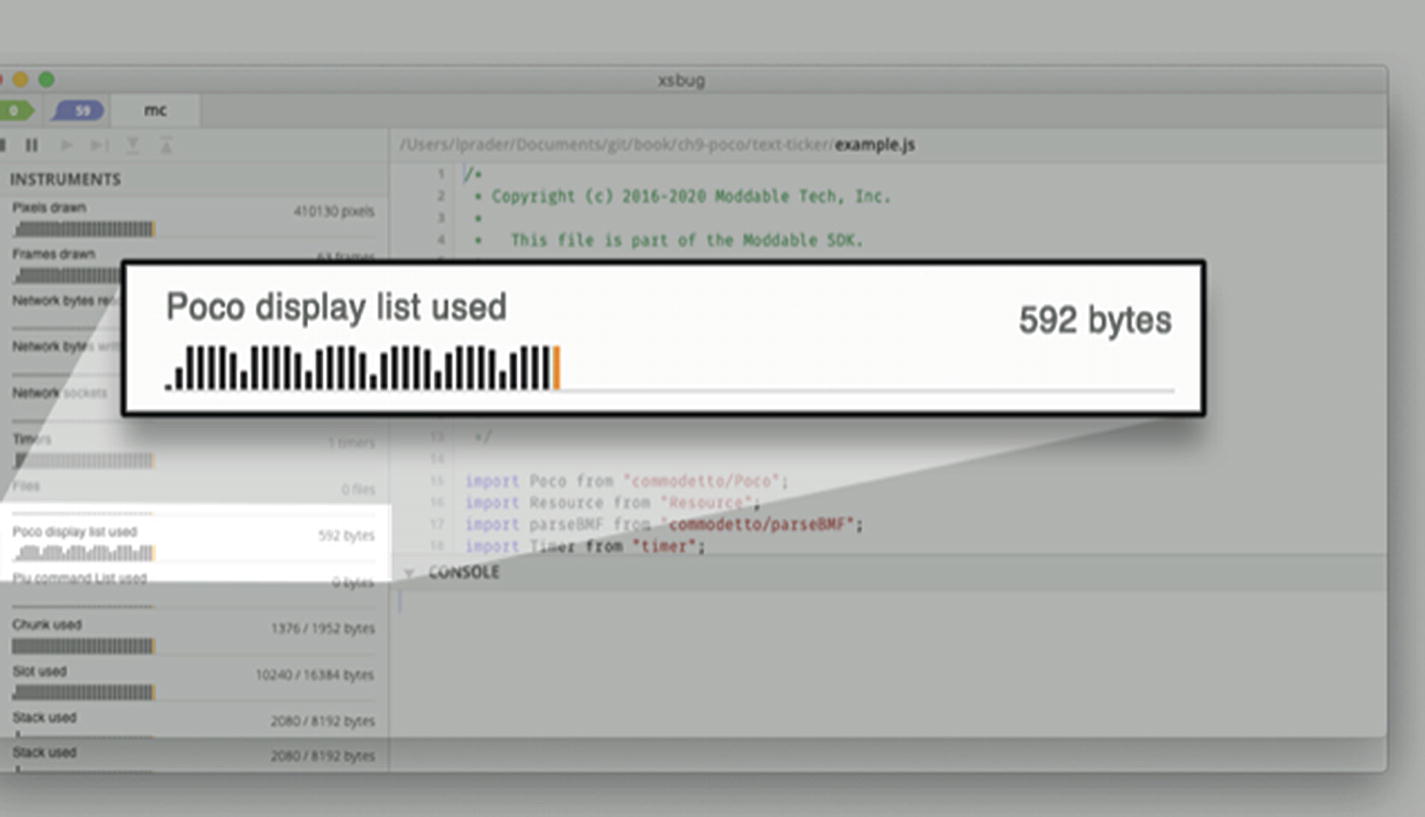
Drawing Random Rectangles
A classic computer graphics demonstration is to continuously render randomly colored rectangles of random sizes and at random locations. The $EXAMPLES/ch9-poco/random-rectangles example does exactly that, by specifying coordinates in the call to Poco’s begin method to limit the drawing to the current rectangle being drawn. If you run the example, you’ll see an animated version of the screen shown in Figure 9-2.
Figure 9-2
Rendering from random-rectangles animation
The first step is to instantiate Poco and clear the screen:
Next, a repeating timer (Listing 9-2) is scheduled to run at about 60 frames a second. When the timer fires, random coordinates and dimensions of a rectangle are generated along with a random color. The begin method limits the drawing to the area of the rectangle.
Timer.repeat(function() {
let x = Math.random() * poco.width;
let y = Math.random() * poco.height;
let width = (Math.random() * 50) + 5;
let height = (Math.random() * 50) + 5;
let color = poco.makeColor(255 * Math.random(),
255 * Math.random(), 255 * Math.random());
poco.begin(x, y, width, height);
poco.fillRectangle(color, 0, 0, poco.width,
poco.height);
poco.end();
}, 16);
Listing 9-2.
The random values are all floating-point because the call to Math.random returns a number from 0 to 1. All Poco functions expect integer values for coordinates, so makeColor and begin automatically round the floating-point numbers provided to the nearest integer. In Chapter 11, you’ll learn how to add your own random integer function to increase performance by eliminating these floating-point operations.
Drawing Blended Rectangles
The rectangles drawn up to this point have all been solid: the pixels are entirely opaque and completely obscure the pixels behind them. A blended rectangle combines a single color with the pixels behind it, which creates an effect like looking through a pair of tinted glasses. Blended rectangles are used in user interfaces to provide a layered effect and to draw shadows.
To draw a blended rectangle, use the blendRectangle method. The parameters are similar to those of fillRectangle, with the addition of the blend level as the second parameter. The blend level is a number from 0 to 255, where 0 means fully transparent (entirely invisible) and 255 means fully opaque. The following line blends over the entire screen with red at a blend level of 128 (50%). Like all other drawing operations, this must occur between calls to begin and end.
If you pass blendRectangle a blend level of 0, it ignores the drawing operation entirely, not even adding an entry to the display list. If you pass a blend level of 255, blendRectangle behaves exactly like fillRectangle.
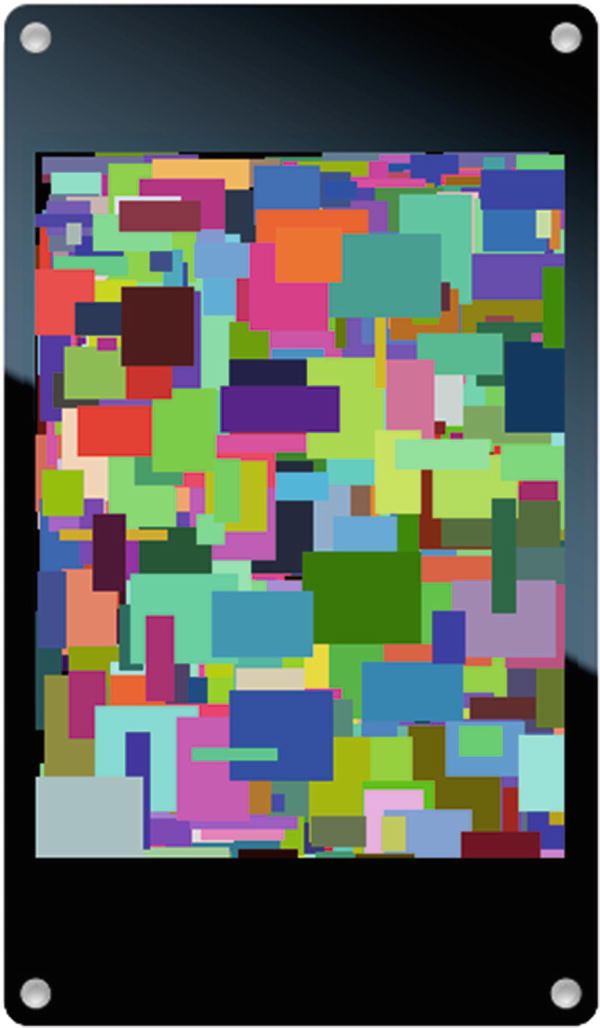
To explore what blended rectangles look like and their rendering performance, the $EXAMPLES/ch9-poco/blended-rectangle example animates a blended rectangle. Figure 9-3 shows images of the blended rectangle in several positions on the screen.
Figure 9-3
Renderings from blended-rectangle animation
The background of the animation consists of four colored bars—white, red, green, and blue. The bars are drawn by the drawBars helper function, shown in Listing 9-3.
function drawBars(poco) {
let w = poco.width;
let h = poco.height / 4;
poco.fillRectangle(poco.makeColor(255, 255, 255),
0, 0, w, h);
poco.fillRectangle(poco.makeColor(255, 0, 0),
0, h, w, h);
poco.fillRectangle(poco.makeColor(0, 255, 0),
0, h * 2, w, h);
poco.fillRectangle(poco.makeColor(0, 0, 255),
0, h * 3, w, h);
}
Listing 9-3.
When the example starts, it covers the entire screen by drawing the colored bars. Notice that drawBars doesn’t begin with a single call to fillRectangle to fill the entire screen with a solid color, but rather draws four separate strips that combine to cover the entire screen area.
poco.begin();
drawBars(poco);
poco.end();
Next, variables are defined to control the animation of a blended black box that drops from the top center of the screen to the bottom (see Listing 9-4).
let boxSize = 30;
let boxBlend = 64;
let boxStep = 2;
let boxColor = poco.makeColor(0, 0, 0);
let x = (poco.width - boxSize) / 2, y = 0;
Listing 9-4.
The size of the box in pixels is defined by boxSize. The blend level is 64 (25%). On each frame of the animation, the box steps two pixels, as defined by boxStep. The boxColor variable defines the box to be drawn in black. Finally, the initial coordinates of the box’s top-left corner are set in the x and y variables.
The motion of the box is animated with a repeating timer, shown in Listing 9-5. The call to begin specifies a drawing area that includes both the current and the previous positions of the box, ensuring that the previous position is fully erased and the new position is fully drawn in one operation. The call to drawBars specifies coordinates that fill the screen, but those are limited to the update area passed to begin. At the end of the timer callback function, the y coordinate is incremented by boxStep. Once the box slides off the bottom of the screen, the y coordinate is reset to 0 to continue animating from the top of the screen.
Timer.repeat(function() {
poco.begin(x, y - boxStep, boxSize, boxSize + boxStep * 2);
drawBars(poco);
poco.blendRectangle(boxColor, boxBlend, x, y, boxSize,
boxSize);
poco.end();
y += boxStep;
if (y >= poco.height)
y = 0;
}, 16);
Listing 9-5.
This animation runs at a smooth 60 frames per second on both the ESP32 and the ESP8266. That’s because the code optimizes the drawing area so that the microcontroller sends only about 60,000 pixels per second to the display, or less than one full frame. The rendering and transmission to the screen of those pixels is spread across 60 frames. This reduces the number of pixels rendered and transmitted by 98.6% compared with rendering full frames. Experiment by changing the variables that control the animation to see the effects of changing the size of the box, the blend level, and the box color.
When running the example, you may notice a small artifact of the box at the bottom of the screen when the box returns to the top. It’s possible to modify the code to eliminate the artifact, but doing so makes the code more complex. This is one of the details automatically taken care of by Piu, as you’ll see in Chapter 10.
Drawing Bitmaps
Drawing bitmaps is the second fundamental drawing operation provided by Poco. It’s used for both mask bitmaps and image bitmaps. Because there are so many different kinds of bitmaps and so many uses for bitmaps in building a user interface, there are several different functions for drawing bitmaps. This section introduces you to some of the most commonly used functions.
Drawing Masks
As you learned in Chapter 8, masks are the most common type of bitmap used in building user interfaces with microcontrollers. There are many reasons for that: they provide excellent quality because they support anti-aliasing, they can be rendered in different colors, they render quickly, and they can be compressed to minimize storage requirements.
Masks are stored in resources. You choose the mask images to use in your project by including them in your project’s manifest as shown in Listing 9-6 (and as you learned in the section “Adding Masks to Your Project” in Chapter 8).
"resources": {
"*-mask": [
"./assets/mask"
]
}
Listing 9-6.
To use a mask bitmap, you must first access the resource it’s stored in. The resource is just data; a Poco bitmap object is needed to render the mask using the Poco API. Commodetto provides functions to create Poco objects from the resource’s data.
To instantiate a bitmap object from a compressed mask, use Commodetto’s parseRLE function. (“RLE” stands for “run-length encoding,” the algorithm used to compress the mask.) The following code retrieves a resource and uses parseRLE to create the bitmap object:
import parseRLE from "commodetto/parseRLE";
let mask = parseRLE(new Resource("mask-alpha.bm4"));
There are some important details to understand in this small example:
As you saw in Chapter 5, the Resource constructor references the resource data in flash memory rather than loading it into RAM. The parseRLE function also references the data in place rather than copying the data from flash memory to RAM; however, parseRLE does allocate a small amount of RAM for the Poco bitmap object that references that data.
Notice that the path the resource is loaded from is mask-alpha.bm4, not mask.png. Remember that tools that are run at build time convert PNG files to an optimized format for the microcontroller, and these tools put the optimized image data into a file of type bm4. Because the image is used as an alpha channel, -alpha is appended to the name. The code running on the microcontroller therefore needs to load the data with a different name than the original. (Piu automatically uses the correct name and extension for you.)
Once you have the bitmap object for the mask, you draw the mask by calling the drawGray method:
poco.drawGray(mask, red, 10, 20);
The first argument is the mask, the second is the color to apply, and the final two arguments are the x and y coordinates. Note that you do not specify the dimensions; Poco always renders bitmaps at their original size, without applying any scaling. This is done because high-quality scaling would use more CPU time and increase the amount of rendering code in Poco.
The mask bitmap object returned by parseRLE has width and height properties that give the dimensions of the bitmap in pixels. These can be useful in your drawing by enabling it to adapt automatically when you change the dimensions of graphics assets. For example, the following code draws a blue rectangle in the area behind the mask, so any pixels that the mask doesn’t draw are blue and any pixels in the mask with transparency blend against the blue background. The size of the blue background rectangle always precisely matches the size of the mask.
As you know from Chapter 8, drawing only a subset of a compressed mask has some inefficiency because the decompressor must skip over the parts of the image above and to the left of what you want to draw. You can use an uncompressed mask instead. To do that, put the mask image in the *-alpha section (rather than the *-mask section) of your manifest’s resources to have it stored in uncompressed form. Then, instead of using parseRLE to load it, use parseBMP with a resource extension of .bmp.
import parseBMP from "commodetto/parseBMP";
let mask = parseBMP(new Resource("mask-alpha.bmp"));
When switching between compressed and uncompressed masks, remember to do the following:
Put the resource in the correct section: *-alpha for uncompressed and *-mask for compressed.
Use the correct loading function to instantiate the bitmap: parseBMP for uncompressed and parseRLE for compressed.
Use the correct extension in the resource name: .bmp for uncompressed and .bm4 for compressed.
Once you have the bitmap, you use drawGray to render masks whether they’re compressed or uncompressed.
Drawing Part of a Mask
The image in Figure 9-4 (which you first saw in Chapter 8) is a single uncompressed mask image that contains icons depicting several different Wi-Fi states.
Figure 9-4
Wi-Fi icon strip
An obvious use for this image is to draw an icon that reflects the current Wi-Fi status. Your application will want to draw only one of the icons at a time, reflecting the current status. As discussed in the preceding section, for reasons of efficiency the image combining the different states should not be compressed.
To draw only part of a bitmap, you specify a source rectangle, the area of the bitmap to use. In the $EXAMPLES/ch9-poco/wifi-icons example, the source rectangle’s x and y coordinates, width, and height are passed to drawGray as optional arguments following the drawing coordinates. Each individual status icon is 27 pixels square. The following code from the wifi-icons example draws four status icons as shown in Figure 9-5:
poco.drawGray(mask, black, 10, 20, 0, 0, 27, 27); // top left
Fading an image in or out is a common transition in a user interface. The drawGray method has an option to blend the mask with the background pixels. This is the same idea as blended rectangles, but using a mask enables you to blend any shape. The $EXAMPLES/ch9-poco/fade-mask example fades a volume icon in and out, as shown in Figure 9-6.
Figure 9-6
Renderings from fade-mask animation
The blend level is specified in the optional ninth argument to drawGray. As in blendRectangle, the blend level is a number from 0 to 255, where 0 means fully transparent and 255 means fully opaque.
Listing 9-7 shows the code from the fade-mask example that fades the mask resource from transparent to opaque. The same drawBars function as in the blended-rectangle example (Listing 9-3) draws the mask over a background.
let mask = parseRLE(new Resource("mask-alpha.bm4"));
let maskBlend = 0;
let blendStep = 4;
let maskColor = poco.makeColor(0, 0, 255);
Timer.repeat(function() {
let y = (poco.height / 4) - (mask.height / 2);
poco.begin(30, y, mask.width, mask.height);
drawBars(poco);
poco.drawGray(mask, maskColor, 30, y,
0, 0, mask.width, mask.height, maskBlend);
poco.end();
maskBlend += blendStep;
if (maskBlend > 255)
maskBlend = 0;
}, 16);
Listing 9-7.
Notice that to use the blend level, you must also provide the source rectangle, even when drawing the entire mask. The dimensions of the bitmap rectangle—mask.width and mask.height in this example—are used for the source rectangle; this ensures that the code doesn’t need to change when the dimensions of the asset are changed.
Drawing Color Images
You add color images to your project using JPEG and PNG files. The build tools convert these to uncompressed bitmaps for rendering on the device, because it’s generally impractical to use the JPEG and PNG compression formats on a microcontroller to build a high-performance user interface. The bitmap is stored in a BMP file (with a .bmp extension) and can be quite large because it’s not compressed. For example, an image 40 pixels square for a display using 16-bit pixels takes up 3,200 bytes of storage.
You create a Poco bitmap for a BMP image using the parseBMP function, as you saw earlier, and you draw it using the drawBitmap method, passing as arguments the x and y coordinates of where to draw the image.
let image = parseBMP(new Resource("quack-color.bmp"));
poco.drawBitmap(image, 30, 40);
As with drawGray, you can optionally draw only part of the image by specifying the source rectangle. The following example draws only the top-left quadrant of the image:
poco.drawBitmap(image, 30, 40, 0, 0,
image.width / 2, image.height / 2);
Drawing JPEG Images
Because of their memory and CPU requirements, compressed JPEG images aren’t a good general-purpose way to store images on microcontrollers; however, they’re useful when you need to store a large number of images in a relatively small space—for example, a slide show or a collection of images to use in a user interface. Commodetto includes a JPEG decompressor that you can use together with Poco to draw JPEG images in your projects. This section explains two different ways to do that.
Storing JPEG Data in Resources
As you know, the build tools automatically convert images in your manifest to BMP files. If you want to keep a JPEG file in its original compressed format, put the JPEG image in the data section of the manifest instead of the resources section (see Listing 9-8). The contents of the data section are always copied without any transformation.
"data": {
"*": [
"./piano"
]
}
Listing 9-8.
The approaches to drawing a JPEG image that are introduced in the following section are incompatible with software display rotation. That’s because software rotation depends on rotating the image at build time, and here the manifest tells the build tools not to transform the images. These techniques for drawing JPEG images work only when you’re using hardware rotation or when software rotation is 0 degrees.
Drawing a JPEG Image from Memory
On computers and phones, JPEG images are usually decompressed once to an offscreen bitmap; then, when the JPEG image is needed, that bitmap is drawn. This approach gives excellent rendering performance, because the complex operation of decompressing the JPEG image happens only once. However, storing the decompressed JPEG image uses a great deal of memory. Consequently, this approach is typically appropriate on microcontrollers for only relatively small images.
The following example uses the loadJPEG function to decompress a resource containing JPEG data to a Poco bitmap. Once the image is in a bitmap, you use drawBitmap to render it as described previously.
import loadJPEG from "commodetto/loadJPEG";
let piano = loadJPEG(new Resource("piano.jpg"));
poco.drawBitmap(piano, 0, 0);
The call to loadJPEG takes some time to complete, because decompressing JPEG images is a relatively difficult operation for a microcontroller. The time varies based on the size of the image, compression level, and microcontroller performance.
Drawing a JPEG Image During Decompression
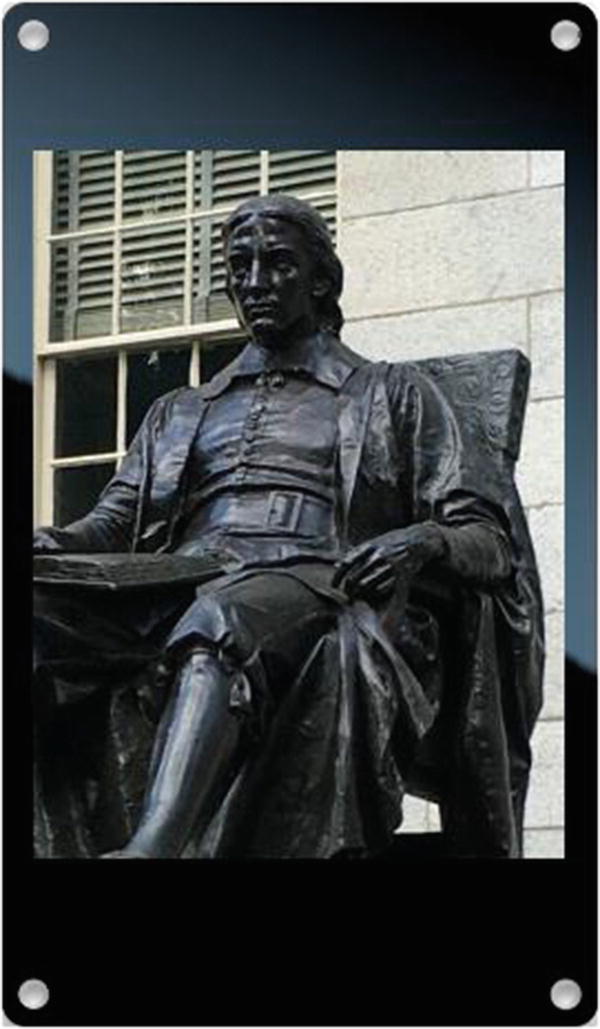
If you don’t have enough memory to hold the full decompressed JPEG image in memory, you can still display the image, by displaying it in blocks as it’s decompressed. The $EXAMPLES/ch9-poco/draw-jpeg example demonstrates how to decompress a full-screen (240 x 320) JPEG image directly to the screen. When you run the example, you’ll see the screen shown in Figure 9-7.
Figure 9-7
JPEG image from draw-jpeg example
First you use the JPEG class to create a Poco bitmap for the JPEG image:
import JPEG from "commodetto/readJPEG";
let jpeg = new JPEG(new Resource("harvard.jpg"));
The JPEG decompressor always decodes one block at a time. The size of the block varies depending on how the JPEG image is compressed, and is between 8 x 8 and 16 x 16 pixels. As the blocks are decompressed, your code can draw them directly to the screen.
Listing 9-9 shows the code from the draw-jpeg example that decompresses the JPEG image to the screen. The read method decompresses one block of the image and returns it as a Poco bitmap. The bitmap object includes x and y properties that provide the coordinates of the block in the JPEG image and width and height properties that provide the block’s dimensions. The ready property of the JPEG class returns true while there are more blocks to display and false after all blocks have been decoded.
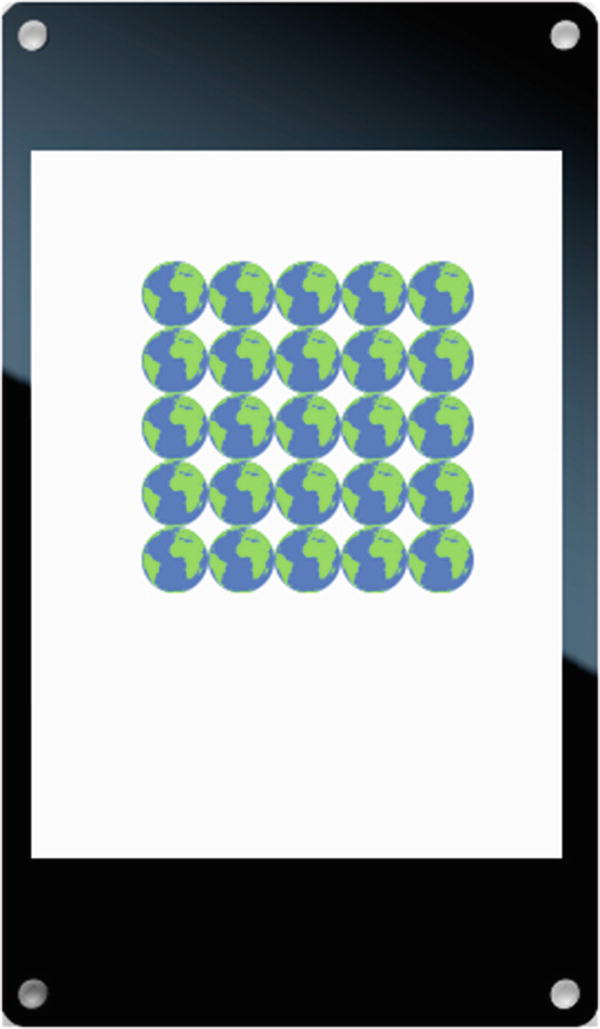
Filling an area of the screen with a texture can create a more interesting user interface than a solid color. The $EXAMPLES/ch9-poco/pattern-fill example demonstrates how to tile an image of earth to cover part of the screen, as shown in Figure 9-8.
Figure 9-8
Repeated earth texture from pattern-fill example
Using a large image of a textured pattern takes more storage than it needs to. A good alternative is to use a small pattern that can be tiled. Your code can simply draw the small image multiple times; however, it takes time to issue all those calls to drawBitmap, and doing so may overflow Poco’s display list. A better option is to use Poco’s fillPattern method, which tiles a rectangular area with a Poco bitmap. For example, here’s how to fill the entire screen with a bitmap stored in a variable named tile:
The arguments after the bitmap are the x and y coordinates, width, and height of the rectangle to fill. The fillPattern method also supports an optional source rectangle, which enables you to use only a section of the bitmap for the tile. For example (as shown in Figure 9-9), the image from the pattern-fill example combines 11 different versions of the same texture, each in a different step of an animation.
Figure 9-9
Image from pattern-fill example
The pattern-fill example uses the source rectangle to fill an area of the screen with an animated pattern. Listing 9-10 shows the code that creates the animation. A timer is used to move sequentially through the eight different images in the combined image. The phase variable keeps track of which of the eight steps of the animated pattern to draw.
let tile = parseBMP(new Resource("tiles-color.bmp"));
let size = 30;
let x = 40, y = 50;
let phase = 0;
Timer.repeat(function() {
poco.begin(x, y, size * 5, size * 5);
poco.fillPattern(tile, x, y, size * 5, size * 5,
phase * size, 0, size, size);
poco.end();
phase = (phase + 1) % 8;
}, 66);
Listing 9-10.
Drawing Masked Color Images
Drawing a color image through a mask (an alpha channel) is a common technique in mobile apps and web pages. As you saw in Chapter 8, it enables you to draw a full-color image of any shape, not just rectangles. Using the drawMasked method of Poco, you can draw an uncompressed color image through an uncompressed grayscale mask.
The drawMasked call takes many arguments, all but one of which is required. These are the parameters, in order:
image – The color bitmap image.
x, y – The coordinates at which to draw.
sx, sy, sw, sh – The source rectangle to use from the color bitmap.
mask – The mask bitmap (uncompressed 4-bit grayscale; compressed masks are not supported).
mask_sx, mask_sy – The coordinates of the top left of the source rectangle to use from the mask bitmap. (The width and height are the same as those of the color bitmap source rectangle.)
blend – (Optional) The blend level, from 0 to 255; defaults to 255 (fully opaque).
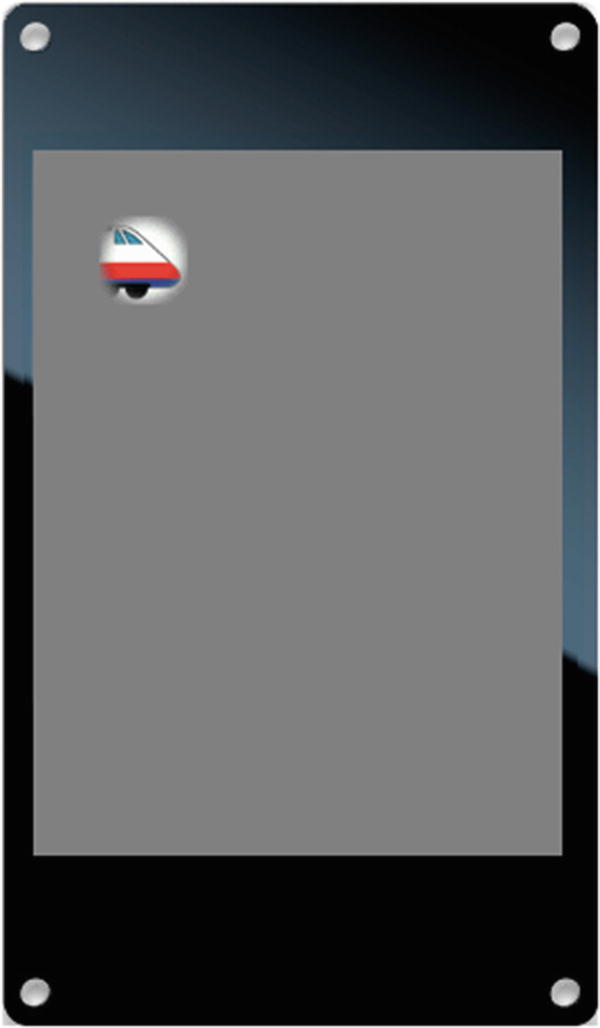
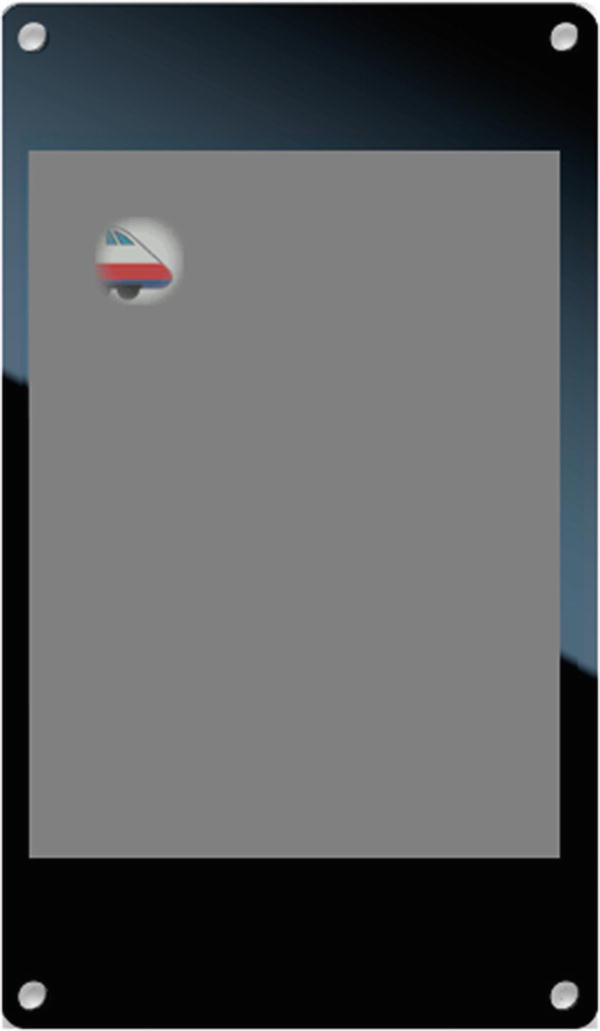
To try drawing a color image through a mask, you’ll need an image and a mask. The $EXAMPLES/ch9-poco/masked-image example uses the circle mask in Figure 9-10 to create a spotlight effect with the train image in Figure 9-11.
Figure 9-10
Circle mask from masked-image example
Figure 9-11
Train image from masked-image example
The mask and color image are loaded with parseBMP because they’re both uncompressed:
let image = parseBMP(new Resource("train-color.bmp"));
let mask = parseBMP(new Resource("mask_circle.bmp"));
As shown in the following code, the drawing location is set to the coordinates (30, 30) in the x and y variables. The variable sx is the left side of the source rectangle; it’s initialized to the right side of the image so that the train rendering begins at the front of the train. The step variable is set to 2 to advance the train two pixels on each frame.
let x = 30, y = 30;
let sx = image.width - mask.width;
let step = 2;
Listing 9-11 shows the code that does the animation. A timer is used to move the train at regular intervals. The location of the drawing is always the same, with the train moving through the mask. The train moves by adjusting sx, the left edge of the image’s source rectangle.
Timer.repeat(function() {
poco.begin(x, y, mask.width, mask.height);
poco.fillRectangle(gray, x, y, mask.width, mask.height);
poco.drawMasked(image, x, y,
sx, 0, mask.width, mask.height, mask, 0, 0);
poco.end();
sx -= step;
if (sx <= 0)
sx = image.width - mask.width;
}, 16);
Listing 9-11.
Figure 9-12 shows the result of drawing part of the train through the mask. Notice that the edges of the mask blend with the gray background.
Figure 9-12
Masked train with default blend level (255)
The optional blend argument to drawMasked changes the relative opacity of each pixel. Figure 9-13 shows the same train image rendered with a blend level of 128 (about 50%). Notice now that all the pixels, not only the edges, blend with the background.
Figure 9-13
Masked train with blend level of 128
Drawing Text
The third and last of the fundamental drawing operations supported by Poco is drawing text. To draw text, you first need a font. Fonts are stored as bitmaps and are usually compressed.
In your applications, fonts are loaded from a resource using the parseBMF function. For compressed fonts, the extension is .bf4. This chapter identifies a font resource with a name consisting of hyphen-separated parts according to the convention that’s typically used in applications built with Piu (as described further in Chapter 10).
import parseBMF from "commodetto/parseBMF";
let regular16 = parseBMF(new Resource("OpenSans-Regular-16.bf4"));
let bold28 = parseBMF(new Resource("OpenSans-Semibold-28.bf4"));
Poco doesn’t impose a limit on the number of fonts your project may contain. Of course, the available flash storage space on your target microcontroller limits the number and size of fonts in your project.
The characters in a font are grayscale masks, so they can be drawn in any color. The drawText method requires as arguments a text string, font, color, and drawing coordinates. The coordinates specify the location of top-left corner of the first character drawn. The following line draws the string Hello in 16-point, regular-weight Open Sans in black starting at the top-left corner of the screen:
poco.drawText("Hello", regular16, black, 0, 0);
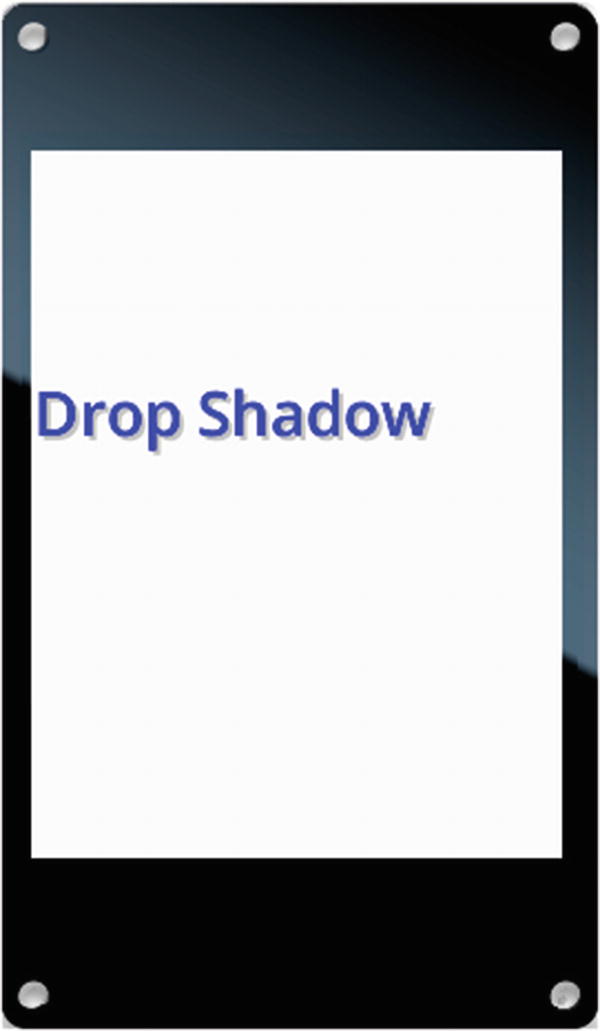
Drawing a Text Shadow
You can achieve a drop shadow effect by drawing the text twice, each time with different coordinates—first as a shadow and then as the primary text. The $EXAMPLES/ch9-poco/text-shadow example begins by drawing the text in the shadow color down and to the right of where the primary text will go and then overlays that with the same string in the primary color drawn at the primary coordinates. This results in the text shown in Figure 9-14.
The height of the text drawn is the same as the height of the font, which is contained in the height property of the font object. The width of the text drawn is determined by using the getTextWidth method. The following code fills the area behind the text with green before drawing the text:
The font is passed to getTextWidth because it contains the measurements for each character. Take care not to measure with one font and draw with another; their measurements are likely different, so you could get unexpected results.
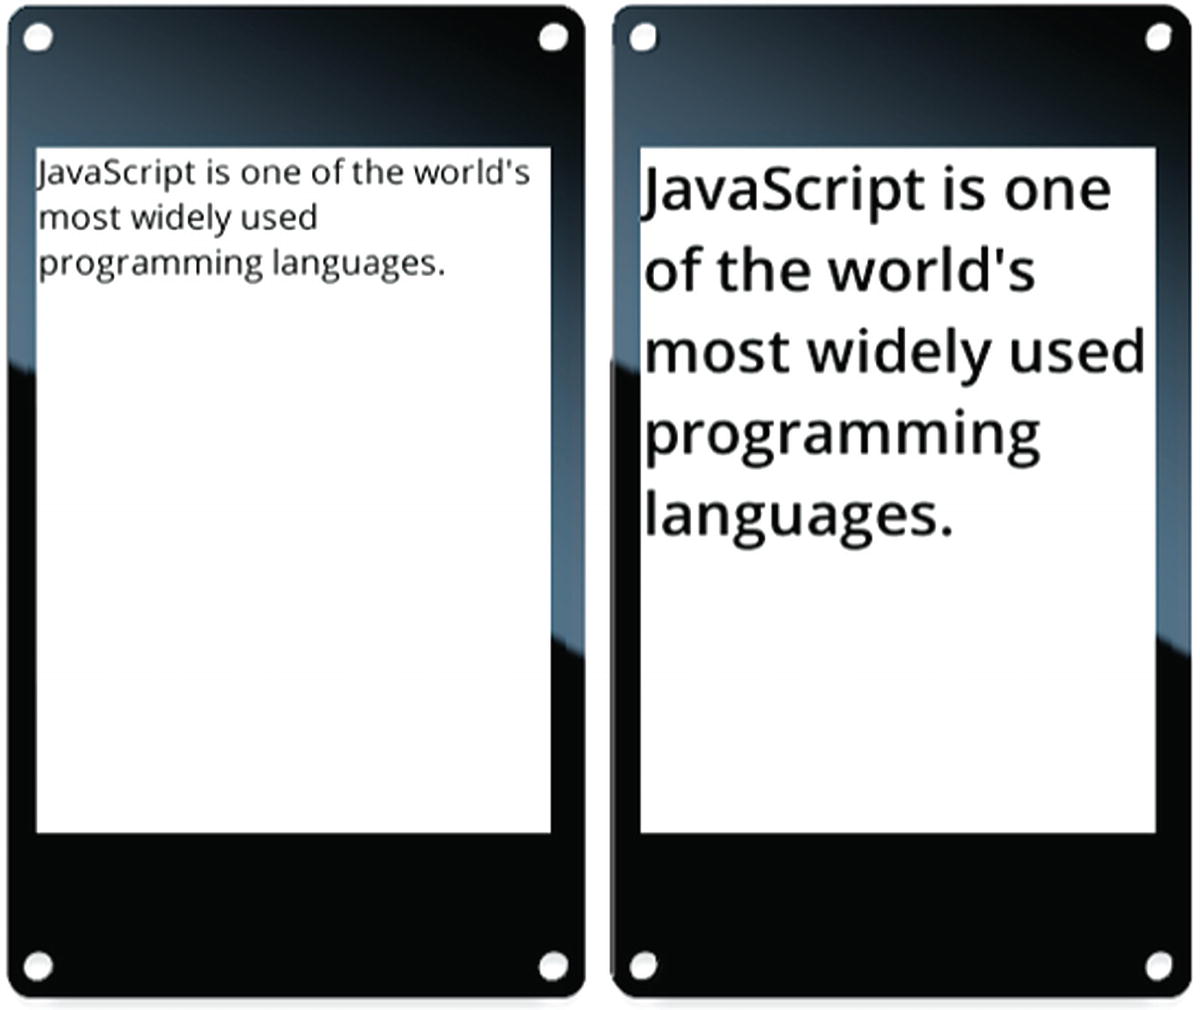
Truncating Text
In situations where the text you want to draw is wider than the space available for it, a common solution is to draw an ellipsis (...) at the point where the text is cut off. The drawText method does this for you automatically when you tell it the width that’s available for drawing.
The following example draws a sentence on a single line, truncating it to the width of the screen. The result is shown in Figure 9-15.
let text = "JavaScript is one of the world's most widely used
In some situations, you may want to draw text across multiple lines of the display. In the general case of supporting written languages from around the world, such word wrapping is challenging. The $EXAMPLES/ch9-poco/text-wrap example presents a basic approach that’s sufficient for common situations when you’re working with languages written with Roman characters.
The example uses the split method of String objects to create an array containing the words of the string:
let text = "JavaScript is one of the world's most widely used
programming languages.";
text = text.split(" ");
It then loops through all the words, one at a time, as shown in Listing 9-12. If there’s enough room on the line to fit the current word or if the word is wider than the full line, the text is drawn; otherwise, width is reset to the full line width and y is increased by the font’s height so that drawing resumes on the next line down.
let width = poco.width;
let y = 0;
let font = regular16;
let spaceWidth = poco.getTextWidth(" ", font);
while (text.length) {
let wordWidth = poco.getTextWidth(text[0], font);
if ((wordWidth < width) || (width === poco.width)) {
Figure 9-16 shows the result of running this example with the font set to regular16 and bold28, respectively.
Figure 9-16
text-wrap example with font size 16 (left) and 28 (right)
Additional Drawing Techniques
Poco and Commodetto provide many tools to simplify and optimize drawing for specific needs. The following sections introduce three of them: using clipping to restrict text to a box, using the origin to easily reuse drawing code, and drawing offscreen to efficiently render gradients.
Restricting Text to a Box
As you know, Poco does not draw outside the update area defined when you call Poco’s begin method; it clips to that area, by setting the initial clipping area to be the same as the update area. Your code can also adjust the clipping area during drawing. The clipping area is always limited by the update area defined by begin; you can shrink the clipping area, but you can ever expand it beyond the initial drawing area.
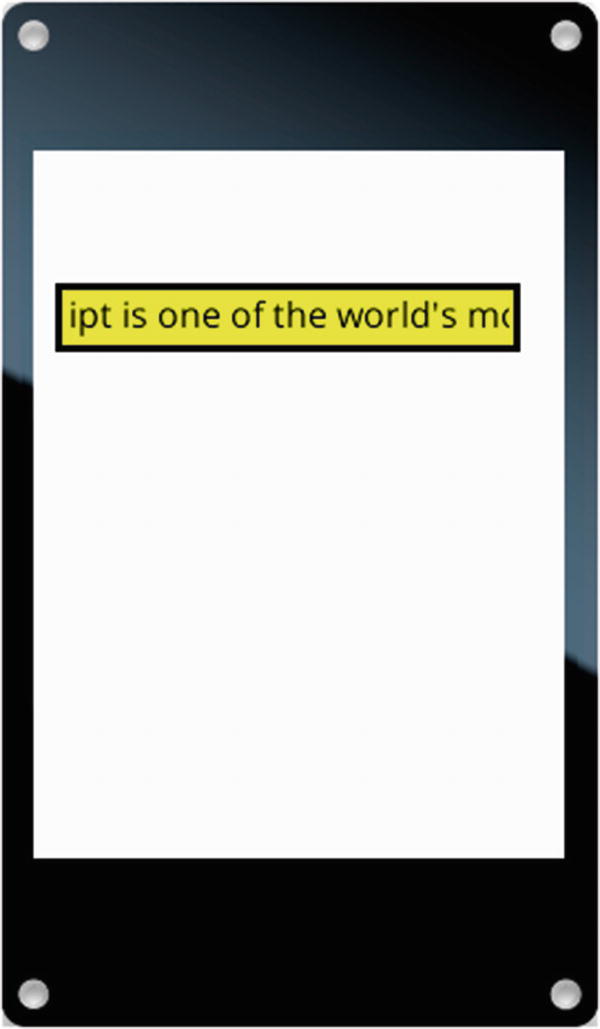
One place where clipping is useful is a ticker—a scrolling text message that fits into a section of the screen. The text must never be drawn outside the bounds of the ticker but should be drawn all the way to its edges. The $EXAMPLES/ch9-poco/text-ticker example demonstrates how to do this; Figure 9-17 shows a rendering of the example.
Figure 9-17
Ticker tape drawn by text-ticker example
Listing 9-13 shows some of the variables used throughout the drawing code. There’s a black frame around the outside, with its size in pixels stored in the frame variable. There’s a small margin inside the frame, where the text cannot be drawn; its size in pixels is stored in the margin variable. The width of the area reserved for the ticker text is stored in tickerWidth. The overall width and height are calculated from these values.
The text is measured once, before drawing starts, to avoid redundant calculations during rendering. The result is stored in textWidth.
let text = "JavaScript is one of the world's most widely used
programming languages.";
let textWidth = poco.getTextWidth(text, regular16);
The variable dx stores the current horizontal offset of the text from the left edge of the ticker text area. The text starts just off the right edge and scrolls in from there.
let dx = tickerWidth;
The ticker is drawn in two parts. First, the black frame and yellow ticker background are drawn:
poco.fillRectangle(black, x, y, width, height);
poco.fillRectangle(yellow, x + frame, y + frame,
tickerWidth + margin * 2,
regular16.height + margin * 2);
Next, the text is drawn (Listing 9-14). The example first uses the clip method to change the clipping area. It calls clip with the x and y coordinates, width, and height of the clipping rectangle. This pushes the current clipping area onto a stack and then intersects it with the requested clip. Calling clip with no arguments pops the clip stack and restores the previous clip. This approach makes it easy to nest clipping area changes.
poco.drawText(text, regular16, black, x + frame + margin + dx,
y + frame);
poco.clip();
Listing 9-14.
Finally, the horizontal offset of the ticker is advanced, to prepare for the next animation frame. When the text completely scrolls off the left edge, it resets to again scroll in from the right edge.
dx -= 2;
if (dx < -textWidth)
dx = tickerWidth;
Easily Reusing Drawing Code
The origin for drawing, (0, 0), is the top-left corner of the screen after you call Poco’s begin method, and the origin has remained there in all the examples so far. You can use the origin method to offset the origin. This simplifies writing a function to draw a user interface element at different locations on the screen. The $EXAMPLES/ch9-poco/origin example uses the origin method to draw identical yellow rectangles with black frames in different locations, as shown in Figure 9-18.
Figure 9-18
Rectangles drawn by the origin example
The following function from the origin example draws a yellow rectangle with a black frame:
function drawFrame() {
poco.fillRectangle(black, 0, 0, 20, 20);
poco.fillRectangle(yellow, 2, 2, 16, 16);
}
In this function, drawing is done at the origin. Moving the origin before calling drawFrame causes the drawing to appear at a different location on the screen. Listing 9-15 shows the code from the origin example that calls the origin method to offset the origin before each call to drawFrame. The result is the four rectangles you saw in Figure 9-19.
drawFrame();
poco.origin(20, 20);
drawFrame();
poco.origin(20, 20);
drawFrame();
poco.origin();
poco.origin();
poco.origin(0, 65);
drawFrame();
poco.origin();
Listing 9-15.
The origin starts at (0, 0). The first call to poco.origin(20, 20) moves the origin to (20, 20). Because the values are relative, the second call to poco.origin(20, 20) moves the origin to (40, 40).
The origin method stores the current origin on a stack. Calling origin with no arguments pops the origin stack and restores the previous origin. As with the clip method, this approach makes nested origin changes easy. In this example, the call to poco.origin(0, 65) occurs after all items on the stack are removed, so the origin is back at (0, 0). After the call, the origin is at (0, 65).
While the final call to origin may appear unnecessary, since no further drawing is performed, Poco considers it an error if you fail to fully clear the origin or clip stack before calling the end method. If this unbalanced situation occurs, the end method reports an error.
Efficiently Rendering Gradients
Your projects aren’t limited to bitmaps created at build time; you can also create bitmaps while your project is running. You’ve already seen one example of this: the loadJPEG function creates a bitmap in memory from compressed JPEG data. Because these bitmaps must be stored in RAM, they’re limited by the amount of available memory. You can create a bitmap at runtime using the BufferOut class, which also creates a virtual screen for the bitmap. This enables you to draw to the offscreen bitmap using Poco in the same way you draw to a physical screen.
import BufferOut from "commodetto/BufferOut";
The $EXAMPLES/ch9-poco/offscreen example creates an offscreen bitmap, draws a simple gradient to the bitmap, and then animates the bitmap on the screen. When creating the offscreen bitmap, you specify its width and height and the pixel format for the new bitmap. Here the pixel format is set to poco.pixelsOut.pixelFormat so that the offscreen bitmap and the screen have the same pixel format.
let offscreen = new BufferOut({width: 64, height: 64,
pixelFormat: poco.pixelsOut.pixelFormat});
This offscreen bitmap is a 64 x 64 pixels square. To draw to it, you create another instance of Poco bound to offscreen, instead of to screen like the first instance.
let pocoOff = new Poco(offscreen);
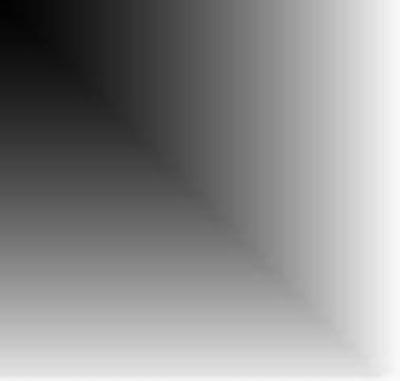
The example then uses pocoOff to draw to the bitmap exactly as if it were drawing to the screen. Listing 9-16 shows the code it uses to draw the gray gradient shown in Figure 9-19.
pocoOff.begin();
for (let i = 64; i >= 1; i--) {
let gray = (i * 4) - 1;
let color = pocoOff.makeColor(gray, gray, gray);
pocoOff.fillRectangle(color, 0, 0, i, i);
}
pocoOff.end();
Listing 9-16.
Figure 9-19
Gray gradient drawn by offscreen example
The bitmap attached to offscreen is available from its bitmap property. The following line draws the offscreen bitmap to the screen:
poco.drawBitmap(offscreen.bitmap, 0, 0);
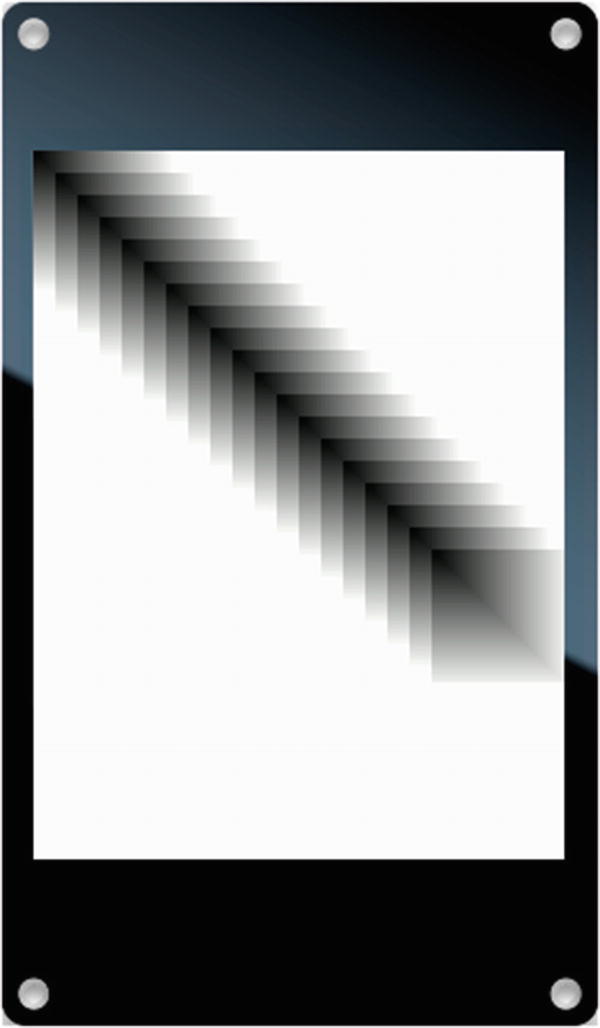
Rendering the content of this offscreen bitmap requires drawing 64 different rectangles, each of a slightly different size and color. Drawing those rectangles over and over in an animation would be too much calculation for a microcontroller. Fortunately, drawing the offscreen bitmap is much easier.
The offscreen example goes on to animate 19 copies of an offscreen bitmap by sliding them left and right at different speeds. Listing 9-17 shows the animation code, and Figure 9-20 shows a rendering of the animation.
poco.drawBitmap(offscreen.bitmap, i * step, i * 10);
step += direction;
if (step > 40) {
step = 40;
direction = -1;
}
else if (step < 1) {
step = 0;
direction = +1;
}
poco.end();
}, 33);
Listing 9-17.
Figure 9-20
Rendering of offscreen animation
Touch Input
If you’re using Poco to draw your product’s user interface and you want to incorporate touch capabilities, you need to implement support for touch input by reading directly from the touch input driver. When you use Piu, touch input is automatically taken care of for you. Fortunately, reading the touch input is not very difficult.
Accessing the Touch Driver
The most common capacitive touch input is the FocalTech FT6206. This part is used in Moddable One and Moddable Two boards. You import the touch driver in your project and create an instance as follows:
import FT6206 from "ft6206";
let touch = new FT6206;
Older resistive touch screens commonly use the XPT2046 touch controller.
import XPT2046 from "xpt2046";
let touch = new XPT2046;
Both touch drivers implement the same API, so once you’ve instantiated the driver your code to read from them is the same for both.
Reading Touch Input
To retrieve touch points from the touch driver, you call the read method. You pass an array of touch points to the read call, and the driver updates the points. Usually you allocate the touch points once, after instantiating the touch driver to minimize the work done by the memory manager and garbage collector. The following line allocates an array with a single touch point. The array is assigned to the points property of the touch input driver instance.
touch.points = [{}];
To retrieve the current touch points, call read with the array of points:
touch.read(touch.points);
The driver sets the state property for each touch point. The values of the state property are as follows:
0 – no touch
1 – touch input begin (finger down)
2 – touch input continue (finger still down)
3 – touch input end (finger lifted)
For all state values except 0, the x and y properties of the touch point indicate the current touch location. The code in Listing 9-18, which is excerpted from $EXAMPLES/ch9-poco/touch, samples the touch driver 30 times a second, outputting the current state to the debug console.
Some versions of the FT6206 do not reliably generate the touch end state. When you run the example, you can see the behavior of your component. If the touch end state is not generated, you can determine that a touch sequence has ended when the touch point enters state 0 (no touch).
Using Multi-touch
The reason that the read method takes an array of points rather than a single point is so that it can support multi-touch. The FT6206 capacitive touch sensors support two simultaneous touch points, as long as they’re not too close together. To use multi-touch, you just need to pass an array with two points.
touch.points = [{}, {}];
touch.read(touch.points);
Applying Rotation
The touch driver always provides points that have neither hardware nor software rotation applied. If you’re using rotation, you need to apply it to the touch points. As you might expect, Piu takes care of rotating the touch points for you.
You can use code from Listing 9-19 to transform coordinates for rotations of 90, 180, and 270 degrees.
if (90 === rotation) {
const x = point.x;
point.x = point.y;
point.y = screen.height - x;
}
else if (180 === rotation) {
point.x = screen.width - point.x;
point.y = screen.height - point.y;
}
else if (270 === rotation) {
const x = point.x;
point.x = screen.width - point.y;
point.y = x;
}
Listing 9-19.
Conclusion
The Poco renderer provides all the basic tools you need to build the user interface of an IoT product. You can draw rectangles, bitmaps, and text with many different options. The rendering capabilities include anti-aliased text, grayscale masks drawn in any color, and rendering of color images through alpha channel masks. You can optimize rendering performance using clipping to restrict the area of the screen that you update.
Poco gives you a great deal of control—but that power brings with it some inconveniences. You must load resources and invoke the appropriate functions to parse them, you must calculate the area of the screen to update, and you must take care of some details of rotation. The next chapter introduces the Piu user interface framework, which takes care of many of these details for you.