There are many ways to enable wireless communication between devices. Chapter 3 introduced many protocols that operate over a Wi-Fi connection to communicate with devices anywhere in the world. This chapter focuses on Bluetooth Low Energy, or BLE, a wireless communication widely used between two devices in close proximity to each other. Products choose to use BLE instead of Wi-Fi if minimizing energy use is particularly important, such as in battery-powered products, and when direct communication with another device, such as a mobile phone, is an acceptable alternative to internet access. Many IoT products use BLE, from heart rate monitors to electric toothbrushes to ovens. Product manufacturers often offer a mobile app or desktop companion application to monitor or control these products.
BLE is version 4 of the Bluetooth standard and was first introduced in 2010. The original Bluetooth was standardized in 2000 to send streams of data over short distances. BLE significantly reduces the energy use of the original Bluetooth, enabling it to operate much longer on a single battery charge. BLE achieves this, in part, by reducing the amount of data transmitted. Transmitting over shorter distances also uses less energy; BLE devices typically have a range of no more than 100 meters, whereas Wi-Fi has a much larger range. BLE’s lower power consumption and cost make it well suited for many IoT products.
Using the information in this chapter, you can build your own BLE devices that run on a microcontroller.
The examples in this chapter are for the ESP32. If you attempt to build them for the ESP8266, the build will fail because the ESP8266 doesn’t have BLE hardware. The examples do, however, run on other devices with integrated BLE supported by the Moddable SDK, including Qualcomm’s QCA4020 and the Blue Gecko by Silicon Labs.
BLE Basics
If you’re new to working with BLE, the information in this section is essential, as it explains concepts used throughout the rest of this chapter. If you’re familiar with BLE, still consider giving this section a quick scan to familiarize yourself with the terminology used in this book and how it relates to the BLE API of the Moddable SDK.
GAP Centrals and Peripherals
The Generic Access Profile , or GAP, defines how devices advertise themselves, how they establish connections with each other, and security. The two main roles defined by GAP are Central and Peripheral .
A Central scans for devices acting as Peripherals and initiates requests to establish a new connection with a Peripheral. A device acting as a Central usually has relatively high processing power and plenty of memory—for example, a smart phone, tablet, or computer—whereas Peripherals are often small and battery-powered. Peripherals advertise themselves and accept requests to establish a connection.
The BLE specification enables a Central to be connected to multiple Peripherals, and a Peripheral to be connected to multiple Centrals. It’s common for a Central to connect to several Peripherals at the same time. For example, you may use your smart phone to connect to your heart rate monitor, smart watch, and lights. It’s uncommon for a Peripheral to connect to more than one Central at a time; most Peripherals do not allow for multiple concurrent connections. The BLE API of the Moddable SDK enables a Peripheral to connect with a single Central at a time.
GATT Clients and Servers
The Generic Attribute Profile, or GATT, defines the way BLE devices transfer data back and forth after a connection is established between them—a client-server relationship.
A GATT Client is a device that accesses data from a remote GATT Server by sending read/write requests. A GATT Server is a device that stores data locally, receives read/write requests, and notifies the remote GATT Client of changes to the values of its characteristics. In this chapter, the term Server is used to mean a GATT Server, and Client means a GATT Client.
GAP vs. GATT
Many BLE tutorials incorrectly use the terms Central and Client interchangeably and the terms Peripheral and Server interchangeably. This is because Centrals usually take on the Client role and Peripherals usually take on the Server role. However, the BLE specification says that either Centrals or Peripherals may take on the role of Client, Server, or both.
Central and Peripheral are terms defined by GAP, telling you how the BLE connection is managed. Client and Server are terms defined by GATT, telling you about the storage and flow of data after a connection has been established. GATT comes into the picture only after the advertising and connection process defined by GAP is complete.
Profiles, Services, and Characteristics

GATT profile hierarchy
Profiles
A profile defines a specific use of BLE for communication between multiple devices, including the roles of the devices involved and their general behaviors. For example, the standard Health Thermometer profile defines the roles of a Thermometer device (a sensor) and a Collector device; the Thermometer device measures the temperature, and the Collector device receives the temperature measurement and other data from the Thermometer. The profile specifies the services that the Thermometer must instantiate (the Health Thermometer service and the Device Information service) and states that the intended use of the profile is in healthcare applications.
Profiles don’t exist on a BLE device; rather, they are specifications implemented by a BLE device. The list of officially adopted BLE profiles is available at bluetooth.com/specifications/gatt. When you’re implementing your own BLE device, it’s a good idea to check whether a standard profile is available that meets the needs of your product. If there is, you’ll benefit from interoperability with other products that support the standard, saving you the time of designing a new profile.
Services
A service is a collection of characteristics that describe the behavior of part of a BLE device. For example, the Health Thermometer service provides temperature data from a Thermometer device. A service may have one or more characteristics and is distinguished by a UUID. Officially adopted BLE services have 16-bit UUIDs. The Health Thermometer service is assigned the number 0x1809. You can create your own custom services by giving them a 128-bit UUID.
Services are advertised by a BLE device. The list of officially adopted BLE services is available at bluetooth.com/specifications/gatt/services.
Characteristics
A characteristic is a single value or data point that provides information about a GATT service. The format of the data depends on the characteristic; for example, the Heart Rate Measurement characteristic used by the Heart Rate service provides a heart rate measurement as an integer, and the Device Name characteristic provides the name of a device as a string.
The list of officially adopted BLE characteristics is available at bluetooth.com/specifications/gatt/characteristics. As with services, officially adopted BLE characteristics have 16-bit UUIDs and you can create your own with a 128-bit UUID.
The BLE API of the Moddable SDK
The Moddable SDK does not have distinct classes in its BLE API for the roles defined by GAP and for GATT. Instead, it provides functions for Centrals and GATT Clients in a single BLEClient class, and functions for Peripherals and GATT Servers in a single BLEServer class. This class organization reflects the two most common configurations of BLE devices: devices that act as Centrals and take on the Client role and devices that act as Peripherals and take on the Server role.
The BLEClient Class
- 1.
Scan for Peripherals.
- 2.
Initiate requests to establish a connection with Peripherals.
- 1.
Find the GATT services of interest.
- 2.
Find characteristics of interest in each service.
- 3.
Read, write, and enable notifications for characteristics within each service.
You subclass the BLEClient class to implement a specific BLE device that supports the operations your device requires. Subclasses call methods of the BLEClient class to initiate the preceding operations. All BLE operations performed by BLEClient are asynchronous to avoid blocking execution for an indeterminate period of time. Consequently, instances of the BLEClient class receive results through callbacks. For example, the BLEClient class has a startScanning method that you call to start scanning for Peripherals, and an onDiscovered callback that’s automatically invoked when a Peripheral is discovered.
You only need to implement the callbacks required to work with the Peripherals, services, and characteristics your device requires.
The BLEServer Class
- 1.
Advertise so that Centrals can discover the Peripheral.
- 2.
Accept connection requests from a Central.
- 1.
Deploy services.
- 2.
Respond to characteristic read and write requests from a Client.
- 3.
Accept characteristic value change notification requests from a Client.
- 4.
Notify a Client of characteristic value changes.
You can implement standard BLE profiles like Heart Rate or your own custom-defined profile to support your product’s unique capabilities. In both cases, you first define GATT services in JSON files and then subclass the BLEServer class to implement specific BLE devices. Subclasses call methods of the BLEServer class to initiate the preceding operations. All BLE operations performed by BLEServer are asynchronous to avoid blocking execution for an indeterminate period of time. Consequently, instances of the BLEServer class receive results through callbacks.
Installing the BLE Host
The examples in this chapter are installed using the pattern described in Chapter 1: you install the host on your device using mcconfig, then install example applications using mcrun.
The host is in the $EXAMPLES/ch4-ble/host directory. Navigate to this directory from the command line and install it with mcconfig.
Creating a BLE Scanner
Listing 4-1.
The onReady callback is invoked when the BLE stack is ready to use. In this example, the onReady callback calls startScanning to enable scanning for nearby Peripherals.
The onDiscovered callback is invoked one or more times for each Peripheral discovered. In this example, the onDiscovered callback traces the discovered Peripheral’s name to the console.
With this simple example, your Central discovers Peripherals around you and tells you their names. Now you’re ready to go a step further: the next example demonstrates how to use other features of the BLEClient class to create a BLE device that communicates with a virtual Peripheral.
Creating Two-Way Communication
The $EXAMPLES/ch4-ble/text-client example implements a Central that connects to a Peripheral and receives text data via characteristic value change notifications.
- 1.
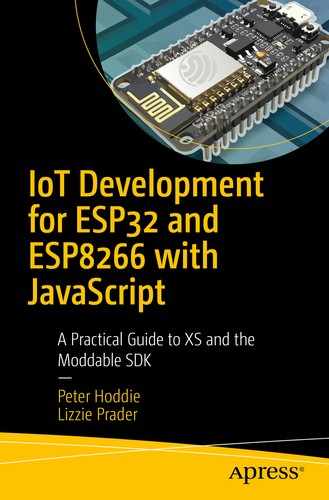
Download and open Bluefruit and enter Peripheral mode. In the ADVERTISING INFO section, change the Local Name field to esp.
Peripheral mode in Bluefruit
- 2.
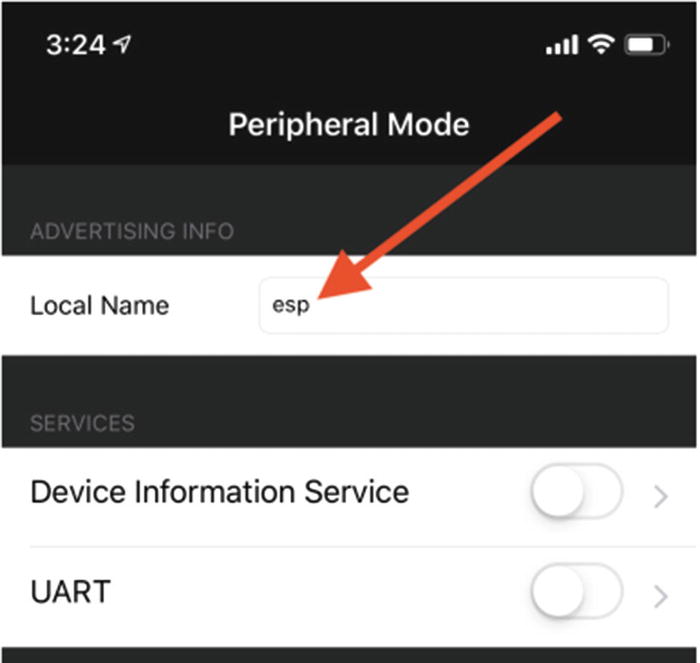
Make sure the UART service is turned on.
UART service enabled
The next sections explain the code that runs on the ESP32 to implement the Central device.
Connecting to the Peripheral
Listing 4-2.
The argument to connect is an instance of the Device class, representing a single Peripheral. BLEClient automatically creates instances of the Device class when a Peripheral is discovered; applications do not instantiate them directly. Applications do, however, interact with instances of the Device class directly—for example, by calling methods to perform GATT service and characteristic discovery.
The onConnected Callback
The onServices Callback
The onServices method is a callback that’s invoked when service discovery is complete. The services argument is an array of service objects—instances of the Service class—each of which provides access to a single service. If discoverPrimaryService was called to find a single service, the services array contains only the one service found.
Listing 4-3.
The onCharacteristics Callback
The onCharacteristics method is a callback that’s invoked when characteristic discovery is complete. The characteristics argument is an array of characteristic objects—instances of the Characteristic class—each of which provides access to a single service characteristic. If discoverCharacteristic was called to find a single characteristic, the characteristics array contains the single characteristic found.
Listing 4-4.
Receiving Notifications

UART screen in Bluefruit
Creating a Heart Rate Monitor
Now that you know the basics of implementing a Client that receives notifications from a Server, this example will show you how to use features of the BLEServer class to implement a Peripheral that takes on the Server role after connecting to a Central.
The $EXAMPLES/ch4-ble/hrm example advertises the standard Heart Rate and Battery services , accepts connection requests from Centrals, sends notifications for simulated heart rate values, and responds to read requests from a Client for a simulated battery level. The next few sections explain how it’s implemented using the BLEServer class.
Defining and Deploying Services
GATT services are defined in JSON files located in the host’s bleservices directory. The JSON is automatically converted to platform-specific native code at build time, and the compiled object code is linked to the application.
Listing 4-5.
The uuid property of the service object is the number assigned to the service by the GATT specification. The Heart Rate service has the UUID 180F.
The characteristics object describes each characteristic supported by the service. Each immediate property is the name of a characteristic. In this example there is just one characteristic: bpm, which stands for beats per minute.
The uuid property of a characteristic object is the unique number assigned to the characteristic by the GATT specification. The bpm characteristic of the Heart Rate service has the UUID 2A37.
The type property specifies the type of the characteristic value used in your JavaScript code. The BLEServer class uses the value of the type property to convert the binary data transferred by the Client to JavaScript types. This saves your Server code the work of converting back and forth between different types of data (ArrayBuffer, String, Number, and so on).
The permissions property defines whether the characteristic is read-only, write-only, or read/write and whether accessing the characteristic requires an encrypted connection. The bpm property is read-only because in a heart rate monitor, the beats per minute is determined by sensor readings and consequently cannot be written by a Client. The read permission indicates that a Client can read the characteristic over a nonencrypted or encrypted connection; use readEncrypted when the value is only accessible over an encrypted connection. Similarly, use write or writeEncrypted for write permissions. To indicate that a characteristic supports both reading and writing, include both a read and a write value in the permissions string, separated by a comma—for example, "readEncrypted,writeEncrypted".
The properties property defines the characteristic’s properties. It may be read, write, notify, indicate, or a combination of those (comma-separated). The read and write values permit reads and writes of the characteristic value, notify permits the Server to notify the Client of changes to the characteristic value without its being requested and without acknowledgment that the notification was received, and indicate is the same as notify except that it requires acknowledgment that the notification was received before another indication can be sent.
Once the BLE stack completes its initialization, it invokes the onReady callback. The hrm example implementation of onReady initiates advertising, enabling its services to be discovered by Clients. The following section explains how the subclass manages when advertising is active.
Advertising
Peripherals broadcast advertisement data to announce themselves. The BLEServer class has a startAdvertising method to begin broadcasting advertisement packets and a stopAdvertising method to stop.
Listing 4-6.
When the connection is lost, the Peripheral again starts advertising.
Listing 4-7.
Advertising data only transmits data; there is no way to reply. Bidirectional communication requires one device to take on the GATT Client role and one device to take on the GATT Server role. Before this can happen, the connection process defined by GAP must be complete.
Establishing a Connection
- 1.
Run the example on your ESP32.
- 2.
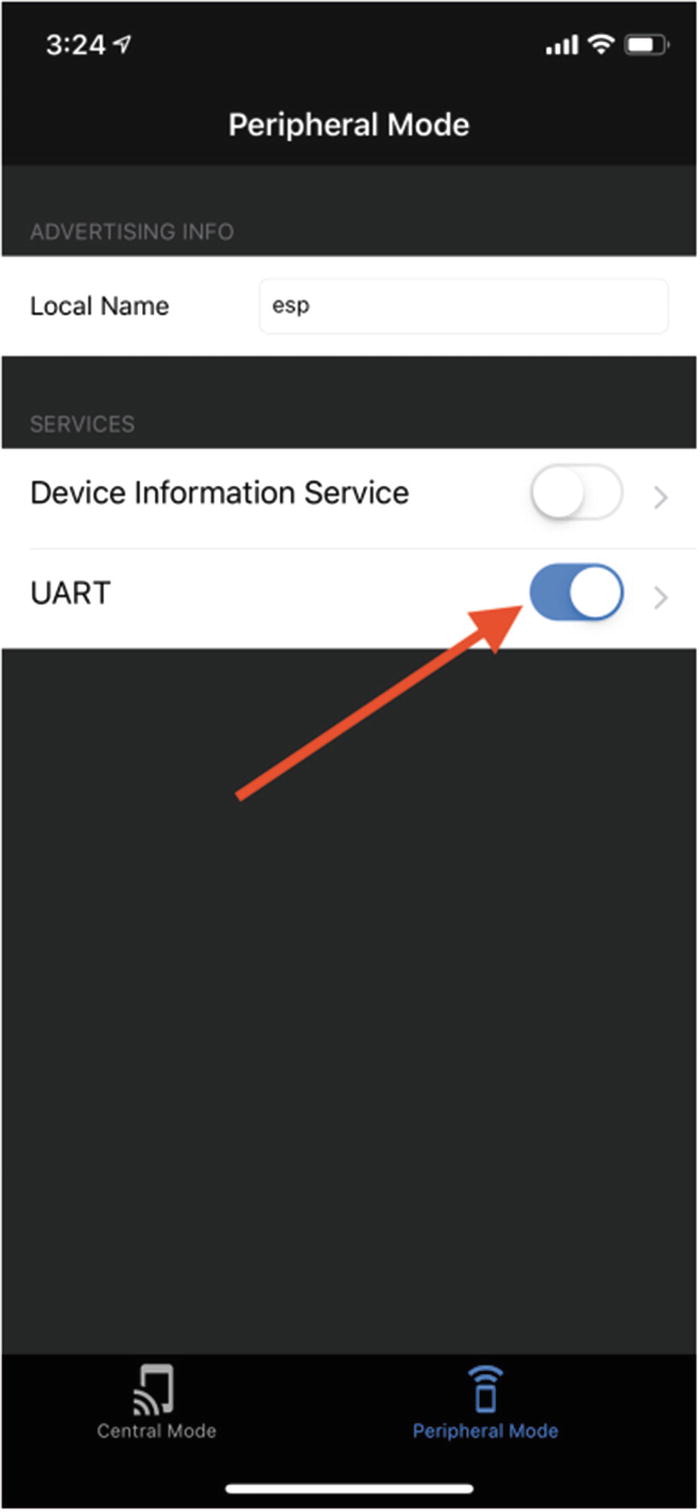
Download and open LightBlue and wait for the Heart Rate Monitor Peripheral to appear, as shown in Figure 4-5.
Heart Rate Monitor Peripheral in LightBlue Peripherals list
- 3.
Tap the Heart Rate Monitor Peripheral to establish a connection to it.
Listing 4-8.
Sending Notifications
BLE Clients may request notifications for characteristics that have the notify property, such as the bpm characteristic in this example. When notifications are enabled, Servers notify the Client of changes to the characteristic’s value without the Server’s having to request the value. Notifications save energy, a key feature of the design of BLE, by eliminating the need for the Client to poll the Server for changes in characteristics.
- 1.
Tap the Heart Rate Measurement characteristic.
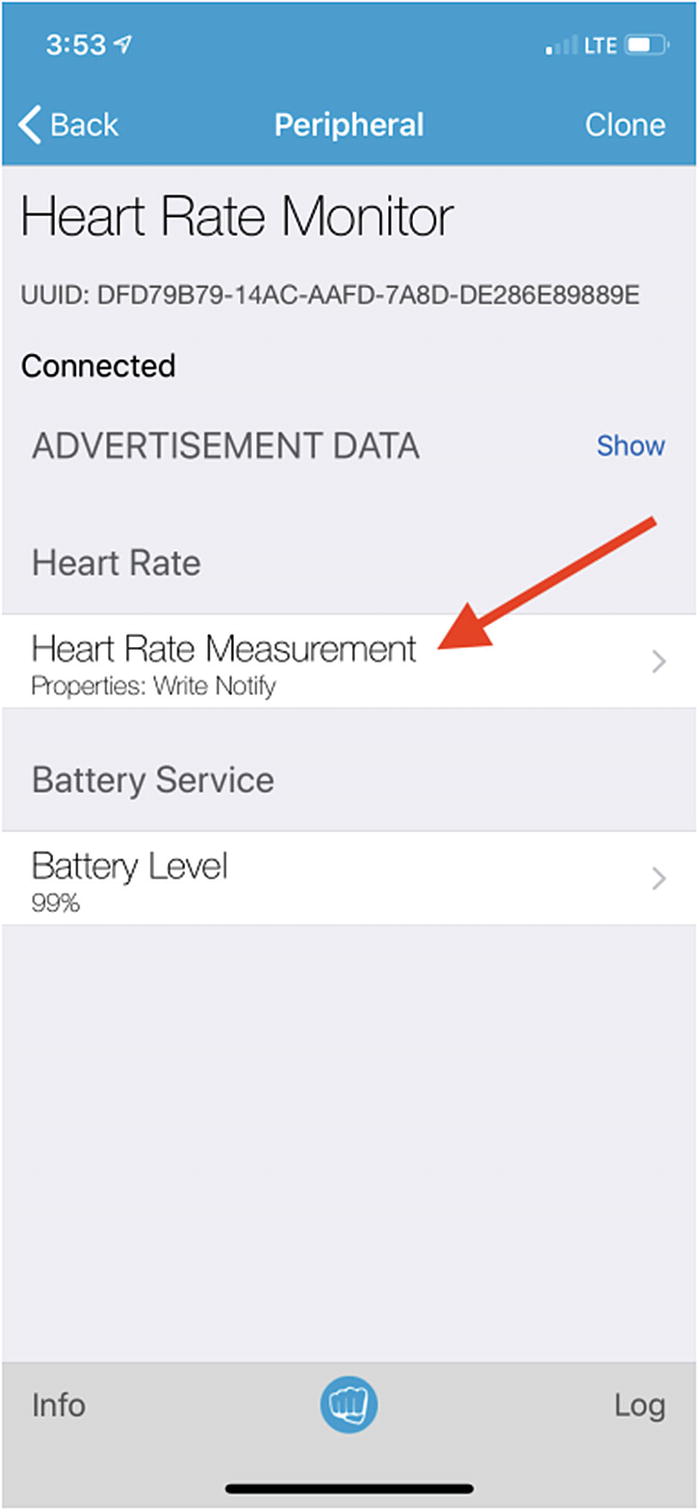
Heart Rate Monitor characteristics screen with Heart Rate Measurement button
- 2.
Tap Listen for notifications to enable notifications.
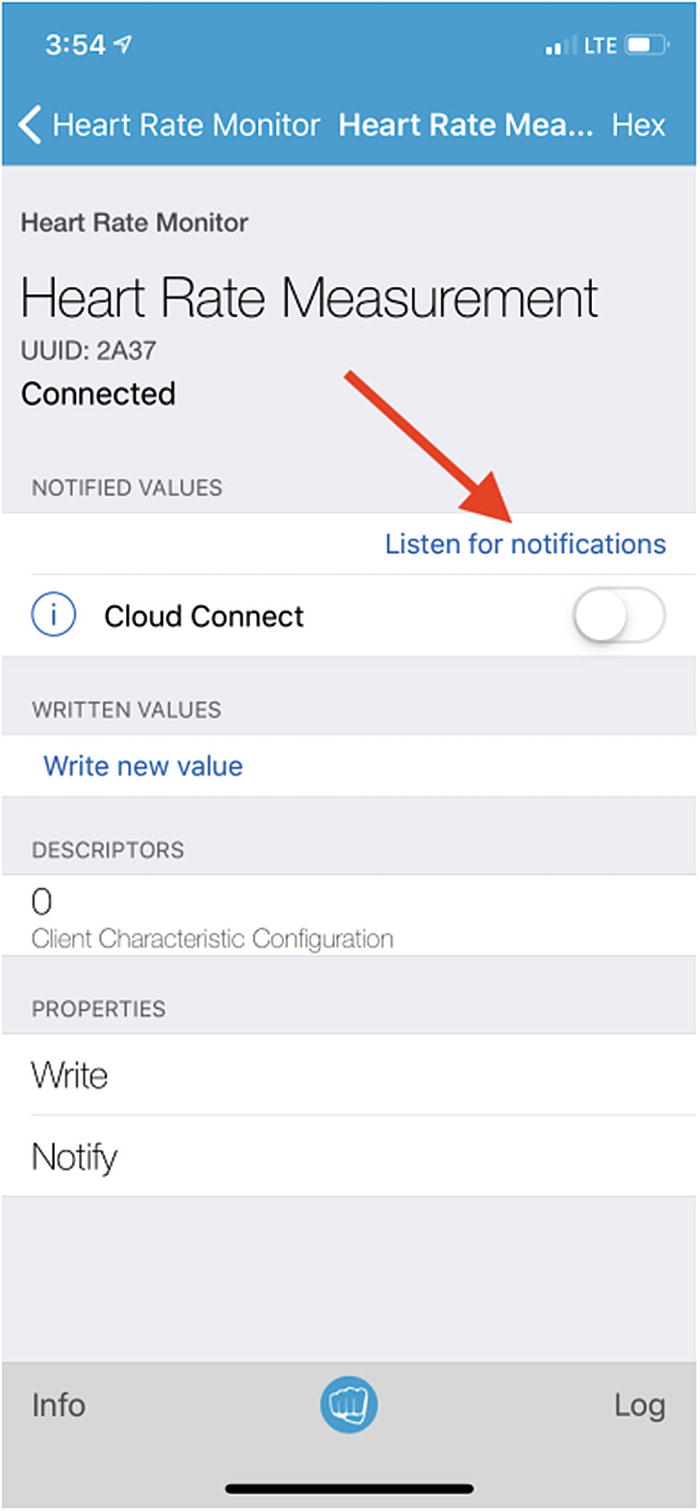
Heart Rate Measurement screen with Listen for notifications button
- 3.
Watch the simulated heart rate values appear.

Heart rate values appearing in NOTIFIED VALUES section
Now let’s take a look at the code that implements notifications for the Heart Rate service on the Server side. The onCharacteristicNotifyEnabled method is a callback that’s invoked when a Client enables notifications on a characteristic. The onCharacteristicNotifyDisabled method is a callback that’s invoked when a Client disables notifications on a characteristic. The characteristic argument for both is an instance of the Characteristic class, which provides access to a single service characteristic.
Listing 4-9.
Listing 4-10.
Responding to Read Requests
- 1.
Tap the Battery Level characteristic.
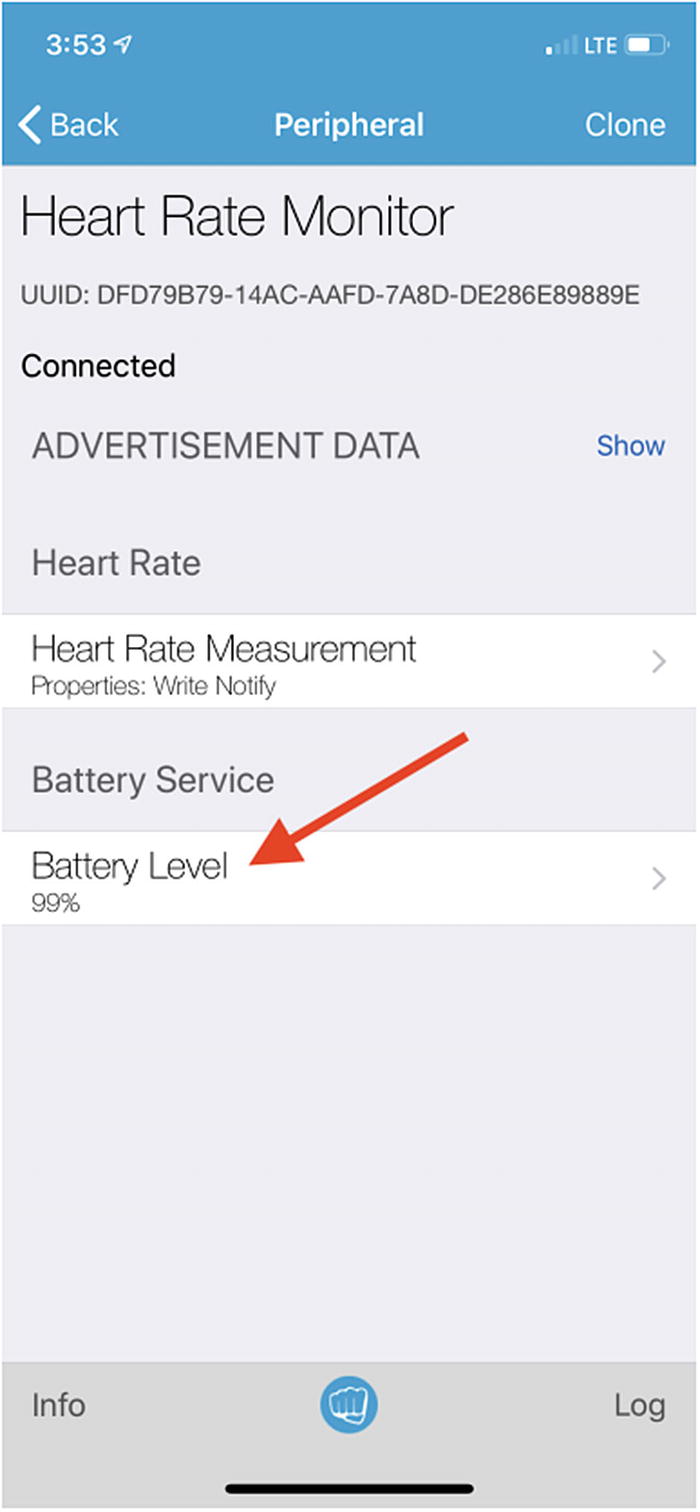
Heart Rate Monitor characteristics screen with Battery Level button
- 2.
Tap Read again.
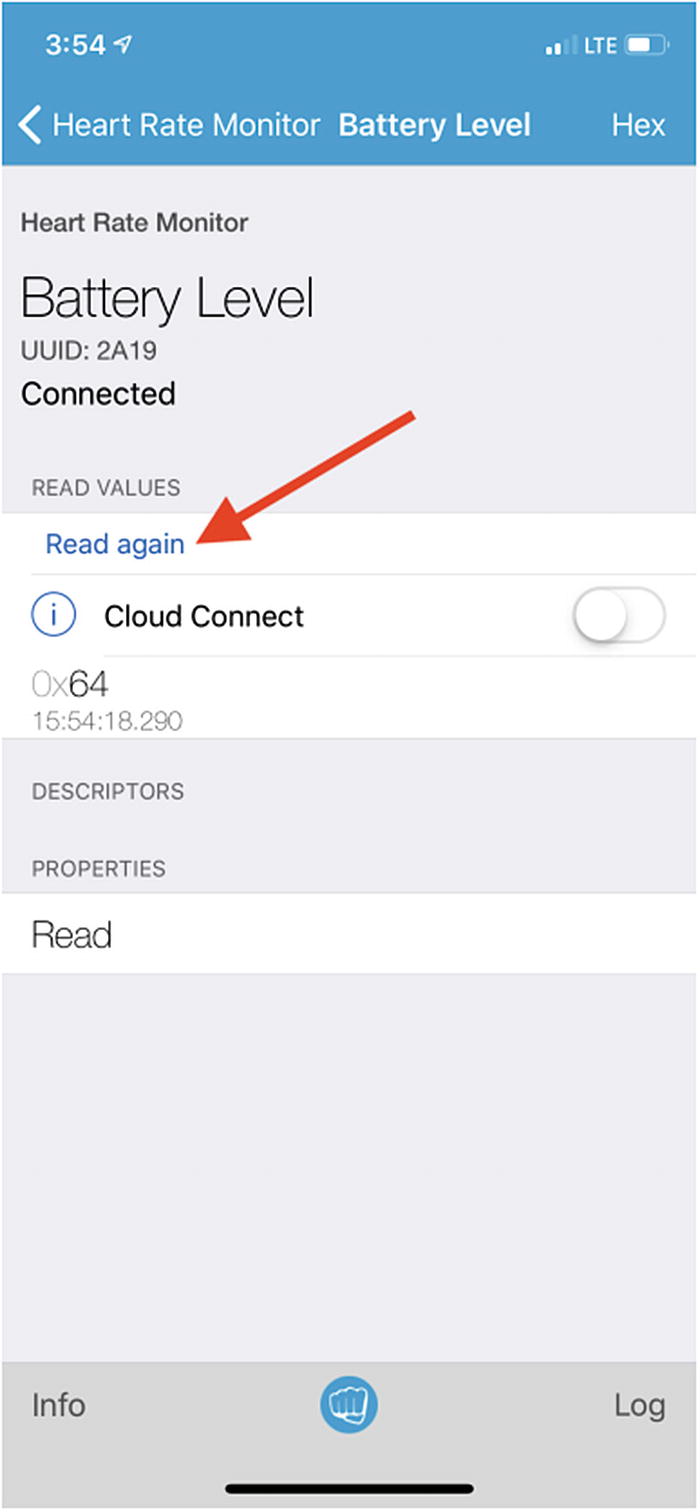
Battery Level screen with Read again button
- 3.
Watch the simulated battery level appear.
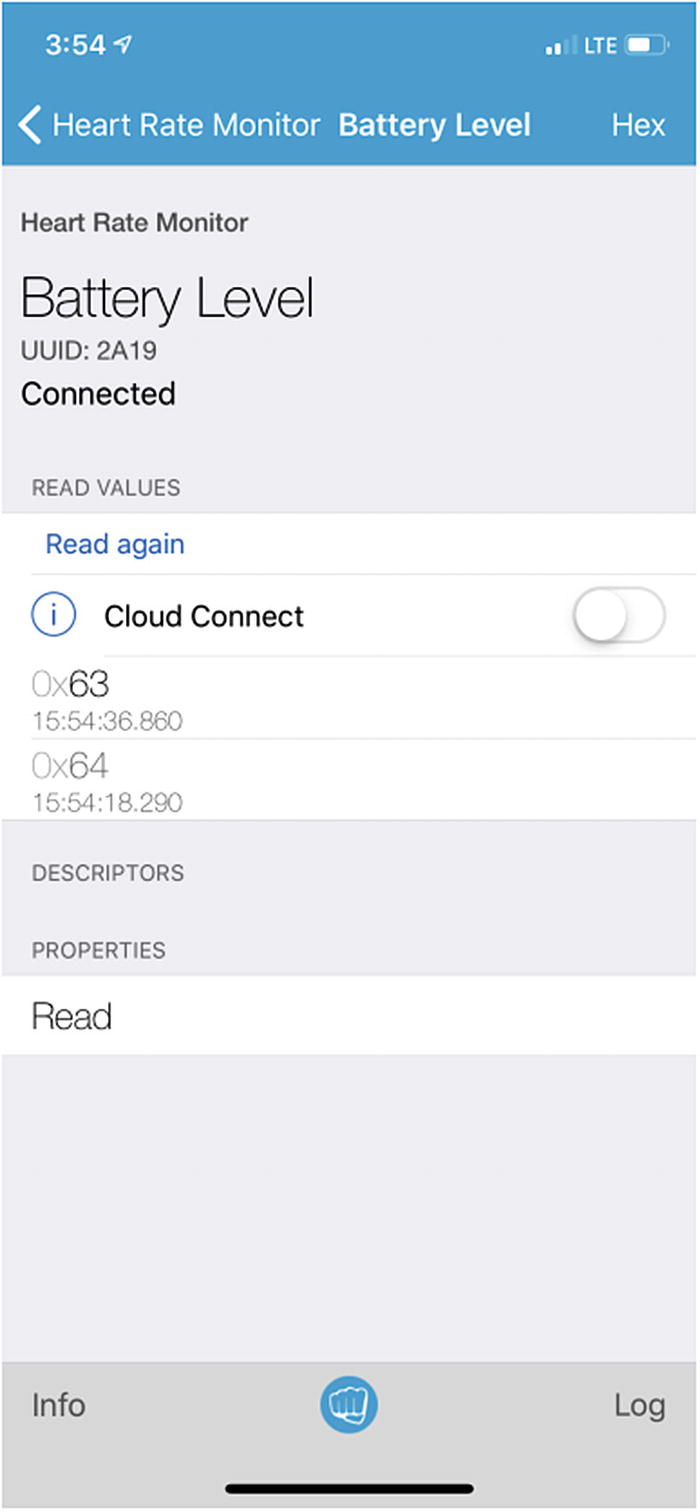
Battery level value appearing in READ VALUES section
Listing 4-11.
Establishing Secure Communication
The Moddable SDK supports enhanced security features introduced in version 4.2 of the Bluetooth Core Specification: LE Secure Connections with Numeric Comparison, Passkey Entry, and Just Works pairing methods. Both the BLEClient and BLEServer classes have an optional securityParameters property that requests that devices establish an LE Secure Connection. The pairing method used depends on the devices’ capabilities and options set in the securityParameters property. Security callback functions are hosted by the BLEClient and BLEServer classes. The next section walks through a simple example.
Secure Heart Rate Monitor
The $EXAMPLES/ch4-ble/hrm-secure example is a secure version of the $EXAMPLES/ch4-ble/hrm example that requires passkey entry for pairing.

Prompt to enter code in LightBlue

Passkey in debug console
Now you can enable notifications for the heart rate value and read the battery value on demand as before, but the connection between the Server and Client is secure.
Listing 4-12.
The bonding property enables bonding, which means that both devices will store and use the keys they exchange the next time they connect. Without bonding enabled, the devices will have to go through pairing every time they connect.
The mitm property requests man-in-the-middle protection, meaning that data exchanged between two paired devices is encrypted to prevent an untrusted device from eavesdropping.
The ioCapability property indicates the user interface capabilities for the device related to confirming the passkey. This device doesn’t have a display, but it has display capability because it can trace to the debug console. Other Peripherals may have more input/output capabilities (for example, a device with a keyboard) or fewer input/output capabilities (such as a device with no way to display text). The ioCapability properties of both devices are used to determine the pairing method. For example, if neither device has a keyboard or display, the Just Works pairing method is used.
The onPasskeyDisplay callback is invoked when you try to establish a connection to the Peripheral. In this case, it’s called when you tap the name of the Peripheral in LightBlue. As you saw before, this example traces the passkey to the debug console.
The onAuthenticated callback is invoked after successful device pairing. This example simply changes the authenticated property to indicate that a secure connection was established.
Listing 4-13.
Conclusion
Now that you understand the essentials of these examples, there’s a lot you can do with BLE on your ESP32. Instead of connecting to virtual Peripherals that you create in LightBlue, you can connect to BLE products in your home. Instead of sending simulated data like the heart rate monitor example, you can send actual sensor data from your favorite off-the-shelf sensors.
If you want to try more BLE examples, see the examples/network/ble directory in the Moddable SDK on GitHub. Examples that enable your device to become a URI-transmitting beacon, pair your device with the iPhone Music app, and more are available. If you want to learn more about the BLE API of the Moddable SDK, see the documentation/network/ble directory.