
![]()
Advanced JavaServer Faces and Ajax
A task that can be run in the background, independent of other running tasks, is known as an asynchronous task. JavaScript is the most popular modern browser language that is used to implement asynchronous tasking in web applications. Ajax is a set of technologies that allows you to perform asynchronous tasks using JavaScript in the background, sending responses from the client browser to the server, and then sending a response back to the client. That response is used to update the page’s Document Object Model (DOM). Enhancing an application to make use of such asynchronous requests and responses can greatly improve the overall user experience. The typical web applications from years past included a series of web pages, including buttons that were used to navigate from one page to the next. The browser had to repaint each new page, and when a user was finished with the next page, they’d click another button to go to a subsequent page, and so on. The days of page reloads are long gone, and client-side asynchronous processing is now the norm. Ajax technology has overtaken the industry of web application development, and users now expect to experience a richer and more desktop-like experience when using a web application.
The JSF framework allows developers to create rich user experiences via the use of technologies such as Ajax and HTML5. Much of the implementation detail behind these technologies can be abstracted away from the JSF developer using JSF components so that the developer needs to worry only about how to use a JSF component tag and relate it to a server-side property.
This chapter delves into using Ajax with the JSF web framework. Along the way, you will learn how to spruce up applications and make the user interface richer and more user friendly so that it behaves more like that of a desktop application. You’ll also learn how to listen to different component phases and system events, allowing further customization of application functionality.
![]() Note This chapter contains examples using the third-party component library PrimeFaces. To use PrimeFaces with Java EE 7 or greater, you must utilize PrimeFaces 4.x+, as earlier releases are not compatible with JSF 2.2.
Note This chapter contains examples using the third-party component library PrimeFaces. To use PrimeFaces with Java EE 7 or greater, you must utilize PrimeFaces 4.x+, as earlier releases are not compatible with JSF 2.2.
6-1. Validating Input with Ajax
Problem
You want to validate the values that are entered into text fields of a form, but you want them to be evaluated immediately, rather than after the form is submitted.
Solution
Perform validation on the field(s) by embedding the f:ajax tag within each component whose values you want to validate. Specify appropriate values for the event and render attributes so that the Ajax validation will occur when the field(s) loses focus, and any validation errors will be identified immediately. The following listing is the JSF view for the newsletter subscription page of the Acme Bookstore application. It has been updated to utilize Ajax validation so that the validation occurs immediately, without the need to submit the form before corresponding errors are displayed.
![]() Note To utilize the f:ajax tag, you must be sure to declare the document head section within the <h:head> </h:head> tags. The component looks for the h:head tags when searching for various <script> tags. In the solution below, the document head section resides within the template.
Note To utilize the f:ajax tag, you must be sure to declare the document head section within the <h:head> </h:head> tags. The component looks for the h:head tags when searching for various <script> tags. In the solution below, the document head section resides within the template.
<?xml version='1.0' encoding='UTF-8' ?>
<!--
Book:  Java EE 7 Recipes
Recipe: 6-1
Author: J. Juneau
-->
<!DOCTYPE html PUBLIC "-//W3C//DTD XHTML 1.0 Transitional//EN" "http://www.w3.org/TR/xhtml1/DTD/xhtml1-transitional.dtd">
<html xmlns="http://www.w3.org/1999/xhtml"
      xmlns:ui="http://xmlns.jcp.org/jsf/facelets"
      xmlns:f="http://xmlns.jcp.org/jsf/core"
      xmlns:h="http://xmlns.jcp.org/jsf/html">

    <body>

        <ui:composition template="layout/custom_template_search.xhtml">
            <ui:define name="content">
                <h:messages globalOnly="true"  errorStyle="color: red" infoStyle="color: green"/>
                <h:form id="contactForm">
                    <h1>Subscribe to Newsletter</h1>
                    <p>
                        <h:outputText id="newsletterSubscriptionDesc"

        value="#{ch6ContactController.newsletterDescription}"/>
                    </p>

                    <br/>
                    <h:panelGrid columns="2" bgcolor="" border="0">
                        <h:panelGroup>
                            <h:outputLabel for="first" value="First: "/>
                            <h:inputText id="first" size="40"
        value="#{ch6ContactController.current.first}">
                                <f:validateLength minimum="1" maximum="40"/>
                                <f:ajax event="blur" render="firstError"/>
                            </h:inputText>
                        </h:panelGroup>
                        <h:panelGroup>

                            <h:outputLabel for="last" value="Last: "/>
                            <h:inputText id="last" size="40"
       value="#{ch6ContactController.current.last}">
                                <f:validateLength minimum="1" maximum="40"/>
                                <f:ajax event="blur" render="lastError"/>
                            </h:inputText>
                        </h:panelGroup>

                        <h:message id="firstError"
                                   for="first"
                                   errorStyle="color:red"/>

                        <h:message id="lastError"
                                   for="last"
                                   errorStyle="color:red"/>
                        <h:panelGroup>
                            <h:outputLabel for="email" value="Email: "/>
                            <h:inputText id="email" size="40"

      value="#{ch6ContactController.current.email}">
                                <f:ajax event="blur" render="emailError"/>
                            </h:inputText>
                        </h:panelGroup>
                        <h:panelGroup/>
                        <h:message id="emailError"
                                   for="email"
                                   errorStyle="color:red"/>
                        <h:panelGroup/>

                        <h:selectOneRadio title="Gender" id="gender"
                                   value="#{ch6ContactController.current.gender}">
                            <f:selectItem  itemValue="M" itemLabel="Male"/>
                            <f:selectItem itemValue="F" itemLabel="Female"/>
                        </h:selectOneRadio>
                        <h:panelGroup>
                            <h:outputLabel for="occupation" value="Occupation: "/>
                            <h:selectOneMenu id="occupation"
       value="#{ch6ContactController.current.occupation}">
                                <f:selectItems value="#{ch6ContactController.occupationList}"/>
                            </h:selectOneMenu>
                        </h:panelGroup>
                        <h:message id="genderError"
                                   for="gender"
                                   errorStyle="color:red"/>

                    </h:panelGrid>
                    <br/>
                    <h:outputLabel for="description" value="Enter your book interests"/>
                    <br/>
                    <h:inputTextarea id="description" rows="5" cols="75"

value="#{ch6ContactController.current.description}"/>

                    <br/>
                    <h:panelGrid columns="2">
                        <h:outputLabel for="password" value="Enter a password for site access: "/>
                        <h:inputSecret id="password" size="40"

value="#{ch6ContactController.current.password}">
                            <f:validateRequired/>
                            <f:ajax event="blur" render="passwordError"/>
                        </h:inputSecret>

                        <h:outputLabel for="passwordConfirm" value="Confirm Password: "/>
                        <h:inputSecret id="passwordConfirm" size="40"

value="#{ch6ContactController.passwordConfirm}"
                                       validator="#{ch6ContactController.validatePassword}">
                            <f:ajax event="blur" render="passwordConfirmError"/>
                        </h:inputSecret>
                    </h:panelGrid>
                    <h:message id="passwordError"
                               for="password"
                               style="color:red"/>
                    <br/>
                    <h:message id="passwordConfirmError"
                               for="passwordConfirm"
                               style="color:red"/>
                    <br/>
                    <hr/>
                    <br/>

                    <h:panelGrid columns="3">
                        <h:panelGroup>
                            <h:outputLabel for="newsletterList" value="Newsletters:" style=" "/>
                            <h:selectManyListbox id="newsletterList"
                                    value="#{ch6ContactController.current.newsletterList}">
                                <f:selectItems value="#{ch6ContactController.newsletterList}"/>
                            </h:selectManyListbox>
                        </h:panelGroup>
                        <h:panelGroup/>
                        <h:panelGroup>
                            <h:panelGrid columns="1">
                                <h:panelGroup>
                                    <h:outputLabel for="notifyme"
                        value="Would you like to receive other promotional email?"/>
                                    <h:selectBooleanCheckbox id="notifyme"
     value="#{ch6ContactController.current.receiveNotifications}"/>
                                </h:panelGroup>
                                <h:panelGroup/>
                                <hr/>
                                <h:panelGroup/>
                                <h:panelGroup>
                                    <h:outputLabel for="notificationTypes"
                        value="What type of notifications are you interested in recieving?"/>
                                    <br/>
                                    <h:selectManyCheckbox id="notifyTypes"
value="#{ch6ContactController.current.notificationType}">
                                        <f:selectItems value="#{ch6ContactController.notificationTypes}"/>
                                    </h:selectManyCheckbox>
                                </h:panelGroup>
                            </h:panelGrid>
                        </h:panelGroup>
                    </h:panelGrid>
                    <hr/>
                    <br/>

                    <h:commandButton id="contactSubmit"
                        action="#{ch6ContactController.subscribe}" value="Save"/>
                    <h:panelGrid  columns="2" width="400px;">
                        <h:commandLink id="manageAccount"
                         action="#{ch6ContactController.manage}" value="Manage Subscription"/>

                        <h:outputLink id="homeLink" value="home.xhtml">Home</h:outputLink>
                    </h:panelGrid>
                </h:form>
            </ui:define>
        </ui:composition>

    </body>
</html>
Once the input components have been “Ajaxified” by embedding the f:ajax tag within them, then tabbing through the fields (causing the onBlur event to occur for each field) will result in a form that resembles Figure 6-1.
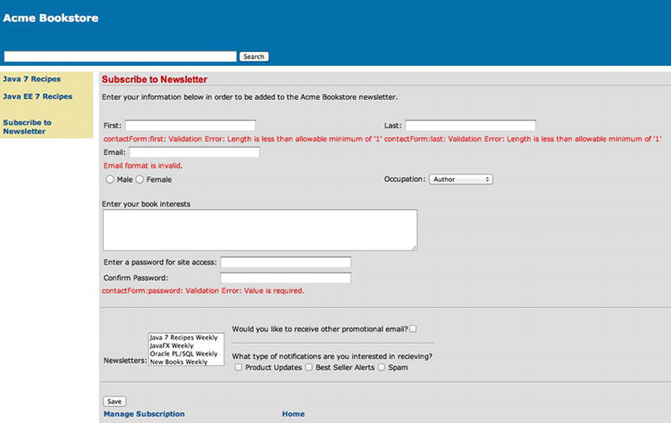
Figure 6-1. Ajax validation using the f:ajax tag
How It Works
In releases of JSF prior to 2.0, performing immediate validation required the manual coding of JavaScript or a third-party component library. The f:ajax tag was added to the JSF arsenal with the release of 2.0, bringing with it the power to easily add immediate validation (and other asynchronous processes) to JSF views using standard or third-party components. The f:ajax tag can be embedded within any JSF input component in order to immediately enhance the component, adding Ajax capabilities to it. This provides many benefits to the developer in that there is no longer a need to manually code JavaScript to perform client-side validation. It also allows validation to occur on the server (in Java code within a JSF managed bean) asynchronously, providing seamless interaction between the client and server and generating an immediate response to the client. The result is a rich Internet application that behaves in much the same manner as a native desktop application. Validation can now occur instantaneously in front of an end user’s eyes without the need to perform several page submits in order to repair all of the possible issues.
To use the f:ajax tag, simply embed it within any JSF component. There are a number of attributes that can be specified with f:ajax, as described in Table 6-1. If an attribute is not specified, then the default values are substituted. It is quite possible to include no attributes in an f:ajax tag, and if this is done, then the default attribute values for the component in which the f:ajax tag is embedded will take effect.
Table 6-1. f:ajax Tag Attributes
| Attribute | Description |
|---|---|
| delay | A value that is specified in milliseconds, corresponding to the amount of delay between sending Ajax requests from the client-side queue to the server. The value none can be specified to disable this feature. |
| disabled | Boolean value indicating the tag status. A value of true indicates that the Ajax behavior should not be rendered, and a value of false indicates that the Ajax behavior should be rendered. The default value is false. |
| event | A String that identifies the type of event to which the Ajax action shall apply. If specified, it must be one of the supported component events. The default value is the event that triggers the Ajax request for the parent component of the Ajax behavior. The default event is action for ActionSource components and is valueChange for EditableValueHolder components. |
| execute | A collection that identifies a list of components to be executed on the server. A space-delimited String of component identifiers can be specified as the value for this attribute, or a ValueExpression (JSF EL) can be specified. The default value is @this, meaning the parent component of the Ajax behavior. |
| immediate | Boolean value indicating whether the input values are processed early in the life cycle. If true, then the values are processed, and their corresponding events will be broadcast during the Apply Request Values phase; otherwise, the events will be broadcast during the Invoke Applications phase. |
| listener | Name of the listener method that is called when an AjaxBehaviorEvent has been broadcast for the listener. |
| onevent | Name of the JavaScript function used to handle UI events. |
| onerror | Name of the JavaScript function used to handle errors. |
| render | Collection that identifies the components to be rendered on the client when the Ajax behavior is complete. A space-delimited String of component identifiers can be specified as the value for this attribute, or a ValueExpression (JSF EL) can be specified. The default value is @none, meaning that no components will be rendered when the Ajax behavior is complete. |
The execute and render attributes of the f:ajax tag can specify a number of keywords to indicate which components are executed on the server for the Ajax behavior or which are rendered again after the Ajax behavior is complete, respectively. Table 6-2 lists the values that can be specified for both of these two attributes.
Table 6-2. f:ajax Tag execute and render Attribute Values
| Attribute Value | Description |
|---|---|
| @all | All component identifiers |
| @form | The form that encloses the component |
| @none | No component identifiers (default for render attribute) |
| @this | The Ajax behavior parent component |
| Component IDs | Space-separated list of individual component identifiers |
| JSF EL | Expression that resolves to a collection of string identifiers |
In the example for this recipe, an f:ajax tag has been embedded inside many of the input components within the form. Each of those components has been Ajaxified, in that the data entered as the value for the components will now have the ability to be processed using the JavaScript resource library associated with JSF. Behind the scenes, the jsf.ajax.request() method of the JavaScript resource library will collect the data for each component that has been Ajaxified and post the request to the JavaServer Faces life cycle. In effect, the data is sent to the managed bean property without submitting the page in a traditional fashion. Notice that the event attribute specifies a JavaScript event that will be used to trigger the Ajax behavior. The JavaScript events that can be specified for the event attribute are those same JavaScript event attributes that are available on the parent component’s tag, but the on prefix has been removed. For instance, if you want to perform an Ajax behavior on an inputText component when it loses focus, you would specify blur for the f:ajax event attribute rather than onBlur. Applying this concept to the example, when a user leaves the first or last name field, they will be validated using their associated f:validate tags immediately because the f:ajax tag has been embedded in them and the event on the f:ajax tag is specified as blur. When the Ajax behavior (the validation in this case) is complete, then the components whose identifiers are specified in the f:ajax render attribute will be re-rendered. In the case of the first and last inputText fields, their associated message components will be re-rendered, displaying any errors that may have occurred during validation.
UTILIZING AN ACTION LISTENER
It is possible to bind an action listener to an f:ajax tag so that when the invoking action occurs, the listener method is invoked. Why would you want to bind an action listener? There are any reasons to do so. For instance, suppose you wanted to capture the text that a user is typing into a text field. You could do so by binding an action method within a managed bean to the listener attribute of an inputText field’s corresponding f:ajax tag and then obtaining the current component’s value from the AjaxBehaviorEvent object within the action method. For instance, suppose that you wanted to test a password for complexity and display a corresponding message indicating whether a password was strong enough. The inputSecret component for the password could be modified to include an f:ajax tag with an event specification of keyup and a listener specified as #{ch6ContactController.passwordStrength}, such as the following listing demonstrates.
Within the view:
<h:outputLabel for="password" value="Enter a password for site access: "/>
<h:inputSecret id="password" size="40"
       value="#{ch6ContactController.current.password}">
    <f:validateRequired/>
    <f:ajax event="keyup" listener="#{ch6ContactController.passwordStrength}"

          render="passwordStrengthMessage"/>
</h:inputSecret>
...
Within the managed bean:
public void passwordStrength(AjaxBehaviorEvent event){
        UIInput password = (UIInput) event.getComponent();
        boolean isStrong = false;
        String input = password.getValue().toString();

        if(input.matches("((?=.*\d)(?=.*[a-z])(?=.*[A-Z]).{6,})")) {
            isStrong = true;
        }

        if(isStrong == true){
            setPasswordStrengthMessage("Password is strong");
        } else {
            setPasswordStrengthMessage("Password is weak");
        }
    }
The code in this example would create a listener event that, when a user types a value, would check the present entry to determine whether it met the given criteria for a secure password. A message would then be displayed to the user to let them know whether the password was secure.
Using the f:ajax tag makes it easy to add Ajax behavior to a JSF component. Before the f:ajax tag, special third-party JavaScript libraries were often used to incorporate similar behaviors within JSF views. f:ajax adds the benefit of allowing the developer to choose between using Ajax behaviors, without the need for coding a single line of JavaScript.
6-2. Submitting Pages Without Page Reloads
Problem
You want to enable your input form to have the ability to submit input fields for processing without reloading the page. In essence, you want your web application input form to react more like that of a desktop application rather than navigating from page to page in order to process data.
Solution
Embed an <f:ajax/> tag within the command component in the view so that the managed bean action is invoked without the page being submitted. Enable f:ajax to update the messages component in the view so that any errors or success messages that result from the processing can be displayed. In this example, the newsletter subscription page for the Acme Bookstore will be changed so that the form is submitted using Ajax, and the commandLink component is processed without submitting the form in a traditional manner. The following excerpt from the newsletter subscription form sources from recipe06_02.xhtml, which demonstrates how to add Ajax functionality to the action components within the form:
<h:commandButton id="contactSubmit" action="#{ch6ContactController.subscribe}"
                value="Save">
    <f:ajax event="action" execute="@form" render="@all"/>
</h:commandButton>
<h:panelGrid  columns="2" width="400px;">
When the button or link is clicked, JavaScript will be used in the background to process the request so that the results will be displayed immediately without needing to refresh the page.
How It Works
The user experience for web applications has traditionally involved a point, click, and page refresh mantra. While this type of experience is not particularly a bad one, it is not as nice as the immediate response that is oftentimes presented within a native desktop application. The use of Ajax within web applications has helped create a more unified user experience, allowing a web application the ability to produce an “immediate” response much like that of a native desktop application. Field validation (covered in Recipe 6-1) is a great candidate for immediate feedback, but another area where immediate responses work well is when forms are being submitted.
The f:ajax tag can be embedded in an action component in order to invoke the corresponding action method using JavaScript behind the scenes. The f:ajax tag contains a number of attributes, covered in Table 6-1 (see Recipe 6-1), that can be used to invoke Ajax behavior given a specified event and re-render view components when that Ajax behavior is complete. Please refer to Table 6-2 to see the values that can be specified for the execute and render attributes of the f:ajax tag.
In the example for this recipe, the commandButton component with an identifier of contactSubmit contains an f:ajax tag that specifies the event attribute as action, the execute attribute as @form, and the render attribute as @all. This means that when the button is invoked, the ch6ContactController.subscribe() method will be called asynchronously using JavaScript, and it will send all the input component values from the form to the server (managed bean) for processing. When the Ajax behavior (subscribe method) is complete, all of the components within the view will be re-rendered. By re-rendering all the components in the view, this allows those message components to display any messages that have been queued up as a result of failed validation or a successful form submission. It is possible to process or render only specified components during an Ajax behavior; to learn more about doing so, please see Recipe 6-3.
![]() Note Note that the event attribute has a default value of action when the f:ajax tag is embedded within a UICommand component. However, it is specified in the code for this example for consistency.
Note Note that the event attribute has a default value of action when the f:ajax tag is embedded within a UICommand component. However, it is specified in the code for this example for consistency.
Adding Ajax actions to a page has been simplified since the addition of the f:ajax tag with the 2.0 release of JSF. Validation and page actions are easy to process asynchronously by utilizing a single tag, f:ajax, to incorporate Ajax functionality into any JSF component.
6-3. Making Partial-Page Updates
Problem
You want to execute only a section of a page using an Ajax event and then render the corresponding section’s components when the Ajax behavior is complete.
Solution
Use the f:ajax tag to add Ajax functionality to the components that you want to execute and render when the Ajax behavior is completed. Specify only the component identifiers corresponding to those components, or @form, @this, or one of the other execute keywords, for the f:ajax tag execute attribute. Likewise, specify only the component identifiers for the corresponding message components within the render attribute.
Suppose that the Acme Bookstore wants to execute the submission of the newsletter subscription form values and update the form’s global message only when the submission is complete. The following commandButton component would execute only the form in which it is placed and the component corresponding to the identifier newsletterSubscriptionMsgs:
<h:commandButton id="contactSubmit" action="#{ch6ContactController.subscribe}" value="Save">
    <f:ajax event="action" execute="@form" render="newsletterSubscriptionMsgs"/>
</h:commandButton>
When the button is clicked, the current form component values will be processed with the request, and the ContactController managed bean’s subscribe method will be invoked. Once the subscribe method is complete, the component within the form that contains an identifier of newsletterSubscriptionMsgs (in this case, a messages component) will be re-rendered.
![]() Note In the case of the newsletter subscription form for the Acme Bookstore, a partial-page render upon completion is a bad idea. This is because the form will never be submitted if the values within the form do not validate correctly. In this case, if some of the form values do not validate correctly, then nothing will be displayed on the page when the Save button is clicked because the subscribe method will never be invoked. If the f:ajax tag’s render attribute is set to @all, then all of the components that failed validation will have a corresponding error message that is displayed. This example should demonstrate how important it is to process the appropriate portions of the page for the result you are trying to achieve.
Note In the case of the newsletter subscription form for the Acme Bookstore, a partial-page render upon completion is a bad idea. This is because the form will never be submitted if the values within the form do not validate correctly. In this case, if some of the form values do not validate correctly, then nothing will be displayed on the page when the Save button is clicked because the subscribe method will never be invoked. If the f:ajax tag’s render attribute is set to @all, then all of the components that failed validation will have a corresponding error message that is displayed. This example should demonstrate how important it is to process the appropriate portions of the page for the result you are trying to achieve.
How It Works
The f:ajax tag makes it simple to perform partial-page updates. To do so, specify the identifiers for those components that you want to execute for the f:ajax execute attribute. As mentioned in the example for this recipe, suppose you want to execute only a portion of a page, rather than all of the components on the given page. You could do so by identifying the components that you want to execute within the view, specifying them within the f:ajax execute attribute, and then rendering the corresponding message components when the Ajax behavior was completed. If nothing is specified for an f:ajax execute attribute, then the f:ajax tag must be embedded inside a component, in which case the parent component would be executed. Such is the default behavior for the f:ajax execute attribute. In the example, the execute attribute of the f:ajax tag specifies the @form keyword, rather than a specific component id. A number of keywords can be specified for both the execute and render attributes of the f:ajax tag. Those keywords are listed in Table 6-2, which describes that the @form keyword indicates that all components within the same form as the given f:ajax tag will be executed when the Ajax behavior occurs. Therefore, all fields within the newsletter subscription form in this example will be sent to the managed bean for processing when the button is clicked.
The same holds true for the render attribute, and once the Ajax behavior has completed, any component specified for the render attribute of the f:ajax tag will be re-rendered. Thus, if a validation occurs when a component is being processed because of the result of an f:ajax method call, a corresponding validation failure message can be displayed on the page after the validation fails. Any component can be rendered again, and the same keywords that can be specified for the execute attribute can also be used for the render attribute. In the example, the newsletterSubscriptonMsgs component is rendered once the Ajax behavior is completed.
Partial-page updates, a common use of the f:ajax tag, are easy to implement and can enhance the functionality and usability of an application. Later in this chapter you will learn how to utilize some third-party component libraries to perform partial-page updates, creating highly usable interfaces for editing data and the like.
6-4. Applying Ajax Functionality to a Group of Components
Problem
You want to apply Ajax functionality to a group of input components, rather than to each component separately.
Solution
Enclose any components to which you want to apply Ajax functionality within an f:ajax tag. The f:ajax tag can be the parent to one or more JSF components, in which case each of the child components inherits the given Ajax behavior. Applying Ajax functionality to multiple components is demonstrated in the following code listing. In the example, the newsletter subscription view of the Acme Bookstore application is adjusted so that each of the inputText components that contains a validator is enclosed by a single f:ajax tag. Given that each of the inputText components is embodied within the same f:ajax tag, the f:ajax render attribute has been set to specify the message component for each of the corresponding inputText fields in the group.
<?xml version='1.0' encoding='UTF-8' ?>
<!--
Book:  Java EE 7 Recipes
Recipe: 6-4
Author: J. Juneau
-->
<!DOCTYPE html PUBLIC "-//W3C//DTD XHTML 1.0 Transitional//EN""http://www.w3.org/TR/xhtml1/DTD/xhtml1-transitional.dtd">
<html xmlns="http://www.w3.org/1999/xhtml"
      xmlns:ui="http://xmlns.jcp.org/jsf/facelets"
      xmlns:f="http://xmlns.jcp.org/jsf/core"
      xmlns:h="http://xmlns.jcp.org/jsf/html">

    <body>

        <ui:composition template="layout/custom_template_search.xhtml">
            <ui:define name="content">
                <h:form id="contactForm">
                    <h1>Subscribe to Newsletter</h1>
                    <p>
                        <h:outputText id="newsletterSubscriptionDesc"
                                      value="#{ch6ContactController.newsletterDescription}"/>
                    </p>

                    <br/>
                    <h:messages id="newsletterSubscriptionMsgs" globalOnly="true"
     errorStyle="color: red" infoStyle="color: green"/>
                    <br/>
                    <f:ajax event="blur" render="firstError lastError emailError genderError
     passwordError passwordConfirmError">
                    <h:panelGrid columns="2" bgcolor="" border="0">
                        <h:panelGroup>
                            <h:outputLabel for="first" value="First: "/>
                            <h:inputText id="first" size="40"
     value="#{ch6ContactController.current.first}">
                                <f:validateLength minimum="1" maximum="40"/>

                            </h:inputText>
                        </h:panelGroup>
                        <h:panelGroup>

                            <h:outputLabel for="last" value="Last: "/>
                            <h:inputText id="last" size="40"
        value="#{ch6ContactController.current.last}">
                                <f:validateLength minimum="1" maximum="40"/>

                            </h:inputText>
                        </h:panelGroup>

                        <h:message id="firstError"
                                   for="first"
                                   errorStyle="color:red"/>

                        <h:message id="lastError"
                                   for="last"
                                   errorStyle="color:red"/>
                        <h:panelGroup>
                            <h:outputLabel for="email" value="Email: "/>
                            <h:inputText id="email" size="40"
        value="#{ch6ContactController.current.email}">

                            </h:inputText>
                        </h:panelGroup>
                        <h:panelGroup/>
                        <h:message id="emailError"
                                   for="email"
                                   errorStyle="color:red"/>
                        <h:panelGroup/>

                        <h:selectOneRadio title="Gender" id="gender"
        value="#{ch6ContactController.current.gender}">
                            <f:selectItem  itemValue="M" itemLabel="Male"/>
                            <f:selectItem itemValue="F" itemLabel="Female"/>
                        </h:selectOneRadio>
                        <h:panelGroup>
                            <h:outputLabel for="occupation" value="Occupation: "/>
                            <h:selectOneMenu id="occupation"
        Value="#{ch6ContactController.current.occupation}">
                                <f:selectItems value="#{ch6ContactController.occupationList}"/>
                            </h:selectOneMenu>
                        </h:panelGroup>
                        <h:message id="genderError"
                                   for="gender"
                                   errorStyle="color:red"/>

                    </h:panelGrid>
                    <br/>
                    <h:outputLabel for="description" value="Enter your book interests"/>
                    <br/>
                    <h:inputTextarea id="description" rows="5" cols="75"
    value="#{ch6ContactController.current.description}"/>

                    <br/>
                    <h:panelGrid columns="2">
                        <h:outputLabel for="password" value="Enter a password for site access: "/>
                        <h:inputSecret id="password" size="40"                         value="#{ch6ContactController.current.password}">
                            <f:validateRequired/>
                            <f:ajax event="keyup" listener="#{ch6ContactController.passwordStrength}"
render="passwordStrengthMessage"/>
                        </h:inputSecret>

                        <h:outputLabel for="passwordConfirm" value="Confirm Password: "/>
                        <h:inputSecret id="passwordConfirm" size="40"
      value="#{ch6ContactController.passwordConfirm}"
                                       validator="#{ch6ContactController.validatePassword}">

                        </h:inputSecret>
                    </h:panelGrid>
                    <h:panelGroup>
                        <h:outputText id="passwordStrengthMessage"
       value="#{ch6ContactController.passwordStrengthMessage}"/>
                        <h:message id="passwordError"
                                for="password"
                                style="color:red"/>
                    </h:panelGroup>
                    <br/>
                    <h:message id="passwordConfirmError"
                               for="passwordConfirm"
                               style="color:red"/>
                    <br/>
                    <hr/>
                    <br/>

                    <h:panelGrid columns="3">
                        <h:panelGroup>
                            <h:outputLabel for="newsletterList" value="Newsletters:" style=" "/>
                            <h:selectManyListbox id="newsletterList"
    value="#{ch6ContactController.current.newsletterList}">
                                <f:selectItems value="#{ch6ContactController.newsletterList}"/>
                            </h:selectManyListbox>
                        </h:panelGroup>
                        <h:panelGroup/>
                        <h:panelGroup>
                            <h:panelGrid columns="1">
                                <h:panelGroup>
                                    <h:outputLabel for="notifyme" value="Would you like to receive
 other promotional email?"/>
                                    <h:selectBooleanCheckbox id="notifyme"
          value="#{ch6ContactController.current.receiveNotifications}"/>
                                </h:panelGroup>
                                <h:panelGroup/>
                                <hr/>
                                <h:panelGroup/>
                                <h:panelGroup>
                                    <h:outputLabel for="notificationTypes" value="What type of
    notifications are you interested in recieving?"/>
                                    <br/>
                                    <h:selectManyCheckbox id="notifyTypes"
    value="#{ch6ContactController.current.notificationType}">
                                        <f:selectItems value="#{ch6ContactController.
    notificationTypes}"/>
                                    </h:selectManyCheckbox>
                                </h:panelGroup>
                            </h:panelGrid>
                        </h:panelGroup>
                    </h:panelGrid>
                    <hr/>
                    <br/>
                    </f:ajax>
                    <h:commandButton id="contactSubmit" action="#{ch6ContactController.subscribe}"
   value="Save">
                        <f:ajax event="action" execute="@form" render="@all"/>
                    </h:commandButton>
                    <h:panelGrid  columns="2" width="400px;">
                        <h:commandLink id="manageAccount" action="#{ch6ContactController.manage}"
   value="Manage Subscription">
                            <f:ajax event="action" execute="@this" render="@all"/>
                        </h:commandLink>
                        <h:outputLink id="homeLink" value="home.xhtml">Home</h:outputLink>
                    </h:panelGrid>
                </h:form>
            </ui:define>
        </ui:composition>

    </body>
</html>
When the page is rendered, each component will react separately given their associated validations. That is, if validation fails for one component, only the message component that corresponds with the component failing validation will be displayed, although each component identified within the f:ajax render attribute will be re-rendered.
![]() Note As a result of specifying a global f:ajax tag, the password component can now execute two Ajax requests. One of the Ajax requests for the field is responsible for validating to ensure that the field is not blank, and the other is responsible for ensuring that the given password String is strong.
Note As a result of specifying a global f:ajax tag, the password component can now execute two Ajax requests. One of the Ajax requests for the field is responsible for validating to ensure that the field is not blank, and the other is responsible for ensuring that the given password String is strong.
How It Works
Grouping multiple components with the same Ajax behavior has its benefits. For one, if the behavior needs to be adjusted for any reason, one change can now be made to the Ajax behavior, and each of the components in the group can benefit from the single adjustment. However, the f:ajax tag is smart enough to enable each component to still utilize separate functionality, such as validation or actions, so each can still have their own customized Ajax behavior. To group components under a single f:ajax tag, they must be added to the view as subelements of the f:ajax tag. That is, any child components must be enclosed between the opening and closing f:ajax tags. All of the enclosed components will then use Ajax to send requests to the server using JavaScript in an asynchronous fashion.
In the example for this recipe, a handful of the inputText components within the newsletter subscription view have been embodied inside an f:ajax tag so that their values will be validated using server-side bean validation when they lose focus. The f:ajax tag that is used to group the components has an event attribute set to blur, and its render attribute contains the String-based identifier for each of the message components corresponding to the components that are included in the group. The space-separated list of component ids is used to re-render each of the message components when the Ajax behavior is complete, displaying any errors that occur as a result of the validation.
6-5. Custom Processing of Ajax Functionality
Problem
You want to customize the Ajax processing for JSF components within a view in your application.
Solution
Write the JavaScript that will be used for processing your request, and utilize the jsf.ajax.request() function along with one of the standard JavaScript event-handling attributes for a JSF component. The following example is the JSF view for the newsletter subscription page for the Acme Bookstore application. All of the f:ajax tags that were previously used for validating inputText fields (Recipe 6-1) have been removed, and the onblur attribute of each inputText component has been set to use the jsf.ajax.request() method in order to Ajaxify the component. The following excerpt is taken from the view named recipe06_05.xhtml, representing the updated newsletter subscription JSF view:
...
<h:outputScript name="jsf.js" library="javax.faces" target="head"/>
<h1>Subscribe to Newsletter</h1>
<p>
    <h:outputText id="newsletterSubscriptionDesc"
                  value="#{ch6ContactController.newsletterDescription}"/>
</p>

<br/>
<h:messages id="newsletterSubscriptionMsgs" globalOnly="true"
      errorStyle="color: red" infoStyle="color: green"/>
<br/>

<h:panelGrid columns="2" bgcolor="" border="0">
    <h:panelGroup>
        <h:outputLabel for="first" value="First: "/>
        <h:inputText id="first" size="40"         value="#{ch6ContactController.current.first}"
                     onblur="jsf.ajax.request(this, event, {execute: 'first', render: 'firstError'});
             return false;">
            <f:validateLength minimum="1" maximum="40"/>
        </h:inputText>
    </h:panelGroup>
    <h:panelGroup>
        <h:outputLabel for="last" value="Last: "/>
        <h:inputText id="last" size="40"
 value="#{ch6ContactController.current.last}"
                     onblur="jsf.ajax.request(this, event, {execute: 'last', render: 'lastError'});
             return false;">
            <f:validateLength minimum="1" maximum="40"/>
        </h:inputText>
    </h:panelGroup>

    <h:message id="firstError"
               for="first"
               errorStyle="color:red"/>

    <h:message id="lastError"
               for="last"
               errorStyle="color:red"/>
    <h:panelGroup>
        <h:outputLabel for="email" value="Email: "/>
        <h:inputText id="email" size="40"         value="#{ch6ContactController.current.email}"
                     onblur="jsf.ajax.request(this, event, {execute: 'email', render: 'emailError'});
             return false;"/>
    </h:panelGroup>
    <h:panelGroup/>
    <h:message id="emailError"
               for="email"
               errorStyle="color:red"/>
    <h:panelGroup/>
...
Using this technique, the inputText components that specify Ajax behavior for the onblur event will asynchronously have their values validated when they lose focus. If any custom JavaScript code needs to be used, it can be added to the same inline JavaScript call to jsf.ajax.request().
![]() Note Method calls cannot be made using the jsf.ajax.request() technique, so it is not possible to invoke a listener explicitly with the Ajax request.
Note Method calls cannot be made using the jsf.ajax.request() technique, so it is not possible to invoke a listener explicitly with the Ajax request.
How It Works
The JavaScript API method jsf.ajax.request(), a JSF 2.x feature, can be accessed directly by a Facelets application, enabling a developer to have slightly more control than using the f:ajax tag. Behind the scenes, the f:ajax tag is converted into a call to jsf.ajax.request(), sending the parameters as specified via the tag’s attributes. To use this technique, you must include the jsf.js library within the view. A JSF outputScript tag should be included in the view, specifying jsf.js as the script name and javax.faces as the library. The jsf.js script within this example will be placed in the head of the view, which is done by specifying head for the target attribute of the outputScript tag. The following excerpt from the example demonstrates what the tag should look like:
<h:outputScript name="jsf.js" library="javax.faces" target="head"/>
![]() Note To avoid nested IDs, it is a good idea to specify the h:form attribute of prependId="false" when using jsf.ajax.request() manually. For instance, the form tag should look as follows:
Note To avoid nested IDs, it is a good idea to specify the h:form attribute of prependId="false" when using jsf.ajax.request() manually. For instance, the form tag should look as follows:
The jsf.ajax.request() method can be called inline, as is the case with the example for this recipe, and it can be invoked from within any of the JavaScript event attributes of a given component. The format for calling the JavaScript method is as follows:
jsf.ajax.request(component, event,{execute:'id or keyword', render:'id or keyword'});
Usually when the request is made using an inline call, the this keyword is specified for the first parameter, signifying that the current component should be passed. The event keyword is passed as the second parameter, and it passes with it the current event that is occurring against the component. Lastly, a map of name-value pairs is passed, specifying the execute and render attributes along with the component identifiers or keywords that should be executed and rendered after the execution completes, respectively. For a list of the valid keywords that can be used, please refer to Table 6-2.
![]() Note You can also utilize the jsf.ajax.request() method from within a managed bean by specifying the @ResourceDependency annotation as follows:
Note You can also utilize the jsf.ajax.request() method from within a managed bean by specifying the @ResourceDependency annotation as follows:
The majority of developers will never need to utilize a manual call to the JSF JavaScript API. However, if the need ever arises, calling the jsf.ajax.request() method is fairly straightforward.
6-6. Custom Conversion of Input Values
You want to automatically convert the values of some input text so that it better conforms to the needs of your application. However, the conversion that you want to perform is outside the scope of those conversions that are available via the JSF standard converter library.
Solution
Create a custom converter class containing the logic that is required for converting the values, and then apply that converter to the inputText components as needed. For this example, the Acme Bookstore has decided that it would like all first and last names in the subscriber list to appear in uppercase. The store would also like all e-mail addresses in lowercase. Therefore, a custom converter will be developed to perform the String conversion automatically behind the scenes.
The following listing is for the conversion class, LowerConverter, which accepts values from registered components and returns a formatted String value in lowercase:
import javax.faces.component.UIComponent;
import javax.faces.context.FacesContext;
import javax.faces.convert.Converter;
import javax.faces.convert.FacesConverter;

/**
 *
 * @author juneau
 */
@FacesConverter("org.javaeerecipes.converter.LowerConverter")
public class LowerConverter implements Converter {

    @Override
    public Object getAsObject(FacesContext context, UIComponent component,
String value) {
        // Return String value in lower case
        return value.toString().toLowerCase();
    }

    @Override
    public String getAsString(FacesContext context, UIComponent component,
Object value) {

        // Return String value
        return value.toString().toLowerCase();

    }
}
The code that is used to create the uppercase converter is very similar, except that the getAsObject and getAsString methods make use of different String functions to return the uppercase values. The sources reside within a class named org.javaeerecipes.chapter6.converter.UpperConverter, and they are nearly identical to the LowerConverter class with the exception of calling the toUpperCase() method, rather than toLowerCase().
Now that the conversion classes have been built, it is time to apply the converters to the JSF components where applicable. The following excerpt is taken from the newsletter subscription page of the Acme Bookstore application, and it demonstrates the use of the converters for the first, last, and e-mail input components.
...
<h:panelGroup>
    <h:outputLabel for="first" value="First: "/>
    <h:inputText id="first" size="40" value="#{ch6ContactController.current.first}">
        <f:validateLength minimum="1" maximum="40"/>
        <f:converter converterId="org.javaeerecipes.converter.UpperConverter"/>
    </h:inputText>
</h:panelGroup>
<h:panelGroup>

    <h:outputLabel for="last" value="Last: "/>
    <h:inputText id="last" size="40" value="#{ch6ContactController.current.last}">
        <f:validateLength minimum="1" maximum="40"/>
        <f:converter converterId="org.javaeerecipes.converter.UpperConverter"/>
    </h:inputText>
</h:panelGroup>

<h:message id="firstError"
            for="first"
            errorStyle="color:red"/>

<h:message id="lastError"
            for="last"
            errorStyle="color:red"/>
<h:panelGroup>
    <h:outputLabel for="email" value="Email: "/>
    <h:inputText id="email" size="40" value="#{ch6ContactController.current.email}">
        <f:converter converterId="org.javaeerecipes.converter.LowerConverter"/>
    </h:inputText>
</h:panelGroup>
<h:panelGroup/>
<h:message id="emailError"
            for="email"
            errorStyle="color:red"/>
<h:panelGroup/>
...
Now if a user types in lowercase for the first or last name or in uppercase for the e-mail field, the values will automatically be converted during the Apply Request Values phase.
How It Works
How many times have you seen an application’s data become unmanageable because of inconsistencies? Maybe you have seen some records where a particular field contains a value in lowercase and other records contain the same value in uppercase…maybe even a mixture of cases! Applying conversion to data before it is persisted (usually in a database) is the best way to ensure data integrity. As you may have read about in Recipe 3-13, the JSF framework ships with a library of standard converters that can be applied to JSF components in order to convert data into a manageable format. While the standard converters will do the job for most applications, there may be situations when custom converters are needed in order to manipulate values into a manageable format for your application. In such cases, JSF custom converter classes can be used to develop the custom conversion logic; they are very easy to develop and apply to JSF components with minimal configuration.
![]() Note Beginning with JSF 2.2, converters and validators can be used as injection targets. For information regarding injection of classes, please see Chapter 12.
Note Beginning with JSF 2.2, converters and validators can be used as injection targets. For information regarding injection of classes, please see Chapter 12.
To develop a custom converter class, you must implement the javax.faces.convert.Converter interface, overriding two methods: getAsString and getAsObject. The getAsString method should accept three parameters: FacesContext, UIComponent, and a String. It should perform the desired conversion and return the converted value in String format. In the case of the LowerConverter example, simply applying toLowerCase() to the String and returning it is all the functionality you require. The getAsObject method should accept the same parameters as the getAsString method, and it should also apply the desired conversion and then return an object of any type. In the case of LowerConverter, you return a String in lowercase, just like the getAsString method. If you follow along and look through the same methods in UpperConverter, the opposite conversion is applied, returning an uppercase String.
To make a converter class available for use within a view, you must annotate the class by applying @FacesConverter to the class declaration. Pass a String into the annotation, being the String-based fully qualified name of the converter class. The UpperConverter @FacesConverter annotation reads as follows:
@FacesConverter("org.javaeerecipes.converter.UpperConverter")
Once the converter class has been written and annotated as required, the converter can be used just like a standard JSF converter tag. The logic contained within the converter can be much more complex than that which is demonstrated in this example, and given the wide variety of prebuilt converters, a custom converter usually does contain complex conversion logic.
6-7. Maintaining Managed Bean Scopes for a Session
Problem
Your application has the requirement to maintain some managed beans that are retained for the entire session and others that are retained only for a single request.
Solution
Develop using the proper JSF managed bean scope that your situation requires. Managed beans utilize annotations to determine how long they are retained, so if your application needs to maintain state within a managed bean for a certain time frame, the scope can be set by annotating the managed bean class. In this example, you will be adding a shopping cart to the Acme Bookstore web site. The cart will be maintained for a browser session at this time, so if a book is added to the cart, then it will remain there until the current session ends. This recipe builds upon those concepts that were covered in Recipe 3-2 because it demonstrates how to use SessionScoped managed beans.
Let’s take a look at the JSF views that are being used for the shopping cart implementation. You are adding a couple of views to the application and modifying one view to accommodate the navigational buttons for the cart. The following excerpt is taken from the book view, which is displayed when a user clicks one of the book titles from the left menu. You are adding buttons to the bottom of the page to add the book to the cart and to view the current cart contents. To view the sources in entirety, please see the view located within the sources: web/chapter06/book.xhtml.
...
<h:panelGrid columns="2" width="45%">
    <h:commandButton id="addToCart" action="#{ch6CartController.addToCart}"
                         value="Add to Cart">
                            <f:ajax render="shoppingCartMsgs"/>
    </h:commandButton>
    <h:commandButton id="viewCart" action="#{ch6CartController.viewCart}"
                        value="View Cart">
    </h:commandButton>
</h:panelGrid>
...
The two buttons that have been added to the book view reference a new class, referred to as ch6CartController, although the name of the class is CartController. The CartController class is a JSF managed bean that contains the shopping cart implementation. The new buttons in the book view are used to add the current book title to the shopping cart and to view the cart. At this time, the shopping cart is a list of Item objects, and each Item object contains a Book object and a quantity. The sources for the Item class can be seen in the next listing:
package org.javaeerecipes.chapter06;

/**
 * Object to hold a single cart item
 * @author juneau
 */
public class Item implements java.io.Serializable {
    private Book book = null;
    private int quantity = 0;

    public Item(Book book, int qty){
        this.book = book;
        this.quantity = qty;
    }

    /**
     * @return the book
     */
    public Book getBook() {
        return book;
    }

    /**
     * @param book the book to set
     */
    public void setBook(Book book) {
        this.book = book;
    }

    /**
     * @return the quantity
     */
    public int getQuantity() {
        return quantity;
    }

    /**
     * @param quantity the quantity to set
     */
    public void setQuantity(int quantity) {
        this.quantity = quantity;
    }

}
For the new shopping cart implementation, the Book class has been updated to include a description field; to see the sources for the Book class, please refer to src/org/javaeerecipes/chapter06/Book.java. The most important class in this example is the CartController managed bean. The sources for this class are listed here:
package org.javaeerecipes.chapter06;

import java.io.Serializable;
import javax.faces.bean.ManagedBean;
import javax.faces.application.FacesMessage;
import javax.faces.bean.SessionScoped;
import javax.faces.context.FacesContext;
import javax.inject.Inject;

/**
 * Chapter 6
 *
 * @author juneau
 */
@SessionScoped
@ManagedBean(name = "ch6CartController")
public class CartController implements Serializable {

    private Cart cart = null;
    private Item currentBook = null;
    @Inject
    AuthorController authorController;

    /**
     * Creates a new instance of CartController
     */
    public CartController() {
    }

    public String addToCart() {
        if (getCart() == null) {
            cart = new Cart();
            getCart().addBook(authorController.getCurrentBook(), 1);
        } else {
            System.out.println("adding book to cart...");
            getCart().addBook(authorController.getCurrentBook(),
                    searchCart(authorController.getCurrentBook().getTitle())+1);
        }
        FacesMessage facesMsg = new FacesMessage(FacesMessage.SEVERITY_INFO,
                "Succesfully Updated Cart", null);
        FacesContext.getCurrentInstance().addMessage(null, facesMsg);
        return null;
    }

    /**
     * Determines if a book is already in the shopping cart
     * @param title
     * @return
     */
    public int searchCart(String title) {
        int count = 0;

        for (Item item : getCart().getBooks()) {
            if (item.getBook().getTitle().equals(title)) {
                count++;
            }
        }
        return count;
    }

    public String viewCart() {
        if (cart == null) {
            FacesMessage facesMsg = new FacesMessage(FacesMessage.SEVERITY_INFO,
                    "No books in cart...", null);
            FacesContext.getCurrentInstance().addMessage(null, facesMsg);
        }

        return "/chapter06/cart";
    }

    public String continueShopping(){
        return "/chapter06/book";
    }

    public String editItem(String title) {
        for (Item item : cart.getBooks()) {
            if (item.getBook().getTitle().equals(title)) {
                currentBook = item;
            }
        }
        return "/chapter06/reviewItem";

    }

    public String updateCart(String title) {
        Item foundItem = null;
        if (currentBook.getQuantity() == 0) {
            for (Item item : cart.getBooks()) {
                if (item.getBook().getTitle().equals(title)) {
                    foundItem = item;
                }
            }
        }
        cart.getBooks().remove(foundItem);
        FacesMessage facesMsg = new FacesMessage(FacesMessage.SEVERITY_INFO,
                "Succesfully Updated Cart", null);
        FacesContext.getCurrentInstance().addMessage(null, facesMsg);
        return "/chapter06/cart";
    }

    /**
     * @return the cart
     */
    public Cart getCart() {
        return cart;
    }

    /**
     * @param cart the cart to set
     */
    public void setCart(Cart cart) {
        this.cart = cart;
    }

    /**
     * @return the currentBook
     */
    public Item getCurrentBook() {
        return currentBook;
    }

    /**
     * @param currentBook the currentBook to set
     */
    public void setCurrentBook(Item currentBook) {
        this.currentBook = currentBook;
    }
}
There is another class that has been added to the application in order to accommodate the shopping cart. The Cart class is an object that is used to hold the List of books in the shopping cart. The listing for the Cart class is as follows:
public class Cart implements java.io.Serializable {
    // List containing book objects
    private List<Item> books = null;

    public Cart(){
        books = null;
    }

    /**
     * @return the books
     */
    public List <Item> getBooks() {
        return books;
    }

    /**
     * @param books the books to set
     */
    public void setBooks(List books) {
        this.books = books;
    }

    /**
     * Utility method to add a book and quantity
     */
    public void addBook(Book title, int qty){
        if (books == null){
            books = new ArrayList();
        }
        books.add(new Item(title, qty));
    }
}
Lastly, let’s take a look at the views that are used to display the contents of the shopping cart. The cart view is used to display the Cart object contents. The contents are displayed using a dataTable component, and each row in the table contains a commandLink that can be clicked to edit that item’s quantity. The cart.xhtml listing is as follows:
<?xml version="1.0" encoding="UTF-8"?>

<!DOCTYPE html PUBLIC "-//W3C//DTD XHTML 1.0 Strict//EN""http://www.w3.org/TR/xhtml1/DTD/xhtml1-strict.dtd">
<html xmlns="http://www.w3.org/1999/xhtml"
      xmlns:f="http://xmlns.jcp.org/jsf/core"
      xmlns:ui="http://xmlns.jcp.org/jsf/facelets"
      xmlns:h="http://xmlns.jcp.org/jsf/html">
    <h:head>
        <meta http-equiv="Content-Type" content="text/html; charset=UTF-8"/>
        <title>Acme Bookstore</title>
    </h:head>
    <h:body>
        <ui:composition template="./layout/custom_template_search.xhtml">
            <ui:define name="content">
                <h:form id="shoppingCartForm">
                    <h1>Shopping Cart Contents</h1>
                    <p>
                        Below are the contents of your cart.
                    </p>
                    <h:messages id="cartMessage" globalOnly="true"
                                errorStyle="color: red" infoStyle="color: green"/>
                    <br/>
                    <h:dataTable id="cartTable" value="#{ch6CartController.cart.books}" var="book"
                                 border="1" rendered="#{ch6CartController.cart.books ne null}">
                        <h:column id="title">
                            #{book.book.title}
                        </h:column>
                        <h:column id="quantity">
                            <h:inputText readonly="true" size="10" value="#{book.quantity}"/>
                        </h:column>
                        <h:column id="edit">
                            <h:commandLink id="editItem"
action="#{ch6CartController.editItem(book.book.title)}" value="Edit"/>
                        </h:column>

                    </h:dataTable>

                    <h:outputText id="emptyCart" value="No items currently in cart."
                                  rendered="#{ch6CartController.cart.books eq null}"/>
                    <br/>
                    <h:commandLink id="continueLink" action="#{ch6CartController.continueShopping}"
     value="Continue Shopping"/>
                </h:form>
            </ui:define>
        </ui:composition>
    </h:body>
</html>
The cart view will look like Figure 6-2 when it is rendered.
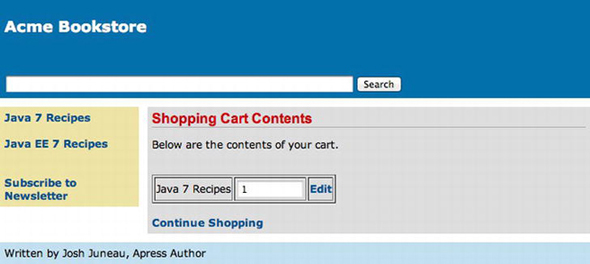
Figure 6-2. Shopping cart view
Finally, when the edit link is clicked, the current book selection quantity can be edited. The view for editing the shopping cart items is named reviewItem.xhtml, and the sources are as follows:
<?xml version='1.0' encoding='UTF-8' ?>
<!--
Book:  Java EE 7 Recipes
Author: J. Juneau
-->
<!DOCTYPE html PUBLIC "-//W3C//DTD XHTML 1.0 Transitional//EN""http://www.w3.org/TR/xhtml1/DTD/xhtml1-transitional.dtd">
<html xmlns="http://www.w3.org/1999/xhtml"
      xmlns:ui="http://xmlns.jcp.org/jsf/facelets"
      xmlns:f="http://xmlns.jcp.org/jsf/core"
      xmlns:h="http://xmlns.jcp.org/jsf/html">
    <h:head>
        <meta http-equiv="Content-Type" content="text/html; charset=UTF-8"/>
        <title>Acme Bookstore</title>
    </h:head>
    <h:body>
        <ui:composition template="./layout/custom_template_search.xhtml">

            <ui:define name="content">
                <h:form id="bookForm">
                    <h1>Review Item</h1>
                    <br/>
                    <h:messages id="reviewMsg" globalOnly="true"
                                errorStyle="color: red" infoStyle="color: green"/>
                    <br/>

                    #{ch6CartController.currentBook.book.title}
                    <br/>
                    <h:graphicImage    id="javarecipes" library="image"
                                       style="width: 100px; height: 120px"
                                       name="#{ch6CartController.currentBook.book.image}"/>
                    <br/>
                    <h:outputLabel for="quantity" value="Quantity: "/>
                    <h:inputText id="quantity"
                                 value="#{ch6CartController.currentBook.quantity}">

                    </h:inputText>
                    <br/>
                    <h:panelGrid columns="2">
                        <h:commandButton id="updateCart"
                       action="#{ch6CartController.updateCart
      (ch6CartController.currentBook.book.title)}"
                                         value="Update"/>

                        <h:commandButton id="viewCart" action="#{ch6CartController.viewCart}"
                                value="Back To Cart">
                        </h:commandButton>
                    </h:panelGrid>
                    <br/>
                    <br/>
                </h:form>
            </ui:define>
        </ui:composition>

    </h:body>
</html>
Figure 6-3 demonstrates what the item review form will look like once it is rendered.

Figure 6-3. Review cart item
![]() Note The session scope is not the best implementation for a shopping cart because it ties the managed bean contents to a particular browser session. What happens when the user needs to leave for a few minutes and then comes back to the browser to see that the session has expired or the browser has been closed? A more functional scope for handling this situation is the Conversation scope, which is covered in Chapter 12.
Note The session scope is not the best implementation for a shopping cart because it ties the managed bean contents to a particular browser session. What happens when the user needs to leave for a few minutes and then comes back to the browser to see that the session has expired or the browser has been closed? A more functional scope for handling this situation is the Conversation scope, which is covered in Chapter 12.
How It Works
Annotating the managed bean class with the scope annotation corresponding to how long you need your managed bean to remain valid controls scope. Typically, one or more JSF views belong to a corresponding managed bean controller. Scope refers to how long a JSF view value needs to be retained in a browser session. Sometimes the value can be reset after a request is placed, and other times the value needs to be retained across several pages. Table 3-1 in Chapter 3 lists the annotations.
![]() Note Be aware that two different sets of annotations are available for use with Java EE 7. To apply a scope to a JSF managed bean, be sure you import the correct annotation class, or your results may vary. Typically, the classes you need to be importing for managing the JSF managed bean scopes reside within the package javax.faces.bean.
Note Be aware that two different sets of annotations are available for use with Java EE 7. To apply a scope to a JSF managed bean, be sure you import the correct annotation class, or your results may vary. Typically, the classes you need to be importing for managing the JSF managed bean scopes reside within the package javax.faces.bean.
In this example, you will focus on the use of the @SessionScoped annotation. The shopping cart managed bean, CartController, has been annotated with @SessionScoped, so it becomes instantiated when a new session begins, and values that are stored within the bean are maintained throughout the client session. When someone visits the Acme Bookstore and decides to add a book to their shopping cart, they click the commandButton labeled Add to Cart on the book view. When this occurs, the addToCart method within the CartController is invoked, and if a Cart instance has not yet been created, then a new instance of Cart is instantiated. After that, the currently selected Book object is added to the cart. If the Cart instance already exists, then the Book objects within the Cart are traversed to make sure that the book does not already exist. If it does already exist, the quantity is bumped up by 1; otherwise, a quantity of 1 is added to the Cart for the currently selected book.
After a book has been added to the Cart, a user can elect to continue shopping or edit the contents of the Cart. This is where the @SessionScoped annotation does its magic. The user can go to any other page within the application and then re-visit the cart view, and the selected Book object and quantity are still persisted. If the user elects to edit the Cart object, they can update the quantity by clicking the Update button, which invokes the CartController class’s updateCart method, adjusting the quantity accordingly.
This is an exhaustive example to demonstrate a simple task, marking a managed bean as @SessionScoped. If the bean had been annotated with @RequestScoped, then the Cart contents would be lost when the user navigates to a new page in the application.
6-8. Listening for System-Level Events
Solution
Create a system event listener class by implementing the SystemEventListener interface and overriding the processEvent(SystemEvent event) and isListenerForSource(Object source) methods. Implement these methods accordingly to perform the desired event processing. The following code listing is for a class named BookstoreAppListener, and it is invoked when the application is started up or when it is shutting down:
package org.javaeerecipes.chapter06.recipe06_08;

import javax.faces.application.Application;
import javax.faces.event.*;

/**
 * Recipe 6-8: System Event Listener
 * @author juneau
 */
public class BookstoreAppListener implements SystemEventListener {

    @Override
    public void processEvent(SystemEvent event) throws AbortProcessingException {
        if(event instanceof PostConstructApplicationEvent){
            System.out.println("The application has been constructed...");
        }

        if(event instanceof PreDestroyApplicationEvent){
            System.out.println("The application is being destroyed...");
        }
    }

    @Override
    public boolean isListenerForSource(Object source) {
        return(source instanceof Application);
    }

}
Next, the system event listener must be registered in the faces-config.xml file. The following excerpt is taken from the faces-config.xml file for the Acme Bookstore application:
...
<application>

               <system-event-listener>
                              <system-event-listener-class>
org.javaeerecipes.chapter06.recipe06_08.BookstoreAppListener
                               </system-event-listener-class>
                               <system-event-class>
                                              javax.faces.event.PostConstructApplicationEvent
                               </system-event-class
               </system-event-listener>

               <system-event-listener>
                              <system-event-listener-class>
org.javaeerecipes.chapter06.recipe06_08.BookstoreAppListener
                              </system-event-listener-class>
                              <system-event-class>
                                             javax.faces.event.PreDestroyApplicationEvent
                              </system-event-class
        </system-event-listener>

    </application>
...
When the application is started, the message “The application has been constructed…” will be displayed in the server log. When the application is shutting down, the message “The application is being destroyed…” will be displayed in the server log.
How It Works
The ability to perform tasks when an application starts up can sometimes be useful. For instance, let’s say you’d like to have an e-mail sent to the application administrator each time the application starts. You can do this by performing the task of sending an e-mail within a class that implements the SystemEventListener interface. A class that implements SystemEventListener must then override two methods, processEvent(SystemEvent event) and isListenerForSource(Object source). The processEvent method is where the real action occurs, because it is the method into which your custom code should be placed. Whenever a system event occurs, the processEvent method is invoked. In this method, you will need to perform a check to determine what type of event has occurred so that you can process only those events that are pertinent. To determine the event that has occurred, perform an instanceof check on the SystemEvent object. In the example, there are two if statements used to determine the type of event that is occurring and to print a different message for each. If the event type is of PostConstructApplicationEvent, then that means the application is being constructed. Otherwise, if the event type is of PreDestroyApplicationEvent, the application is about to be destroyed. The PostConstructApplicationEvent event is called just after the application has been constructed, and PreDestroyApplicationEvent is called just prior to the application destruction.
The other method that must be overridden within the SystemEventListener class is named isListenerForSource. This method must return true if this listener instance is interested in receiving events from the instance referenced by the source parameter. Since the example class is built to listen for system events for the application, a true value is returned if the source parameter is an instance of Application.
After the system event listener class has been written, it needs to be registered with the application. In the example, you want to listen for both the PostConstructApplicationEvent and the PreDestroyApplicationEvent, so there needs to be a system-event-listener element added to the faces-config.xml file for each of these events. Within the system-event-listener element, specify the name of the event listener class within a system-event-listener-class element and the name of the event within a system-event-class element.
6-9. Listening for Component Events
Problem
You want to invoke a listener method when a specified component event is occurring. For instance, you want to listen for a component render event.
Solution
Embed an f:event tag within the component for which you want to listen for events. The f:event tag allows components to invoke managed bean listener methods based upon the current component state. For instance, if a component is being rendered or validated, a specified listener method could be invoked. In the example for this recipe, an outputText component is added to the book view of the Acme Bookstore application to specify whether the current book is in the user’s shopping cart. When the outputText component is being rendered, a component listener is invoked that checks the current state of the cart to see whether the book is contained within it. If it is in the cart, then the outputText component will render a message stating so; if not, then the outputText component will render a message stating that it is not in the cart.
The following excerpt is taken from a view named recipe06_09.xhtml, a derivative of the book view for the application. It demonstrates the use of the f:event tag within a component. Note that the outputText component contains no value attribute because the value will be set within the event listener.
...
<h:outputText id="isInCart" style="font-style: italic; color: ">
    <f:event type="preRenderComponent" listener="#{ch6CartController.isBookInCart}"/>
</h:outputText>
...
The CartController class contains a method named isBookInCart. The f:event tag in the view references this listener method via the CartController managed bean name, ch6CartController. The listener method is responsible for constructing the text that will be displayed in the outputText component.
public void isBookInCart(ComponentSystemEvent event) {
    UIOutput output = (UIOutput) event.getComponent();
    if (cart != null) {
        if (searchCart(authorController.getCurrentBook().getTitle()) > 0) {
            output.setValue("This book is currently in your cart.");
        } else {
            output.setValue("This book is not in your cart.");
        }
    } else {
        output.setValue("This book is not in your cart.");
    }
}
How It Works
Everything that occurs within a JSF application is governed by the JSF application life cycle. As part of the life cycle, JSF components go through different phases within their lifetimes. Listeners can be added to JSF components to perform different tasks when a given phase is beginning or ending. There are two pieces to the puzzle for creating a component listener: the tag that is embedded within the component for which your listener will perform tasks and the listener method itself. To add a listener to a component, the f:event tag should be embedded within the opening and closing tags of the component that will be interrogated. The f:event tag contains a handful of attributes, but only two of them are mandatory for use: type and listener. The type attribute specifies the type of event that will be listened for, and the listener attribute specifies the managed bean listener method that will be invoked when that event occurs. The valid values that could be specified for the name attribute are preRenderComponent, postAddToView, preValidate, and postValidate. In addition to these event values, any Java class that extends javax.faces.event.ComponentSystemEvent can also be specified for the name attribute.
The listener method must accept a ComponentSystemEvent object. In the example, the listener checks to see whether the shopping cart is null, and if it is, then a message indicating an empty cart will be set for the outputText component’s value. Otherwise, if the cart is not empty, then the method looks through the List of books in the cart to see whether the currently selected book is in the cart. A message indicating whether the book is in the cart is then added to the value of the outputText component. Via the listener, the actual value of the component was manipulated. Such a technique could be used in various ways to alter components to suit the needs of the situation.