
Chapter 6
Using Images
• Using an ImageView
• Loading images
• Loading an image placeholder
Chances are that if you are making an application with JavaFX, you will need to have some form of interaction with images. Even if your application is not directly related to images or image working, you may need a splash screen, a background, or even an image for a control.
This chapter teaches you how to work with images and load them into JavaFX. By the end of this chapter you will be able to add an image file to your project and load it to the screen. The first step in this process is to learn about the ImageView node.
The ImageView Node
Before you can display an image to the screen, you need to add an ImageView node to your application. All images are displayed using the ImageView node. Think of it as the film onto which your pictures are developed. The only purpose for the ImageView node is to display your images using the Image class.
The package for the ImageView is javafx.scene.image.ImageView. You must import this package before you can use the ImageView. Add a Stage and a Scene to your script, and then import the package for an ImageView, as follows:
/*
 * Chapter6.fx
 *
 * v1.0 - J. F. DiMarzio
 *
 * 5/17/2010 – created
 *
 * Working with images
 *
 */
package com.jfdimarzio.javafxforbeginners;
import javafx.stage.Stage;
import javafx.scene.Scene;
import javafx.scene.image.ImageView;

/**
 * @author JFDiMarzio
 */
Stage {
    title : "Images"
    scene: Scene {
        width: 200
        height: 200
        content: [
        ]
    }
}
You can insert an ImageView into the Scene’s content using the following code:
content: [ImageView {
    image:
}  ]
As it is now, the ImageView node will not do anything. Keep in mind that although the ImageView is a node by itself, it really doesn’t do much without an image to display. Right now the script will not run; you need to add an image for the ImageView to display. In the next section you use the Image class to help the ImageView display something to the screen.
TIP
The ImageView has attributes that affect the way in which an image is displayed. However, without an image to display, it does not make sense to discuss those attributes now. You will learn about these attributes after sending an image to the ImageView.
The Image Class
The Image class is used to take in image files and format them for display. The Image class and the ImageView node work hand-in-hand to display your images to the screen.
The Image class is in the following package; it must be imported before you start working with the Image class:
import javafx.scene.image.Image;
The Image class can take in images from various sources. In this section you work with two of these sources: the Web and a local image file. First, let’s pull an image from the Internet. The image you will display is http://jfdimarzio.com/butterfly.png.
Create an Image class and assign it to the image attribute of the ImageView. Notice that in the Image class you set the width and the height of the image. This is not necessarily the width and the height of the display (that is controlled by the width and height of the Scene). Rather, the width and the height of the Image class controls the size of the image that is passed to the ImageView.
The URL of the image—in this case, http://jfdimarzio.com/butterfly.png—is assigned as a value to the url parameter of the Image class. This tells the Image class where to look for a valid image to format. Set the url parameter as follows and then run your script:
     scene: Scene {
         width: 200
         height: 200
         content: [ImageView {
             image: Image {
                 width: 200;
                 height: 200;
                 url: "http://jfdimarzio.com/butterfly.png"
             }
         }  ]
     }
After you run this script, your application should look like what’s shown in Figure 6-1.
Because images loaded from the Web have a tendency to load slower, you may want to load the image in the background so that the user does not see a blank screen while the image is being displayed. This is easy to accomplish in JavaFX. In fact, you can use a second image—a placeholder image—to display to your user while your main image is being loaded.

Figure 6-1 Using an image from the Web
The following modification to the previous example loads the web image in the background. A second image is loaded in the placeholder and displayed to the user while the web image is loaded.
Stage {
   title : "Test"
   scene: Scene {
       width: 200
       height: 200
       content: [ImageView {
                       image: Image {
                           width: 200;
                           height: 200;
                           url: "http://jfdimarzio.com/butterfly.png"
                             backgroundLoading: true;
                             placeholder: Image{
                             url: "{__DIR__}images/waiting.png"
                       }
                       }
                   }    ]
   }
}
The placeholder attribute of the Image class takes its own Image class. This second Image class is used to display a temporary image when the main image is being downloaded. Notice the use of the backgroundLoading attribute to control whether or not the image is loaded in the background.
NOTE
Previously you worked with the constant {__PROFILE__}. The constant {__DIR__} works the same way and is explained in more detail later in this chapter.
JavaFX does a good job of displaying images from a website, and the setup involved in this is fairly straightforward. The url parameter points directly to the image you want to display. However, chances are you are going to want to display images that you package into your application.
If you want to display an image that you have locally, the concept remains the same but the process is slightly different. You will want to think ahead as to how the image will be distributed with the application.
You can include an image in the package with your application. That image can then be called from an Image class and displayed using the ImageView. Distributing images in this way is more reliable than displaying them from the Internet. That is, there are more chances for something to go wrong if you are relying on an external website to host your images and you are relying on the Internet connection of that user to access the images.
The first step in displaying a local image is to include that image in your package. Right-click your package and select New | Other. This will open the Create File dialog box. Select the Other category and then select a File Type of Folder. Click the Next button to continue and name your folder. Name the folder images and then click Finish. Now you have a folder within your package to keep your images.
TIP
It is always recommended to create a separate folder for your images. This helps you keep your projects standardized and easy to manage.
Next, drag an image from your local drive into the images folder in the NetBeans IDE, as shown in Figure 6-2.
Now that the image is added to your project packages, you can reference it in your script. The key to referencing an image you have added directly to your package is a handy JavaFX constant called {__DIR__}.
Figure 6-2 Adding an image to your package
The {__DIR__} constant represents the path to your package. The following string represents the contents of the {__DIR__} constant in my project (this constant will be different based on how you set up your project):
jar:file:/C:/Users/JFDiMarzio/Documents/NetBeansProjects/
JavaFXForBeginners/dist/JavaFXForBeginners.jar!/com/jfdimarzio/
javafxforbeginners/
You can reference your new image from your images folder by using the {__DIR__} constant to build your url value. The following code shows an ImageView displaying the butterfly.png file from the images folder:
     scene: Scene {
         width: 200
         height: 200
         content: [ImageView {
             image: Image {
                 width: 200;
                 height: 200;
                 url: "{__DIR__}images/butterfly.png"
             }
         }   ]
     }
To this point you have learned how to display an image using the Image class and the ImageView node. Admittedly this is not the most exciting code in this book—it is actually very basic. However, there is one more way to display images in JavaFX that is unique and very powerful.
Layered images can be saved to a native JavaFX format known as an FXZ (Java FX Zip) file. JavaFX can load an FXZ file and display it as if it were any other image file. The advantage to using an FXZ file is that JavaFX can use the layer information to manipulate the image. To take full advantage of this final method of image display, you must learn about the JavaFX Production Suite.
JavaFX Production Suite
The JavaFX Production Suite is a collection of tools that allow you to develop graphics for use within JavaFX scripts. More specifically, the core of the JavaFX Production Suite is a plug-in for Adobe Photoshop (CS3 and CS4) and Adobe Illustrator that exports your Adobe images to JavaFX FXZ files while preserving the layer information.
The JavaFX Production Suite can be downloaded from the JavaFX website. It is a quick and rather painless installation.
Because the JavaFX Production Suite preserves the layer information of the images as used in Adobe Photoshop or Adobe Illustrator, you can access this valuable information within your JavaFX script. You can use this information to move, transform, and apply effects to each individual layer as if it were a separate image.
The key to ensuring that JavaFX can properly access the images is in how you set up your images in Adobe Photoshop or Adobe Illustrator.
NOTE
For the remainder of this chapter I will use Adobe Photoshop for the examples, but the same concepts apply to Adobe Illustrator.
Create an image that has layers in Adobe Photoshop. Figure 6-3 shows the butterfly image we have been using in this chapter. I have used the Quick Select Tool to create a new layer by cutting the butterfly from the background. The name you assign to each layer of your image is important. For the JavaFX Production Suite plug-in to preserve your layer naming, you must prefix each name with jfx:. For example, the image shown in Figure 6-3 consists of two layers: the background and the butterfly. To preserve these names within JavaFX, you must rename the layers, while inside Adobe Photoshop, to jfx:background and jfx:butterfly, respectively. The JavaFX Production Suite plug-in will know that any name prefixed with jfx: is to be preserved, and it will strip off the jfx: during the export process.
The import part of the process, as far as JavaFX is concerned, is what follows.
TIP
If you do not prefix the names of your layers with jfx:, the JavaFX Production Suite plug-in will generate names for you. This could be a problem if you want to retain control over how you access your images later.
Next, you must add your layers to a group. Again, this is done within Adobe Photoshop and can be seen in Figure 6-3. As with the layers, the group name must be prefixed with jfx:.
If you do not add your layers to a group, it will be much harder to access the individual layers. More code will be required to work with the layers after you export the image if you do not add them to a group while you are still in Adobe Photoshop.
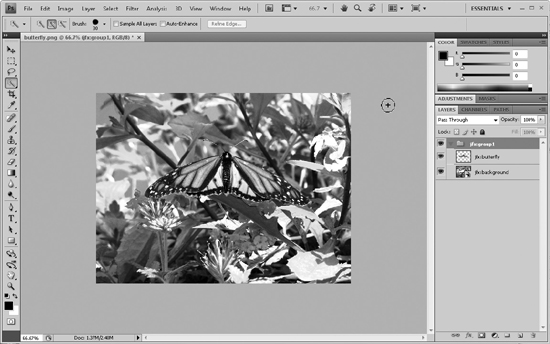
Figure 6-3 Butterfly image in Adobe Photoshop
TIP
I am not a Photoshop expert, but I have noticed that you will have a much easier time adding your layers to the group if you rename your layers before create the group.
After your layers have been created and renamed, you can use the JavaFX Production Suite plug-in to export your image for use in JavaFX. Select File | Automate | Save for JavaFX… to save your file for use within your JavaFX script, as shown in Figure 6-4.
The JavaFX Production Suite plug-in will open an export options and preview window, as shown in Figure 6-5. You can use this window to preview what your exported image will look like if you want to. The image preview of the butterfly image is shown in Figure 6-6.
However, the important feature of this window is the option labeled Preserve ‘JFX:’ IDs Only. Make sure this option is selected to keep the layer and group names you applied while in Adobe Photoshop. Save your image when you are finished to complete the process.
The JavaFX Production Suite plug-in will create an FXZ file (for this example, the file is named butterfly.fxz). The butterfly.fxz file is just a compressed file that contains a content.fxd file and a number of images. You can open an FXZ file with a standard file decompression tool to see what is inside of it.
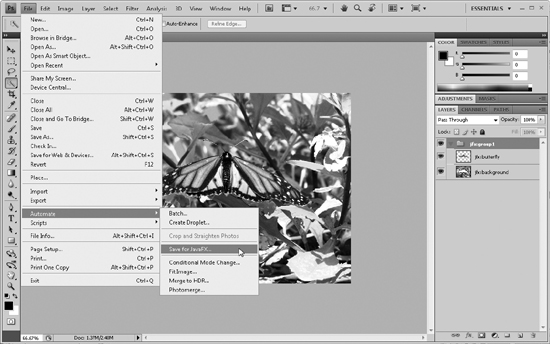
Figure 6-4 Saving your image for JavaFX
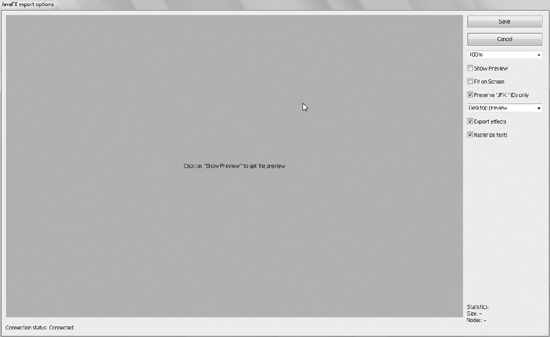
Figure 6-5 The JavaFX export options window
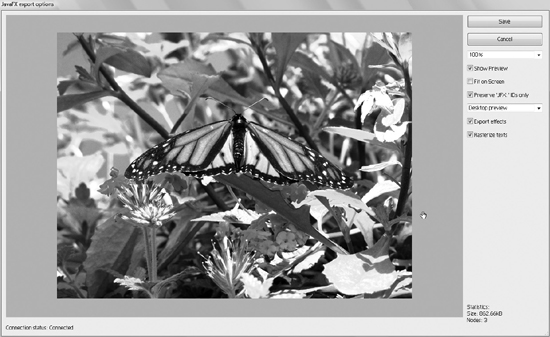
Figure 6-6 Butterfly image preview in the JavaFX export options window
In the case of the butterfly.fxz file, it contains a content.fxd file and two images. The two images, butterfly.png and background.png, represent the two layers of the original image that were exported from Adobe Photoshop. These images were created by the JavaFX Production Suite plug-in. The images were named according to the layer names that were prefixed with the jfx: notation.
Although each image you export from Adobe Photoshop will likely have different layer images within its FXZ file, one element that will be common to all FXZ files is content.fxd, which is a definition file that specifies the relationship between the included image files. This is a JavaFX script that is imported into your project when you want to work with the image. The content.fxd file for the butterfly.fxz is shown here:
/*
 * Generated by JavaFX plugin for Adobe Photoshop.
 * Created on Sun Apr 11 17:45:24 2010
 */
//@version 1.0

Group {
      clip: Rectangle { x:0 y:0 width:800 height:600 }
      content: [
          Group {
                   id: "group1"
                   content: [
                         ImageView {
                               id: "background"
                               x: 0
                               y: 0
                               image: Image {
                                    url: "{__DIR__}background.png"
                               }
                         },
                         ImageView {
                               id: "butterfly"
                               x: 151
                               y: 181
                               image: Image {
                                     url: "{__DIR__}butterfly.png"
                               }
                         },
                   ]
            },
      ]
}
Notice that the content.fxd file contains the code that creates a JavaFX Group. The Group contains a clip rectangle that defines the overall dimensions of the complete image and another Group that contains the individual images as ImageViews.
Now that you have a completed FXZ file (using the JavaFX Production Suite), you can use that file in your script.
Using an FXZ File in JavaFX
Being able to use an FXZ file in your JavaFX script is a powerful and rewarding skill. It does not take much scripting to access an FXZ file. In fact, JavaFX provides a node just for the purpose of working with FXZ files. The FXDNode can be used to load images from an FXZ file.
The FXDNode is located in the javafx.fxd.FXDNode package. This package must be imported to load and work with FXZ files:
import javafx.fxd.FXDNode;
NOTE
The following code example assumes the butterfly.fxz file has been included in the images folder within the current package.
The first step is to create the FXDNode and load the butterfly.fxz file. Create a var named butterflyGroup and type it as an FXDNode, as shown here:
var butterflyGroup : FXDNode = FXDNode{
      url:"{__DIR__}images/butterfly.fxz"
      };
Now you can access the FXDNode by calling butterflyGroup. The url parameter points to the butterfly.fxz file in the images folder. Notice that the butterflyGroup var has been typed as an FXDNode using the : FXDNode notation. Although this is not necessary because JavaFX is not a strongly typed language, it is still a very good practice to get into.
Next, you can extract the butterfly image and move it to a different location against the background. The following code extracts the butterfly layer, moves it, and applies a rotation:
var butterfly = butterflyGroup.getNode("butterfly");
butterfly.translateX = 50;
butterfly.translateY = 50;
butterfly.rotate = 45;
The getNode method of FXDNode is used to extract a layer from the loaded FXZ file. The getNode method takes the layer name that was applied to the layer before it was exported from Adobe Photoshop. In this case, you are extracting the butterfly layer; therefore, the name “butterfly” is passed to the getNode method.
The final step is to assign the FXDNode to the Scene’s content. The full script is as follows:
/*
 * Chapter6.fx
 *
 * v1.0 - J. F. DiMarzio
 *
 * 5/17/2010 – created
 *
 * Working with images
 *
 */

package com.jfdimarzio.javafxforbeginners;

import javafx.stage.Stage;
import javafx.scene.Scene;
import javafx.fxd.FXDNode;

var butterflyGroup : FXDNode = FXDNode{
      url:"{__DIR__}images/butterfly.fxz"
      };
var butterfly = butterflyGroup.getNode("butterfly");
butterfly.translateX = 50;
butterfly.translateY = 50;
butterfly.rotate = 45;
/**
 * @author JFDiMarzio
 */
Stage {
    title : "FXZ Images"
    scene: Scene {
        content:[ butterflyGroup]
    }
}
Run this code using your Desktop profile and you will see the butterfly layer rotated and moved against the background, as shown in Figure 6-7.
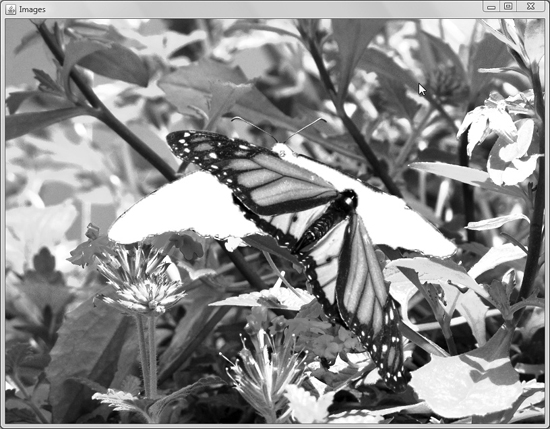
Figure 6-7 Butterfly layer rotated and moved
Try This Working with Different Image Types
Take some time before the next chapter to explore how JavaFX displays and works with different images and image types. Using the skills you learned in this chapter, try to display images of different types to JavaFX. Which images files will display? Which image files will not?
For an added level of research, try changing the sizes of the images. Take note of which image types allow you load up the largest images in the shortest amount of time.
This skill will help you in the future when you need to incorporate images of different types from different developers or sources into one application.
In this chapter you learned to import and display images to your JavaFX Scenes. This is an important skill to have in creating rich environments for your users. However, just displaying images alone will not create an exciting-enough environment to stop your users in their tracks.
In Chapter 7 you learn how to apply effects to your images within JavaFX.
 Chapter 6 Self Test
1. What node is used to display images?
2. What class is used to write an image to the ImageView node?
3. True or false? An Image class can accept images from the Web.
4. What value does the {__DIR__} constant contain?
5. True or false? To have an image load in the background, use the BackgroundImage loader.
6. What is the name of the tool used to export images from Adobe Photoshop and Adobe Illustrator for JavaFX?
7. True or false? You must add jfx: to the beginning of each layer name to access those layers by name in your script.
8. What node is used to load images from an FXZ file?
9. True or false? The FXZ file is a compressed file that contains images and definitions.
10. What method is used to load an image layer?