5. Looping with for, While, and Do...While!
In This Chapter
• Learn how to have some code run repeatedly
• Work with
for,while, anddo...whileloops
When you are coding something, there will be times when you want to repeat an action or run some code multiple times. For example, let’s say we have a function called saySomething that we want to repeatedly call 10 times.
One way we could do this is by simply calling the function 10 times using copy and paste:
saySomething();
saySomething();
saySomething();
saySomething();
saySomething();
saySomething();
saySomething();
saySomething();
saySomething();
saySomething();
This works and accomplishes what we set out to do, but...we shouldn’t do something like this. After all, duplicating code is never a good idea. If we had a nickel for every time you read that here, we’d have about four or five nickels. #killing_it
Now, even if we do decide to duplicate some code a few times manually, this approach doesn’t really work in practice. The number of times we will need to duplicate our code will vary based on some external factors such as the number of items in a collection of data, some result from some web service, the number of letters in a word, and various other things that will keep changing. It won’t always be a fixed number like 10. Often, the number of times we want to repeat some code could be very VERY large. We don’t want to copy and paste something a few hundred or thousand times in order to repeat something. That would be terrible.
What we need is a generic solution for repeating code with control over how many times the code repeats. In JavaScript, this solution is provided in the form of something known as a loop. There are three kinds of loops we can use to repeat some code:
for loops
while loops
Each of these three loop variations allow us to specify the code we want to repeat (aka loop) and a way to stop the repetition when a condition is met. In the following sections, we’ll learn all about them.
Onward!
 Note
Note
Something beyond alert!
We’ve been using the alert function these past few chapters to get our code to display something on screen. In this chapter, we’re going to look at one more way of displaying something on the screen that is a bit less intrusive. We’re going to be using the document.write function:
document.write("Show this on screen!");
This function will print the text you provide to the page displayed in your browser without displaying a dialog that requires you to dismiss every time it appears. You’ll see why we want something that is more lightweight when you learn more about loops and how we may want to print many things to the screen.
The for Loop
One of the most common ways to create a loop is by using the for statement to create a for loop. A for loop allows us to repeatedly run some code until an expression we specify returns false. To help clarify this definition, let’s look at an example.
If we had to translate our earlier saySomething example using for, it would look as follows:
for (let i = 0; i < 10; i++) {
  saySomething();
}

function saySomething() {
  document.writeln("hello!");
}
If you want to follow along more actively and see this code for yourself, enter this code inside some script tags in an HTML document:
<!DOCTYPE html>
<html>

<head>
  <meta charset="utf-8">
  <title>Loops!</title>

  <style>

  </style>
</head>

<body>
  <script>
    for (let i = 0; i < 10; i++) {
      saySomething();
    }

    function saySomething() {
      document.writeln("hello!");
    }
  </script>
</body>

</html>
Once your document is ready, save your document and preview it in your browser. After the page has loaded, what you would see is shown in Figure 5.1.
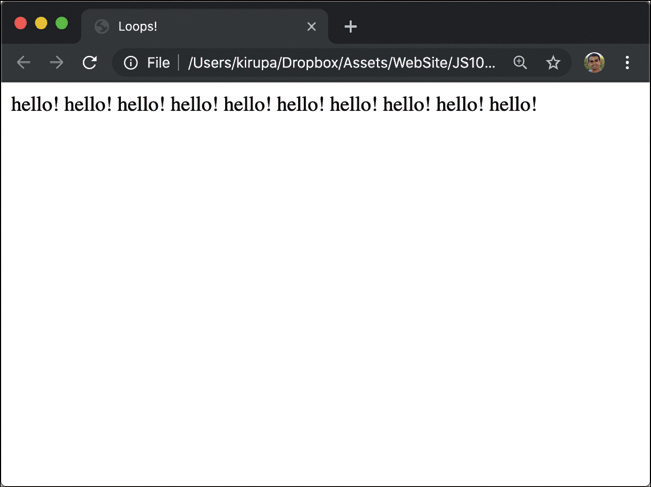
FIGURE 5.1
hello! repeats across the page.
The word hello! will be repeated ten times across your page. This is made possible thanks to the for loop, so we are going to thank it back by learning all about how it works. First, here is our star:
for (let i = 0; i < 10; i++) {
  saySomething();
}
This is a for loop. It probably looks very different from other statements we’ve seen so far, and that’s because...well, it is very different. To understand the differences, let’s generalize a for loop into the form shown in Figure 5.2.
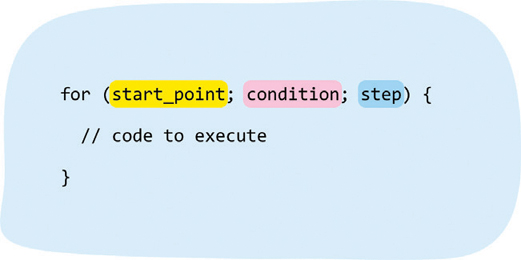
FIGURE 5.2
General, high level for loop.
This high-level view corresponds to the actual values from our example (Figure 5.3).
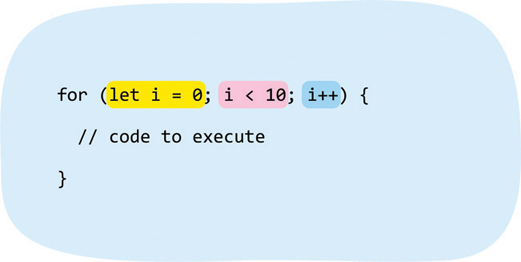
FIGURE 5.3
The actual values.
These three differently colored regions each play a very important role in how your loop functions. In order to use a for loop well, we must know what each region accomplishes, so we will spend the next few minutes diving deeper into each section.
The Starting Point
In the first region, we define the starting point for our loop. A common thing to put here is some code to declare and initialize a variable, similar to what we did in Figure 5.4.
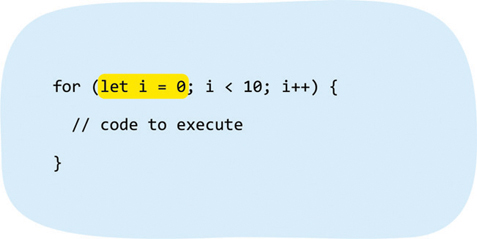
FIGURE 5.4
Declaring and initializing a variable i.
What we are telling JavaScript is to start our loop with the variable i initialized to 0.
The Step
We are going to skip ahead to the step region next (Figure 5.5).

FIGURE 5.5
The step.
In this stage, we specify how our starting point will evolve. For our example, what we are saying is that each time our loop runs, the value of i will be increased by 1. That is captured by the cryptic looking i++. We’ll cover what the ++ means later when we look at how numbers and math in JavaScript work, but another way of representing this would be to say i = i + 1.
The Condition (aka How Long to Keep Looping)
Going back to the stage we skipped, we have the condition part of our loop that determines when the loop will stop running (Figure 5.6).
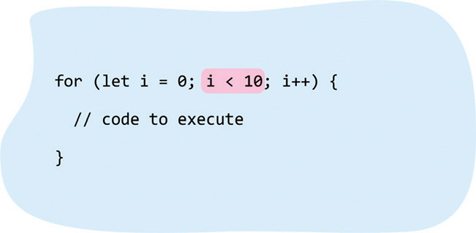
FIGURE 5.6
The condition part of the loop.
In our example, the condition is that our i variable is less than the value of 10:
If our
ivariable is less than 10, this expression evaluates to true and our loop continues to run.If our
ivariable becomes equal to or greater than 10, the condition is false, and our loop terminates.
Putting It All Together
Ok, now that we have looked at each part of our for loop in greater detail, let’s use our newly gained knowledge to run through it all at once to see what is going on. Our full example, repeated from earlier, is as follows:
for (let i = 0; i < 10; i++) {
  saySomething();
}

function saySomething() {
  document.writeln("hello!");
}
When our for loop is initially hit at the starting point, the i variable is created and initialized to 0. Next, we go to the condition part of the loop that determines whether our loop should keep running or not. The condition checks if the value of i is less than 10. Is 0 less than 10? Yes it is, so this condition evaluates to true and the code contained inside the loop runs. Once this is done, the step part of our loop kicks in. In this stage, the i variable is incremented by 1 to have a value of 1. At this point, our loop has run through one cycle, commonly referred to as an iteration. Time to start the next iteration.
For the next iteration, the loop starts all over again except the variable i isn’t re-initialized. Its value is 1 from the previous iteration, so that carries over. For the condition, we re-check whether the new value of 1 is less than 10...which it is. The code inside our loop (basically the saySomething function) and the step part of the loop where i increments by 1 happen. The value of i is then incremented by 1 to a value of 2, and this iteration is done for the day...leaving the door open for the next iteration!
This process repeats iteration after iteration until the condition i < 10 evaluates to false. Since we started the loop with i being 0, the loop is set to terminate when the value of i is less than 10, and i increments by 1 in each iteration, this loop (and any code contained in it) will run 10 times before stopping. Phew!
Some for Loop Examples
In the previous section, we dissected a simple for loop and labeled all its inner workings. The thing about for loops and most everything in JavaScript is that a simple example doesn’t always cover everything we might need. The best solution is to look at some more examples of for loops, and that’s what we are going to be doing in the next few sections.
Breaking a Loop
Sometimes, we may want to end our loop before it reaches completion. The way we end a loop is by using the break keyword. Below is an example:
for (let i = 0; i < 100; i++) {
  document.writeln(i);

  if (i == 45) {
    break;
  }
}
When the value of i equals 45, the break keyword stops the loop from continuing further. While this example was just a little bit contrived, when we do run into a real-world case for ending our loop, we now know what to do.
Skipping an Iteration
There will be moments when we want our loop to skip its current iteration and move on to the next one. That is cleverly handled by the continue keyword:
let floors = 28;

for (let i = 1; i <= floors; i++) {
  if (i == 13) {
    // no floor here
    continue;
  }

  document.writeln("At floor: " + i + "<br>");
}
Unlike break where our loop just stops and goes home, continue tells our loop to stop and move on to the next iteration. We will often find ourselves using continue when handling errors where we just want the loop to move on to the next item.
Going Backwards
There is no reason why our starting point has to have a variable initialized to 0 and then increment that variable upward:
for (let i = 25; i > 0; i--) {
  document.writeln("hello");
}
You can just as easily start high and then decrement until your loop condition returns a false.
You may have heard that doing something like this increases your loop’s performance. The jury is still out on whether decrementing is actually faster than incrementing, but feel free to experiment and see if you notice any performance benefits.
You Don’t Have to Use Numbers
When filling out your for loop, you don’t have to only use numbers:
for (let i = "a"; i != "aaaaaaaa"; i += "a") {
  document.writeln("hmm...");
}
You can use anything you want as long as your loop will eventually hit a point where it can end. Notice that in this example we are using the letter a as our currency for running this loop. At each iteration, the value of i is incremented with the letter a, and the loop stops when i equals aaaaaaaa.
Oh, No He Didn’t!
Oh yes! Yes, I did. I went there, took a picture, posted on Facebook, and came back:
let i = 0;
let yay = true;

for (; yay;) {
  if (i == 10) {
    yay = false;
  } else {
    i++;
    document.writeln("weird");
  }
}
You don’t have to fill out the three sections of your for loop in order to make it work. As long as, in the end, you manage to satisfy the loop’s terminating condition, you can do whatever you want...just like the example above shows.
The Other Loops
Living in the shadow of the beloved for loop are the while and do...while loop variants. In the interest of completeness, let’s quickly look at both of them.
The while Loop
The while loop repeats some code until its condition (another expression) returns false. Take a look at the following example:
let count = 0;

while (count < 10) {
  document.writeln("looping away!");

  count++;
}
In this example, the condition is represented by the count < 10 expression. With each iteration, our loop increments the count value by 1:
let count = 0;

while (count < 10) {
  document.writeln("looping away!");

  count++;
}
Once the value of count becomes 10, the loop stops because the count < 10 expression will return false. If you look at everything the while loop does, it does look a great imitation of the for loop. While the for loop formally required you to define the starting, condition, and step stages, the while loop expects you to define those stages yourself in your own way.
The do...while Loop
Now, we get to the Meg Griffin of the loop variants. That would be the do...while loop whose purpose is even less defined than while. Where the while loop had its conditional expression first before the loop would execute, the do...while loop has its conditional expression at the end.
Here is an example:
let count = 0;

do {
    document.writeln("I don't know what I am doing here! <br>");


    count++;
} while (count < 10);
The main difference between a while loop and a do...while loop is that the contents of a while loop could never get executed if its conditional expression is false from the very beginning:
while (false) {
  document.writeln("Can't touch this!");
}
With a do...while loop, because the conditional expression is evaluated only after one iteration, your loop’s contents are guaranteed to run at least once:
do {
  document.writeln("This code will run once!");
} while (false);
That can come in handy in some situations. Now, before we wrap things up, there is just one last bit of information I need to tell you before we move on. The break and continue statements that we saw earlier as part of the awesome for loop also work similarly when used inside the while and do...while loop variants.
The Absolute Minimum
So, there you have it—a look at for loops and how we can use them along with very basic coverage of the while and do...while loops. Right now, we may not see ourselves using loops a whole lot. As we start getting into more involved situations involving collections of data, elements in your DOM, text manipulation, and other stuff, we’ll be using loops a whole lot more. Basically...keep all the information we’ve seen here really close by!
If you have any questions on the content here, don’t be stuck! Post on the forums at https://forum.kirupa.com really quick help from both me as well as some of the web’s smartest and friendliest developers.