32. Event Bubbling and Capturing
In This Chapter
• Learn how events travel through the DOM
• Understand the differences between event capturing and event bubbling
• Interrupt events
In the previous chapter, you learned how to use the addEventListener function to listen for events that you want to react to. That chapter covered the basics, but it glossed over an important detail about how events actually get fired. An event isn’t an isolated disturbance. Like a butterfly flapping its wings, an earthquake, a meteor strike, or a Godzilla visit, many events ripple and affect a bunch of elements that lie in their path.
In this article, I will put on my investigative glasses, a top hat, and a serious British accent to explain what exactly happens when an event gets fired. You will learn about the two phases events live in, why all of this is relevant, and a few other tricks to help you better take control of events.
Event Goes Down. Event Goes Up.
To better help us understand events and their lifestyle, let’s frame all of this in the context of a simple example. Here is some HTML we’ll refer to.
<!DOCTYPE html>
<html>

<head>
  <title>Events!</title>
</head>

<body id="theBody" class="item">
  <div id="one_a" class="item">
    <div id="two" class="item">
      <div id="three_a" class="item">
        <button id="buttonOne" class="item">one</button>
      </div>
      <div id="three_b" class="item">
        <button id="buttonTwo" class="item">two</button>
        <button id="buttonThree" class="item">three</button>
      </div>
    </div>
  </div>
  <div id="one_b" class="item">

  </div>
  <script>

  </script>
</body>

</html>
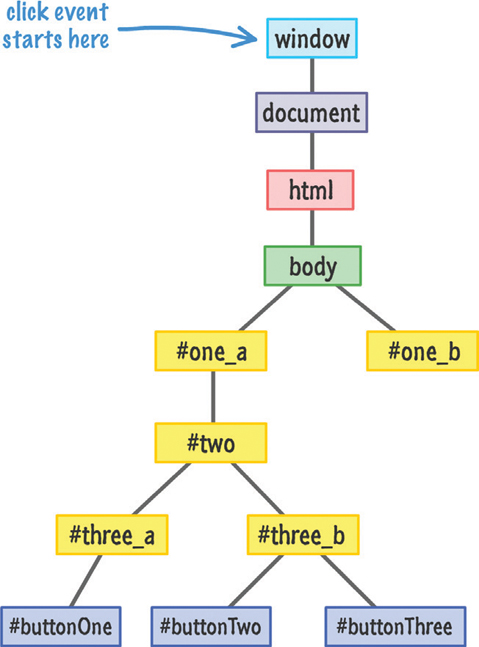
As we can see, there is nothing really exciting going on here. The HTML should look pretty straightforward (as opposed to being shifty and constantly staring at its phone), and its DOM representation looks as shown in Figure 32.1.

FIGURE 32.1
What the DOM for the markup we saw looks like.
Here is where our investigation is going to begin. Let’s say that we click on the buttonOne element. From what we saw previously, you know that a click event is going to be fired. The interesting part that I omitted is where exactly the click event is going to get fired from. Your click event (just like almost every other JavaScript event) does not actually originate at the element that you interacted with. That would be too easy and make far too much sense.
Instead, an event starts at the root of your document:
From the root, the event makes its way through the narrow pathways of the DOM and stops at the element that triggered the event, buttonOne (also more formally known as the event target):

As shown in the diagram, the path your event takes is direct, but it does obnoxiously notify every element along that path. This means that if you were to listen for a click event on body, one_a, two, or three_a, the associated event handler will get fired. This is an important detail that we will revisit in a little bit.
Now, once our event reaches its target, it doesn’t stop. Like some sort of an energetic bunny for a battery company whose trademarked name I probably can’t mention here, the event keeps going by retracing its steps and returning back to the root:
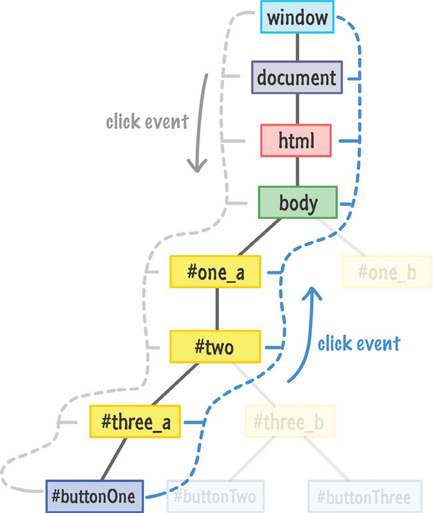
Just like before, every element along the event’s path as it is moving on up gets notified about its existence.
Meet the Phases
One of the main things to note is that it doesn’t matter where in your DOM you initiate an event. The event always starts at the root, goes down until it hits the target, and then goes back up to the root. This entire journey is very formally defined, so let’s look at all of this formalness.
The part where you initiate the event and the event barrels down the DOM from the root is known as the Event Capturing Phase:
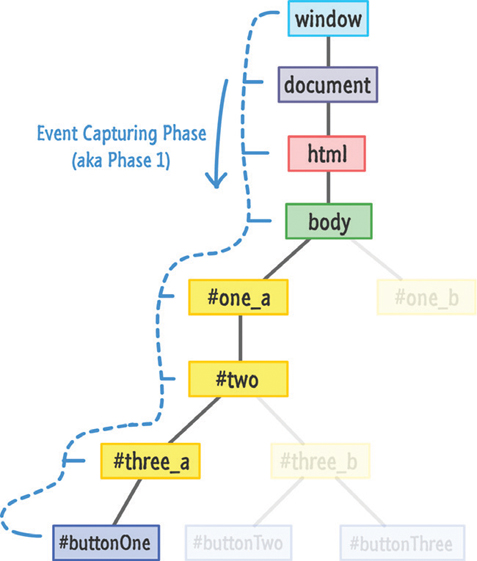
The less learned in the world may just call it Phase 1, so be aware that you’ll see the proper name and the phase name used interchangeably in event-related content you may encounter in real life. Up next is Phase 2 where our event bubbles back up to the root:

This phase is also known as the Event Bubbling Phase. The event “bubbles” back to the top!
Anyway, all of the elements in an event’s path are pretty lucky. They have the good fortune of getting notified twice when an event is fired. This kinda sorta maybe affects the code you write, for every time we listen for events, we make a choice on which phase we want to listen for your event on. Do we listen to your event as it is fumbling down in the capture phase? Do we listen to your event as it climbs back up in the bubbling phase?
Choosing the phase is a very subtle detail that you specify with a true or false as part of your addEventListener call:
item.addEventListener("click", doSomething, true);
If you remember, I glossed over the third argument to addEventListener in the previous chapter. This third argument specifies whether you want to listen for this event during the capture phase. An argument of true means that you want to listen to the event during the capture phase. If you specify false, this means you want to listen for the event during the bubbling phase.
To listen to an event across both the capturing and bubbling phases, you can simply do the following:
item.addEventListener("click", doSomething, true);
item.addEventListener("click", doSomething, false);
I don’t know why you would ever want to do this, but if you ever do, you now know what needs to be done.
Not Specifying a Phase
Now, you can be rebellious and choose to not specify this third argument for the phase altogether:
item.addEventListener("click", doSomething);
When you don’t specify the third argument, the default behavior is to listen to your event during the bubbling phase. It’s equivalent to passing in a false value as the argument.
Who Cares?
At this point, you are probably wondering why all of this matters. This is doubly true if you have been happily working with events for a really long time and this is the first time you’ve ever heard about this. Your choice of listening to an event in the capturing or bubbling phase is mostly irrelevant to what you will be doing. Very rarely will you find yourself scratching your head because your event listening and handling code isn’t doing the right thing because you accidentally specified true instead of false in your addEventListener call.
With all this said...there will come a time in your life when you need to know and deal with a capturing or bubbling situation. This time will sneak up on your code and cause you many hours of painful head scratching. Over the years, these are the situations where I’ve had to consciously be aware of which phase of my event’s life I am watching for:
Dragging an element around the screen and ensuring the drag still happens even if the element I am dragging slips out from under the cursor
Nested menus that reveal submenus when you hover over them
You have multiple event handlers on both phases, and you want to focus only on the capturing or bubbling phase event handlers exclusively
A third party component/control library has its own eventing logic and you want to circumvent it for your own custom behavior
You want to override some built-in/default browser behavior such as when you click on the scrollbar or give focus to a text field
In my nearly 105 years of working with JavaScript, these five things were all I was able to come up with. Even this is a bit skewed to the last few years, since various browsers didn’t work well with the various phases at all.
Event, Interrupted
The last thing I am going to talk about before re-watching Godzilla is how to prevent your event from propagating. An event isn’t guaranteed to live a fulfilling life where it starts and ends at the root. Sometimes, it is actually desirable to prevent your event from growing old and happy.
To end the life of an event, you have the stopPropagation method on your Event object:
function handleClick(e) {
  e.stopPropagation();

  // do something
}
As its name implies, the stopPropagation method prevents your event from continuing through the phases. Continuing with our earlier example, let’s say that you are listening for the click event on the three_a element and wish to stop the event from propagating. The code for preventing the propagation will look as follows:
let theElement = document.querySelector("#three_a");
theElement.addEventListener("click", doSomething, true);

function doSomething(e) {
  e.stopPropagation();
}
When you click on buttonOne, here is what our event’s path will look like:
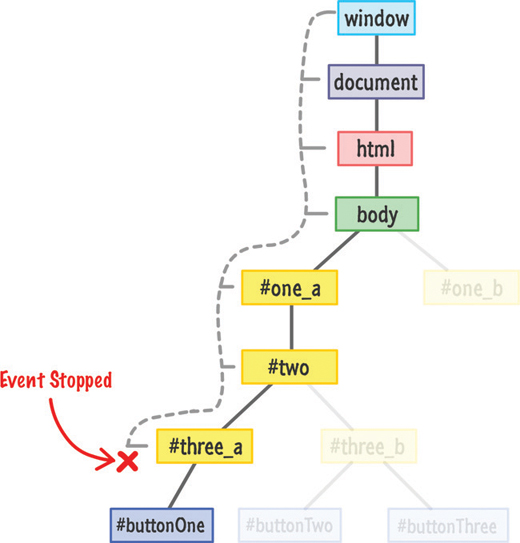
Our click event will steadfastly start moving down the DOM tree notifying every element on the path to buttonOne. Because the three_a element is listening for the click event during the capture phase, the event handler associated with it will get called:
function doSomething(e) {
  e.stopPropagation();
}
In general, events will not continue to propagate until an event handler that gets activated is fully dealt with. Because three_a has an event listener specified to react on a click event, the doSomething event handler gets called. Your event is in a holding pattern at this point until the doSomething event handler executes and returns.
In this case, the event will not propagate further. The doSomething event handler is its last client, thanks to the stopPropagation function that is hiding in the shadows to kill the event right there and then. The click event will never reach the buttonOne element nor get a chance to bubble back up. So tragically sad.
 Tip
Tip
Another function that lives on your event object that you may awkwardly run into is preventDefault:
function overrideScrollBehavior(e) {
e.preventDefault();
// do something
}
What this function does is a little mysterious. Many HTML elements exhibit a default behavior when you interact with it. For example, clicking in a textbox gives that textbox focus with a little blinking text cursor appearing. Using your mouse wheel in a scrollable area will scroll in the direction you are scrolling. Clicking on a check box will toggle the checked state on or off. All of these are examples of built-in reactions to events your browser instinctively knows how to handle.
If you want to turn off this default behavior, you can call the preventDefault function. This function needs to be called when reacting to an event on the element whose default reaction you want to ignore. You can see an example of me using this function in the Smooth Parallax Scrolling tutorial online at: http://bit.ly/kirupaParallax.
The Absolute Minimum
So...yeah! How about those events and their bubbling and capturing phases? One of the best ways to learn more about how event capturing and bubbling works is to just write some code and see how your event makes its way around the DOM.
We are done with the technical part of all this, but if you have a few more minutes to spare, then I encourage you watch the somewhat related episode of Comedians Getting Coffee aptly titled It’s Bubble Time, Jerry! In what is probably their bestest episode, Michael Richards and Jerry Seinfeld just chat over coffee about events, the bubbling phase, and other very important topics. I think.