33. Mouse Events
In This Chapter
• Learn how to listen to the mouse using the various mouse events
• Understand the MouseEvent object
• Deal with the Mouse Wheel
One of the most common ways people (and possibly cats) interact with their computers is by using a pointing device known as a mouse (Figure 33.1).
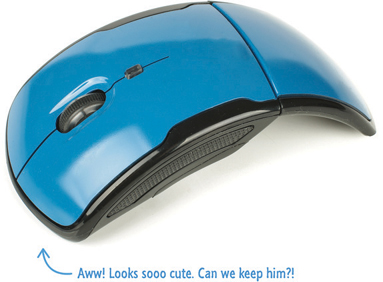
FIGURE 33.1
Cats probably like them too.
This magical device allows you to accomplish great things by moving it around with your hands and clicking around with your fingers. Using them as a, um...user is one thing. As a developer, trying to make your code work with a mouse is something else. That’s where this chapter comes in.
Meet the Mouse Events
In JavaScript, our primary way of dealing with the mouse is through events. There are a boatload of events that deal with the mouse, but we won’t be looking at all of them here. Instead, we’ll focus on just the cool and popular ones such as the following:
clickdblclickmouseovermouseoutmouseentermouseleavemousedownmouseupmousemovecontextmenumousewheelandDOMMouseScroll
The names of these events should give you a good idea of what they do, but we’ll take nothing for granted and look at each of these events in some level of greater detail in the following sections. I should warn you that some events are just dreadfully boring to learn about.
Clicking Once and Clicking Twice
Let’s start with probably the most popular of all the mouse events that you will use—the click event. This event is fired when you click on an element. To state this differently in a way that doesn’t involve mentioning the thing you are describing as part of your description, the click event is fired when you use your mouse to press down on an element and then release the press while still over that same element.
Here is a totally unnecessary visualization of what I am talking about:
You’ve seen the code for working with the click event a few times already, but you can never really get enough of it. Here is another example:
let button = document.querySelector("#myButton");
button.addEventListener("click", doSomething, false);

function doSomething(e) {
  console.log("Mouse clicked on something!");
}
The way you listen to the click event is just like almost any other event that you’ll encounter, so I won’t unnecessarily bore you with that detail and our old friend addEventListener. Instead, I will bore you with details about the somewhat related dblclick event.
The dblclick event is fired when you quickly repeat a click action a double number of times, and the code for using it looks as follows:
let button = document.querySelector("#myButton");
button.addEventListener("dblclick", doSomething, false);

function doSomething(e) {
  console.log("Mouse clicked on something...twice!");
}
The amount of time between each click that ends up resulting in a dblclick event is based on the OS you are running the code in. It’s neither browser specific nor something you can define (or read) using JavaScript.
Don’t Overdo It
If you happen to listen to both the click and dblclick event on an element, your event handlers will get called three times when you double-click. You will get two click events to correspond to each time you clicked. After your second click, you will also get a dblclick event.
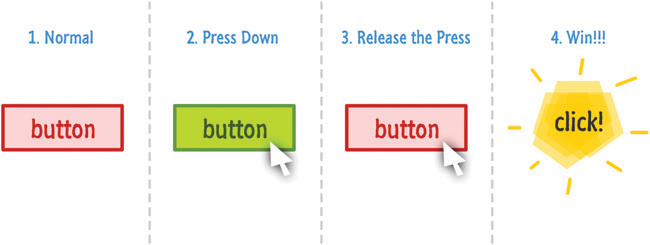
Mousing Over and Mousing Out
The classic hover over and hover out scenarios are handled by the appropriately titled mouseover and mouseout events respectively:
Here is a snippet of these two events in action:
let button = document.querySelector("#myButton");
button.addEventListener("mouseover", hovered, false);
button.addEventListener("mouseout", hoveredOut, false);

function hovered(e) {
  console.log("Hovered!");
}

function hoveredOut(e) {
  console.log("Hovered Away!");
}
That’s all there is to these two events. They are pretty boring overall...which, as you’ve probably found out by now, is actually a good thing when it comes to programming concepts.
What About the Other Two Similar-Looking Events?
We just looked at two events (mouseover and mouseout), which are all about hovering over something and hovering away from something. As it turns out, you have two more events that pretty much do the exact same thing. These are your mouseenter and mouseleave events. There is one important detail to know about these events that makes them unique. The mouseenter and mouseleave events do not bubble.
This detail only matters if the element you are interested in hovering over or out from has child elements. All four of these events behave identically when there are no child elements at play. If there are child elements at play:
mouseoverandmouseoutwill get fired each time you move the mouse over and around a child element. This means that you could be seeing many unnecessary event fires even though it seems like you are moving your mouse within a single region.mouseenterandmouseleavewill get fired only once. It doesn’t matter how many child elements your mouse moves through.
For 90% of what you will do, mouseover and mouseout will be good enough. For the other times, often involving slightly more complex UI scenarios, you’ll be happy that the non-bubbling mouseenter and mouseleave events are available.
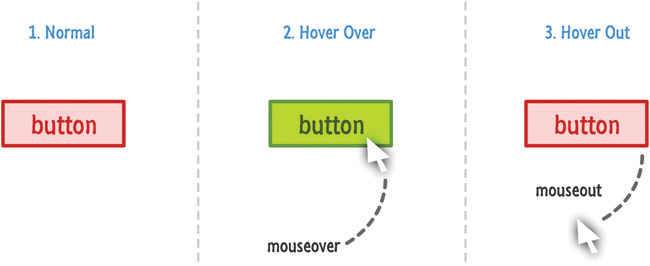
The Very Click-like Mousing Down and Mousing Up Events
Two events that are almost subcomponents of the click event are the mousedown and mouseup ones. From the following diagram, you’ll see why:
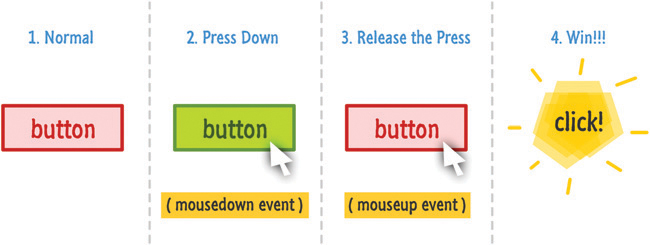
When you press down with your mouse, the mousedown event is fired. When you release the press, the mouseup event is fired. If the element you pressed down on and released from are the same element, the click event will also fire.
You can see all of this from the following snippet:
let button = document.querySelector("#myButton");
button.addEventListener("mousedown", mousePressed, false);
button.addEventListener("mouseup", mouseReleased, false);
button.addEventListener("click", mouseClicked, false);

function mousePressed(e) {
  console.log("Mouse is down!");
}

function mouseReleased(e) {
  console.log("Mouse is up!");
}

function mouseClicked(e) {
  console.log("Mouse is clicked!");
}
You may be wondering, “Why bother with these two events?” The click event seems perfectly suited for most cases where you may want to use mousedown and mouseup. If you are spending sleepless nights wondering about this, the answer is...Yes! A more helpful (and sensible) answer is that the mousedown and mouseup events simply give you more control in case you need it. Some interactions (such as drags...or awesome moves in video games where you press and hold to charge a lightning bolt of doom!) need you to act only when the mousedown event has happened but the mouseup event hasn’t.
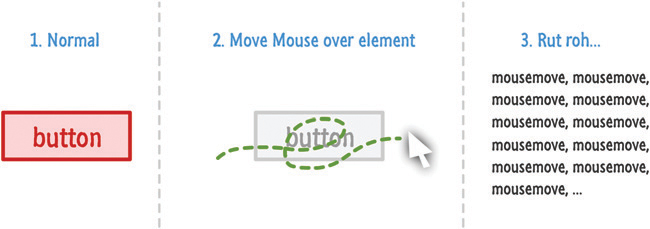
The Event Heard Again...and Again...and Again!
One of the most chatty events that you’ll ever encounter is the very friendly mousemove event. This event fires a whole lotta times as your mouse moves over the element you are listening for the mousemove event on:
What follows is an example of the mousemove event in code:
let button = document.querySelector("#myButton");
button.addEventListener("mousemove", mouseIsMoving, false);

function mouseIsMoving(e) {
  console.log("Mouse is on the run!");
}
Your browser controls the rate at which the mousemove event gets fired, and this event gets fired if your mouse moves even a single pixel. This event is great for many interactive scenarios where your mouse’s current position is relevant to keep track of, for example.
The Context Menu
The last mouse-related event we are going to look at is affectionately called contextmenu. As you probably know very well, when you commonly right-click in various applications, you will see a menu:

This menu is known as the context menu. The contextmenu event is fired just before this menu appears.
Now, you may be wondering why anybody would want an event for this situation. To be completely honest with you (as opposed to all of the other times when I’ve been lying), there is only one primary reason to listen for this event. That reason has to do with preventing this menu from appearing when you right-click or use a context menu keyboard button or shortcut.
Here is an example of how you can prevent the default behavior where the context menu appears:
document.addEventListener("contextmenu", hideMenu, false);

function hideMenu(e) {
  e.preventDefault();
}
The preventDefault method on any type of Event stops whatever the default behavior is from actually happening. Because the contextmenu event is fired before the menu appears, calling preventDefault on it ensures the context menu never shows up. The default behavior has been prevented from running. Yes, this is also the second time I’m mentioning this property. As you know, I am being paid by the word (ha ha).
With all of this said, I can think of a billion other ways you could prevent the context menu from appearing without using an event for dealing with all of this, but that’s the way things are...for now <insert evil, maniacal laughter>!
The MouseEvent Properties
Let’s get a little bit more specific. All of the mouse events we’ve seen so far are based around MouseEvent. Normally, this is the kind of factoid you keep under your hat for trivia night and ignore. This time around, though, this detail is important because MouseEvent brings with it a number of properties that make working with the mouse easier. Let’s look at some of them.
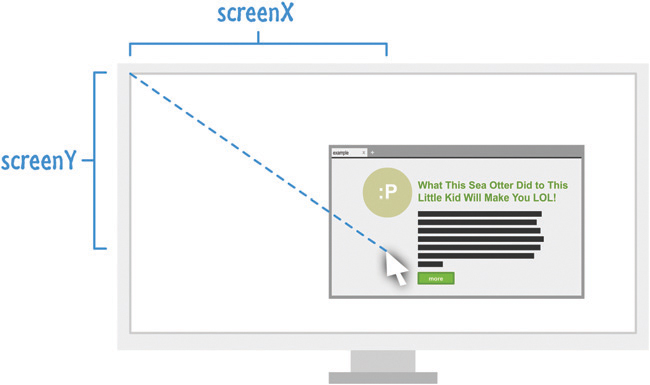
The Global Mouse Position
The screenX and screenY properties return the distance your mouse cursor is from the top-left location of your primary monitor:
Here is a very simple example of the screenX and screenY properties at work:
document.addEventListener("mousemove", mouseMoving, false);

function mouseMoving(e) {
  console.log(e.screenX + " " + e.screenY);
}
It doesn’t matter what other margin/padding/offset/layout craziness you may have going on in your page. The values returned are always going to be the distance between where your mouse is now and where the top-left corner of your primary monitor is.
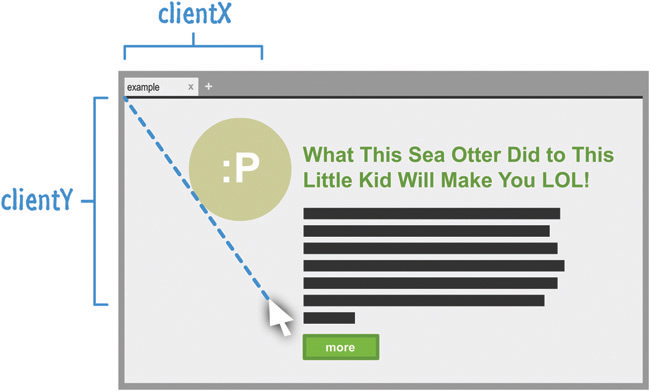
The Mouse Position Inside the Browser
The clientX and clientY properties return the x and y position of the mouse relative to your browser’s (technically, the browser viewport’s) top-left corner:
The code for this is nothing exciting:
let button = document.querySelector("#myButton");
document.addEventListener("mousemove", mouseMoving, false);

function mouseMoving(e) {
  console.log(e.clientX + " " + e.clientY);
}
You just call the clientX and clientY properties of the event argument that got passed in to our event handler to get the values.
Detecting Which Button Was Clicked
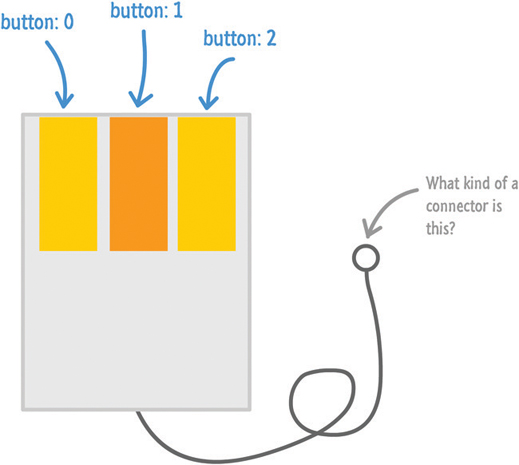
Your mice often have multiple buttons or ways to simulate multiple buttons. The most common button configuration involves a left button, a right button, and a middle button (often a click on your mouse wheel). To figure out which mouse button was pressed, you have the button property. This property returns a 0 if the left mouse button was pressed, a 1 if the middle button was pressed, and a 2 if the right mouse button was pressed:
The code for using the button property to check for which button was pressed looks exactly as you would expect:
document.addEventListener("mousedown", buttonPress, false);
function buttonPress(e) {
  if (e.button == 0) {
    console.log("Left mouse button pressed!");
  } else if (e.button == 1) {
    console.log("Middle mouse button pressed!");
  } else if (e.button == 2) {
    console.log("Right mouse button pressed!");
  } else {
    console.log("Things be crazy up in here!!!");
  }
}
In addition to the button property, you also have the buttons and properties that sort of do similar things to help you figure out which button was pressed. I’m not going to talk too much about those two properties, but just know that they exist. You can Google them if you want to know more.
Dealing with the Mouse Wheel
The mouse wheel is special compared to everything else we’ve seen so far. The obvious difference is that we are dealing with a wheel as opposed to a button. The less obvious, yet probably more relevant, detail is that you have two events to deal with. You have the mousewheel event that is used by Internet Explorer and Chrome and the DOMMouseScroll event used by Firefox.
The way you listen for these mouse wheel-related events is just the usual:
document.addEventListener("mousewheel", mouseWheeling, false);
document.addEventListener("DOMMouseScroll", mouseWheeling, false);
It’s what happens afterwards where things get interesting. The mousewheel and DOMMouseScroll events will fire the moment you scroll the mouse wheel in any direction. For all practical purposes, the direction you are scrolling the mousewheel is important. To get that information, we’ll need to go spelunking in the event handler to find the event argument.
The event arguments for a mousewheel event contain a property known as wheelDelta. For the DOMMouseScroll event, you have the detail property on the event argument. Both of these properties are similar in that their values change from positive or negative depending on what direction you scroll the mouse wheel. The thing to note is that they are inconsistent in what sign they go with. The wheelDelta property associated with the mousewheel event is positive when you scroll up on the mouse wheel. It is negative when you scroll down. The exact opposite holds true for DOMMouseScroll’s detail property. This property is negative when you scroll up, and it is positive when you scroll down.
Handling this wheelDelta and detail inconsistency is pretty simple...as you can see in the following snippet:
function mouseWheeling(e) {
  let scrollDirection;
  let wheelData = e.wheelDelta;

  if (wheelData) {
    scrollDirection = wheelData;
  } else {
    scrollDirection = -1 * e.detail;
  }

  if (scrollDirection > 0) {
    console.log("Scrolling up! " + scrollDirection);
  } else {
    console.log("Scrolling down! " + scrollDirection);
  }
}
The scrollDirection variable stores the value contained by the wheelData property or the detail property. Depending on whether this value is positive or negative, you can then special case the behavior.
The Absolute Minimum
Generally, it is true that if you know how to just work with one event, you pretty much know how to work with all other events. The only thing you need to know is which event corresponds to what you are trying to do. The mouse events are a good introduction to working with events because they are very easy to play with. They aren’t very fussy, and the things you learn about them you will use in almost all apps that you build.
Some additional resources and examples that you may want to check out:
Move Element to Click Position: http://bit.ly/kirupaElementClickPosition
Are You on a Touch-Enabled Device: http://bit.ly/kirupaTouchEnabled
If you have any further questions, take a moment and ask away on https://forum.kirupa.com.