

THE DOM TREE IS A MODEL OF A WEB PAGE
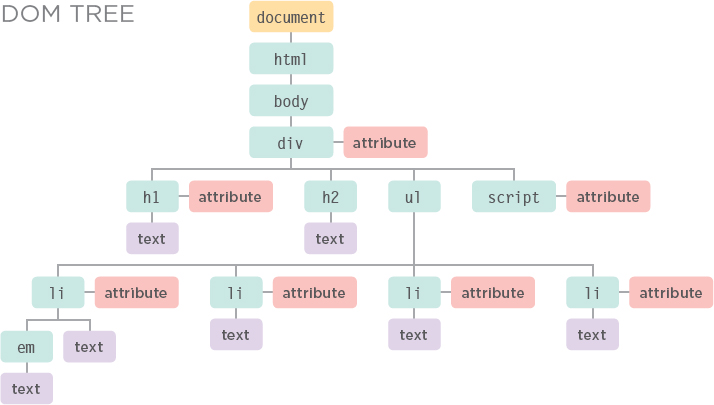
As a browser loads a web page, it creates a model of that page. The model is called a DOM tree, and it is stored in the browsers’ memory. It consists of four main types of nodes.
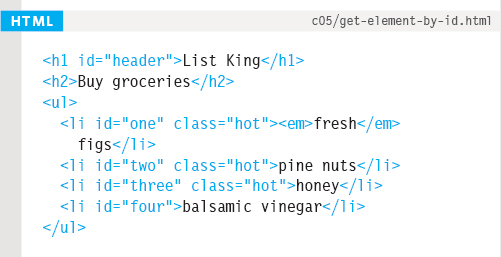
BODY OF HTML PAGE
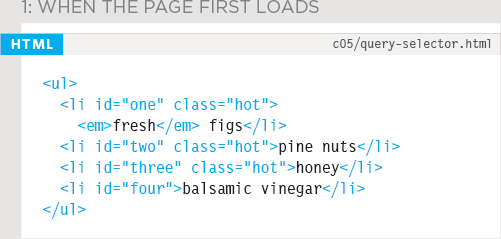
<html>
  <body>
    <div id=“page”>
      <h1 id=“header”>List</h1>
      <h2>Buy groceries</h2>
      <ul>
        <li id=“one” class=“hot”><em>fresh</em> figs</li>
        <li id=“two” class=“hot”>pine nuts</li>
        <li id=“three” class=“hot”>honey</li>
        <li id=“four”>balsamic vinegar</li>
      </ul>
      <script src=“js/list.js”></script>
    </div>
  </body>
</html>
 THE DOCUMENT NODE
Above, you can see the HTML code for a shopping list, and on the right hand page is its DOM tree. Every element, attribute, and piece of text in the HTML is represented by its own DOM node. At the top of the tree a document node is added; it represents the entire page (and also corresponds to the document object, which you first met on p36).
When you access any element, attribute, or text node, you navigate to it via the document node. It is the starting point for all visits to the DOM tree.
 ELEMENT NODES
HTML elements describe the structure of an HTML page. (The <h1> - <h6> elements describe what parts are headings; the <p> tags indicate where paragraphs of text start and finish; and so on.)
To access the DOM tree, you start by looking for elements. Once you find the element you want, then you can access its text and attribute nodes if you want to. This is why you start by learning methods that allow you to access element nodes, before learning to access and alter text or attributes.
Note: We will continue to use this list example throughout this chapter and the next two chapters so that you can see how different techniques allow you to access and update the web page (which is represented by this DOM tree).
Relationships between the document and all of the element nodes are described using the same terms as a family tree: parents, children, siblings, ancestors, and descendants. (Every node is a descendant of the document node.)
Each node is an object with methods and properties. Scripts access and update this DOM tree (not the source HTML file). Any changes made to the DOM tree are reflected in the browser.
 ATTRIBUTE NODES
The opening tags of HTML elements can carry attributes and these are represented by attribute nodes in the DOM tree.
Attribute nodes are not children of the element that carries them; they are part of that element. Once you access an element, there are specific JavaScript methods and properties to read or change that element's attributes. For example, it is common to change the values of class attributes to trigger new CSS rules that affect their presentation.
 TEXT NODES
Once you have accessed an element node, you can then reach the text within that element. This is stored in its own text node.
Text nodes cannot have children. If an element contains text and another child element, the child element is not a child of the text node but rather a child of the containing element. (See the <em> element on the first <li> item.) This illustrates how the text node is always a new branch of the DOM tree, and no further branches come off of it.
WORKING WITH THE DOM TREE
Accessing and updating the DOM tree involves two steps:
1: Locate the node that represents the element you want to work with.
2: Use its text content, child elements, and attributes.
STEP 1: ACCESS THE ELEMENTS
Here is an overview of the methods and properties that access elements covered on p192 - p211.
The first two columns are known as DOM queries. The last column is known as traversing the DOM.
SELECT AN INDIVIDUAL ELEMENT NODE
Here are three common ways to select an individual element:
getElementById()
Uses the value of an element's id attribute (which should be unique within the page). See p195
querySelector()
Uses a CSS selector, and returns the first matching element. See p202
You can also select individual elements by traversing from one element to another within the DOM tree (see third column).
SELECT MULTIPLE ELEMENTS (NODELISTS)
There are three common ways to select multiple elements.
getElementsByClassName()
Selects all elements that have a specific value for their class attribute. See p200
getElementsByTagName()
Selects all elements that have the specified tag name. See p201
querySelectorAll()
Uses a CSS selector to select all matching elements. See p202
TRAVERSING BETWEEN ELEMENT NODES
You can move from one element node to a related element node.
parentNode
Selects the parent of the current element node (which will return just one element). See p208
previousSibling / nextSibling
Selects the previous or next sibling from the DOM tree. See p210
firstChild / lastChild
Select the first or last child of the current element. See p211
Throughout the chapter you will see notes where DOM methods only work in certain browsers or are buggy. Inconsistent browser support for the DOM was a key reason why jQuery became so popular.
The terms elements and element nodes are used interchangeably but when people say the DOM is working with an element, it is actually working with a node that represents that element.
STEP 2: WORK WITH THOSE ELEMENTS
Here is an overview of methods and properties that work with the elements introduced on p186.
ACCESS / UPDATE TEXT NODES
The text inside any element is stored inside a text node. To access the text node above:
1. Select the <li> element
2. Use the firstChild property to get the text node
3. Use the text node's only property (nodeValue) to get the text from the element
nodeValue
This property lets you access or update contents of a text node.
See p214
The text node does not include text inside any child elements.
WORK WITH HTML CONTENT
One property allows access to child elements and text content:
innerHTML
See p220
Another just the text content:
textContent
See p216
Several methods let you create new nodes, add nodes to a tree, and remove nodes from a tree:
createElement()
createTextNode()
appendChild() / removeChild()
This is called DOM manipulation.
See p222
ACCESS OR UPDATE ATTRIBUTE VALUES
Here are some of the properties and methods you can use to work with attributes:
className / id
Lets you get or update the value of the class and id attributes.
See p232
hasAttribute()
getAttribute()
setAttribute()
removeAttribute()
The first checks if an attribute exists. The second gets its value. The third updates the value. The fourth removes an attribute.
See p232
CACHING DOM QUERIES
Methods that find elements in the DOM tree are called DOM queries. When you need to work with an element more than once, you should use a variable to store the result of this query.
When a script selects an element to access or update, the interpreter must find the element(s) in the DOM tree.
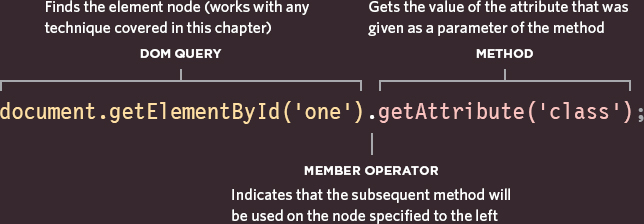
Below, the interpreter is told to look through the DOM tree for an element whose id attribute has a value of one.
Once it has found the node that represents the element(s), you can work with that node, its parent, or any children.
When people talk about storing elements in variables, they are really storing the location of the element(s) within the DOM tree in a variable. The properties and methods of that element node work on the variable.
If your script needs to use the the same element(s) more than once, you can store the location of the element(s) in a variable.
This saves the browser looking through the DOM tree to find the same element(s) again. It is known as caching the selection.
Programmers would say that the variable stores a reference to the object in the DOM tree. (It is storing the location of the node.)

itemOne does not store the <li> element, it stores a reference to where that node is in the DOM tree. To access the text content of this element, you might use the variable name: itemOne.textContent
ACCESSING ELEMENTS
DOM queries may return one element, or they may return a NodeList, which is a collection of nodes.
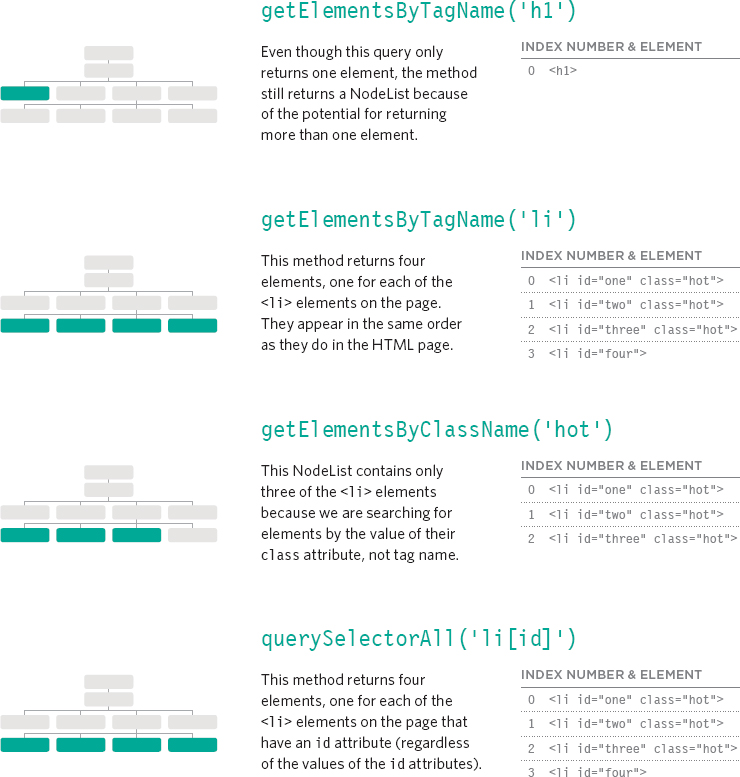
Sometimes you will just want to access one individual element (or a fragment of the page that is stored within that one element). Other times you may want to select a group of elements, for example, every <h1> element in the page or every <li> element within a particular list.
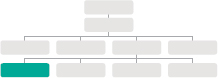
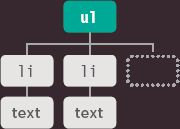
Here, the DOM tree shows the body of the page of the list example. We focus on accessing elements first so it only shows element nodes. The diagrams in the coming pages highlight which elements a DOM query would return. (Remember, element nodes are the DOM representation of an element.)
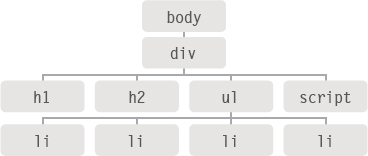
GROUPS OF ELEMENT NODES
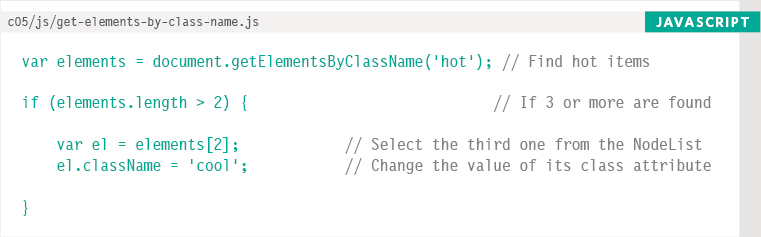
If a method can return more than one node, it will always return a NodeList, which is a collection of nodes (even if it only finds one matching element). You then need to select the element you want from this list using an index number (which means the numbering starts at 0 like the items in an array).
For example, several elements can have the same tag name, so getElementsByTagName() will always return a NodeList.
FASTEST ROUTE
Finding the quickest way to access an element within your web page will make the page seem faster and/or more responsive. This usually means evaluating the minimum number of nodes on the way to the element you want to work with. For example, getElementById() will quickly return one element (because no two elements on the same page should have the same value for an id attribute), but it can only be used when the element you want to access has an id attribute.
METHODS THAT RETURN A SINGLE ELEMENT NODE:
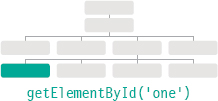
Selects an individual element given the value of its id attribute. The HTML must have an id attribute in order for it to be selectable.
First supported: IE5.5, Opera 7, all versions of Chrome, Firefox, Safari.
querySelector(‘css selector’)
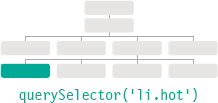
Uses CSS selector syntax that would select one or more elements. This method returns only the first of the matching elements.
First supported: IE8, Firefox 3.5, Safari 4, Chrome 4, Opera 10
METHODS THAT RETURN ONE OR MORE ELEMENTS (AS A NODELIST):
getElementsByClassName(‘class’)

Selects one or more elements given the value of their class attribute. The HTML must have a class attribute for it to be selectable. This method is faster than querySelectorAll().
First supported: IE9, Firefox 3, Safari 4, Chrome 4, Opera 10 (Several browsers had partial / buggy support in earlier versions)
getElementsByTagName(‘tagName’)
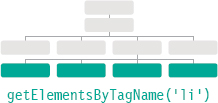
Selects all elements on the page with the specified tag name. This method is faster than querySelectorAll().
First supported: IE6+, Firefox 3, Safari 4, Chrome, Opera 10 (Several browsers had partial / buggy support in earlier versions)
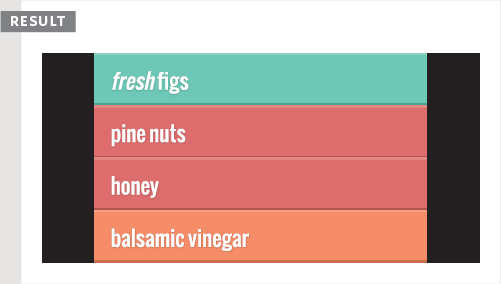
querySelectorAll(‘css selector’)
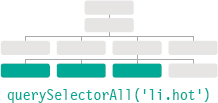
Uses CSS selector syntax to select one or more elements and returns all of those that match.
First supported: IE8, Firefox 3.5, Safari 4, Chrome 4, Opera 10
METHODS THAT SELECT INDIVIDUAL ELEMENTS
getElementById() and querySelector() can both search an entire document and return individual elements. Both use a similar syntax.
getElementById() is the quickest and most efficient way to access an element because no two elements can share the same value for their id attribute. The syntax for this method is shown below, and an example of its use is on the page to the right.
querySelector() is a more recent addition to the DOM, so it is not supported in older browsers. But it is very flexible because its parameter is a CSS selector, which means it can be used to accurately target many more elements.
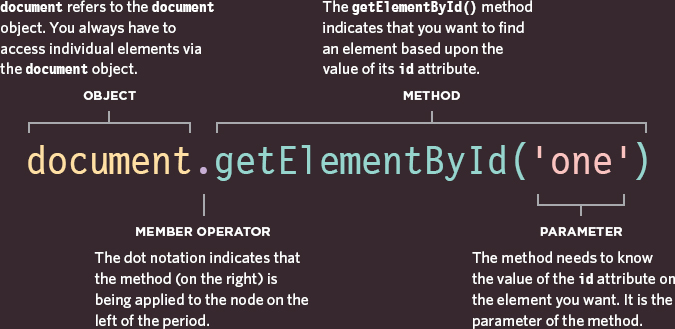
This code will return the element node for the element whose id attribute has a value of one. You often see element nodes stored in a variable for use later in the script (as you saw on p190).
Here the method is used on the document object so it looks for that element anywhere within the page. DOM methods can also be used on element nodes within the page to find descendants of that node.
SELECTING ELEMENTS USING ID ATTRIBUTES
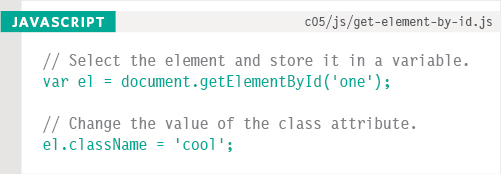

getElementById() allows you to select a single element node by specifying the value of its id attribute.
This method has one parameter: the value of the id attribute on the element you want to select. This value is placed inside quote marks because it is a string. The quotes can be single or double quotes, but they must match.
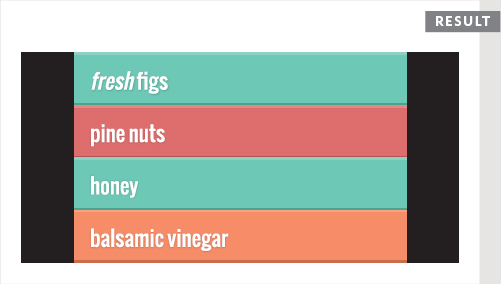
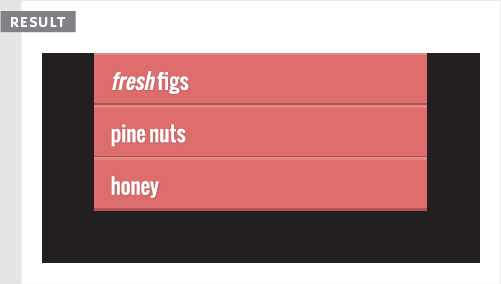
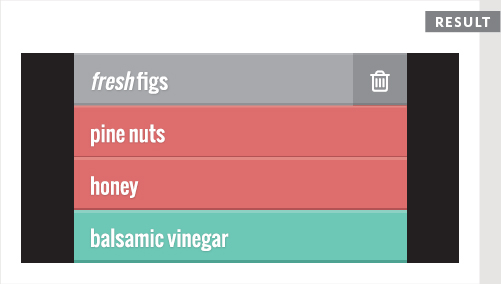
In the example on the left, the first line of JavaScript code finds the element whose id attribute has a value of one, and stores a reference to that node in a variable called el.
The code then uses a property called className (which you meet on p232) to update the value of the class attribute of the element stored in this variable. Its value is cool, and this triggers a new rule in the CSS that sets the background color of the element to aqua.
Note how the className property is used on the variable that stores the reference to the element.
Browser Support: This is one of the oldest and best supported methods for accessing elements.
This result window shows the example after the script has updated the first list item. The original state, before the script ran, is shown on p185.
NODELISTS: DOM QUERIES THAT RETURN MORE THAN ONE ELEMENT
When a DOM method can return more than one element, it returns a NodeList (even if it only finds one matching element).
A NodeList is a collection of element nodes. Each node is given an index number (a number that starts at zero, just like an array).
The order in which the element nodes are stored in a NodeList is the same order that they appeared in the HTML page.
When a DOM query returns a NodeList, you may want to:
- Select one element from the NodeList.
- Loop through each item in the NodeList and perform the same statements on each of the element nodes.
NodeLists look like arrays and are numbered like arrays, but they are not actually arrays; they are a type of object called a collection.
Like any other object, a NodeList has properties and methods, notably:
- The length property tells you how many items are in the NodeList.
- The item() method returns a specific node from the NodeList when you tell it the index number of the item that you want (in the parentheses). However, it is more common to use array syntax (with square brackets) to retrieve an item from a NodeList (as you will see on p199).
LIVE & STATIC NODELISTS
There are times when you will want to work with the same selection of elements several times, so the NodeList can be stored in a variable and re-used (rather than collecting the same elements again).
In a live NodeList, when your script updates the page, the NodeList is updated at the same time. The methods beginning getElementsBy… return live NodeLists. They are also typically faster to generate than static NodeLists.
In a static NodeList when your script updates the page, the NodeList is not updated to reflect the changes made by the script.
The new methods that begin querySelector… (which use CSS selector syntax) return static NodeLists. They reflect the document when the query was made. If the script changes the content of the page, the NodeList is not updated to reflect those changes.
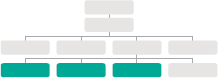
Here you can see four different DOM queries that all return a NodeList. For each query, you can see the elements and their index numbers in the NodeList that is returned.
SELECTING AN ELEMENT FROM A NODELIST
There are two ways to select an element from a NodeList: The item() method and array syntax. Both require the index number of the element you want.
THE item() METHOD
NodeLists have a method called item() which will return an individual node from the NodeList.
You specify the index number of the element you want as a parameter of the method (inside the parentheses).
Executing code when there are no elements to work with wastes resources. So programmers often check that there is at least one item in the NodeList before running any code. To do this, use the length property of the NodeList - it tells you how many items the NodeList contains.
Here you can see that an if statement is used. The condition for the if statement is whether the length property of the NodeList is greater than zero. If it is, then the statements inside the if statement are executed. If not, the code continues to run after the second curly brace.

1
Select elements that have a class attribute whose value is hot and store the NodeList in a variable called elements.
2
Use the length property to check how many elements were found. If 1 or more are found, run the code in the if statement.
3
Store the first element from the NodeList in a variable called firstItem. (It says 0 because index numbers start at zero.)
Array syntax is preferred over the item() method because it is faster. Before selecting a node from a NodeList, check that it contains nodes. If you repeatedly use the NodeList, store it in a variable.
ARRAY SYNTAX
You can access individual nodes using a square bracket syntax similar to that used to access individual items from an array.
You specify the index number of the element you want inside square brackets that follow the NodeList.
As with all DOM queries, if you need to access the same NodeList several times, store the result of the DOM query in a variable.
In the examples on both of these pages, the NodeList is stored in a variable called elements.
If you create a variable to hold a NodeList (as shown below) but there are no matching elements, the variable will be an empty NodeList. When you check the length property of the variable, it will return the number 0 because it does not contain any elements.

1
Create a NodeList containing elements that have a class attribute whose value is hot, and store it in the variable elements.
2
If that number is greater than or equal to one, run the code inside the if statement.
3
Get the first element from the NodeList (it says 0 because index numbers start at zero).
SELECTING ELEMENTS USING CLASS ATTRIBUTES
The getElementsByClassName() method allows you to select elements whose class attribute contains a specific value.
The method has one parameter: the class name which is given in quotes within the parentheses after the method name.
Because several elements can have the same value for their class attribute, this method always returns a NodeList.
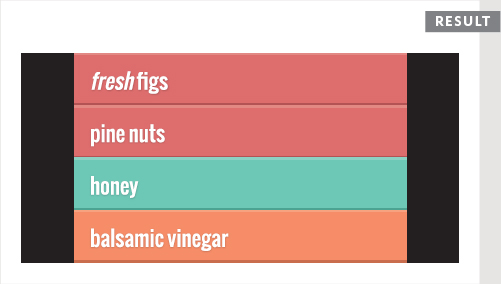
This example starts by looking for elements whose class attribute contains hot. (The value of a class attribute can contain several class names, each separated by a space.) The result of this DOM query is stored in a variable called elements because it is used more than once in the example.
An if statement checks if the query found more than two elements. If so, the third one is selected and stored in a variable called el. The class attribute of that element is then updated to say class. (In turn, this triggers a new CSS style, changing the presentation of that element.)
Browser Support: IE9, Firefox 3, Chrome 4, Opera 9.5, Safari 3.1
SELECTING ELEMENTS BY TAG NAME
The getElementsByTagName() method allows you to select elements using their tag name.
The element name is specified as a parameter, so it is placed inside the parentheses and is contained by quote marks.
Note that you do not include the angled brackets that surround the tag name in the HTML (just the letters inside the brackets).

This example looks for any <li> elements in the document. It stores the result in a variable called elements because the result is used more than once in this example.
An if statement checks if any <li> elements were found. As with any element that can return a NodeList, you check that there will be a suitable element before you try to work with it.
If matching elements were found, the first one is selected and its class attribute is updated. This changes the color of the list item to make it aqua.
Browser Support: Very good - it is safe to use in any scripts.
SELECTING ELEMENTS USING CSS SELECTORS
querySelector() returns the first element node that matches the CSS-style selector. querySelectorAll() returns a NodeList of all of the matches.
Both methods take a CSS selector as their only parameter. The CSS selector syntax offers more flexibility and accuracy when selecting an element than just specifying a class name or a tag name, and should also be familiar to front-end web developers who are used to targeting elements using CSS.
These two methods were introduced by browser manufacturers because a lot of developers were including scripts like jQuery in their pages so that they could select elements using CSS selectors. (You meet jQuery in Chapter 7.)
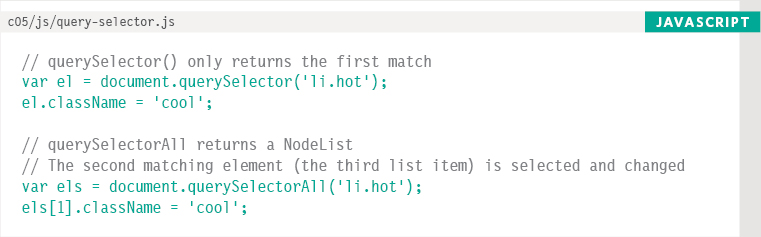
If you look at the final line of code, array syntax is used to select the second item from the NodeList, even though that NodeList is stored in a variable.
Browser Support: The drawback with these two methods is that they are only supported in more recent browsers.
IE8+ (released Mar 2009)
Firefox 3.5+ (released Jun 2009)
Chrome 1+ (released Sep 2008)
Opera 10+ (released Sep 2009)
Safari 3.2+ (released Nov 2008)
JavaScript code runs one line at a time, and statements affect the content of a page as the interpreter processes them.
If a DOM query runs when a page loads, the same query could return different elements if it is used again later in the page.
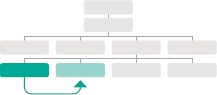
Below you can see how the example on the left-hand page (query-selector.js) changes the DOM tree as it runs.
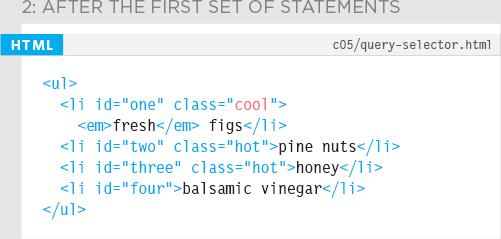
1. This is how the page starts. There are three <li> elements that have a class attribute whose value is hot. The querySelector() method finds the first one, and updates the value of its class attribute from hot to cool. This also updates the DOM tree stored in memory so - after this line has run - only the second and third <li> elements have a class attribute with a value of hot.
2. When the second selector runs, there are now only two <li> elements whose class attributes have a value of hot (see left), so it just selects these two. This time, array syntax is used to work with the second of the matching elements (which is the third list item). Again the value of its class attribute is changed from hot to cool.
3. When the second selector has done its job, the DOM tree now only holds one <li> element whose class attribute has a value of hot. Any further code looking for <li> elements whose class attribute has a value of hot would find only this one. However, if they were looking for <li> elements whose class attribute has a value of cool, they would find two matching element nodes.
REPEATING ACTIONS FOR AN ENTIRE NODELIST
When you have a NodeList, you can loop through each node in the collection and apply the same statements to each.
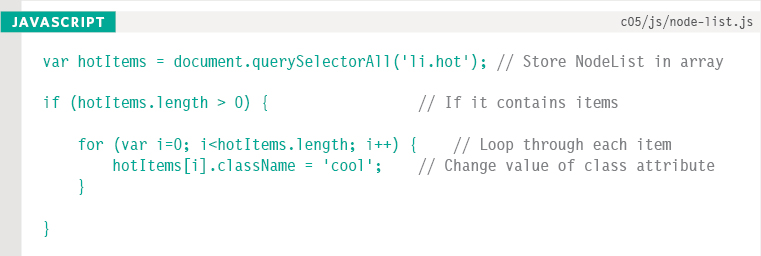
In this example, once a NodeList has been created, a for loop is used to go through each element in the NodeList.
All of the statements inside the for loop's curly braces are applied to each element in the NodeList one-by-one.
To indicate which item of the NodeList is currently being worked with, the counter i is used in the array-style syntax.

1
The variable hotItems contains a NodeList. It contains all list items whose class attribute has a value of hot. They are collected using the querySelectorAll() method.
2
The length property of the NodeList indicates how many elements are in the NodeList. The number of elements dictates how many times the loop should run.
3
Array syntax is used to indicate which item in the NodeList is currently being worked with: hotItems[i] It uses the counter variable inside the square brackets.
LOOPING THROUGH A NODELIST
If you want to apply the same code to numerous elements, looping through a NodeList is a powerful technique.
It involves finding out how many items are in the NodeList, and then setting a counter to loop through them, one-by-one.
Each time the loop runs, the script checks that the counter is less than the total number of items in the NodeList.
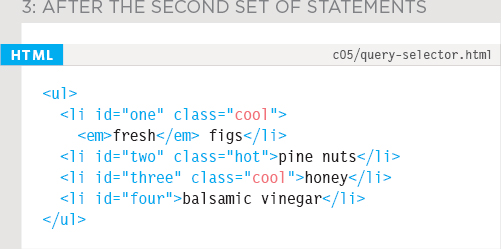
In this example, the NodeList is generated using querySelectorAll(), and it is looking for any <li> elements that have a class attribute whose value is hot.
The NodeList is stored in a variable called hotItems, and the number of elements in the list is found using the length property.
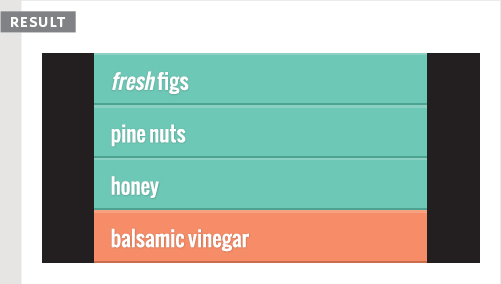
For each of the elements in the NodeList, the value of the class attribute is changed to cool.
LOOPING THROUGH A NODELIST: PLAY-BY-PLAY
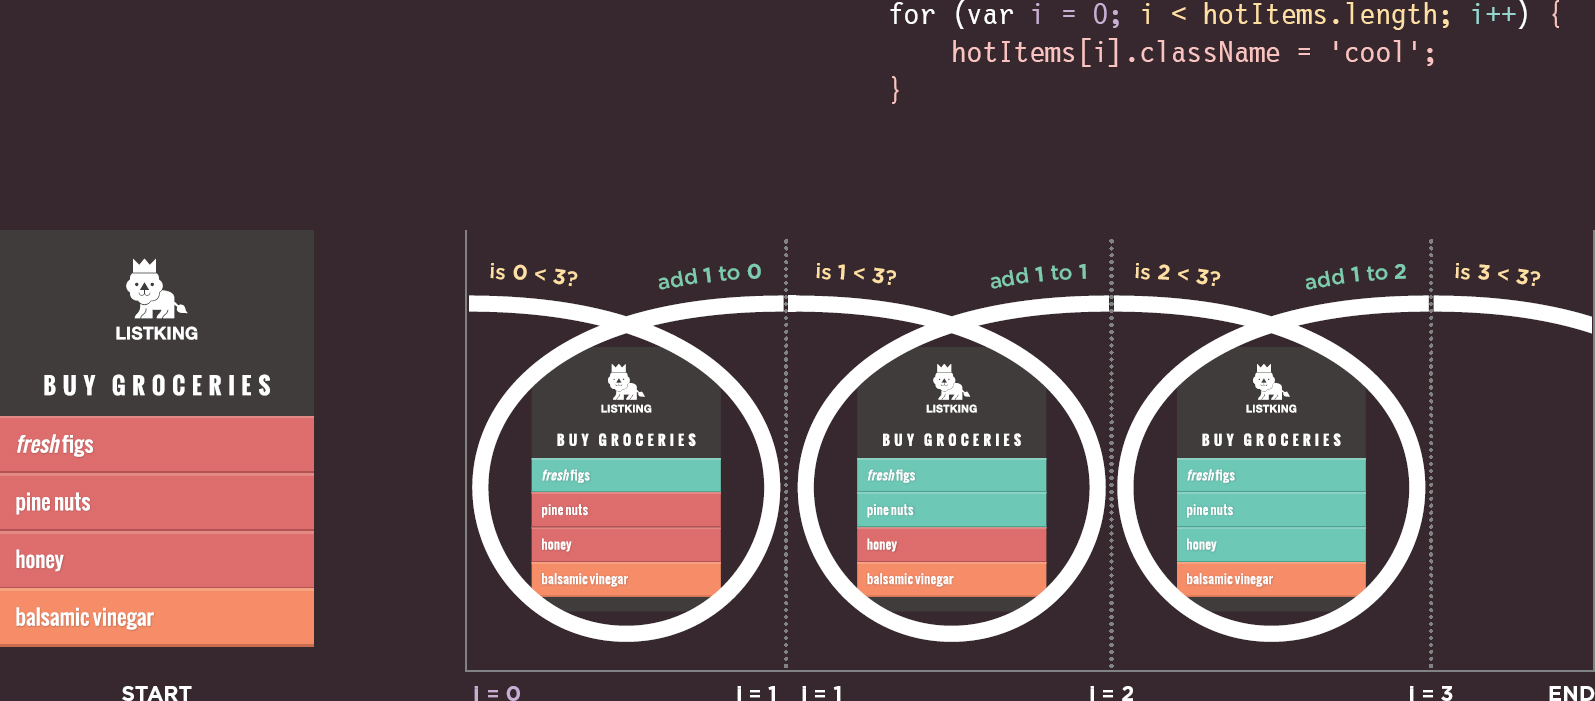
At the start of this example, there are three list items with a class attribute whose value is hot so the value of hotItems.length is 3.
At first, the value of the counter is set to 0, so the first item from the NodeList (which has an index of 0) is targeted and the value of its class attribute is set to cool.
When the value of the counter is 1, the second item from the NodeList (which has an index of 1) is targeted and the value of its class attribute is set to cool.
When the value of the counter is 2, the third item from the NodeList (which has an index of 2) is targeted and the value of its class attribute is set to cool.
When the value of the counter is 3, the condition no longer returns true, so the loops ends. The script then continues to the first line of code after the loop.
TRAVERSING THE DOM
When you have an element node, you can select another element in relation to it using these five properties. This is known as traversing the DOM.
parentNode
This property finds the element node for the containing (or parent) element in the HTML.
(1) If you started with the first <li> element, then its parent node would be the one representing the <ul> element.
previousSibling nextSibling
These properties find the previous or next sibling of a node if there are siblings.
If you started with the first <li> element, it would not have a previous sibling. However, its next sibling (2) would be the node representing the second <li>.
firstChild lastChild
These properties find the first or last child of the current element.
If you started with the <ul> element, the first child would be the node representing the first <li> element, and (3) the last child would be the last <li>.

These are properties of the current node (not methods to select an element); therefore, they do not end in parentheses.
If you use these properties and they do not have a previous/next sibling, or a first/last child, the result will be null.
These properties are read-only; they can only be used to select a new node, not to update a parent, sibling, or child.
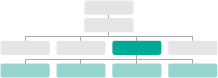
WHITESPACE NODES
Traversing the DOM can be difficult because some browsers add a text node whenever they come across whitespace between elements.
Most browsers, except IE, treat whitespace between elements (such as spaces or carriage returns) as a text node, so the properties below return different elements in different browsers:
previousSibling
nextSibling
firstChild
lastChild
Below, you can see all of the whitespace nodes added to the DOM tree for the list example. Each one is represented by a green square. You could strip all the whitespace out of a page before serving it to the browser. This would also make the page smaller and faster to serve/load. However, it would also make the code much harder to read.
Another way around this problem is to avoid using these DOM properties altogether.
One of the most popular ways to address this kind of problem is to use a JavaScript library such as jQuery, which helps deal with such problems. These types of browser inconsistencies were a big factor in jQuery's popularity.

Internet Explorer (shown above) ignores whitespace and does not create extra text nodes.

Chrome, Firefox, Safari, and Opera create text nodes from whitespace (spaces and carriage returns).
PREVIOUS & NEXT SIBLING
You have just seen that these properties can return inconsistent results in different browsers. However, it is safe to use them when there is no whitespace between elements.
For this example, all spaces between the HTML elements have been removed. In order to demonstrate these properties, the second list item is selected using getElementById().
From this element node, the previousSibling property will return the first <li> element, and the nextSibling property will return the third <li> element.

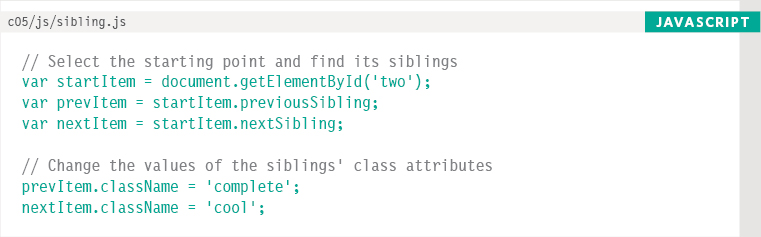
Note how references to sibling nodes are stored in new variables. This means properties such as className can be used on that node by adding the dot notation between the variable name and the property.
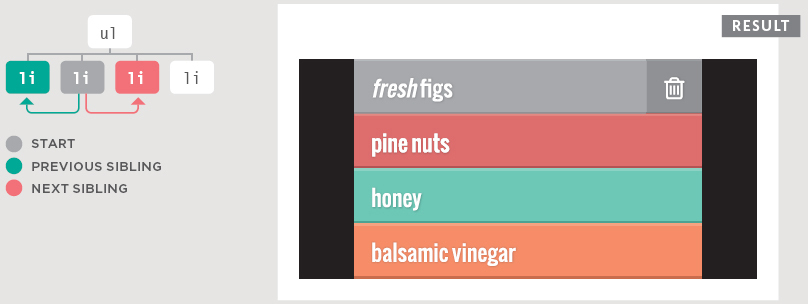
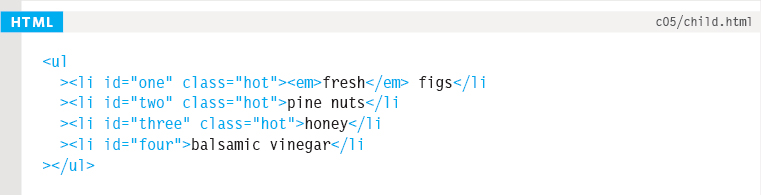
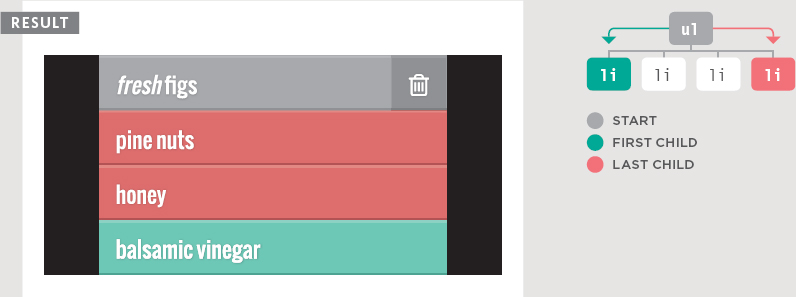
FIRST & LAST CHILD
These properties also return inconsistent results if there is whitespace between elements. In this example, a slightly different solution is used in the HTML - the closing tags are put next to the opening tags of the next element, making it a little more readable. The example starts by using the getElementsByTagName() method to select the <ul> element from the page. From this element node, the firstChild property will return the first <li> element, and the lastChild property will return the last <li> element.

HOW TO GET/UPDATE ELEMENT CONTENT
So far this chapter has focused on finding elements in the DOM tree. The rest of this chapter shows how to access/update element content. Your choice of techniques depends upon what the element contains.
Take a look at the three examples of <li> elements on the right. Each one adds some more markup and, as a result, the fragment of the DOM tree for each list item is very different.
- The first (on this page) just contains text.
- The second and third (on the right-hand page) contain a mix of text and an <em> element.
You can see that by adding something as simple as an <em> element, the DOM tree's structure changes significantly. In turn, this affects how you might work with that list item. When an element contains a mix of text and other elements, you are more likely to work with the containing element rather than the individual nodes for each descendant.
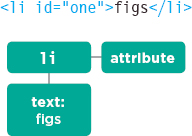
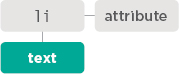
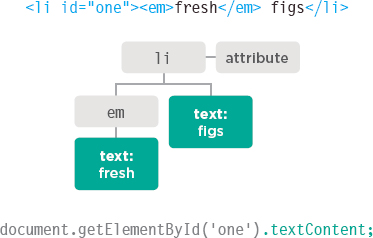
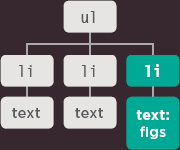
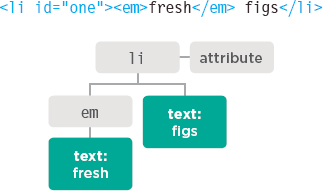
Above, the <li> element has:
- One child node holding the word that you can see in the list item: figs
- An attribute node holding the id attribute.
To work with the content of elements you can:
- Navigate to the text nodes. This works best when the element contains only text, no other elements.
- Work with the containing element. This allows you to access its text nodes and child elements. It works better when an element has text nodes and child elements that are siblings.
TEXT NODES
Once you have navigated from an element to its text node, there is one property that you will commonly find yourself using:
| PROPERTY | DESCRIPTION |
| nodeValue | Accesses text from node (p214) |
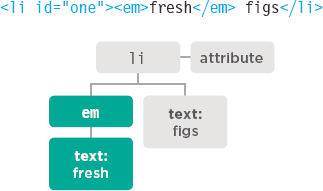
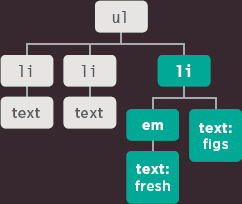
An <em> element is added. It becomes the first child.
- The <em> element node has its own child text node which contains the word fresh.
- The original text node is now a sibling of the node that represents the <em> element.
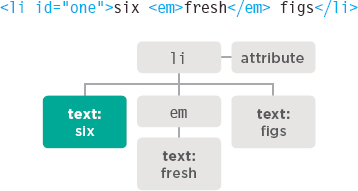
When text is added before the <em> element:
- The first child of the <li> element is a text node, which contains the word six.
- It has a sibling which is an element node for the <em> element. In turn, that <em> element node has a child text node containing the word fresh.
- Finally, there is a text node holding the word figs, which is a sibling of both the text node for the word “six” and the element node, <em>.
CONTAINING ELEMENT
When you are working with an element node (rather than its text node), that element can contain markup. You have to choose whether you want to retrieve (get) or update (set) the markup as well as the text.
| PROPERTY | DESCRIPTION |
| innerHTML | Gets/sets text & markup (p220) |
| textContent | Gets/sets text only (p216) |
| innerText | Gets/sets text only (p216) |
When you use these properties to update the content of an element, the new content will overwrite the entire contents of the element (both text and markup).
For example, if you used any of these properties to update the content of the <body> element, it would update the entire web page.
ACCESS & UPDATE A TEXT NODE WITH NODEVALUE
When you select a text node, you can retrieve or amend the content of it using the nodeValue property.
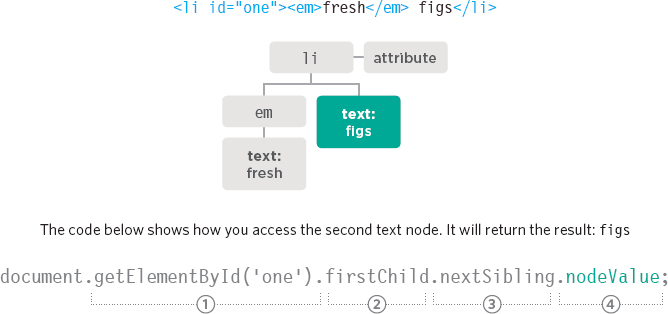
In order to use nodeValue, you must be on a text node, not the element that contains the text.
This example shows that navigating from the element node to a text node can be complicated.
If you do not know whether there will be element nodes alongside text nodes, it is easier to work with the containing element.
1. The <li> element node is selected using the getElementById() method.
2. The first child of <li> is the <em> element.
3. The text node is the next sibling of that <em> element.
4. You have the text node and can access its contents using nodeValue.
ACCESSING & CHANGING A TEXT NODE
To work with text in an element, first the element node is accessed and then its text node.
The text node has a property called nodeValue which returns the text in that text node.
You can also use the nodeValue property to update the content of a text node.
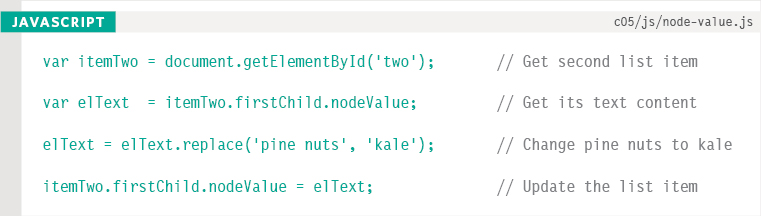
This example takes the text content of the second list item and changes it from pine nuts to kale.
The first line collects the second list item. It is stored in a variable called itemTwo.
Next the text content of that element is stored in a variable called elText.
The third line of text replaces the words ‘pine nuts’ with ‘kale’ using the String object's replace() method.
The last line uses the nodeValue property to update the content of the text node with the updated value.
ACCESS & UPDATE TEXT WITH TEXTCONTENT (& INNERTEXT)
The textContent property allows you to collect or update just the text that is in the containing element (and its children).
textContent
To collect the text from the <li> elements in our example (and ignore any markup inside the element) you can use the textContent property on the containing <li> element. In this case it would return the value: fresh figs.
You can also use this property to update the content of the element; it replaces the entire content of it (including any markup).
One issue with the textContent property is that Internet Explorer did not support it until IE9. (All other major browsers support it.)
innerText
You may also come across a property called innerText, but you should generally avoid it for three key reasons:
SUPPORT
Although most browser manufacturers adopted the property, Firefox does not because innerText is not part of any standard.
OBEYS CSS
It will not show any content that has been hidden by CSS. For example, if there were a CSS rule that hid the <em> elements, the innerText property would return only the word figs.
PERFORMANCE
Because the innerText property takes into account layout rules that specify whether the element is visible or not, it can be slower to retrieve the content than the textContent property.
ACCESSING TEXT ONLY
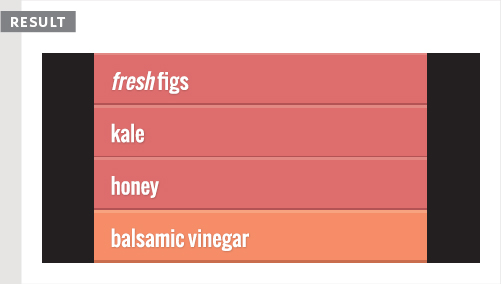
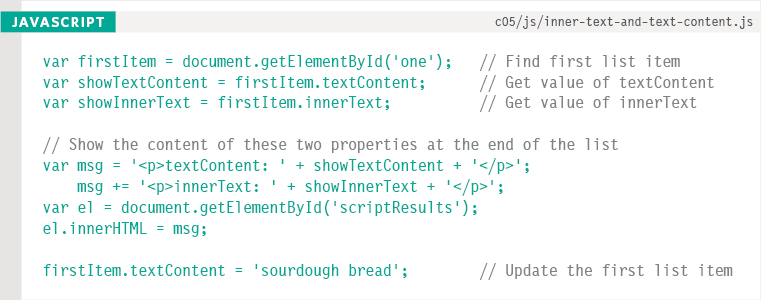
In order to demonstrate the difference between textContent and innerText, this example features a CSS rule to hide the contents of the <em> element.
The script starts off by getting the content of the first list item using both the textContent property and innerText. It then writes the values after the list.
Finally, the value of the first list item is then updated to say sourdough bread. This is done using the textContent property.
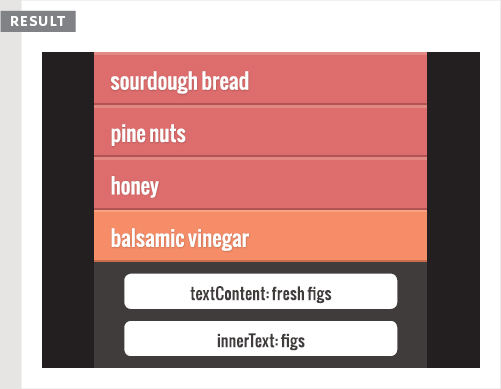
In most browsers:
- textContent collects the words fresh figs.
- innerHTML just shows figs (because fresh was hidden by the CSS).
But:
- In IE8 or earlier, the textContent property does not work.
- In Firefox, the innerText property will return undefined because the it was never implemented in Firefox.
ADDING OR REMOVING HTML CONTENT
There are two very different approaches to adding and removing content from a DOM tree: the innerHTML property and DOM manipulation.
THE innerHTML PROPERTY
Note: there are security risks associated with using innerHTML - these issues are described on p228.
APPROACH
innerHTML can be used on any element node. It is used both to retrieve and replace content. To update an element, new content is provided as a string. It can contain markup for descendant elements.
ADDING CONTENT
To add new content:
1. Store new content (including markup) as a string in a variable.
2. Select the element whose content you want to replace.
3. Set the element's innerHTML property to be the new string.
REMOVING CONTENT
To remove all content from an element, you set innerHTML to an empty string. To remove one element from a DOM fragment, e.g., one <li> from a <ul>, you need to provide the entire fragment minus that element.
EXAMPLE: CHANGING A LIST ITEM
1: Create variable holding markup
var item;
item = ‘<em>Fresh</em> figs’;
You can have as much or as little markup in the variable as you want. It is a quick way to add a lot of markup to the DOM tree.
2: Select element whose content you want to update
3: Update content of selected element with new markup
DOM manipulation easily targets individual nodes in the DOM tree, whereas innerHTML is better suited to updating entire fragments.
DOM MANIPULATION METHODS
DOM manipulation can be safer than using innerHTML, but it requires more code and can be slower.
APPROACH
DOM manipulation refers to a set of DOM methods that allow you to create element and text nodes, and then attach them to the DOM tree or remove them from the DOM tree.
ADDING CONTENT
To add content, you use a DOM method to create new content one node at a time and store it in a variable. Then another DOM method is used to attach it to the right place in the DOM tree.
REMOVING CONTENT
You can remove an element (along with any contents and child elements it may contain) from the DOM tree using a single method.
EXAMPLE: ADDING A LIST ITEM
1: Create new text node
![]()
2: Create new element node
![]()
3: Add text node to element node

4: Select element you want to add the new fragment to
5: Append the new fragment to the selected element

ACCESS & UPDATE TEXT & MARKUP WITH INNERHTML
Using the innerHTML property, you can access and amend the contents of an element, including any child elements.
innerHTML
When getting HTML from an element, the innerHTML property will get the content of an element and return it as one long string, including any markup that the element contains.
When used to set new content for an element, it will take a string that can contain markup and process that string, adding any elements within it to the DOM tree.
When adding new content using innerHTML, be aware that one missing closing tag could throw out the design of the entire page.
Even worse, if innerHTML is used to add content that your users created to a page, they could add malicious content. See p228.
GET CONTENT
The following line of code collects the content of the list item and adds it to a variable called elContent:
var elContent = document.getElementById(‘one’).innerHTML;
The elContent variable would now hold the string:
‘<em>fresh</em> figs’
SET CONTENT
The following line of code adds the content of the elContent variable (including any markup) to the first list item:
document.getElementById(‘one’).innerHTML = elContent;
UPDATE TEXT & MARKUP
This example starts by storing the first list item in a variable called firstItem.
It then retrieves the content of this list item and stores it in a variable called itemContent.
Finally, the content of the list item is placed inside a link. Note how the quotes are escaped.
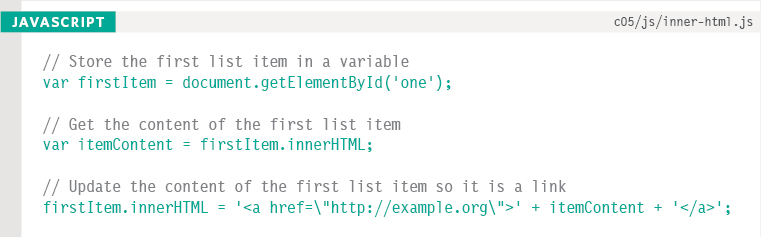

As the content of the string is added to the element using the innerHTML property, the browser will add any elements in the string to the DOM. In this example, an <a> element has been added to the page. (Any new elements will also be available to other scripts in the page.)
If you use attributes in your HTML code, escaping the quotation using the backslash character can make it clearer that those characters are not part of the script.
ADDING ELEMENTS USING DOM MANIPULATION
DOM manipulation offers another technique to add new content to a page (rather than innerHTML). It involves three steps:
1
CREATE THE ELEMENT
createElement()
You start by creating a new element node using the createElement() method. This element node is stored in a variable.
When the element node is created, it is not yet part of the DOM tree. It is not added to the DOM tree until step 3.
2
GIVE IT CONTENT
createTextNode()
createTextNode() creates a new text node. Again, the node is stored in a variable. It can be added to the element node using the appendChild() method.
This provides the content for the element, although you can skip this step if you want to attach an empty element to the DOM tree.
3
ADD IT TO THE DOM
appendChild()
Now that you have your element (optionally with some content in a text node), you can add it to the DOM tree using the appendChild() method.
The appendChild() method allows you to specify which element you want this node added to, as a child of it.
In the example at the end of the chapter, you will see another method that can be used to insert an element into the DOM tree. The insertBefore() method is used to add a new element before the selected DOM node.
DOM manipulation and innerHTML both have uses. You will see a discussion of when to choose each method on p226.
Note: You may see developers leave an empty element in their HTML pages in order to attach new content to that element, but this practice is best avoided unless absolutely necessary.
ADDING AN ELEMENT TO THE DOM TREE
createElement() creates an element that can be added to the DOM tree, in this case an empty <li> element for the list.
This new element is stored inside a variable called newEl until it is attached to the DOM tree later on.
createTextNode() allows you to create a new text node to attach to an element. It is stored in a variable called newText.

The text node is added to the new element node using appendChild().
The getElementsByTagName() method selects the position in the DOM tree to insert the new element (the first <ul> element in the page).
Finally, appendChild() is used again - this time to insert the new element and its content into the DOM tree.
REMOVING ELEMENTS VIA DOM MANIPULATION
DOM manipulation can be used to remove elements from the DOM tree.
1
STORE THE ELEMENT TO BE REMOVED IN A VARIABLE
You start by selecting the element that is going to be removed and store that element node in a variable.
You can use any of the methods you saw in the section on DOM queries to select the element.
When you remove an element from the DOM, it will also remove any child elements.
2
STORE THE PARENT OF THAT ELEMENT IN A VARIABLE
Next, you find the parent element that contains the element you want to remove and store that element node in a variable.
The simplest way to get this element is to use the parentNode property of this element.
The example on the right is quite simple, but this technique can significantly alter the DOM tree.
3
REMOVE THE ELEMENT FROM ITS CONTAINING ELEMENT
The removeChild() method is used on the containing element that you selected in step 2.
The removeChild() method takes one parameter: the reference to the element that you no longer want.
Removing elements from the DOM will affect the index number of siblings in a NodeList.
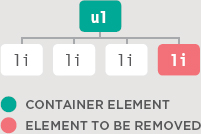
REMOVING AN ELEMENT FROM THE DOM TREE
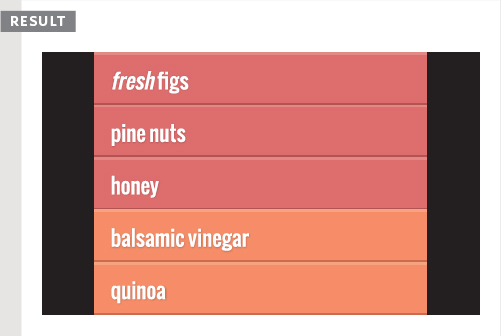
This example uses the removeChild() method to remove the fourth item from the list (along with its contents).
The first variable, removeEl, stores the actual element you want to remove from the page (the fourth list item).
The second variable, containerEl, stores the <ul> element that contains the element you want to remove.
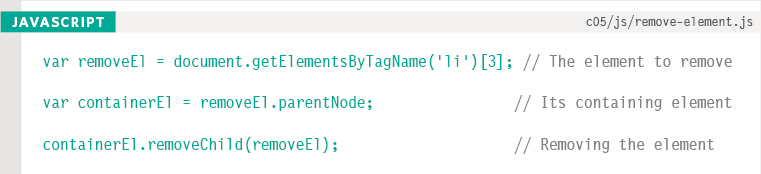
The removeChild() method is used on the variable that holds the container node.
It requires one parameter: the element you want to remove (which is stored in the second variable).
COMPARING TECHNIQUES: UPDATING HTML CONTENT
So far, you have seen three techniques for adding HTML to a web page. It's time to compare when you should use each one.
In any programming language, there are often several ways to achieve the same task. In fact, if you asked ten programmers to write the same script, you may well find ten different approaches.
Some programmers can be rather opinionated and believe that their way is always the “right” way to do things - when there are often several right ways. If you understand why people prefer some approaches over others, then you are in a strong position to decide whether it meets the needs of your project.
document.write()
The document object's write() method is a simple way to add content that was not in the original source code to the page, but its use is rarely advised.
ADVANTAGES
- It is a quick and easy way to show beginners how content can be added to a page.
DISADVANTAGES
- It only works when the page initially loads.
- If you use it after the page has loaded it can:
1. Overwrite the whole page
2. Not add the content to the page
3. Create a new page
- It can cause problems with XHTML pages that are strictly validated.
- This method is very rarely used by programmers these days and is generally frowned upon.
You can choose different techniques depending on the task (and keep in mind how the site might be developed in the future).
element.innerHTML
The innerHTML property lets you get/update the entire content of any element (including markup) as a string.
ADVANTAGES
- You can use it to add a lot of new markup using less code than DOM manipulation methods.
- It can be faster than DOM manipulation when adding a lot of new elements to a web page.
- It is a simple way to remove all of the content from one element (by assigning it a blank string).
DISADVANTAGES
- It should not be used to add content that has come from a user (such as a username or blog comment), as it can pose a significant security risk which is discussed over the next four pages.
- It can be difficult to isolate single elements that you want to update within a larger DOM fragment.
- Event handlers may no longer work as intended.
DOM MANIPULATION
DOM manipulation refers to using a set of methods and properties to access, create, and update elements and text nodes.
ADVANTAGES
- It is suited to changing one element from a DOM fragment where there are many siblings.
- It does not affect event handlers.
- It easily allows a script to add elements incrementally (when you do not want to alter a lot of code at once).
DISADVANTAGES
- If you have to make a lot of changes to the content of a page, it is slower than innerHTML.
- You need to write more code to achieve the same thing compared with innerHTML.
CROSS-SITE SCRIPTING (XSS) ATTACKS
If you add HTML to a page using innerHTML (or several jQuery methods), you need to be aware of Cross-Site Scripting Attacks or XSS; otherwise, an attacker could gain access to your users’ accounts.
This book has several warnings about security issues when you add HTML to a page using innerHTML. (There are also notes about it when using jQuery.)
HOW XSS HAPPENS
XSS involves an attacker placing malicious code into a site. Websites often feature content created by many different people. For example:
- Users can create profiles or add comments
- Multiple authors may contribute articles
- Data can come from third-party sites such as Facebook, Twitter, news tickers, and other feeds
- Files such as images and video may be uploaded
Data you do not have complete control over is known as untrusted data; it must be handled with care.
The next four pages describe the issues you need to be aware of, and how to make your site secure against these kinds of attacks.
WHAT CAN THESE ATTACKS DO?
XSS can give the attacker access to information in:
- The DOM (including form data)
- That website's cookies
- Session tokens: information that identifies you from other users when you log into a site
This could let the attacker access a user account and:
- Make purchases with that account
- Post defamatory content
- Spread their malicious code further / faster
EVEN SIMPLE CODE CAN CAUSE PROBLEMS:
Malicious code often mixes HTML and JavaScript (although URLs and CSS can be used to trigger XSS attacks). The two examples below demonstrate how fairly simple code could help an attacker access a user's account.
This first example stores cookie data in a variable, which could then be sent to a third-party server:
<script>var adr=‘http://example.com/xss.php?cookie=’ + escape(document.cookie);</script>
This code shows how a missing image can be used with an HTML attribute to trigger malicious code:
<img src=“http://nofile” onerror=“adr=‘http://example.com/xss.php?’+escape(document.cookie)“;>
Any HTML from untrusted sources opens your site to XSS attacks. But the threat is only from certain characters.
DEFENDING AGAINST CROSS-SITE SCRIPTING
VALIDATE INPUT GOING TO THE SERVER
1. Only let visitors input the kind of characters they need to when supplying information. This is known as validation. Do not allow untrusted users to submit HTML markup or JavaScript.
2. Double-check validation on the server before displaying user content/storing it in a database. This is important because users could bypass validation in the browser by turning JavaScript off.
3. The database may safely contain markup and script from trusted sources (e.g., your content management system). This is because it does not try to process the code; it just stores it.
ESCAPE DATA COMING FROM THE SERVER & DATABASE
6. Do not create DOM fragments containing HTML from untrusted sources. It should only be added as text once it has been escaped.
5. Make sure that you are only inserting content generated by users into certain parts of the template files (see p230).
4. As your data leaves the database, all potentially dangerous characters should be escaped (see p231).
So, you can safely use innerHTML to add markup to a page if you have written the code - but content from any untrusted sources should be escaped and added as text (not markup), using properties like textContent.
XSS: VALIDATION & TEMPLATES
Make sure that your users can only input characters they need to use and limit where this content will be shown on the page.
FILTER OR VALIDATE INPUT
The most basic defense is to prevent users from entering characters into form fields that they do not need to use when providing that kind of information.
For example, users’ names and email addresses will not contain angled brackets, ampersands, or parentheses, so you can validate data to prevent characters like this being used.
This can be done in the browser, but must also be done on the server (in case the user has JavaScript turned off). You learn about validation in Chapter 13.
You may have seen that the comment sections on websites rarely allow you to enter a lot of markup (they sometimes allow a limited subset of HTML). This is to prevent people from entering malicious code such as <script> tags, or any other character with an event handling attribute.
Even the HTML editors used in many content management systems will limit the code that you are allowed to use within them, and will automatically try to correct any markup that looks malicious.
LIMIT WHERE USER CONTENT GOES
Malicious users will not just use <script> tags to try and create an XSS attack. As you saw on p228, malicious code can live in an event handler attribute without being wrapped in <script> tags. XSS can also be triggered by malicious code in CSS or URLs.
Browsers process HTML, CSS, and JavaScript in different ways (or execution contexts), and in each language different characters can cause problems. Therefore, you should only add content from untrusted sources as text (not markup), and place that text in elements that are visible in the viewport.
Never place any user's content in the following places without detailed experience of the issues involved (which are beyond the scope of this book):
| Script tags: | <script>not here</script> |
| HTML comments: | <!-- not here --> |
| Tag names: | <notHere href=“/test” /> |
| Attributes: | <div notHere=“norHere” /> |
| CSS values: | {color: not here} |
XSS: ESCAPING & CONTROLLING MARKUP
Any content generated by users that contain characters that are used in code should be escaped on the server. You must control any markup added to the page.
ESCAPING USER CONTENT
All data from untrusted sources should be escaped on the server before it is shown on the page. Most server-side languages offer helper functions that will strip-out or escape malicious code.
HTML
Escape these characters so that they are displayed as characters (not processed as code).
| & | & |
| < | < |
| > | > |
| ` | ` |
| ' | ' (not ') |
| “ | " |
| / | / |
JAVASCRIPT
Never include data from untrusted sources in JavaScript. It involves escaping all ASCII characters with a value less than 256 that are not alphanumeric characters (and can be a security risk).
URLS
If you have links containing user input (e.g., links to a user profile or search queries), use the JavaScript encodeURIComponent() method to encode the user input. It encodes the following characters:
, / ? : @ & = + $ #
ADDING USER CONTENT
When you add untrusted content to an HTML page, once it has been escaped on the server, it should still be added to the page as text. JavaScript and jQuery both offer tools for doing this:
JAVASCRIPT
DO use: textContent or innerText (see p216)
DO NOT use: innerHTML (see p220)
JQUERY
DO use: .text() (see p316)
DO NOT use: .html() (see p316)
You can still use the innerHTML property and jQuery .html() method to add HTML to the DOM, but you must make sure that:
- You control all of the markup being generated (do not allow user content that could contain markup).
- The user's content is escaped and added as text using the approaches noted above, rather than adding the user's content as HTML.
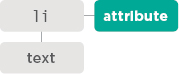
ATTRIBUTE NODES
Once you have an element node, you can use other properties and methods on that element node to access and change its attributes.
There are two steps to accessing and updating attributes.
First, select the element node that carries the attribute and follow it with a period symbol.
Then, use one of the methods or properties below to work with that element's attributes.
| METHOD | DESCRIPTION |
| getAttribute() | gets the value of an attribute |
| hasAttribute() | checks if element node has a specified attribute |
| setAttribute() | sets the value of an attribute |
| removeAttribute() | removes an attribute from an element node |
| PROPERTY | DESCRIPTION |
| className | gets or sets the value of the class attribute |
| id | gets or sets the value of the id attribute |
You have seen that the DOM treats each HTML element as its own object in the DOM tree. The properties of the object correspond to the attributes that type of element can carry. On the left, you can see the className and id properties. (Others include accessKey, checked, href, lang, and title.)
CHECK FOR AN ATTRIBUTE AND GET ITS VALUES
Before you work with an attribute, it is good practice to check whether it exists. This will save resources if the attribute cannot be found.
The hasAttribute() method of any element node lets you check if an attribute exists. The attribute name is given as an argument in the parentheses.
Using hasAttribute() in an if statement like this means that the code inside the curly braces will run only if the attribute exists on the given element.
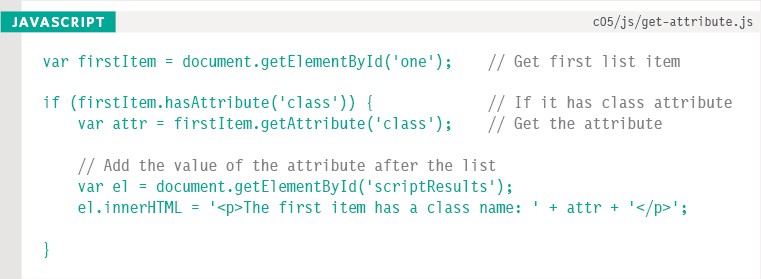
In this example, the DOM query getElementById() returns the element whose id attribute has a value of one.
The hasAttribute() method is used to check whether this element has a class attribute, and returns a Boolean. This is used with an if statement so that the code in the curly braces will run only if the class attribute does exist.
The getAttribute() method returns the value of the class attribute, which is then written to the page.
Browser Support: Both of these methods have good support in all major web browsers.
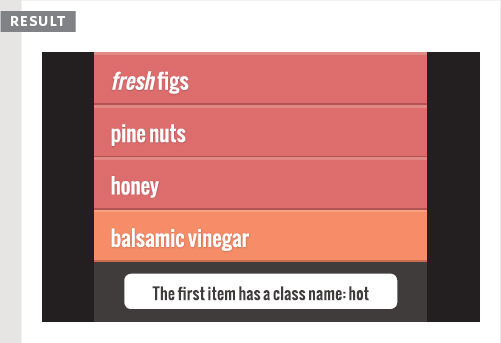
CREATING ATTRIBUTES & CHANGING THEIR VALUES
The className property allows you to change the value of the class attribute. If the attribute does not exist, it will be created and given the specified value.
You have seen this property used throughout the chapter to update the status of the list items. Below, you can see another way to achieve the task.
The setAttribute() method allows you to update the value of any attribute. It takes two parameters: the attribute name, and the value for the attribute.
When there is a property (like the className or id properties), it is generally considered better to update the properties rather than use a method (because, behind the scenes, the method would just be setting the properties anyway).
When you update the value of an attribute (especially the class attribute) it can be used to trigger new CSS rules, and therefore change the appearance of the elements.
Note: These techniques override the entire value of the class attribute. They do not add a new value to the existing value of the class attribute.
If you wanted to add a new value onto the existing value of the class attribute, you would need to read the content of the attribute first, then add the new text to that existing value of the attribute (or use the jQuery .addClass() method covered on p320).
REMOVING ATTRIBUTES
To remove an attribute from an element, first select the element, then call removeAttribute(). It has one parameter: the name of the attribute to remove.
Trying to remove an attribute that does not exist will not cause an error, but it is good practice to check for its existence before attempting to remove it.
In this example, the getElementById() method is used to retrieve the first item from this list, which has an id attribute with a value of one.
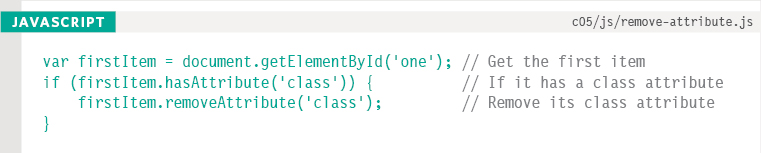
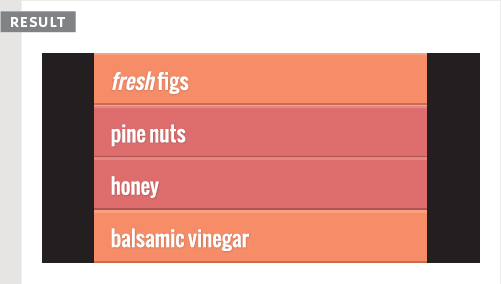
The script checks to see if the selected element has a class attribute and, if so, it is removed.
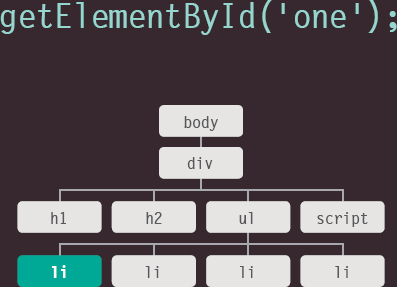
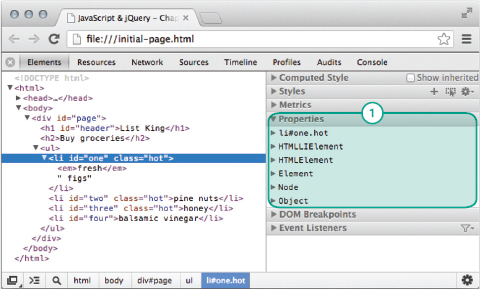
EXAMINING THE DOM IN CHROME
Modern browsers come with tools that help you inspect the page loaded in the browser and understand the structure of the DOM tree.
In the screenshot to the right, the <li> element is highlighted and the Properties panel (1) indicates that this is an:
- li element with an id attribute whose value is one and class whose value is hot
- an HTMLLIElement
- an HTMLElement
- an element
- a node
- an object
Each of these object names has an arrow next to it which you can use to expand that section. It will tell you what properties are available to that kind of node.
They are separated because some properties are specific to list item elements, others to element nodes, others to all nodes, and others to all objects, and the different properties are listed under the corresponding type of node. But they do remind you of which properties you can access through the DOM node for that element.
To get the developer tools in Chrome on a Mac, go to the View menu, select Developer and then Developer Tools. On a PC, go to Tools (or More Tools) and select Developer Tools.
Or right-click on any element and select Inspect Element.
Select Elements from the menu that runs across the top of this tool. The source of the page will be shown on the left and several other options to the right.
Any element that has child elements has an arrow next to it that lets you expand and collapse the item to show and hide its content.
The Properties panel (on the right) tells you the type of object the selected element is. (In some versions of Chrome this is shown as a tab.) When you highlight different elements in the main left-hand window, you can see the values in the Properties panel on the right reflect that element.
EXAMINING THE DOM IN FIREFOX
Firefox has similar built-in tools, but you can also download a DOM inspector tool that shows the text nodes.
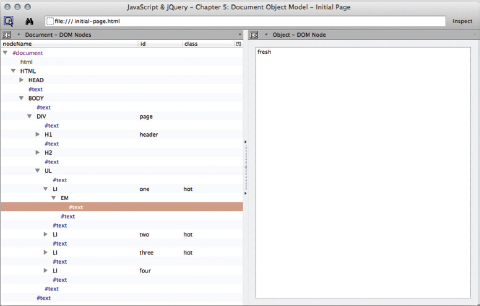
If you search online for “DOM Inspector”, you will find the tool designed for Firefox shown on the left. In the screen shot, you can see a similar tree view to the one shown in Chrome, but it also shows you where there are whitespace nodes (they are shown as #text). In the panel to the right, you can see the value in the nodes; whitespace nodes have no value in this panel.
Another FIrefox extension worth trying is called Firebug.

Firefox also has a 3D view of the DOM, where a box is drawn around each element, and you can change the angle of the page to show which parts of it stick out more than others. The further they protrude the further into child elements they appear.
This can give you an interesting (and quick) glimpse into the complexity of the markup used on a page and the depth to which elements are nested.

EXAMPLE
DOCUMENT OBJECT MODEL
This example brings together a selection of the techniques you have seen throughout the chapter to update the contents of the list. It has three main aims:
1: Add a new item to the start and end of the list
Adding an item to the start of a list requires the use of a different method than adding an element to the end of the list.
2: Set a class attribute on all items
This involves looping through each of the <li> elements and updating the value of the class attribute to cool.
3: Add the number of list items to the heading
This involves four steps:
1. Reading the content of the heading
2. Counting the number of <li> elements in the page
3. Adding the number of items to the content of the heading
4. Updating the heading with this new content
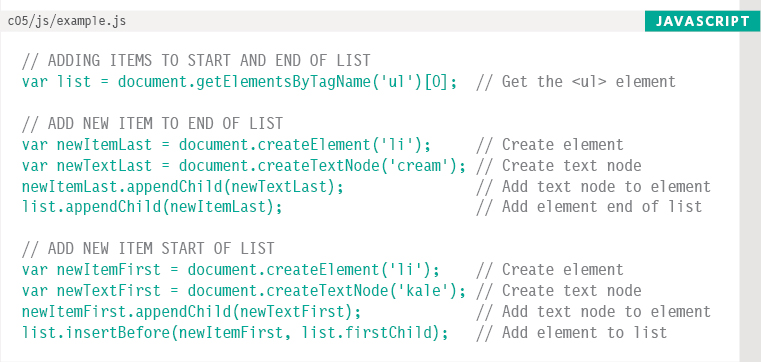
This part of the example adds two new list items to the <ul> element: one to the end of the list and one to the start of it. The technique used here is DOM manipulation and there are four steps to creating a new element node and adding it to the DOM tree:
1. Create the element node
2. Create the text node
3. Add the text node to the element node
4. Add the element to the DOM tree
To achieve step four, you must first specify the parent that will contain the new node. In both cases, this is the <ul> element. The node for this element is stored in a variable called list because it is used many times.
The appendChild() method adds new nodes as a child of the parent element. It has one parameter: the new content to be added to the DOM tree. If the parent element already has child elements, it will be added after the last of these (and will therefore be the last child of the parent element).
parent.appendChild(newItem);
(You have seen this method used several times both to add new elements to the tree and to add text nodes to element nodes.)
To add the item to the start of the list, the insertBefore() method is used. This requires one extra piece of information: the element you want to add the new content before (the target element).
parent.insertBefore(newItem, target);
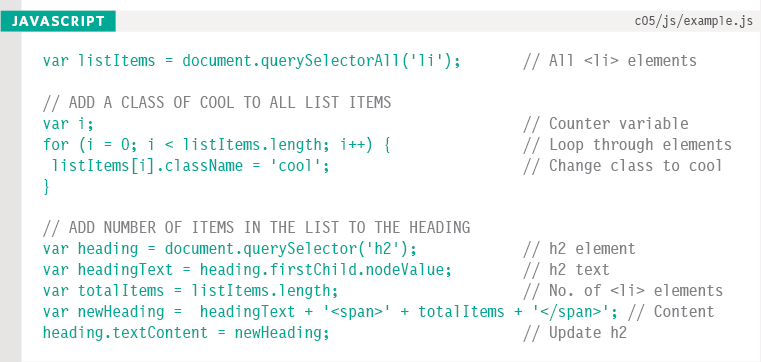
The next step of this example is to loop through all of the elements in the list and update the value of their class attributes, setting them to cool.
This is achieved by first collecting all of the list item elements and storing them in a variable called listItems. A for loop is then used to go through each of them in turn. In order to tell how many times the loop should run, you use the length property.
Finally, the code updates the heading to include the number of list items. It updates it using the innerHTML property as opposed to the DOM manipulation techniques used earlier in the script.
This demonstrates how you can add to the content of an existing element by reading its current value and adding to it. You could use a similar technique if you needed to add a value to an attribute - without overwriting its existing value.
To update the heading with the number of items in the list, you need two pieces of information:
1. The original content of the heading so that you can add the number of list items to it. It is collected using the nodeValue property (although innerHTML or textContent would do the same).
2. The number of list items, which can be found using the length property on the listItems variable.
With this information ready, there are two steps to updating the content of the <h2> element:
1. Creating the new heading and storing it in a variable - the new heading will be made up of the original heading content, followed by the number of items in the list.
2. Updating the heading, which is done by updating the content of the heading element using the innerText property of that node.
SUMMARY
DOCUMENT OBJECT MODEL
- The browser represents the page using a DOM tree.
- DOM trees have four types of nodes: document nodes, element nodes, attribute nodes, and text nodes.
- You can select element nodes by their id or class attributes, by tag name, or using CSS selector syntax.
- Whenever a DOM query can return more than one node, it will always return a NodeList.
- From an element node, you can access and update its content using properties such as textContent and innerHTML or using DOM manipulation techniques.
- An element node can contain multiple text nodes and child elements that are siblings of each other.
- In older browsers, implementation of the DOM is inconsistent (and is a popular reason for using jQuery).
- Browsers offer tools for viewing the DOM tree.