
6
Screen Management
Fields collect data from users, and you have seen how to create your own custom fields from a wide range of field types to address your different requirements. Indeed, data collection is at the center of any information system, but that is only half of the story. It is just as important to have your fields organized so that users do not feel overwhelmed, and the general flow of fields needs to be logically structured and grouped into sections. This is where screens come in.
In this chapter, we will pick up from where we left off in the last chapter and explore the relationship between fields and screens. We will further discuss how you can use screens to customize your Jira to provide users with a better user experience. By the end of the chapter, you will have learned the following:
- What screens are and how to create them
- How to add fields onto screens
- How to break down your screen into logical sections with tabs
- The relationship between screens and issue operations
- How to link screens with projects and issue types
- How to configure project-specific screens as a project administrator
Understanding Jira and screens
Before you can start working with screens, you need to first understand what they are and how they are used in Jira. Compared to a normal paper-based form, fields in Jira are like checkboxes and spaces that you need to fill in, and screens are like form documents themselves. When fields are created in Jira, they need to be added to screens for them to be presented to users.
In most cases, screens are associated with issue operations such as creating, viewing, and editing issues. This association is defined in screen schemes. This allows you to have different screens for different operations. Screen schemes are then associated with issue type screen schemes, which, when applied to projects, will map screen schemes to issue types. This lets each issue type in a project have its own set of screens. The only time a screen will be used directly is when it is associated with a workflow transition. In Jira, a workflow defines the various statuses an issue can go through. For example, an issue can go from open to closed. Transitions are the actions that take the issue from one status to the next, and Jira lets you display a screen as part of the action if you choose to. We will cover workflows in Chapter 7, Workflow and Business Process.
To help you visualize how screens are used in Jira, Atlassian has provided the following diagram, which summarizes the relationship between fields, screens, and their respective schemes:

Figure 6.1 – Screens and schemes
Now that we have a basic understanding of screens, let’s start looking at how you can create and manage them in Jira.
Working with screens
While many other software systems provide users with limited control over the presentation of screens, Jira is very flexible when it comes to screen customizations. You can create your own screens and decide what fields are to be placed on them and their order. You can also decide which screens are to be displayed for issue operations. In Jira, you can create and design customized screens for the following operations:
- Creating an issue in the Create Issue dialog box
- Editing an issue when an issue is being updated
- Viewing an issue after an issue is created and is being viewed by users
- Transitioning an issue through a workflow
Screens are managed centrally from the administration console, which means you need to be a Jira administrator to create and configure screens. Perform the following steps to access the View Screens page:
- Log in as a Jira administrator user.
- Browse to the Jira administration console.
- Select the Issues tab and then the Screens option. This will bring up the View Screens page.
The View Screens page lists all the screens that are currently available in your Jira instance. You can select a screen and configure what fields will be on this screen and decide how you will divide a screen into various tabs.
For each of the screens listed here, Jira will also tell you what screen scheme each of the screens is a part of and the workflows that are being used. You have probably noticed that for screens that are either part of a screen scheme or workflow, there is no Delete option available, as you cannot delete screens that are in use. You need to disassociate the screen from screen schemes and/or workflows to delete them, as shown in the following screenshot:
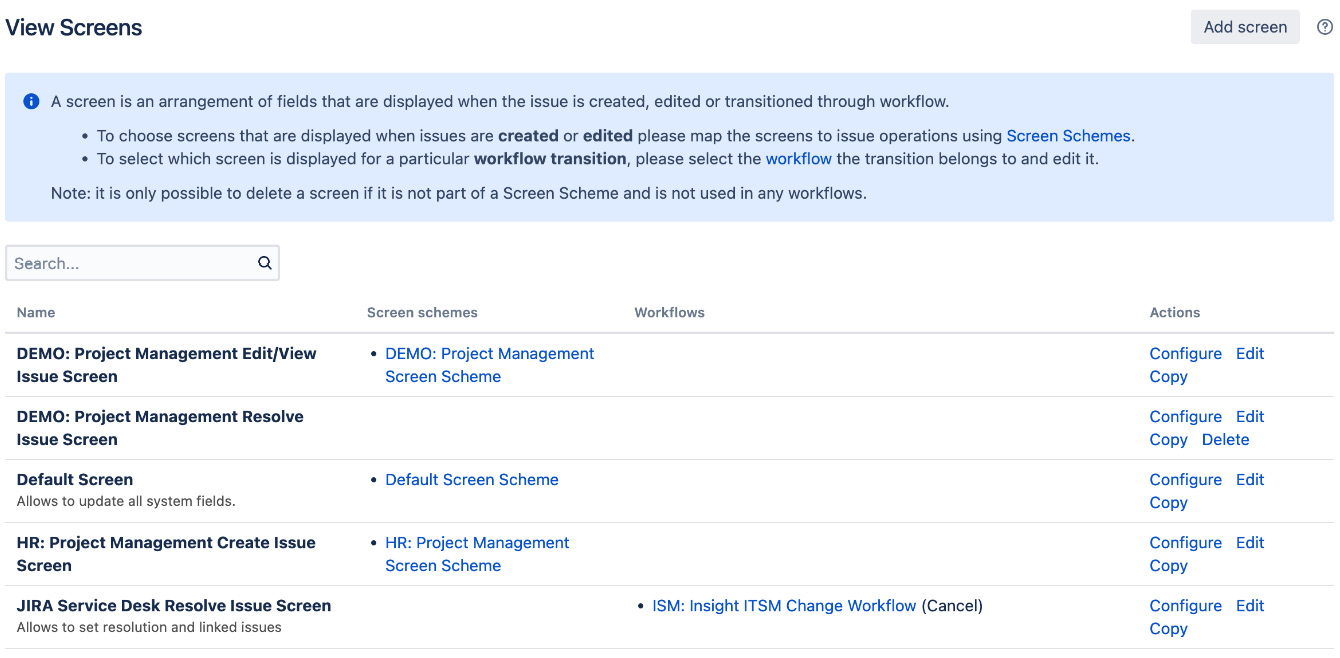
Figure 6.2 – View screens
As shown in the preceding screenshot, for each screen you can perform the following operations:
- Configure: This configures what fields are to be placed on the screen. It is not to be confused with the Edit operation.
- Edit: This updates the screen’s name and description.
- Copy: This makes a copy of the selected screen, including its tabs and field configurations.
- Delete: This deletes a screen from Jira. This is only available if it is not being used by a screen scheme or a workflow.
The screens listed here do not affect Jira Service Desk. We will cover screen and field configuration for Jira Service Desk in Chapter 11, Jira Service Management. Next, let’s take a look at the default screens that come with Jira and how you can create your own screens.
Adding a new screen
Jira comes with several screens by default (as listed in the following bullet list), and every time you create a new project, a new set of screens is created for the project, based on the template you select. These project-specific screens will all have their names starting with the project key, for example, HD: Task Management View Issue Screen, where HD is the project’s key:
- Default screen: This screen is used for creating, editing, and viewing issues
- Resolve Issue screen: This screen is used when resolving and closing issues
- Workflow screen: This screen is used when transitioning issues through workflows (if they are configured to have a screen, such as Reopen Issue)
While the default screens and screens automatically created for your projects can cover the most basic requirements, you will soon find yourself outgrowing them, and adjustments will need to be made. For example, if you want to keep certain fields read-only, such as priority so that they cannot be changed after issue creation, you can achieve this by setting up different screens for creating and editing issues. Another example is having different Create and Edit screens for different issue types, such as Bug and Task. In these cases, you will need to create your own screens in Jira using the following steps:
- Browse to the View Screens page.
- Click on the Add screen button. This will bring up the Add screen dialog box.
- Enter a meaningful name and description for the new screen. It is a good idea to name your screen after its purpose, for example, HD: Bug Create Screen, to indicate that it is the screen to create new bug issues for project HD.
- Click on the Add button to create the screen.
At this point, your new screen is blank with no fields on it. Fields in Jira are arranged and displayed from top to bottom in a single column. You have full control of what fields can be added and in what order they can be arranged.
The only exception to this is for the View screen. When you are viewing an issue, fields are grouped together by type. For example, user fields such as reporter and assignee are displayed together on the top right-hand side of the page. Also note that for system fields such as Summary and Issue, even if you take them off the screen, they will still be displayed when viewing an issue. For these fields, you cannot change their position on the screen.
Adding a field to a screen
When you first create a screen, it is of little use. For screens to have items to present to the users, you must first add fields onto the screens:
- Click on the Configure link for the screen you wish to add fields to.
- Select the fields you would like to add by typing in the field’s name in the Field name drop-down list. Jira will auto-match the field as you type, as shown in the following screenshot. If you do not see the field you are looking for, make sure it is not already on the screen or on a different tab. Tabs are covered in a later section:

Figure 6.3 – Adding a field to a screen
Fields are added to the bottom of the list. You can reorder the list of fields by simply dragging them up and down.
Deleting a field from a screen
Fields can be removed from a screen. When a field is taken off, the field will not appear when the screen is presented to the user. There is a subtle difference between deleting a field from a screen and hiding it (as discussed in Chapter 5, Field Management). Although both actions will prevent the field from showing up, by removing the field, issues will not receive a value for that field when they are created. This becomes important when a field is configured to have a default value. When the field is removed from the screen, the issue will not have the default value for the field, while if the field is simply hidden, the default value will be applied.
You will also need to pay close attention when deleting fields from a screen, as there is no confirmation dialog. Make sure that you do not delete required fields, such as Summary, from a screen used to create new issues. As seen in Chapter 5, Field Management, Jira will prevent you from hiding fields that are marked as required, but Jira does not prevent you from taking the required fields off the screen. Therefore, it is possible for you to end up in a situation where Jira requires a value for a field that does not exist on the screen. This can lead to very confusing error messages for end users. To remove a field from the screen, do the following:
- Click on the Configure link for the screen you wish to remove fields from.
- Hover your mouse over the field you want to delete and click on the X (remove) button.
When you delete a field from a screen, existing issues will not lose their value for the field. Once you add the field back, the values will be displayed again.
Using screen tabs
In most cases, you will be sequentially adding fields to a screen and users will fill them from top to bottom. However, there will be cases where your screen becomes over-complicated and cluttered due to the sheer number of fields you need, or you may simply want to have a way to logically group several fields together and separate them from the rest. This is where tabs come in.
If you think of screens as the entire form a user must fill in, then tabs are the individual pages or sections that make up the whole document. Tabs go from left to right, so it is a good practice to design your tabs to flow logically from left to right. For example, the first tab can gather general information, such as the summary and description. Subsequent tabs will gather more domain-specific information, as shown here:
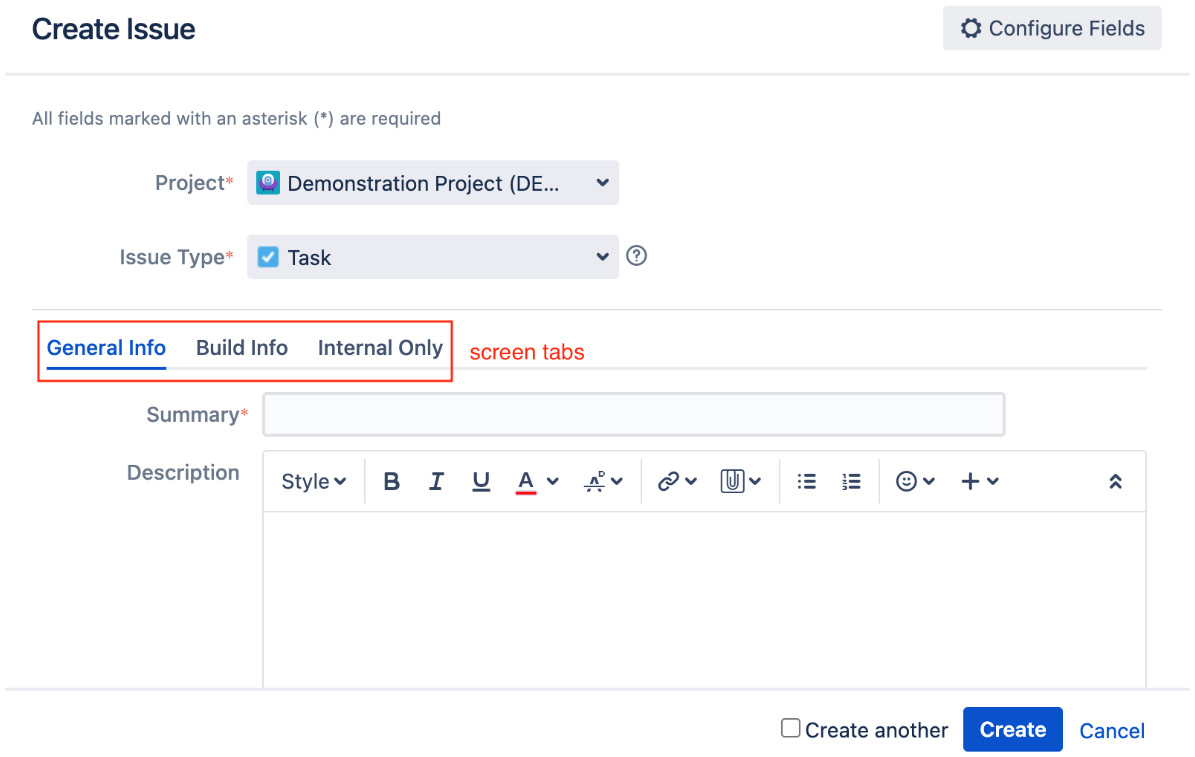
Figure 6.4 – Screen tabs
Adding a tab to a screen
You can add tabs to any screen in Jira. In fact, by default, all screens have a default tab called Field Tab, which is used to host all the fields. You can add new tabs to a screen to break down and better manage your screen presentation, as follows:
- Browse to the View Screens page.
- Click on the Configure link for the screen on which you wish to add a new tab.
- Click on the + button above the field list and enter a name for the tab.
- Click on the Add button to create the tab.
Tabs are organized horizontally from left to right. When you add a new tab to the screen, it is appended to the end of the list. You can change the order of tabs by dragging them left and right in the list, as shown in the following screenshot:

Figure 6.5 – Adding a new screen tab
You can also move a field from one tab to another by dragging the field and hovering it over the target tab. This will save you time from having to manually remove a field from a tab and then add it to the new tab.
Note
One thing to keep in mind is that, if there are no fields placed on a tab, the tab will not be displayed.
Editing/deleting a tab
Just like screens, you can maintain existing tabs by editing their names and/or removing them from the screen. Perform the following steps to edit a tab’s name:
- Browse to the View Screens page.
- Click on the Configure link for the screen that has the tab you wish to edit.
- Select the tab by clicking on it.
- Click on the edit icon and enter a new name for the tab.
- Click on the Save button to apply the change.
When you delete a tab, the fields that are on the tab will be taken off the screen. You will need to re-add or move them to a different tab if you still want those fields to appear on the screen. You cannot delete the last tab on the screen. To delete a tab, perform the following steps:
- Browse to the View Screens page.
- Click on the Configure link for the screen that has the tab you wish to edit.
- Select the tab by clicking on it.
- Click on the delete icon. Jira will ask you to confirm whether you want to delete the tab and list all the fields present.
- Click on the Delete button to remove the tab from the screen.
Editing/deleting a screen
You can edit existing screens by updating their details to help keep your configurations up to date and consistent. Perform the following steps to edit a screen:
- Browse to the View Screens page.
- Click on the Edit link for the screen on which you wish to update. This will take you to the Edit Screen page.
- Update the name and description of the screen.
- Click on the Update button to apply your changes.
To delete an existing screen, it must not be in use by any screen schemes or workflows. If it is associated with a screen scheme or workflow, you will not be able to delete it. You will need to undo the association first. Perform the following steps to delete a screen:
- Browse to the View Screens page.
- Click on the Delete link for the screen you wish to remove. This will take you to the Delete Screen page for confirmation.
- Click on the Delete button to remove the screen.
By deleting a screen, you do not delete the fields that are on the screen from the system.
Copying a screen
Screens can sometimes be complex, so creating a new screen from scratch may not be the most efficient method if there is already a similar one available. Just like with many other entities in Jira, you can make a copy of an existing screen, thus cutting down the time that it would otherwise take you to re-add all the fields:
- Browse to the View Screens page.
- Click on the Copy link for the screen you wish to copy.
- Enter a new name and description for the screen.
- Click on the Copy button to copy the screen.
Note
When you copy a screen, it will also copy all the tabs a screen has.
We have seen how you can create and configure screens; next we will look at how we can apply screens to issue operations, with screen schemes.
Working with screen schemes
You have seen how we can create and manage screens and how to configure what fields to add to the screens. The next piece of the puzzle is letting Jira know which screen to use for each issue operation.
Screens are displayed during issue operations, and a screen scheme defines the mapping between screens and the operations. With a screen scheme, you can control which issue operations the screen displays, as follows:
- Create Issue: This screen is shown when you create a new issue
- Edit Issue: This screen is shown when you edit an existing issue
- View Issue: This screen is shown when you view an issue
Just like screens, whenever you create a new project in Jira, a new screen scheme is created specifically for your project, and screens are automatically assigned to these issue operations.
The defaults created are usually good enough to get started. However, there will be times when you do not want certain fields to be available for editing once the issue is created. Another example would be when certain fields are not needed during creation because the required information may not be available at the time. Therefore, instead of confusing and/or overwhelming your users, leave those fields out during issue creation and only ask for them to be filled in at a later time when the information becomes available.
As you can see, by having different screens for each issue operation rather than having a one-screen-fits-all approach, Jira provides you with a new level of flexibility to control and design your screens. As always, if there are no significant differences between the screens, for example, create and edit, it is recommended that you create a base screen and use the Copy Screen feature to reduce your workload.
Just like screens, you need to be a Jira administrator to manage screen schemes. Perform the following steps to manage screen schemes:
- Browse to the Jira administration console.
- Select the Issues tab and then the Screen Schemes option to bring up the View Screen Schemes page:

Figure 6.6 – View Screen Schemes
From the View Screen Schemes page, you will be able to see a list of all the existing screen schemes, create and manage their configurations, and view their associations with issue type screen schemes (this will be explained in the Issue type screen scheme section). Let’s start with creating new screen schemes.
Adding a screen scheme
Usually, you will be using the screen scheme created by Jira for your project. However, there will be cases where you need more than one. For example, if you need to display a different set of screens based on the various issue types you have in your project, you will need to create a new screen scheme for each issue type. Perform the following steps to create a new screen scheme:
- Browse to the View Screen Schemes page.
- Click on the Add screen scheme button.
- Enter a name and description for the new screen scheme. Just like with screens, it is a good idea to adopt a consistent pattern that describes the purpose of the screen scheme, such as DEMO: Bug Screen Scheme.
- Select a default screen from the list of screens. This screen will be displayed when no specific issue operation is mapped.
- Click on the Add button to create the screen scheme.
At this stage, the new screen scheme is not in use. This means that it is not associated with any issue type screen schemes yet (issue type screen schemes are covered in later sections). The new screen scheme will also use the same screen selected as your default screen for all issue operations. Now, if you want to use the same screen to create, edit, and view, then you are all set; there is no need to perform any further configuration to your screen scheme. However, if you need to have different screens displayed for different issue operations, then you will need to establish this association.
When an issue operation does not have an association with a screen, the selected default screen will be applied. If the issue operation is later given in a screen association, then the specific association will take precedence over the general fallback default screen.
Associating screens to issue operations
Each issue operation can be associated with one screen. Perform the following steps to associate an issue operation with a screen:
- Click on the Configure link for the screen scheme you want to update.
- Click on the Associate an issue operation with a screen button.
- Select an issue operation to be assigned to a screen.
- Select the screen to be associated to the issue operation.
- Click on the Add button to create the association.

Figure 6.7 – Configure a screen scheme
As shown in the preceding screenshot, the Create Issue and Edit Issue operations are associated with DEMO: Project Management Create Issue Screen and DEMO: Project Management Edit Issue Screen, respectively. Since we do not have a screen associated with the View Issue operation, the default association, DEMO: Project Management View Issue Screen, will be used.
Editing/deleting an association
After you create an association for an issue operation, Jira prevents you from creating another association for the same issue operation by removing it from the list of available options. In order to change the association to a different screen, you need to edit the existing association, as follows:
- Click on the Configure link for the screen scheme you want to update.
- Click on the Edit link for the association you wish to edit.
- Select a new screen to associate with the issue operation.
- Click on the Update button to apply the change.
If you decide that one or more existing associations are no longer needed, then you can delete them from the screen scheme by performing the following steps:
- Click on the Configure link for the screen scheme you want to update.
- Click on the Delete link for the association you wish to delete.
Please note that, unlike other similar operations, deleting an issue operation association does not prompt you with a confirmation page. As soon as you click on the Delete link, your association will be deleted immediately.
Editing/deleting a screen scheme
You can update the details of existing screen schemes, such as their name and description. In order for you to make changes to the default screen selection, you need to configure the screen scheme, which will be covered in later sections. Perform the following steps to edit an existing screen scheme:
- Browse to the View Screen Schemes page.
- Click on the Edit link for the screen scheme you wish to edit.
- Update the name and description with new values.
- Click on the Update button to apply the changes.
Inactive screen schemes can also be deleted. If the screen scheme is active (that is, associated with an issue type screen scheme), then the Delete option will not be present. Perform the following steps to delete a screen scheme:
- Browse to the View Screen Schemes page.
- Click on the Delete link for the screen scheme you wish to delete.
- Click on the Delete button to confirm that you wish to delete the screen scheme.
Copying a screen scheme
While screen schemes are not as complicated as screens, there will still be times when you would like to copy an existing screen scheme rather than create one from scratch. You might wish to copy the scheme’s screens/issue operations associations, which we will cover in the following section, or make a quick backup copy before making any changes to the scheme.
Perform the following steps to copy an existing screen scheme:
- Browse to the View Screen Schemes page.
- Click on the Copy link for the screen scheme you wish to copy.
- Enter a new name and description for the screen scheme.
- Click on the Copy button to copy the selected screen scheme.
Just like creating a new screen scheme, copied screen schemes are inactive by default.
Issue type screen scheme
Screen schemes group screens together and create associations with issue operations. The next piece of the puzzle is to tell Jira to use our screen schemes when creating, viewing, and editing specific types of issues.
We do not directly associate screen schemes to Jira. The reason for this is that Jira has the flexibility to allow you to define this on a per-issue-type level. What this means is that, instead of forcing all issue types in a given project to use the same screen scheme, you can use different screen schemes for different issue types. This extremely flexible and powerful feature is provided through the issue type screen scheme.
Just like screens and screen schemes, you need to be a Jira administrator to create and manage issue type screen schemes. Perform the following steps to manage issue type screen schemes:
- Browse to the Jira administration console.
- Select the Issues tab and then the Issue type screen schemes option to bring up the Issue Type Screen Schemes page:

Figure 6.8 – View the issue type screen schemes
Just as with a screen scheme, Jira will automatically create an issue type screen scheme when you create your project. Since one project can only have one issue type screen scheme associated with it, usually you will not need to create new ones yourself. However, there might be a time when you want to create a new scheme, such as experimenting with some new configurations while still wanting to keep the existing one untouched in case of a rollback.
Perform the following steps to create a new issue type screen scheme:
- Browse to the Issue Type Screen Schemes page.
- Click on the Add issue type screen scheme button.
- Enter a name and description for the new issue type screen scheme.
- Select a default screen scheme from the list of screen schemes.
- Click on the Add button to create the issue type screen scheme.
That’s right, you guessed it! The new issue type screen scheme is not yet in use. It will only become active once it is applied to one or more projects, which we will look at shortly, but let’s first look at how to associate screen schemes with issue types.
Associating issue types to screen schemes
Jira determines which screen scheme to use for an issue type by establishing an association between screen schemes and issue types. Each issue type can have only one screen scheme associated with it. However, each screen scheme can be associated with more than one issue type.
Perform the following steps to add a new association:
- Click on the Configure link for the issue type screen scheme you wish to configure.
- Click on the Associate an issue type with a screen scheme button.
- Select the issue type to add an association.
- Select the screen scheme to be associated with the issue type.
- Click on the Add button to create the association:

Figure 6.9 – Configure an issue type screen scheme
As shown in the preceding screenshot, the Story, Task, and Bug issue types are explicitly associated with DEMO: Project Management Story Screen Scheme, DEMO: Project Management Task Screen Scheme, and DEMO: Project Management Bug Screen Scheme, respectively. All other issue types, such as Sub-task, will be associated with the default DEMO: Project Management Screen Scheme.
Editing/deleting an association
You can update existing associations such as the default association, which is created automatically when you create a new issue type screen scheme:
- Click on the Configure link for the issue type screen scheme you wish to configure.
- Click on the Edit link for the association you wish to edit.
- Select a new screen scheme to associate it with the issue type.
- Click on the Update button to apply the change.
You can also delete existing associations for issue types if you no longer need them to be explicitly set. However, you cannot delete the default association, since it is used as a catch for all of the issue types that do not have an association defined. This is important because, while you may have created associations for all of the issue types right now, you might add new issue types down the line and forget to create associations for them. To delete an association, perform the following steps:
- Click on the Configure link for the issue type screen scheme you wish to configure.
- Click on the Delete link for the association you wish to delete.
Just like associations in screen schemes, you will not be taken to a confirmation dialog, and the association will be deleted immediately.
Editing/deleting an issue type screen scheme
You can make updates to an existing issue type screen scheme’s name and description. To change its screen scheme/issue type association details, you need to configure the issue type screen scheme, which will be covered in later sections. Perform the following steps to update an issue type screen scheme:
- Browse to the Issue Type Screen Schemes page.
- Click on the Edit link for the issue type screen scheme you wish to edit.
- Update the name and description with new values.
- Click on the Update button to apply the changes.
Just as with all of the other schemes in Jira, you cannot delete issue type screen schemes that are in use. You will have to make sure that no project uses it before Jira allows you to delete the scheme. To delete issue type screen schemes, perform the following steps:
- Browse to the Issue Type Screen Schemes page.
- Click on the Delete link for the issue type screen scheme you wish to delete.
- Click on the Delete button to remove the issue type screen scheme.
Copying an issue type screen scheme
Issue type screen scheme cloning is also available in Jira. You can easily make copies of existing issue type screen schemes. One very useful application of this feature is that it enables you to make backup copies before experimenting with new configurations. Note that copying the issue type screen scheme does not back up the screen schemes and screens that it contains.
Perform the following steps to copy an existing issue type screen scheme:
- Browse to the Issue Type Screen Schemes page.
- Click on the Copy link for the issue type screen scheme you wish to copy.
- Enter a new name and description for the issue type screen scheme.
- Click on the Copy button to copy the selected scheme.
- Newly created issue type screen schemes are inactive by default, while cloned schemes are not used by any projects.
The last step to tie the screens, screen schemes, and issue type screen scheme together is to apply the issue type screen scheme to a project.
Associating an issue type screen scheme with a project
The final piece of the puzzle to put your screens to use is to associate the issue type screen scheme with the project you want to use. Perform the following steps to associate your new issue type screen scheme:
- Browse to the target project’s administration page.
- Click on the Screens option from the left panel.
- Select the Use a different scheme option from the Actions menu:
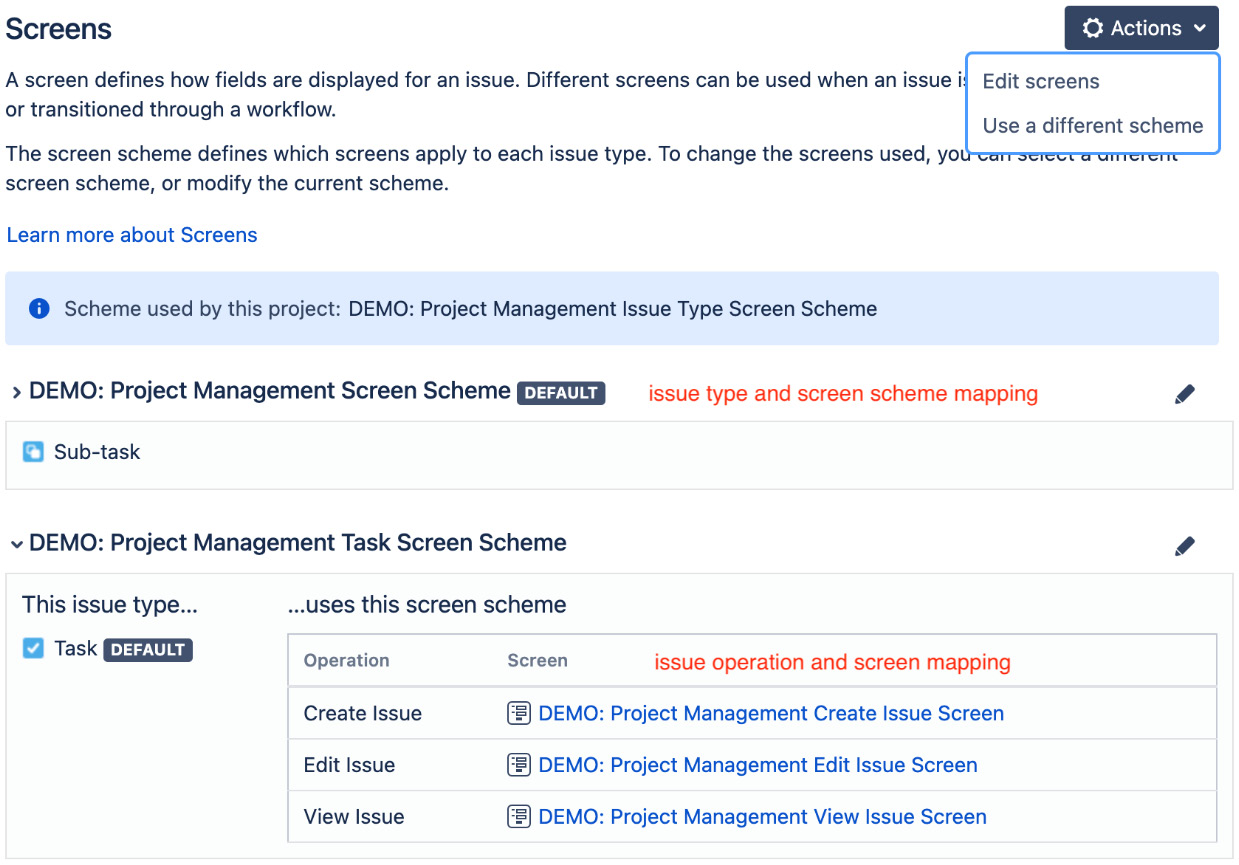
Figure 6.10 – Associate an issue type screen scheme to a project
- Select the issue type screen scheme from the Scheme select list.
- Click on the Associate button.
Once you associate the issue type screen scheme with the project, Jira will show you the details of the mapping, as shown in the preceding screenshot.
Delegating screen management
Managing screen configurations used to be centrally controlled by the Jira administrator. The project administrator can only select what issue type screen scheme to use, but if modifications need to be made for the screens, the Jira administrator will need to be involved. This often creates a bottleneck for simple things, such as adding or removing a field from a screen, especially for large organizations that have many projects but only a few Jira administrators.
Jira now has a new feature called Extended Project Administration, which empowers project administrators by allowing them to make changes to screens used by their projects.
Extended project administration is controlled via permission settings, which we will cover in Chapter 9, Securing Jira.
There are, however, some restrictions for this, as listed here:
- The screen must not be a default system screen
- The screen must already be used by the project
- The screen must not be shared with any other projects or used as a transition screen in workflows
- Only fields that already exist in the system can be added to a screen
Essentially, this means that you, as a project administrator, can only make changes to screens that are dedicated to a single project. If the screen is shared with multiple projects, you will still need help from a Jira administrator. To make changes to screens for your project as a project administrator, perform the following steps:
- Browse to the target project’s administration page.
- Click on the Screens option from the left panel.
- Expand the issue type and select the screen you want to configure.
If the screen can be configured, you should see something similar to the following screenshot, where you have the familiar screen configuration page, but now shown inside the context of a project:

Figure 6.11 – Delegated screen management
Troubleshooting fields and screens
As we have seen in this and the previous chapters, many factors can control whether a field should be displayed. It can be very confusing and frustrating when an expected field does not display, as there are many configurations to check, such as screens, field configurations, and more. It is for this reason that Jira has a handy tool that can help you to determine why a field is not displaying for a given issue. To use the field helper tool, do the following:
- Browse to the issue where you are not seeing the field.
- Click on the Admin dropdown and then the Where is my field? option:

Figure 6.12 – Field helper

Figure 6.13 – Field helper result
As we can see from the preceding screenshot, the Archiver field is not being displayed on the issue because the field does not have a value for the current issue. So, this will save you time from checking whether the field is added to the screen or if the field configuration has set the field to hidden.
The HR project
Armed with the new knowledge that you have gathered in this chapter, together with fields from the previous chapter, it is time for you to further customize your Jira to provide a better user experience through presentation.
What we will do this time is create new screens and apply them to our HR project. We want to separate the new fields that are showing generic fields from our specialized custom fields designed for handling employee onboarding and termination. We also want to apply the changes to the issues of the New Employee and Termination types only, and not affect the other issue types in the project. As with any changes to be done on a production system, it is critical that you have a backup of your current data before applying changes.
Setting up screens
In Chapter 5, Field Management, you created a few custom fields specifically designed for our HR team. The problem we had is that all of the new fields show up for both the New Employee and Termination issue types, regardless of whether they are applicable, and this is because both issue types use the same set of screens.
To address this, we will create two new sets of screens, one for New Employee and one for Termination. The default one can be left for other issue types we have in the project, such as Task.
The easiest way to do this will be to clone the existing screens, so we do not have to manually add all of the fields, and avoid forgetting to add a field by accident. To create screens for each issue type, perform the following steps:
- Browse to the View Screens page and click on the Copy link for HR: Task Management Create Issue Screen.
- Name the new screen HR: Create/View New Employee Screen.
- Click on the Copy button to create the screen.
Now that we have our new screen, it is time to configure its fields using the following steps. Since this screen is for creating New Employee issues, we do not need the Last Day field:
- Click on the Configure link of our new HR: Create/View New Employee Screen.
- Remove the Last Day field by hovering over it and clicking its Remove button.
Just to spice things up a bit, we can also create a new People tab and move all people-related fields, such as the Assignee, Reporter, and Direct Manager fields, onto that tab.
We created and configured our create screen. Our new edit screen is going to look very similar to this with just a few modifications. Perform the following steps as we want to remove the Issue Type field since we do not want users to change the issue type after it is created:
- Click on the Copy link for HR: Create/View New Employee Screen.
- Name the new screen HR: Edit New Employee Screen.
- Click on the Copy button to create the new screen.
- Remove the Issue Type field.
Repeat the steps to create a new set of screens for the Termination issue type. This time, instead of removing the Last Day field, remove the Direct Manager field from both screens.
Setting up screen schemes
With the screens created and configured, we now need to link them up with issue operations, so that Jira will know on which action the new screens will be displayed, using the following steps:
- Browse to the View Screen Schemes page and click on Add Screen Scheme.
- Name the new screen scheme HR: New Employee Screen Scheme.
- Select HR: Create/View New Employee Screen as the default screen.
- Click on the Add button to create the screen scheme.
With our screen scheme in place, it is time to link up our screens with their respective issue operations, as follows:
- Click on the Associate an Issue Operation with a Screen button.
- Select HR: Edit New Employee Screen for the Edit Issue operation.
Since we assigned HR: Create/View New Employee Screen to Default, this screen will be applied to unmapped operations—Create Issue and View Issue. There are no differences if you choose to explicitly set the mappings for the preceding two operations.
We have created the screen scheme for the New Employee issue type. Now repeat the same steps for the Termination issue type.
Setting up issue type screen schemes
Now, you need to apply the newly created screen scheme to the correct issue type. Since Jira has already created an issue type screen scheme for our project, we just need to configure it to use our new screen schemes for the appropriate issue types, using the following steps:
- Browse to the Issue Type Screen Schemes page and click on the Configure link for HR: Task Management Issue Type Screen Scheme.
- Click on the Associate an issue type with a screen scheme button.
- Select New Employee for Issue Type.
- Select HR: New Employee Screen Scheme as the screen scheme to be associated.
- Click on the Add button to create the association.
This will ensure that issues of the New Employee type will have your new screens applied, while issues of other types will not be affected. Now, repeat the steps to associate the Termination issue type with its screen scheme.
Putting it together
Since we are reusing the existing issue type screen scheme by associating various issue types with our new screen schemes, we do not need to make any additional changes. However, if you have created a new issue type screen scheme instead, you will need to associate it with the HR project.
You can now take a look at your hard work and see your custom screens, fields, and tabs all working nicely together to present you with a custom form for collecting user data. Let’s go ahead and create a new incident and see what your newly customized Create Issue screen will look like, as shown in the following screenshot:

Figure 6.14 – HR project result
As you can see, the Last Day field is no longer showing on the screen when you create a New Employee issue, and our people-related fields are now showing on the new People tab. If you create a new Termination issue, the Direct Manager field will not display.
Summary
In this chapter, we looked at how Jira structures its presentation with screens. We looked at how screens are used in Jira via screen schemes, which map screens to issue operations. We also looked at how issue type screen schemes are then used to map screen schemes to issue types. Therefore, for any given project, each issue type can have its own set of screens for create, edit, and view. We also discussed how screens can be broken down into tabs to provide a more logical grouping of fields, especially when your screen starts to have a lot of fields on it.
Together with custom fields, which we saw in the previous chapter, we can now create effective screen designs to streamline our data collection. In the next chapter, we will delve into workflows, one of the most powerful features in Jira.