
9
Securing Jira
In the previous chapters, you learned how to store data in Jira by creating issues. As you can see, as an information system, Jira is all about data. It should come as no surprise to you that security plays a big role in Jira, to ensure that only the right people will get access to your data. This is achieved by providing a flexible and robust way for you to manage access control. It is able to integrate with your existing security practices, such as a password policy, and allows both centrally controlled permissions and delegating and empowering your project owners and users to manage permissions for their own projects.
By the end of this chapter, you will have learned about the following:
- Managing users, groups, and project roles
- User directories and how to connect Jira to the Lightweight Directory Access Protocol (LDAP)
- General access control in Jira
- Managing project- and issue-level permission settings
- How to troubleshoot permission problems
- Configuring Jira with Security Assertion Markup Language (SAML) single sign-on (SSO) and just-in-time (JIT) user provision
Specifically, we will look at the following topics:
- Managing users
- Managing groups and roles
- User directories
- Understanding Jira permissions
- Issue security
- Troubleshooting permissions
- Workflow security
- Password policy
- Enabling SSO with SAML
- Auditing system changes
- The human resources (HR) project
Before we delve into the deep end of how Jira handles security, let’s first take a look at how Jira maintains user and group memberships.
Managing users
Each user needs to have an account for them to access Jira unless it is configured to allow anonymous access (refer to the Permission schemes section in this chapter for details). Each user is identified by their unique username.
The user browser is where you will be able to see a list of all the users in Jira, including their usernames, email addresses, last login attempt, and which user directory they belong to. The user browser also provides you with search capabilities. You will be able to search for users that fit the criteria, such as by username, full name, email address, and group association. Perform the following steps to access the user browser:
- Browse to the Jira administration console.
- Select the User management tab and then the Users option, to take you to a screen like this:
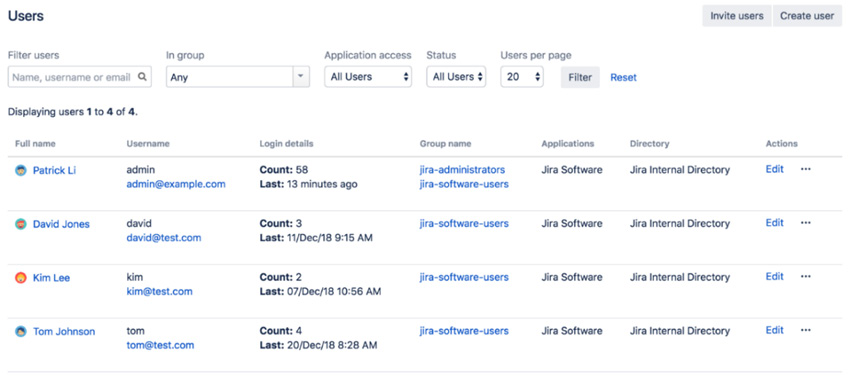
Figure 9.1 – User browser
By default, the results will be paginated to show 20 users per page, but you can change this setting to show up to 100 users per page. When dealing with large deployments having hundreds of users, these options will become very useful to quickly find the users you need to manage.
Other than providing the ability for you to effectively search for users, the user browser also lets you add new users to Jira and manage a user’s group/role associations.
Adding a user
Jira lets you add new users in several ways, such as the following:
- Direct creation by the Jira administrator
- Invitation from the Jira administrator to create an account
- Synchronization of user accounts from an external user repository, such as LDAP
- By signing up for an account if the public signup option is enabled
The first three options have centralized management, whereby only Jira administrators can create and/or manage user accounts. These options are most applicable to private Jira instances designed to be used by an organization’s internal users.
The last option allows users to sign up for accounts by themselves. This is most useful when you run a public Jira instance, where manually creating user accounts is not scalable enough to handle the volume. We will be looking at how to enable the public signup option and integrate with LDAP in the User directories section later. For now, we will examine how administrators can create user accounts manually. Here’s how to do this:
- Browse to the User Browser page.
- Click on the Create user button.
- Enter a unique username for the new user. Jira will let you know if the username is already taken.
- Enter the password, full name, and email address of the user. If you do not enter a password, a random password will be generated. In this case, you should select the Send notification email option so that the new user can reset their password.
- Select which applications in Jira the new user will have access to. For example, if you are running Jira software, you should check the Jira Software option. Doing so will consume one license seat count.
- Click on the Create user button to create a new user.
Alternatively, administrators can also choose to invite users so that they can create their accounts themselves. This is different than the public signup option since only recipients of invitations will be able to create accounts. For this feature to work, you will need to have an outgoing mail server configured, as invitations will be sent as emails. Perform the following steps to invite users to sign up:
- Browse to the User Browser page.
- Click on the Invite users button.
- Specify the email addresses of the people you wish to invite. You can invite multiple people at once.
- Click on the Invite users button to send out invitations.
Enabling public signup
If your Jira setup is public (for example, an open source project), then creating user accounts individually, as explained earlier, would become a very demanding job for your administrator. For this type of Jira setup, you can enable public signup to allow users to create accounts by themselves. Perform the following steps to enable public signup in Jira:
- Browse to the Jira administration console.
- Select the System tab and then the General configuration option.
- Click on the Edit Settings button.
- Select Public for the Mode field.
- Click on the Update button to apply the change.
Once you have set Jira to run in Public mode, users will be able to sign up and create their own accounts from the login page, as illustrated in the following screenshot:
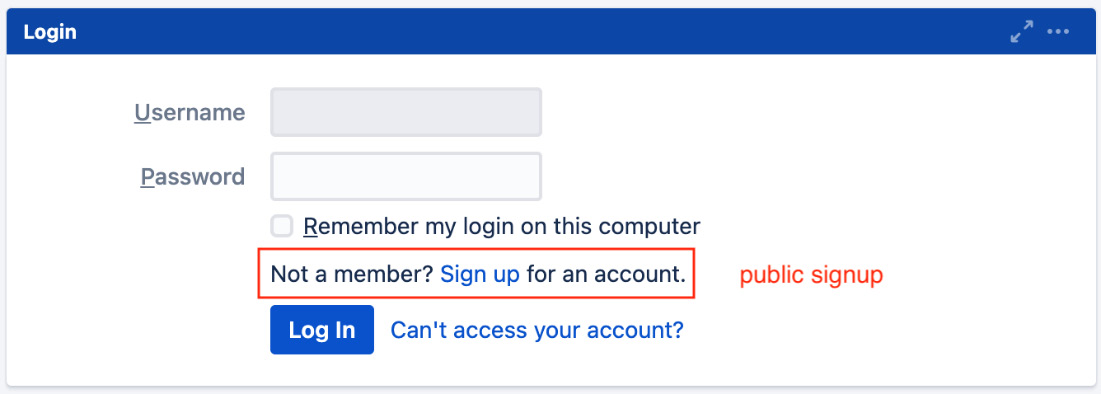
Figure 9.2 – Public signup
As you will see in the Application access section later in this chapter, once a user signs up for a new account, they will automatically join groups with the Jira user’s global permission. If you have set Jira to run in Private mode, then only the administrator will be able to create new accounts.
Enabling CAPTCHA
If you are running Jira in Public mode, you run the risk of having automated spam bots creating user accounts on your system. To counter this, Jira provides the CAPTCHA service, where potential users will be required to type a word represented in an image into a text field. Perform the following steps to enable the CAPTCHA service:
- Browse to the Jira administration console.
- Select the System tab and then the General configuration option.
- Click on the Edit Settings button.
- Select On for the CAPTCHA on signup field.
- Click on the Update button to apply the change.
Now, when someone tries to sign up for an account, Jira will present them with a CAPTCHA challenge that must be verified before the account is created, as illustrated in the following screenshot:
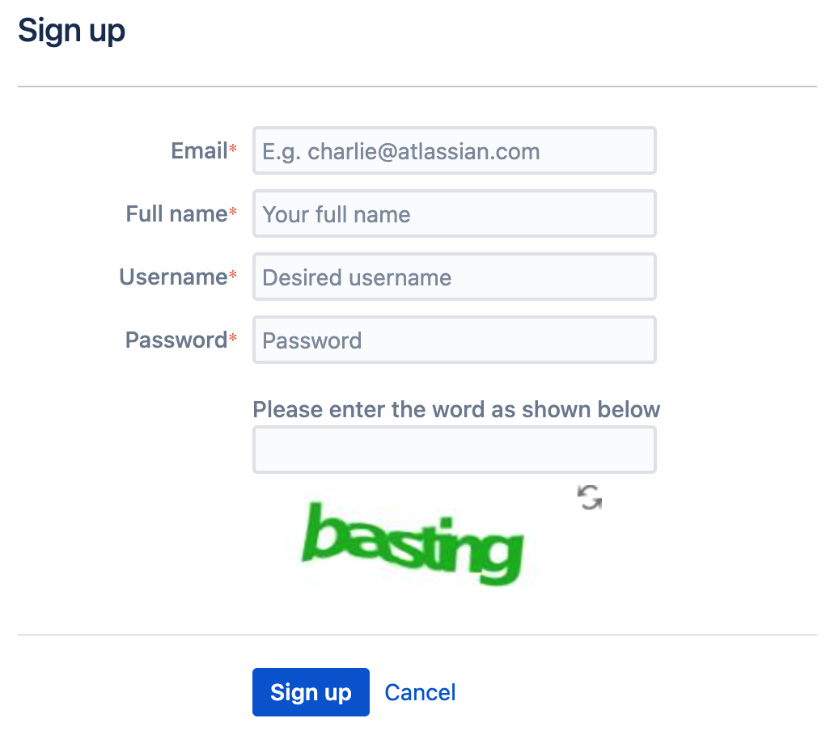
Figure 9.3 – CAPTCHA
In addition to managing users, we also need to review how groups and roles are managed in Jira. Let’s go through this in the next section.
Managing groups and roles
Groups are a common way of managing users in any information system. A group represents a collection of users, usually based on their positions and responsibilities within the organization. In Jira, groups provide an effective way to apply configuration settings, such as permissions and notifications, to users.
Groups are global in Jira, which is something that should not be confused with project roles (which we will discuss later). This means that if you belong to the jira-administrators group, then you will always be in that group regardless of which project you are accessing. You will see in later sections how this is different from project roles.
Managing groups
As with the user browser, the group browser allows you to search, add, and configure groups within Jira. Here’s how to access this:
- Browse to the Jira administration console.
- Select the User management tab and then the Groups option. This will bring up the Group Browser page, as illustrated in the following screenshot:

Figure 9.4 – Group Browser page
Jira comes with a few default groups. These groups are created automatically when you install Jira. For Jira software, we have the following groups:
|
Group |
Description |
|
jira-administrators |
Administrators of Jira. By default, this group lets you access the administration console. |
|
jira-software-users |
By default, members of this group will have access to the Jira Software application. |
Table 9.1 – Default groups
Other Jira applications, such as Jira Service Desk, will have different sets of default groups.
Adding a group
Other than the three groups that come by default with Jira, you can create your own groups. It is important to note that once you create a group, you cannot change its name. Therefore, make sure that you think about the name of the group carefully before you create it. Follow these steps to create a group:
- Browse to the Group Browser page.
- Enter a unique name for the new group in the Add group section.
- Click on the Add group button to create this new group.
After a group is created, it will be empty and will have no members; you will need to manually add users to the group.
Editing group memberships
Often, people move around within an organization, and your Jira setup needs to be kept up to date with such movement. In the group browser, there are two ways to manage group memberships. The first option is to manage the membership on a per-group level, and the second option is to manage several groups at the same time. These options are actually similar, so we will cover them at the same time.
Perform the following steps to manage individual groups:
- Browse to the Group Browser page.
- Click on the Edit members link for the group you wish to manage members of. This will bring you to the Bulk Edit Group Members page.
You will notice that both options will take you to the same page. The difference is that if you chose the individual group option, Jira will auto-select the group to update, and if you chose the bulk edit option, then no groups will be selected. However, regardless of which option you choose, you can still select one or all of the groups to apply your changes to, as described in the following screenshot:

Figure 9.5 – Group members
Perform the following steps to update the membership in one or more groups:
- Browse to the Bulk Edit Group Members page.
- Select one or more groups to update.
- Select users from the middle box and click on the Remove selected users button to take users out of the groups.
- Specify users (by typing usernames) in the right-hand side box and click on the Add selected users button to add users to the groups.
Deleting a group
If a group has become redundant, you can remove it from Jira by following these steps:
- Browse to the Group Browser page.
- Click on the Delete link for the group you wish to remove and click on Delete again to permanently remove the group.
Once you remove a group, all users who previously belonged to it will have their group associations updated to reflect the change. However, if you have other configurations using the group, it can have a negative impact if you are not careful. For example, if you are restricting the Create Issue project permission to only a group called developers in your permission scheme, by deleting the developers group, nobody will be able to create issues in projects using the permission scheme.
Important note
Be very careful when deleting a group, as it might be used in other configurations.
Managing roles
As you have seen, groups are collections of users and are applied globally to all projects in Jira. Jira also offers another way of grouping users, which is applied on the project level only.
Similar to users and groups, project roles are maintained by the Jira administrator through the Project Role Browser page. There is a slight difference, however, because since project roles are specific to projects, Jira administrators only define which roles are available in Jira and their default members. Each project’s administrators (discussed in later sections) can further define each role’s membership for their own projects, overriding the default assignment. We will first look at what Jira administrators can control through the Project Role Browser page and then look at how project administrators can fine-tune the membership assignment later.
Perform the following steps to access the Project Role Browser page:
- Browse to the Jira administration console.
- Select the System tab and then the Project roles option. This will bring up the Project Role Browser page, as illustrated in the following screenshot:
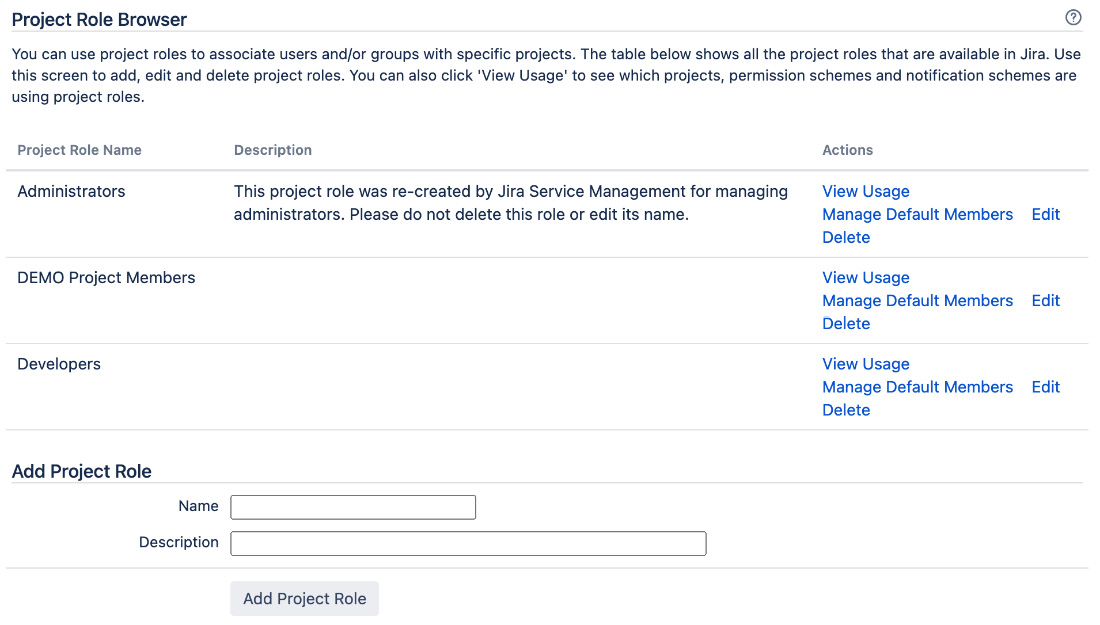
Figure 9.6 – Project Role Browser page
Adding a project role
To start creating your own project roles, you will first need to add the role as a Jira administrator, and then each project administrator will be able to add users to it. Perform the following steps to create a new project role:
- Browse to the Project Role Browser page.
- Enter a unique name for the new project role in the Add Project Role section.
- Click on the Add Project Role button to create this project role.
Once you add a new project role, it will appear for every project.
Managing default members
You can assign default members to project roles so that newly created projects will have project roles assigned to them. Default members are an efficient way for Jira administrators to assign project role members automatically, without having to manually manage each new project as it comes in.
For example, by default, users in the jira-administrators group will have the Administrators project role. This not only increases the efficiency of the setup by creating a baseline for new projects but also offers the flexibility to allow modifications to the default setup to cater to unique requirements.
Perform the following steps to set default members for a project role:
- Browse to the Project Role Browser page.
- Click on the Manage Default Members link for the project role you wish to edit.
The following screenshot shows that the Developers project role has two default users (Alana Grant and David Pereira) and a default group (jira-software-users):
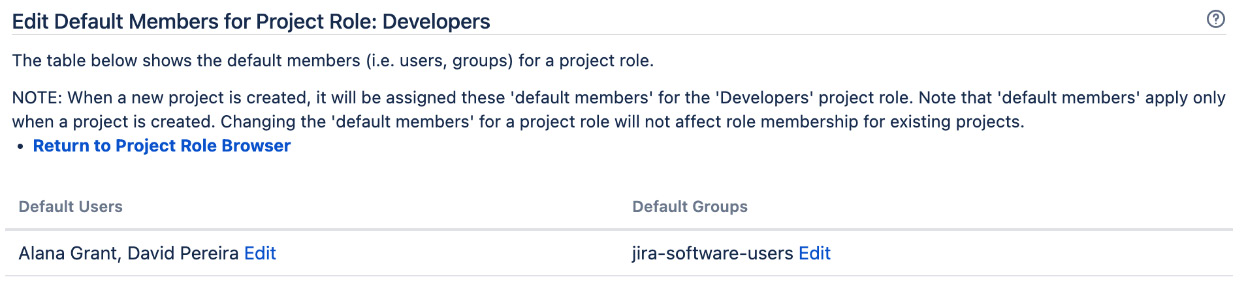
Figure 9.7 – Default role members
On this page, you will see all the default members assigned to the selected project role. You can assign default memberships based on individual users or groups.
Perform the following steps to add a default user/group to a project role:
- Click on the Edit link for the default member option (either the user or group).
- Use the user picker/group picker function to select users/groups you wish to assign to the project role.
- Click on the Add button to assign the role. The following screenshot shows that the jira-software-users group is the default group for the Developers project role, and the contract-developers group is to be added:
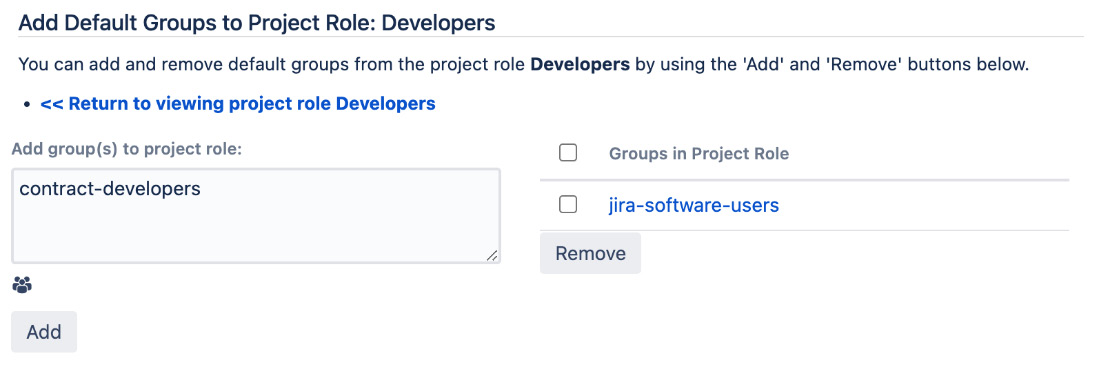
Figure 9.8 – Adding a default role member
Once added, any new projects created will have the specified users/groups assigned to the project role. It is important to note that changes to default memberships are only applied to new projects. Existing projects will not retrospectively have the new default members applied.
Assigning project role members
As you have seen, Jira allows you to assign default members to projects when they are created. This might be sufficient for most projects when they start, but changes will often need to be made due to staff movement during the project life cycle. While it is possible for the Jira administrator to continue maintaining each project’s membership, it can easily become an overwhelming task, and in most cases, since project roles are specific to each project, it makes sense to delegate this responsibility to the owner of each project.
In Jira, an owner of a project is someone with the Administer Projects permission. By default, members of the Administrators project role will have this permission. We will see how to manage permissions in Jira in the Project permissions section later.
As a project administrator, you will be able to assign members to various project roles for your project. You can assign roles from the project administration page, as follows:
- Browse to the project administration page for the project you want to update.
- Select the Users and roles option from the left-hand panel.
- Click on the Add users to a role link.
- Start typing the user’s username or the group’s name. Jira will auto-search for results as you type.
- Click on the Add users to a role button once you have found the user/group you want to add. You can see an overview of this in the following screenshot:

Figure 9.9 – Adding a role member
Tip
You should use groups instead of individual users where possible to help with future maintenance.
The users and groups assigned to a project role will be for the current project only. Each project administrator can configure this for their own projects. In this way, you can maintain project role memberships separately for each project.
User directories
You might be wondering how and where Jira stores users and groups. User directories are what Jira uses to do this. A user directory is backed by a user repository system, such as LDAP, a database, or a remote user management system, such as Atlassian Crowd. Out of the box, Jira comes with a default internal directory that stores user and group information in the database.
You can have multiple user directories in Jira. This allows you to connect your Jira instance to multiple user repositories. For example, you can have an LDAP directory for your internal users and the Jira internal directory using the database for external users. An example is given in the following screenshot, where we have three user directories configured. The first user directory is the built-in Jira internal directory running on the Jira database. The second user directory is connected to Microsoft Active Directory (AD) in read-only mode. The last user directory is connected to Atlassian Crowd, user identity management software from Atlassian:

Figure 9.10 – User directories
As a Jira administrator, you can manage user directories by performing these two steps:
- Browse to the Jira administration console.
- Select the User management tab and then select the User Directories option.
From there, you can see a list of user directories you currently have configured in Jira, add new directories, and manually synchronize with the remote user repository.
When adding a new user directory, you need to first decide on the directory type. There are several different user directory types within Jira, as outlined here:
- Jira internal directory: This is the built-in default user directory when you first install Jira. With this directory, all the user and group information is stored in the Jira database.
- AD/LDAP: This is used when you want to connect Jira to an LDAP server. With this directory, Jira will use the backend LDAP to query user information and group membership. This is also known as an LDAP connector and should not be confused with internal and LDAP authentication directories.
- Internal with LDAP authentication: This is also known as a delegated LDAP. With this directory type, Jira will only use LDAP for authentication and will keep all user information internally in the database (retrieved from LDAP when the user successfully authenticates for the first time). This approach can provide better performance. Since LDAP is only used for authentication, this avoids the need to download larger numbers of groups from LDAP.
- Atlassian Crowd: If you are also using Atlassian Crowd, a user management and SSO and identity management solution, you can use this directory type to connect to your crowd instance. With this option, you can also configure your Jira instance to participate in the SSO session. Note that Jira Data Center has SSO support built in, so Atlassian Crowd is not required.
- Atlassian Jira: Jira can act as a user repository for other compatible applications. If you have another Jira instance running, you can use this directory type to connect to the other Jira instance and for user information.
When you have multiple user directories configured for Jira, there are a few important points to keep in mind. The order of the user directories is important, as it will directly affect the order Jira will use to search for users and apply changes to users and groups. For example, if you have two user directories and both have a user called admin with different passwords, this will have the following effects:
- When you log in to Jira with the admin username, you will be logged in as the admin user from the first user directory that is able to validate the password, in the order of listed directories.
- After logging in, you will be granted group membership from the directory that has validated your password. Any other directories will be skipped.
- If you make a change to the admin user, such as changing the full name, then the changes will only be applied to the first directory Jira has write access to.
Another important point to remember when working with user directories is that you cannot make changes to the user directory when you are logged in with a user account that belongs to the said directory. For example, if you are logged in with an LDAP account, then you will not be able to make changes to Jira’s LDAP user directory settings, since there is the potential for the new change to actually lock you out of Jira.
Important note
Always have an active administrator user account ready in the default Jira internal directory—for example, the account created during the initial setup. This will provide you with an administrator account that can help you fix user directory problems, such as the preceding scenario. If you have a user account with the same name in the other user directory, then the internal directory should also be the first one in the list.
Connecting to LDAP
Jira supports a wide range of LDAP servers, including Microsoft AD and OpenLDAP. If a particular LDAP is not listed as one of the options, then we also have a Generic Directory Server option.
When using the AD/LDAP connector directory type, you can choose to connect with one of the following permission options:
- Read only: Jira cannot make any modifications to the LDAP server.
- Read only, with local groups: Information retrieved from LDAP will be read-only, but you can also add users to groups created within Jira. These changes will not be reflected in LDAP.
- Read/Write: Jira will be able to retrieve and make changes to the LDAP server.
The Read only option is the most common option, as information technology (IT) teams often centrally manage LDAP servers and changes are not allowed. With this option, Jira will only need read access to user data stored in LDAP to verify user credentials and group membership. If you only want to use LDAP as a user repository and for authentication, but still want to have the flexibility to update group membership without having to get the LDAP team involved, then the Read only, with local groups option will be the best fit. Lastly, the Read/Write option should be avoided, as propagating changes to LDAP, such as group membership, can have an unforeseen impact on other systems also relying on the same LDAP server.
To connect your Jira setup to LDAP, all you have to do is add a new user directory, as follows:
- Browse to the User Directories page.
- Click on the Add Directory button and select either Microsoft Active Directory or LDAP from the Directory Type select list, and then click on Next.
- Provide your LDAP server information.
Since every LDAP is different, the exact parameters that are required will vary. At a minimum, you need to provide the following information:
|
Parameter |
Description |
|
Name |
This is the name of the user directory. |
|
Directory Type |
This is where you select the flavor of your LDAP. This will help Jira to prefill some of the parameters for you. |
|
Hostname |
This is the hostname of your LDAP server. |
|
Port |
This is the port number of your LDAP server. Jira will prefill this based on your directory type selection. |
|
Base DN |
This is the root node for Jira to search for users and groups. |
|
LDAP Permissions |
This helps you choose whether Jira should be able to make changes to LDAP. |
|
Username |
This is the username that Jira will use to connect to LDAP for user and group information. |
|
Password |
This is the password that Jira will use to connect to LDAP. |
Table 9.2 – User directory parameters
You can see these sections completed in the following screenshot:
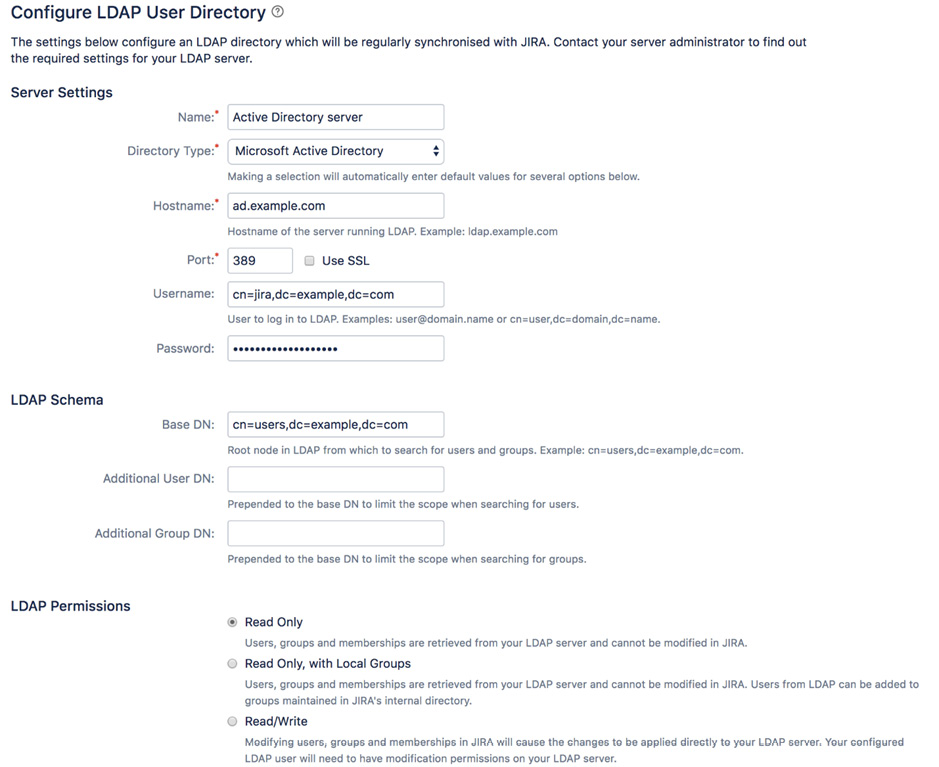
Figure 9.11 – Adding an LDAP user directory
Apart from the preceding parameters, there are additional advanced settings, such as User Schema Settings and Group Schema Settings. After filling in the form, you can click on the Quick Test button to verify that Jira is able to connect to your LDAP server and authenticate with the username and password provided. Note that this does not test for things such as user lookup. If the initial quick test is successful, then you can go ahead and click on the Save and Test button. This will add the user directory and take you to the test page, where you can test the settings with a proper user credential (this will be different than the one used by Jira to connect to LDAP), as illustrated in the following screenshot:

Figure 9.12 – Test LDAP user directory
After the new user directory is added, Jira will automatically synchronize with the LDAP server and pull in users and groups. Depending on the size of your LDAP server, this may take some time to complete. After the initial synchronization, Jira will periodically perform incremental synchronization for any changes every 60 minutes.
Understanding Jira permissions
Jira manages its permissions in a hierarchical manner. Each level is more fine-grained than the one above it. For a user to gain access to a resource (for example, to view an issue), they need to satisfy all applicable permissions, as follows:
- Application access: This defines the groups that will have access to the various applications in Jira (for example, Jira Software)
- Global permission: This permission controls access rights functions, such as overall administration
- Project-level permission: This permission controls project-level permissions—for example, creating and editing issues
- Issue-level security: This permission controls view access to each individual issue
We will now look at each of the permission levels and how you can configure them to suit your requirements, starting from access to the Jira application.
Application access
As we have explained in Chapter 1, Getting Started with Jira Data Center, the Jira product family includes several applications and you can have them all running together—for example, you can have Jira Software and Jira Service Management running in the same instance. Access to each of the running applications is controlled via the Application access feature. To manage application access, perform the following steps:
- Browse to the Jira administration console.
- Select the Applications tab and then the Application access option.
- Select a group to grant access to the application. If you check the Default option of the group, new users will be added to the group when created. You can see an overview of this in the following screenshot:

Figure 9.13 – Application access
You can only assign groups with application access. Once a group is assigned access to an application, all active users in the group will be granted access. Note that each user in the group will also consume a license seat for the application.
Global permissions
Global permissions, as the name suggests, control permissions that are applied globally, such as administrator-level access. Similar to application access, global permissions are applied to groups rather than individual users. The following table lists all permissions and what they control in Jira:
|
Global permission level |
Description |
|
Jira System Administrators |
This gives permission to perform all Jira administration functions. This is akin to the root mode in other systems. |
|
Jira Administrators |
This gives permission to perform most Jira administration functions that are not related to system-wide changes (for example, to configure the Simple Mail Transfer Protocol (SMTP) server and to export/restore Jira data). |
|
Browse Users |
This gives permission to view a list of Jira users and groups. This permission is required if the user needs to use the User Picker/Group Picker function. |
|
Create Shared Object |
This gives permission to share filters and dashboards with other users. |
|
Manage Group Filter Subscriptions |
This gives permission to manage group filter subscriptions. Filters will be discussed in Chapter 10, Searching, Reporting, and Analysis. |
|
Bulk Change |
This gives permission to perform bulk operations, including the following:
|
|
Browse Archive |
This gives permission to browser projects and issues that have been archived. |
Table 9.3 – Global permissions
Jira System Administrators versus Jira Administrators
For people who are new to Jira, it is often confusing when it comes to distinguishing between the Jira System Administrators and Jira Administrators global permission. For the most part, they are very similar, and they can carry out most of the administrative functions in Jira.
The difference is that Jira administrators cannot access functions that can affect the application environment or network, while a Jira system administrator has access to everything.
While it can be useful to separate these two, in most cases, it is not necessary. By default, the jira-administrators group has both Jira System Administrators and Jira Administrators permissions.
The following list shows examples of system operations that are only available to people with the Jira System Administrators permission:
- Configuring SMTP server details
- Configuring the Concurrent Versions System (CVS) source code repository
- Configuring listeners
- Configuring services
- Configuring where Jira stores index files
- Importing data into Jira from an Extensible Markup Language (XML) backup
- Exporting data from Jira to an XML backup
- Configuring attachment settings
- Accessing Jira license details
- Granting/revoking Jira System Administrators global permission
- Deleting users with Jira System Administrators global permission
Configuring global permissions
Global permissions are configured and maintained by Jira administrators and Jira system administrators, as follows:
- Browse to the Jira administration console.
- Select the System tab and then the Global permissions option to bring up the Global Permissions page, as shown in the following screenshot:

Figure 9.14 – Global Permissions page
Important note
Users with the Jira Administrators global permission cannot grant themselves the Jira System Administrators global permission.
Granting global permissions
Global permissions can only be granted to groups. For this reason, you will need to organize your users into logical groups for global permissions to take effect. For example, you will want to have all your administrators belong to a single group, such as the jira-administrators group so that you can grant them administration permission. Here’s how to do this:
- Browse to the Global Permissions page.
- Select a permission you wish to assign from the Add Permission section.
- Choose the group to be given the permission.
- Click on the Add button to add the assignment.
The Group drop-down list will list all the groups in Jira. It will also have an extra option called Anyone on the web. This option refers to all users, including those that are not needed to log in to access Jira. You cannot select this option when granting the Jira Users permission, as they are required to log in, and Anyone refers to a non-logged-in user. For a production system, it is recommended to take care when granting any global permission to Anyone (non-logged-in users), as this can lead to security and privacy concerns. For example, by granting Anyone as the global permission for Browse Users, anyone with access to your Jira instance will be able to get your registered users’ information.
Revoking global permissions
Global permissions can also be revoked. Both Jira system administrators and Jira administrators can revoke global permissions, but Jira administrators cannot revoke the Jira System Administrators global permission.
Perform the following steps to delete a global permission from a group:
- Browse to the Global Permissions page.
- Click on the Delete link for the group you wish to remove from the global permission.
- Click on the Delete button to revoke the global permission for the group.
Jira has built-in validation rules to prevent you from accidentally locking yourself out by mistakenly removing the wrong permissions. For example, Jira will not let you delete the last group from Jira System Administrators global permissions, as doing so effectively prevent you from adding yourself back (since only Jira system administrators can assign/revoke global permissions).
Project permissions
The next level of permission control is project permissions. Jira defines a list of permissions that covers the different operations a user can perform within the context of a project, such as creating new issues and adding comments to issues. Unlike application access and global permissions, which only allow you to use groups, project permissions have a lot more options when it comes to determining who to grant permissions to. A list of project permissions is set out here:
- Application access: This is for any user that has been granted access to the application
- Reporter: This is the user who submitted the issue
- Group: These are all users that belong to the specified group
- Single user: This is any user in Jira
- Project lead: This is the lead of the project
- Current assignee: This is the user currently assigned to the issue
- Project role: These are all users that belong to the specified role
- User custom field value: This user is specified in a custom field of the type User Custom Field
- Group custom field value: These are users within a specified group in a Group Custom Field type
Since you will likely have many projects, Jira lets you define your permissions once and apply them to multiple projects, with permission schemes.
Permission schemes
Permission schemes are collections of associations between permissions and users. Each permission scheme is a reusable, self-contained entity that can be applied to one or more projects.
As with most schemes, permission schemes are applied on the project level. This allows you to apply fine-grained permissions for each project. Just as with project roles, Jira administrators oversee the creation and configuration of permission schemes, and it is up to each project’s administrator to choose and decide which permission scheme to use. This way, administrators are encouraged to design their permissions so that they can be reused based on the common needs of their organization. With meaningful scheme names and descriptions, project administrators will be able to choose a scheme that will fit their needs the best instead of requesting a new set of permissions to be set up for each project.
There is, however, some level of freedom for project administrators when it comes to configuration workflows and screens used by their own projects, as we have already seen in earlier chapters covering those two topics. If the permission scheme has the Extended project administration option enabled, then any projects using that permission scheme will allow project administrators to make changes without having to rely on a Jira administrator.
We will first look at how Jira administrators manage and configure permission schemes and then at how project administrators can apply them in their projects.
Perform the following steps to start managing permission schemes:
- Browse to the Jira administration console.
- Select the Issues tab and then the Permission schemes option to bring up the Permission schemes page, as illustrated in the following screenshot:

Figure 9.15 – Permission schemes page
On the Permission schemes page, you will see a list of all the permission schemes. From there, you will be able to create new schemes and edit and delete existing schemes, as well as configure each scheme’s permission settings.
Configuring permission schemes
Unlike other schemes, such as workflow schemes, Jira does not create a project-specific permission scheme when you create a new project, but rather, it uses a preconfigured scheme called the Default Permission Scheme. If your project needs to have its permission configuration changed, you can either update the permissions in the Default Permission Scheme (which would apply the changes to all other projects using it) or create a separate permission scheme for your new project.
Since there are many permissions in a permission scheme, it is often much easier and more efficient to clone the Default Permission Scheme or another existing permission scheme as the base for your new permission scheme and then make the necessary changes, instead of creating a new scheme from scratch.
Once you have decided to either update an existing permission scheme or have created a new permission scheme, you can then proceed to update its permission settings, as follows:
- Browse to the Permission Schemes page.
- Click on the Permissions link for a permissions scheme you wish to configure.
On this page, you will be presented with a list of project-level permissions, along with short descriptions for each, and the users, groups, and roles that are linked to each of the permissions. This is your one-page view of permission settings for projects, and you will also be able to control who will have access to each of the actions defined by the permissions listed. You can see an overview of this page in the following screenshot:
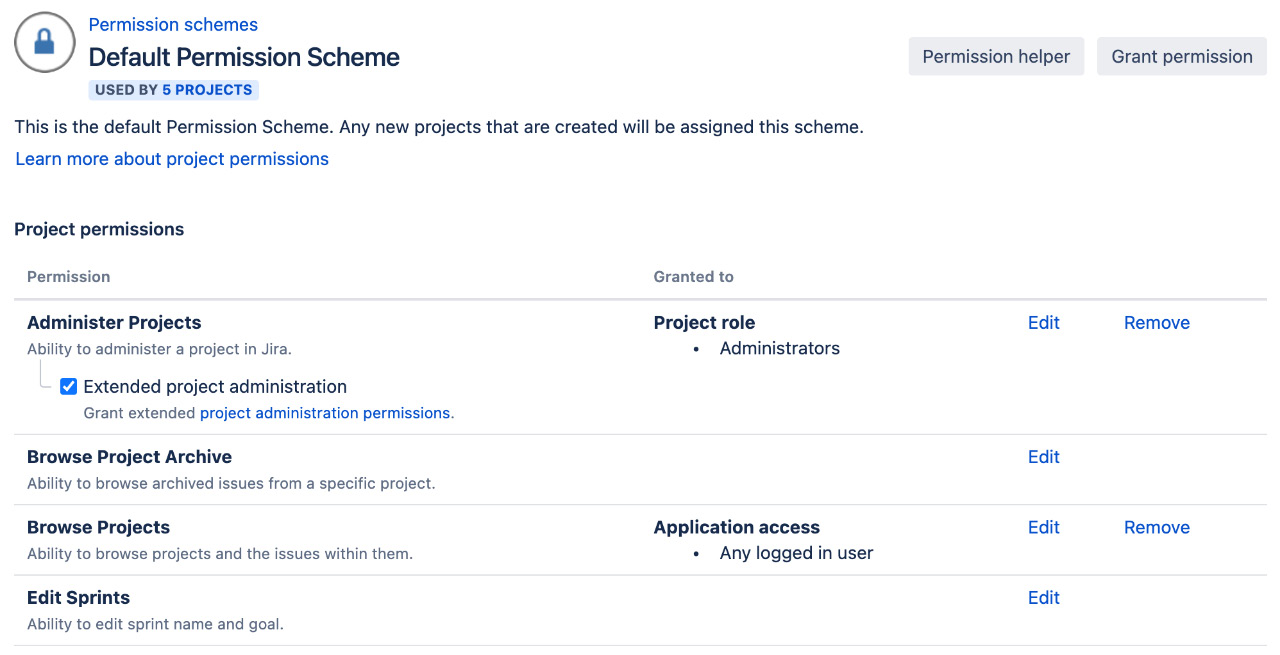
Figure 9.16 – Configuring a permission scheme
To grant permissions to one or more users, do the following:
- Click on the Grant permission button or the Edit link for a specific permission.
- Select permissions you wish to grant to the user.
- Select who to grant the permission to. Click on the Show more link to see more options.
- Click on the Grant button to grant the selected permission, as illustrated in the following screenshot:

Figure 9.17 – Grant permission page
As you can see, unlike global permissions, which only allow you to grant permissions to groups, there are many options available. While each option has its uses, you need to consider how you can maintain your permissions in the long run. For example, although it might be tempting to use the Single user option to quickly grant permission to a user who is requesting access quickly, this can easily become a maintenance nightmare if not careful. The most common options are Group and Project Role. Out of these two, Project Role is often the most flexible option, as it allows each project’s administrator to add users or groups to roles with permissions. Groups, on the other hand, often require either the Jira administrator or, in the case of LDAP, another IT administrator to add and remove users from individual groups.
Other options, such as User custom field value, are a very flexible way to allow end users to control access. For example, you could have a custom field called Editors, and set up your Edit Issues permission to allow only users specified in the custom field to be able to edit issues.
The custom field does not have to be placed on the usual view/edit screens for the permission to be applied. For example, you can have the custom field appear on a workflow transition called Submit to Manager. Once the user has selected the manager, only the manager will have permission to edit the issue.
Revoking permissions is as simple as granting them. Here’s how you can do this:
- Browse to the Edit Permissions page for the permission scheme you wish to configure.
- Click on the Remove link for the permission you wish to revoke, and click on Remove again.
When you are trying to revoke permissions to prevent users from gaining access to certain things, you need to make sure no other options are granted the same permission that might be applied to the same user. For example, if you have both the Single user and Group options set for the Browse Projects permission, then you will need to make sure that you revoke the Single user option and also make sure that the user does not belong to the Group option selected so that you do not have a loophole in your permission settings.
Applying a permission scheme
Once you have your permission scheme configured, you can apply the scheme to your projects. There really is nothing special involved here. Permission schemes are applied to projects in the same way as notification and workflow schemes. Follow these next steps for instructions on how to configure these:
- Browse to the project administration page you want to apply the permission scheme to.
- Select the Permissions option from the left-hand panel.
- Select the Use a different scheme option from the Actions menu.
- Select a permission scheme you want to use.
- Click on the Associate button.
Permission schemes are applied immediately, and you will be able to see the permissions take effect.
Issue security
We have seen how Jira administrators can restrict general access to Jira with application access and global permissions, and what project administrators can do to place permissions on individual projects through permission schemes. Jira allows you to take things to yet another level to allow ordinary users to set the security level on issues they are working with, with issue security.
Issue security allows users to set view permissions (but not edit them) on issues by selecting one of the preconfigured issue security levels. This is a very powerful feature, as it allows the delegation of security control to the end users and empowers them (to a limited degree) to decide who can view their issues.
On a high level, issue security works in a similar way to permission schemes. The Jira administrator will start by creating and configuring a set of issue security schemes with security levels set. Project administrators can then apply one of these schemes to their projects, which allows users (with the Set Issue Security project permission) to select security levels within the scheme and apply them to individual issues.
Issue security schemes
As explained earlier, the starting point of using issue security is issue security schemes. It is the responsibility of the Jira administrator to create and design security levels so that they can be reused as much as possible.
Jira does not come with any predefined issue security schemes, so you will have to create your own from scratch. Perform the following steps to create a new issue security scheme:
- Browse to the Jira administration console.
- Select the Issues tab and then the Issue security schemes option to bring up the Issue Security Schemes page, as illustrated in the following screenshot:
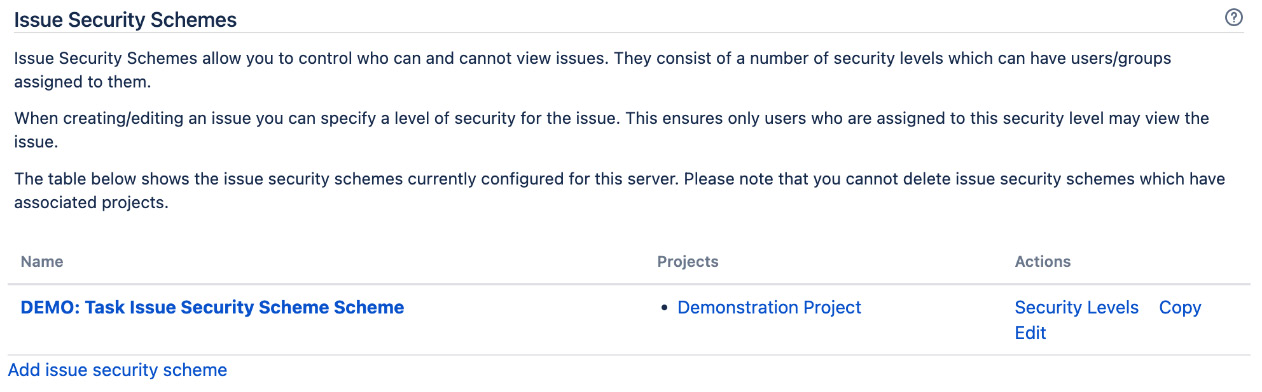
Figure 9.18 – Issue Security Schemes page
- Click on the Add issue security scheme link.
- Enter a name and description for the new scheme.
- Click on the Add button to create a new issue security scheme.
Since an issue security scheme does not define a set of security levels like a permission scheme, you will need to create your own set of security levels right after you create your scheme.
Configuring an issue security scheme
Unlike permission schemes, which have a list of predefined permissions, with issue security schemes, you need to define all the security levels you need. Each security level represents the level of security that users need to meet before Jira will allow them access to the requested issue. Note that even though they are called security levels, it does not mean that there are any forms of hierarchy among the set of levels you create.
To add new security levels to your issue security scheme, proceed as follows:
- Browse to the Issue Security Schemes page.
- Click on the Security Levels link for the issue security scheme you wish to configure. This will take you to the page shown here:

Figure 9.19 – Issue security levels
- Enter a name and description for the new security level in the Add Security Level section.
- Click on the Add Security Level button.
You can add as many security levels as you like in a scheme. One good practice is to design and name your security levels based on your team or project roles (for example, Developers only).
As with permission schemes, once you have your security levels in place, you will need to assign who will have access to each of the security levels. Users assigned to the security level will have permission to view issues with the specified security level. Proceed as follows:
- Click on the Add link for the security level you wish to assign users to.
- Select an option you wish to assign to the security level.
- Click on the Add button to assign users.
Just as with permission schemes, it is better to use options such as Project Role and Group, as they are more flexible and do not tie the security level to individual users, allowing you to control permission with options such as group association.
Setting a default security level
You can set a security level to be the default option for issues if none is selected. This can be a useful feature for projects with a high-security requirement to prevent users (with the Set Issue Security permission) from forgetting to assign a security level for their issues. Follow these next steps:
- Browse to the Edit Issues Security Levels page.
- Click on the Default link for the security level you want to set as default.
Once set as default, the security level will have Default next to its name. Now, when the user creates an issue and does not assign a security level, the default security level will be applied.
Applying an issue security scheme
Just as with permission schemes, project administrators apply issue security schemes to projects. Applying an issue security scheme is similar to applying a workflow scheme, where there is an intermediate migration step involved. This is to ensure that existing issues with set issue security levels can be successfully migrated over to the new security levels in the scheme. Proceed as follows:
- Browse to the project administration page you want to apply the workflow scheme to.
- Select the Issue Security option from the left-hand panel.
- Select the Use a different scheme option from the Actions menu.
- Select a permission scheme to use.
- Click on the Next button to move to step 2 of the process.
- Select a new security level to apply to an existing issue that may be affected by this change.
- Click on the Associate button to apply the new issue security scheme.
Now that we have seen how to apply permissions to projects and issues, let’s take a look at how you can troubleshoot problems you might encounter due to incorrect permission settings.
Troubleshooting permissions
Just as with notifications, it can be very frustrating to troubleshoot permission settings. To help with this, Jira also provides a Permission Helper tool to assist administrators with pinpointing settings that prevent users from accessing certain features.
The Permission Helper tool works similarly to the Notification Helper tool. Here’s how you can use it:
- Browse to the Jira administration console.
- Select the System tab and then the Permission helper option.
- Specify the user having access problems in the User field.
- Specify the issue to test with.
- Select the permission the user does not have (for example, Edit Issues).
- Click on the Submit button.
You can see an overview of the process in the following screenshot:
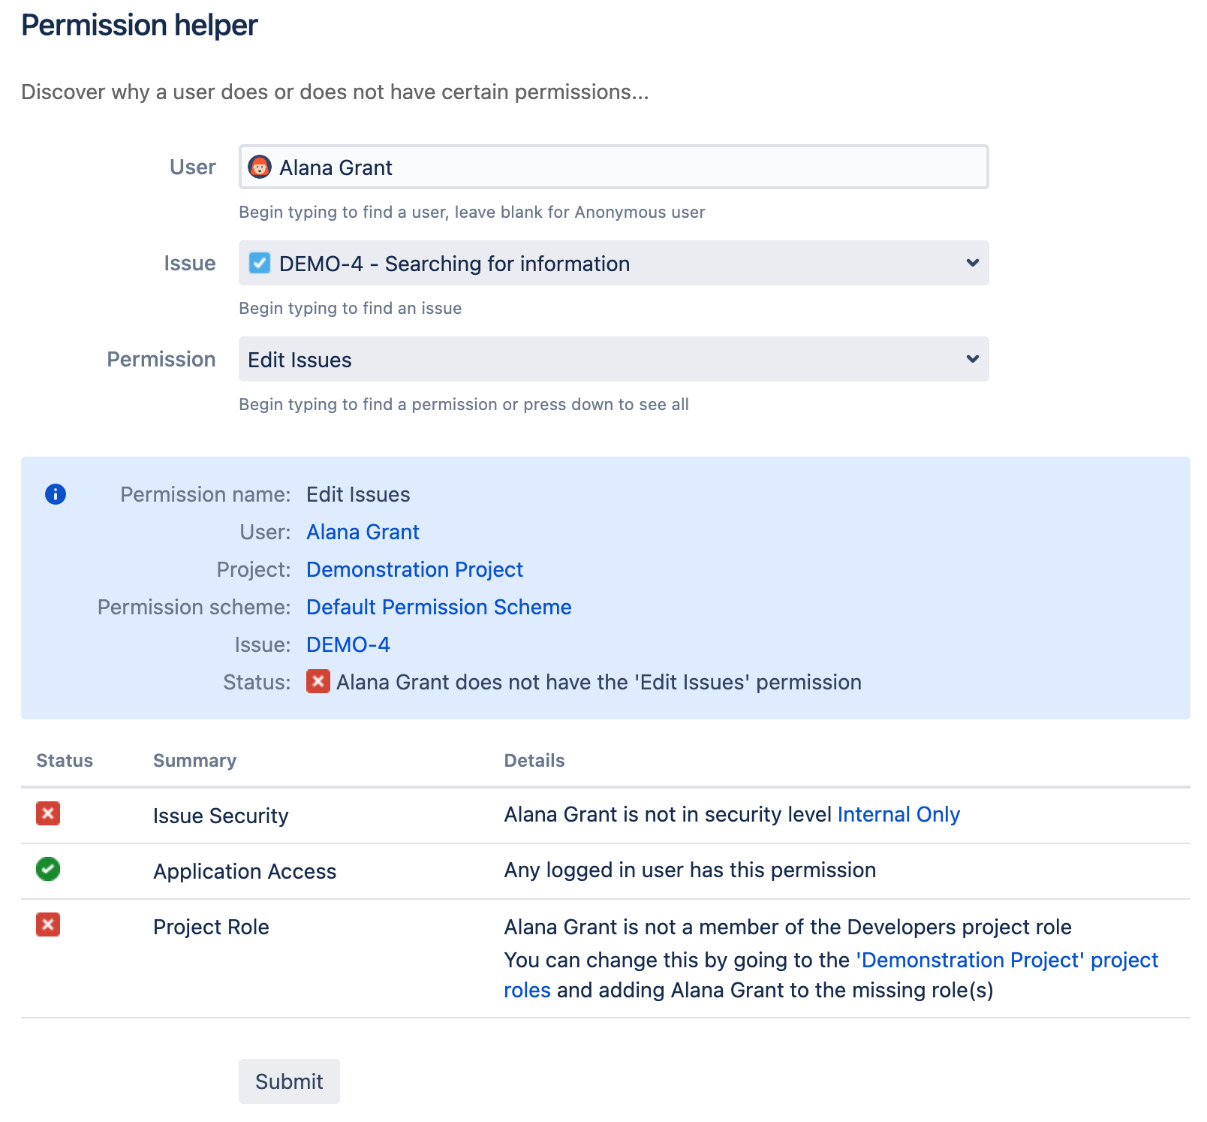
Figure 9.20 – Permission helper page
As shown in the preceding screenshot, the user Alana Grant cannot edit issue DEMO-4 because she does not have the required Internal Only issue security level defined by the issue security scheme used by the project and is not in the Developers project role needed by the permission scheme.
Workflow security
The security features we have looked at so far are not applied to workflows. When securing your Jira setup, you will also need to consider who will be allowed to perform certain workflow transitions—for example, only users in the Managers group will be able to execute the Authorize transition on issues. For you to enforce security on workflows, you will have to set it on each transition you have by adding workflow conditions. Refer to Chapter 7, Workflow and Business Process, which discusses workflows and conditions in more detail.
Password policy
In most cases, unless you are using an SSO solution, you will be using a username and password combination to log in to Jira, so you will want users to choose strong passwords that cannot be easily guessed. If your organization is already enforcing a password policy and centrally managing authentication, such as via LDAP, then all you have to do is integrate Jira with it and you are good to go. However, if this is not the case, Jira comes with the ability for you to set a password policy to make sure your users do not choose simple, guessable passwords. To set up a password policy for Jira, perform the following steps:
- Browse to the Jira administration console.
- Select the System tab and then Password Policy.
- Choose from one of the available options, with the Custom option allowing you to specify your own requirements.
- Click on the Update button to apply the policy.
After you have applied your new password policy, existing user passwords will not be affected. However, if users try to change their own password, or if you are creating a new user account, Jira will make sure the password meets the requirements of the policy and will display an error message if the requirements are not met, as illustrated in the following screenshot:

Figure 9.21 – Password policy
Next, let’s look at how to enable SSO with SAML.
Enabling SSO with SAML
If your organization uses SAML for SSO, you can also configure Jira to participate in the SAML session so that your users will not need to log in to Jira every time they try to access the application. Also, if you have configured your SAML identity provider (IdP) with two-factor authentication (2FA) for additional security, Jira gets that benefit as well.
The one pre-requisite for enabling SAML SSO with Jira is that you must run Jira on Hypertext Transfer Protocol Secure (HTTPS). If you have not configured your Jira setup to do so, please refer to Chapter 1, Getting Started with Jira Data Center, for details.
To enable SAML SSO with Jira, proceed as follows:
- Browse to the Jira administration console.
- Select the System tab and then Authentication methods, which will take you to the page shown here:
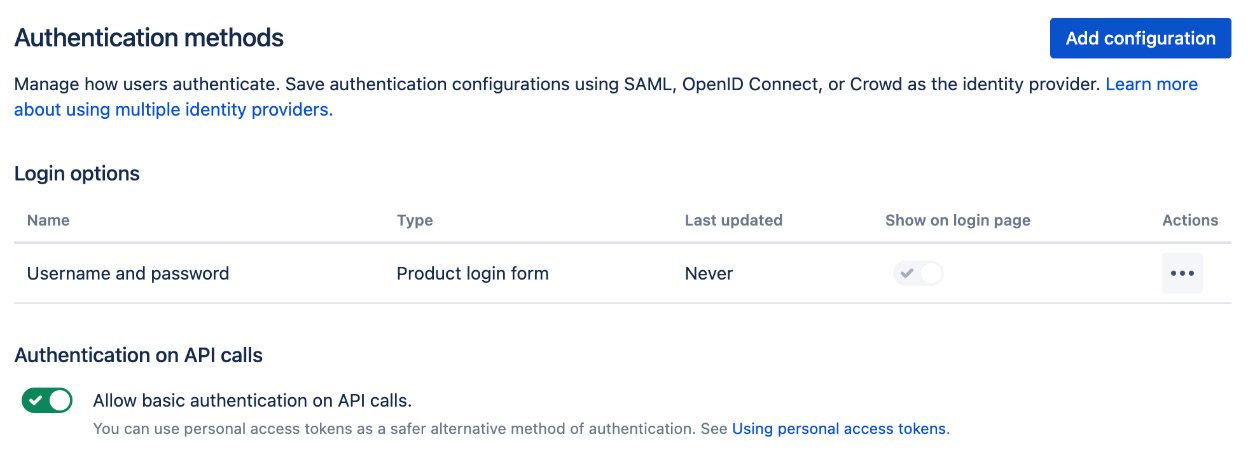
Figure 9.22 – Authentication methods page
- Click on the Add configuration button.
- Enter a name for the configuration. It is a good practice to name it after the IdP and authentication method—for example, Okta SAML.
- Select the authentication method—in this case, SAML.
After you have selected SAML as the authentication method, you will need to enter the details for your SAML configuration. The SAML configurations will be provided by your SAML-compliant IdP, such as Microsoft Azure AD, Okta, and Ping Identity. You will also need to provide Assertion Consumer Service URL and Audience URL (Entity ID) values to your IdP in order to register Jira as an application or service provider (SP). Lastly, you need to enter a value for Login button text. This is what will be displayed to the end users when they try to log in, so it should be something meaningful—for example, Log in with SSO. After you have entered all your configurations, click on the Save configuration button.
Once you have added your SAML configuration, it will be shown as a login option on the login page, as illustrated in the following screenshot:

Figure 9.23 – SAML authentication
Important note
There is an option to hide the username and password option by toggling the Show on login page option for the default username and password authentication method.
Enabling JIT provisioning
With SAML SSO, you can automatically create user accounts for new users when they first log in to Jira via SSO. Any subsequent logins will also automatically update the user account’s details, keeping the user’s Jira account and account in the IdP in sync.
This is useful when you only want to create accounts on demand or are not synchronizing with your user directory such as LDAP to pull all your accounts into Jira. To enable JIT provisioning, proceed as follows:
- Select the Edit option for your SAML authentication method.
- Toggle on the JIT provisioning option.
- Enter the SAML attributes that should be used for the user’s display name, email, and groups. These are provided by your SAML IdP.
- Save your configuration.
Once JIT provisioning is enabled, when a new user logs in to Jira via SAML SSO, Jira will create a new account based on the attributes provided by the SAML response. The account will also be updated every time the user logs in.
Auditing system changes
When you have more than one Jira administrator managing your Jira instance, it can often lead to a too many cooks situation, or you simply would like to keep track of who made which changes and when. Jira tracks and records many changes to many of the key system features and provides you with a full audit log of all the activities that are going on. This helps you diagnose problems and also perform a security audit in your system. To access the audit log, follow these steps:
- Browse to the Jira administration console.
- Select the System tab and then the Audit log option.
As we can see from the following screenshot, the audit log keeps a track of changes such as custom fields, project roles, and more. You can filter the audit log based on the date and type, the person who made the change, and other options to help you narrow down the search:

Figure 9.24 – Audit log
You can also configure how and what Jira should track for the audit log. By going to the Settings option, you can select how long you want to keep the audit logs and what you want to track, as shown here:
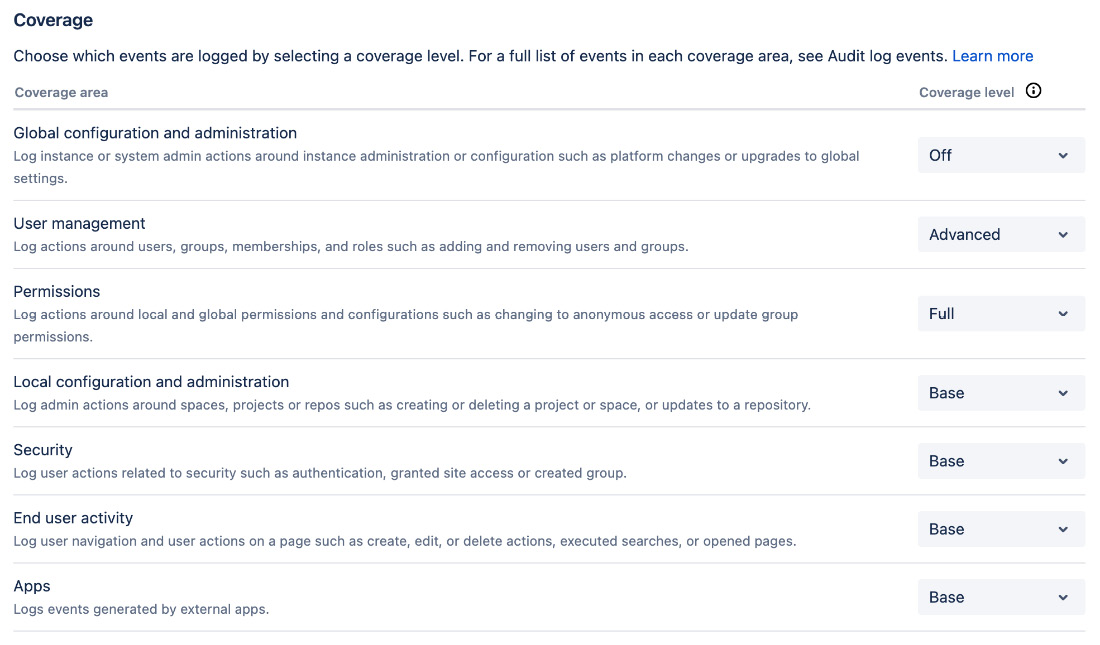
Figure 9.25 – Audit log settings
By default, Jira tracks all the items under the Coverage heading at a base level. If you want Jira to track more details for a particular item, simply change the Coverage level option to either Advanced or Full.
The HR project
In the previous chapters, you configured your Jira to capture data with customized screens and fields and processed the captured data through workflows. What you need to do now is secure the data you have gathered to make sure that only authorized users can access and manipulate issues.
Since your HR project is used by the internal team, what you really need to do is put enough permissions around your issues to ensure that the data they hold does not get modified by other users by mistake. This allows us to mitigate human errors by handling access accordingly.
To achieve this, you need to have the following requirements:
- You should know who belongs to the HR team
- Restrict issue assign operations to only the user that has submitted the ticket and members of the HR team
- Do not allow issues to be moved to other projects
- Limit the assignment of tickets to the reporter and members of the HR team
Of course, there are a lot of other permissions we can apply here; the preceding four requirements will be a good starting point for us to build on further.
Setting up groups
The first thing you need to do is to set up a new group for your help desk’s team members. This will help you distinguish normal Jira users from your help desk staff. Follow these steps to do this:
- Browse to the Group Browser page.
- Name the new group hr-team in the Add Group section.
- Click on the Add group button.
You can create more groups for other teams and departments for your scenario here. Since anyone can log a ticket in your project, there is no need to make that distinction.
Setting up user group association
With your group set up, you can start assigning members of your team to the new group, as follows:
- Browse to the Group Browser page.
- Click on the Edit members link for the hr-team group.
- Select users with the user picker or simply type in usernames separated by a comma. This time, let’s add our admin user to the group.
- Click on the Add selected users button.
Setting up permission schemes
The next step is to set up permissions for our HR project, so you need to have your own permission scheme. As always, it is more efficient to copy the Default Permission Scheme as a baseline and make your modifications on top, since we are only making a few changes here. Proceed as follows:
- Browse to the Permission Schemes page.
- Click on the Copy link for Default Permission Scheme.
- Rename the new permission scheme HR Permission Scheme.
- Change the description to Permission scheme designed for HR team projects.
Now that we have our base permission scheme set up, we can start on the fun part—interpreting requirements and implementing them in Jira.
Setting up permissions
The first thing you need to do when you start setting up permissions is to try to match existing Jira permissions to your requirements. In our case, we want to do the following:
- Restrict who can assign issues
- Restrict who can be assigned to an issue
- Disable issues from being moved
Looking at the existing list of Jira permissions, you can see that we can match the requirements with the Assign Issues, Assignable Users, and Move Issues permissions, respectively.
Once you work out which permissions you need to modify, the next step is to work out a strategy to specify users that should be given the permissions. Restricting the Move Issue options is simple. All you have to do is remove the permission for everyone, thus effectively preventing anyone from moving issues in your project.
The next two requirements are similar, as they are both granted to the reporter (the user that submitted the ticket) and our new hr-team group. Follow the next steps:
- Browse to the Permission Schemes page.
- Click on the Permissions link for HR Permission Scheme.
- Click on the Grant permission button.
- Select both the Assign Issues and Assignable Users permissions.
- Select the Reporter option.
- Click on the Add button.
- Repeat the steps and grant the hr-team group both permissions.
By selecting both permissions in one go, you have quickly granted multiple permissions to users. Now, you need to remove all users granted with the Move Issues permission. There should be only one granted at the moment, Any logged in user, but if you have more than one, you will need to remove all of them. Here’s how you can do this:
- Browse to the Permission Schemes page.
- Click on the Permissions link for HR Permission Scheme.
- Click on the Remove link for all users that have been granted the Move Issues permission.
That’s it! You’ve addressed all your permission requirements with just a few clicks.
Putting it together
Last, but not least, you can now put on your project administrator’s hat and apply your new permission scheme to your HR project, as follows:
- Browse to the project administration page for your HR project.
- Click on the Permissions option and select your new HR permission scheme.
- Click on the Associate button.
By associating the permission scheme with your project, you have applied all your permission changes. Now, if you create a new issue or edit an existing issue, you will notice that the list of assignees will no longer include all the users in Jira.
Summary
In this chapter, we looked at how we can integrate Jira with user repositories, such as LDAP, through user directories, and Jira’s user management options with groups and project roles. Though they are very similar, groups are global, while project roles are specific to each project. We also covered how Jira hierarchically manages permissions. We discussed each permission level in detail and how to manage them. By using the different permission control options Jira provides, we design our permission controls to better manage user access to projects and issues.
In the next chapter, we will take a different approach and start looking at another powerful use for Jira—getting your data out through reporting.