
8
Emails and Notifications
So far, you have learned how to use and interact with Jira directly from its web interface through a browser. We will now take a look at how Jira uses emails as a notification mechanism to alert you of updates.
One powerful feature of Jira is its ability to create new issues, add comments to issues, and update issue details through emails. This provides you with a whole new option for how you and your users can interact with Jira.
In this chapter, we will cover the following topics:
- Jira and email
- Mail servers
- Mail queues
- Events
- Notifications
- Batching email notifications
- Troubleshooting notifications
- Incoming emails
- The HR project
Jira and email
Emails have become one of the most ubiquitous communication tools in today’s world. Businesses and individuals rely on emails to send and receive information around the world almost instantly. Therefore, it should come as no surprise that Jira is fully equipped and integrated with email support.
Jira’s email support comes in several flavors:
- First, Jira sends emails to users about changes that have been made to their issues, such as adding comments, so people working on the same issue can be kept on the same page
- Second, Jira can poll mailboxes for emails and create issues and comments based on the content of the email
- The last feature is the ability for users to create and subscribe to filters to set up feeds in Jira (we will discuss filters in Chapter 10, Searching, Reporting, and Analysis)
These features open up a whole new dimension to how users can interact with Jira.
In the following sections, we will look at what you need to do to enable Jira’s powerful email support, as well as explore the tools and options at your disposal so that you can configure Jira and email in a way that suits you.
Mail servers
For Jira to communicate with emails, you need to configure or register your mail servers in Jira. There are two types of mail servers you need to configure:
- Outgoing: This is used by Jira to send emails out to users. Jira supports SMTP mail servers.
- Incoming: This is used by Jira to retrieve emails from users. Jira supports POP and IMAP servers.
The following diagram shows how Jira interacts with various mail servers:

Figure 8.1 – Mail servers
We will start with outgoing mail servers to see the different options we have to configure Jira to send emails to users, customize the email’s contents, enable SSL for additional security, and finally, send a test email.
Working with outgoing mail
To configure the outgoing SMTP server, you will need the Jira system administrator’s global permission (the user that was created during the initial setup is a system administrator). Perform the following steps to manage the outgoing mail server:
- Log in to Jira as a Jira system administrator.
- Browse to the Jira administration console.
- Select the System tab and then the Outgoing mail option. This will bring up the Outgoing mail page:

Figure 8.2 – The Outgoing mail page
Note
You can only have one outgoing mail server in Jira.
There are two ways to add an outgoing mail server in Jira. Both options have some common configuration parameters that you will need to fill in. The following table shows these parameters:
|
Field |
Description |
|
Name |
This specifies a name for the mail server. |
|
Description |
This specifies a brief description of the mail server. |
|
From address |
This specifies an email address that outgoing emails will appear to have come from. |
|
Email prefix |
This specifies a prefix that will appear with all the emails sent from Jira. This allows your users to set up filter rules in their mail clients. The prefix will be added to the beginning of the email subject. |
|
Service Provider |
Here, you can select from one of the three predefined mail providers – that is, Google, Yahoo!, or the custom SMTP server. |
|
Host Name |
This specifies the hostname of your mail server (for example, smtp.example.com). |
|
SMTP Port |
This specifies the port number that your mail server will be running on. This is optional; if left blank, the default port number of 25 will be used. |
|
Username |
This is used to authenticate against the mail server if required. Note that mail servers may require authentication to relay emails to non-local users. |
|
Password |
This is used to authenticate the user against the mail server if required. |
|
JNDI Location |
This is the JNDI lookup name if you already have a mail server configured for your application server. Refer to the following section for details. |
Table 8.1 – Outgoing mail server configuration
For the rest of the parameters, depending on the option you select to set up your mail server, you only need to fill in the appropriate details.
Configuring an SMTP server
The first option is to select from one of the built-in service providers and specify the mail server’s details. For example, if you have an SMTP mail server running, you can select the Custom option from the Service Provider field and specify the host and port number. This is the approach most people will use as it is straightforward. With this approach, the administrator fills in the mail server’s host information, such as the hostname and port number. To do so, follow these steps:
- Browse to the Outgoing mail page.
- Click on the Configure new SMTP mail server button.
- Enter the general details of your mail server, including the name, description, from address, and email prefix.
- Select the type of mail server from the Service Provider field.
- Enter the mail server’s connection details.
- Click on the Test Connection button to verify the configuration.
- Click on the Add button to register to the mail server:

Figure 8.3 – The Add SMTP Mail Server page
Note
Jira comes with support for Google and Yahoo! mail services. You can select these options in the Service Provider field if you are using these services.
Configuring an SMTP server with JNDI
The second option is to use the Java Naming and Directory Interface (JNDI). This approach is slightly more complicated as it requires configuration on the application server itself, and it requires you to restart Jira.
If you are using the standalone distribution, which uses Apache Tomcat, the JNDI location will be java:comp/env/mail/JiraMailServer. You will also need to specify the mail server details as a JNDI resource in the server.xml file in the JIRA_INSTALL/conf directory.
A sample declaration is shown in the following code snippet. You will need to substitute some values with the real values for some of the parameters in the code of your mail server’s details:
<Resource name="mail/JiraMailServer" auth="Container" type="javax.mail.Session"
  mail.smtp.host="mail.server.host"
  mail.smtp.port="25"
  mail.transport.protocol="smtp"
  mail.smtp.auth="true"
  mail.smtp.user="username"
  password="password"
/>
You will need to restart Jira after saving your changes to the server.xml file.
Disabling outgoing mail
If you are running a test or evaluation Jira instance, or testing changes that you have made to your configurations, you might not want to flood your users with test emails. The easiest way for you to disable all outgoing emails is by just clicking on the Disable outgoing mail button. This will stop Jira from sending all emails as a result of issue updates. Once you are ready to send emails again, you can click on the Enable outgoing mail button.
Note
Disabling outgoing mail will only prevent Jira from sending out notification emails based on notification schemes.
Enabling SMTP over SSL
To increase security, you can encrypt the communication between Jira and your mail server if your mail server supports SSL. Two steps are involved in enabling SSL over SMTP in Jira:
- The first step is to import your mail server’s SSL certificate into Java’s trust store. You can do this with Java’s keytool utility. On a Windows machine, run the following command in the Command Prompt:
keytool -import -alias mail.yourcompany.com -keystore $JAVA_HOME/jre/lib/security/cacerts -file yourcertificate
- The second step is to configure your application server to use SSL for mail communication. The following declaration is for Apache Tomcat, which is used by Jira standalone. We can use the same configuration file and only need to add two additional parameters:
<Resource name="mail/JiraMailServer"
auth="Container"
type="javax.mail.Session"
mail.smtp.host="mail.server.host"
mail.smtp.port="25"
mail.transport.protocol="smtp"
mail.smtp.auth="true"
mail.smtp.user="username"
password="password"
mail.smtp.atarttls.enabled="true"
mail.smtp.socketFactory.class="javax.net.ssl.SSLSocketFactory"
/>
Once you have imported your certificate and configured your mail server, you will have to restart Jira.
Sending a test email
It is always a good idea to send a test email after you configure your SMTP mail server to make sure that the server is running and that you have set it correctly in Jira. Here is how to go about it:
- Browse to the Outgoing mail page.
- Click on the Send a test email link for your SMTP mail server.
- Click on the Send button to send the email. Jira will autofill the To address based on the user you have logged in as.
If everything is correct, you will see a confirmation message in the Mail log section and receive the email in your inbox. If there are errors, such as an error with the mail server connection, then the Mail log section will display these problems. This is very useful when troubleshooting any problems with Jira’s connectivity with the SMTP server:
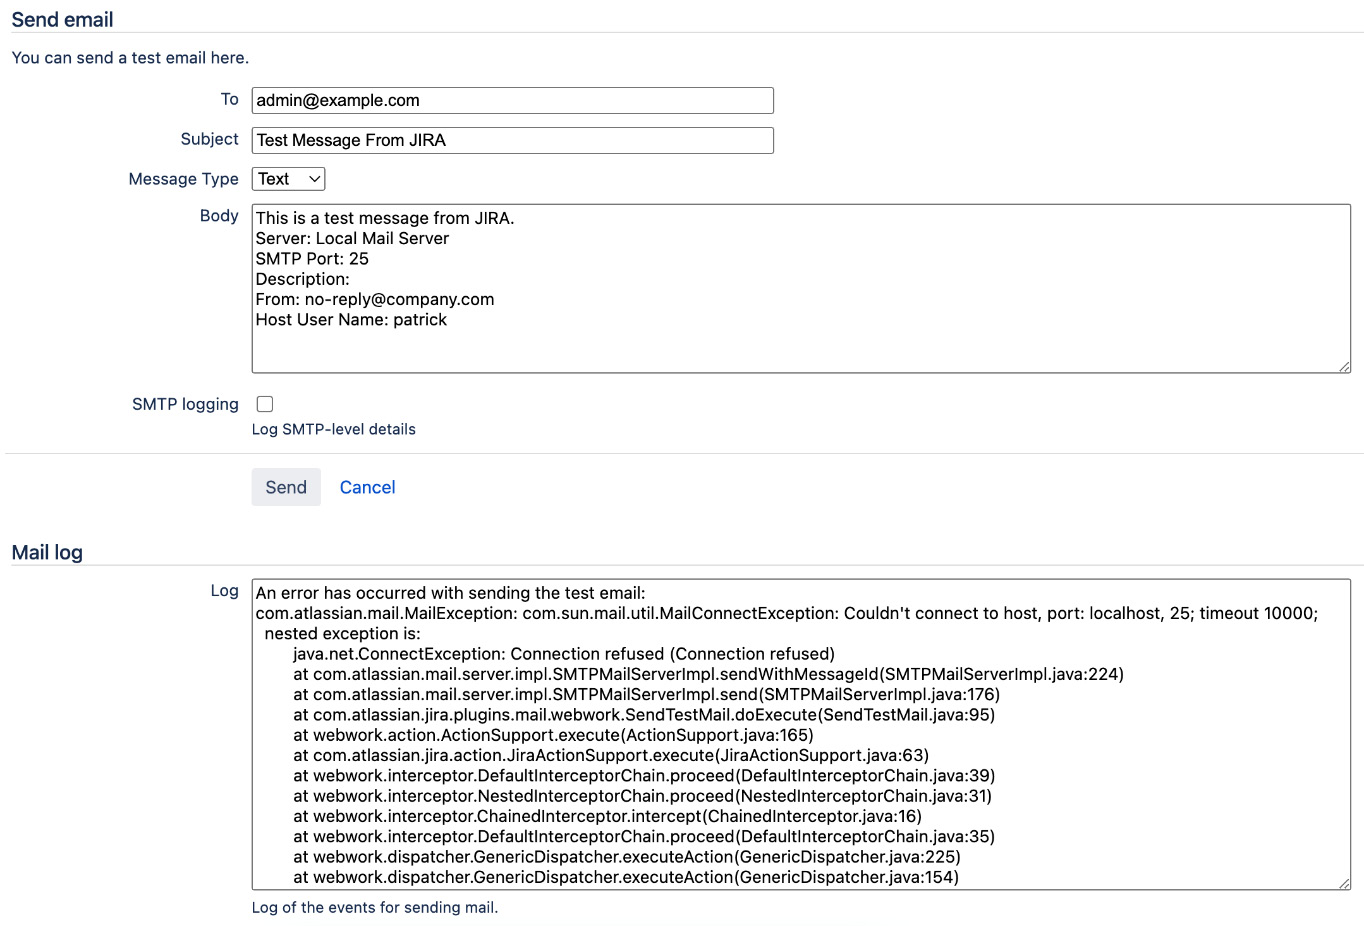
Figure 8.4 – Testing the outgoing mail server
In the preceding screenshot, you can see that the test email delivery has failed, and the error is because Jira was unable to connect to the configured SMTP server.
We have now looked at how you can add an outgoing SMTP mail server in Jira, and send out test emails. In the next section, we will look at Jira’s mail delivery mechanism.
Mail queues
Most emails in Jira are not sent immediately when an operation is performed. Instead, they are placed in a queue, which Jira will process periodically. This is very similar to the real-life scenario where mail is placed in mailboxes and picked up every day by postal workers. In this section, we will take a look at Jira’s mail queue, and how to use it to help identify and troubleshoot if outgoing emails are stuck.
Viewing the mail queue
Normally, you do not need to manage the mail queue. Jira automatically places emails into the queue and processes them periodically. However, as an administrator, there may be times when you wish to inspect the mail queue, especially to troubleshoot problems related to Jira notification emails. Sometimes, emails can get stuck, and inspecting the mail queue will help you identify these problems and fix them.
Perform the following steps to view the content of the mail queue:
- Browse to the Jira administration console.
- Select the System tab and then the Mail queue option:
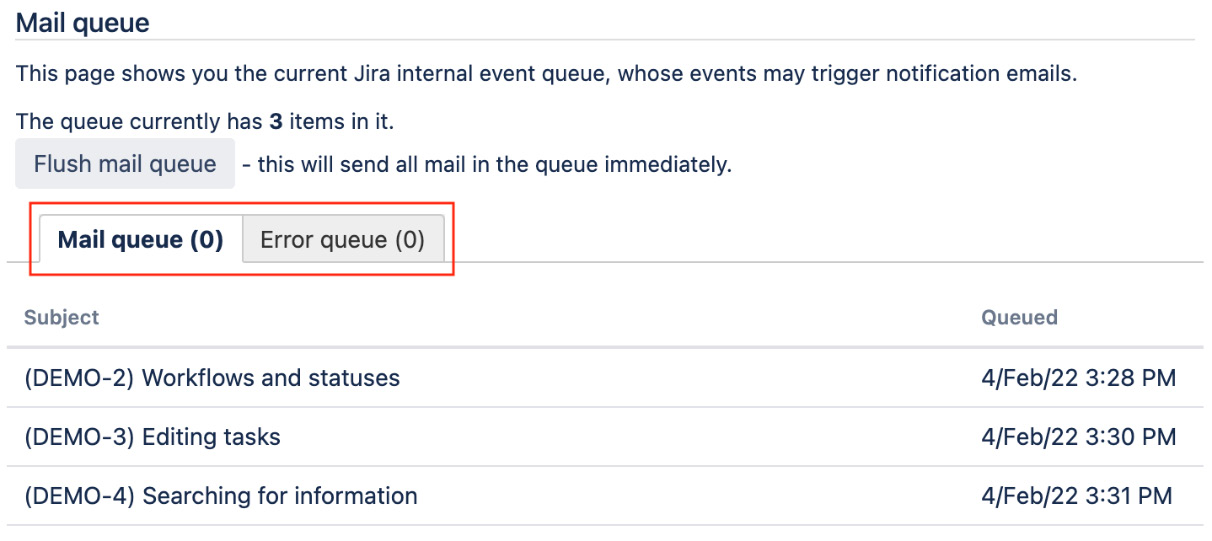
Figure 8.5 – The Mail queue page
This page provides you with a one-page view of the current emails in the queue that are waiting for delivery. There are two queues – Mail queue and Error queue:
- The Mail queue tab contains all the emails that are pending delivery. If Jira can successfully deliver these emails, they will be removed from the queue. Any items listed in red indicate that Jira has unsuccessfully attempted to send those emails. Jira will retry 10 times, and if still unsuccessful, these items will be moved to the error queue.
- The Error queue tab contains emails that cannot be delivered by Jira. You can choose to resend all the failed items in the error queue or delete them.
Flushing the mail queue
While Jira automatically flushes the mail queue, you can also manually flush the queue if you want to send out emails immediately. When you manually flush the queue, Jira will try to send all the emails that are currently in the queue.
Perform the following steps to manually flush the mail queue:
- Browse to the Mail queue page.
- Click on the Flush mail queue button
If Jira is successful in sending emails, you will see the queue shrink and the items disappear. If some emails fail to be delivered, those items will be highlighted in red. The mail queue is used when Jira automatically sends out emails, as we will see in the next section. When you manually send out emails in Jira, those emails are sent out immediately.
Manually sending emails
Sometimes, you, as the administrator, may need to send out emails containing important messages to your users. For example, if you are planning some maintenance work that will take Jira offline for an extended period, you may want to send an email to all Jira users to let them know of the outage.
Jira has a built-in facility where you can manually send out emails to specific groups of users. There are two options when manually sending emails – you can send them in groups or by projects.
When sending them in groups, all you need to do is select one or more groups in Jira, and all users that belong to the selected groups will receive the email. Users belonging to more than one group will not receive duplicated emails.
When sending emails by projects, you need to select one or more projects and then the project roles. We will discuss project roles in more detail in the next chapter, but for now, you can think of them as groups of users within projects. For example, you can send emails to all users that are part of Demonstration Project rather than all users in Jira.
To send emails to users in Jira, perform the following steps:
- Browse to the Jira administration console
- Select the System tab and then the Send email option
- Choose whether you want to send to users by Project Roles or Groups
- Enter the email’s Subject and Body content
- Click on the Send button to send the email to all users in the selected project roles/groups
The following screenshot shows an example of sending maintenance outage notification emails to everyone by selecting the jira-software-users group, which every Jira Software user is a member of by default:
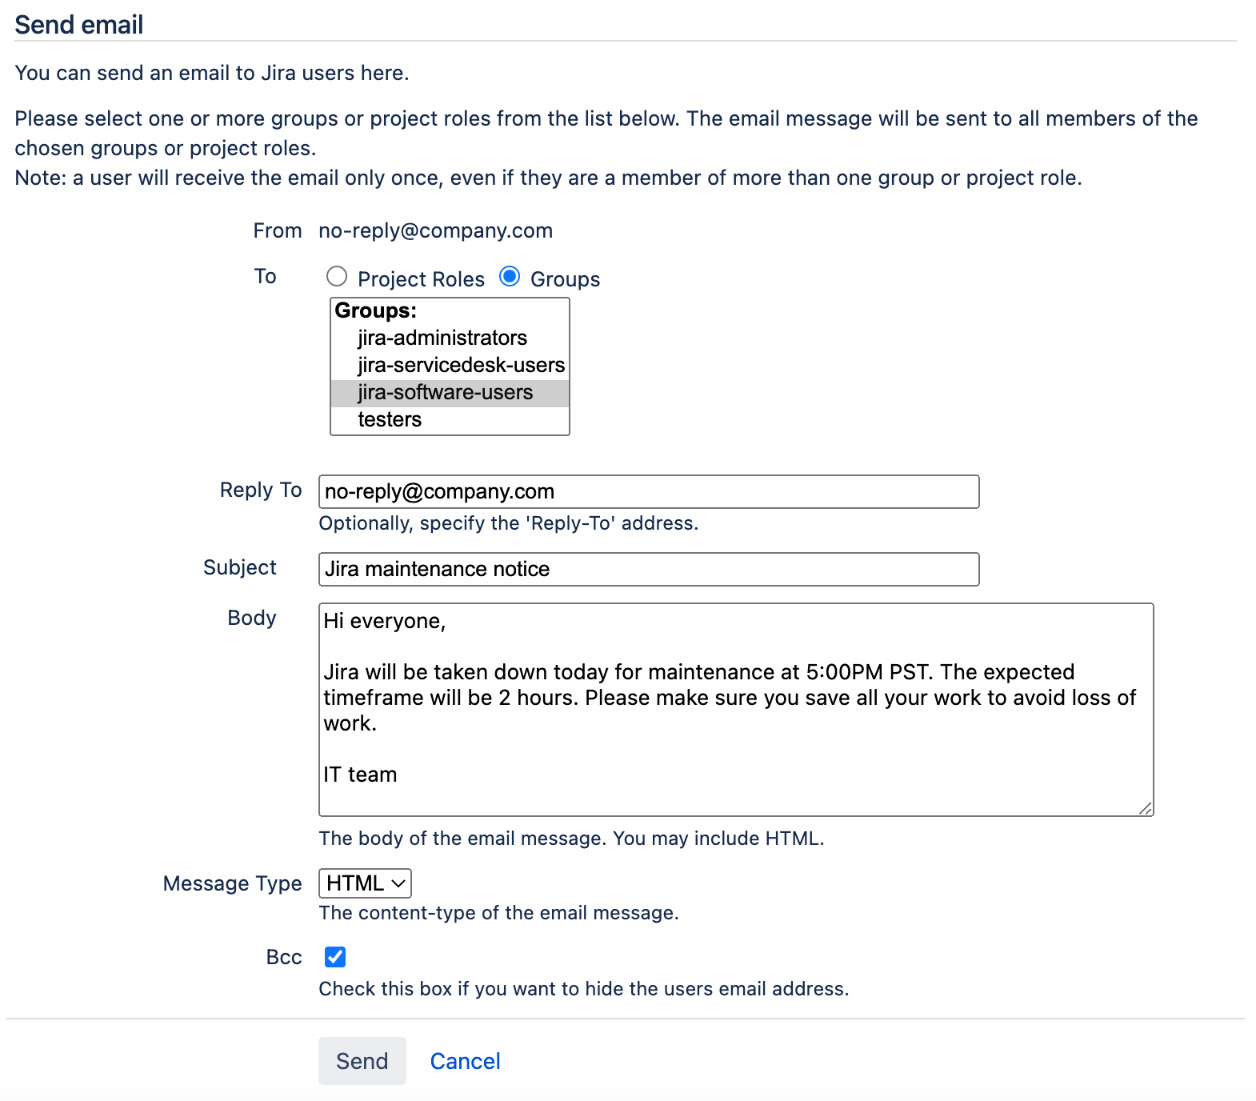
Figure 8.6 – The Send email page
Note
Since Jira does not provide a What You See Is What You Get (WYSIWYG) editor for composing emails, you may want to draft an email and send it to yourself before sending it out to everyone.
Now that we have seen how to configure an outgoing mail server in Jira and send emails, let’s take a deeper look at how Jira automates email notifications when users perform actions on issues.
Events
Jira is an event-driven system. This means that when an action occurs (for example, when an issue is created), Jira will fire off a corresponding event. This event is then picked up by components that are designed to listen to the event. These are called listeners. When a listener picks up an event, it will perform its duty, such as keeping issues up to date with changes or sending an email to users who are watching the issue.
This mechanism allows Jira to process operations asynchronously. The advantage of this model is operations, such as sending emails, are separated from Jira’s core functions, such as issue creation. If there is a problem with the mail server, for example, you will not want this problem to prevent your users from creating issues.
There are two types of events in Jira:
- System events: These are internal events that are used by Jira, and they usually represent the main functionalities in Jira. They cannot be added, edited, or deleted.
- Custom events: These are events that are created by users. They can be added and deleted, and they are fired through workflow post functions.
As an administrator, you will be able to get a one-page view of all the events in Jira. You just need to do the following:
- Browse to the Jira administration console.
- Select the System tab and then the Events option. This will bring up the View Events page:

Figure 8.7 – Issue events
Each event is associated with a template, which is often referred to as a mail template. These templates define the content structure of emails when notifications are sent. For system events, you cannot change their templates (you can change the template file’s content, however). For custom events, you can choose to use one of the existing templates or create your own mail template.
In the following sections, we will look at how to create and register custom mail templates, create a new custom event to use the new template, and fire the new event when actions are performed on an issue. After that, we will look at how to tie events to notifications so that we can tell Jira who should receive notification emails for the event.
Working with mail templates
Mail templates are physical files that you create and edit via a text editor. Jira has a set of default templates for all the system events. Instead of modifying them directly, Jira lets you upload your modified version of the templates and override the default. For us to create a new mail template, we can also look at these existing templates and use them as a starting point. You can download the default templates by following these steps:
- Browse to the Jira administration console
- Select the System tab and then the Email templates option
- Click on the Download .zip button
This will download all the default templates in a .zip file. Once you unzip it, you will see two main directories – email and email-batch. The email directory is what we will focus on for now, as it contains all the mail templates for the event. Inside the email directory, you will see the following subdirectories:
- css directory: Contains CSS files to apply styles to the email
- html directory: Contains templates when Jira is sending out emails as HTML
- includes directory: Contains common content that is shared between one or more templates
- subject directory: Contains templates that are used to generate the email’s subject
- text directory: Contains templates when Jira is sending out emails as plain text
As we can see, for a given mail template used by the issue event, there are at least three components – subject, HTML, and text. So, if you want to add a new template for a custom event, you will need to create those three files and place them in those directories accordingly. And if you want to modify an existing mail template, make sure you make your changes to all the necessary files, usually in both the HTML and text directories.
While creating new mail templates, it is a good practice to name your template files after the issue event, for example, issueescalated.vm. This will help future users understand the purpose of those templates.
Mail templates use Apache’s Velocity template language (http://velocity.apache.org). For this reason, creating new mail templates will require some understanding of HTML and template programming.
If your templates only contain static text, you can simply use standard HTML tags for your template. However, if you need to have dynamic data rendered as part of your templates, such as the issue key or summary, you will need to use the Velocity syntax. A full explanation of Velocity is beyond the scope of this book. The following paragraph provides a quick introduction to creating simple mail templates for Jira. You can find more information on Velocity and its usage in Jira mail templates at https://confluence.atlassian.com/adminjiraserver0822/customizing-email-content-1142237912.html.
In a Velocity template, all the text will be treated as normal. Anything that starts with a dollar sign ($), such as $issue, is a Velocity statement. The $ sign tells Velocity to reference the item after the sign, and, when combined with a period (.), you can retrieve the value specified. For example, the following code in a template will get the issue key and summary from the current issue, separated by a - character:
$issue.key - $issue.summary
This will produce content similar to DEMO-1 - This is a demo issue.
Jira provides a range of Velocity references that you can use to create mail templates. These references allow you to access data such as the issue being updated and the user triggering the event. You can find a comprehensive list at https://developer.atlassian.com/server/jira/platform/jira-templates-and-jsps/#email-templates.
Now that you have a basic understanding of how Velocity works, you need to create a template for the mail subject. The following code shows a typical subject template:
$eventTypeName: ($issue.key) $issue.summary
When the template is processed, Jira will substitute the actual values for the event type (for example, issue created), issue key, and issue summary. Therefore, the preceding example would produce content similar to Issue Escalated: HD-11: Database server is running very slow.
Then, you need to create a template for the actual email content. Here, you need to create a text and HTML version. The following code shows a simple example of a text-based template, which displays the key for the escalated issue:
Hello,
The ticket $issue.key has been escalated and is currently being worked on.  We will contact you if we require more information.
Regards
Support team.
Before Jira sends out the email, the preceding text will be processed, where all Velocity references, such as $issue.key, will be converted into proper values; for example, DEMO-1.
Once you have either updated or created your mail templates, you will need to upload them to Jira. Here’s how to do that:
- Zip up your mail templates
- Browse to the Jira administration console
- Select the System tab and then the Email templates option
- Click on the Upload .zip button and upload the .zip file you created
- Click on the Apply button once Jira has verified your template’s content
Once the updated templates have been uploaded, it can take up to 5 minutes for the changes to take effect. If you are simply modifying existing templates, then that is all you need to do, but if you are adding new templates, you will need to register them with Jira.
To register your new templates, locate and open the email-templates-id-mappings.xml file in the <JIRA_INSTALL>/atlassian-jira/WEB-INF/classes directory in a text editor.
Add a new entry to the end of the file before closing the </templatemappings> tag, as follows:
<templatemapping id="10001">
  <name>Example Custom Event</name>
  <template>examplecustomevent.vm</template>
  <templatetype>issueevent</templatetype>
</templatemapping>
Here, we have registered a new custom mail template entry. The details of this are shown in the following table:
|
Parameter |
Description |
|
id |
This is the unique ID for the template. You need to make sure that no other template mapping has the same ID. |
|
name |
This is a human-readable name for Jira to display. |
|
template |
These are the mail template filenames for subject, text, and HTML. All three template files must be named as specified here. |
|
type |
This is the template type. For events that are generated from an issue, the value will be issueevent. |
Table 8.2 – Email template ID mapping parameters
After creating your templates and registering them in the mapping file, you will have to restart Jira for the changes to be picked up. The new templates will be available when we create new events, which we will discuss in the following section.
Adding a custom event
Jira comes with a comprehensive list of system events that are focused on issue-related operations. However, there will be times when you will need to create custom-designed events that represent specialized business operations, or when you simply need to use a custom email template.
Perform the following steps to add a new custom event:
- Browse to the View Events page.
- Enter a name and description for the new event in the Add New Event section.
- Select the mail template for the new event. If you have registered a new mail template, you can select it for the event.
- Click on the Add button to create a new event:

Figure 8.8 – The Add New Event page
With that, we have added a new event to Jira and assigned a custom email template to it. We will look at how we can fire our new event in the next section.
Firing a custom event
Unlike system events, with custom events, you need to tell Jira when it can fire a custom event.
Custom events are mostly fired by workflow transitions. Recall from Chapter 7, Workflow and Business Process, that you can add post functions to workflow transitions. Almost all of Jira’s transitions will have post functions that fire appropriate events. It is important to understand that just because an event is fired does not mean that there needs to be something to listen to it.
If you skipped Chapter 7, Workflow and Business Process, or still do not have a good understanding of workflows, now would be a good time to go back and revisit that chapter.
Perform the following steps to fire a custom event from a workflow post function:
- Browse to the View Workflows page.
- Click on the Edit link of the workflow that will be used to fire the event.
- Click on the transition that will fire the event when executed.
- Click on the Post Functions tab.
- Click on the Edit button for the post function that reads Fire a <event name> event that can be processed by the listeners:
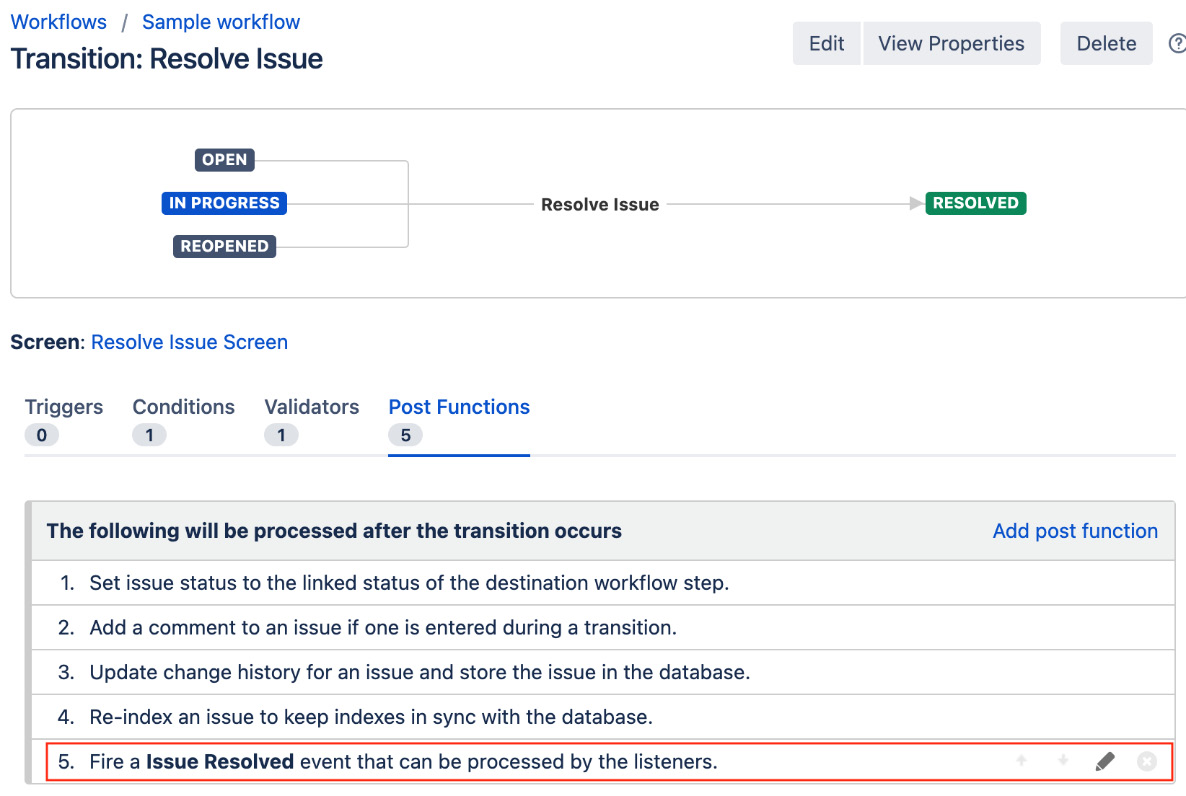
Figure 8.9 – Firing an issue event
- Select the custom event from the drop-down list.
- Click on the Update button to apply any changes to the post function.
- Publish the workflow.
Now, whenever the workflow transition is executed, the post function will run and fire the selected event. With events covered, in the next section, we will look at how we can configure Jira to listen for these events and send out notifications accordingly.
Notifications
Notifications associate events (both system and custom) to email recipients. When an event is fired and picked up, emails will be sent out. Notification types define the recipients of emails. For example, you can set them to only send emails to a specific user or all members from a given user group. You can add multiple notifications to a given event.
Jira ships with a comprehensive list of notification types (that is, the recipients) that will cover many of your needs. The following table lists all the notification types that are available and how they work:
|
Notification Type |
Description |
|
Current Assignee |
This is the current assignee of the issue. |
|
Reporter |
This is the reporter of the issue (usually the person who created the issue). |
|
Current User |
This is the user who fired the event. |
|
Project Lead |
This is the lead of the project that the issue belongs to. |
|
Component Lead |
This is the lead of the component that the issue belongs to. |
|
Single User |
This states any user that exists in Jira. |
|
Group |
This states that all users belong to the specified group. |
|
Project Role |
This states that all users belong to the specified project role. |
|
Single Email Address |
This states any email address. |
|
All Watchers |
This states that all users are watching this issue. |
|
User Custom Field Value |
This states the users specified in the user-type custom field. For example, if you have a User Picker Custom Field called Recipient, the user that’s selected in the custom field will receive notifications if they have access to the issue. |
|
Group Custom Field Value |
This states all users that belong to the group in the group-type custom field. For example, if you have a Group Picker Custom Field called Approvers, all users from the group (with access to the issue) that are selected in the custom field will receive notifications. |
Figure 8.3 – Notification types
As you can see, the list includes a wide range of options, from issue reporters to values contained in custom fields. Anything that can be represented as a user such as Project Lead, or contains user values such as User Custom Field Value, can be chosen to receive notifications.
If a user belongs to more than one notification for a single event, Jira will make sure that only one email will be sent so that the user does not receive duplicates. For a user to receive notifications, the user must have permission to view the issue. The only exception to this is when using the single email address option (we will discuss security in Chapter 9, Securing Jira). If the user does not have permission to view the issue, Jira will not send a notification email.
So, now that can create custom events, create and modify mail templates, and control when events are fired, we will look at how to add notifications to events so that users can start receiving emails via a notification scheme.
Notification schemes
A notification scheme is a reusable entity that links events with notifications. In other words, it contains the associations between events and their respective email recipients. In this section, we will cover notification schemes and how you can use them to send out notification emails when an event occurs in Jira.
To manage notification schemes in Jira, follow these steps:
- Browse to the Jira administration console.
- Select the Issues tab and then the Notification Schemes option. This will bring up the Notification Schemes page:

Figure 8.10 – The Notification Schemes page
From this screen, you can see a list of all the notification schemes and the projects that are currently using them. Jira comes with a generic default notification scheme. The default scheme is set up with notifications set for all the system events. This allows you to quickly enable notifications in Jira. The default setup has the following notifications:
- Current Assignee
- Reporter
- All Watchers
You can modify the default notification scheme to add your own notification rules, but as you grow your Jira adoption, it is a better idea to create a new scheme from scratch or copy the default scheme and make your modifications there.
Adding a notification scheme
Unlike other schemes such as the workflow scheme, where Jira will create one whenever a new project is created, all new projects will be set to use the Default Notification Scheme option. So, if you want to create notifications that are specific to your project, you will have to create a new notification scheme. Perform the following steps to create a new notification scheme:
- Browse to the Notification Schemes page
- Click on the Add notification scheme link at the bottom
- Enter a name and description for the new notification scheme
- Click on the Add button to create the notification scheme
When you create a new notification scheme, you create a blank scheme that can be configured later so that you can add your own notification rules to it. You must configure its notification rules before applying the scheme to projects after you create a new notification scheme; otherwise, no notifications will be sent out. We will look at how to configure notification rules later in this chapter.
Managing a notification scheme
Notification schemes contain notifications that are set on events in Jira. A notification determines who will receive an email when the corresponding event is fired. Perform the following steps to add a new notification:
- Click on the Notifications link for the notification scheme you wish to configure.
- Click on the Add Notification link or the Add link for the event you wish to add a notification for. Both actions will bring you to the Add Notification page. If you click on the Add link, the Events selection list will preselect the event for you.
- Select the events you want to add the notification type to.
- Select the notification type from the available options.
- Click on the Add button. For example, the following screenshot shows setting up a notification for Jira to send out emails to the project lead when issues are created and updated:

Figure 8.11 – The Add Notification page
Once added, the notification will be listed against the events that have been selected. You can continue adding notifications for the events by repeating the same steps.
Note
You can select multiple events to add a notification type to.
When notifications are no longer required for certain events, you can also have them removed. To remove notifications, you will need to do so one by one, per event:
- Browse to the Edit Notifications page for the notification scheme you wish to configure
- Click on the Delete link for the notification you wish to remove
- Click on the Delete button to confirm the removal
After you remove a notification, users affected by that notification will stop receiving emails from Jira. However, you need to pay attention to your configurations, as there may be other notifications for the same event that will continue to send emails to the same user. For example, if you created two notifications for the issue-created event – one set to a single user, John (who belongs to the jira-administrator group), and another set to the jira-administrator group – and your goal is to prevent emails from being sent to the user, John, you will need to remove both notifications from the event instead of simply using the Single User option.
Assigning a notification scheme
When new projects are created, they are automatically assigned to use the default notification scheme. If you want your project to use a different scheme, you will need to go to the Notifications section of your project’s administration console:
- Browse to the project administration page for the project you want to apply the notification scheme to.
- Select the Notifications option from the left panel:

Figure 8.12 – Associating a notification scheme
- Select Use a different scheme from the Actions menu.
- Select the notification scheme to use.
- Click on the Associate button.
As soon as a notification scheme is applied to the project, it will take effect immediately, and you will see emails being sent out for the events that have been configured in the scheme. Like any other schemes in Jira, notification schemes can be assigned to multiple projects so that they can share the same notification behavior.
With so many notifications, users can often get overwhelmed by the number of emails Jira will send out. In the next section, we will take a look at how we can help reduce the number of notification emails users receive by batching them together.
Batching email notifications
One common complaint users have about Jira’s email notifications is their frequency. Every change that’s made to the same issue will trigger an email to be sent, and for a busy team that’s constantly updating issues, such as adding comments, this can very quickly cause a storm of emails being sent that flood users’ inboxes. To help alleviate this challenge, Jira 8 has introduced the feature of batch email notifications. The way this works is as follows – all changes that are made to a given issue in the past 10 minutes will be batched into a single summary email, so the user will only receive one email for these changes instead of one per change. This helps significantly reduce the amount of clutter that’s generated as a result of frequent updates that are made to issues. To enable email batching, follow these steps:
- Browse to the Jira administration console
- Select the System tab and then the Batching email notifications option
- Check the Batching email notifications option to enable it
As this is a new feature that was added in Jira 8, improvements are being planned for future releases, such as adding support for including custom field values in the summary email and having a customizable batching option.
Now that we have covered email notifications, we will see the tools provided by Jira to help us troubleshoot issues related to notifications.
Troubleshooting notifications
Often, when people do not receive notifications from Jira, it can be difficult and frustrating to find the cause. The two most common causes of notification-related problems are either outgoing mail server connectivity or misconfiguration of the notification scheme.
Troubleshooting outgoing mail server problems is quite simple. All you have to do is try to send out a test email, as described in the Sending a test email section. If you receive your test email, then there will be no problems with your outgoing mail server configuration and you can focus on your notification configurations.
Troubleshooting notifications is not as straightforward since there are several things that you will need to consider. To help with this challenge, Jira has a handy feature called Notification helper. The Notification helper feature can save the Jira administrator time by helping them pinpoint why a given user does or does not receive notifications. All the administrator has to do is tell the helper who the user is, which issue (or an example issue from a project) the user will or will not be receiving notifications for, and the event that is triggering the notification. Follow these steps:
- Browse to the Jira administration console
- Select the System tab and then the Notification helper option
- Specify the user that will or will not receive notifications in the User field
- Specify the issue to test with
- Select the type of notification event
- Click on the Submit button
The Notification helper feature will then process the input and report whether the user is expected to receive notifications, and why, based on the notification scheme settings:
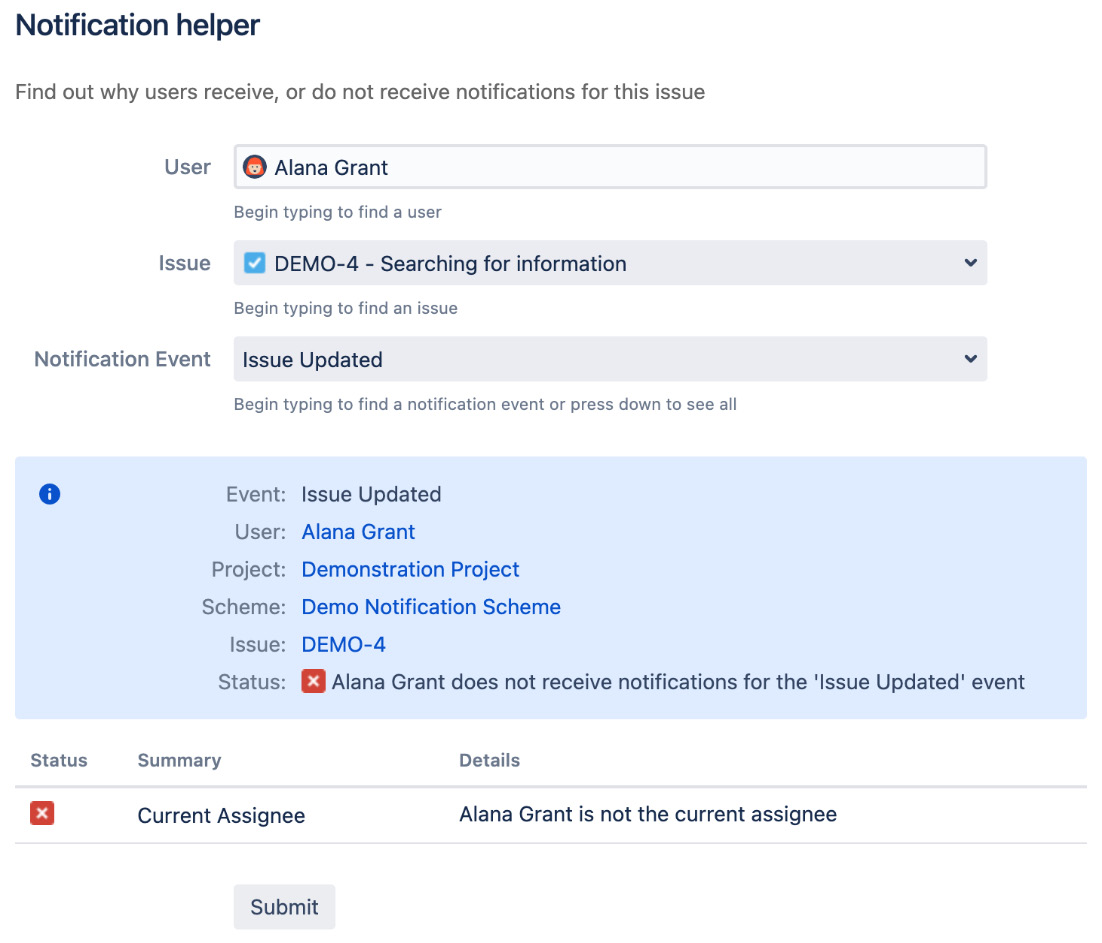
Figure 8.13 – The Notification helper page
As you can see from the preceding screenshot, the user, Alana Grant, is currently not receiving notifications for the DEMO-4 issue when it is being updated because the notification is set up to have only the Current Assignee receive emails, and Alana Grant is not the assignee.
Now that we have looked at how Jira can send out email notifications and how you can troubleshoot them when you do not receive emails, in the next section, we will look at how to send emails to Jira to create issues and comments.
Incoming emails
We have seen how to configure Jira to send emails to notify users about updates on their issues. However, this is only half of the story when it comes to Jira’s email support.
You can also set up Jira so that it periodically polls mailboxes for emails and creates issues based on the emails’ subject and content. This is a very powerful feature with the following benefits:
- It hides the complexity of Jira from business users so that they can log issues more efficiently and leave the complexity to the IT team.
- It allows users to create issues, even if Jira can only be accessed within the internal network. Users can send emails to a dedicated mailbox for Jira to poll.
In this section, we will look at how to add incoming mail servers for Jira to poll emails, and then create mail handlers to create issues and/or comments from the emails.
Adding an incoming mail server
For Jira to retrieve emails and create issues from them, you need to add the POP/IMAP mail server configurations to Jira. POP and IMAP are mail protocols that are used to retrieve emails from the server. Email clients, such as Microsoft Outlook, use one of these protocols to retrieve your emails.
Unlike outgoing mail servers, Jira allows you to add multiple incoming mail servers. This is because while you only need one mail server to send emails, you may have multiple mail servers or multiple mail accounts (on the same server) that people will use to send emails to.
For example, you might have one that’s dedicated to providing support and another one for sales. It is usually a good idea to create separate mail accounts to make it easier when you’re trying to work out which email can go into which project. For this reason, adding POP/IMAP mail servers can be thought of as adding multiple mail accounts in Jira. Perform the following steps to add an incoming mail server:
- Browse to the Jira administration console
- Select the System tab and then the Incoming mail option
- Click on the Add POP/IMAP Mail Server button
- Enter a name and description for the mail server
- Select the type of mail service provider – for example, if you are using your own hosted mail service or one of the recognized cloud providers such as Google
- Specify the hostname of the POP/IMAP server if you are using your own (custom provider)
- Enter the username/password credentials for the mail account
- Click on the Save button to create the POP/IMAP mail server:

Figure 8.14 – The Add mail server page
Note
You can have multiple incoming servers.
Mail handlers
Mail handlers are what Jira uses to process retrieved emails. Each mail handler can process emails from one incoming mail server and periodically scan for new emails. Jira ships with several mail handlers, each with its own features. In the following sections, we will discuss each of the handlers in detail.
Creating a new issue or adding a comment to an existing issue
Creating a new issue or adding a comment to an existing issue mail handler (also known as the create and comment handler in previous versions of Jira) is the most used mail handler. It will create new issues from the received emails and also add comments to existing issues if the incoming email’s subject contains a matching issue key. If the subject does not contain a matching issue key, a new issue is created. The following table lists the parameters that are required when creating the mail handler:
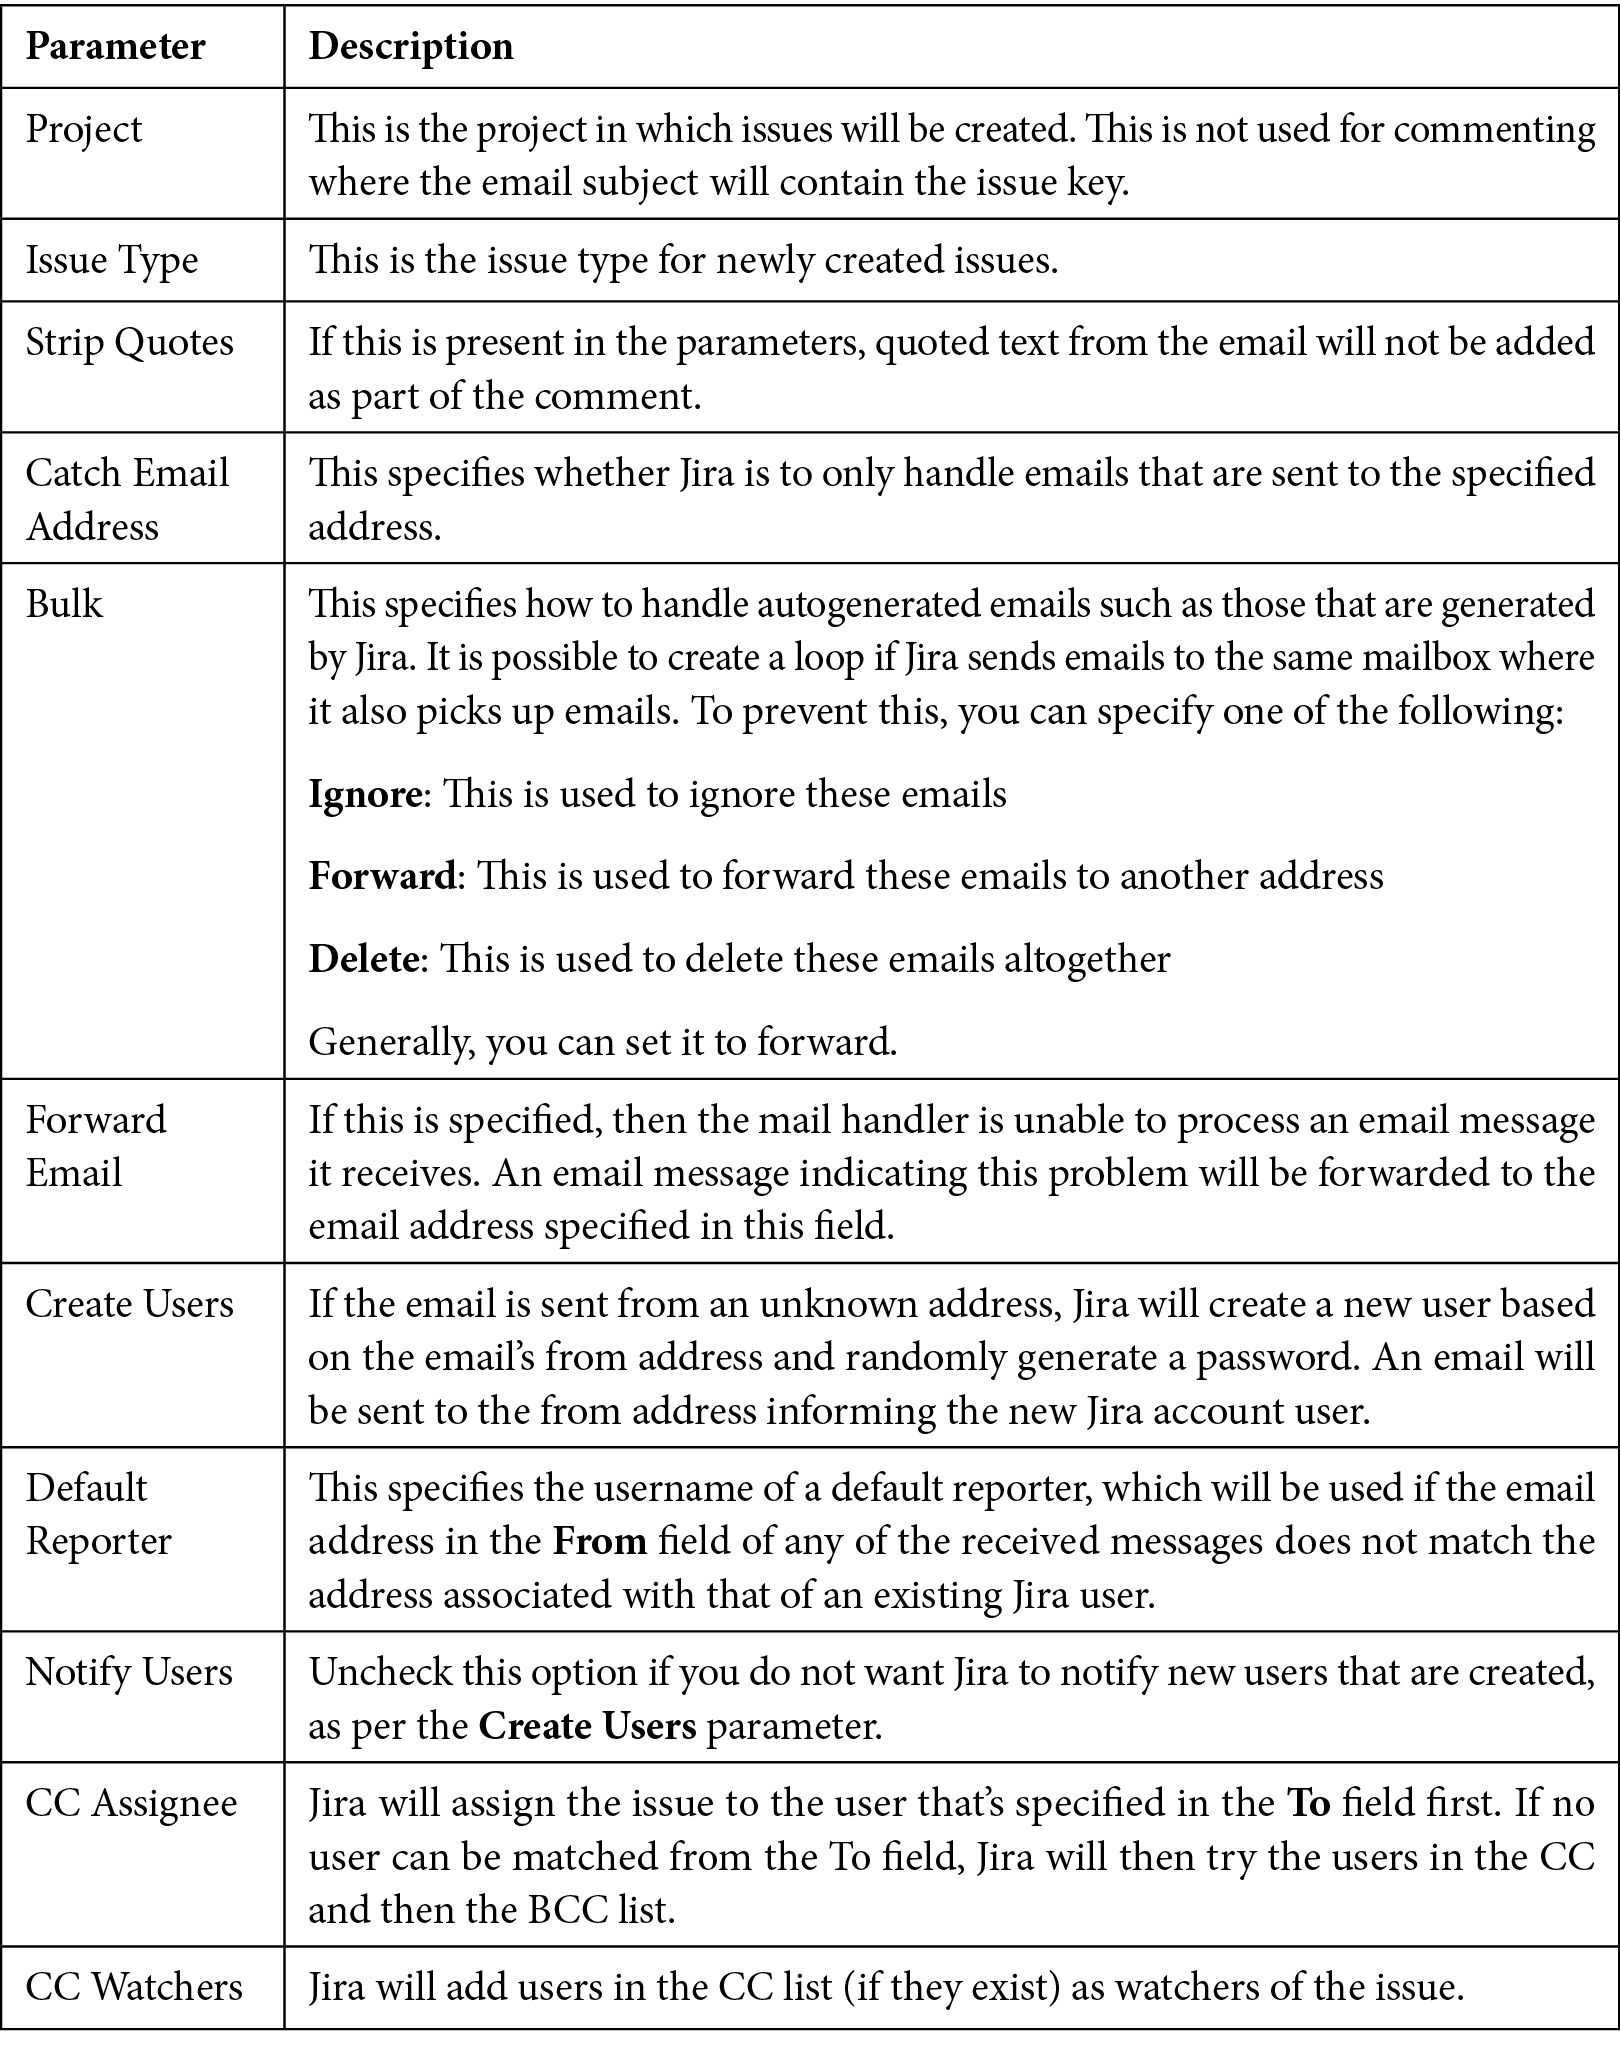
Table 8.4 – Mail handler configuration
Adding a comment with the entire email body
This mail handler extracts text from an email’s content and adds it to the issue with a matching issue key in the subject. The author of the comment is taken from the From field.
It has a set of parameters that are similar to the create and comment handler.
Adding a comment from the non-quoted email body
Adding a comment from the non-quoted email body is very similar to the full comment handler, but it only extracts non-quoted text and adds them as comments. Text that starts with > or | is considered to be quoted.
It has a set of parameters that are similar to the create and comment handler.
Creating a new issue from each email message
Creating a new issue from each email message is quite similar to the create and comment handler, except this will always create a new issue for every received email.
It has a set of parameters that are similar to the create and comment handler.
Adding a comment before a specified marker or separator in the email body
Adding a comment before a specified marker or separator in the email body is a more powerful version of the comment handlers. It uses regular expressions to extract text from email contents and adds them to the issue:
|
Parameter |
Description |
|
Split Regex |
This regex expression is used to extract contents. There are two rules for the regex expression: Rule 1: It must start and end with a delimiter character, usually with / Rule 2: It cannot contain commas; for example, /-{}{}{}{}{}s*Original Messages*{}-/ or /_____________*/ |
Table 8.5 – Regex mail handler configuration
Adding a mail handler
You can set up as many mail handlers as you want. It is recommended that you create dedicated mailboxes for each project where you wish to allow Jira to create issues from emails. For each account, you will need to create a mail handler. The mailbox you set up needs to be accessible through POP or IMAP. Perform the following steps to add a mail handler:
- Browse to the Incoming Mail page.
- Click on the Add incoming mail handler button.
- Provide a name to the new mail handler.
- Select an incoming mail server or Local Files.
- Specify how long Jira will wait to poll the mailbox for new emails (in minutes). You will want to keep this long enough to allow enough time for Jira to process all the emails, but not too long as you may end up having to wait for a long time to see your emails converted into issues in Jira.
- Select the type of handler you want to add.
- Click on the Next button:
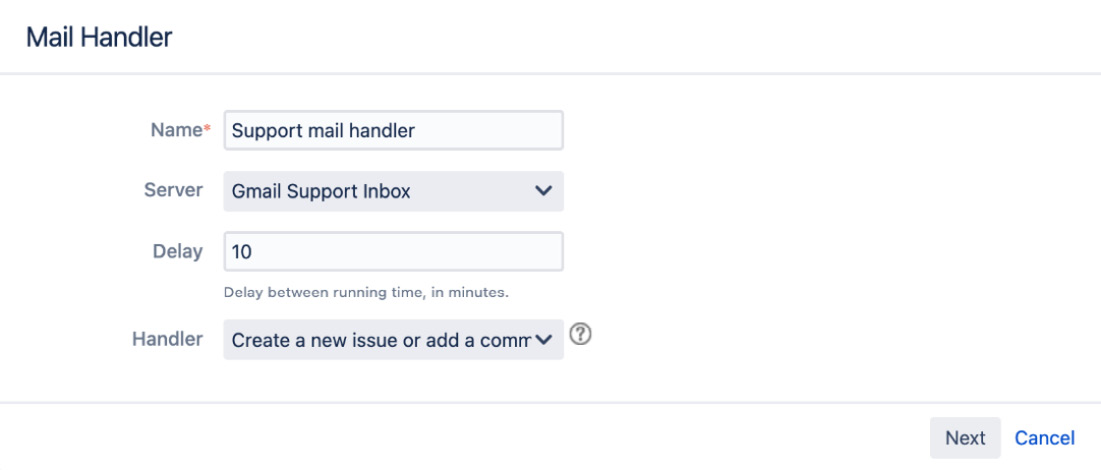
Figure 8.15 – Adding a mail handler – step 1
Depending on the handler type you select, the next screen will vary. On the next screen, you will need to provide the required parameters for the mail handler, as described in the preceding section. The following screenshot shows an example configuration dialog box, where new issues will be created in the IT support project as Task types:
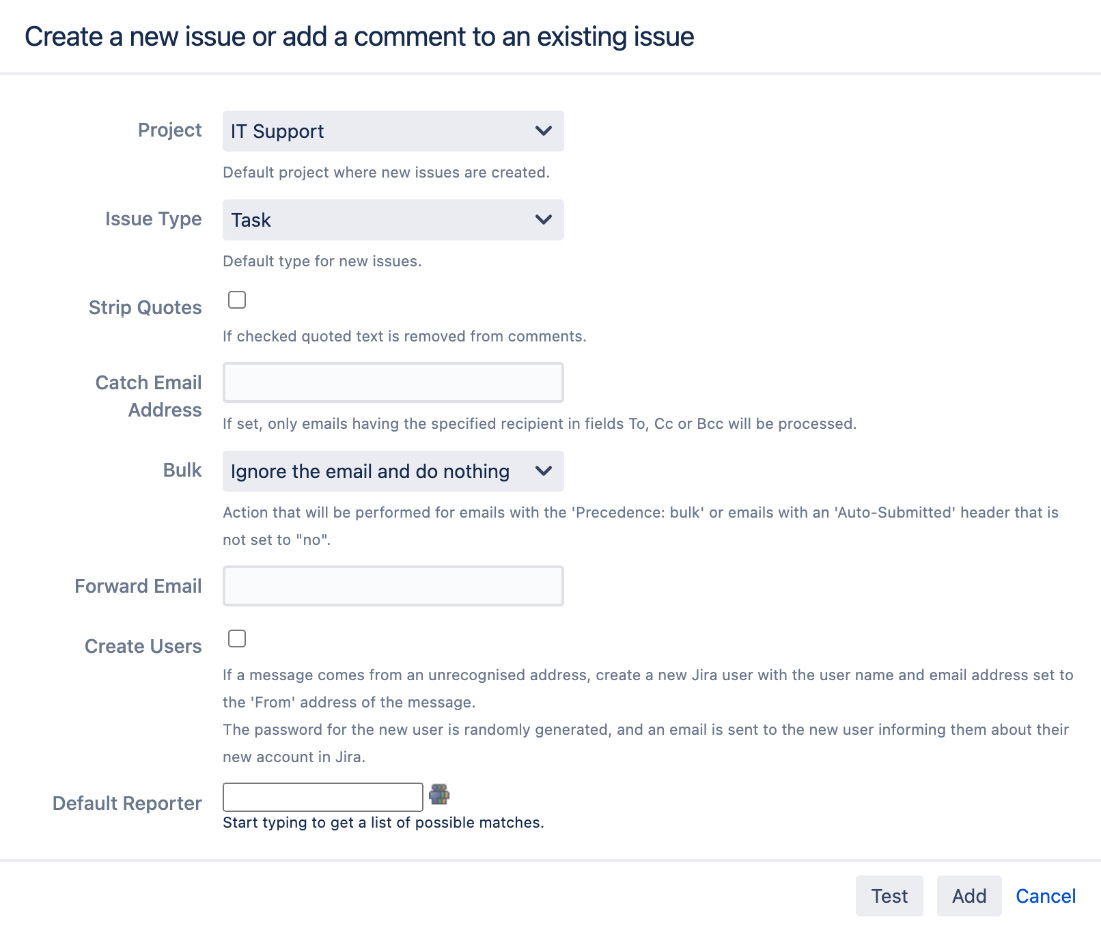
Figure 8.16 – Adding a mail handler – step 2
You can always use the Test button to test out your configuration. Jira provides helpful hints if there are problems.
Advanced mail handler
The default mail handlers that come with Jira are often enough for simple email processing needs. If you need to have more control or need special processing logic for your incoming emails, you can create custom mail handlers. However, creating new mail handlers requires you to have programming knowledge; a better option is to use an add-on called Enterprise Email Handler for Jira (JEMH).
With JEMH, you can set up advanced email routing, additional email-triggered operations such as updating an issue based on your email content, an audit of received/processed emails, and more. You can find out more about JEMH at https://marketplace.atlassian.com/apps/4832/enterprise-email-handler-for-jira-jemh.
The HR project
Users will often want to get progress updates on their issues after they have logged them. So, instead of business users having to ask for updates, we will proactively update them through our newly acquired knowledge – that is, Jira notifications.
In Chapter 5, Field Management, we added a custom field called Direct Manager, which allows users to add the manager of the new employee or leaving employee so that they can be kept in the loop.
The other customization we made in Chapter 7, Workflow and Business Process, was adding new transitions to the workflow. We need to make sure that those transitions fire the appropriate events and also send out notifications. In summary, we need to do the following:
- Send out notifications for the events that are fired by our custom workflow transitions
- Send out notifications to users that are specified in our Direct Manager custom field
While you can achieve both using other Jira features, such as adding users as watchers to the issue and reusing existing Jira system events, this exercise will explore the options that are available to you. In later chapters, you will see that there are other criteria to consider while deciding on the best approach.
Setting up mail servers
The first step of enabling email communication, as you may have guessed, is to register mail servers in Jira. If you are using the standalone distribution of Jira, it is recommended that you add your mail server by entering the host information. Follow these steps:
- Log in to Jira as a Jira administrator.
- Browse to the Jira administration console.
- Select the System tab and then the Outgoing mail option.
- Click on the Configure new SMTP mail server button.
- Enter your mail server information. If you do not have a mail server handy, you can sign up for a free Gmail account and use that for testing purposes.
After adding your mail server, you can try sending yourself a quick test email to check whether Jira can access your server successfully.
Updating workflow post functions
In Chapter 7, Workflow and Business Process, we created a few new workflow transitions. Now, we need to update these new transitions to make sure they fire the appropriate events:
- Browse to the View Workflows page.
- Click on the Edit link for HR: Termination Workflow.
- Click on any transitions other than Done.
- Update the post function to fire the Issue Updated event rather than the Generic Event.
- Repeat this for all other transitions except the Done transition.
- Publish the draft workflow. You can save a backup copy in case you want to revert.
We are using the Issue Updated event because it reflects the fact that the issue is being updated; also, the event is tied to more appropriate email templates. We can, of course, also create a new custom event and email templates and make the post function fire the custom event instead.
Setting up a notification scheme
Now, you need to have a notification scheme so that you can start adding notifications to your events. We will base our notification scheme on the default scheme to help us get things set up quickly:
- Select the Issues tab and then the Notification schemes option
- Click on the Copy link for the Default Notification Scheme option
- Click on the Edit link of the copied notification scheme
- Rename it HR Notification Scheme and click on Update
This will create a new notification scheme with the basic notifications pre-populated. All you need to do now is modify the events and add your own notification needs.
Setting up notifications
There are two rules you need to follow to add notifications. First, you need to add notifications for your custom events so that emails will be sent out when they are fired. Second, you will want users that are specified in the CC list custom field to also receive emails along with the assignee and reporter of the issue:
- Click on the Notifications link for HR Notification Scheme
- Click on the Add notification link
- Select the Issue Updated event type
- Select User Custom Field Value for the notification type and select Direct Manager from the drop-down list
- Click on the Add button
Nice and easy. With just a few clicks, you have added the Direct Manager custom field to the notification scheme. So, now, regardless of who is put into the field, the user will receive notifications for issue updates.
Putting it together
The last step, as always, is to associate your scheme with projects for activation:
- Browse to the HR project’s administration page
- Select the Notifications option from the left panel
- Use a different scheme in the Actions menu
- Select the new HR Notification Scheme we just created
- Click on the Associate button
With just a few clicks, you have enabled Jira to automatically send out emails to update users with their issue’s progress. Not only this, but you have tied in the custom fields you created from earlier chapters to manage who, along with the issue assignee and reporter, will also get these notifications. So, let’s put this to the test:
- Create a new Termination issue in the HR project.
- Select a user for the Direct Manager custom field. It is a good idea not to select yourself since the reporter will get notifications by default. Also, make sure that the user that’s selected has a valid email address.
- Transition the issue so that it moves along the workflow.
- You will receive emails from Jira within minutes.
If you do not receive emails from Jira, check your mail queue and check whether the mail is being generated. Then, follow the steps provided in the Troubleshooting notifications section of this chapter.
Summary
In this chapter, we looked at how Jira can stay in touch with its users through emails. Indeed, with today’s new gadgets, such as smartphones and tablets, being able to keep users updated with emails is a powerful feature, and Jira has a very flexible structure in place to define the rules on who will receive notifications.
We also very briefly mentioned some of the security rules about who can receive notifications. Jira performs security checks before sending out notifications for two very good reasons – first, there is no point in sending an email to a user who cannot view the issue; second, you will not want unauthorized users viewing the issue and receiving updates that they won’t know anything about.
In the next chapter, we will look into the security aspects of Jira and how you can secure your data to prevent unauthorized access.