
12
Jira and Third Party Apps
As we have seen in previous chapters, Jira is a highly customizable product that allows you to customize many of its features to better suit your needs. Of course, no product is perfect, and despite Jira’s rich set of features, there are still gaps within the product that cannot fulfill everyone’s needs. Recognizing that they cannot do this alone, Atlassian allows Jira to be extended by others, including partners, independent software developers, and customers, through Jira’s highly extensible app infrastructure.
In this chapter, you will learn about the following topics:
- Apps and what they are
- Atlassian Marketplace
- Installing and managing apps after they are installed
- Using apps to extend Jira’s features and capabilities
Atlassian Marketplace and third-party apps
In the context of Jira, an app is a separate software package that can be installed into Jira to extend its capabilities. An app often consists of multiple modules, such as custom fields, reports, and workflow post functions. You would often hear people talk about apps, add-ons, and plugins. In the context of Jira, all three refer to the same thing, so in this book, we will use the term app. But if you see the terms plugin or add-on mentioned, we are really talking about the same thing.
Most apps are registered and listed on the Atlassian Marketplace, at https://marketplace.atlassian.com. The Marketplace lets you, as the end user, browse and search for apps, read user reviews, and get documentation and contact details for the app vendor. For example, when searching for apps that can integrate with Slack, we can see the following apps on the Marketplace:

Figure 12.1 – Atlassian Marketplace
Jira apps on the Marketplace can be free or paid for. Paid apps are charged based on your Jira’s user tiers. Each paid app listed on the Marketplace will have a Pricing tab that will explain its pricing structure, as shown here:

Figure 12.2 – App pricing
Apps also have different levels of availability for the hosting type. Some apps will support all three options of Cloud, Data Center, and Server, while others may only support one or two. It is important to check whether the app you are interested in supports your hosting type. This is especially important for a Data Center deployment; if you install the Server version of the app, it may lead to unexpected behaviors and errors.
One useful feature of the Marketplace is that if the app supports Data Center or Server, you can download the app directly from the site. This is not something you will need to do normally; as we will see later in this chapter, Jira is natively integrated with the Marketplace by default, so you can find and install apps directly from inside Jira. But if Jira is unable to connect to the Marketplace due to network or security reasons, you can manually download the app and install it.
Now that we have a brief overview of Atlassian Marketplace, let’s look at how you can use Jira to find, install, and manage apps next.
Universal Plugin Manager
The Universal Plugin Manager (UPM) is the main tool you will use to find, install, and manage apps for your Jira instance. The UPM is integrated with the Atlassian Marketplace by default, so if your Jira instance has an outbound internet connection, you will be able to search and install apps directly from the UPM.
There are two main interfaces for the UPM:
- Find apps – This interface allows you to search for third-party apps from Atlassian Marketplace directly and install them in your Jira.
- Manage apps – This interface allows you to manage the apps that are installed in your Jira. You can manage, disable, update, and uninstall the apps.
We will look at each of the interfaces and how you can use them to install, update, and manage third-party apps in Jira.
Searching and installing apps from the Atlassian Marketplace
If your Jira instance has an outbound internet connection and has an Atlassian Marketplace connection enabled, you can search and install apps from the UPM directly. This is the easiest way to install apps into Jira, as UPM will make sure to download the latest compatible version of the app. To install an app from the Atlassian Marketplace using the UPM, follow these steps:
- Browse to the Jira administration console.
- Select the Manage apps tab and then the Find new apps option.
- Search for the app you are looking for in the Search the Marketplace textbox. You can also use the various controls to browse and filter your search results.
- Click on the Install button to install the app if it is free, or the Free trial button if the app is a paid app, as shown here:

Figure 12.3 – Finding apps in the UPM
If the app is free, clicking on the Install button will let Jira download and install the app for you. If the app is a paid app, Jira will install the app and walk you through the process of generating a trial license.
Once installed, the app will be ready to go. Some sophisticated apps may require further configuration before you can use them; in these cases, you can use the Manage apps interface.
Installing apps manually
If for some reason, Jira is unable to connect to the Atlassian Marketplace, or if the app you want to install is not on the Marketplace, you can manually install the app from the Manage apps interface. To install an app manually, follow these steps:
- Browse to the Jira administration console.
- Select the Manage apps tab and then the Manage apps option.
- Click on the Upload app option:

Figure 12.4 – Manually installing an app
- Select the app you want to install from the dialog box, and click Upload:
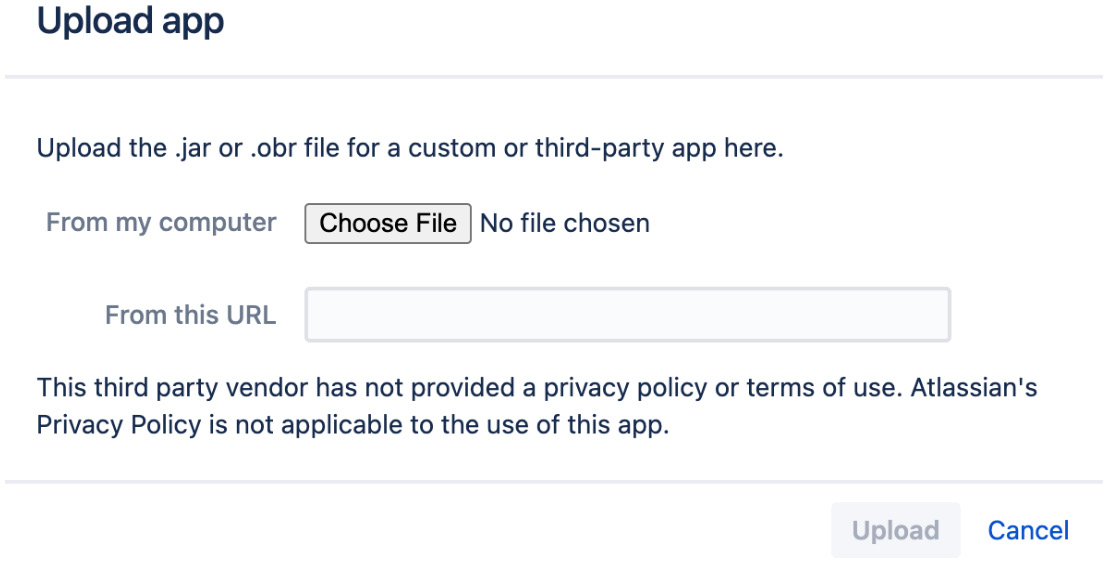
Figure 12.5 – Upload app
Tip
You can upload and install the app by either selecting the app’s file directly or via a URL to the app archive file.
When you are installing apps manually this way, you need to make sure that you are installing a version of the app that is compatible with the version of your Jira and is of the right hosting type. Each app on the Atlassian Marketplace has a version list that shows the app’s compatibility, so make sure you download the correct app version. If you install an incompatible app, in most cases, it will be automatically disabled and you can simply uninstall it, but sometimes it could lead to more serious problems that could bring your Jira instance down.
Managing installed apps
All installed apps are listed in the Manage apps interface of the UPM. You can access the Manage apps interface by selecting the Manage apps option.
The Manage apps interface will list all user-installed apps by default, as shown here:
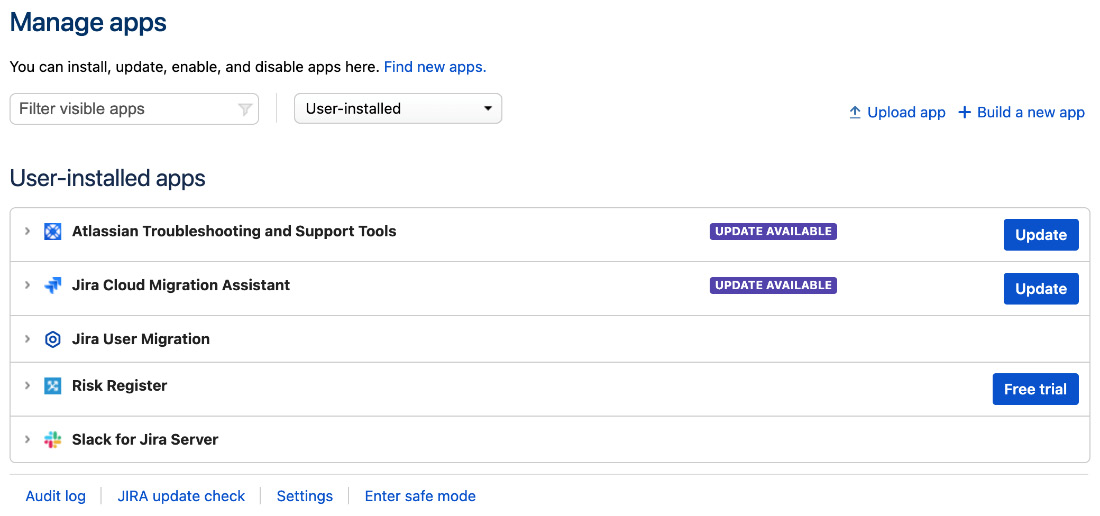
Figure 12.6 – UPM Manage apps
By default, only user-installed apps are displayed. This is because many of Jira’s core features are also implemented as apps, so this will help to keep the list short. You can toggle the type of apps to display all apps in the system.
You can click on an app in the list to expand and view its details. This will show you a lot of useful information about the installed app and allow you to manage it:
- Buy now – If the app is a paid app and you have not yet purchased a license, you can click on the Buy now button to purchase it.
- Configure – If the app requires additional configuration after installation, it will usually have a Configure button. Clicking on that will take you to the app’s main configuration page.
- Uninstall – This will uninstall the app from your Jira instance. Note that for some apps, uninstalling may also delete any data that is related to the app. When in doubt, you should disable the app first.
- Disable/Enable – This will disable or enable the app. Once disabled, the app is still installed in Jira, but its features will not be available.
- Update – If there is a newer version of the app available on the Marketplace, you can click on the Update button to automatically update the app. However, before you update an app, you should always check whether the newer version is compatible with your environment. Sometimes, new versions may have new requirements on Java, databases, and other system components.
- Version – The version of the app you have installed. This is a very important piece of information, and vendors will always ask for this when troubleshooting problems.
- Documentation – This link will take you to the app’s documentation on the vendor’s website.
- Support and issues – This link will take you to the support portal of the vendor for you to request support. It can also take you to the vendor’s website with details on how to request support.
- Enabled modules – This will list all the modules an app contains when expanded. Usually, all modules are enabled by default after installation. You can selectively disable certain modules within an app. You may want to do this to limit certain functions from your users, or as per instructions given by the vendor’s support staff as part of the troubleshooting process. Note that this is for advanced users, as if you disable the wrong modules, it could lead to the app not functioning correctly or even the loss of data.
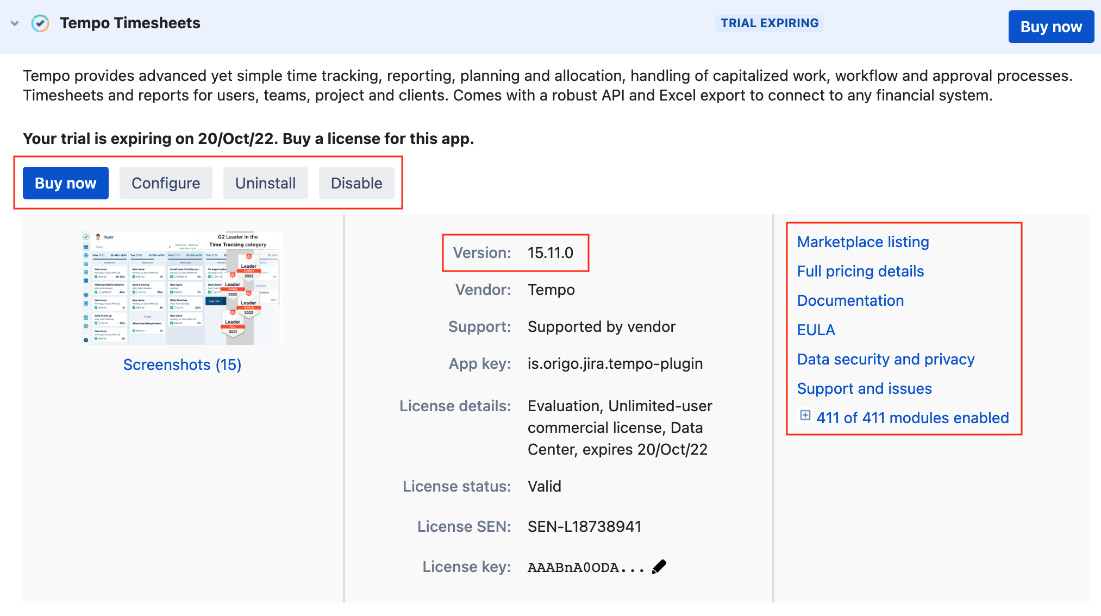
Figure 12.7 – Managing apps
Configuring the UPM
Other than installing and uninstalling apps, the UPM has several other useful features that can help you manage and troubleshoot problems. At the bottom of the UPM, there are four options:

Figure 12.8 – Configuring the UPM
We will look at each of the options closely in the next sections, starting with the audit log.
Audit log
Jira keeps track of when an app is installed, uninstalled, or updated. This is a very useful tool if you need to run periodic audits on changes that happen in a system. Oftentimes, apps are installed and after a while, people forget who installed the app or whether the app is still being used. This is especially a problem if the app is an expensive paid app. By reviewing the audit log, you can find out who initially installed the app or last updated it. As shown below, we can see the Tempo Timesheets app was installed on September 20, 2022.

Figure 12.9 – Audit log
Note
Note that the audit log will be purged periodically; the default is after 90 days.
Jira update check
As you start to install third-party apps into Jira, upgrading Jira to newer versions, especially major versions, would start to become more complex, as you would need to make sure the apps you are using are compatible with the version of Jira you are upgrading to. This can sometimes be a cumbersome task, especially if you have a lot of apps installed.
The Jira update check tool from the UPM helps to make this easier for you by automatically checking all the apps you have and generating a compatibility report, as shown here:
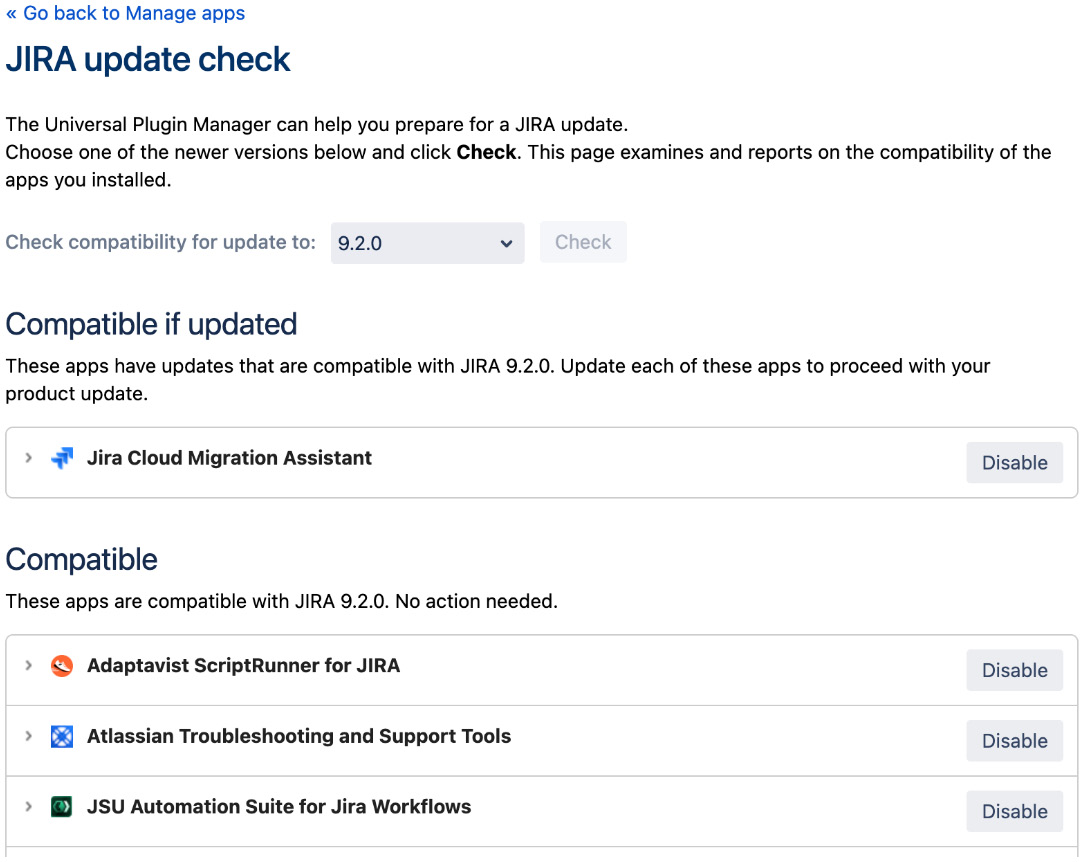
Figure 12.10 – Jira update check
Simply select the Jira version you are targeting, and click on the Check button. As shown in the preceding report, we have three apps that are listed as compatible and one that is not, but there is an updated version available that is compatible. Note that this tool only works for apps that are on the Atlassian Marketplace; apps that are not on the Marketplace cannot be checked with this tool.
Settings
The Settings option lets you control how the UPM will work. For example, if you want the UPM to be able to connect to the Atlassian Marketplace to download and install apps directly. For some organizations, due to security reasons, you may not want to allow this, so you can disable this option.
Another common option is to allow end users to request apps they want to be installed. Jira will then send an email to Jira administrators of the request, and this helps to reduce friction between users and administrators. The following screenshot shows the settings you can change for the UPM:
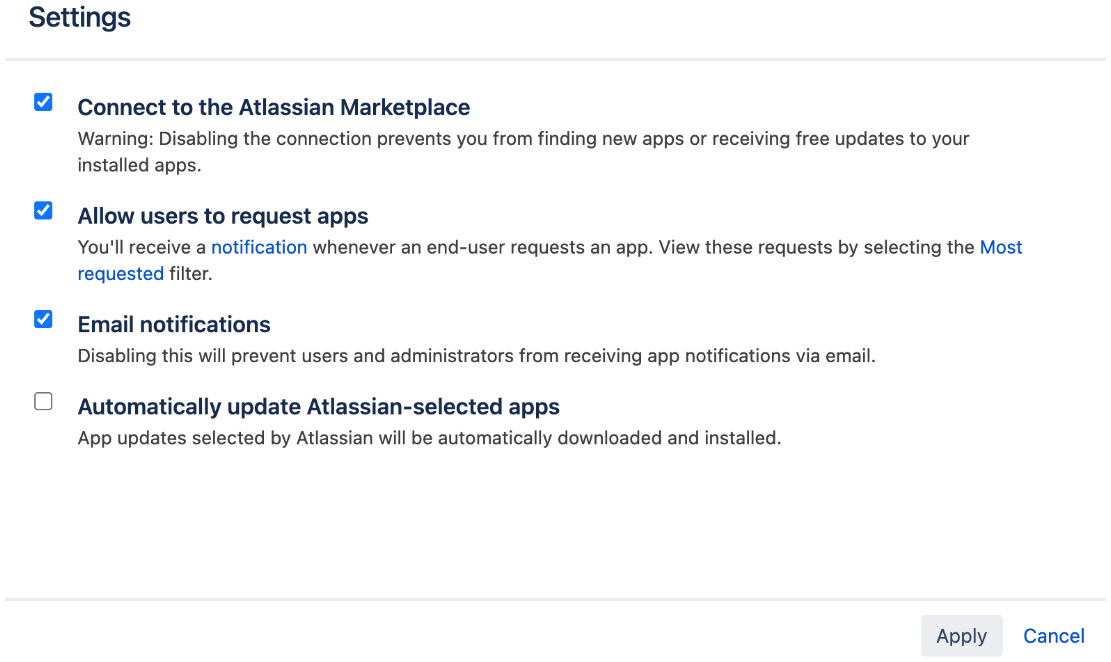
Figure 12.11 – UPM settings
Enter safe mode
The last option is to put Jira into safe mode. When Jira is placed into safe mode, all user-installed apps are disabled. This is a very useful tool when troubleshooting problems. Often when something is not working correctly in Jira, it can be challenging to pinpoint exactly what the root cause is, especially if you have many apps. In these cases, the method of elimination would be the best option; by putting Jira into safe mode and re-enabling apps one at a time, you can narrow down the cause of the problem, if it is caused by an app.
Note that when you put Jira into safe mode, all the third-party apps will be disabled, which can sometimes be detrimental to your end users. So, make sure you communicate this before enabling safe mode.
Extending Jira with apps
Now that we have seen how to find and install third-party apps, we will look at some of the common use cases where you can extend Jira’s core features with apps. In this section, we will make use of some of the popular apps available on the Atlassian Marketplace to illustrate how you can use apps to extend Jira.
Extending custom fields with apps
In Chapter 5, Field Management, we introduced custom fields and looked at the out-of-the-box field types Jira provides. With third-party apps, we can extend the list of options even further. So far, most fields we have seen so far are primarily used to capture and display data, but custom fields can do far more than that. In this section, we will be looking at the Electronic Signature for Jira app.
As the name suggests, the Electronic Signature for Jira app allows users to capture electronic signatures when changes are made to issues, usually as part of a workflow transition. This is especially useful during approval processes, such as for CFR 21 Part 11 compliance, where signatures are required and need to be recorded for audit purposes.
The app provides this functionality by adding a new custom field called Electronic Signature. You can add this field to your Jira once the app is installed.
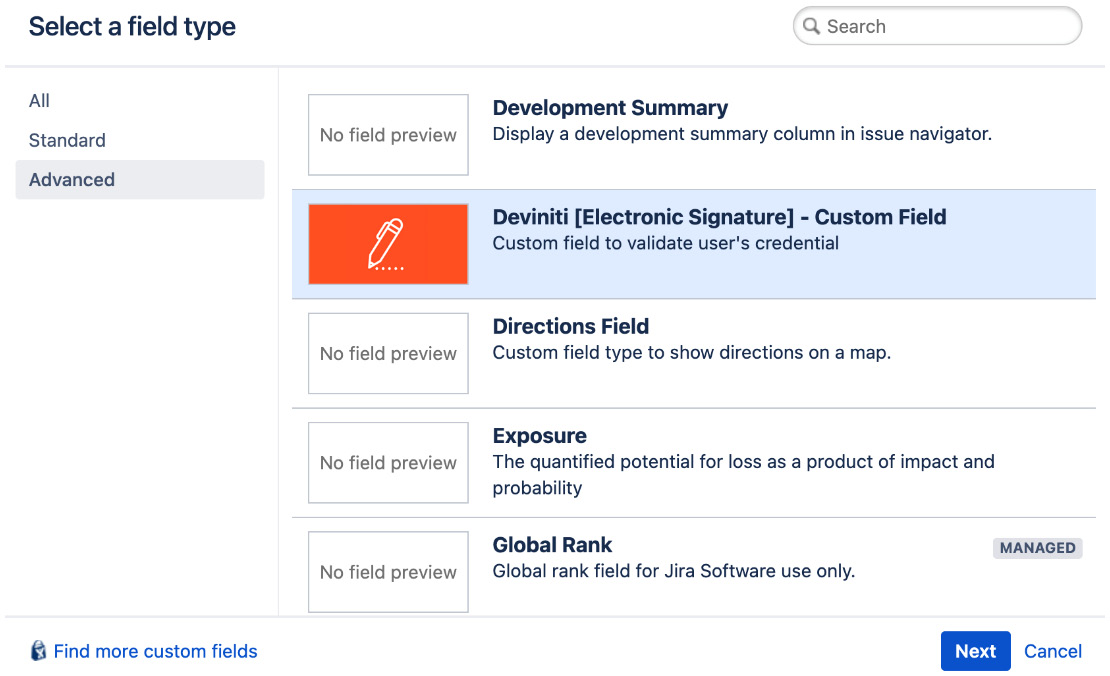
Figure 12.12 – Add electronic signature custom field
After you have added the field to Jira, make sure you place it onto screens where electronic signatures need to be verified and captured. For example, the screen used for the Approved workflow transition. With the field on the screen, when you transition the issue, you will see the field asking you to enter your Jira credentials. If the correct credentials are entered, the workflow transition can complete, and the signature will be recorded for the issue.
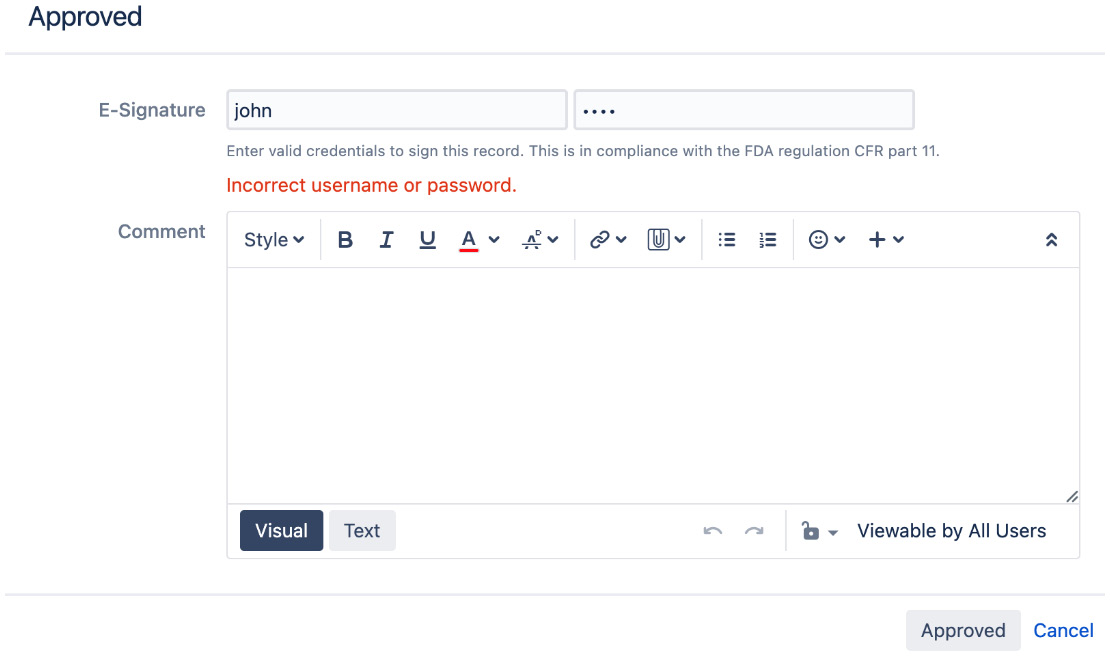
Figure 12.13 – Validating the electronic signature
As we can see, while the primary purpose of any field is to capture and store data, apps can contain useful custom fields that have very different functions.
Extending workflow with apps
In Chapter 7, Workflow and Business Process, we looked at using Jira workflows and their components for your projects. Jira comes with many useful components such as conditions, validators, and post functions, but for you to unleash the full power of Jira’s workflow, you would need to use some third-party apps. In this section, we will look at some of the popular apps and the useful workflow components they provide.
The app we will look at is the JSU Automation Suite for Jira Workflows (JSU). This app comes with several useful workflow components. A very common Jira use case is to make a field required only during certain workflow transitions. For example, when a user is creating an issue, the user may not know the due date for the issue so leaves it blank. When the issue is picked up by someone and transitions to In Progress, a due date will be needed, so we will want to make sure the user enters a due date value before the issue can be transitioned. The JSU comes with a Fields Required (JSU) validator that can check to make sure a value is provided for selected fields before the workflow transition can complete. As shown next, we have added the Fields Required (JSU) validator and selected the Description and Due Date fields to be required:
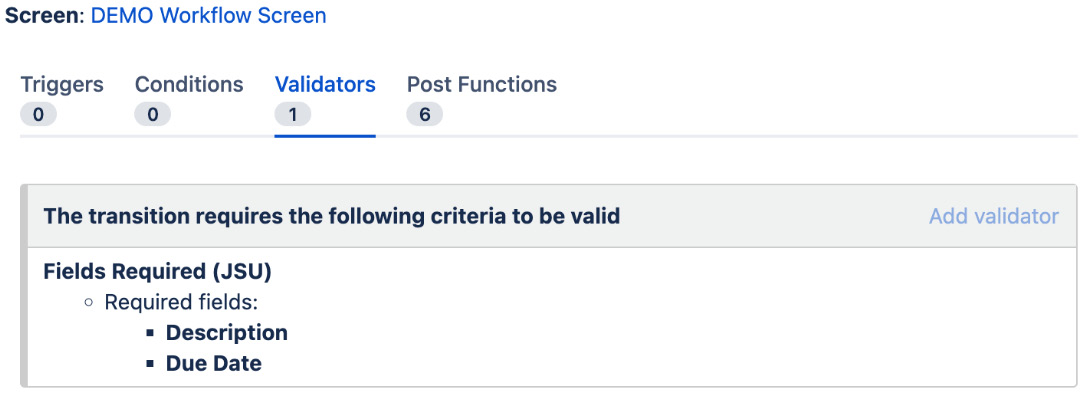
Figure 12.14 – Add validator
So now, if an issue is transitioned to the In Progress status without providing a value for Description or Due Date, error messages will be displayed:

Figure 12.15 – Field required validator
Obviously, for this to work, you need to make sure you apply a screen to the workflow transition and put all the required fields onto the screen.
Another useful feature JSU provides is the ability to automatically set a value to any fields in Jira as part of a workflow transition. Out of the box, Jira comes with a post function that allows you to set a value for some system fields such as Assignee and Resolution. This lets you automate some tasks, such as automatically assigning the issue to yourself when you move it to In Progress or clearing the issue’s resolution when it is reopened. But often, users would want to set a value to other fields, especially custom fields. JSU provides such a post function that not only allows you to set a value for any fields but also comments, and even updates the fields for other issues.
As an example, we have added the Update Any Issue Field (JSU) post function to the workflow transition. We configured the post function to update the Assignee field for all subtasks under the issue to the current user (specified as %%CURRENT_USER%%). So now, if an issue is transitioned to the In Progress status, all its subtasks will have their assignee automatically assigned to the user performing the transition.
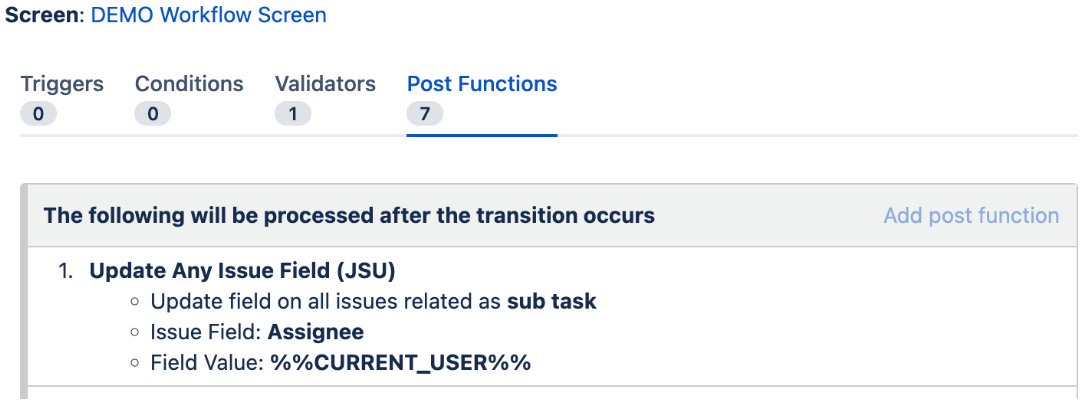
Figure 12.16 – Add post function
Third-party apps such as JSU come with many useful workflow conditions, validators, and post functions you can use to enrich what you can do with workflows.
Customizing Jira with scripts
The apps we have looked at so far are all prepackaged, purpose-built solutions that are designed to provide specific functions. These are great as they provide solutions for common problems people would have or features that everyone needs.
However, sometimes you have requirements that are not covered by any apps that are available on the Atlassian Marketplace. Now you can create a custom app for that, but often you simply need a custom field that captures or displays data in a specific way, or a workflow validator that has some specialized business logic. In these cases, you can use an app called ScriptRunner.
ScriptRunner is an app that brings scripting capabilities into Jira. If you know how to write Groovy scripts, ScriptRunner will let you create custom fields, workflow components such as validators, and post functions defined by your own Groovy scripts. This way, you can implement these components with your own business logic, without having to go through the process of creating a full-blown app.
In this section, we will take a look at the ScriptRunner app and how you can use it to create your own custom field. Once you have installed the ScriptRunner app, there will be a new ScriptRunner tab when you go to the Jira administration console. As we can see, ScriptRunner comes with many different options for you to create scripts, including some built-in scripts. Since we are focusing on creating our own custom field in this section, we will be looking at Fields.
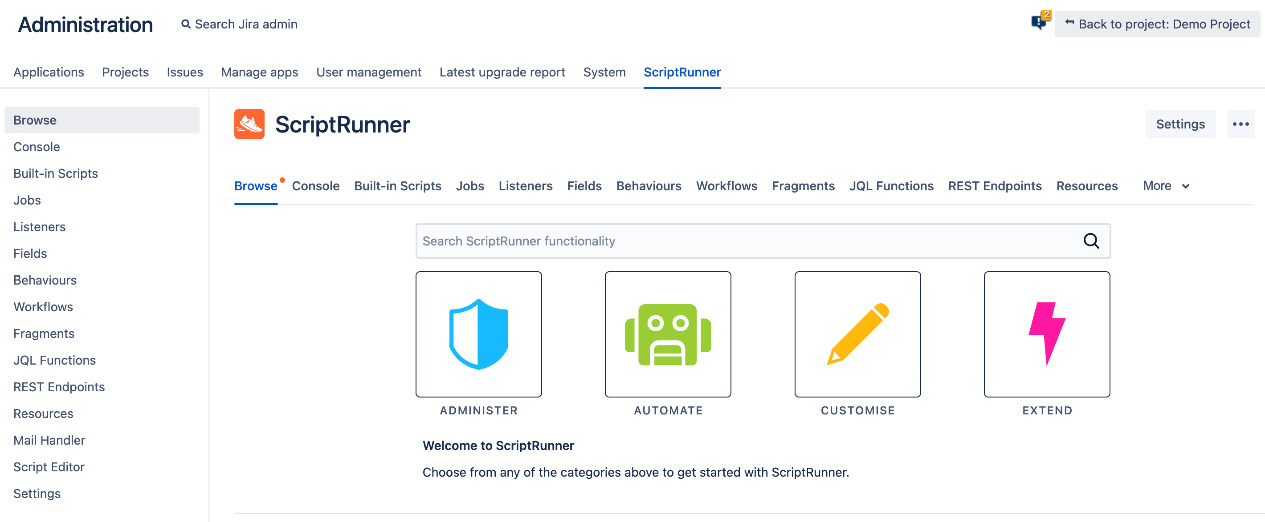
Figure 12.17 – ScriptRunner
To create a custom script field, select the Fields option, and then the Custom Script Field option, as shown here:
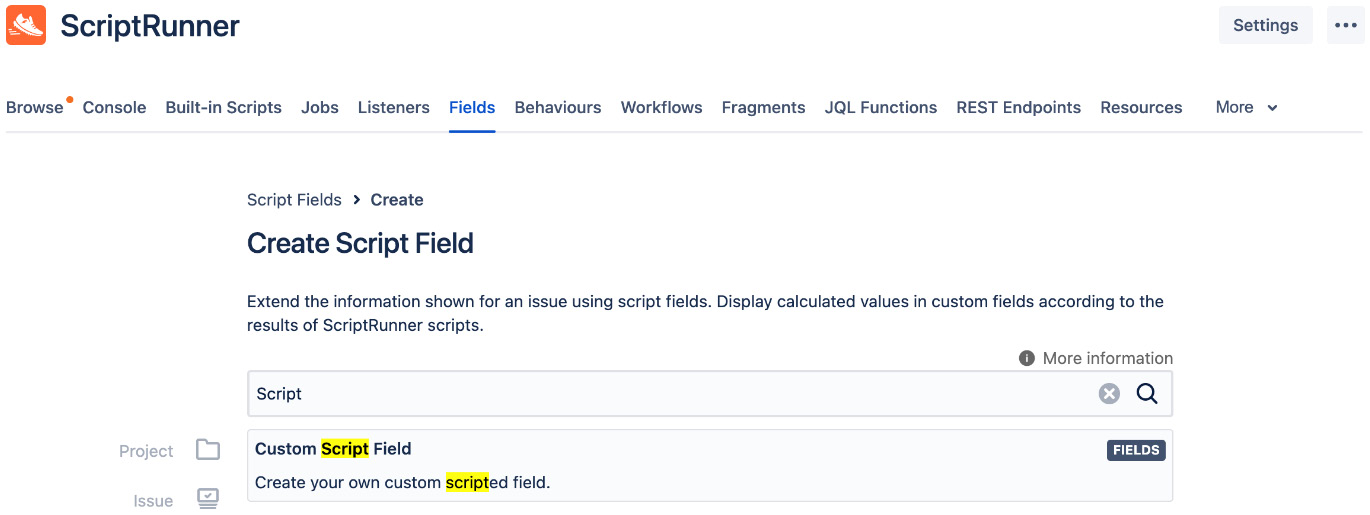
Figure 12.18 – Custom Script Field
Now that we have chosen to create a scripted field, we need to provide some basic details for our field as well as the script itself. In our example, we will be creating a simple field that will display the number of comments an issue has:
- Enter a name for our field, such as Number of comments.
- Select a template for our field. This will determine what our field will look like. For our example, we will choose the Number Field template.
- Enter the following script that will be run when the field is displayed. With ScriptRunner, you can load your scripts either as inline code or from a file. Inline code is easy to work with but saving your code to a file makes things easier to maintain, as you can keep your code files in a code repository for better change tracking. In our example, we will use the inline option:
import com.atlassian.jira.component.ComponentAccessor
def commentManager = ComponentAccessor.getCommentManager()
def numberOfComments = commentManager.getComments(issue).size()
return numberOfComments ? numberOfComments as Double : null
- Enter an issue key into the Preview Issue Key textbox and click on the Preview button. This will test our script against the issue.
- Click on the Add button to create our custom field.
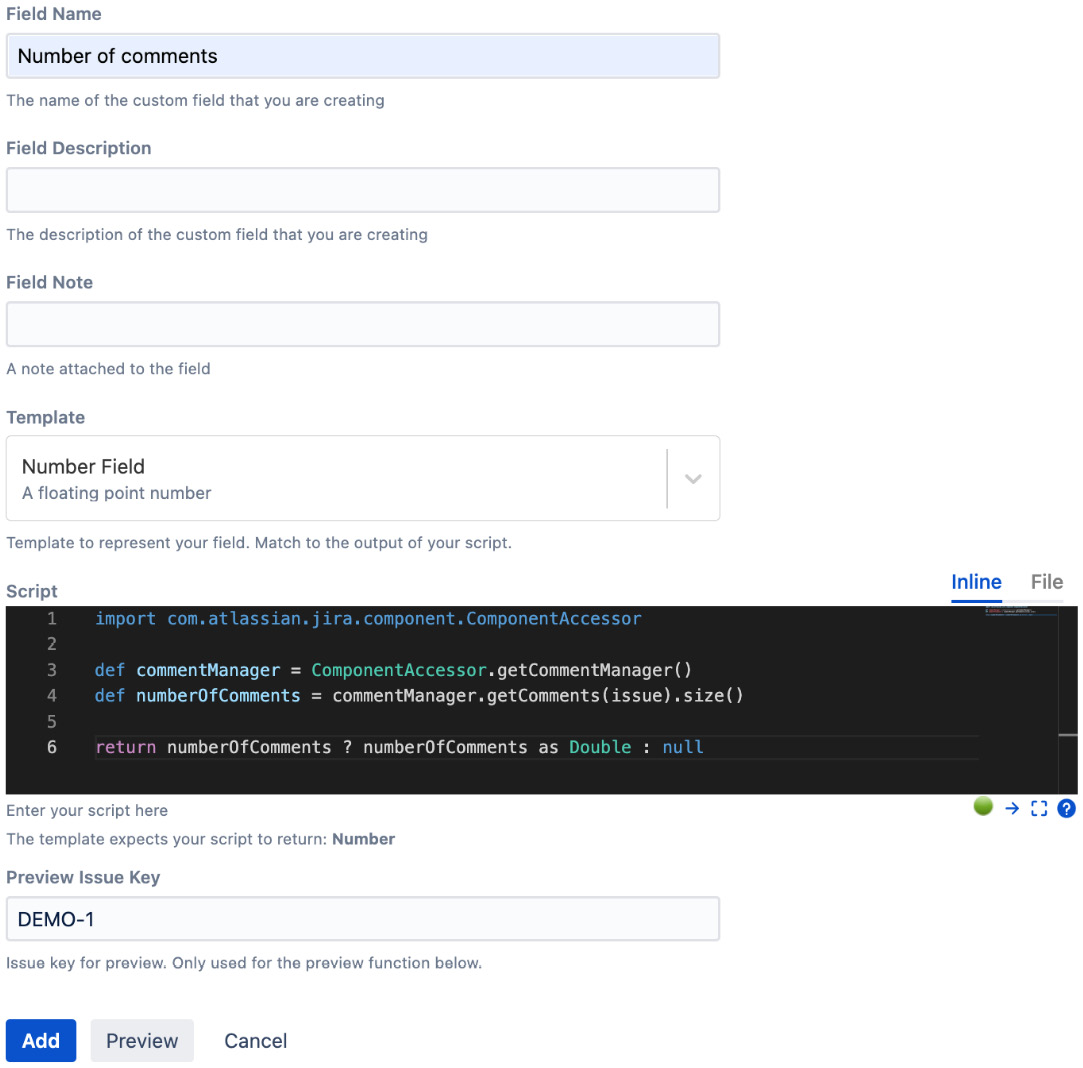
Figure 12.19 – Adding a custom script field
Once our custom script field is created, we need to make sure the field is applied to the correct context and added to the necessary fields. Once we have done that, you should see the field displaying the number of comments an issue has:
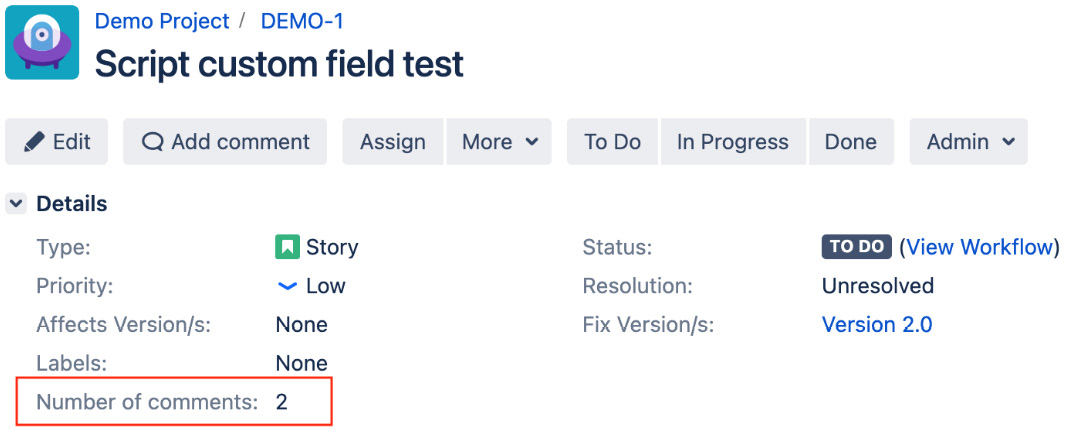
Figure 12.20 – Custom script field result
Since the script is run every time the field is rendered, its values will be automatically updated. If you want the value in the field to be searchable, make sure to assign a search template to it. Since our field displays a number, we can use either the number searcher or the number range searcher.
Better time tracking and reporting
In Chapter 4, Working with Issues, we briefly looked at how users can track their time spent against the issue they are working on. It is a very useful feature, and many organizations use this to keep track of their project’s progress. However, Jira’s out-of-the-box time tracking is rather rudimentary, and it is not very easy to get a report on the hours logged. Once again, apps to the rescue! When it comes to time tracking and reporting, there are several options available, depending on your needs.
If all you want is a better tool to get visibility into the hours logged by your users and create time tracking reports, then the Worklogs - Time Tracking and Reports app is perfect for you. Once installed, there will be a new Worklogs option at the top. Clicking that option will take you to the Worklogs report view provided by the app:

Figure 12.21 – Time tracking report
From here, you can select the project, users/groups, date range, and many other options to generate a report on the time tracking data entered by your users. As shown previously, for the month of September, two users have logged time on two different projects. You can change the table report view to pie and bar charts, as well as export the report to an Excel spreadsheet. This is a very useful tool that complements the out-of-the-box time tracking feature.
Now if you want something more powerful and robust, you might want to look into the Tempo Timesheets - Jira Time Tracking (Tempo) app. The Tempo app takes the basic time tracking feature in Jira and takes it to a whole new level.
After you have installed Tempo, there will be a new Tempo option at the top. Clicking that option will list Tempo’s different features. Tempo comes with all the features you would want for tracking time and generating reports on the data. For example, each user can view their own logged time both in a Calendar and Timesheet view, as shown next. This is a great tool for users to keep track of their time logging as well as generate a report at the end of each month for billing purposes:

Figure 12.22 – Tempo
Tempo also allows you to create saved reports on the time tracking data that can be reused at a later time, similar to saved filters. For example, you can create a report for each of your projects, and send that to your clients as part of your regular project progress update.
Apart from regular time tracking and reporting, Tempo also has advanced features such as allowing users to submit their timesheets for approval, organizing users into teams for better resource management and planning, tracking across multiple teams and projects by setting up accounts, and more.
Selecting an app and its vendor
Now that we have seen what third-party apps are and how they can be useful to you, you might want to go to the Atlassian Marketplace and find as many useful apps as you can and install them into your own Jira instance. This is actually very dangerous and is often how people find themselves in difficult situations, such as during Jira upgrades.
As useful as third-party apps are, care must be taken when choosing and installing them. When choosing to install an app, there are several important factors to consider and you must do your due diligence:
- Is the app well maintained and supported? It does not matter whether an app is really good, as if it is not maintained and supported, you will not be able to get any help when you run into problems or need to upgrade Jira later. Take a look at the reviews from other users, see whether the app has a good track record of supporting multiple versions of Jira, and see whether the vendor has a support channel. You can find out all this information on the app’s page on the Atlassian Marketplace.
- Does the app have a cloud migration pathway? If migrating to Atlassian Cloud is something you would consider in the future, it is important to see whether the app has both an equivalent cloud version, as well as a migration pathway available. This will make your life a lot easier when you do decide to go to the cloud.
- Does the app conflict with any other apps you may have already installed? Sometimes, apps from different vendors will conflict with each other, and you may not find out about this until it is installed and running. In some cases, the app vendors may be aware of these conflicts and would have that as part of their documentation, but this is not always the case. For this reason, it is important that you test out the new app in a staging environment before installing it in production.
As we can see, care must be taken when choosing an app for your Jira, especially if the app will serve an important function for your organization. It is common that an app will become so important that your users cannot live without it. So it is just as important that you choose the right app vendor as the app itself. A good vendor will be there ready to support you when you run into problems and bugs, need to upgrade to a new version of Jira, and if you choose to migrate to the cloud.
It is often a good idea to keep an inventory of the apps you have installed and how they are being used. Keep that up to date and have regular reviews, as you do not want to keep apps that you no longer need, especially if the app is a paid app. If you have multiple Jira administrators, make sure to let each know when an app is added or removed, so if there is a problem, nobody is caught off guard.
Summary
In this chapter, we looked at third-party apps, what they are, and what they can do. We looked at the Atlassian Marketplace, from where you can search for apps that might be useful to you. We also learned how to use the Universal Plugin Manager to install and manage apps, and some of its additional features to help troubleshoot problems in Jira, especially if the problem is related to apps. We also looked at some popular apps and how to use them to extend Jira’s capabilities, such as adding new custom field types and workflow post functions, so you can do more with Jira. Lastly, we looked at some important factors to consider when choosing what app to install. Jira is a great tool, and third-party apps help to make this tool even better, but you must make sure you choose the right app for you to ensure your long-term success.