
4
Working with Issues
In the previous chapters, we saw how Jira can be used to manage projects for different purposes. A software development organization will use Jira to manage its software development life cycle and track bugs, while a customer services organization may choose to use Jira to track and log customer complaints and suggestions. At its core, issues are what users will be working with in those projects. The issue is one of the fundamental building blocks in Jira – almost all of Jira’s features and concepts revolve around issues.
In this chapter, we will explore the different features Jira has for users to work with issues. By the end of this chapter, you will have learned about the following topics:
- Issues and how they are used in Jira
- Creating, editing, and deleting issues
- Moving issues between projects
- Voting and watching issues to get notified of changes
- Advanced issue operations, including uploading attachments and linking issues
- Managing issue types and issue type schemes
- Managing priorities and a priority scheme
Understanding issues
An issue in Jira usually represents a unit of work that users will work on. Depending on how you are using Jira, an issue can also represent other things and concepts in the real world. For example, in a software development project, an issue can be a bug or a story, while in an IT service project, an issue can be an incident or a support request.
Despite all the differences in what an issue can represent, there are several key aspects that are common to all issues in Jira, listed as follows:
- An issue must belong to a project.
- It must have a type, also known as an issue type, which indicates what the issue represents.
- It must have a summary. The summary acts like a one-line description of what the issue is about.
- It must have a status. A status indicates where along the workflow the issue is at a given time. We will discuss workflows in Chapter 7, Workflow and Business Process.
In summary, an issue in Jira represents a unit of work that can be completed by a user, such as a task in a business project, a story in a software development project, or a request in a service desk project. These are all different types of issue. So let’s start by taking a look at issues in more detail.
Jira issue summary
As we have already discussed, an issue in Jira can be anything in the real world to represent a unit of work or a task to be completed. In this section, we will look at how Jira presents an issue in the user interface for business and software projects. We will cover Jira Service Desk in Chapter 11, Jira Service Management, as it has a different interface.
First, let’s look at an issue in detail. The following screenshot shows a typical example of an issue and breaks it down into more digestible sections, followed by an explanation of each of the highlighted sections in a table. This view is often called the issue summary or the View Issue page, as shown here:

Figure 4.1 – Issue summary view
Its sections are described as follows:
- Project / issue key: This shows the project the issue belongs to. The issue key is the unique identifier of the current issue. This section acts as a breadcrumb for easy navigation.
- Issue summary: This is a brief summary of the issue.
- Issue export options: These are the various export options for the issue. The options include XML, Word, and Printable.
- Issue operations: These are the operations that users can perform on the issue, such as Edit, Assign, and Add comment. These are covered in later sections of this chapter.
- Workflow transitions: These are the workflow transitions that are available. Workflows will be covered in Chapter 7, Workflow and Business Process,
- Issue details /fields: This section lists issue fields such as issue Type and Priority. Custom fields are also displayed in this section. Fields will be covered in Chapter 5, Field Management.
- User fields: This section is specifically for user-type fields, such as Assignee and Reporter. Fields will be covered in Chapter 5, Field Management.
- Date fields: This section is specific for date-type fields, such as Created and updated. Fields will be covered in Chapter 5, Field Management.
- Attachments: This lists all the attachments in an issue.
- Sub-task list: Issues can be broken down into smaller sub-tasks. If an issue has sub-tasks, they will be listed in this section.
- Comments: This lists all the comments that are visible to the current user.
- Work log: This lists all the time-tracking information your users have logged against the issue. See the Tracking time section for more details.
- History: Keeps track of all changes that have occurred for this issue, including the values that are used before and after the change.
- Activity: This is similar to History but is formatted in a more user-friendly way. It can also generate an RSS feed for the content.
When using Jira with Scrum or Kanban, issues will be shown as cards on the agile board, which has a more concise summary of issues, as shown here:

Figure 4.2 – Issue agile card
However, when you click on the card, Jira will display detailed information about the issue in a detailed panel. Now that we have seen how issues are presented in Jira, let’s take a look at how you can work with issues.
Working with issues
As we have already seen, issues are at the center of Jira. In the following sections, we will look at what you, as a user, can do with issues. Note that each of these actions will require you to have specific permissions, which we will cover in Chapter 9, Securing Jira.
Creating an issue
When creating a new issue, you will need to fill in several fields. Some fields are mandatory, such as the issue’s summary and type, while others are optional, such as the issue’s description. We will discuss fields in more detail in the next chapter.
There are several ways in which you can create a new issue in Jira. You can choose either of the following options:
- Click on the Create button from the top banner
- Press C on your keyboard
This will bring up the Create Issue dialog box, as shown in the following screenshot:
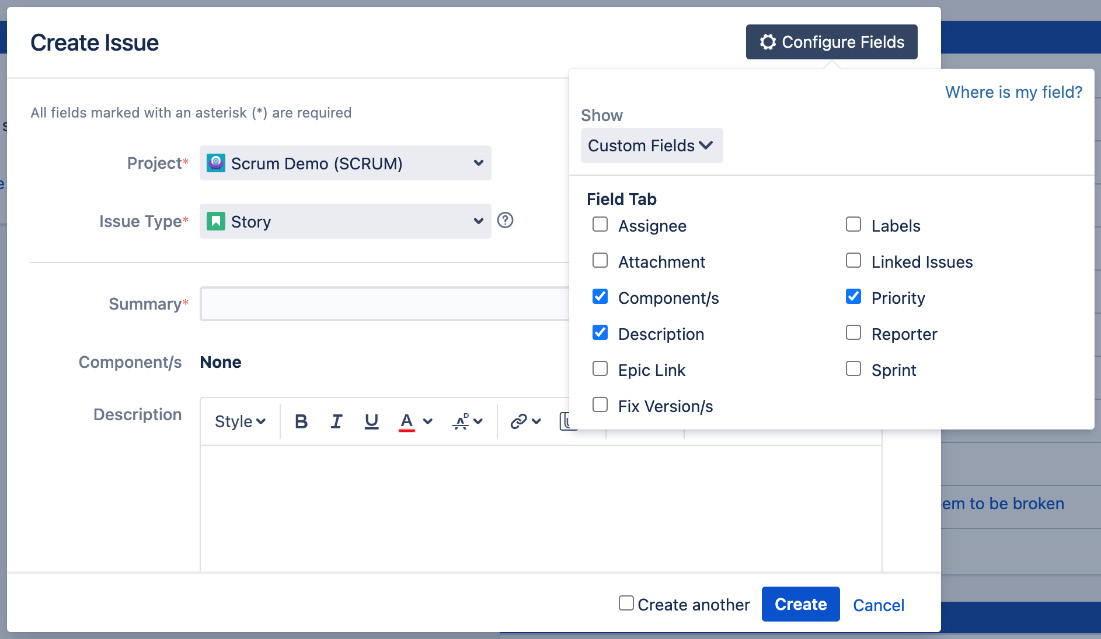
Figure 4.3 – Create Issue dialog
As you can see, there are quite a few fields, and the required fields will have a red asterisk (*) mark next to their names.
The administrator configures what fields will be part of the Create Issue dialog, but your users can customize and make their own Create Issue screen by hiding the optional fields by performing the following steps:
- Click on the Configure Fields option in the top-right corner.
- Select the Custom Fields option.
- Uncheck all the fields you want to hide and check the fields that you want to display, as shown in the preceding screenshot.
Make sure you do not hide any required fields, otherwise you will not be able to create new issues. You are only hiding or showing these fields for yourself.
Important note
Only the Jira administrator can hide and show fields globally for all users.
There is a Create another option beside the Create button. By checking this option and then clicking on the Create button, the Create Issue dialog box will stay on the screen and remember the values you have previously entered, such as priorities components, and due dates. This way, you can avoid having to fill in the whole dialog box again and will only have to update the fields that are different, such as Summary. With this feature, you can rapidly create many issues in a much shorter time frame.
Tip
Apart from manually creating issues this way, you can also use advanced tools, such as the issue importer, Jira’s REST APIs, and emails, to create issues.
Assigning issues to users
Once an issue has been created, the user that’s normally assigned to the issue will start working on it. Afterward, the user can reassign the issue, for example, to QA staff for further verification.
There are many instances where an issue needs to be reassigned to a different user, for example, when the current assignee is unavailable or if issues are created with no specific assignee. Another example is where issues are assigned to different people at different stages of the workflow. For this reason, Jira allows users to reassign issues once they have been created.
Go through the following steps to assign an issue:
- Browse to the issue you wish to assign.
- Click on the Assign button in the Issue menu bar or press A on your keyboard (you can also use the inline edit feature here). This will bring up the Assign dialog.
- Select the new assignee for the issue and optionally add a comment to provide some information to the new assignee.
- Click on the Assign button, as shown in the following screenshot:
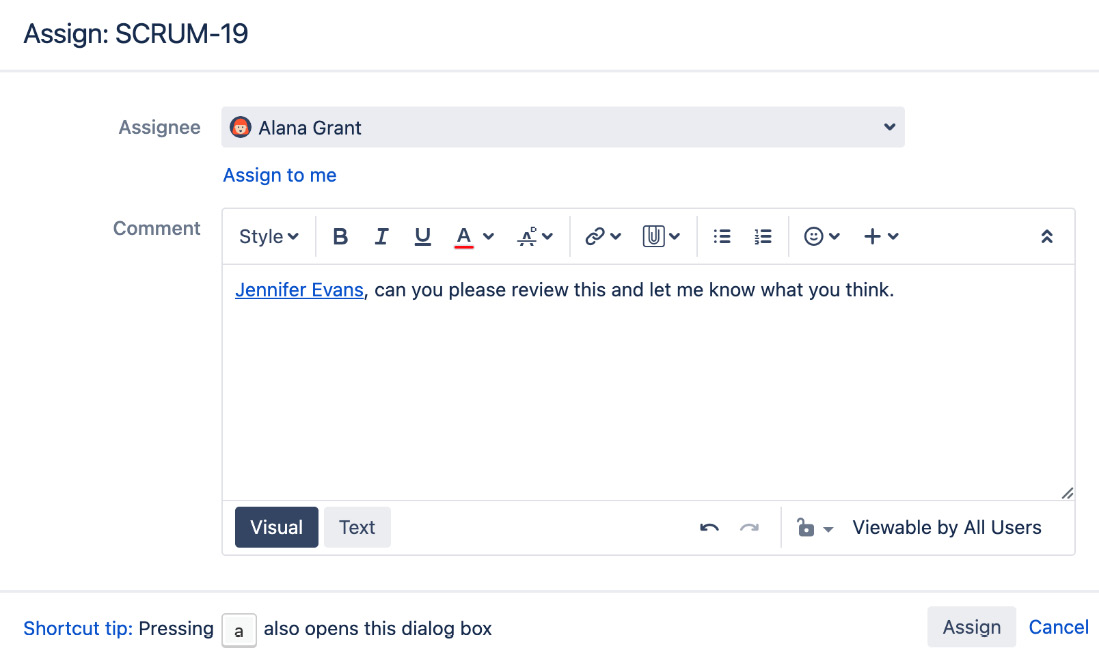
Figure 4.4 – Assign issue
Once this issue has been reassigned, its Assignee value will be updated to the new user. The new assignee will also receive a notification email alerting them of the assignment. You can also unassign an issue this way by simply selecting the Unassigned option. Unassigned issues do not have an assignee and will not show up on anyone’s list of active issues.
Tip
You can press I on your keyboard to quickly assign an issue to yourself.
Editing an issue
There are two ways in which you can edit an issue in Jira:
- The first and more traditional way is by clicking on the Edit button or by pressing E on your keyboard. This will bring up the Edit Issue dialog box, along with all the editable fields for the current issue. This allows you to make changes to multiple fields at once.
- The second option is called inline editing. With this approach, you will be able to view the issue and edit the field you want on the spot, without having to wait for the edit dialog to load. To edit a field inline, all you need to do is hover your mouse over the value for the field you want to update, click on the Edit (pencil) icon, and start editing, as shown in the following screenshot:

Figure 4.5 – Inline editing
The fields you can edit are controlled by the screen that’s used for the edit issue operation. Screens will be discussed in Chapter 6, Screen Management. Note that not all fields can be edited; some fields are read-only and some specialized fields may not display when viewing the issue.
Moving an issue between projects
Once an issue has been created, the issue is associated with the project it is created in. You can, however, move the issue around from one project to another. This may sound like a very simple process, but there are many steps involved and many things that need to be considered:
- First, you need to decide on a new issue type for the issue if the current issue type does not exist in the new project.
- Second, you will need to map a status for the issue if the target project or issue type uses a different workflow.
- Third, you will need to decide on the values for any mandatory fields that exist in the new project but that do not exist in the current project.
Sounds like a lot? Luckily, Jira comes with a wizard that is designed to help you address all these things.
Go through the following steps to start moving an issue:
- Browse to the issue you wish to move.
- Click on the Move option in the More menu. This will bring up the Move Issue wizard.
There are essentially four steps in the Move Issue wizard:
- The first step is to select which project you wish to move the issue to. You will also need to select the new issue type, as shown in the following screenshot. If the same issue type exists in the new project, you can usually continue and use the same issue type:
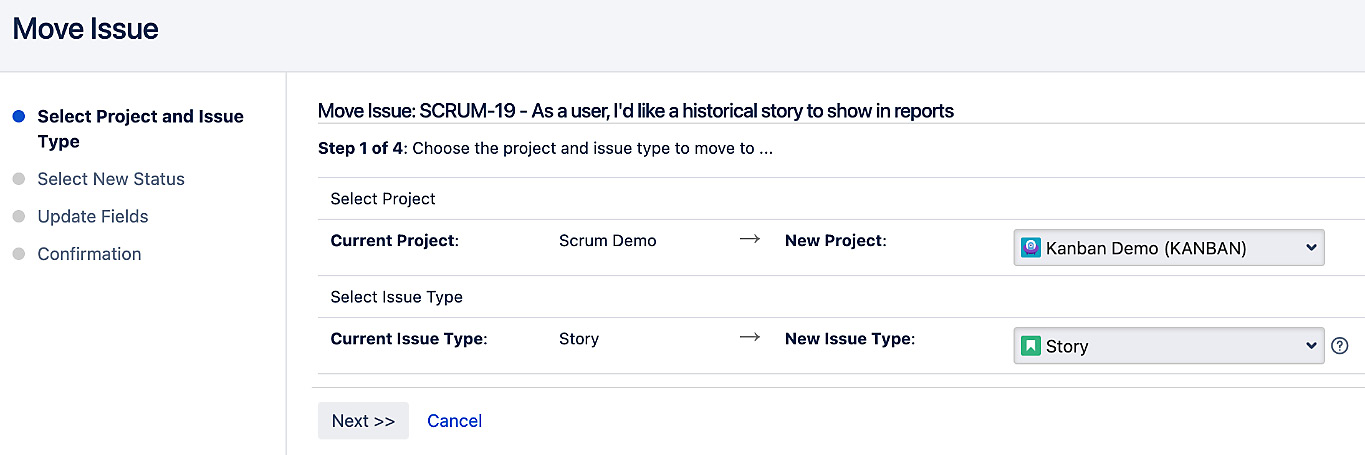
Figure 4.6 – Move Issue step 1
- The second step allows you to map the current issue to the new project’s workflow, as shown in the following screenshot. If the issue’s status exists in the target project, the wizard will skip this step:

Figure 4.7 – Move Issue step 2
- The third step shows all the fields that exist in the new project but not the current project, as well as those that require a value, as shown in the following screenshot. Again, if there are no fields that require values to be set, this step will be skipped:

Figure 4.8 - Move Issue step 3
- The fourth and last step shows you the summary of the changes that will be applied by moving the issue from the source project to the target project. This is your last chance to make sure that all the information is correct. If there are any mistakes, you can go back to step one and start over again. If you are happy with the changes, confirm the move by clicking on Move, as shown in the following screenshot:
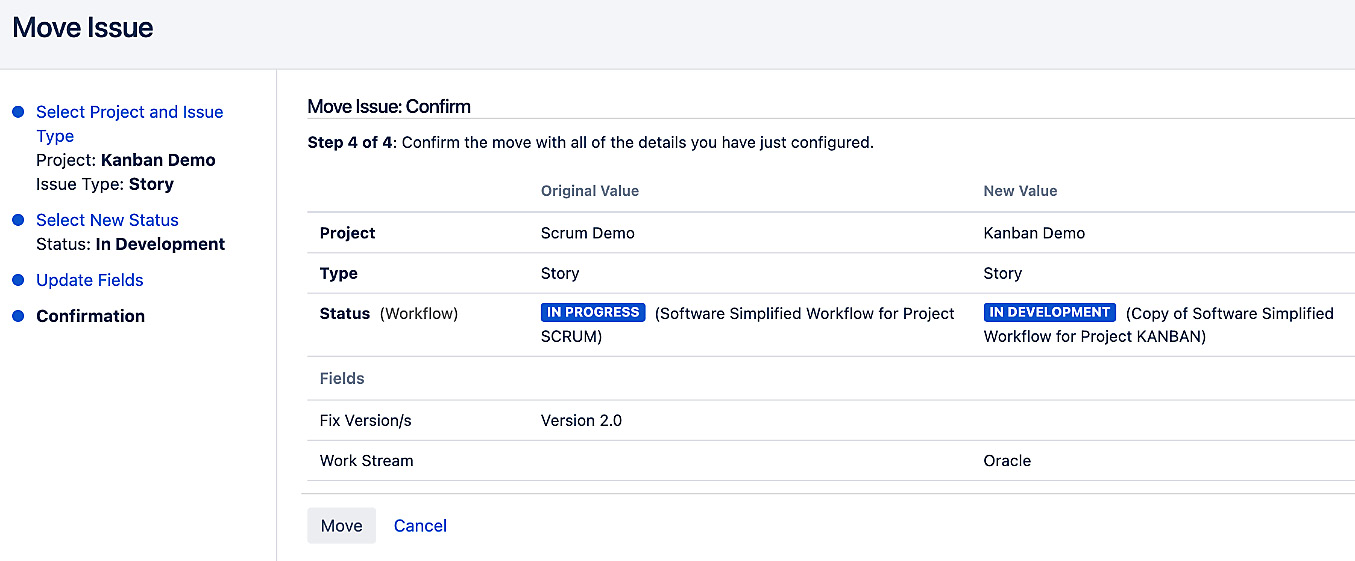
Figure 4.9 – Move Issue step 4
Once the issue has been moved, it will be given a new issue key based on the new project. If you access the issue with its old issue key, Jira will automatically redirect you.
Another useful use of the move issue feature is if you need to change the type of the issue. Sometimes the different issue types have very different configurations, such as workflows. In this case, Jira will not let you simply edit the Type field of an issue. What you need to do is use the move feature, but instead, you will select the same project as the target, and select the issue type you want to change to.
Sharing issues with other users
If you want to email an issue to other users in Jira, instead of having to manually copy and paste the issue’s URL in an email, you can use the built-in share feature in Jira. All you have to do is go to the issue you want to share and click on the share icon, as shown in the following screenshot, or press S on your keyboard. Then, select the users you want to share the issue with and click on the Share button, as shown in the following screenshot:
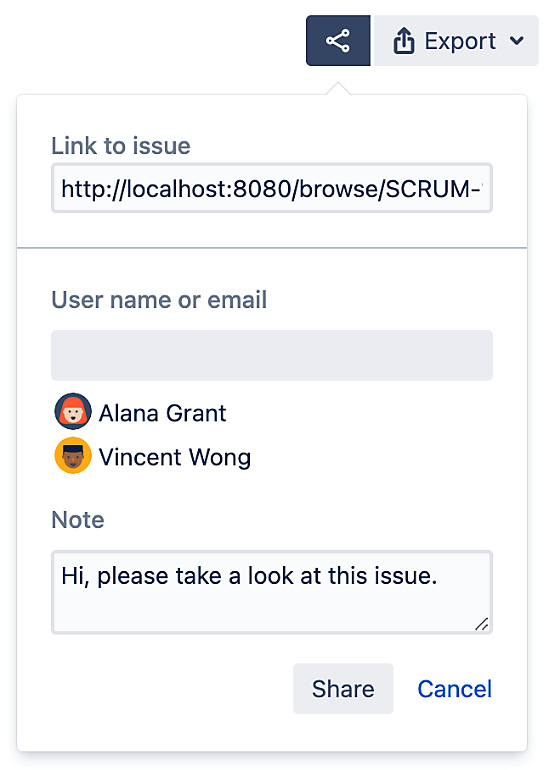
Figure 4.10 – Share issue
Note
If the user you are sharing the issue with does not have access to the issue, they will not be able to see the issue’s details.
Deleting an issue
You can delete issues from Jira. You might need to delete issues that have been created by mistake or if the issue is redundant, although normally, it is better to close and mark the issue as a duplicate. We will discuss closing an issue in Chapter 7, Workflow and Business Process.
Issue deletion is permanent in Jira. Unlike some other applications that may put deleted records in a trash bin that you can retrieve later, Jira completely deletes the issue from the system. The only way to retrieve the deleted issue is by restoring Jira from a previous backup.
Go through the following steps to delete an issue:
- Browse to the issue you wish to delete.
- Click on the Delete option from the More menu. This will bring up the Delete Issue dialog box, as shown in the following screenshot:

Figure 4.11 – Delete Issue
- Click on the Delete button to remove the issue permanently from Jira.
Note that deleting an issue permanently removes it from Jira, along with all its data, including attachments and comments.
Receiving notifications on an issue
Jira can send automated email notifications about updates regarding issues to users. Normally, notification emails will only be sent out to the issue’s reporter, assignee, and people who have added themselves as watchers of the issue. This behavior can be changed through notification schemes, which we will discuss in Chapter 8, Emails and Notifications.
By watching an issue, you will receive email notifications on activities, such as new comments and issue updates. Users watching the issue can also choose to stop watching and thus stop receiving email updates from Jira. You can also add other users as watchers by adding them to the watchers list.
To watch an issue, simply click on the Start watching this issue link. If you are already watching the issue, it will change to Stop watching this issue. If you click on the link again, you will stop watching the issue.
Important note
Jira will automatically add you as a watcher for issues that are created by you and issues you have commented on and updated.
Jira also shows you how many people are actively watching the issue by displaying the total watchers next to the watch icon. You can click on the number next to Watchers to see the full list of watchers, and add new users as watchers to the issue, as shown here:
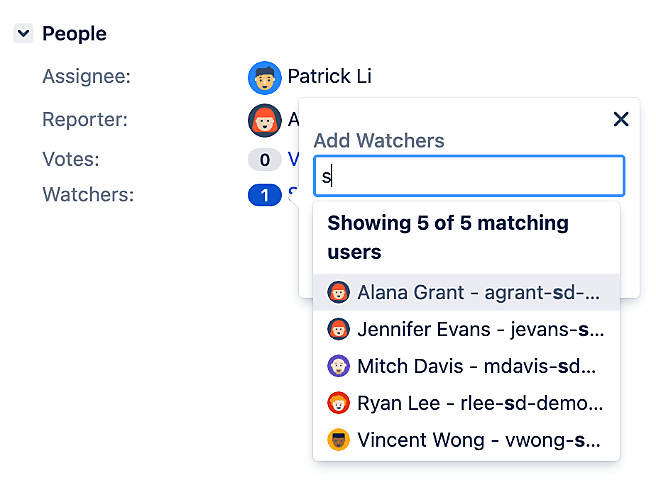
Figure 4.12 – Add Watchers
Casting a vote on an issue
The most straightforward way to express your interest in a Jira issue is to vote for it. For organizations or teams that manage their priorities based on popularity, voting is a great mechanism for collecting this information.
An example of this is how Atlassian uses Jira (https://jira.atlassian.com/browse/JRASERVER-9) as a way to let its customers choose and vote for the features they want to be implemented or bugs to be fixed by voting on issues based on their needs. This allows the product management and marketing team to have an insight into market needs and how to best evolve their offerings.
One thing to keep in mind when voting is that you can only vote once per issue. You can vote many times for many different issues, but for any given issue, you have only one vote. This helps prevent a single user from continuously voting on the same issue, which may skew the voting result. You can, however, unvote a vote you have already cast on an issue and vote for it again later; if you choose to do this, it will still only count as one vote.
To vote for an issue, simply click on the Vote for this issue link next to Votes. When you have voted for an issue, the icon will appear colored. When you have not yet voted for an issue, the icon will appear grayed out.
Note
Note that you cannot vote for issues that you have created.
Issue linking
Jira allows you to create custom hyperlinks for issues. This allows you to provide more information about the issue. There are two types of links you can create: linking to other issues in Jira or linking to any arbitrary resources on the web, such as a web page.
Linking issues with other issues
Issues are often related to other issues in some way. For example, issue A might be blocking issue B, or issue C might be a duplicate of issue D. You can add descriptions to the issue to convey this information, or delete one of the issues in the case of duplication, but with this approach, it is hard to keep track of all these relationships. Luckily, Jira provides an elegant solution for this with the standard issue link feature.
The standard issue link lets you link an issue with one or more other issues in the same Jira instance. This means that you can link two issues from different projects together (if you have access to both projects). Linking issues in this way is very simple; all you need to know is the target issues to link to. You can link issues by going through the following steps:
- Browse to the View Issue page for the issue you wish to create a link for.
- Select Link from the More menu. This will bring up the Link Issue dialog box.
- Select the Jira Issue option from the left panel.
- Select the type of issue linking from the This issue drop-down menu.
- Select the issues to link to. You can use the search facility to help you locate the issues you want.
- Click on the Link button, as shown in the following screenshot:
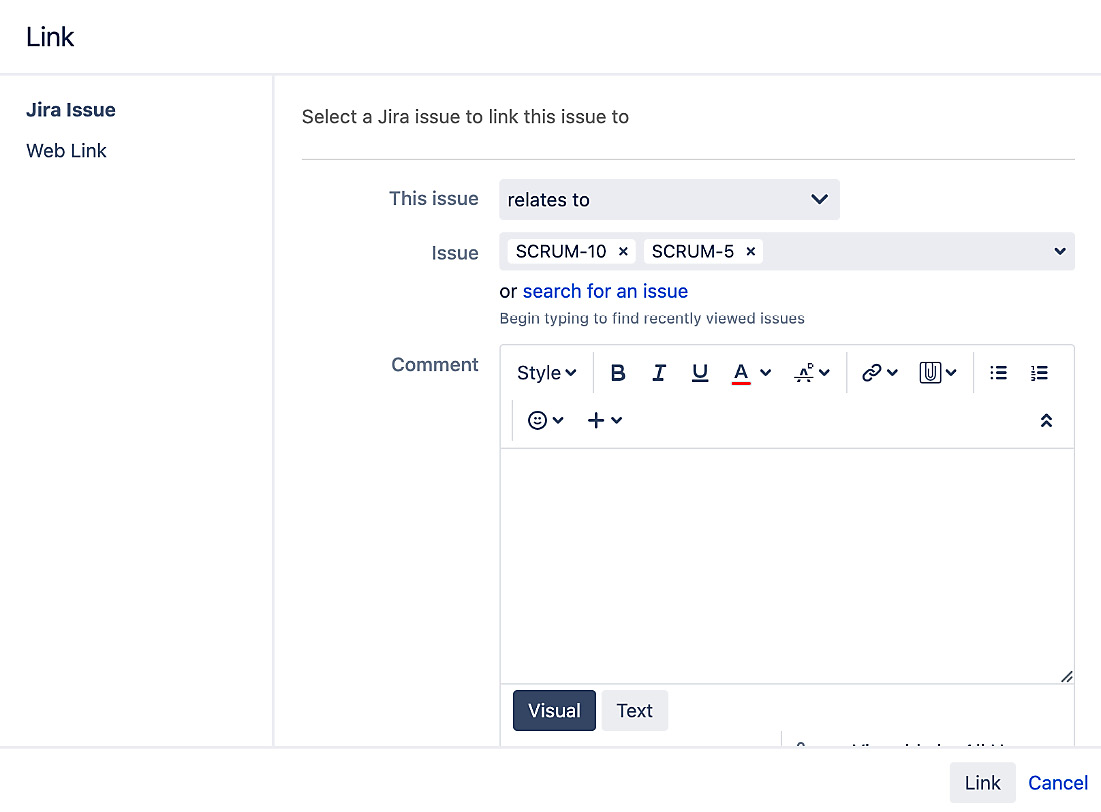
Figure 4.13 – Link issues
After you have linked your issues, they will be displayed in the Issue Links section on the View Issue page. Jira will display the target issue’s key, description, priority, and status.
Linking issues with remote contents
The standard Jira issue link allows you to link multiple issues to the same Jira instance. Jira also lets you link issues to resources, such as web pages on the internet.
Using remote issue links is quite similar to the standard issue link; the difference is that instead of selecting another issue, the URL address of the target resource is specified. You can set this up by going through the following steps:
- Open the Link Issue dialog box.
- Select the Web Link option from the left panel.
- Specify the URL address for the target resource. Jira will automatically try and find and then load the appropriate icon for the resource.
- Provide the name for the link in the Link Text field. The name you provide here will be what is shown for the link when viewing the issue.
- Click on the Link button, as shown in the following screenshot:
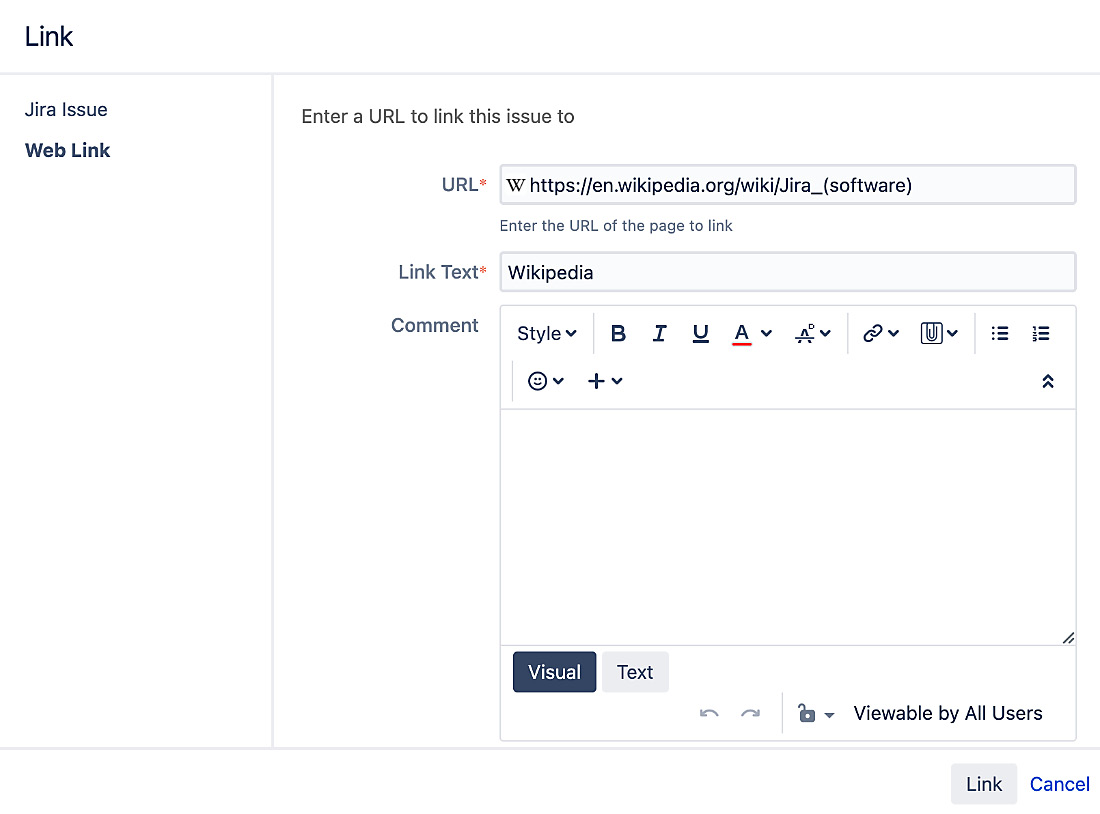
Figure 4.14 – Web Link
By using issue linking, Jira allows you to add more contextual information to issues. In fact, Atlassian uses this feature extensively when integrating Jira with their other products, such as linking an issue with a Confluence wiki page, and a Bamboo build plan.
Cloning an issue
When you need to create a new issue and you already have a baseline issue, Jira allows you to quickly create it with the data based on your existing issues by cloning the original one. Cloning an issue allows you to quickly create a new one, with most of its fields populated. For example, you might have two software products with the same bug. After creating a bug report in one project, you can simply clone it for the other project.
A cloned issue will have all the fields copied from the original issue; however, it is a separate entity. Further actions performed on either of the two issues will not affect the other.
When an issue is being cloned, a Clone link is automatically created between the two issues, establishing a relationship.
Cloning an issue in Jira is simple and straightforward. All you have to do is specify a new summary (or accept the default summary with the text CLONE at the front) for the cloned issue by going through the following steps:
- Browse to the issue you wish to clone.
- Select Clone from the More menu.
- Enter a new summary for the newly cloned issue.
- Check the Clone sub-tasks checkbox if you also want to copy over all the sub-tasks.
- Check the Clone attachments checkbox if you want to copy over all the attachments.
- Click on the Clone button.
Once the issue has been successfully cloned, you will be taken to the issue summary page for the newly cloned issue.
Tracking time
Since issues often represent a single unit of work that can be worked on, it is logical for users to log the time they have spent working on it. You can specify the estimated effort that is required to complete an issue, and Jira will be able to help you track its progress.
Jira displays the time tracking information of an issue in the Time Tracking panel on the right-hand side, as shown in the following screenshot:

Figure 4.15 – Time Tracking
The Time Tracking panel includes the following information:
- Estimated: This represents the original estimated effort that’s required to complete the issue, for example, the estimated time required to fix a bug by a developer.
- Remaining: This represents the remaining time for the issue to be completed. It is calculated automatically by Jira based on the original estimate and total time logged by users. However, the user logging work on the issue, as described in the following section, can also override this value.
- Logged: This represents the total time spent on the issue so far.
Specifying original estimates
Original estimates represent the anticipated time required to complete the work that’s represented by the issue. It is shown as a blue bar under the Time Tracking section.
For you to specify an original estimate value, you need to make sure that the Time Tracking field is added to the issue’s create and/or edit screen. We will discuss fields and screens in Chapter 5, Field Management, and Chapter 6, Screen Management, respectively.
To specify an original estimate value, provide a value for the Original Estimate field when you are creating or editing an issue.
Logging work
Logging work in Jira allows you to specify the amount of time (work) you have spent working on an issue. You can log work against any of the issues, provided you have permission to do so. We will cover permissions in Chapter 10, Searching, Reporting, and Analysis. Go through the following steps to log work against an issue:
- Browse to the issue you wish to log work against.
- Select Log Work from the More menu.
- Enter the amount of time you wish to log. Use w, d, h, and m to specify the week, day, hour, and minute, respectively.
- Select the date you wish to log your work against.
- Optionally, select how the remaining estimate should be adjusted.
- Add a description of the work you have done.
- Optionally, select who can view the work log entry.
- Click on the Log button.
When you log work on an issue, you have the option to choose how the remaining estimate value will be affected. By default, this value will be automatically calculated by subtracting the amount that has been logged from the original estimate. You can, however, choose from other options that are available, such as setting the remaining estimate to a specific value or reducing it by an amount that is different from the amount of work being logged.
Tip
You can also click on the + sign in the Time Tracking section to log time.
Issues and comments
Jira lets users create comments on issues. As we have already seen in the previous section, you will be able to create comments when assigning an issue to a different user. This is a very useful feature that allows multiple users to collaborate so that they can work on the same issue and share information. For example, the support staff (issue assignee) may request more clarification from the business user (issue reporter) by adding a comment to the issue. When combined with Jira’s built-in notification system, automatic email notifications will be sent to the issue’s reporter, assignee, and any of the other users watching the issue. Notifications will be covered in Chapter 8, Emails and Notifications.
By default, all logged-in users will be able to add comments to issues they can access. Go through the following steps to add a comment to an issue:
- Browse to the issue you wish to add a comment to.
- Click on the Comment button or press M on your keyboard.
- Type a comment into the textbox. You can preview and set restrictions on who can view your comment.
- Click on the Add button to add the comment, as shown in the following screenshot:

Figure 4.16 – Add comment
Once a comment has been added, the comment will be visible in the Comments tab in the Activity section at the bottom. When you are creating comments, you can select who can view your comment using the comment access control. This is very useful if you have external users viewing the issue and you only want to share your comments with internal users.
Attachments
As we have seen so far, Jira uses fields such as Summary and Description to capture data. This works for most cases, but when you have complex data such as application log files or screenshots, this becomes insufficient. This is where attachments come in. Jira allows you to attach files from your local computer or a screenshot you have taken.
Attaching files
The easiest way to attach a file to a Jira issue is via the drag and drop action. You can do this by going through the following steps:
- Browse to the issue you wish to attach a file to.
- Drag and drop the files you want to attach to the browser. You will see an outline indicating where you can drop the file to attach it to the issue, as shown in the following screenshot:

Figure 4.17 – Add attachment
Drag and drop is the easiest way to attach files, but if, for some reason, drag and drop does not work, you can also manually select the file and attach it by going through the following steps:
- Browse to the issue you wish to attach a file to.
- Select the Attach files option from the More menu.
- Select and attach the files you want to attach from the file browser.
Depending on the file’s type, certain files, such as images and PDFs, can be viewed directly from Jira’s UI without having to download them.
Issue types and sub-tasks
As we saw earlier, issues in Jira can represent many things, ranging from software development tasks to project management milestones. Issue types are what differentiate one type of issue from another.
Each issue has a type (hence the name issue type), which is represented by the Issue type field. This lets you know what type of issue it is and helps you determine many other details, such as which fields will be displayed for this issue.
The out-of-the-box issue types are great for software development projects, but they do not necessarily meet the needs of others. Since it is impossible to create a system that can address everyone’s needs, Jira lets you create your own issue types and assigns them to projects. For example, for a help desk project, you might want to create a custom issue type called ticket. You can create this custom issue type and assign it to the Help Desk project and users will be able to log tickets, instead of bugs, in the system.
Issue types are managed through the Manage Issue Types administration page. Perform the following steps to access this page:
- Log in to Jira as a Jira administrator.
- Browse to the Jira administration console.
- Select the Issues tab and then the Issue types option. This will take you to the Issue types page.

Figure 4.18 – Issue types
The preceding screenshot shows a list of issue types that represent different things an issue can be, including Bug and Epic in software development, and Incident and Change for IT services. So let’s take a look at how to create our own issue types next.
Creating issue types
There are many use cases for creating your own issue types. The most common use case is when you want your issues to represent something other than the out-of-the-box issue types. Another common use case is to apply different configurations for the issues in a given project. Since most configuration schemes in Jira are based on project and issue types, if you want certain issues in a project to have a different set of fields, you can create a new issue type and apply the configuration scheme to that issue type only. To create a new issue type, take these steps:
- Browse to the Issue Types page.
- Click on the Add Issue Type button.
- Enter the name and description for the new issue type.
- Select whether the new issue type will be a standard issue type or a sub-task issue type.
- Click on Add to create the new issue type.
Once the new issue type has been created, it will be assigned a default icon. If you want to change the icon, you will need to click on the Edit link for the issue type and then select a new image as its icon.
Deleting issue types
When deleting an issue type, you must keep in mind that the issue type might already be in use, meaning that issues have already been created with that issue type. So, when you delete an issue type, you will need to select a new one for those issues. The good news is that Jira takes care of this for you. As we can see in the following screenshot, when we delete the Bug issue type, Jira informs us of the existing 10 issues that are of the Bug type. You will need to assign them to a new issue type, such as Defect:

Figure 4.19 – Delete Issue Type
Using sub-tasks
Jira allows only one person (assignee) to work on one issue at a time. This design ensures that an issue is a single unit of work that can be tracked against one person. However, in the real world, we often find ourselves in situations where we need to have multiple people working on the same issue. This may be caused by a poor breakdown of tasks or simply because of the nature of the task at hand. Whatever the reason, Jira provides a mechanism to address this problem through sub-tasks.
As we have seen earlier when discussing issue types, a sub-task is simply another issue type. The only difference is that a sub-task must always have a parent issue.
For every issue, you can have one or more sub-tasks that can be assigned and tracked separately from each other. Sub-tasks cannot have other sub-tasks. Jira only allows one level of sub-task.
Since sub-tasks belong to an issue, you need to browse to the issue first before you can create a new sub-task by going through the following steps:
- Browse to the issue you wish to create sub-tasks for.
- Select Create sub-task from the More menu.
You will see a familiar Create Issue dialog box; however, one thing you will notice is that, unlike when you are creating an issue, you do not select which project to create the sub-task in. This is because Jira can determine the project’s value based on the parent issue. You will also notice that you can only select issue types that are sub-tasks.
Other than these differences, creating a sub-task is no different than creating a normal issue. You can customize the fields that are shown in the dialog box and choose to rapidly create multiple sub-tasks by selecting the Create another option.
Once the sub-task has been created, it will be added to the Sub-Tasks section of the parent issue. You will see all the sub-tasks that belong to the issue and their status. If a sub-task has been completed, it will have a green check mark next to it, as shown in the following screenshot:

Figure 4.20 – Sub-Tasks
Now we have seen how you can manage issue types, we will look at how you can use issue type schemes to group issue types together so they can be applied to a project next.
Issue type schemes
Issue type schemes are templates or collections of issue types that can be applied to projects. As we can see in the following screenshot, Jira comes with a default issue type scheme, which is applied to all projects that do not have specific issue type schemes applied. When you create a new project, a new issue type scheme is created for you based on the project template you have selected. The new scheme will also have issue types pre-populated based on the template. As we can see in the following screenshot, we have several issue type schemes, and Jira will list the projects that are using them:

Figure 4.21 – Issue type schemes
As we will see in later chapters, most configurations in Jira are managed through schemes, such as issue type schemes, field configuration schemes, and workflow schemes. The main advantage of using a scheme is schemes are reused components. In the case of issue type schemes, you can apply the same issue type scheme to one or more projects, and they will all have the same set of issue types. This greatly reduces the administrative and maintenance burden of the Jira administrator by reusing schemes and allows you to establish standards for your configurations. When you create your own issue types, to make them available, you need to add them to the issue type scheme that’s used by your project.
Adding issue types to an issue type scheme
Go through the following steps to create a new issue type scheme:
- Browse to the administration console.
- Select the Issues tab and then the Issue type schemes option. This will bring you to the Issue type schemes page.
- Click on the Edit link for the issue type scheme you want to add issue types to.
- Drag the issue types that you want to be part of the scheme from the Available Issue Types list and drop them into the Issue Types for Current Scheme list.

Figure 4.22 – Configure issue type scheme
- Select a Default Issue Type value. Note that this is optional, and you can only select a default issue type after you have selected at least one issue type for the new scheme.
- Click on the Save button.
Once you have created and configured your issue type scheme, you can associate it to one or more projects by clicking on the Associate button, and selecting the projects to apply the scheme to.
Issue priorities
Priorities help users set the importance of issues. Users can first assign priority values to issues and later use them to sort the list of issues they have to work on, thereby helping the team decide which issues to focus on first. Jira comes with five levels of priorities out of the box, as shown in the following screenshot:

Figure 4.23 – Priorities
You can customize this list by creating your own priorities. To create new priorities, follow these steps:
- Browse to the administration console.
- Select the Issues tab and then the Priorities option.
- Enter a name and description for the new priority.
- Click on the Select Image link to choose an icon for the priority.
- Specify a color for the priority. You can either type in the HTML color hex code directly or use the color picker to help you select the color you want. The color that’s chosen here will be used when icon images cannot be displayed, such as when you export issues to a spreadsheet.
- Click on the Add button.
Creating a priority scheme
Priority schemes work in a similar way to the issue type scheme feature we looked at earlier. You can create a scheme so that it contains only the issue priorities you need and then apply the scheme to a project. This way, each project can have its own set of priority options. To create and apply a new priority scheme, follow these steps:
- Browse to the administration console.
- Select the Issues tab and then the Priority schemes option.
- Click on the Add priority scheme button.
- Enter a name for the new priority scheme.
- Drag the priorities that you want to be part of the scheme from the Available priorities list and drop them into the Selected priorities list.
- Select a Default priority value. Note that this is optional, and you can only select a default priority after you have selected at least one priority for the new scheme.
- Click on the Add button, as shown in the following screenshot:
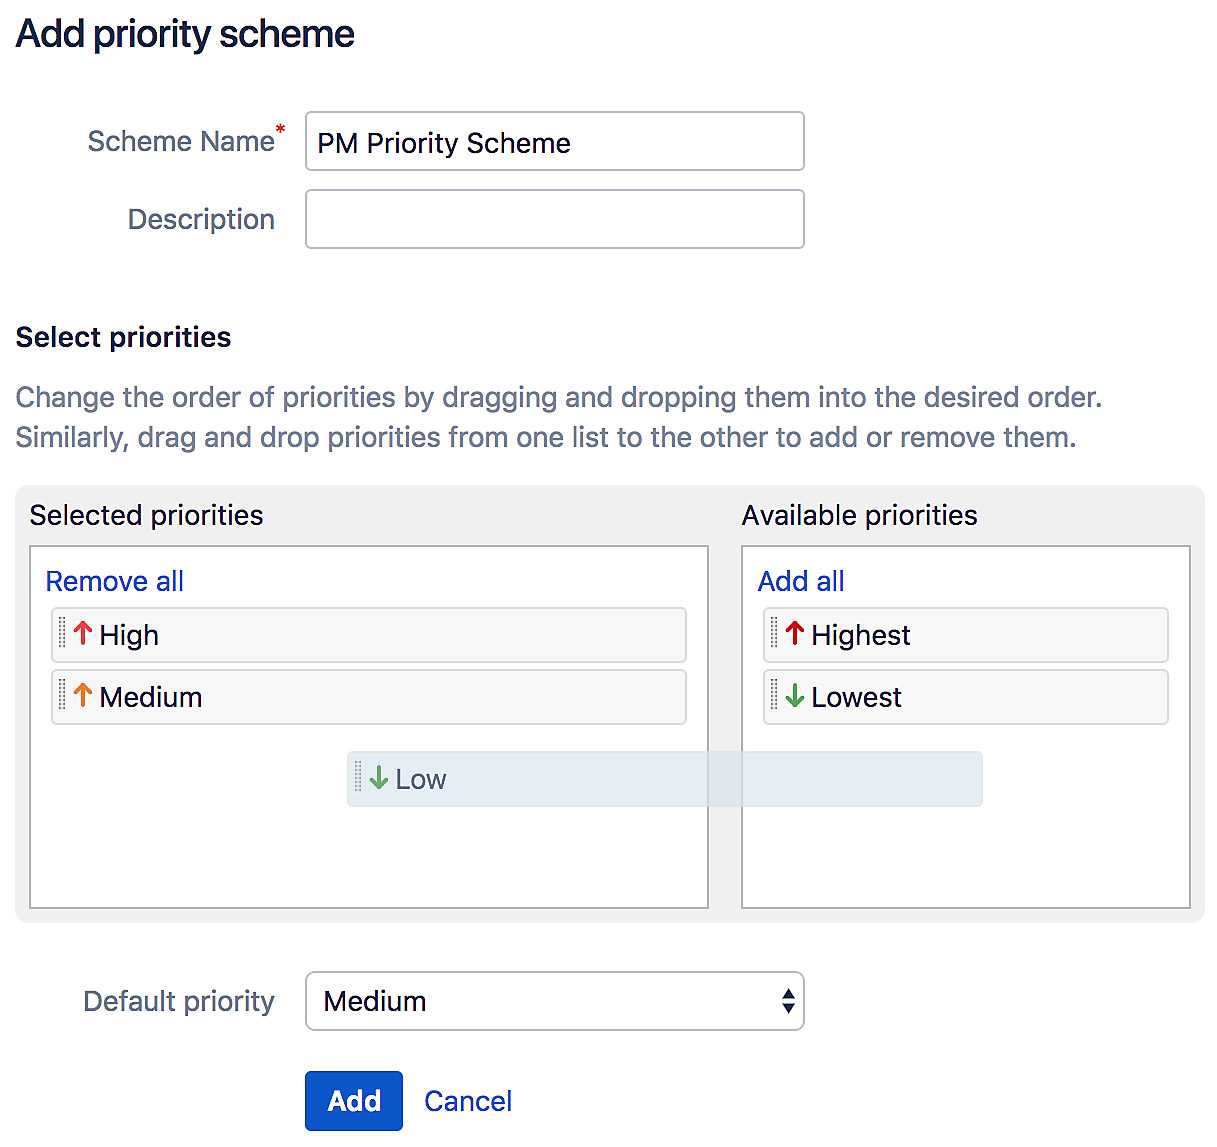
Figure 4.24 – Configure priority scheme
Once you have created the new priority scheme, you can click its Associate link to apply the scheme to one or more projects.
The HR project
In this exercise, we will continue our setup for the project we created in the previous chapter. We will add the following configurations to our project:
- A set of new issue types that are specific to our HR project
- Add our new issue types to the issue type scheme to make them available
Adding new issue types
Since our project is for the human resources team, we need to create a few custom issue types to augment the default ones that come with Jira. For this exercise, we will create two new issue types, New Employee and Termination.
The first step, that is, setting up an issue type association, is to create the two issue types that we need, New Employee and Termination:
- Browse to the Issue Types page.
- Click on the Add Issue Type button.
- Type New Employee in the Name field.
- Click on the Add button to create the new issue type.
You should now see the new issue type in the table. Now, let’s add the Termination issue type:
- Click on the Add Issue Type button again.
- Type Termination in the Name field.
- Click on Add to create the new issue type.
You should see both the New Employee and Termination issue types. However, this will only make our new issue types available—it will not make them the only options when creating a new issue for our project. As you may recall from the previous sections, we need to add the new issue types to the issue type scheme that’s used by our project.
Updating the issue type scheme
We want to limit the issue types to only New Employee, Termination, and the generic Task for our HR project, but we do not want to affect the other projects that still need to have Bug and other default issue types. Therefore, we need to create a new issue type scheme specifically for our project. We can do this by going through the following steps:
- Browse to the Issue Type Schemes page.
- Click on the edit link for our issue type scheme. The default one that’s created by Jira should be called HR: Task Management Issue Type Scheme.
- Drag the New Employee and Termination issue types from the Available Issue Types panel to the Issue Types for Current Scheme panel.
- Click on the Save button.
Putting it all together
With everything created and set up, you can go back and create a new issue to see how it all looks. If everything works out, you should see something like the following screenshot:

Figure 4.25 – Sample project
As you can see, for the HR project, we now have three issue types available from our issue type scheme: Task, New Employee, and Termination.
Summary
In this chapter, we looked at what issues are in Jira and explored the basic operations of creating, editing, and deleting issues. We also looked at the advanced operations offered by Jira to enhance how you can manipulate and use issues, such as adding attachments, creating sub-tasks, and linking multiple issues. We then looked at how we can create our own issue types and apply them to projects so the issues we create will better represent the type of tasks we have.
In the next chapter, we will look at fields and how we can create our own custom fields to capture additional information from users.