Chapter 4
A Wearable News Alert Light Show

You know how to make a single LED blink. By using several GPIO pins, you could make a few LEDs blink together. But how about a ring of twelve multicolored LEDs, or a string of thirty, all changing colors at once? That makes for a much prettier light display—especially when you can pin it on your jacket or wear it as a belt, which is no problem with a computer as small and power efficient as the Pi Zero W.
This chapter will introduce a couple of kinds of addressable colored LEDs and show how to wire, power, and program them. You’ll be able to monitor your Twitter feed and change the pattern of the lights according to what’s happening on Twitter. Or, if you don’t use Twitter, you can scrape any website you follow and display it as a light show.

Figure 4-1: A NeoPixel Jewel showing off its colors
Hardware Requirements
Here’s a list of what you need for this chapter:
- An addressable RGB light string. There are two types: the WS2812B or the SK6812, sold under the name “NeoPixel,” and a newer type, the APA102C, sold by Adafruit under the name “DotStar.” DotStars are a little more expensive and aren’t available in as many shapes, but they’re easier to use and capable of more lighting effects.
- A power supply for the lights, with a jack to match its plug. You can get a plug-in “wall wart,” a battery if you want to make it wearable, or both. See “Power Supplies” in a moment, or check out the section “Making It Portable: Batteries” at the end of this chapter if you want battery details.
- A 3.3- to 5-volt active level shifter chip such as a 74AHCT125 or a 74AHCT245. You can get by without a level shifter, but if you’re ordering parts and paying for shipping anyway, spend the extra buck and a half and buy one. See the section “Logic Level Shifters” later in this chapter for more information.
- Soldering equipment. Most light strings come without wires attached, so you’ll have to solder on some wires.
Recommended:
- A multimeter (a cheap one is fine)
- A large capacitor (1000 µF, 6.3V or higher)
Since it’s important for all the hardware to work together, let’s talk in more detail about some of it so you know that you’re ordering the right parts.
Power Supplies
Light strings take a lot of power—more than they can draw from the Pi. A Raspberry Pi’s GPIO pins are rated for 16 milliamps per pin, or 50 mA across the whole GPIO header. A single NeoPixel or DotStar (just one pixel, not a string of them) draws 60 mA at full brightness. You could fry your Pi’s GPIO if you tried to power multiple pixels that way.
You could tap into the 5-volt power supply you’re using to power your Pi if it’s a 2-amp or better supply and if you’re not powering more than about 15 lights. But tapping into a USB cable is a pain; it’s easier to use a separate supply, at least while you’re testing. I like the cheap adjustable “wall warts.”

Figure 4-2: Adjustable “wall wart” power supply, along with a matching jack with bare wire leads to plug into a breadboard
They typically come with a selection of plugs, and you can either turn a dial or change plugs to get different voltages and polarities. You’ll also need a jack that matches one of the plugs on the wall wart and can connect to your breadboard (bare wires) or directly to your light string.
Both NeoPixels and DotStars are nominally powered at 5 volts, though less is fine. Don’t exceed 5 volts: they’re reportedly very sensitive to over-voltage and you might damage your light string. If you can set your power supply to around 4.5 volts, that’s perfect, but anything from 3.5 to 5 should work as long as it provides enough current to power your light string (60 mA times the number of lights). Use a voltmeter to make sure the power supply is producing what it claims—though the voltage may drop quite a bit once you add a load like a light string. A voltmeter can also ensure you don’t have power and ground reversed.
Also, if you want to very safe about your light strings, connect a large capacitor (1000 µF, 6.3V or higher) between the power and ground terminals to protect against any voltage spikes your power supply might generate.
I’ll address batteries and battery plugs at the end of this chapter.
DotStars
APA102C light strings, also called DotStars, use a protocol called “two-wire SPI” to let your Raspberry Pi set color and brightness for every LED in the string. SPI stands for Serial Peripheral Interface bus; two-wire means, in this case, that you have one wire for data and a second wire for a “clock” signal to tell the light string when new data is available. That’s a good thing: it’s easy to drive the light string from a Raspberry Pi, much easier than with the older one-wire NeoPixel strings.
Of course, all electronic devices also have a power and ground wire as well. Connect the ground wire to the ground on your Pi, but remember, don’t power the light string from the Pi’s GPIO pins. Use a separate 3- to 5-volt power supply for the DotStar’s power line.
DotStar strings have a direction: you need to attach your signal wires at the input end of the string, not the output end. If you look closely, the string probably has arrows indicating direction, from input to output. There may already be wires attached at one end or the other, but don’t be fooled—some strings come with wires attached at the wrong end, in which case you should ignore them and solder your own wires to the input end. (If your string comes with wires at the output end, you can keep them in case you want to add a second DotStar string, or you can just cut them off.)
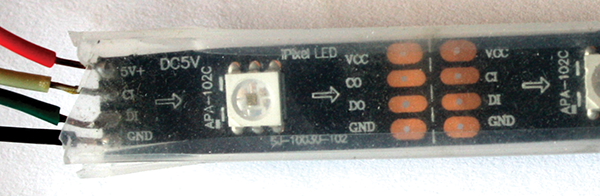
Figure 4-3: The arrows show the direction of the DotStar string.
If you’re powering your DotStar at 3 to 4 volts, there’s an easy way to wire it (Figure 4-4): connect your power supply’s positive wire to the light string’s +5V connection. Connect both grounds, from the Pi and the light string, to ground on your power supply.
Then connect Data Input (it might be labeled DI) to GPIO 10. If you’re using a GPIO breadboard extension, GPIO 10 might be labeled MOSI, for “Master Out, Slave In.” Your Pi is the master, and it’s sending data out through MOSI to the slave, the light string. Connect the clock input wire (CI) to GPIO 11, also called SCLK. This wiring should work as long as the DotStar’s input voltage is similar to the Pi’s 3.3 volts. It might not work at 5 volts.
To test it, you’ll need to download some software. Using a prewritten library is easiest so you don’t have to handle all the details of SPI. In this case, the best supported library is provided by Adafruit. It’s hosted on GitHub, and you can use git to download it. Bring up a terminal on your Pi.
If you’re running headless, you may not have git yet. Type this command to be sure:
sudo apt-get install git
Figure 4-4: The simplest wiring for a DotStar string
Then download and install the DotStar library, with three more commands:
git clone https://github.com/adafruit/Adafruit_DotStar_Pi.git
cd Adafruit_DotStar_Pi
sudo python setup.py install
Time to test it! Edit the file strandtest.py with nano, Leafpad, or whatever text editor you prefer. Look near the beginning of the file for the line where numpixels is set.

Figure 4-5: Edit strandtest.py and look for numpixels.
Change numpixels to the number of pixels in your string. A few lines down from that, look for the line that says
strip = Adafruit_DotStar(numpixels, datapin, clockpin)(the first strip = line, the one that’s not commented out), and change it to
strip = Adafruit_DotStar(numpixels, 12000000)That’s 12 followed by six zeros. Save the file, then run
sudo python strandtest.pyWith any luck, you’ll see beautiful bars of color pulsing down your strip.

Figure 4-6: DotStar, wired up and running. The chip on the breadboard is a 74LVC245 level shifter.
If the LEDs don’t light up, especially if you’re powering the light strip at close to 5 volts, you may need a level shifter.
Logic Level Shifters
The Raspberry Pi’s GPIO signals are only 3.3 volts. Since the DotStar expects 5V, sometimes the Pi’s signals may not be strong enough, and you might need to boost them.
A logic level shifter can take input at 3.3 volts and convert it to 5. You can buy passive level shifters, sold under names like “Bi-Directional Level Shifter,” but unfortunately those boards aren’t fast enough to handle this job. You need an active level shifter. These chips have a lot of confusing names, but the names often include terms like “line driver” or “bus transceiver,” sometimes with “3-state” or “tri-state” thrown in. The two most popular level shifting chips known to work with addressable LED strings are the 74LVC245 and the 74AHCT125. Figures 4-7 and 4-8 show wiring diagrams.

Figure 4-7: Wiring a DotStar string with the 74LVC245 Octal Bus Transceiver with 3-State Outputs
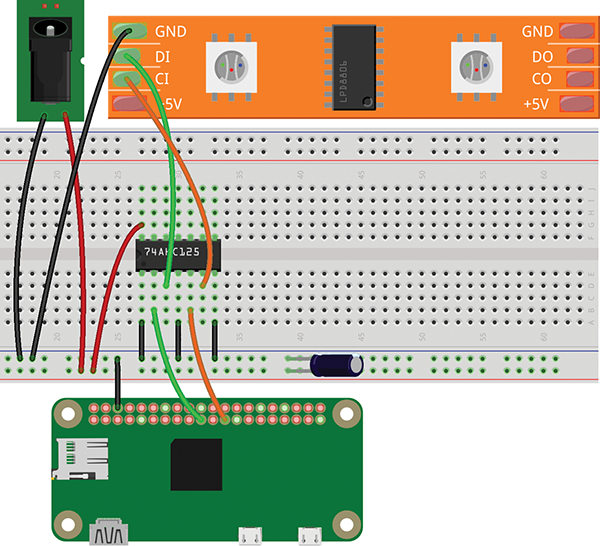
Figure 4-8: Wiring a DotStar string with the 74AHCT125 Quad Buffer/Line Driver, 3-State
Once the wiring is ready, run sudo python strandtest.py again. If low signal voltage was the problem, a level shifter will get your DotStars glowing. If not, recheck your wiring.
NeoPixels
WS2812B or SK6812 light strings, sold by Adafruit under the name NeoPixels, have been around for years. They’re less expensive than DotStars, and you can get them in all sorts of configurations: strings, jewels, circles, sticks, matrices, and individual pixels.
Unfortunately, they’re a lot trickier to use with a Pi. Why? They need precise timing. They only have a data line, whereas DotStars have a data line and a clock line. Since there’s no clock, the controller expects to get its data in a prompt, orderly fashion. That’s easy with a microcontroller like an Arduino, but it’s more difficult from a computer running Linux. A real operating system might be busy with other things just at the time when a signal needs to be sent to the light controller.
NeoPixels are also a little pickier than DotStars about input voltage. They have the same overvoltage problems as DotStars (try not to exceed 5 volts), but unlike DotStars, if you go too low, below 4 volts, you may see strange behavior.
The Simplest Hookup
As with DotStars, there’s a simple hookup that might work if you’re running around 4 volts to your light string. First, run power and ground from your power source to the light string. You’ll also need a connection from the power source’s ground to one of the Pi’s ground pins.
For signaling, run a wire from the light string’s Data In to GPIO 18 (pin 12). You’ll be using PWM to talk to the light string, and PWM is only available on a few Raspberry Pi pins, including GPIO 18.

Figure 4-9: The simplest NeoPixel hookup. It may not work, depending on your voltage source.
The Software
For a long time, there was no way of driving NeoPixels directly from a Raspberry Pi. Then along came a library called rpi_ws281x. It even comes with Python bindings.
The library is written in the C language and uses a build system called scons, so you’ll need to install some prerequisites to build it:
sudo apt-get install build-essential python-dev git scons swigOnce those are installed, build and install the library. At the prompt, type the following five commands:
git clone https://github.com/jgarff/rpi_ws281x.git
cd rpi_ws281x
scons
cd python
sudo python setup.py install
All that installation and building takes a little while, but once it’s ready, you can change into the examples directory, where the Python example scripts are (in Linux, cd stands for “change directory”):
cd examples
ls
You should see the following:
SK6812_lowlevel.py    SK6812_white_test.py  multistrandtest.py  strandtest.py
SK6812_strandtest.py  lowlevel.py           neopixelclock.py
These are all example programs you can run. Start by editing strandtest.py in nano, Leafpad, or whatever text editor you prefer.

Figure 4-10: Editing strandtest.py
Change LED_COUNT to the number of LEDs you have in your string. Notice that LED_PIN is also set; if you want to fiddle with different pins later, you can do so here (but stick with 18 for now).
Save the file. Then, back in the shell, type
sudo python strandtest.py(you have to use sudo because PWM, like SPI, requires root permission) and cross your fingers. If all goes well, you’ll see a beautiful light show.
Troubleshooting
What if you don’t see anything, or you see a few lights turn on but no light show? There are several things that could go wrong. These light strings are finicky.
Check your voltage level with a voltmeter and make sure it’s around 4.5–5 volts and the right polarity (you don’t have V+ and ground mixed up).
If voltage is good, it’s possible the Pi’s audio hardware is interfering—it uses some of the same PWM resources the light string needs. You can disable it. First, create a file named /etc/modprobe.d/snd-blacklist.conf. You’ll need sudo permission to edit that file. Try this:
sudo leafpad /etc/modprobe.d/snd-blacklist.conf(or nano instead of leafpad if you’re running headless). Add this line:
blacklist snd_bcc28i035Then reboot.
For more information on this and other things that can go wrong, see the GitHub page for the library: https://github.com/jgarff/rpi_ws281x.
The next likely culprit is logic levels—that pesky requirement that the WS2812B wants 5 volts and the Pi only provides 3.3.
To get around that, you might need a logic level shifter. For background on them, see “Logic Level Shifters” earlier.
Figures 4-11 and 4-12 show wiring diagrams for NeoPixels with the two most popular level-shifting chips.
With any luck, if your light string wasn’t working before, a level shifter will get you going.

Figure 4-11: Wiring a NeoPixel light string with the 74LVC245 Octal Bus Transceiver with 3-State Outputs
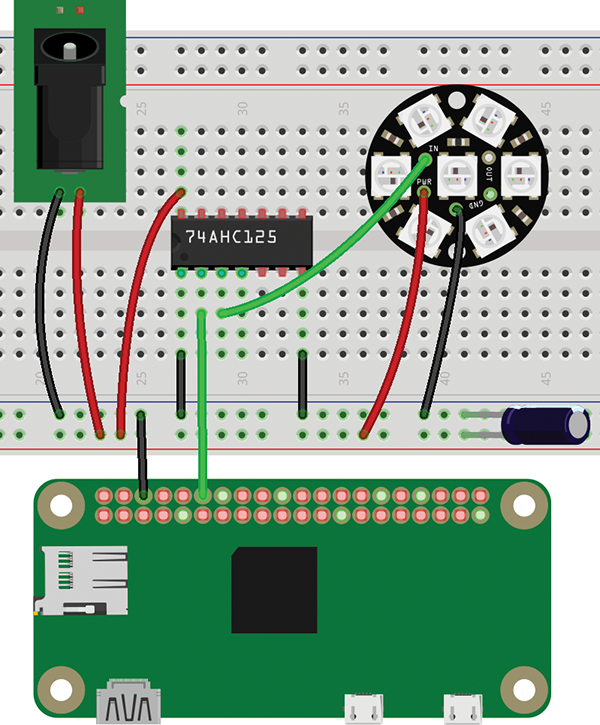
Figure 4-12: Wiring a NeoPixel light string with the 74AHCT125 Quad Buffer/Line Driver, 3-state
One last comment about NeoPixels. It’s theoretically possible to drive them using one-wire SPI, similar to the two-wire SPI the DotStars use, rather than PWM. For SPI, use the Pi’s GPIO 10, labeled “MOSI,” rather than GPIO 18, and change the pin specified in strandtest.py. On the face of it, SPI sounds like it ought to be a more reliable method, but in practice, I’ve had no luck using SPI with NeoPixels. Feel free to try it, and drop me a line if you get it to work.
Searching for Twitter Keywords
I know that it’s tempting just to run strandtest.py forever. Ooh, shiny! But why not make the LEDs show something useful instead?
How about monitoring keywords on your Twitter stream so you can see trends visually with changing colors? (If you skipped the Twitter discussion in Chapter 3, “A Temperature Notifier and Fan Control,” don’t despair; skim this section, then skip ahead to “Web Scraping in Python” for a non-Twitter option.)
If you’re still in the NeoPixel or DotStar library after running strandtest.py, get out of it: cd with no other arguments will get you back to your home directory. Create a file called twit.py that includes your Twitter code (import twitter and the init_twitter() function) from Chapter 3.
In Python-Twitter, GetHomeTimeline() will get your timeline—the list of recent tweets from everyone you follow. You can make a loop that checks your timeline every couple of minutes and prints any new tweet you haven’t seen before. To try that, add this section to twit.py:
import time

if __name__ == '__main__':
    twitapi = init_twitter()

    tweets_seen = set()    # The set of tweets already seen

    while True:
        timeline = twitapi.GetHomeTimeline()
        print("
==========================")
        for tweet in timeline:
            if tweet.id in tweets_seen:
                continue

            print("
=== %s (%s) ===" % (tweet.user.screen_name,
                                         tweet.user.name))
            print(tweet.text)
            print("    %s" % tweet.created_at)
            tweets_seen.add(tweet.id)
        time.sleep(120)    # Wait two minutes
GetHomeTimeline() returns a list, and each tweet in the list is a twitter.Status object. The online documentation for Python-Twitter isn’t very complete, but the library has built-in help you can get in the Python console or in IDLE:
>>> import twitter
>>> help(twitter.Api.GetHomeTimeline)
If you try that, it will tell you that GetHomeTimeline returns a sequence of twitter.Status instances, one for each message. Then you can find out what a Status includes:
>>> help(twitter.Status)The important part of a twitter.Status is .text: that’s the content of the tweet, so you can print tweet.text, and tweet.text is where you should look for keywords.
In the listing, tweets_seen is a set of all the tweets you’ve already seen, so you can check whether you’ve seen each tweet before and print it only the first time.
String Searches and Python Dictionaries
Once you have the text of a tweet, Python makes string searches super easy. For example, if you want to know whether a Twitter status includes “raspberry pi,” you can use this:
    if "raspberry pi" in tweet.text.lower():
        print "Another Raspberry Pi tweet!"
The .lower() function converts the status text to all lowercase, so you can search for “raspberry pi” without needing to worry whether it might be “Raspberry Pi” or “RASPBERRY PI.”
Pick a few topics you want to match and keywords that tell you somebody’s tweeting about each topic. For instance, I follow a lot of science and tech people. I also follow people who tweet about nature and the outdoors. How many tweets are related to Raspberry Pi or open source, compared to the ones about nature? You could set up a Python dictionary like this:
topicwords = {
    'tech':   [ 'raspberry pi', 'linux', 'maker', 'open source'],
    'nature': [ 'bike', 'hike', 'bird', 'bear', 'trail' ]
    }
A Python dictionary lets you index by keywords. topicwords is the dictionary. topicwords['tech'] gets you the list of techie words. topicwords['tech'][2] gets you the third word in that list, or maker[2] (2 gives you the third word in the list, and not the second, because Python, like most computer languages, starts lists with 0).
You could use any categories, such as emotion words like “happy,” “smile,” “rofl,” “sad,” or “angry”; sports terms; terms related to politics; and so forth, depending on what you see in your Twitter stream. Adjust the list for your own preferences and experiment. You can use a lot more keywords than this example, though I recommend sticking to only two or three topics initially. Note that all the terms are lowercase, even those that are usually capitalized, like “ROFL”; that’s because we’re converting everything to lowercase before comparing the strings.
Now you can get your home timeline. Look through all the Status.texts and see if any of the keywords are there. To do that, loop over the statuses; then for each status, loop over the topics (tech and nature); then for each topic, loop over the keywords in that topic and see if that keyword is in that Status.text. Put this in your twit.py script, after the end of init_twitter() and before if __name__ == '__main__'::
def match_keywords(twitapi, topicwords):
    timeline = twitapi.GetHomeTimeline(50)
    matches = {}    # Build up a new dictionary of matches to return

    for tweet in timeline:
        text = tweet.text.lower()
        for topic in topicwords:
            for word in topicwords[topic]:
                if word in text:            # Got a match! Add it.
                    if topic in matches:    # saw this topic already
                        matches[topic] += 1
                    else:         # first time we've seen this topic
                        matches[topic] = 1
    return matches
match_keywords returns a new dictionary that looks something like this: { 'nature': 3, 'tech': 6. This indicates that there were three tweets with nature keywords and six that were techie. You can test it by printing its output from if __name__ == '__main__':.
print(match_keywords(twitapi, topicwords))Displaying Twitter Information on a Light String
You have the new dictionary returned from match_keywords. How do you show it on a light string?
How about showing a pixel for each tweet that matches a keyword, with a different color for each topic? The colors can cycle across the string or around the circle so it won’t be boring to look at.
In the same directory where you have twit.py, edit a new file called twitterlights.py and make the first line import twit so it can use the Twitter code you already wrote. Add import time so you can sleep between updates.
Then include the module for whichever light string you’re using, and set up the values it needs. Fortunately, Adafruit wrote their NeoPixel and DotStar libraries to have similar calls: they both have a Color type, and they both have strip.begin(), strip.setPixelColor(i, Color(*color)), and strip.show(). So after you initialize the light string, you can use the same code to control it whether it’s a DotStar or a NeoPixel.
To initialize the string, you’ll need the basic definition of the light strip, plus a way to define colors. So import Color as well as the strip itself (for NeoPixels, you’ll also need to import ws), define your number of pixels as num_pixels, and initialize your strip. You can copy and paste from whatever worked in strandtest.py:
import twit
import time

# For DotStars:
from dotstar import Adafruit_DotStar, Color
num_pixels = 30
strip = Adafruit_DotStar(num_pixels, 12000000)
strip.begin()
or
import twit
import time

# For NeoPixels:
from neopixel import Adafruit_NeoPixel, Color, ws

# LED strip configuration:
LED_PIN        = 18      # GPIO pin (18 uses PWM!).
LED_FREQ_HZ    = 800000  # LED signal frequency (usually 800khz)
LED_DMA        = 5       # DMA channel to use (try 5)
LED_BRIGHTNESS = 256     # 0 for darkest, 255 for brightest
LED_INVERT     = False   # True to invert the signal
LED_CHANNEL    = 0       # set to '1' for GPIOs 13, 19, 41, 45 or 53
LED_STRIP      = ws.WS2811_STRIP_GRB   # Strip type, color ordering

num_pixels = 7

strip = Adafruit_NeoPixel(num_pixels, LED_PIN,
                          LED_FREQ_HZ, LED_DMA, LED_INVERT,
                          LED_BRIGHTNESS, LED_CHANNEL, LED_STRIP)
strip.begin()
That takes care of initializing the light string. Now how do you use it to show the Twitter keywords?
Let’s specify a color for each topic. Colors are specified as a list of (Red, Green, Blue), with each primary color going from 0 to 255. (0, 0, 0) is black (all colors off), (255, 255, 255) is white at full brightness (all three colors on), (255, 0, 0) is bright red, (0, 32, 0) is dim green, and so on. To show tech as purple and nature as green:
topiccolors = {
    'nature': Color(  0, 255,   0),
    'tech':   Color(255,   0, 255),
    }
The following code will display as many pixels of each color as there are tweets seen. If you see seven nature tweets and five tech tweets, it’ll show seven green pixels and five purple pixels, advancing down the light strip or around the circle.
TWITTER_CHECK_TIME = 120       # How often to check Twitter
TIME_BETWEEN_PIXELS = .02      # Seconds from one pixel to the next
led_number = 0                 # Which LED are we setting right now?
tot_time = TWITTER_CHECK_TIME  # So we'll check immediately

twitapi = init_twitter()

while True:
    if tot_time >= TWITTER_CHECK_TIME:
        keywords_found = twit.match_keywords(twitapi, topicwords)
        tot_time = 0
        print(keywords_found)

    # Loop over the topics:
    for topic in keywords_found:
        # keywords_found[topic] is the number of keywords
        # we matched on Twitter. Show that number of pixels.
        # The color for this topic is topiccolors[topic].
        for i in range(keywords_found[topic]):
            strip.setPixelColor(led_number, topiccolors[topic])
            strip.show()
            led_number = (led_number + 1) % num_pixels
            time.sleep(TIME_BETWEEN_PIXELS)
            tot_time += TIME_BETWEEN_PIXELS
That looks good most of the time, but there’s one more tweak to make it look even better. If the total number of Twitter hits over all the topics divides evenly into the number of pixels, or vice versa—suppose you have 20 pixels, and you saw seven tech tweets and three nature tweets, for a total of ten—then the colors will just stay in the same place rather than advancing around the string, and the display will look static. You can guard against that by taking the sum of the keywords found for each topic and using the modulo operator (%) to check for divisions with no remainder, and then adding a blank pixel in that case. Put this code right after print(keywords_found), indented only four spaces, not eight:
    tot_hits = sum(keywords_found[i] for i in keywords_found)
    if num_pixels % tot_hits == 0 or tot_hits % num_pixels == 0:
        keywords_found['blank'] = 1
Whew! Lots of steps, but the result is pretty. Once it’s working, try adding more topics in different colors.
Web Scraping in Python
Don’t care for Twitter, or just more interested in following some other website? No problem—you can write a web scraper.
“Scraping” means downloading a web page and searching through the text. Here’s a very simple Python web scraper that accepts the same list of topic words as in the Twitter example and returns the same dictionary of matches:
import requests

def match_keywords(url, topicwords):
    r = requests.get(url)
    matches = {}

    for line in r.text.splitlines():
        line = line.lower()        # convert it to lowercase
        for topic in topicwords:
            for word in topicwords[topic]:
                if word in line:
                    # Add it to matches
                    if topic in matches:
                        matches[topic] += 1
                    else:
                        matches[topic] = 1
    return matches
This code splits the output into lines and counts the number of lines where there was a keyword match. You can test it with this:
if __name__ == '__main__':
    topicwords = {
        # Set up your topic words here, as in the Twitter section
        }

    print(match_keywords('http://WEBSITE_TO_SCRAPE', topicwords))
Of course, replace WEBSITE_TO_SCRAPE with whatever website you want to try.
This scraper isn’t ideal, though, because 90 percent of a typical web page consists of menus, sidebars, ads, and JavaScript, and you don’t want to scrape that. You only want to look at the text you’d see if you viewed the page in a browser. For that, you need to parse the web page’s source, which you can do with a Python module called BeautifulSoup. First you have to install it (this covers both Python 2 and Python 3):
sudo apt-get install python-bs4 python-lxml python3-bs4Then you can parse the web page and remove all that JavaScript. (Removing menus and sidebars is harder and is left as an exercise for the reader.) You can search for <script> tags, remove (“extract”) them from the page, get only the text part of what’s left, convert it to lowercase, split it into lines, and then run your keyword search. The if __name__ == '__main__': part doesn’t change.
import requests
from bs4 import BeautifulSoup

def match_keywords(url, topicwords):
    r = requests.get(url)
    soup = BeautifulSoup(r.text, "lxml")

    # Remove javascript:
    for script in soup(["script"]):
        script.extract()      # Remove all <script> tags

    matches = {}

    for line in soup.text.lower().splitlines():
        for topic in topicwords:
            for word in topicwords[topic]:
                if word in line:
                    if topic in matches:

                        matches[topic] += 1
                    else:
                        matches[topic] = 1
    return matches
You can get as fancy as you want to with BeautifulSoup and look only for certain tags, only for headlines, and so forth. When you’re happy with your scraper, you can import it into a light string program, just as you would have with twit.py, except that you’ll import scrape rather than twit, and instead of initializing the Twitter API, you’ll call scrape.match_keywords('THE-WEBSITE-TO-SCRAPE’, topicwords.
Making It Portable: Batteries
Once you have your light string working, wouldn’t it be nice to get it off your desk and make it wearable?
Since you’ll be running the Pi as well as the light string off batteries, calculate the amps you expect your lights will draw: about 60 mA at full brightness times the number of pixels. Then add about an amp for the Pi, though you can probably get by with as little as 0.2 amps if it’s idling most of the time, or a little more if it’s going to be doing heavy computation. Batteries are rated by “amp hours,” so if you can estimate the amps your project needs, you can make a first guess as to how long any given battery will run it.
One easy option is a portable USB charger with a lithium-ion battery.
These are sold as emergency chargers for cellphones, but they can power any device that expects to be plugged into a USB port. Typically they come with a USB A jack, so you can plug in a normal USB A to MicroUSB cable to get power to your Pi.
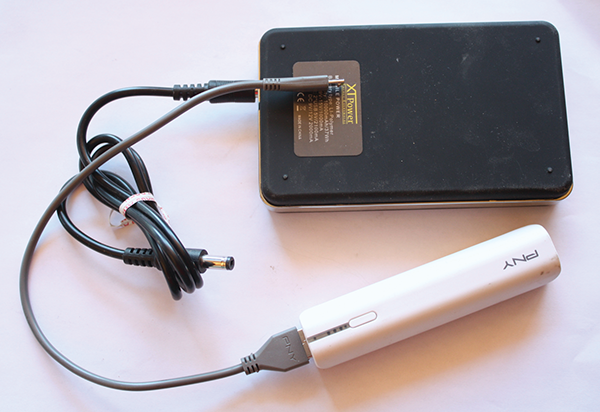
Figure 4-13: A couple of portable USB chargers
To power a light string in addition to a Pi, you’ll probably have to make a Y connector that goes from the battery’s USB plug to the light string. Even if you use separate batteries for the Pi and the light string, you’ll still need a Y connector to link the two batteries’ grounds together. Be sure to check the current output limitations (amps) on any battery you buy; small batteries may not have enough juice to power a Pi or a light string, let alone both.
You can use AA or AAA battery packs, but I don’t recommend it. Three AA alkaline batteries provide 4.5 volts, and four nickel-metal hydride (NiMH) rechargeables provide 4.8. Either of those is within the acceptable voltage range, but the batteries won’t last very long, and when they get tired the voltage will fall off steeply, to the point where your Pi might start behaving erratically.
Another option is lithium-polymer batteries, sold in hobby shops for powering radio control airplanes and cars.
A lot of NeoPixel tutorials recommend a single-cell li-po, which delivers 3.7 volts, a nice safe voltage for the light strings. But that’s not enough voltage to power the Pi, so you’ll need a separate battery or a step-up power converter.
If you use a two-cell li-po, available in hobby shops that sell model airplane supplies, you get 7.4 volts—far too high for either the Pi or the light string—but you can use a voltage regulator or step-down power converter to bring the voltage down to 5 volts. A voltage regulator might need a heat sink, so read up on the details of the regulator you choose. Step-down power converters are more efficient and might not need a heat sink. Either way, make sure it can handle several amps.

Figure 4-14: 5V voltage regulator used with a battery of higher voltage
Plugs for Portable Projects
No matter what battery you use, you’ll most likely have to solder a cable with connectors. If you use one battery to power both the Pi and the light string, you’ll need a Y connector that has power and ground from the battery going both to the Pi and to the light string. Even if you use two batteries with separate connectors, you’ll still need some form of Y to connect the Pi’s ground to the light string. Just like people, electronic gizmos need common ground to communicate.

Figure 4-15: Running both the Pi Zero W and a NeoPixel Jewel off a USB backup battery, with a MicroSD plug (made from a spare USB OTG adapter) for the Pi and a mini-Deans connector for the NeoPixel
On the Pi’s side, it’s best to use a MicroUSB plug for power. You can provide 5V input power via GPIO pin 2 (the one labeled 5v), but there’s no protection against voltage spikes as there is on the Pi’s normal MicroUSB Power In jack. If you bought a pack of USB OTG adapters to get your USB hub working (Chapter 1), they also make nice solderable MicroUSB connectors.
For the light string (and the battery, if you’re not using one that comes with a connector), you have your choice. There are lots of options: various types of connectors, Deans and mini-Deans, phone plugs (meant for audio), car and motorcycle plugs…the list is endless, and there’s no standard. Use whatever you can find easily, especially if you have a local store that carries them. (No matter how many connectors you think you bought, you will run short on a Friday night when you’re working on that last-minute project for the weekend.) Hobby shops that sell radio control planes and cars are good hunting grounds.

Figure 4-16: Connectors galore!
Whatever connectors you decide to use, get several of them, both male and female, so you can make adapters for several batteries, adapters from your wall wart to your wearable device, and so on.
There you have it: a wearable device that is not only pretty, but actually shows you useful information, updated in real time.
And that’s it! Now you’ve built a selection of projects using the Raspberry Pi Zero W. You can use these projects as a basis for further adventures with the Pi. Don’t forget to check out the GitHub repo, https://github.com/akkana/pi-zero-w-book, where you’ll find all the code in the book (so you don’t have to type it in yourself), wiring diagrams, and maybe a few additional examples of what the Pi Zero W can do.
Have fun!