Chapter 1
Getting Started

Why choose the Raspberry Pi Zero W? It’s small. It’s cheap. It’s power efficient. It has WiFi and Bluetooth Low Energy (BLE) built in. And it has the same general-purpose input/output (GPIO) header that bigger Raspberry Pis have: the gateway to controlling all sorts of hardware.
It’s easy to build gizmos that use hardware and networking in fun ways. In this book, you’ll build three projects using the Pi Zero W:
- Blinking LEDs
- An environmental monitor that can keep track of the temperature in your house, and even turn on your fan or air conditioner before you get home from work
- A wearable light string that monitors news feeds and websites to alert you when there’s something interesting going on
You don’t need much prior experience with either hardware or programming—though knowing how to solder will help.
With what you learn from these projects, you can extend the Pi’s power to hundreds of other hardware and software projects.
Hardware Requirements
Each chapter opens with a list of hardware required to finish the project. That makes it easy to know you have what you need without running to the electronics store every half hour, or if you live in a remote area, waiting several days for mail order.
Here’s the hardware you’ll need for this introductory chapter:
- The Raspberry Pi Zero W itself (though you can follow along on any Raspberry Pi)
- A power source: 5 volts, at least 1 amp, with a MicroUSB plug
- A microSD card, preferably at least 8 GB, to use with a monitor (you can get by with 4 GB if you only want to run “headless”)
- Another computer with WiFi and a MicroSD writer
To use the PIXEL desktop, you’ll need the following:
- A monitor, keyboard, and mouse
- A cable that connects mini-HDMI to your monitor
- A USB hub, ideally one with external power and not USB 3: either a hub that plugs into MicroUSB, or a regular hub plus a USB On-the-Go (OTG) adapter
Now let’s look at the board itself.
About the Raspberry Pi Zero W
The technical specs of the Pi Zero W are as follows:
- 1 GHz, single-core ARM11 Broadcom CPU
- 512 MB of RAM
- MicroSD card slot
- MicroUSB power connector
- Mini-HDMI video port
- MicroUSB On-the-Go (OTG) port
- Hardware Attached on Top (HAT)-compatible 40-pin header
- Composite video and reset headers
- CSI camera connector
- 802.11n wireless LAN
- Bluetooth Low Energy 4.0

Figure 1-1: The small but mighty Raspberry Pi Zero W
The Pi Zero W sports a fairly punchy processor for such a small, inexpensive device—not as hot as the larger Pi 3, but faster than the original Raspberry Pi—and it can run a full version of Linux. That means you have hundreds of programs and libraries already available, and you can write your own software for it in any language of your choice. Most examples in this book will use Python: it’s the most flexible, the easiest to learn, and very well supported.
The Pi Zero W doesn’t arrive with an operating system, or even any built-in storage. It has to boot from a MicroSD card with an OS installed.
The most popular OS for the Raspberry Pi family is Raspbian, a version of Debian Linux. It’s built for the ARM CPU and customized for the Raspberry Pi, so that’s what you’ll use with this book. You can also run other versions of Linux, such as Arch or Gentoo, as well as specialized distributions optimized for tasks like playing video on your TV. But the Zero W isn’t the best choice for such heavy lifting; for TV you’re better off choosing the faster Raspberry Pi 3.
You can buy MicroSD cards that already have Raspbian installed, but it’s easy to download and install yourself. You’ll need a computer (not the Pi itself) that can write to an SD card.
Installing Raspbian
Since you can’t boot your Pi Zero W until you install an OS to the SD card, you’ll do this step with your existing computer.
You can download Raspbian from the Raspberry Pi Foundation: https://www.raspberrypi.org/downloads/raspbian/
It gives you two options: install just Raspbian, or install something called NOOBS (which stands for New Out Of the Box Software). NOOBS gives you links to install several different OS options, including Raspbian, but it’s a larger download and takes longer to install. For this book, choose Raspbian.
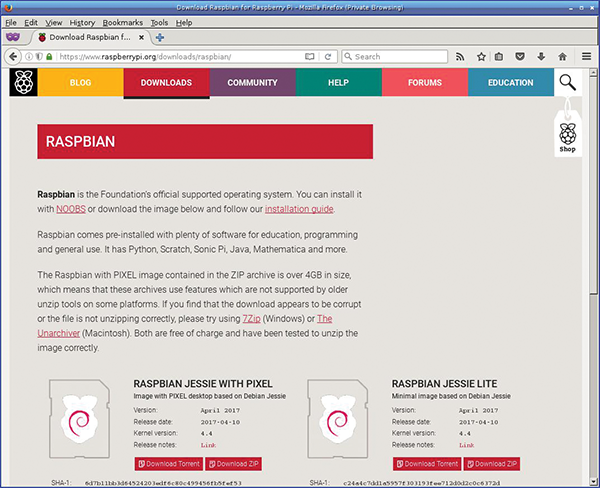
Figure 1-2: The Raspbian download page
On the Raspbian download page, you’ll see two options:
- Raspbian Jessie with PIXEL
- Raspbian Jessie Lite
Raspbian is a version of Debian, and Debian versions are named after characters from the Toy Story movies. Raspbian is currently based on the last version of Debian, named Jessie—the Yodeling Cowgirl from Toy Story 2 and 3. As this book was being written, Debian released a newer version, named Stretch, after a stretchy purple octopus from Toy Story 3. Raspbian will eventually upgrade to Stretch, but there shouldn’t be much difference on the surface.
PIXEL is the name of the desktop Raspbian uses—the interface and menus you see on the screen when you connect a monitor to the Pi. If you plan to connect your Pi to a monitor, you definitely want the full version with PIXEL. If you’re planning on using it for lightweight hardware projects, never want to run a desktop, and want to save space on the SD card, you can choose Jessie Lite. In that case, after you’ve finished installing Raspbian to your SD card, you can skip ahead to the section “Headless: Connecting Without a Monitor.”
Whichever image you download, unzip it to get a file with a name like 2017-04-10-raspbian-jessie.img. (The date might be different.) Follow the directions linked from the Raspbian Download page. For the full Raspbian, if your unzip program is old and can’t handle zip files larger than 4 GB, you may need to install a newer one.
Then write the unzipped file directly to your SD card. You need to overwrite the whole card, not just copy the file onto a partition. The Raspbian folks recommend using a tool called Etcher, which you can find at https://etcher.io/. But they also have instructions for people who want more control over the process: Windows users can use Win32DiskImager, and Mac and Linux people can use dd. If you’re a Chromebook user, Raspbian doesn’t have a page for you, but if you use developer mode and bring up a terminal, you can follow the dd instructions meant for Linux users.
Connecting to a Monitor, Keyboard, and Mouse
You now have Raspbian installed and you’re ready to try it. If you don’t have a monitor handy and want to run headless, skip ahead to the section “Headless: Connecting Without a Monitor.”
The Pi Zero W has a built-in mini-HDMI video port. So you will need a cable that connects from mini-HDMI to whatever your monitor requires, like HDMI or DVI, or you’ll have to use adapters on a regular HDMI cable.
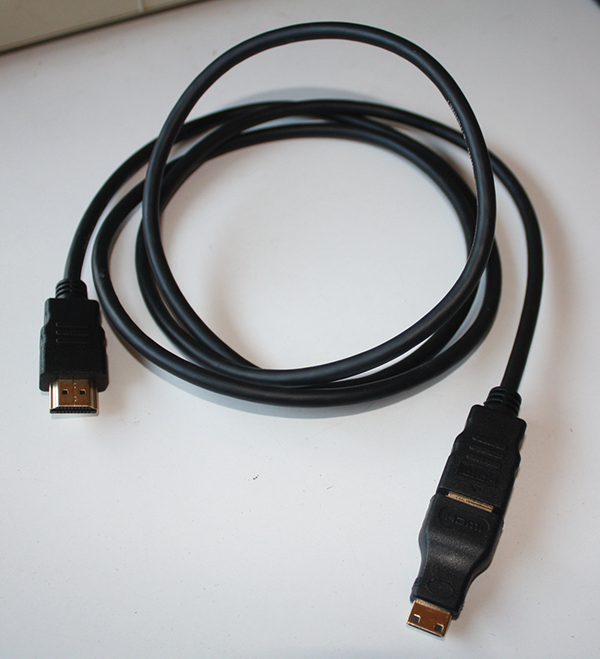
Figure 1-3: An HDMI cable with a mini-HDMI adapter

Figure 1-4: Adapters galore! A video adapter from mini-HDMI to regular HDMI, and then to DVI, plus a USB OTG adapter. The Pi Zero W also has a ribbon cable attached to it.
You’ll also need a USB hub. The Pi Zero W has only a single MicroUSB port (plus a power port that uses the same connector), but you’ll need a place to plug in both a keyboard and a mouse. The hub can be a little tricky: Pis have known problems connecting to some cheap unpowered hubs and trouble driving slow hardware like a mouse or keyboard off a USB 3 hub. Your best bet is a USB 2 hub with an external power supply.
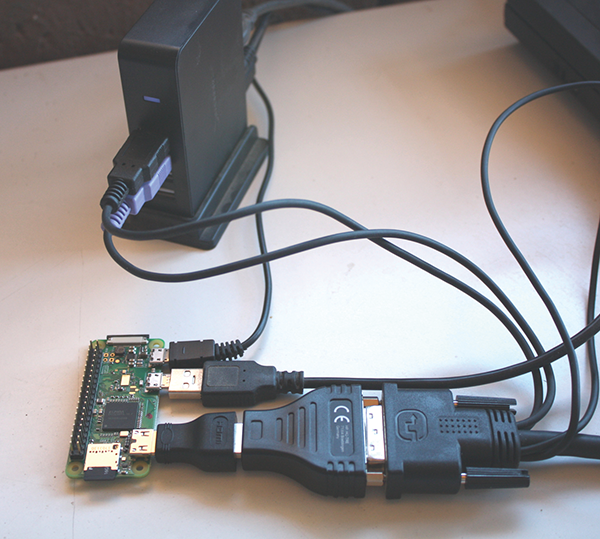
Figure 1-5: The powered USB 2 hub is plugged in to the Pi via a USB OTG adapter. The author’s DVI KVM is connected via two adapters to the Zero W’s mini HDMI, and the mouse and keyboard cables from the KVM plug into the USB hub. Whew!
You might also need a special USB cable. Most hubs have a regular USB A plug. But you need a hub specifically intended for computers with MicroUSB, or an adapter that goes from MicroUSB to your hub. One option is a MicroUSB-to-USB A female adapter, sometimes called a USB OTG adapter; they’re inexpensive and will probably be useful for a variety of purposes on the Pi Zero W.
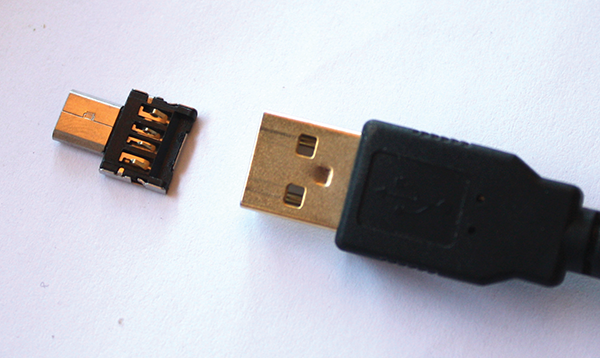
Figure 1-6: A USB On-the-Go (OTG) adapter
Got your mini-HDMI and USB hub all set up? It’s time to try booting the Pi Zero W with a monitor. Skip ahead to “Logging In and Changing the Default Password.”
Headless: Connecting Without a Monitor
The Raspberry Pi Zero W is a great hardware controller. It’s small and power efficient, and it has all those hardware outputs. You might have bought it purely for that purpose and have no intention of connecting it to a monitor.
But how do you get your software on it or test it?
Fortunately, there are several ways to connect over the Pi Zero W’s built-in WiFi. The easiest is Secure Shell, or SSH. But before you can do that, you have to set up wireless on the SD card so that the Pi will boot and automatically connect itself to the network.
Start by plugging your Raspbian SD card into your computer. If you’ve just finished copying Raspbian to the card, eject the card and reinsert it to force the computer to read and mount the new partitions you just wrote onto the card.
Normal Raspbian (not NOOBS) uses two partitions on the SD card. The first is the boot partition: it contains a Linux kernel and some startup files like drivers for hardware the Pi can’t do without. The second is the root partition, where most of Raspbian’s files are. The root partition is formatted as the native Linux ext4 filesystem, and you probably won’t be able to mount it except from another Linux computer. Fortunately, you can do the configuration you’re most likely to need using only the boot partition, which you can mount on any computer. Mount that partition now.
Configuring SSH and WiFi from Another Computer
Raspbian has SSH out of the box, but it’s disabled by default. To enable it, create a file called ssh on the SD card’s boot partition. The file can be empty; all that matters is that it’s named ssh. Now Raspbian will start SSH the next time you boot.
That’s the easy part. Next you have to set up the Pi’s network connection.
If your WiFi network uses Dynamic Host Configuration Protocol, or DHCP (which handles automatic addressing), and doesn’t have a password or any browser authentication screens, the Pi should connect on its own. In that case, skip ahead to “Finding Your Pi on the Local Network.” Otherwise, you can configure networking by creating a file on the boot partition called wpa_supplicant.conf.
You’ll need the name of your network, called the service set identifier (SSID). That’s what you normally see in your computer’s menus when you connect. Of course, you’ll need your network password if you have one.
If your network requires browser authentication—in other words, if you connect to the network without a password, then go to a web page where you type in a password—you’re probably out of luck. There’s no easy way to set up a computer to do that automatically. If plugging in a monitor isn’t possible, you have a couple more options. You can use a USB Ethernet dongle with an OTG adapter. Or you can buy a USB serial cable made for a Raspberry Pi, in which case you’ll need to edit config.txt on the SD card’s boot partition and add these two lines to enable a serial console and disable Bluetooth:
enable_uart=1
dtoverlay=pi3-disable-bt
But back to configuring WiFi.
Got your SSID and password ready? Create wpa_supplicant.conf by opening it with whatever text editor you prefer. You must use a plain text editor, not a word processor like Word. If you don’t already have a text editor you use regularly, try Notepad on Windows, TextEdit on Mac, or nano on Linux.
Enter this:
ctrl_interface=DIR=/var/run/wpa_supplicant GROUP=netdev
update_config=1

country=US
network={
    ssid="YOUR SSID"
    psk="YOUR PASSWORD"
}
in which YOUR SSID is replaced by the SSID of your network, and YOUR PASSWORD is replaced by your network password. If your network doesn’t have a password, use this instead:
network={
    ssid="YOUR SSID"
    key_mgmt=NONE
}
If your SSID is hidden (it doesn’t show up automatically when you scan for networks), it might help to add this line after the key_mgmt line:
scan_ssid=1Save the file and exit.
To use a static IP address, rather than one dynamically configured with DHCP, you need an extra step. (If you aren’t sure, you probably won’t need this step.)
You’ll need to mount the Raspbian partition, the second partition on the hard drive. It’s an ext4 format filesystem, so you’ll probably need access to a Linux machine for this part. In etcon the Raspbian partition, edit the file dhcpcd.conf. Add a section at the bottom with your static network information:
interface wlan0
static ip_address=192.168.1.x
static routers=192.168.1.1
static domain_name_servers=192.168.1.1
Replace 192.168.1.x and, if needed, the other addresses with the ones for your network. Save the file and exit. You’re ready to try booting.
Finding Your Pi on the Local Network
If you’re connecting to your Pi over the network rather than using a monitor and you’re not using a static IP address, you’ll have to figure out what address it ended up using. That will be four numbers separated by dots, like 192.168.1.125.
If you’re on your own home network and you can log in to your WiFi router (usually by using a browser to navigate to http://192.168.1.1), there’s probably a Devices tab that shows all devices currently on the network. Look for a new or unfamiliar device: that’s probably your Pi. It might even show a hostname of raspberrypi.
If you do a web search, you’ll find utilities to search for Raspberry Pis on the local network, like the Adafruit-Pi-Finder. But here are some lower-level ways to search for your Pi.
Using arp and fping
If you can install the fping program, here’s a fast way to find Raspberry Pis on your network:
fping -a -r1 -g 192.168.1.0/24  &> /dev/null
arp -n | fgrep " b8:27:eb"
Raspberry Pi WiFi chips have Ethernet addresses that start with b8:27:eb, so this looks only for Raspberry Pis on the network.
If you can’t install fping, try the arp command anyway. It might not see a newly booted Pi, but it’s worth a try.
If it doesn’t find anything, a more reliable program is nmap.
Using nmap
You can find all the machines on your local network with the command nmap. Linux machines probably have nmap already, but on a Mac or Windows machine you can get it from https://nmap.org/download.html. If your network is 192.168.1:
sudo nmap -sn 192.168.1.0/24You can search for only Raspberry Pi devices this way:
$ sudo nmap -sn 192.168.1.0/24 | grep -i -B 2 B8:27:EBSSHing to Your Raspberry Pi
Once your Pi is up and running, and you know its network address, you can log in using SSH. On Mac and Linux, and Chromebooks with developer mode, get a terminal and type
ssh ADDRESS-OF-YOUR-PIWindows doesn’t have SSH installed by default, but there are plenty of good SSH programs available. The most popular is a graphical program called PuTTY. You can download graphical SSH programs for Mac and Chrome OS, too.
SSH even lets you run desktop programs on your Pi, using a technique called X forwarding. That requires an X server program on your local computer. Linux comes with X already; on Mac you can download X11 from Apple; on Windows there are various X servers available, such as Xming.
Once you’re running X on your local computer, log in to your Pi with ssh -X (that’s a capital X) from Mac or Linux, or in PuTTY, enable Connection > SSH > X11 in the PuTTY configuration. Then you can run graphical programs from that shell and they will display on your local machine.
Logging In and Changing the Default Password
You’ve booted your Pi Zero W and you’re ready to log in, whether it’s in PIXEL or over SSH. The first time you log in, use the username pi, and the password raspberry.
If you’ve enabled SSH, you will see a warning:
SSH is enabled and the default password for the 'pi' user has not been changed.
This is a security risk - please login as the 'pi' user and type
'passwd' to set a new password.
You should change the default password!
You can change the password right now using the command line. Bring up a terminal by clicking on the terminal icon at the top of the screen, as shown in Figure 1-7, or by choosing Accessories > Terminal.

Figure 1-7: The PIXEL desktop showing a terminal
You’ll be working a lot more with the terminal and the command line in later chapters, but for now, just type passwd at the prompt:
$ passwd
Changing password for pi.
(current) UNIX password:
Type the current password, raspberry. Then, when prompted, enter your new password.
Basic Configuration
The raspi-config program can do a lot of basic configuration. In the terminal, type
sudo raspi-configNavigate around this screen by using the up and down arrow keys. Hit Enter to choose one of the categories or to choose an option.
You can change the password (if you didn’t already do so from the command line) or set a hostname.
Under Boot Options, you can choose whether to start in the graphical desktop, or skip it and just boot into the command-line interface (CLI) if you’re running headless. For each option, you have a choice of whether the user pi will be logged in automatically, or whether you’ll have to log in with a password. If you’re connecting over the network with SSH, that setting doesn’t matter much; you’ll have to log in no matter what (though there are ways of using SSH without a password).
Under Localisation Options, you can use Change Locale to change the language and country you use. For instance, if you’re in the United States I recommend changing your locale to en_US.UTF-8. The default is en_GB.UTF-8.
When you’re finished with Change Locale, press the Tab key. The highlight will jump to Ok and you can press Enter to accept the new locale(s). Next you’ll be taken to a screen where you configure the system locale. People in the United States should choose en_US.UTF-8.
The Interfacing Options section lets you enable hardware such as a Pi Camera, if you have one; enable services like SSH or virtual network computing (VNC); or enable hardware options like SPI or I2C (more about those in Chapter 3) Serial, 1-Wire, or Remote GPIO.
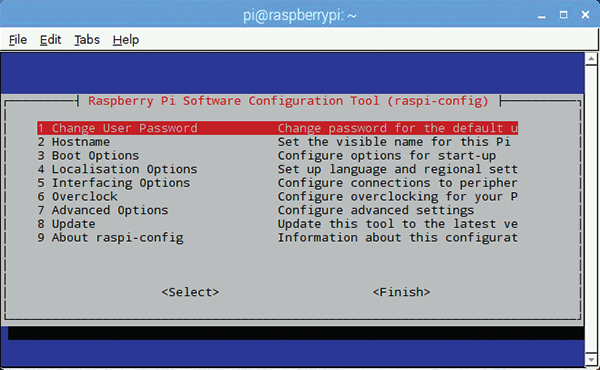
Figure 1-8: raspi-config, running in the PIXEL desktop
If you’re running a headless Pi, be sure to enable SSH here. The trick of creating a file named ssh on the boot partition works only once. You don’t want to have to do that every time you use your Pi!
There are other sections, like Overclocking and Advanced Options, but you shouldn’t need to adjust those options.
When you’re done configuring, press Tab to get to Finish. raspi-config will prompt you to reboot if you’ve changed any settings that require a reboot.
The PIXEL Desktop
The Raspberry Pi desktop is called PIXEL. Clicking the raspberry icon in the top left opens a set of menus you can explore. Next to that are icons for a web browser, file manager, and terminal (you’ll be using the terminal for most of this book).
The final two icons on the top bar are Wolfram and Mathematica. Wolfram Research made these tools available to Raspberry Pi users free of charge, though you’ll probably find them frustratingly slow on the Pi Zero W. If you want to explore the Wolfram world, you’re better off with a Raspberry Pi 3.
At the upper right is a networking icon, showing whether your Pi W is connected to WiFi. If you didn’t already configure WiFi, you can do it now—the easy way. Click on the WiFi icon in the upper right, choose your network, and set your password.

Figure 1-9: Configuring WiFi in PIXEL
Exploring PIXEL
Once WiFi is working, doodle to your heart’s content. There are lots of other interesting options under Preferences: you can customize the fonts and colors and the background image, change the behavior of the mouse and keyboard, and add new items to the menu.
You can also install new software. Click the raspberry icon, go to Preferences, and look for Add/Remove Software. There are hundreds of packages you can install, organized by category. You’ll install a few of those packages in later chapters.
Introducing the Linux Command Line
A lot of programming requires the command line, so you’ll be using the terminal and typing commands a lot with this book. (It’s also handy when you’re running without a monitor, or debugging something on a device that’s at the other side of the house or out in the back yard.)
The program that reads your commands and executes them is called the shell. You’ll be using a shell called Bash, short for the Bourne-Again Shell. The name is a pun: the original Unix shell was written by someone named Bourne, but it wasn’t open source and couldn’t be used in free operating systems like Linux, so the new shell rewritten to replace the Bourne shell was dubbed “Bourne Again.”
The first word you type at the shell prompt is a command, and all the words after the command are called arguments. If you want to see the contents of the current directory, type ls (a command, short for “list” the contents of the directory). If you want to see the contents of the directory called python_games, type ls python_games. ls is still the command, and python_games is the argument.
Some commands require “root privilege,” which is like the Administrator account on Windows. For those, you can type sudo before the command (sudo is short for Super User DO—in other words, do this command as the super user). Earlier in this chapter you typed sudo raspi-config to reconfigure the system.
Editing Command Lines
The normal Backspace, Delete, arrow keys, Home, and End work when you’re editing commands. But there are some other nice features too.
One example is autocomplete. You hardly ever have to type a whole command; you can hit the Tab key to see what options you have. For instance, typing ls py and pressing Tab completes to ls python_games/. (The slash at the end indicates that python_games is a directory, which is the same thing as a folder: it isn’t a file; it contains files.)
If there’s more than one match, Tab will only complete as far as it can. Typing ras and pressing Tab completes to raspi because there are a bunch of different commands that start with raspi. But if you keep hitting Tab (two more times), it will show you the list of everything that matches:
pi@raspberrypi:~ $ raspi
raspi-config  raspistill    raspividyuv
raspi-gpio    raspivid      raspiyuv
pi@raspberrypi:~ $ raspi
At this point, if you type -c, the command will expand to raspi-config; if you type v instead, it will expand to raspivid, which would let you take videos with a camera module if you have one installed.
Some other useful editing shortcuts:
- The up arrow shows you the previous command you typed, which you can edit or change.
- Ctrl-W deletes the last word.
- Ctrl-U deletes back to the beginning of the line.
- Ctrl-K deletes to the end of the line.
- Ctrl-A goes to the beginning of the line, Ctrl-E to the end, Ctrl-B moves backward, Ctrl-F moves forward, Ctrl-H deletes the previous character, and Ctrl-D deletes the next character. These do the same thing as Home, End, Left, Right, Backspace, and Delete, but you can type them without moving your hands from the normal typing position.
- If you need to page up to see earlier commands you typed, use Shift-PageUp.
Installing Software
You can install software from the command line as well as from the PIXEL menus. The Debian installation software is called APT (for Advanced Package Tool), and most of the software installation and search commands start with apt. You can search for packages with aptitude search:
pi@raspberrypi:~ $ aptitude search camera
p   camera.app - GNUstep application for digital still came
p   cameramonitor - Webcam monitoring in system tray
p   libomxil-bellagio0-components-c - Motorola Camera components for
    Bellagio Op
i   python-picamera - Pure Python interface to the Raspberry Pi’
p   python-picamera-docs - Documentation for the Python interface to
i   python3-picamera - Pure Python interface to the Raspberry Pi
p   python3-snap-camera - A camera that uses PiFace Control and Disp
The lines that start with i—python-picamera and python3-picamera—mean those programs are already installed. The others are available for installation. You can install them with sudo apt-get install:
sudo apt-get install cameramonitorAPT will figure out what other packages that package requires, and ask you whether it should install them all. If you type y (or just press Enter), it will install all the necessary packages.
Some of the packages are downright silly. For instance, type sudo apt-get install cowsay and then run it:
pi@raspberrypi:~ $ cowsay Raspberry Pi is cool
 ______________________
< Raspberry Pi is cool >
 ----------------------
           ^__^
           (oo)\_______
            (__)       )/
                ||----w |
                ||     ||
Another fun program is sl: it’s there so that if you mean to type ls but accidentally reverse the characters, you get something besides a boring error message. Install it and try it yourself if you want to see what it does.
Getting Help
One more useful command is man, which shows the built-in man(ual) pages. man ls tells you all about the ls command. (Press the spacebar to advance to the next page, and press Q to quit.) Unfortunately, a lot of the Raspbian-specific commands, like raspi-config, don’t have man pages, but you can learn a lot about basic Linux commands this way.
The apropos command helps you find man pages. So, for example, apropos gpio tells you about some man pages where you can read about the GPIO pins on the Raspberry Pi—if you didn’t have this book to tell you about them.
Some commands also have built-in help. If you’re wondering how to run a program, try running it with -h or --help (that’s one dash with h or two dashes with help). Some of the raspi commands are nonstandard and take just help as an argument—as you’ll see in the next chapter when you progress to blinking an LED.