
Chapter 3
A Temperature Notifier and Fan Control

Do you hate to come home to a hot house? Or do you just want to know what the temperature is in your office so you can dress appropriately?
In this project, you’ll set up your Pi to monitor the temperature and make it available via Twitter. The Pi can even turn on a fan or an air conditioner before you get home, based on temperature limits you set or a Twitter message you send it.
Hardware Requirements
Here’s a list of what you need for this chapter:
- An I2C temperature sensor, such as the Si7021, MCP9808, or BME280
- Four hookup wires
- A PowerSwitch Tail (optional, for switching on a fan or air conditioner)

Figure 3-1: Testing an automated fan with a PowerSwitch Tail and three different temperature sensors on the I2C bus
The first thing you’ll need is a temperature sensor board. These are inexpensive, around $5 to $10, depending on accuracy and the other features they offer, such as the ability to measure humidity or barometric pressure. Most of them use a protocol called I2C.
What Is I2C?
I2C (pronounced “eye squared see” or “eye two see”) stands for inter-integrated circuit. It’s a protocol for reading information from, and writing to, low-power devices like sensors. It uses two wires (for clock and data) plus another pair for power and ground. You’ll sometimes see references to “two-wire” interfaces, which are more or less the same thing as I2C.
Each I2C device has an address, and you can have multiple devices connected to your Pi at the same time as long as they have different addresses.
The System Management Bus (SMBus) is a slightly simpler subset of I2C. That’s worth knowing mostly because one of the ways of talking to I2C devices using Python is called smbus. The smbus library is fairly simple to use despite an almost complete lack of documentation; fortunately, you can find lots of examples on the web. (The GPIOzero libraryhas no support—yet—for I2C. RPi-gpiohas some support, but it’s a lot more fiddly than smbus.)
If you’re using Raspbian-lite, you’ll have to install a couple of packages first. On the full version of Raspbian, these packages are probably already installed, but it doesn’t hurt to run this command anyway to be sure:
sudo apt-get install i2c-tools python-smbusEnabling I2C
Raspbian comes with support for I2C built in, but it’s disabled by default. Fortunately, it’s easy to enable.
In a terminal, type sudo raspi-config, move down to Interfacing Options, and press Enter. Then move down to I2C and press Enter again. Use the Tab or left-arrow key and press Enter to answer Yes to “Would you like the ARM I2C interface to be enabled?”
Or, if you prefer using the GUI, choose Preferences > Raspberry Pi Configuration and click the OK button to enable I2C.
Either way, once you exit you should have I2C enabled. To verify that, in a terminal, type this:
ls /dev/i2c*Note the asterisk at the end of the command: it’s a wildcard that means you want to show any file in /dev that starts with i2c. The Pi should respond with this:
/dev/i2c-1If you see /dev/i2c-1, you’re set. (On early Raspberry Pis, it was called i2c-0 instead of 1.)
If you see i2cdetect: command not found, it means you didn’t install i2c-tools and python-smbus (see the section “What Is I2C?” earlier).
Choosing a Sensor
A wide variety of inexpensive temperature sensors are available that “speak” I2C. Since the chips themselves are tiny, they’re often available mounted on “breakout boards” that make it easy to plug the sensor into a breadboard and wire it to your Raspberry Pi. Many temperature sensors also measure other quantities, such as atmospheric pressure or humidity.
Whichever sensor you choose, you’ll need to figure out how to talk to it from the Pi. Each I2C device has a different address and speaks a slightly different language. The details for each chip are in its datasheet (a PDF that you can find with a web search; for example, search for “Si7021 datasheet”), but extracting the details from a datasheet isn’t always easy. I recommend starting with a web search for the chip name plus “python” or even “raspberry pi python” to see if someone has already done that work for you. Ideally, do this before you order a sensor, so you’ll know ahead of time if a sensor is difficult to use with Python on the Pi.
Let’s start with the simple and accurate MCP9808 chip.
The MCP9808 I2C Temperature Sensor
The breakout board has eight holes, but you’ll only need four of them for basic I2C: Vdd (input voltage, 3.3 volts), Gnd (ground), SCL (clock), and SDA (data).

Figure 3-2: MCP9808 temperature sensor wiring
You’ll probably need to solder a header onto your breakout board, or use test leads with clips that can make good contact with the through-holes on the board.
If you have hookup wires in a selection of colors, I suggest a color code convention: use red for power, black for ground, orange or yellow for clock (remember this as “clock works orange”), and green or blue for data. If you don’t have that many wire colors, don’t worry—the Pi and the chip won’t care; a color code just makes it easier for humans to see at a glance what’s wired to what.
On the Pi Zero end, wire the 3.3v power (red) wire to pin 1 on the Pi, and the ground (black) wire to any of the Pi’s ground connections, such as pin 6 or pin 9. Refer to Figure 2-7, in the previous chapter, if you need to check pin numbers. Wire SDA to the Pi’s pin 3 (GPIO 2), and CLK (clock) to pin 5 (GPIO 3).

Figure 3-3: MCP9808 wired up to the Pi Zero W, ready to test
Now check to make sure your Pi sees the new I2C device. In a shell, type
pi@raspberrypi:~ $ i2cdetect -y 1In that command, 1 is the number of the I2C bus you’re using. Modern Raspberry Pis, including the Zero W, have two I2C buses, and bus 1 uses pins 3 and 5; older Pis have only one, bus 0.
You should see the following:
0       1  2  3  4  5  6  7  8  9  a  b  c  d  e  f
00:          -- -- -- -- -- -- -- -- -- -- -- -- --
10: -- -- -- -- -- -- -- -- 18 -- -- -- -- -- -- --
20: -- -- -- -- -- -- -- -- -- -- -- -- -- -- -- --
30: -- -- -- -- -- -- -- -- -- -- -- -- -- -- -- --
40: -- -- -- -- -- -- -- -- -- -- -- -- -- -- -- --
50: -- -- -- -- -- -- -- -- -- -- -- -- -- -- -- --
60: -- -- -- -- -- -- -- -- -- -- -- -- -- -- -- --
The output shows that the Pi detected a device at address (10 + 8) = 18—the address the MCP9808 uses. If you don’t see anything there, check your wiring and don’t proceed until ic2detect -y 1 gives the right output. If you see a number other than 18 and you don’t have anything else plugged into your Pi, it might be that your MCP9808 is using a different address; try using the address you see instead of 0x18 when you write your program.
If you’re sure your wires are plugged into all the right places but i2cdetect still doesn’t see the sensor, try connecting A0, A1, and A2 on the sensor to ground on the Pi. Those lines set the address of the MCP9808, and some breakout boards may need the address lines grounded.
Measuring the Temperature
You can read data from an I2C device with smbus:
import smbus
bus = smbus.SMBus(1)
bus.read_i2c_block_data(address, cmd)
For this sensor, address is 18 in base 16. In Python, you can represent a hexadecimal number by putting 0x in front of it, so it’s 0x18. cmd is the command you’re sending to the chip to tell it to give you a temperature reading: for the MCP9808, that’s 0x05.
The trick is interpreting the bytes it sends back. The MCP9808 sends 2 bytes (data[0] and data[1] in the Python code), and its datasheet helpfully gives example code to translate these 2 bytes into a temperature in Celsius. Translated into Python, that code sample looks like this:
# Read temperature from an MCP9808 using I2C.

import smbus

MCP9808 = 0x18         # The default I2C address of the MCP9808
temp_reg = 0x05        # The temperature register

bus = smbus.SMBus(1)

def read_temperature_c():
    data = bus.read_i2c_block_data(MCP9808, temp_reg)

    # Calculate temperature (see 5.1.3.1 in the datasheet):
    upper_byte = data[0] & 0x1f    # clear flag bits
    lower_byte = data[1]
    if upper_byte & 0x10 == 0x10:  # less than 0C
        upper_byte &= 0x0f
        return 256 - (upper_byte * 16.0 + lower_byte / 16.0)
    else:
        return upper_byte * 16.0 + lower_byte / 16.0

if __name__ == '__main__':
    ctemp = read_temperature_c()
    ftemp = ctemp * 1.8 +32
    print("Temperature: %.2f F (%.2f C)" % ftemp, ctemp)
Run it, either from IDLE or in the shell:
python MCP9808.pyand it should print the temperature in both Fahrenheit and Celsius.
Here’s one more neat feature of the MCP9808: it can use addresses besides 0x18. That’s what those extra pins on the board are for. So if you want to have multiple MCP9808 sensors attached to your Pi at the same time, you can—as long as you wire their addresses so they’re all different.
Measuring Temperature and Humidity with an Si7021
Another popular sensor is the Si7021, which measures humidity as well as temperature. It has an older sibling, the HTU21d, that uses the same address and works with the same code. Its hookup is similar to the MCP9808 and it uses the same four wires: power, ground, data, and clock. You can see a wiring diagram in Figure 3-4.
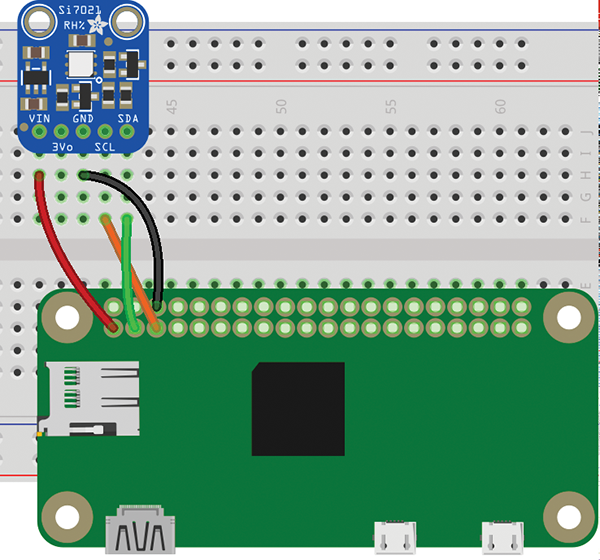
Figure 3-4: Si7021 temperature and humidity sensor
The software side is a little more complicated than the other chip, since the Si7021 handles several commands. Aside from measuring both temperature and humidity, it has “hold” and “no hold” modes.
But that’s just the start of the problems. It turns out that when you read 2 bytes from an Si7021 using the smbus library, the second byte is always the same as the first. So you’re really only reading one byte, and you won’t get the full accuracy of the chip.
The duplicated byte seems to be a bug in the smbus library, and I never did find a way to get smbus to read that second byte. Fortunately, there are other solutions. For instance, you can read from and write to the /dev/i2c-1 device directly, and use an interface called fcntl (short for “file control”).
Here’s a program that does that:
import time, array
import io, fcntl
class Si7021:
    ADDRESS = 0x40
    I2C_SLAVE=0x0703
    READ_TEMP_NOHOLD = b"xF3"
    READ_HUM_NOHOLD = b"xF5"
    SOFT_RESET = b"xFE"

    def __init__(self, bus):
        # Open the I2C bus:
        self.fread  = io.open("/dev/i2c-%d" % bus, "rb",
                              buffering=0)
        self.fwrite = io.open("/dev/i2c-%d" % bus, "wb",
                              buffering=0)

        # initialize the device as a slave:
        fcntl.ioctl(self.fread, self.I2C_SLAVE, self.ADDRESS)
        fcntl.ioctl(self.fwrite, self.I2C_SLAVE, self.ADDRESS)

        self.fwrite.write(self.SOFT_RESET)
        time.sleep(.1)

    def close(self):
        self.fread.close()
        self.fwrite.close()

    def readI2C(self, cmd):
        self.fwrite.write(cmd)
        time.sleep(.1)

        data = self.fread.read(3)
        buf = array.array('B', data)

        if self.crc8check(buf):
            return buf
        else:
            return None

    def read_temperature_c(self):
        buf = self.readI2C(self.READ_TEMP_NOHOLD)
        if not buf:
            return -273.15    # absolute zero

        return (((buf[0] << 8 | buf [1]) & 0xFFFC)
                * 175.72 / 65536.0 - 46.85)

    def read_humidity(self):
        buf = self.readI2C(self.READ_HUM_NOHOLD)
        if not buf:
            return -1

        return (((buf[0] << 8 | buf [1]) & 0xFFFC)
                * 125.0 / 65536.0 - 6.0)

    def crc8check(self, value):
        remainder = ( ( value[0] << 8 ) + value[1] ) << 8
        remainder |= value[2]
        divisor = 0x988000

        for i in range(0, 16):
            if( remainder & 1 << (23 - i) ):
                remainder ^= divisor
            divisor = divisor >> 1
        if remainder == 0:
            return True
        else:
            return False

if __name__ == '__main__':
    sensor = Si7021(1)
    ctemp = sensor.read_temperature_c()
    print("Temperature:  %.2f F (%.2f C)"
          % ctemp * 1.8 + 32, ctemp)
    print("Relative Humidity: %.1f %%"
          % sensor.read_humidity())
    sensor.close()
Reading Temperature and Pressure from a BME280
The final temperature sensor we’ll cover here is the BME280, which lets you read barometric pressure as well as temperature. The pressure sensor is said to be accurate enough that you can use it as an altimeter—though for that, you’d need to calibrate it, since air pressure varies according to the weather as well as with altitude.
It wires up pretty much the same as the other two chips, as you can see in Figure 3-5.

Figure 3-5: Wiring the BME280 temperature and pressure sensor
However, in software the BME is quite a bit more complicated than the other two sensors. It needs to be initialized, and then you have to read several values and turn them into temperature and pressure.
Fortunately, other people have already done that for you, and there are several libraries that work well. So rather than trying to reproduce pages of code here, do a web search for “raspberry pi python bme280,” or check this book’s GitHub repo, https://github.com/akkana/pi-zero-w-book, for example code that you can use with the BME280.
A Temperature Tweeter
One of the nifty features of the Raspberry Pi Zero W is that it has WiFi built in. So you could, say, set up a Twitter account to tweet the temperature.
Registering with Twitter
The hard work is registration. In order to use Twitter from a program, you have to register your program with Twitter and jump through some hoops to set up what’s known as OAuth authentication.
Go to https://apps.twitter.com/ (on any computer—you don’t have to do this part on the Pi), log in to Twitter if you haven’t already, and click Create New App. If you’re setting up a special Twitter account for your temperature tweeter, log in as that account rather than your normal account.
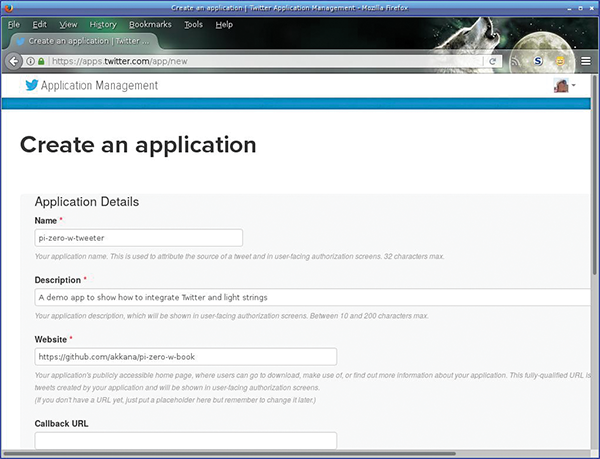
Figure 3-6: Twitter’s page for registering a new app
In the Application Details page, the hard part is the first entry, Name. Your app name has to be unique in the universe of everyone who’s ever registered a Twitter app. You may have to try quite a few times to come up with a name no one else has ever thought of. Good luck!
The rest of the fields are easier. Description is a short description of what your app does. When you’re first registering it, you probably don’t know yet what it will do, so this isn’t too critical. You can change it later. Website is a URL for a website describing the app. If you have a web page or a GitHub repository where you’ll describe it, use that. If not, make something up.
Callback URL applies mostly to web apps; you can leave it blank for a Python app.
Of course, you have to click that you’ve read the Developer Agreement and understood all the clauses about firstborn children and blood sacrifices. You did notice those parts, right?
Click Create Your Twitter Application. If you found a name that’s not taken, Twitter will take you to the Application Settings page. Otherwise, try another name.
In Application Settings, click the Permissions tab and check the access permissions; by default, the setting may be Read or Read, Write but you may want to change it to Read, Write and Access Direct Messages. (In Chapter 4, you will use Twitter’s direct messages.) Changing the permissions will change your secret keys, so set the permissions first.
The secret keys? They’re the point of this whole exercise. Once you have the permissions the way you want them, click the Keys And Access Tokens tab at the top of the page.
You’ll see Consumer Key and Consumer Secret there. But you need two other tokens as well: Access Token and Access Token Secret. Even though it sounds like some of them are secret and some aren’t, all four of the tokens are secret and you shouldn’t put them in your Python program or share them with other people.
To generate the other two tokens, scroll down and click “Create my access token” at the bottom of page.

Figure 3-7: Click “Create my access token” to generate the third and fourth tokens.
Now you’re on a page that shows all four tokens. Copy and paste them to a file. Linux generally stores configurations in directories named ~/.config/APPNAME/ (on Linux, the tilde character, ~, is short for your home directory, /home/pi, so this is really /home/pi/.config/APPNAME). Create that directory. Then, from the shell, type
mkdir ~/.config/YOUR_APP_NAMEReplace YOUR_APP_NAME appropriately (but it’s best to avoid using spaces).
Then in your editor, create a file in that directory called auth. For instance, if you’re using nano to edit files, use this:
nano ~/.config/YOUR_APP_NAME/authStore your four Twitter tokens in it so it looks like this:
consumer YOUR_CONSUMER_KEY
consumer_secret YOUR_CONSUMER_SECRET_KEY
access_token YOUR_ACCESS_TOKEN
access_token_secret YOUR_SECRET_ACCESS_TOKEN
Of course, replace YOUR_CONSUMER_KEY and the other three variables with the actual keys you copy from the Twitter page.
Now your Python programs will be able to read the keys from that file without any risk of people seeing your secret keys when you share your code.
Python Twitter Libraries
There are lots of Python wrappers for the Twitter API. The two most popular are Python-Twitter and Tweepy. They’re similar enough that if you learn one, you can probably learn the other without too much difficulty. I’ll use Python-Twitter here. Install it with this command:
sudo apt-get install python-twitterIf you prefer to use the graphical installer in PIXEL, that’s fine too.
Python-Twitter depends on several other packages. The installer will ask you to confirm that it’s okay to install those packages too.
You’re ready to start coding. At the beginning of your temperature-sensing program, import the twitter module (that’s Python-Twitter, which you just installed). Read in the four tokens from the file, examining each line to figure out which token is which and storing them in a dictionary called oauthtokens. Then call twitter.Api() to log in and get a twitter.Api object.
import twitter

def init_twitter():
    conffile = "/home/pi/.config/YOUR_APP_NAME/auth"
    oauthtokens = {}
    with open(conffile) as conf:
        for line in conf:
            line = line.split()
            oauthtokens[line[0]] = line[1]

    return twitter.Api(
        consumer_key=oauthtokens["consumer"],
        consumer_secret=oauthtokens["consumer_secret"],
        access_token_key=oauthtokens["access_token"],
        access_token_secret=oauthtokens["access_token_secret"])
Once you’re logged in, you can call Twitter functions to get the timeline, check direct messages, post tweets, and so forth. At first, though, all you’ll need is the ability to post a new tweet.
Tweeting the Temperature
If you’ve already initialized the Twitter API, all you need to post a tweet is PostUpdate("Whatever you want to say"). You can easily add that to your temperature monitoring program:
if __name__ == '__main__':
    twitapi = init_twitter()

    ctemp = read_temperature_c()
    ftemp = ctemp * 1.8 + 32
    twitapi.PostUpdate("The temperature is %.1f degrees!" % ftemp)
In practice, though, this approach can fail in various ways. For instance, if you run this code inside a while True loop and the temperature hasn’t changed since last time, you’ll be trying to post the exact same tweet as last time, and your program will die with a Twitter error, since Twitter assumes that if you try to post the same tweet twice, it must be a mistake. To guard against that, check for Twitter exceptions:
    while True:
        ctemp = read_temperature_c()
        ftemp = ctemp * 1.8 + 32
        try:
            tempx = "The temperature is %.1f degrees!"
            twitapi.PostUpdate(tempx % ftemp)
        except twitter.TwitterError as e:
            print("Twitter error: %s" % str(e))
Of course, you can do variations, such as posting only if the temperature is above a certain value:
        try:
            if ftemp>90:
                tempx = "It's too hot!! %.1f degrees!"
                twitapi.PostUpdate(tempx % ftemp)
        except twitter.TwitterError as e:
            print("Twitter error: %s" % str(e))
Controlling a Fan or Air Conditioner
In Chapter 2, “Blink an LED,” you turned LEDs on and off. But what if you want to control something big? For instance, wouldn’t it be nice to be able to switch on your air conditioner automatically when the temperature rises above 85 degrees?
You can’t do that directly; if you tried to send 120 volts of alternating current through a Raspberry Pi you’d have crispy burned Pi. You need something that can take input at one voltage and use it to switch a circuit running at a completely different voltage. You can buy relays that will do the job, but there’s a device that makes it much easier: the PowerSwitch Tail (see Figure 3-8).

Figure 3-8: The PowerSwitch Tail
The manufacturer calls the PowerSwitch Tail “an opto-isolated solid-state relay.” The important part of that is “isolated”; it means there’s no electrical connection between the 120-volt AC your house devices use and the delicate 3.3–5-volt DC innards of your Raspberry Pi. (And yes, there’s a 220-volt version for use outside the United States.)
To wire up the PowerSwitch Tail, you’ll need two or three bare wires and a slim flat-bladed screwdriver to anchor the wires. On the Pi Zero W, use the same pin you used for the LED in Chapter 2: pin 8 or GPIO 14 (though nearly any GPIO pin will work).

Figure 3-9: Two ways of wiring the PowerSwitch Tail
The PowerSwitch Tail has three terminals, labeled +in, -in, and Ground. There are two ways to hook it up. First, you can connect -in to a ground connection on your Pi, and connect +in to the GPIO signal line you’ll control with software. A second option is to connect Ground on the PowerSwitch Tail to ground on the Pi, connect +in to 3.3v on the Pi, and connect -in to your GPIO line.
Whichever route you choose, set the GPIO line to high or low the same way you did with the blinking LED in Chapter 2. Depending on what model of PowerSwitch Tail you have, the logic may be reversed; you might need to set the GPIO line to high to make AC flow through the PowerSwitch Tail, or you might need to set it to low.
You don’t need to have anything plugged in to the PowerSwitch Tail to test it; it has an LED that lights up when power would be flowing, and you can hear it click whenever it switches on or off. You can test it with your LED code from Chapter 2—except now, instead of controlling a single LED, you can control a desk lamp, fan, air conditioner, or anything else you can plug into house current. Of course, with a fan or air conditioner, you probably don’t want to blink it on and off every second!
Switching a Fan Automatically by Temperature
I’ll use the MCP9808 sensor since its code is the smallest, but you can replace the code inside get_temperature_f() with code for any sensor you have.
# Control a fan or air conditioner using temperature sensor readings

import RPi.GPIO as GPIO
import smbus
from time import sleep

# Constants:
MCP9808 = 0x18         # The default I2C address of the MCP9808
TEMP_REG = 0x05        # The temperature register
POWERSWITCH = 14       # GPIO pin for the PowerSwitch Tail

# Depending on your model, you might need to reverse these:
FAN_ON = GPIO.HIGH
FAN_OFF = GPIO.LOW

# How hot does it have to get before turning on a fan?
TOO_HOT = 80

# How many seconds should we sleep between temp checks?
SLEEPTIME = 60 * 5

bus = smbus.SMBus(1)

def initialize():
    GPIO.setmode(GPIO.BCM)
    GPIO.setup(POWERSWITCH, GPIO.OUT)

def get_temperature_f():
    '''Return temperature in Fahrenheit'''
    data = bus.read_i2c_block_data(MCP9808, TEMP_REG)

    # Calculate temperature (see 5.1.3.1 in the datasheet):
    upper_byte = data[0] & 0x1f    # clear flag bits
    lower_byte = data[1]
    if upper_byte & 0x10 == 0x10:  # less than 0C
        upper_byte &= 0x0f
        ctemp = 256 - (upper_byte * 16.0 + lower_byte / 16.0)
    else:
        ctemp = upper_byte * 16.0 + lower_byte / 16.0

    print(ctemp * 1.8 + 32)
    return ctemp * 1.8 + 32

if __name__ == '__main__':
    initialize()

    try:
        while True:
            temp = get_temperature_f()
            if temp >= TOO_HOT:
                GPIO.output(POWERSWITCH, FAN_ON)
            else:
                GPIO.output(POWERSWITCH, FAN_OFF)

            sleep(SLEEPTIME)
    except KeyboardInterrupt:
        GPIO.cleanup()
Adjust the constants as needed, like which pins you’re using, whether you need a HIGH or LOW signal to turn your fan on, and what temperature should trigger the fan to come on.
Switching via Internet Messaging
If you don’t want to use automatic temperature sensing, you can send a message over the Internet to switch your AC on and off remotely from work or wherever you might be. I’ll use Twitter messaging as an example, but you could check email messages, or use a service that receives SMS messages you send from your phone.
For instance, you could send your Pi a direct message with a special code, like “FAN ON.” Then your Pi could check for messages inside the code from the earlier listing in the section “Tweeting the Temperature.” Add import calendar to the Python imports at the top of the file, and then add a check_for_command function:
import twitter
import calendar
import time
import RPi.GPIO as GPIO

def init_twitter():
    # THE SAME CODE YOU USED IN PREVIOUS EXAMPLES

twitapi = init_twitter()
messages_seen = set()

def check_for_command(twitapi, code, recentminutes):
    '''Check for the last msg that starts with code
       and was sent in the specified number of minutes.
       Look for the command after the code, e.g., FAN ON.
       Returns (cmd, user) if there was a command,
       cmd is a string like "ON", user is a screen name.
       Returns (None, None) if there was no command.
    '''
    DMs = twitapi.GetDirectMessages(count=5, skip_status=True)
    now = time.time()
    for msg in DMs:
        # Have we already seen this message?
        if msg.id in messages_seen:
            break
        messages_seen.add(msg.id)

        if msg.text.startswith(code):
            # strip off the code part to get the ON or OFF command:
            cmd = msg.text[len(code):].strip()

            # Parse the creation time for the message,
            # make sure it was sent recently
            t = time.strptime(msg.created_at,
                              '%a %b %d %H:%M:%S +0000 %Y')
            # How old is the message?
            minutesold = (now - calendar.timegm(t)) / 60
            if minutesold > recentminutes:
                break

            # We have a valid command.
            return cmd, msg.sender_screen_name

    # Didn't see a command:
    return None, None
A lot of the code has to do with parsing the time to be sure you’re not responding to a command you sent three weeks ago. Twitter sends times that look like “Wed Jul 05 19:15:12 +0000 2017” in GMT, so you have to turn that into a Python time in order to compare it to the current time.
You’ll probably want to add some extra checking inside the if msg.text.startswith(code) section for security, to make sure the message comes from your account. You don’t want just any Twitter user to be able to message your Pi and switch your home appliances on or off!
Add the Twitter code to your PowerSwitch Tail program, and in the while True: loop, instead of (or in addition to) checking whether temp >= TOO_HOT, check for a Twitter message:
if __name__ == '__main__':
    twitapi = init_twitter()
    powerswitch = 14
    GPIO.setmode(GPIO.BCM)
    GPIO.setup(powerswitch, GPIO.OUT)
    try:
        while True:
            cmd, user = check_for_command(twitapi, "FAN", 30)
            if cmd == "ON":
                GPIO.output(powerswitch, GPIO.HIGH)
                twitapi.PostDirectMessage("Turned fan ON",
                                          screen_name=user)
            elif cmd == "OFF":
                GPIO.output(powerswitch, GPIO.LOW)
                twitapi.PostDirectMessage("Turned fan OFF",
                                          screen_name=user)
            elif cmd:
                twitapi.PostDirectMessage("Unknown command %s"
                                          % cmd,
                                          screen_name=user)

            time.sleep(60 * 5)   # sleep 5 minutes between checks

    except KeyboardInterrupt:
        GPIO.cleanup()
Then all you have to do is send yourself (or your Pi, if you’ve set up a different Twitter account for it) a direct message saying “FAN ON,” and the Pi will see the ON command and switch on the fan for you, and then message you back to tell you it saw the command. If you want to turn it off again, send another message, “FAN OFF.”
Pretty cool—literally!