
Chapter 2
Laying the Foundation for Your Kickstarter Campaign
In This Chapter
![]() Getting your project ready for crowdfunding
Getting your project ready for crowdfunding
![]() Highlighting what makes your project unique
Highlighting what makes your project unique
![]() Writing your project description to appeal to supporters
Writing your project description to appeal to supporters
![]() Making the best use of Kickstarter categories
Making the best use of Kickstarter categories
One of the biggest challenges (and also opportunities) with Kickstarter is deciding what your unique project will be, determining what makes it special, and then labeling it in the appropriate category.
In this chapter, I examine ways to think about framing your project and communicating what makes it unique, and also determining its appropriate Kickstarter category.
In order to create a winning and engaging campaign, you need to have a dynamic and interesting presence on Kickstarter. Hundreds of projects are added every week, so yours needs to stand out and catch everyone’s eye, not just your friends.
In this chapter, I show you how to make a strong impression by carefully choosing your category, writing interesting copy, and creating a compelling video to explain your Kickstarter project. I’ll also delve into some of the resources available around the web to make your content as interesting as possible.
Transforming Your Passion into a Kickstarter Project
Your best bet is to have a specific project already in mind. If you just want to use Kickstarter to stimulate your creative juices, that’s putting the cart before the horse. Your campaign needs to be concrete and well-rounded, focused on putting a real product out. If you’re having trouble figuring out what project is the best fit for your passion, this section can help.
To start, consider the following example: Say you’re interested in sharing the story of an amazing disabled athlete who has overcome horrendous injuries and is now competing at the World Triathlete Championships. You know this athlete personally and feel his story of triumph over tragedy could inspire others — but you’re unsure about how to proceed.
A first step would be to think about this passion and the best possible way to tell the story. Make a list that examines the following questions:
![]() Is this a story you can tell in real time? Continuing the earlier example, telling the story in real time means you’ll follow the athlete’s upcoming competition. A story that’s not in real time would have a different focus (say, retelling an amazing past accomplishment).
Is this a story you can tell in real time? Continuing the earlier example, telling the story in real time means you’ll follow the athlete’s upcoming competition. A story that’s not in real time would have a different focus (say, retelling an amazing past accomplishment).
![]() What kind of material will you have access to and use to tell this story? For example, will you have video and photos, or just photos? This consideration might help you determine whether your project should be a short film or a photo-gallery showing.
What kind of material will you have access to and use to tell this story? For example, will you have video and photos, or just photos? This consideration might help you determine whether your project should be a short film or a photo-gallery showing.
![]() Are you familiar with the project’s topic personally, or is it something you’ll need to research? How close are you to a subject? If you don’t have a personal relationship with the potential person(s) involved, perhaps seek out opportunities to get to know him or her before beginning the Kickstarter project.
Are you familiar with the project’s topic personally, or is it something you’ll need to research? How close are you to a subject? If you don’t have a personal relationship with the potential person(s) involved, perhaps seek out opportunities to get to know him or her before beginning the Kickstarter project.
![]() Do you have more experience in one type of project than another? If you have written many magazine articles and short stories in the past, but have never attempted a short film or documentary, consider researching articles and seminars relating to topics such as “translating a story to film” before you embark on the project.
Do you have more experience in one type of project than another? If you have written many magazine articles and short stories in the past, but have never attempted a short film or documentary, consider researching articles and seminars relating to topics such as “translating a story to film” before you embark on the project.
![]() How many resources would you have at your disposal for each type of project you’re considering? Make a list of every piece of equipment, software program, or other tool you have for each type of project (film, book, showing, whatever); see where the biggest gaps in your list are. Also, think about whether you will need to hire people to help make your project a reality. In Chapter 3, you consider the need to pay for or barter with this outside help.
How many resources would you have at your disposal for each type of project you’re considering? Make a list of every piece of equipment, software program, or other tool you have for each type of project (film, book, showing, whatever); see where the biggest gaps in your list are. Also, think about whether you will need to hire people to help make your project a reality. In Chapter 3, you consider the need to pay for or barter with this outside help.
By examining your responses to all these questions, you can get a clear idea of what it takes to turn your passion into a project. When you know what type of project you want to create, you’re ready to start preparing the material for your Kickstarter campaign, as I explain in the next section.
Prepping to Start Your Project
You can save time down the road by preparing key elements of your project information before you begin to set it up on Kickstarter. Figure 2-1 gives you an overview of the elements you need to prepare for your campaign page, which explains your overall vision for your Kickstarter project. The following list introduces each item:
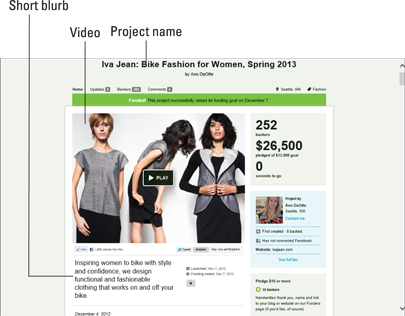
Figure 2-1: An overview of a Kickstarter campaign page.
![]() A fabulous project name: The name for your project is critical because it needs to explain what the project is all about. Chose a title that is simple, specific, and memorable. Avoid using words like help; such words are too generic. Choose words that exemplify what you’re doing through active terms. Here are some examples of good project names that are compelling and specific:
A fabulous project name: The name for your project is critical because it needs to explain what the project is all about. Chose a title that is simple, specific, and memorable. Avoid using words like help; such words are too generic. Choose words that exemplify what you’re doing through active terms. Here are some examples of good project names that are compelling and specific:
• Nomiku: Bring sous vide into your kitchen
• Fund the 2013 Union Square Fire Dancing Expo
• The Goon Movie — Let’s Kickstart this Sucker!
![]() An image that represents your project: Kickstarter requires an image in a 4:3 aspect ratio, meaning that the image is slightly more horizontal than vertical. Also, be sure that the image has a high enough resolution to look good on the World Wide Web — ideally 200 dpi or higher to avoid pixilation.
An image that represents your project: Kickstarter requires an image in a 4:3 aspect ratio, meaning that the image is slightly more horizontal than vertical. Also, be sure that the image has a high enough resolution to look good on the World Wide Web — ideally 200 dpi or higher to avoid pixilation.
 Choose an image that summarizes your project in a nutshell, like a logo, a photo of your design prototype or book cover, a screen shot from a video (if you’re already underway on production), still photos from a studio shoot, and so on. Ideally you won’t use just a photo of yourself, but instead something that shows what the project is about.
Your project image needs to grab a viewer’s attention and visually illustrate the nature of your project quickly. The image is featured on the Kickstarter main page if someone is searching in your category or geographic region. Figure 2-2 showcases a great project image for the Pebble E-Paper Watch, discussed in this book as the all-time most successful Kickstarter campaign. The image is simple, clean, compelling, and clearly shows the project.
![]() A short blurb that describes your project: Think Twitter; think elevator pitch. The limit for your short description is 135 characters (not 135 words). For pointers on creating an effective description, flip to “What Makes Your Project Unique? Writing a Short Project Description” later in this chapter. The short description will appear just below your photo on your main project page; it should be almost as short as a photo caption. It will also appear with your project image on any category or search pages, as mentioned earlier.
A short blurb that describes your project: Think Twitter; think elevator pitch. The limit for your short description is 135 characters (not 135 words). For pointers on creating an effective description, flip to “What Makes Your Project Unique? Writing a Short Project Description” later in this chapter. The short description will appear just below your photo on your main project page; it should be almost as short as a photo caption. It will also appear with your project image on any category or search pages, as mentioned earlier.
![]() A short video that grabs attention: A key element of every Kickstarter project is a short video, ideally two minutes or less. See the section “Making a Compelling Video” later in this chapter for more details.
A short video that grabs attention: A key element of every Kickstarter project is a short video, ideally two minutes or less. See the section “Making a Compelling Video” later in this chapter for more details.
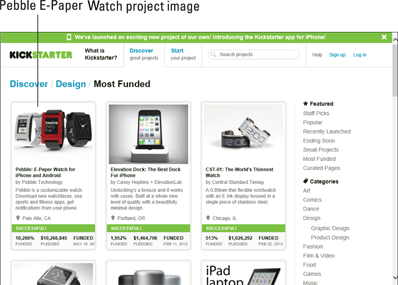
Figure 2-2: The Pebble E-Paper Watch had a great project image for its Kickstarter campaign.
![]() Duration for your project campaign: Kickstarter recommends a campaign timeframe of 30 days or less, but doesn’t insist upon it. The campaign duration is your call. In fact, several campaigns run up to 60 days. The advantage of a shorter window is a sense of urgency to encourage backers to donate; however, it gives you less time to promote your project. I suggest you check out the details about managing and spreading the word about your campaign (they’re in Chapter 6) before you determine your campaign duration.
Duration for your project campaign: Kickstarter recommends a campaign timeframe of 30 days or less, but doesn’t insist upon it. The campaign duration is your call. In fact, several campaigns run up to 60 days. The advantage of a shorter window is a sense of urgency to encourage backers to donate; however, it gives you less time to promote your project. I suggest you check out the details about managing and spreading the word about your campaign (they’re in Chapter 6) before you determine your campaign duration.
![]() A project funding goal: Before you go online to set up a project, think through your funding needs and have an amount in mind. Setting the funding goal is a big part of any program’s success. Chapter 3 goes into detail about how much to ask for, depending on what your project needs.
A project funding goal: Before you go online to set up a project, think through your funding needs and have an amount in mind. Setting the funding goal is a big part of any program’s success. Chapter 3 goes into detail about how much to ask for, depending on what your project needs.
![]() A category: Every Kickstarter project needs to fit into one of the site’s defined categories. The section “Understanding Kickstarter Categories” later in this chapter details the available categories and how to classify your project, but think early on about what category your work might fall into.
A category: Every Kickstarter project needs to fit into one of the site’s defined categories. The section “Understanding Kickstarter Categories” later in this chapter details the available categories and how to classify your project, but think early on about what category your work might fall into.
![]() Your bio: You will be asked to write a short description about yourself for your project. If you have an existing bio/CV/résumé completed, locate it and review it before you go any further; think about what elements you want to highlight in your personal Kickstarter bio. Be sure to include any experience or accomplishments you have that demonstrate your ability to meet the goals you’ve outlined in your campaign.
Your bio: You will be asked to write a short description about yourself for your project. If you have an existing bio/CV/résumé completed, locate it and review it before you go any further; think about what elements you want to highlight in your personal Kickstarter bio. Be sure to include any experience or accomplishments you have that demonstrate your ability to meet the goals you’ve outlined in your campaign.
![]() A full description of your project: Beyond the short blurb, you will be writing a detailed description of your campaign, goals, risks, and challenges. The section “Creating the Long Project Description” later in this chapter details the steps needed to fill this out, and it is a good idea to begin outlining the details of your campaign before you go much further.
A full description of your project: Beyond the short blurb, you will be writing a detailed description of your campaign, goals, risks, and challenges. The section “Creating the Long Project Description” later in this chapter details the steps needed to fill this out, and it is a good idea to begin outlining the details of your campaign before you go much further.
![]() Rewards: Every Kickstarter campaign has backer rewards at several funding levels. Even if you’re unsure about your own potential rewards at this point, take a quick browse through other campaigns on the site to get an idea of the types of reward levels out there. You find out more about rewards in Chapters 3 and 9.
Rewards: Every Kickstarter campaign has backer rewards at several funding levels. Even if you’re unsure about your own potential rewards at this point, take a quick browse through other campaigns on the site to get an idea of the types of reward levels out there. You find out more about rewards in Chapters 3 and 9.
What Makes Your Project Unique? Writing a Short Project Description
Your short project description needs to convey your project’s unique selling point. This may sound a bit like a marketing term, and in a way, it is. This description appears just below your main project image on your campaign home page and on any search pages. You only get 135 characters (this includes spaces) in these areas of the Kickstarter site to make your project stand out.
Tens of thousands of books, movies, comic books, games, and products are marketed every year. Your Kickstarter project is no different. A strong unique selling point helps you
![]() Create a concise project description.
Create a concise project description.
![]() Describe your project quickly to potential backers.
Describe your project quickly to potential backers.
![]() Differentiate your project from the thousands of others on the market.
Differentiate your project from the thousands of others on the market.
The following steps can help you pinpoint what makes your project unique in your short product description:
1. Describe your project in one word: film, book, show, design, product, painting, and so on.
This single-word description helps you get at the very core of the project and gets you thinking about how to differentiate from other ideas.
2. Build a powerful phrase or sentence around your one word.
For example: A film about families struggling to overcome poverty in rural America.
This expanded phrase explains the core of the project.
3. Expand your sentence so that it explains why your project is different or better than others on the market:
Unlike previous documentaries that only show the nuts-and-bolts basics of the fiscal impact of poverty in rural America, this film will go deeper, examining the specific psychological effects long-term poverty has on rural families.
4. Check the character count of your sentence. In Microsoft Word, you can do this by selecting the text and clicking the word count in the lower-left corner of the screen.
When you click the word count, a Word Count dialog box appears with additional details including the character count without spaces and the character count with spaces. Most other word processing programs offer a similar tool.
5. If you’re not within the 135-character limit, start by deleting any unnecessary words and looking for phrases that you can make more concise by replacing them with single words.
In the example just given, the description is beyond 135 characters (spaces count for characters). If the differentiating quality of the film is psychological effects versus fiscal impact, you might narrow down the description as follows:
Documentaries about poor rural American families usually focus on money. This film examines poverty’s deep psychological effects.
This new description is only 130 characters, including spaces.
You may find yourself struggling a bit here, determining how to phrase your expanded sentence and short unique selling proposition. Practice describing your project in a succinct way a few different times. After you edit down the description as needed, read and re-read the description. Create multiple versions with different lead-ins until you find the right mix.
If you find you cannot describe your project quickly and accurately, perhaps you have too vague of a concept. Think about what you want to focus on, and then ask the following questions (each sample question is followed by a real-world example):
![]() Is there a way I can limit the time duration of my project? Instead of following an athlete for an entire year on his or her journey, should I only focus on a three-month window?
Is there a way I can limit the time duration of my project? Instead of following an athlete for an entire year on his or her journey, should I only focus on a three-month window?
![]() Should I focus on a specific geographic area? Is it too ambitious to document all the taco shops in California? Should I only focus on one region, such as Southern California?
Should I focus on a specific geographic area? Is it too ambitious to document all the taco shops in California? Should I only focus on one region, such as Southern California?
![]() Is my finished product too long? Would this film about a symphony be better as a short documentary instead of a full-length one?
Is my finished product too long? Would this film about a symphony be better as a short documentary instead of a full-length one?
![]() Would this concept be building on (or redoing) something already in the market? If so, how? Where will my project take the concept? How is this iPhone accessory different from the hundreds of others already on Kickstarter?
Would this concept be building on (or redoing) something already in the market? If so, how? Where will my project take the concept? How is this iPhone accessory different from the hundreds of others already on Kickstarter?
![]() Can I eliminate an element of my project? Do I need to make three versions of my comic book? Should I only produce one?
Can I eliminate an element of my project? Do I need to make three versions of my comic book? Should I only produce one?
![]() Should I collaborate with someone else to make the project more complete or understandable? If I partner with a videographer, can we make a combination web series and documentary at the same time to make a more compelling finished product?
Should I collaborate with someone else to make the project more complete or understandable? If I partner with a videographer, can we make a combination web series and documentary at the same time to make a more compelling finished product?
Start with whatever notes you have for your unique selling proposition. Then go through and answer each of these questions individually. Expand or contract your unique selling proposition based on your responses. Then try rewording it.
Creating the Long Project Description
On your campaign page, your long project description appears below the short blurb. This long project description is your opportunity to tell the full story of your passion and reasoning behind your Kickstarter campaign. Although you aren’t limited by a certain number of characters, it’s best to first revisit the initial description that you started when you were writing your short blurb. Go back to that first sentence you were writing, and instead of trying to cut it down to 135 characters, look at how you can expand on it:
![]() Write as if you were talking to a friend about how your passion got started.
Write as if you were talking to a friend about how your passion got started.
![]() Use a conversational tone, so potential backers get a sense of what you’re like.
Use a conversational tone, so potential backers get a sense of what you’re like.
![]() Use at least 3–4 sentences to describe why you want to make your project.
Use at least 3–4 sentences to describe why you want to make your project.
![]() In as much detail as possible, describe the steps of your project and various milestones you hope to accomplish.
In as much detail as possible, describe the steps of your project and various milestones you hope to accomplish.
![]() Similar to when you wrote your short blurb, clearly define how your project is different from others and why a backer should pledge. In addition to text, you have many opportunities to apply formatting and add additional media. Use the Bold, Underline, and Italic formatting buttons to draw attention to specific elements of your campaign or key milestones.
Similar to when you wrote your short blurb, clearly define how your project is different from others and why a backer should pledge. In addition to text, you have many opportunities to apply formatting and add additional media. Use the Bold, Underline, and Italic formatting buttons to draw attention to specific elements of your campaign or key milestones.
You can also link to other web pages or content here as well. If you want potential backers to learn more about the issue or topic associated with your project, insert the appropriate web links.
Choosing media to support your description
Media is the key to keeping attention here! In the Project Description box, you can add pictures, audio, and more video to support your idea.
I would recommend adding specific media here to help tell your story. You might have used these already in your Project Video, but it doesn’t hurt to reinforce your story and also give potential backers quick information that they can browse without watching the entire video:
![]() Photos of your project in action (if available)
Photos of your project in action (if available)
![]() Photos related to your topic and supporting visuals
Photos related to your topic and supporting visuals
![]() Short audio clips — especially helpful if you’re a musician and have a demo track or sample of how your project sounds
Short audio clips — especially helpful if you’re a musician and have a demo track or sample of how your project sounds
![]() Video clips from your project (if available)
Video clips from your project (if available)
![]() Photos or video clips from any press interviews you may have done
Photos or video clips from any press interviews you may have done
Keep all your clips in this section short, ideally 20 to 30 seconds or fewer. You want potential backers to get a sense of the campaign and your specific points, but keep in mind that they have a lot of content to go through!
Risks and Challenges
The project description also includes a section called Risks and Challenges. This special section lets you address what issues you think might come up during your project and how you plan to address them. In short, this gives your backers some peace of mind when they ask, “Does this person have the ability to pull this project off?” or even more importantly, “Do I feel confident giving this person my money, sure that he or she will deliver the item in the campaign as promised?”
 Unhappy Kickstarter backers tend to be very vocal about overdue rewards, production delays, and changes. Especially if your campaign includes a lot of variables that might be out of your control, be sure to use this section to highlight the potential pitfalls clearly and how you are anticipating overcoming them. The last thing you want is a bunch of unhappy backers posting about delays on social media!
In order to best fill out this box, go back to your project budget and review all the parts required to make your campaign a success. Which elements do you think might present the biggest obstacles?
Here are a few examples of such challenges:
![]() Unable to get required raw material (such as video footage, usable images, interview audio) to complete the project
Unable to get required raw material (such as video footage, usable images, interview audio) to complete the project
![]() Running out of time or missing deadlines
Running out of time or missing deadlines
![]() Conflicts with weather/seasons/special events
Conflicts with weather/seasons/special events
![]() Personal time constraints
Personal time constraints
![]() Production delays
Production delays
![]() Lack of knowledge or technical skill
Lack of knowledge or technical skill
![]() Budget overages
Budget overages
For each bullet item you think of for your individual campaign, come up with at least one (ideally two) responses that show how you will handle each problem.
Combine the potential challenges and solutions list into a paragraph or two and paste it here. By addressing these issues early, you get used to thinking about what you might need to have in place before even launching your campaign — and about how to assure your backers that you have the skills needed to handle the challenges. This early, proactive thinking builds community with your backers for the long haul.
Making a Compelling Video
Your video is featured at the very top of your Kickstarter campaign page — and needs to draw in potential backers quickly.
Before even starting your project, it’s best to spend time creating the video and getting it ready for upload.
A polished video eases the approval process (in which Kickstarter reviews your overall project application). If your video flows smoothly, has a good look and feel, and accurately explains your project, the Kickstarter review team can see that you understand the guidelines and requirements for a campaign. If your video is unfinished or hard to follow, it may be harder for Kickstarter to see that your campaign fits its requirements.
In the following sections, you explore what content to include in your video and basic tools for creating a video.
Outlining the content for your video
The video is one of the most important tools you have to get backers excited about your Kickstarter campaign. Why? The video tells a story in an easy-to-follow way and doesn’t require backers to go through lines of text.
Your video needs to specifically address your Kickstarter campaign. Be sure you clearly convey the primary goal of your campaign. For example, is the campaign hoping to completely fund a new fashion item and get it in stores, or provide resources to make samples for a trunk show? As you gather your raw materials outlined later in this section, constantly think about how each element will illustrate the goal of your campaign. If it doesn’t fit, don’t use it. A hilarious photo of your product idea in some fantastical scene doesn’t necessarily belong in your Kickstarter video. Even if humorous, your video needs to be professional and convey a clear message to instill confidence in your backers.
An important element to consider when beginning your Project Video: Two minutes or less! Why two minutes or less? Internet users, even those seeking creative projects and content, have an extremely short attention span. An average commercial is 30 seconds; an average television news segment is two and a half minutes. If you can’t tell the story of your project in under two minutes, it’s unlikely you will be able to draw backers in.
Before beginning production of your video, gather up and identify the raw materials you might want to include, such as
![]() Existing video clips of your project underway, if available
Existing video clips of your project underway, if available
![]() Still photos from your project underway, if available
Still photos from your project underway, if available
![]() Still photos of prototypes, samples, or examples of what you hope to produce
Still photos of prototypes, samples, or examples of what you hope to produce
![]() Illustrations or animated panels you want to show onscreen to highlight a film’s story
Illustrations or animated panels you want to show onscreen to highlight a film’s story
![]() Existing video or news clips that relate to your product or eventual goal
Existing video or news clips that relate to your product or eventual goal
![]() Music clips or downloads for purchase that fit with the theme of your project
Music clips or downloads for purchase that fit with the theme of your project
Choosing tools to make a great video
Gone are the days when you needed expensive editing equipment to make a video. Because you’re not posting a video for broadcast television, it doesn’t need to be HD resolution, although many phones and small cameras can shoot video in HD. Even if you don’t actually have video footage for the project, you can use a number of tools to turn still photos into a video with music or other sound. Two major computer-based resources to try are
![]() iMovie: This drag-and-drop program comes standard on most Mac computers now and allows you to input video clips, photos, and music into a central file and edit them together into a finished piece.
iMovie: This drag-and-drop program comes standard on most Mac computers now and allows you to input video clips, photos, and music into a central file and edit them together into a finished piece.
![]() Windows Movie Maker: Part of the Microsoft suite of software often found on PCs that have recent versions of Windows and Office installed. If it is not pre-installed on your computer, you can download it from the Microsoft website at
Windows Movie Maker: Part of the Microsoft suite of software often found on PCs that have recent versions of Windows and Office installed. If it is not pre-installed on your computer, you can download it from the Microsoft website at Microsoft.com.
If you don’t have access to a desktop-based editing program or are intimidated by the idea of using one, there are other, extremely user-friendly ways to create a video — even from still photos:
![]() Animoto (
Animoto (http://animoto.com): This web-based tool enables you to create an unlimited number of 30-second videos for free, using a drag-and-drop tool. You can become a member for as little as $30/year to get access to templates and music to make videos of any duration.
Log on to the website to start your video project, as shown in Figure 2-3.
You then can begin uploading your raw data, such as videos and still photos, as shown in Figure 2-4. You then manipulate your video elements to tell your Kickstarter story.
Music adds an important element to any video project and can create a fun, serious, energetic, or lighthearted mood. Figure 2-5 shows a sample selection of Animoto’s musical library. Choose a track and let Animoto match the music to your images.
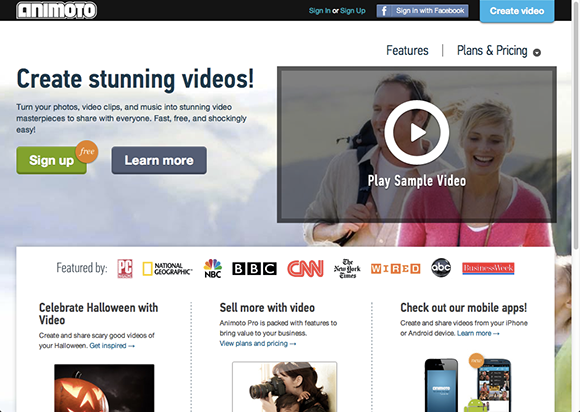
Figure 2-3: Animoto uses easy drag-and-drop technology.
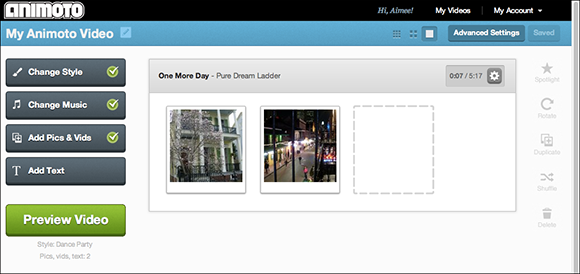
Figure 2-4: Upload a collection of clips and images in any order.
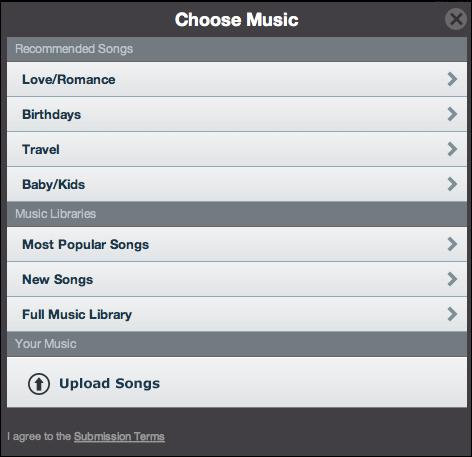
Figure 2-5: Select a musical track from Animoto’s library.
![]() YouTube Video Editor (
YouTube Video Editor (www.youtube.com/editor): YouTube already is a great place to upload and showcase your videos; the website also has a good online tool for basic editing and enhancement. Using this free editor, you can
• Combine video clips.
• Stabilize blurriness.
• Add transitions and music.
• Make precise timing edits.
YouTube Video Editor does not allow you to integrate still photos like Animoto does, but it is a good tool if you already have a collection of video clips and you need to edit it down into two minutes for your Kickstarter Project Video.
Figure 2-6 shows the user interface for YouTube Video Editor.
![]() Picasa: Most people think of Picasa as a photography tool, used to organize and upload photos to web albums. However, this tool from Google also has functions that let you make a video from just your still photos, similar to Animoto. If you don't already have Picasa on your computer, you can download it for free from
Picasa: Most people think of Picasa as a photography tool, used to organize and upload photos to web albums. However, this tool from Google also has functions that let you make a video from just your still photos, similar to Animoto. If you don't already have Picasa on your computer, you can download it for free from www.picasa.google.com. Install it by clicking the program file in your "downloads" folder or opening the file from where you told your computer to save the program.
After you launch the program, it automatically starts scanning your computer for all the pictures and video files on your hard drive and puts them into the Picasa library. From there, you can quickly start building a project around your Kickstarter video.
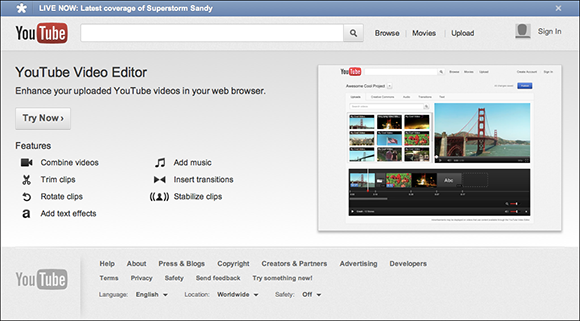
Figure 2-6: YouTube Video Editor helps you export a finished video.
A smartphone is another tool you can use to create a Kickstarter Project Video. Most smartphones (iPhone, Android, BlackBerry, and so on) come with an integrated video camera. For a simple and straightforward video about your project, try the following steps:
1. Use your phone to film a short two-minute synopsis of the project, showing any relevant visuals, details, or project elements.
Remember that you will not be able to edit, manipulate, or change this video; you will have to shoot it in real time, exactly as you would like it to appear online. If you choose this method, you need to have any and all props or visuals already organized and ready, and be sure to monitor your time (to keep it under two minutes). Practice several times before shooting for real.
2. To save the video to your computer, sync your phone with your computer or e-mail the video file to yourself.
3. Preview your video.
The following points are good to check, especially if you’ve filmed the video on a smartphone:
• Does the video display well on a desktop or laptop as well as on a mobile device?
• Can you understand the audio throughout the video?
• Is the lighting bright enough that your potential backers can see what you want the video to show?
• Is the video jerky or unstable? Consider re-shooting using a tripod, resting the phone on a steady surface, or having a friend help you if you shot the video yourself.
• Did you remember all the content you planned to include in the video?
4. Upload the video when you come to that part of your project’s development.
Chapter 5 walks you through the details of setting up your campaign in Kickstarter.
Understanding Kickstarter Categories
Many people come to the Kickstarter website and browse categories they’re already interested in; it’s critical to place your project in the category most aligned with your finished product. In the following sections, you find an introduction to each Kickstarter category and tips on choosing the best category for your project.
Introducing the categories
When you first come to the Kickstarter main page, you see a staff pick for the project of the day and a listing of all the Kickstarter categories in a column at the right of the screen. The following list gives you examples of the types of projects that are suitable for each category.
![]() Art: The category includes paintings, drawings, sculpture, performance art, digital art, watercolors, pencil art, chalk art, charcoal art, and art schools or instruction. Figure 2-7 shows the Kickstarter campaign page for an art installation at the Dead Sea. The campaign’s goal was to highlight the importance of water conservation.
Art: The category includes paintings, drawings, sculpture, performance art, digital art, watercolors, pencil art, chalk art, charcoal art, and art schools or instruction. Figure 2-7 shows the Kickstarter campaign page for an art installation at the Dead Sea. The campaign’s goal was to highlight the importance of water conservation.
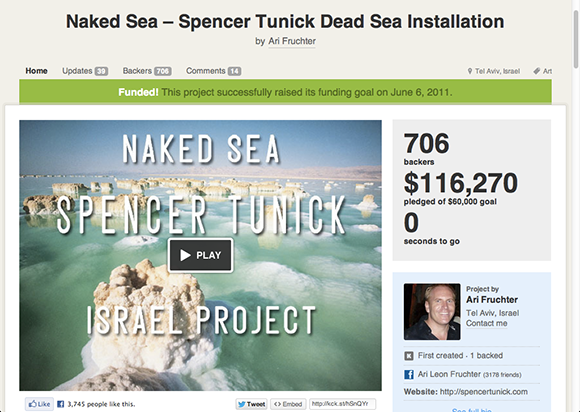
Figure 2-7: This project for an art installation at the Dead Sea was featured in the Art category.
![]() Comics: Here you find comic books, ongoing comic strips, online comic series, and products for comic enthusiasts. Figure 2-8 shows the Kickstarter campaign page for The Bargain, a graphic novel, which appeared in the Comics category. So did The Order of the Stick, a comic strip series that was turned into a printed book. (Find out more about The Order of the Stick in Chapter 3.) That project fit this category best because it specifically deals with a comic strip format, even though the campaign was for re-printing of a book-style collection.
Comics: Here you find comic books, ongoing comic strips, online comic series, and products for comic enthusiasts. Figure 2-8 shows the Kickstarter campaign page for The Bargain, a graphic novel, which appeared in the Comics category. So did The Order of the Stick, a comic strip series that was turned into a printed book. (Find out more about The Order of the Stick in Chapter 3.) That project fit this category best because it specifically deals with a comic strip format, even though the campaign was for re-printing of a book-style collection.
![]() Dance: Projects in this category include dance recitals, dance troupe costumes, choreography services, and dance festivals. Figure 2-9 is a sample Dance entry, which is a campaign to expand a dance and movement installation into an evening-length dance performance for a festival in Brooklyn.
Dance: Projects in this category include dance recitals, dance troupe costumes, choreography services, and dance festivals. Figure 2-9 is a sample Dance entry, which is a campaign to expand a dance and movement installation into an evening-length dance performance for a festival in Brooklyn.
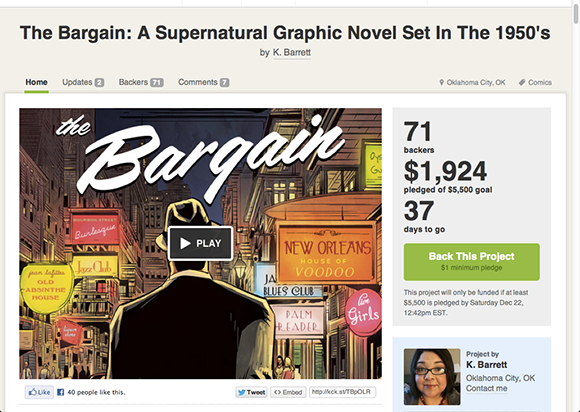
Figure 2-8: This graphic novel project appeared in the Comics category.

Figure 2-9: This Kickstarter campaign’s goal is to expand a modern dance performance.
![]() Design: This category is for Kickstarter projects related to product development, modeling/fabrication, and graphic design. Projecteo, shown in Figure 2-10, featured its campaign for a tiny Instagram projector (which enables users to project their Instagram images) in the Design category. Projecteo is a great example of the type of new tool or product that is a good fit for the Design category. See the section, “Choosing the right category,” a little later in this chapter for more about deciding whether the Design category is right for your project.
Design: This category is for Kickstarter projects related to product development, modeling/fabrication, and graphic design. Projecteo, shown in Figure 2-10, featured its campaign for a tiny Instagram projector (which enables users to project their Instagram images) in the Design category. Projecteo is a great example of the type of new tool or product that is a good fit for the Design category. See the section, “Choosing the right category,” a little later in this chapter for more about deciding whether the Design category is right for your project.
![]() Fashion: This category accommodates designers of jewelry and clothing (including hats, scarves, gloves, and accessories). Projects that take the form of fashion shows and product-line launches typically opt for the Fashion category. Figure 2-11 shows a Fashion entry for Iva Jean, which launched a Kickstarter campaign for the creation and distribution of a line of women’s clothing that’s designed to be clean-cut for work but that also meets the needs of bicycle commuters.
Fashion: This category accommodates designers of jewelry and clothing (including hats, scarves, gloves, and accessories). Projects that take the form of fashion shows and product-line launches typically opt for the Fashion category. Figure 2-11 shows a Fashion entry for Iva Jean, which launched a Kickstarter campaign for the creation and distribution of a line of women’s clothing that’s designed to be clean-cut for work but that also meets the needs of bicycle commuters.
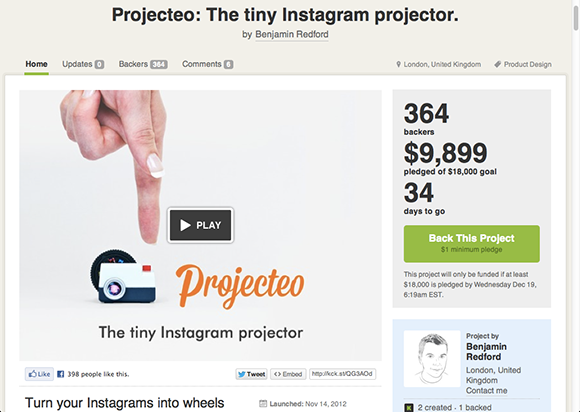
Figure 2-10: The Projecteo campaign appeared in the Design category.
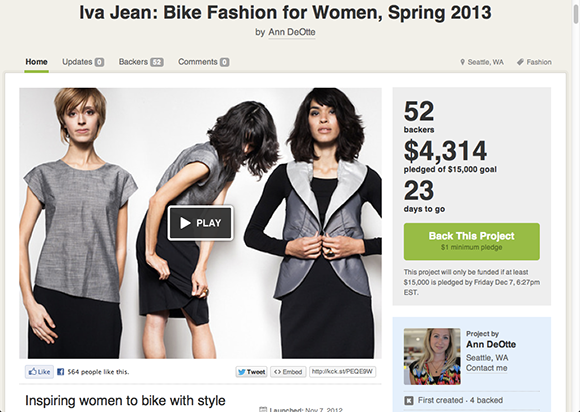
Figure 2-11: Iva Jean is a natural fit for the Fashion category.
![]() Film & Video: If your project is a documentary, short film, full-length feature film, instructional video, or web series, it’s likely a good fit for the Film & Video category. Figure 2-12 shows a sample Film & Video entry, a campaign for the documentary, Love Thy Nature, which explores individual connection with the natural world.
Film & Video: If your project is a documentary, short film, full-length feature film, instructional video, or web series, it’s likely a good fit for the Film & Video category. Figure 2-12 shows a sample Film & Video entry, a campaign for the documentary, Love Thy Nature, which explores individual connection with the natural world.
![]() Food: Food projects can take various directions, including the launch or development of an edible product, a project for a farmer’s market or community co-op, or tools and equipment for chefs or restaurants. Sugar Knife Marshmallows, for example, placed its campaign for a small batch of artisanal marshmallows in the Food category, as shown in Figure 2-13. See “Choosing the right category” later in this chapter if you need help deciding whether your food-related project should appear in Food or in another category, such as Publishing for a cookbook.
Food: Food projects can take various directions, including the launch or development of an edible product, a project for a farmer’s market or community co-op, or tools and equipment for chefs or restaurants. Sugar Knife Marshmallows, for example, placed its campaign for a small batch of artisanal marshmallows in the Food category, as shown in Figure 2-13. See “Choosing the right category” later in this chapter if you need help deciding whether your food-related project should appear in Food or in another category, such as Publishing for a cookbook.

Figure 2-12: Love Thy Nature is a documentary and thus appeared in the Film & Video category.
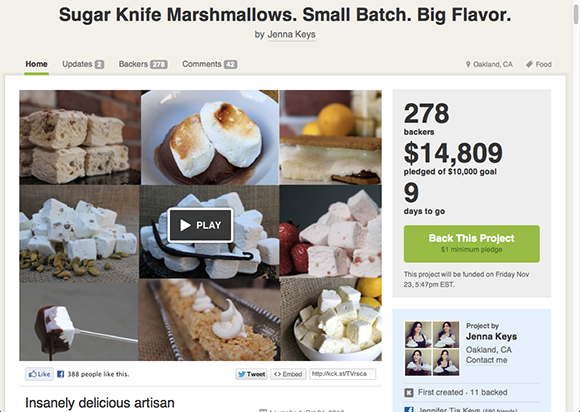
Figure 2-13: Sugar Knife Marshmallows placed its campaign in the Food category.
![]() Games: This category covers traditional board games; video games; online games; role-playing games; and equipment such as game accessories, tools, and consoles. Figure 2-14 shows a sample Games entry for a video game called Timber and Stone.
Games: This category covers traditional board games; video games; online games; role-playing games; and equipment such as game accessories, tools, and consoles. Figure 2-14 shows a sample Games entry for a video game called Timber and Stone.
![]() Music: If the goal of your project is to fund a musical concert or record an album, the Music category is a good fit. Musicians looking to fund the production costs of creating an album or expanding a short album into a longer project often turn to Kickstarter to raise the funds. One example is Austin Lucas, whose Kickstarter campaign page is shown in Figure 2-15.
Music: If the goal of your project is to fund a musical concert or record an album, the Music category is a good fit. Musicians looking to fund the production costs of creating an album or expanding a short album into a longer project often turn to Kickstarter to raise the funds. One example is Austin Lucas, whose Kickstarter campaign page is shown in Figure 2-15.
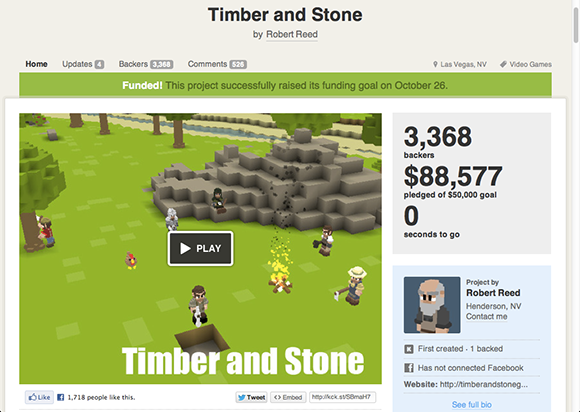
Figure 2-14: This sample Games entry showcases the production of the Timber and Stone video game.
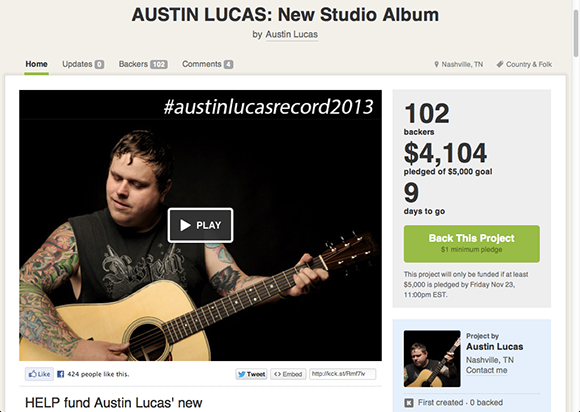
Figure 2-15: Austin Lucas chose the Music category for his campaign to raise funds needed for the production a new studio album.
![]() Photography: Shutterbug projects such as photography books, gallery showings, and exhibitions fit the Photography category. Your photo project might be to raise funds for prints, the exhibition space, or production costs. Figure 2-16 shows a campaign for a photography book that features lesbian, gay, bisexual, and transgender athletes.
Photography: Shutterbug projects such as photography books, gallery showings, and exhibitions fit the Photography category. Your photo project might be to raise funds for prints, the exhibition space, or production costs. Figure 2-16 shows a campaign for a photography book that features lesbian, gay, bisexual, and transgender athletes.
![]() Publishing: This category covers major traditional areas of publishing: fiction books, nonfiction books, photo books, short story anthologies, and journalism. Figure 2-17 shows a sample Publishing entry for a fictional series. The Finding 40 Project, featured in a case study in Chapter 6, also appeared in the Publishing category.
Publishing: This category covers major traditional areas of publishing: fiction books, nonfiction books, photo books, short story anthologies, and journalism. Figure 2-17 shows a sample Publishing entry for a fictional series. The Finding 40 Project, featured in a case study in Chapter 6, also appeared in the Publishing category.
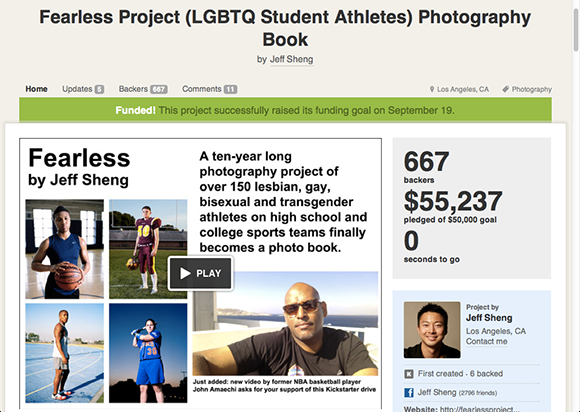
Figure 2-16: This campaign raised money for the production of a photography book on lesbian and gay issues.

Figure 2-17: Sample Publishing entry for the production of a fictional series.
![]() Technology: High-tech creativity can find a home in hardware, software, gadgets, or accessories for smartphones/computers. Figure 2-18 shows a Technology entry for a new type of small electronics component board for engineers.
Technology: High-tech creativity can find a home in hardware, software, gadgets, or accessories for smartphones/computers. Figure 2-18 shows a Technology entry for a new type of small electronics component board for engineers.
![]() Theater: This category is for dramatic plays, musical plays, theater camps and workshops, and theater restorations or upgrades. Figure 2-19 shows a sample Theater entry.
Theater: This category is for dramatic plays, musical plays, theater camps and workshops, and theater restorations or upgrades. Figure 2-19 shows a sample Theater entry.
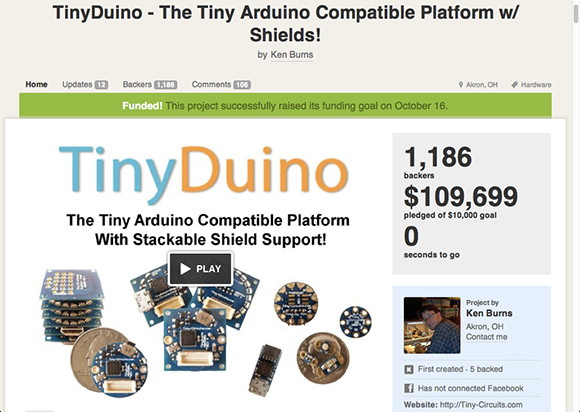
Figure 2-18: TinyDuino appeared in the Technology category.
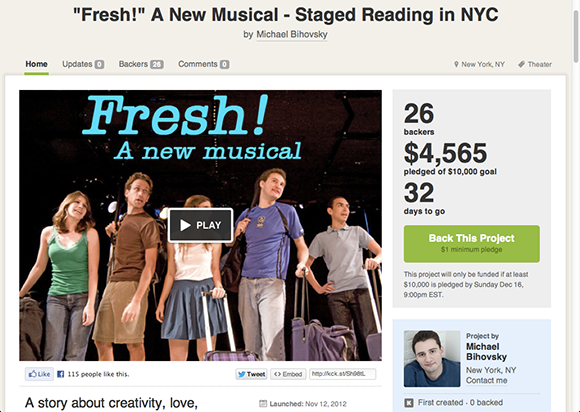
Figure 2-19: Sample Theater entry for a staged reading of Fresh, a new musical whose creators hope to get eventual backers for Broadway.
Choosing the right category
I recommend spending a few minutes on the Kickstarter main page — before you do anything else — reviewing multiple campaigns in your likely category.
Possibly your potential campaign could work in more than one category. For example, is a cookbook more appropriate for the Food category or the Publishing category? To answer this question, I examine some choices in each category and why they fit one category better than another:
![]() Food: Most projects in this category have to do specifically with the production, distribution, or delivery of food; the small batch of artisan marshmallows (refer to Figure 2-13) is a natural fit. Are you trying to create a project that has to do with eventual distribution of a food product to people (as opposed to helping people figure out what to do with that food)? Your project belongs in the Food category if it’s edible.
Food: Most projects in this category have to do specifically with the production, distribution, or delivery of food; the small batch of artisan marshmallows (refer to Figure 2-13) is a natural fit. Are you trying to create a project that has to do with eventual distribution of a food product to people (as opposed to helping people figure out what to do with that food)? Your project belongs in the Food category if it’s edible.
![]() Publishing: Projects in this category would be more closely related to the story of — or how-tos related to — food. Cookbooks are classic examples. Successful campaigns for books about food, such as the Publishing the +5 of Eating Cookbook and Trailer Food Diaries: Cookbook, appear in the Publishing/Nonfiction category. That’s not to say you can’t put a cookbook in a Food category. Some authors do, as was the case for Cooking with Fire: The Disaster Cookbook. However, most projects that end up with a finished book should be in the Publishing category.
Publishing: Projects in this category would be more closely related to the story of — or how-tos related to — food. Cookbooks are classic examples. Successful campaigns for books about food, such as the Publishing the +5 of Eating Cookbook and Trailer Food Diaries: Cookbook, appear in the Publishing/Nonfiction category. That’s not to say you can’t put a cookbook in a Food category. Some authors do, as was the case for Cooking with Fire: The Disaster Cookbook. However, most projects that end up with a finished book should be in the Publishing category.
![]() Design: Many of Kickstarter’s most successful campaigns come up in the Design category, where clever product designers create innovative new tools or products that customers are eager to preorder. In this chapter, I examine the success of the Elevation Dock campaign, tapping into one of the largest consumer audiences in the United States: Apple iPhone users.
Design: Many of Kickstarter’s most successful campaigns come up in the Design category, where clever product designers create innovative new tools or products that customers are eager to preorder. In this chapter, I examine the success of the Elevation Dock campaign, tapping into one of the largest consumer audiences in the United States: Apple iPhone users.
This product could also fall into two categories: Design or Technology. It’s important to look at the key central point of the campaign: the design and creation of a product that fits a market niche or need. This product is not simply another gadget or add-on to a phone; it is truly a design improvement based on others available on the market, hence the placement in the Design category.
iPhone Elevation Dock: Realizing a Market Niche
The Kickstarter campaign for the Elevation Dock illustrates how you can pinpoint a product’s unique angle and create campaign materials around that angle.
For all the worldwide fans Apple has clamoring for its innovative phone and music products, there seems to always be a problem with one key element: the charging stations. Often, after purchasing a basic Apple product, consumers look for ways to dock or charge the product that do the job better than the basic plug-in charger issued by the manufacturer. There are many options on the market, but many of those products suffer from a specific design flaw: They don’t allow for the protective case.
Consumers who spend hundreds of dollars on a phone or other device often purchase a protective case to shield the item from damage in case of drops or bumps. The problem (and also the opportunity): No one standard size or dimensions can fit all of those products — dozens of models are available for each individual gadget, all made by different companies. A sample aftermarket iPhone case illustrates this point in Figure 2-20:
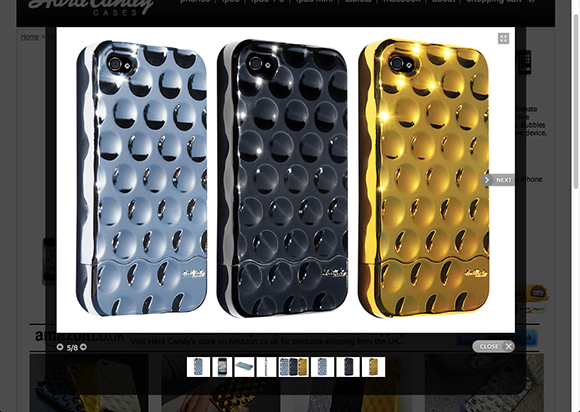
Figure 2-20: Sample aftermarket case, showing diversity in selection.
Additionally, many of these other aftermarket docks weren’t made with the same care and standards as other Apple products have to meet — consumers would complain the docks were too flimsy or lightweight or didn’t dock and undock smoothly.
Casey Hopkins of ElevationLab (http://elevationlab.com) recognized this challenge in 2011 and began work on a design for the solution — the Elevation Dock, which is specially designed to charge an iPhone regardless of the case size.
A standard Apple Dock sells for $29 and ElevationLab listed its base model for sale on Kickstarter at $59, a price more than 100% higher than that of the manufacturer’s version. Why such a difference? According to ElevationLab’s website, it’s “The Best Dock for iPhone,” and the press seemed to agree.
According to a December 2011 writeup in Wired Magazine (during the Kickstarter campaign), the Elevation Dock is “the dock Apple should have made.” This type of endorsement is extremely powerful for the millions of Apple users who routinely pay a premium to have the latest and best technology. Figure 2-21 shows the manufacturer’s version of a dock.
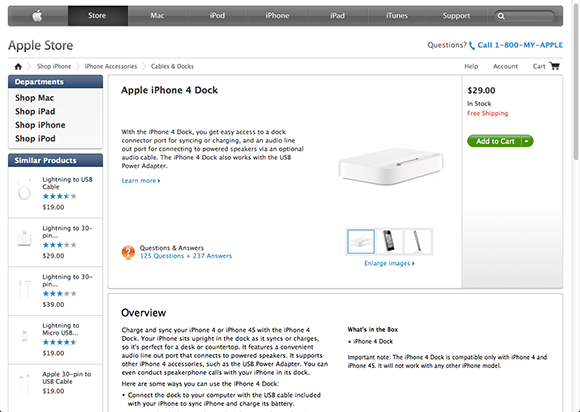
Figure 2-21: Apple’s standard dock product.
The Kickstarter campaign also tapped into another touchpoint for Apple users: the chance to preorder something before it goes on sale. Apple users notoriously line up around the block when the newest phone is released; the stores are often packed whenever a new generation iPad comes out or an accessory pack is released. These users love to get the newest thing first, ideally before anyone else can get their hands on it.
Elevation Dock’s Kickstarter campaign was essentially a pre-sale for the product before it had even gone into official production. The company’s original $75,000 goal was to fund a first production run and pre-sell some of the docks.
Surpassing $1.4 million at the end of its campaign in February 2012, the company had raised more than enough to not only fund an entire production run, but also to offer special limited edition “Kickstarter Exclusive” colors and finishes (as shown in Figure 2-22), as well as reseller packs — pre-selling large numbers of docks to retail resellers around the country.
Clearly, this campaign knew its audience.
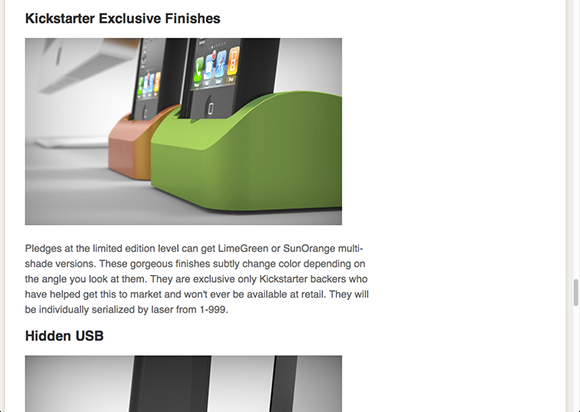
Figure 2-22: Kickstarter exclusive colors for Elevation Dock.