
Chapter 5
Setting Up Your Campaign
In This Chapter
![]() Filling out your project details
Filling out your project details
![]() Creating your biography
Creating your biography
![]() Setting up your payment account
Setting up your payment account
![]() Reviewing your campaign one last time
Reviewing your campaign one last time
![]() Submitting your campaign to Kickstarter for approval
Submitting your campaign to Kickstarter for approval
You’re excited about your project. You know what makes it unique. You’ve prepared a project description and video with a distinct call to action. Your list of potential backers is ready. You know your project expenses backwards and forwards — and how much money you want to raise. You can’t wait to share your creative rewards with your backers.
Does this sound like you? If so, you’re definitely ready to set up your campaign in Kickstarter and submit it for review. This chapter walks you through the whole process, from creating your Kickstarter account to reviewing all the details in your Kickstarter dashboard one last time.
 Even if you don’t have every detail about your campaign completely nailed down, you might still want to start setting up your campaign. The Kickstarter dashboard is extremely flexible, allowing you to fine-tune your project description and figure out the financial details of your campaign before submitting it for review. Just refer to Chapters 2 and 3 when (for example) you need help with your project profile or rewards, and then return to this chapter for the details about adding these campaign elements into your Kickstarter dashboard. In fact, the verification of your Amazon Payments account and identity can take several days, so you might want to get a head start on those details. I explain how each works in “Activating Your Payment Account,” later in this chapter. Kickstarter’s approval process will also take at least a full day, maybe two or three, so be sure to factor that in when you’re deciding how much time you need to start a project.
 After you submit your project for Kickstarter’s review and approval, Kickstarter limits the changes you can make to your campaign. This chapter helps you make sure all the details are just right before you pass the point where changes aren’t allowed.
As I walk you through the process for setting up your campaign, please note the steps and locations of various buttons, tabs, and boxes were correct as this book went to press, but online interfaces can change quickly, subtly, and without notice. So if a step doesn't work quite the way it's described, Kickstarter has likely updated its interface. Nevertheless, the general advice and overall process should still be accurate. You can always check www.dummies.com/go/kickstarterfdupdates for any updates about major changes.
Kickstarting Your Kickstarter Account
Before you can start filling out details about your campaign, you need to set up an account with Kickstarter. Simply follow these steps:
1. On the top of the main Kickstarter page, locate and click the blue Start link, shown in Figure 5-1.
You’re taken to a brief video on how Kickstarter works.
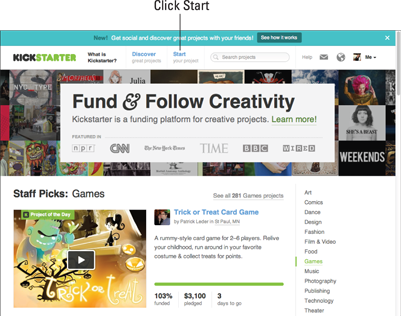
Figure 5-1: Starting to set up your Kickstarter account from the home page.
2. If you haven’t already, click Play in the middle of the video screen to review the introductory video.
3. After watching the video, click the green Start Your Project button and click Continue to verify that you meet the eligibility requirements for Kickstarter.
The requirements are listed on screen and you can find an overview of Kickstarter’s requirements and guidelines in Chapter 1. On the resulting page is where you set up your user name and password, or login if you already have a Kickstarter account.
4. Set up your user name and password or log in using an existing account.
You can set up a user name and password unique to Kickstarter or log in with Facebook Connect.
While setting up your Kickstarter campaign using Facebook Connect might save a few steps, I recommend creating your own unique Kickstarter login and account. You will have the opportunity to link your individual campaign to your Facebook account later, so I recommend linking it there if you choose to use Facebook to promote your campaign. Using Facebook Connect to set up your Kickstarter account means your Facebook account is linked to everything you do on Kickstarter, as opposed to being able to promote and link to a specific campaign. Kickstarter allows you to create multiple campaigns off of one login; you may not want to link every campaign to your Facebook page if you end up doing more than one Kickstarter project.
• If you set up a user name and password unique to Kickstarter: Determine which e-mail address you’d like to use to manage your Kickstarter campaign and a public user name -- Ideally your real name so friends, family and associates can search for you even if they don’t know the official name of your project. Set up a strong password by using a combination of letters and numbers that’s at least eight characters long, doesn’t form a natural word (especially not the word password), doesn’t include numbers in sequence.
• If you use Facebook Connect: Enter the same login information you use for your Facebook account. Kickstarter prompts you to set up a password that’s unique to your Kickstarter account.
When you’re done, you move onto the guidelines page.
5. If you haven’t already done so, read the entire Project Guidelines carefully.
As I explain in Chapter 1, you want to review the prohibited uses to ensure you don’t spend time building a project that will not get approved. For example, fundraising for your favorite charity — or promoting a product that is so outrageous that it will likely never come to fruition — will probably be rejected.
6. After you acknowledge the Project Guidelines as prompted, click Start Your Project again.
Kickstarter directs you to your project dashboard that shows several steps to get your project profile up and running.
The Guidelines tab on the left gives you quick access to the Kickstarter guidelines at any time. The Preview option the far right enables you to see how your campaign will look to potential backers on the Kickstarter website after your campaign launches.
Six tabs correlate to the various steps of setting up your campaign in Kickstarter:
• Basics
• Rewards
• Story
• About You
• Account
• Review
The remaining sections in this chapter explain everything you need to know about filling out each tab.
After you set up your account, you can login from the Kickstarter home page. Simply click Log In in the upper-right corner and follow the prompts.
Filling Out Your Project Profile
When you’re ready to fill out your project profile on the Basics tab, shown in Figure 5-2, have all the information you developed and fine-tuned in Chapters 2 and 3 handy. Then follow these steps:
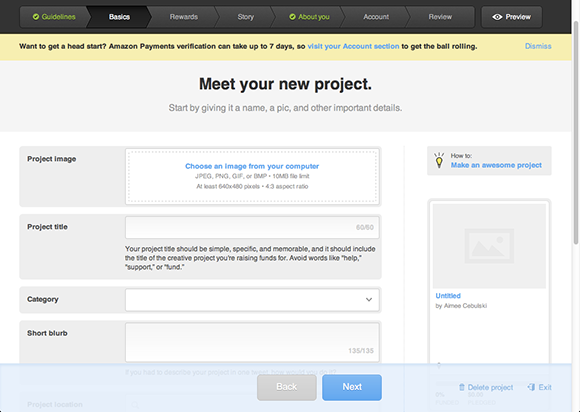
Figure 5-2: You fill out your project profile on the Basics tab of your Kickstarter dashboard.
1. In the Project Image area, click the Choose an Image from Your Computer link.
You’re directed to a box where you can select from photos anywhere on your computer.
2. Browse through your files and select the image you have chosen to represent your project, keeping in mind the 4:3 aspect ratio required by Kickstarter.
If necessary, you may have to load different images until you find the one that best fits the 4:3 aspect ratio box Kickstarter uses. In addition, your photo needs to meet the following requirements:
• A file format of JPEG, PNG, GIF, or BMP. The file extension (or three letters after the period in a filename) tells you a file’s format. If you have a TIF file (which is another common image format) or a PSD file (which is a proprietary format used in Photoshop and Photoshop Elements), you’ll need to convert your image to one of the accepted formats in an image-editing program or ask someone with a little graphics knowledge to help you.
• At least 640 x 480 pixels, which ensures your image will appear clearly onscreen and not look pixilated.
• No larger than 10MB, which is pretty large, so your image is most likely just fine.
3. Type the name of your project in the box called Project Title.
See Chapter 2 for help choosing a name. Ideally, the name should be relatively short and easy to read in one brief sentence and tie directly to what you’re hoping to accomplish with your campaign
4. Choose the category that best fits your project.
In Chapter 2, I introduce all the standard Kickstarter categories and the types of project typical in each. Figure 5-3 shows the Kickstarter Category drop-down menu; move your mouse pointer over the appropriate category and click to select.
5. Insert your short blurb in the box labeled Short Blurb.
In Chapter 2, I discussed the importance of making your blurb concise and compelling in 135 characters or less. In this box, copy and paste the blurb you wrote and character-counted in Word.
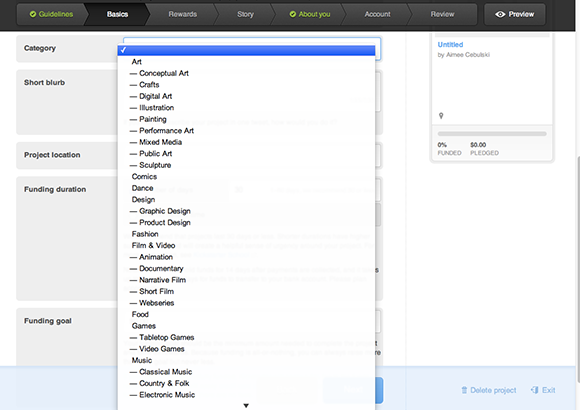
Figure 5-3: Choosing your Kickstarter category from the drop-down menu.
6. Fill out the Project Location box with your location or the location where the project will take place.
For example, if you’re shooting a movie on location, place the location here. If you’re designing a piece of technology in your home town, type that location.
7. Type in the number of days for your project in the box labeled Project Duration.
A 30–60 day window allows you more time to use public relations, social media, and events to spread the word if appropriate. (There’s more about using these tools to promote your campaign later in this book.)
8. Enter your funding goal as a dollar figure in the box labeled Funding Goal.
Figure 5-4 shows where you need to input the goal figure you calculated in Chapter 3. Remember that after you submit your project to Kickstarter, you cannot change this goal. Make sure your zeroes and decimals are all in the right places and that you’ve accounted for Kickstarter’s 5 percent fee as well as Amazon’s credit card processing fees. I cover checking all the details of your campaign later in this chapter.
That’s everything you need to include on the Basics tab. Click Preview in the upper-right of your dashboard to see how your entries will look on your Kickstarter campaign page.
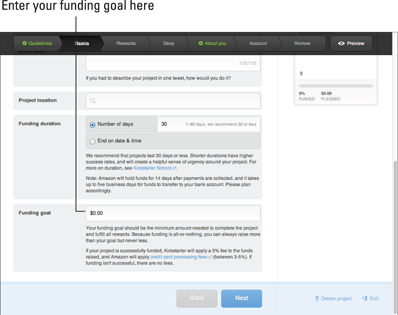
Figure 5-4: Setting your funding goal.
Setting Up Backer Rewards
Before you fill out the Rewards tab, find your list of backer levels, the reward for each level, and your estimated delivery dates for each reward. (Chapter 3 helps choose rewards and Chapter 4 helps you map out project timelines.)
Then fill out each individual reward box on your Kickstarter dashboard by following these steps:
1. Click the Rewards tab to begin inputting rewards.
You start with a blank box labeled Reward #1, as shown in Figure 5-5.
2. In the Pledge Amount box, input the dollar amount for your lowest-value reward.
3. In the Description box, enter a brief description of the reward that your backers will receive if they support you at the listed dollar amount.
4. Select a month and year for your estimated delivery of this reward.
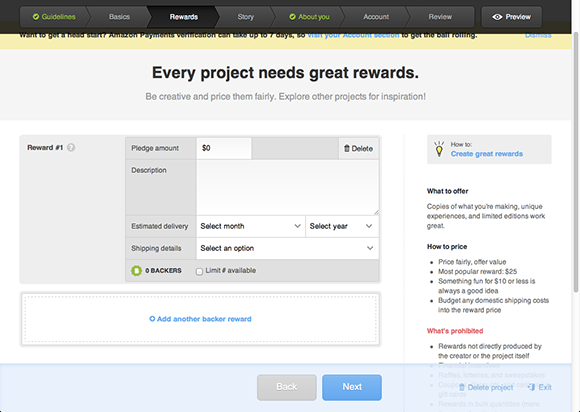
Figure 5-5: Inputting your rewards and dollar amounts into your project.
5. Select from the following options: Shipping Anywhere in the World, Shipping within the US Only, or No Shipping Involved.
If you ship worldwide, you can charge backers outside the U.S. a shipping fee. Simply select the Add a Fee check box and enter an amount. However, you don’t have the option to charge U.S. backers a shipping fee, so make sure that fee is included in your cost estimate, as outlined in Chapter 3. Kickstarter recommends you budget domestic shipping into the price of the reward.
6. When you’re ready to enter your next highest reward, click the tile labeled Add Another Backer Reward and repeat Steps 2–6 until you’ve entered all your rewards.
Again, click the Preview button in the upper-left corner to see how your entries will appear on your campaign page.
Telling Your Project’s Story
On the Story tab, you upload your campaign video, enter your long project description, and fill out the Risks and Challenges section. Chapter 2 helps you determine what information you need to include in each of these elements.
Uploading your video
When you’re ready to upload your video, follow these steps:
1. Click the Upload Video button.
2. Navigate to the video file you previously created and saved on your computer.
3. Click the file you want to upload.
You see a progress bar as the file uploads; once the file is completely uploaded, a 100% Complete notification lets you know that your video has been successfully uploaded to your project profile.
4. Click Preview in the upper-right to check your video and make sure you like how it will appear on your campaign page.
If you have the option, consider watching the preview on more than one computer to check for possible format issues.
Filling out your project description
If you followed my advice in Chapter 2, you’ve written and reviewed all the text and images you want to include in your project description already. You can use all the tools of your word-processing software (such as spell checking) to write and review the text. Keep in mind, however, that any formatting you apply in a word processor tool is stripped out of the text when you paste it into the Project Description box in Kickstarter. You also need to use the Kickstarter site’s upload tools to insert images, multimedia, and links into your project description.
Here’s a list of the Kickstarter text tools and how they work:
![]() Bold: Select the text you want to apply the bold formatting to and then select the Bold button above the main text box. To remove bold, repeat the same process.
Bold: Select the text you want to apply the bold formatting to and then select the Bold button above the main text box. To remove bold, repeat the same process.
![]() Italic: Select the text you want to italicize and click the Italic button.
Italic: Select the text you want to italicize and click the Italic button.
![]() Link: This tool works in two ways. You can select text you’ve already entered and click the Link button. The text you selected then points to the URL. Or you can place the text cursor where you want to insert a link, and then click the Link button. The URL that you enter then appears linked in the text area.
Link: This tool works in two ways. You can select text you’ve already entered and click the Link button. The text you selected then points to the URL. Or you can place the text cursor where you want to insert a link, and then click the Link button. The URL that you enter then appears linked in the text area.
![]() Unlink: This tool removes a link. You can select the whole link or place the text cursor inside the link. Then click the Unlink button to remove the link. The text remains, however, so if you want to remove that, use your keyboard.
Unlink: This tool removes a link. You can select the whole link or place the text cursor inside the link. Then click the Unlink button to remove the link. The text remains, however, so if you want to remove that, use your keyboard.
![]() List: This tool applies a bulleted-list treatment. Select the text you want to format as a bulleted list and click the List button. To remove the formatting, select the bulleted text and click the List button again.
List: This tool applies a bulleted-list treatment. Select the text you want to format as a bulleted list and click the List button. To remove the formatting, select the bulleted text and click the List button again.
![]() Heading: You can divide your project description into sections by adding headings. Place your heading on its own line and click the Heading tool. Heading text appears larger and bolder so that it stands out from the body text.
Heading: You can divide your project description into sections by adding headings. Place your heading on its own line and click the Heading tool. Heading text appears larger and bolder so that it stands out from the body text.
To insert multimedia, you have the following tools:
![]() Video: Adding video at this point is really adding a link to video footage hosted elsewhere; you’re not actually uploading video here as you did when you added your Project Video. This option allows you to link to supporting videos about your project or topic, whether or not you created them. If you click Video here, a pop-up box appears, asking you to paste in a web link from either YouTube or Vimeo.
Video: Adding video at this point is really adding a link to video footage hosted elsewhere; you’re not actually uploading video here as you did when you added your Project Video. This option allows you to link to supporting videos about your project or topic, whether or not you created them. If you click Video here, a pop-up box appears, asking you to paste in a web link from either YouTube or Vimeo.
![]() Image: Adding images here is different from using the Video button. If you click Image, you can either upload an image from your computer or enter a website link directly to an image from another web page. If you upload your own image, you’re directed to choose the file on your computer; after that file has uploaded, you’re prompted to enter an optional caption if you’d like, as well as a click-through link if you would like people to be able to view another website that supports your project.
Image: Adding images here is different from using the Video button. If you click Image, you can either upload an image from your computer or enter a website link directly to an image from another web page. If you upload your own image, you’re directed to choose the file on your computer; after that file has uploaded, you’re prompted to enter an optional caption if you’d like, as well as a click-through link if you would like people to be able to view another website that supports your project.
![]() Audio: Adding audio files or links here is very much like using the Image button. You have the option of uploading an audio file from your computer, which must be in MP3, MP4, or WAV format. You can also choose to link to an existing web page here that has audio on it (or an audio-sharing site such as SoundCloud or Rdio).
Audio: Adding audio files or links here is very much like using the Image button. You have the option of uploading an audio file from your computer, which must be in MP3, MP4, or WAV format. You can also choose to link to an existing web page here that has audio on it (or an audio-sharing site such as SoundCloud or Rdio).
Adding Details about You
The next tab across the top is called About You, and is designed to give potential backers a little bit of detail about your background and where to connect with you outside of Kickstarter.
![]() Profile Photo: This is completely different from any of the images you used in your campaign setup; this photo is just a photo of you as the creative force behind the campaign. Click the box that says “upload an image from your computer” and you’re directed to select a photo from your files. Note that the photo’s format must be JPEG, PNG, GIF, or BMP and (like your project image) the photo must be at least 640 x 480 pixels to avoid appearing blurry. The photo cannot be larger than 10MB, but again, that is a fairly large size so the clarity of the image will likely not be an issue.
Profile Photo: This is completely different from any of the images you used in your campaign setup; this photo is just a photo of you as the creative force behind the campaign. Click the box that says “upload an image from your computer” and you’re directed to select a photo from your files. Note that the photo’s format must be JPEG, PNG, GIF, or BMP and (like your project image) the photo must be at least 640 x 480 pixels to avoid appearing blurry. The photo cannot be larger than 10MB, but again, that is a fairly large size so the clarity of the image will likely not be an issue.
Select a photo that is fairly closely cropped, ideally a head shot or head-and-torso shot; the box showing your photo is fairly small. You want backers to be able to see you clearly.
![]() Name: This is where you put your full name, so people can search by your name as well as your project title.
Name: This is where you put your full name, so people can search by your name as well as your project title.
![]() Facebook Connect: If you would like to link your personal Facebook page to your project, you can enter the link here; it will take backers directly to that Facebook page if they have valid Facebook accounts.
Facebook Connect: If you would like to link your personal Facebook page to your project, you can enter the link here; it will take backers directly to that Facebook page if they have valid Facebook accounts.
![]() Biography: This should be a short description about you and your experience or background — especially how they relate to this project. If you have an existing résumé, bio, or CV, you have a good place to pull copy. Keep your biography fairly short (400 words or less) and conversational in tone. This description should be easy to read and follow, just as if you were telling someone you just met about your experience.
Biography: This should be a short description about you and your experience or background — especially how they relate to this project. If you have an existing résumé, bio, or CV, you have a good place to pull copy. Keep your biography fairly short (400 words or less) and conversational in tone. This description should be easy to read and follow, just as if you were telling someone you just met about your experience.
![]() Your Location: Input your current home town here, so that people seeking projects nearby will know you exist.
Your Location: Input your current home town here, so that people seeking projects nearby will know you exist.
![]() Websites: You can add links here to any external websites that give people a sense of your project or passion. Links to a blog, professional web page, Facebook company or non-personal pages, Twitter feed, Pinterest page, and more are perfect here! You can enter as many websites as you like; just input the URL and click the button that says Add. A new blank box appears above the URL you just added; if you want to, add another website to the list.
Websites: You can add links here to any external websites that give people a sense of your project or passion. Links to a blog, professional web page, Facebook company or non-personal pages, Twitter feed, Pinterest page, and more are perfect here! You can enter as many websites as you like; just input the URL and click the button that says Add. A new blank box appears above the URL you just added; if you want to, add another website to the list.
Activating Your Payment Account
Kickstarter uses Amazon Payments to process your backer payments.
Click the Account tab to begin the process of activating your Amazon Payments account.
To be eligible to start a Kickstarter project as a U.S. creator, you need to satisfy the requirements of Amazon Payments:
![]() You are a U.S. citizen or a permanent resident with either a Social Security Number or EIN (employer ID number).
You are a U.S. citizen or a permanent resident with either a Social Security Number or EIN (employer ID number).
![]() You have a U.S. address, U.S. bank account and state-issued ID such as a driver’s license.
You have a U.S. address, U.S. bank account and state-issued ID such as a driver’s license.
![]() You have a major U.S. credit or debit card.
You have a major U.S. credit or debit card.
![]() You are at least 18 years old.
You are at least 18 years old.
If you don’t meet these criteria, you will not be accepted by Kickstarter. If you do, gather the necessary materials you will need based on the preceding list and then follow these steps:
1. Click the box labeled Amazon Payments and follow the link.
2. If you don’t have an Amazon Payments account, you’re instructed to set one up.
Figure 5-6 shows where on Kickstarter you begin the setup for Amazon Payments.
Next you verify your identity. This allows Kickstarter to be sure that you are who you say you are.
3. Click Identity Verification and begin entering the details requested regarding your address, Social Security Number, and driver’s license number.
The final step in setting up your Account tab is entering your contact details. This is how Kickstarter will contact you with backer updates, questions, or follow-up needs.
4. Enter your e-mail address and phone number in the boxes where indicated.
Be sure that your spam filters are not set too high on whatever e-mail account you use for Kickstarter; otherwise they may reject verification e-mails as spam. You can also set your e-mail spam settings to allow any e-mails from the domain kickstarter.com.
After you’ve input all the required information in the Account tab, it can take up to 48 hours for everything to be verified.
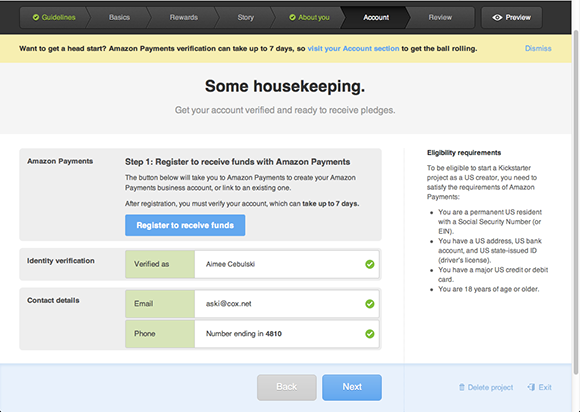
Figure 5-6: Setting up an Amazon Payments account.
Preparing for Kickstarter Review
After all the elements of your campaign have been uploaded into your project page through the Kickstarter dashboard, it’s time to submit your project to Kickstarter for review and approval.
It’s important to note that not every campaign is approved; some are rejected and need to be modified if they violate the terms, conditions, or other regulations specified by Kickstarter. To ensure that your project is approved quickly, the next section reviews the final steps and checks that you should take before submission.
Double-checking your campaign uploads
Before you move to the Kickstarter Review tab, be sure to check the following:
![]() Take a moment to look at the seven tabs: Are any of them red or do they indicate an X? If so, click that tab and look to see what missing elements Kickstarter is asking for. Correct any errors.
Take a moment to look at the seven tabs: Are any of them red or do they indicate an X? If so, click that tab and look to see what missing elements Kickstarter is asking for. Correct any errors.
![]() Click the Story tab and make sure that your video has loaded properly: You should see a small thumbnail image from your video. If necessary, re-upload your video until this tab is green.
Click the Story tab and make sure that your video has loaded properly: You should see a small thumbnail image from your video. If necessary, re-upload your video until this tab is green.
![]() Click the About You tab and double-check your Biography to make sure that your profile photo is uploaded. (Adding a personal photo makes backers feel more connected to you and your project, even if they don’t know you personally.)
Click the About You tab and double-check your Biography to make sure that your profile photo is uploaded. (Adding a personal photo makes backers feel more connected to you and your project, even if they don’t know you personally.)
![]() If you have a Facebook account, be sure to use the box on this page called Facebook Connect, where you can post updates from your project to your Facebook page and also let people find your Kickstarter campaign through your Facebook page.
If you have a Facebook account, be sure to use the box on this page called Facebook Connect, where you can post updates from your project to your Facebook page and also let people find your Kickstarter campaign through your Facebook page.
Conducting a final review and submitting your campaign
The last tab in the sequence is Review. Click this tab to double-check the list of needs from Kickstarter; look for any elements flagged as red or with an X. The following steps walk you through this tab:
1. Double-check your funding duration and funding goal one last time.
Once your project is accepted, your funding duration and funding goal cannot be changed. You will be able to edit some details of the project and add more photos — even after it has launched — but you won’t be able to change your goal or duration.
2. Click Preview Project to see what your Kickstarter campaign page will look like.
3. If you’re happy with everything on your dashboard and how your preview looks, click Submit for Review.
That’s it! Your project will now be reviewed by Kickstarter and will show up as Pending Review when you log in to your account — until you receive an e-mail indicating that the project has been accepted and you’re ready to launch. Your project will not be live until it is accepted and you launch it.