
Chapter 3
Deciding How Much to Ask For
In This Chapter
![]() Knowing what it’s gonna take to make your project a reality
Knowing what it’s gonna take to make your project a reality
![]() Examining other Kickstarter campaigns
Examining other Kickstarter campaigns
![]() Looking for hidden costs
Looking for hidden costs
![]() Estimating average donations
Estimating average donations
Every campaign, no matter how large or small, needs a budget and a fundraising goal. This goal should be a figure that represents the amount needed to make your creative project a reality, or at least get it underway.
In this chapter, I discuss the steps needed to realistically estimate your budget and determine the approximate likely donation amounts.
Figuring How Much Your Project Will Cost
The first step in determining your fundraising goal for your Kickstarter campaign is determining the scope of your project:
![]() Are you trying to raise enough funds to complete an entire project all the way to the end? If you’re seeking backers to complete an entire project, you need a rough estimation of the complete campaign, not just a jump-start, before you begin setting up your campaign (as outlined in Chapter 5).
Are you trying to raise enough funds to complete an entire project all the way to the end? If you’re seeking backers to complete an entire project, you need a rough estimation of the complete campaign, not just a jump-start, before you begin setting up your campaign (as outlined in Chapter 5).
![]() Is your goal to simply raise enough to launch your project or to take it to the next level? Think briefly about your entire project as you envision it in its completed form. Would there be a natural set of milestones en route to launching the project? For example, would you need funds to buy some essential equipment? Would money be needed to rent gallery space or studio time? These would be major milestones that the funding must reach before you can move farther along in the project. One or more of these milestones could be a good goal to shoot for when you’re raising funds to launch the project.
Is your goal to simply raise enough to launch your project or to take it to the next level? Think briefly about your entire project as you envision it in its completed form. Would there be a natural set of milestones en route to launching the project? For example, would you need funds to buy some essential equipment? Would money be needed to rent gallery space or studio time? These would be major milestones that the funding must reach before you can move farther along in the project. One or more of these milestones could be a good goal to shoot for when you’re raising funds to launch the project.
One of the best tools for estimating a project budget is to use an Excel spreadsheet or other charting/calculation software. Using a software program is recommended over hand-tabulating potential costs for several reasons:
![]() A spreadsheet is easier to update and modify.
A spreadsheet is easier to update and modify.
![]() A spreadsheet can calculate totals for your budget line items more accurately.
A spreadsheet can calculate totals for your budget line items more accurately.
![]() You can share a spreadsheet with potential backers.
You can share a spreadsheet with potential backers.
![]() You can also back up a spreadsheet file for added protection.
You can also back up a spreadsheet file for added protection.
 This section focuses on estimating expenses for your project. Remember that, if your campaign is successful, Kickstarter will also charge you 5 percent of the money you raise and Amazon will charge you credit card processing fees. When you finalize your overall budget spreadsheet, remember to take these fees into account and make sure they won’t leave you short of funds to finish your project and deliver your rewards.
Outlining broad expense categories
You probably already have a rough estimate of the elements needed to complete your project; this may be the result of past experience with similar projects or knowledge of other projects in your industry. Even so, it’s important to create a comprehensive, specific budget for your new project to ensure that you’re asking for the correct amount.
Start your spreadsheet for tabulating estimated costs with six main categories:
![]() Research/Licenses/Permits
Research/Licenses/Permits
![]() Equipment to rent (including space)
Equipment to rent (including space)
![]() Equipment to buy
Equipment to buy
![]() Staff hours or temporary help
Staff hours or temporary help
![]() Production
Production
![]() Marketing
Marketing
As shown in Figure 3-1, the preceding six categories will give you a starting point for dropping in estimated costs and help you think about things you haven’t considered yet. The equipment to rent or buy are listed as hard costs, meaning you have to spend money to make them part of your project.
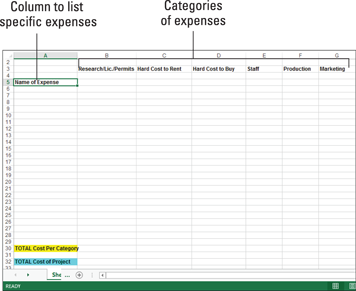
Figure 3-1: A template Excel spreadsheet for estimating costs.
Listing individual expenses
Once you have started a spreadsheet with the six categories, it’s time to start listing individual expenses one by one.
Your expenses will differ, depending on the type of project. For example:
![]() For a photography project, you may need to purchase or buy lighting equipment or rent studio time.
For a photography project, you may need to purchase or buy lighting equipment or rent studio time.
![]() For a film, you might have to hire extras or pay an editor to put the rough video together.
For a film, you might have to hire extras or pay an editor to put the rough video together.
![]() For a musical performance, you may need an accompanist or specific instruments to make your vision a reality.
For a musical performance, you may need an accompanist or specific instruments to make your vision a reality.
![]() For production of a table lamp, you may have to pay a manufacturing company to produce a plastic prototype or mold.
For production of a table lamp, you may have to pay a manufacturing company to produce a plastic prototype or mold.
 Your spreadsheet is a good way to start thinking about costs, but you should refer to it several times before finalizing your budget, thinking about things you might have forgotten. For example, you might flesh out your list of expenses as follows:
1. In your spreadsheet, spend about 20 minutes listing the first things that come to your mind in each category; then put the list away.
2. An hour later, reopen the file and look at the list; try to add at least one item to each category.
3. The next day, examine your list one last time, attempting to determine what elements you missed the previous two times.
Figure 3-2 shows a rough-draft Excel spreadsheet with as many potential project expenses as possible for a fictional photographer who wants to make a book.
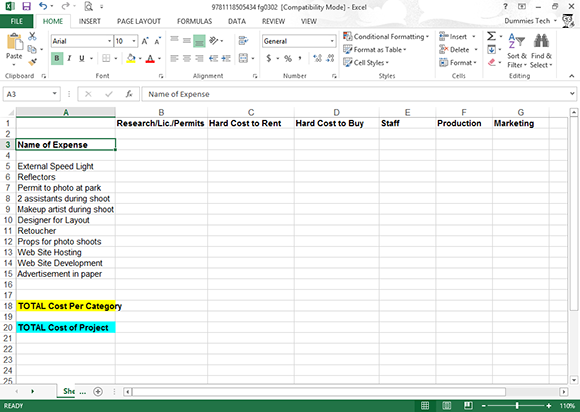
Figure 3-2: Sample spreadsheet with expenses listed but no costs.
Trying to estimate those costs
After creating your list of expenses, it’s important to make your estimated cost as accurate as possible. Especially if you’ve never made a creative project like the one you’re interested in launching through Kickstarter, estimating your costs might seem difficult. However, if you’ve built a spreadsheet as I’ve described in the preceding sections, you’re well on your way. The following sections provide guidelines and ideas for making realistic estimates for each expense category.
Figure 3-3 shows an expanded project-cost spreadsheet with actual costs estimated in and added up.
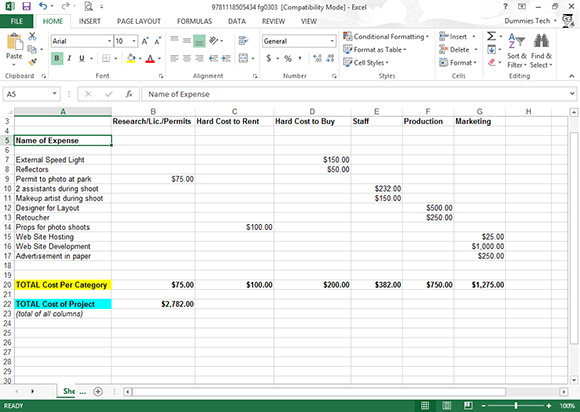
Figure 3-3: Expanded project spreadsheet with estimated costs.
Research, licenses, and permits
Permits and licenses are typically fixed (hard) costs. To estimate the cost, contact your local, state, or regional agencies, depending on where you plan to work. For research, determine whether you need to pull up old magazine or newspaper articles, access newspaper databases, buy copies of previous recordings, and so on. Then attempt to estimate the costs involved, basing your figure on current pricing listed (usually through the source’s website).
Equipment rentals or purchases
For hard costs— such as things you need to buy or rent — try to get as firm a quote as possible. For example:
![]() Call the studio where you want to record and get its current hourly rate. Then estimate how many hours you expect you’ll need.
Call the studio where you want to record and get its current hourly rate. Then estimate how many hours you expect you’ll need.
![]() Research camera lighting through Amazon or Google for a ballpark figure.
Research camera lighting through Amazon or Google for a ballpark figure.
Be sure to try and get the most accurate pricing possible direct from the source. Do not use Internet chat rooms, blogs, or message boards as your sole source of information for costs; these might be good for estimates, but you will need to check those figures against real-world pricing.
Staff
For hiring extras or basic assistance that does not require education or training, estimate 20 percent above the minimum wage of your state per hour and multiply that by the number of hours you think you will use the help.
Say, for example, you expect you’ll need 2 assistants for 2 full-day, 8-hour shoots. And you assume the minimum wage in the U.S. is $7.25 per hour (which is correct as this book goes to press). The calculation for your estimate looks like this:
2 × 16 × $7.25 = $232
Your project may require additional skilled staff for part or all of your duration. For example, you might need to hire an additional camera person, a sound technician, editors, makeup artists, and so on. As you estimate these costs for your spreadsheet, the following resources can help:
![]() Job search sites: Do some basic research on sites such as Craigslist.org or Monster.com to see whether rates are published for positions in these categories.
Job search sites: Do some basic research on sites such as Craigslist.org or Monster.com to see whether rates are published for positions in these categories.
![]() Industry message boards and websites: You can also search Google, using phrases such as “average hourly rate for makeup artist” (specify your hometown) to see aggregate amounts on message boards or industry websites.
Industry message boards and websites: You can also search Google, using phrases such as “average hourly rate for makeup artist” (specify your hometown) to see aggregate amounts on message boards or industry websites.
![]() Quotes from local professionals: You might want to also place a few phone calls when creating your budget to local skilled staff in your hometown to get their current hourly or daily rates for comparison.
Quotes from local professionals: You might want to also place a few phone calls when creating your budget to local skilled staff in your hometown to get their current hourly or daily rates for comparison.
Often these professionals are hired on a daily or half-day rate, so factor in the number of days you might need each type of staff and enter those values in your spreadsheet.
Production
Beyond the costs required to create all your raw materials, you may have an additional “production” cost, or a cost to put your project together in its finished format. This could mean using software to run video clips together, printing a finished book, producing CDs/DVDs, mass-producing your actual finished product (if in the design category), and so forth.
This part of the budgeting process can be the most complicated and often under-estimated. This is a good point to stop and look at your overall Kickstarter campaign and again ask yourself, Am I seeking backers to just launch me on my way, or am I seeking funding for the entire project from beginning to end? If the answer is the latter (funding for the whole project), you need to have a realistic budget item for production.
Production is categorized as everything that is not a hard line item (that is, fixed cost) as listed earlier; it’s not hiring staff, securing location permits, paying for props or designers. It’s that nebulous “finishing” step that takes the project from a raw product to a ready-for-delivery product or a prototype to a production model.
Since each Kickstarter project is different, there is no hard-and-fast rule for estimating your production cost. You will need to estimate based on your actual project. The best way to do this is to actually get estimates in advance — during this budgeting process — and not to wait until after all your raw materials have been gathered or produced.
Some examples of trying to estimate production costs include the following:
![]() Getting a firm manufacturing quote from at least three different suppliers if your design product requires mass production.
Getting a firm manufacturing quote from at least three different suppliers if your design product requires mass production.
![]() Researching the cost of hiring a software expert or editing expert for the finished product; give this person a production overview and outline of the finished product (how many minutes, how many songs, and other such details that affect the amount of consulting time) and get a firm quote.
Researching the cost of hiring a software expert or editing expert for the finished product; give this person a production overview and outline of the finished product (how many minutes, how many songs, and other such details that affect the amount of consulting time) and get a firm quote.
![]() Get at least three printing quotes — from different types of printers — if you’re making a book, comic or magazine; give the printing company as specific a set of requirements as possible, including number of pages, color requirements, cover type, and quantities.
Get at least three printing quotes — from different types of printers — if you’re making a book, comic or magazine; give the printing company as specific a set of requirements as possible, including number of pages, color requirements, cover type, and quantities.
Marketing
Your campaign budget needs to include dollars to promote your end result. After you complete a successful Kickstarter campaign and make the finished creative piece, you need to get out there and sell it!
Marketing and promotion is an extremely broad expense — in some cases, the sky is the limit. But start with the basics. At the very minimum, you should include the following costs in your project budget:
![]() Creating and maintaining a website
Creating and maintaining a website
![]() Hosting a launch party, or a viewing or screening event
Hosting a launch party, or a viewing or screening event
![]() Mailing samples of your product to reporters, writers, and bloggers
Mailing samples of your product to reporters, writers, and bloggers
![]() Participating in fairs/festivals that showcase creative work
Participating in fairs/festivals that showcase creative work
![]() Advertising (if relevant)
Advertising (if relevant)
If the audience for a specific publication, website, or news source would be interested in your finished piece, research their advertising costs in advance by requesting a media kit.
In Chapter 6, I examine ways to market and promote your Kickstarter campaign. The details in that chapter can also help you estimate your costs.
Examining other Kickstarter campaigns
So you have entered as many possible expenses as you could think of and estimated their cost. This gave you a project estimate of . . . what? $100? $1,000? $10,000? How do you know if this figure is realistic or completely off the mark?
There’s no exact way to know whether your budget is correct, but it’s important to examine other campaigns in your category at this point. The following steps walk you through the overall process:
1. Go to www.kickstarter.com.
On the right, you see a list of all 13 possible project categories.
2. Click the category you think your project will most likely fall under.
In Figure 3-4, I clicked Games, which highlighted the staff picks for the Games category in the center of the page.
Refer to Chapter 2 if you need help deciding what category is best for your project.
3. Click the option labeled See All (Number) (Category) Projects, as shown in Figure 3-4.
For example, See All 281 Games Projects. The number will vary depending on the projects available at any one time.
All the projects in your category appear, as shown in Figure 3-5.
4. Spend several minutes clicking through several of the projects in your intended category.
Be sure to check out the Staff Picks, Most Popular, Most Funded, and Ending Soon categories within the overall category page. You need to scroll down to see the different ways projects are grouped within the category page, as shown in Figure 3-6.
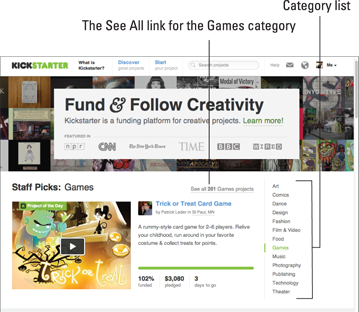
Figure 3-4: List of Kickstarter project categories.
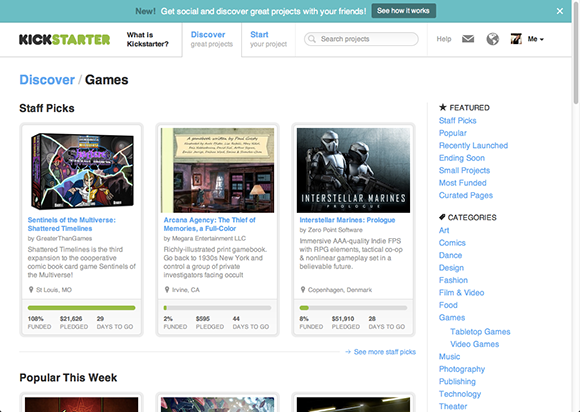
Figure 3-5: The Kickstarter Games category page.
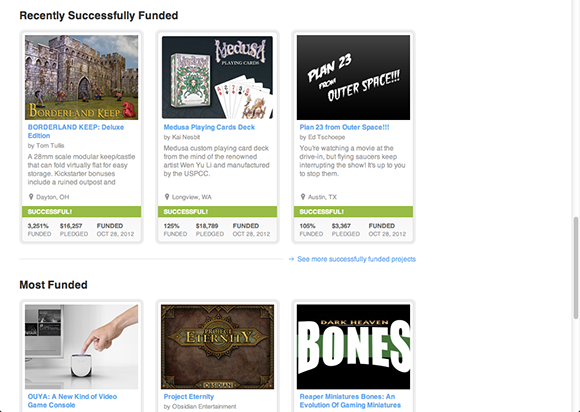
Figure 3-6: Scroll down to see how projects are grouped on the category page.
5. When you notice a project that’s similar to yours, note the funding goal. How much does that project’s goal differ from yours?
If you see dramatic differences between your potential budget and others in your likely category, it doesn’t necessarily mean your budget is wrong, but it may mean you should re-evaluate some of your elements.
6. Read these project descriptions to see whether a similar project mentions costs that you haven’t thought of yet.
• If your estimate is noticeably lower than those of similar projects: Are you setting yourself up to fall short? Potentially you haven’t considered hidden costs, so look thoroughly at these campaigns to see whether something strikes you as a cost you haven’t identified.
• If your funding goal is substantially higher than those of other projects in your category: Perhaps you’re being overly ambitious in your estimated number of backers or the number of units you might sell or produce. Examine these projects and check how many products they distributed, how many backers they actually received at each level, and so on.
Estimating Potential Donations
When determining your overall project budget, you must also estimate backer pledges.
Kickstarter is an all-or-nothing model, so if you don’t get to your project goal, you get none of the pledges.
You can’t estimate your pledges as accurately as you can estimate your project costs. But you can make a well-informed guess by following this overall process:
1. Make a very basic list of people you could consider, off the top of your head, as potential backers.
2. Use your project’s cost estimate to evaluate how many backers you’d need at different levels. Evaluate whether these levels suit the people on your list of potential backers.
3. Consider what rewards might interest your potential backers and the donation amount you could connect to each reward.
In the sections that follow, you find details and tips for working through each of these steps.
Who you gonna call?
It’s not just the signature line from a classic 1980s movie about a team of paranormal hunters. Figuring out who your potential backers are is a key step to Kickstarter success. Like it or not, most of your backers will be people with some personal connection to you, not total strangers. It’s time to generate a contact list.
Creating your contact list before you submit your project to Kickstarter for review has several advantages, in addition to helping you estimate your potential donations: Your contact list may spark creative ideas for rewards or changes to your project overview.
The first step in building your potential backer list is looking at all the elements of your life:
![]() Your family: It’s true that blood is thicker than water. Top of your potential solicitation list should be every member of your family, including parents, grandparents, siblings, cousins, second cousins, aunts, uncles, godparents . . . you get the idea!
Your family: It’s true that blood is thicker than water. Top of your potential solicitation list should be every member of your family, including parents, grandparents, siblings, cousins, second cousins, aunts, uncles, godparents . . . you get the idea!
![]() Your second family: We often spend more of our days with our co-workers than with actual family members. If you have good social relationships with your co-workers, consider them as a source for your first list of potential backers.
Your second family: We often spend more of our days with our co-workers than with actual family members. If you have good social relationships with your co-workers, consider them as a source for your first list of potential backers.
![]() Your community: Are you active in a religious organization, volunteer group, or other club? You might not think of this group as potential backers, but dozens of potential individuals in these groups would likely want to see your project succeed. You may also have a large online community — separate from a Facebook or Twitter account. Maybe you post actively and have Pinterest boards? Do you post in user groups or message boards? These could also be places to find additional backers.
Your community: Are you active in a religious organization, volunteer group, or other club? You might not think of this group as potential backers, but dozens of potential individuals in these groups would likely want to see your project succeed. You may also have a large online community — separate from a Facebook or Twitter account. Maybe you post actively and have Pinterest boards? Do you post in user groups or message boards? These could also be places to find additional backers.
![]() Your industry: An important group to consider is the industry in which your project falls. For example, if you want to make a film, your backer list might include film societies, clubs, professional groups, festival organizers, and more. The case study at the end of this chapter (see “The Order of the Stick: Building on a Fan Base and Offering Creative Rewards”) looks at an excellent example of a campaign owner working heavily with industry leaders and creating a rallying effect around the project.
Your industry: An important group to consider is the industry in which your project falls. For example, if you want to make a film, your backer list might include film societies, clubs, professional groups, festival organizers, and more. The case study at the end of this chapter (see “The Order of the Stick: Building on a Fan Base and Offering Creative Rewards”) looks at an excellent example of a campaign owner working heavily with industry leaders and creating a rallying effect around the project.
Think outside the proverbial box when it comes to ideas to locate potential backers. Look at everyone you come in contact over the course of the week and think about whether they might be interested in your project. Who knows? Your hairstylist might be a secret comic book enthusiast who would love to back your project that creates a new comic superhero who cuts hair in a flash!
Evaluate your potential reward levels
In this step, you experiment with reward levels until you find a comfortable spot for reward levels that your backers might actually fund. Here’s how this works:
1. Divide your estimated project cost by several numbers. Start with 5, 10, 25, 50, 100.
Doing this will help you guesstimate the potential number of backers you would need at each level to reach your goal. For example, the total project cost for the film project featured earlier in this chapter is $2,782. Table 3-1 outlines how many backers you’d need at a few basic backer levels:
Table 3-1 Estimating Backers Needed at Different Funding Levels
|
If All Your Backers Gave |
You’d Need This Many Backers |
|
$5 |
557 |
|
$10 |
279 |
|
$25 |
112 |
|
$50 |
56 |
|
$100 |
28 |
You might also want to consider some backer levels that may be significant to your project. For example, in my campaign for The Finding 40 Project, I had (of course) a backer level of $40 for individuals to preorder a copy of the book. If you are working on a film in 2013 and hope to premiere it at a 2014 film festival, a $14 pledge might be a natural fit.
2. Return to your backer list and consider who might back you at these different amounts.
If it becomes obvious that you’ll need thousands of backers at a $5 or $10 level — or even a hundred backers at a $50 pledge or more — and if this seems unreasonable to ask of the folks on your target list, consider lowering your overall project goal by 10 to 25 percent and re-calculating before you move on to Step 3.
To lower your overall project goal without dramatically changing the scope of your project, consider how your Kickstarter campaign might just “kick-start” your project rather than fund it completely. You might want to lower the number of finished copies of your project, limit the scope of what you’re producing, or realize that this campaign will only fund the first half of a film or project. Here are some specific ideas:
• Use the Kickstarter campaign to create a trailer or teaser for a feature film instead of the entire finished production.
• Produce the first in a series of comic books, instead of an entire run.
• Produce a single prototype for your design element, realizing that you’ll then have to get a loan, attract an investor, or launch another Kickstarter campaign to fund production once you’ve built a buzz for the product.
3. If you seem to have enough potential backers to meet your project cost estimate, try working out specific goals for each backer level.
For example, if you have a list of 300 potential backers, the $5 donation level is probably too low (because you’d need 557 of them to reach your goal, or 279 — pretty much your whole backer list — to reach even half of your goal). You have a better chance of funding your project if you have a handful of $100 or $50 backers and a larger pool of $25 and $10 backers. Continuing with the film example, you could play with the numbers as shown in Table 3-2.

Using an example like this, you can see the impact even a few larger backers have at reaching your goal and also the combined impact of a few more backers at the lower levels. In the second row of Table 3-2, you see how just adding a few more $50 backers takes you well over your fundraising goal without dramatically increasing your overall number of backers.
Rewarding your backers
Like it or not, almost no one does something for nothing. A very small percentage of your backers will support your campaign without expecting anything in return, but not most. Thankfully, Kickstarter lets you create a series of rewards to say “thank you” to those who back your project and want to see you succeed.
Now that you’ve built your contact list, determined that your list of contacts could realistically support your fundraising goal, and experimented with the levels of support you need, you’re ready to start thinking about possible rewards at each level of support.
Kickstarter allows you to set rewards at any level, from $1 to $10,000 (or more) and to also limit the number of backers at any one level.
The following tips can help you fine-tune the different levels of support for your rewards:
![]() Start with four reward amounts. You can always add more before your campaign goes live.
Start with four reward amounts. You can always add more before your campaign goes live.
![]() Estimate who might contribute at each level. As a basic guideline, think about the potential backers on your list. How many will be willing and able to give $5? $25? $50? $100? The likelihood of the number of backers to donate a certain amount will help you determine where to set your levels.
Estimate who might contribute at each level. As a basic guideline, think about the potential backers on your list. How many will be willing and able to give $5? $25? $50? $100? The likelihood of the number of backers to donate a certain amount will help you determine where to set your levels.
![]() Make sure one option is a low amount. Because Kickstarter is a crowdfunding site that’s designed to let as many people as possible into your project, you don’t want to set your starting reward too high!
Make sure one option is a low amount. Because Kickstarter is a crowdfunding site that’s designed to let as many people as possible into your project, you don’t want to set your starting reward too high!
After creating a list of your goals for your different backer levels, you need to associate a reward that goes with each amount. Your rewards should correlate to the dollar value invested by the backers, meaning your best rewards should be saved for your largest backers.
 Be sure you factor in the cost of your reward when setting the reward level; do not promise a CD to a $10 backer if it costs $15 to produce and deliver each one!
No matter the dollar value, each reward should offer something that has a personal meaning for your backer. These rewards are designed to thank a backer for support of your project, not anyone else’s. Consequently, rewards should be directly related to the project, not just a random reward. For example, a personal thank-you card showing an image from your project would be ideal.
The following list offers just a few sample ideas of rewards at various levels. I provide a list of other creative backer rewards in Chapter 9:
![]() $1 – $5 Backers:
$1 – $5 Backers:
• A thank-you on your project’s website
• A personal thank-you card
• The backer’s name listed in the finished product
• The backer’s name in the credits
![]() $10 – $25 Backers:
$10 – $25 Backers:
• Electronic versions of your finished product (e-book, CD/DVD, download)
• Invitations to a performance event
• Invitations to a VIP party for the project
![]() $25 – $50 Backers:
$25 – $50 Backers:
• Printed versions of your finished product (book, comic book, photos)
• Finished versions of games, toys
• Signed copies of printed versions
![]() $100-and-up Backers:
$100-and-up Backers:
• Printed thank-yous in project foreword or on the cover or jacket
• Combo packs of e-versions of your project, as well as finished products
• Multiple copies of a project to give as gifts
The list of potential ideas for backers is nearly limitless; if you can think of a creative way to say “thank you,” do it!
Figures 3-7, 3-8, and 3-9 show three examples of creative or personalized ways to reward backers: creating a villain, inviting backers to a premiere screening, and cooking a gourmet meal.
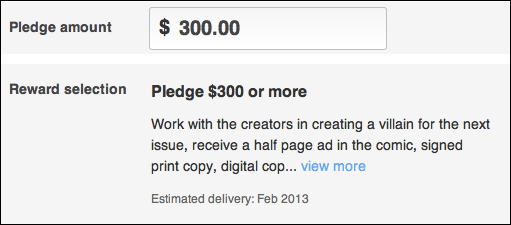
Figure 3-7: Rewarding backers with the option to create a villain in a comic book.
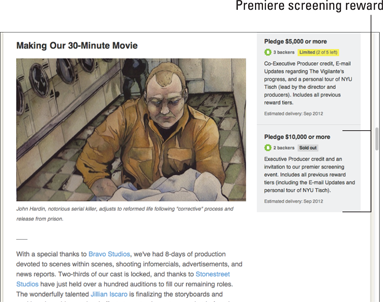
Figure 3-8: Inviting backers to a premiere screening as a reward.
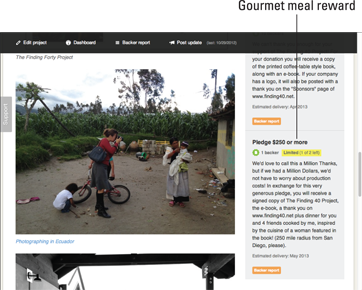
Figure 3-9: Saying “thank you” by offering to cook your backer a gourmet meal.
The Order of the Stick: Building on a Fan Base and Offering Creative Rewards
Earlier in this chapter, you find out about the importance of assessing your fan base and offering rewards as you figure out your fundraising goal and project budget. In this section, you see how a successful Kickstarter campaign for The Order of the Stick, organized by the comic’s creator Rich Burlew, used both of these elements.
The Order of the Stick wasn’t a new product when it launched on Kickstarter; it had started in 2003 as a once-in-a-while strip on Burlew’s personal web page, shown in Figure 3-10. Created as a satirical version of a Dungeons and Dragons type game, this comic features stick-figure style characters competing in a fantasy role-playing scenario. Over time, the comic expanded to several times a week and grew a very large following.
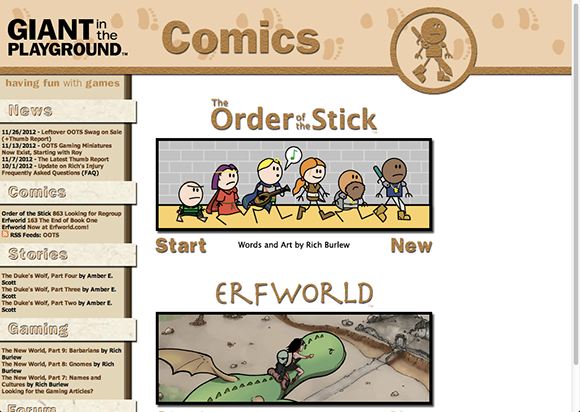
Figure 3-10: The Order of the Stick main web page.
In 2005, Burlew began publishing the comic in printed form in basic books. For several years, he published the comic books through his own production house. However, this proved extremely expensive and eventually he found himself unable to continue production, fronting all the costs himself for each run.
From his own posts on his Kickstarter page, Burlew said: “I’ve been self-publishing my comedy-fantasy-adventure web comic The Order of the Stick in paper format since 2005, but one of the hardest parts about doing it all on my own is keeping the older books available. This project is designed to get at least one of those books back into print.”
Figure 3-11 shows a sample of a previously printed book.
In January 2012, Burlew launched a Kickstarter campaign to get his books back into production. His goal was $57,750, enough to reprint a select run of books. But as you can see in Figure 3-12, he ended up with more than 20 times his goal, raising $1,254,120. The campaign raised more than enough to reprint the entire series of all the books published up to that point, as well as fund eight new titles to be published over the next year.
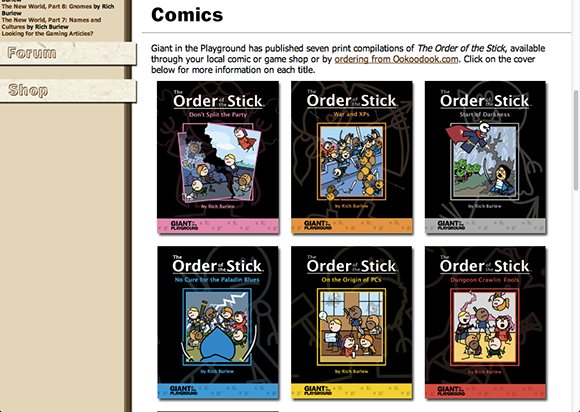
Figure 3-11: Printed version of an earlier The Order of the Stick book.
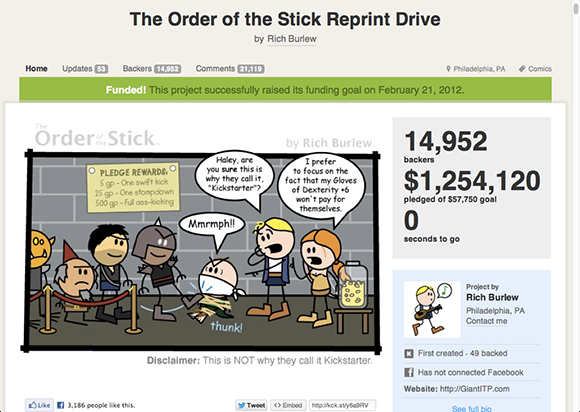
Figure 3-12: Successful Kickstarter campaign page for The Order of the Stick.
Building on a fan base
The Order of the Stick had spent several years before the Kickstarter campaign building a fan base. Through publication of the other comic strips and printed books, Burlew had an existing network of thousands of followers through the strip's existing website (www.giantitp.com). This website has a daily average of 150,000 individual page views, giving it a large viewership.
Burlew launched his Kickstarter campaign through his website, communicating directly to his fan base, as shown in Figure 3-13.
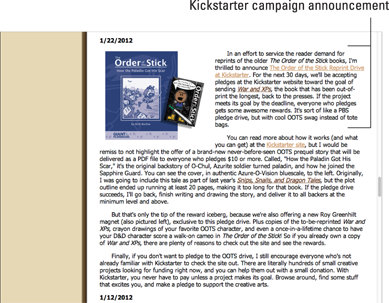
Figure 3-13: Launching a Kickstarter campaign directly through a post on creator’s own website.
The Order of the Stick was also already a part of several existing online communities focused on role-playing and web comics — and received exposure for its Kickstarter campaign on ComicsBeat, as shown in Figure 3-14.
As recommended in Chapter 6, Facebook is a great way to communicate with your potential backer group and spread the word about your Kickstarter campaign. Because Order of the Stick was an established product with an existing fan base on Facebook, posting heavily on the strip’s Facebook page and providing a link to the Kickstarter campaign (as shown in Figure 3-15) was a logical choice.
Figure 3-14: The Order of the Stick mentioned on industry website ComicsBeat.
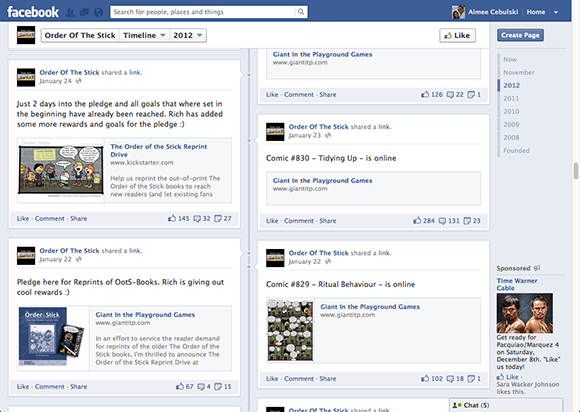
Figure 3-15: Using Facebook in your fan base to launch a Kickstarter campaign.
Chapter 6 goes into detail about spreading the word about your Kickstarter campaign among your communities after your campaign launches. However, it’s never too early to begin thinking about who all your potential supporters are — and where you might connect with them.
Getting creative with rewards
Another reason this campaign was so successful was the extreme diversity and variety of pledge levels and backer rewards. It wasn’t just a few high-rolling backers giving tens of thousands of dollars to meet this goal; it was thousands of individual smaller backers — which is the true power of crowdfunding.
Here’s a small sampling of the more than 50 different reward-and-pledge combinations:
![]() $10 (lowest reward available, 2,256 sold): A Roy Greenhilt fridge magnet, exclusive to this pledge drive, shipped anywhere in the world. Plus a digital PDF of the original Order of the Stick story, “How the Paladin Got His Scar,” when it is completed. (Note: All rewards below this level include the digital download as well.)
$10 (lowest reward available, 2,256 sold): A Roy Greenhilt fridge magnet, exclusive to this pledge drive, shipped anywhere in the world. Plus a digital PDF of the original Order of the Stick story, “How the Paladin Got His Scar,” when it is completed. (Note: All rewards below this level include the digital download as well.)
![]() $26 reward (772 sold): One newly printed copy of On the Origin of PCs plus a Roy Greenhilt magnet, shipped anywhere in the United States.
$26 reward (772 sold): One newly printed copy of On the Origin of PCs plus a Roy Greenhilt magnet, shipped anywhere in the United States.
![]() $49 reward (74 sold): PATIENCE for a SIGNED PRINT: The 8x10 art print, autographed by the author, plus the Roy Greenhilt magnet and the coloring book and stuff. Add any one signed book for an additional $45.
$49 reward (74 sold): PATIENCE for a SIGNED PRINT: The 8x10 art print, autographed by the author, plus the Roy Greenhilt magnet and the coloring book and stuff. Add any one signed book for an additional $45.
![]() $240 reward (25 sold): A complete set of all 8 limited-edition Order of the Stick (OOTS) holiday ornaments from 2004 to 2011, signed by the artist, Rich Burlew, plus a Roy Greenhilt magnet. Add one signed copy of every OOTS book for $262.
$240 reward (25 sold): A complete set of all 8 limited-edition Order of the Stick (OOTS) holiday ornaments from 2004 to 2011, signed by the artist, Rich Burlew, plus a Roy Greenhilt magnet. Add one signed copy of every OOTS book for $262.
![]() $675 reward (10 sold): PATIENCE for YOUR D&D PARTY: An original full-color crayon drawing of your D&D party (or party from another RPG, up to 6 characters) based on your descriptions, made and signed by Rich Burlew and shipped anywhere in the world, plus six Roy Greenhilt magnets, six of all the other free stuff, six art prints, six patches, and one copy of the Sticky Shticks expansion.
$675 reward (10 sold): PATIENCE for YOUR D&D PARTY: An original full-color crayon drawing of your D&D party (or party from another RPG, up to 6 characters) based on your descriptions, made and signed by Rich Burlew and shipped anywhere in the world, plus six Roy Greenhilt magnets, six of all the other free stuff, six art prints, six patches, and one copy of the Sticky Shticks expansion.
At the top end of the spectrum, several Order of the Stick rewards showcase the possibility of high-end backers pledging large amounts to truly get involved with the project:
With countless characters in the series, one of the rewards was the option to choose a character to feature in a new story; three backers chose this reward as shown on the left in Figure 3-16.
One backer even selected the highest-level reward ($5,000), giving the backer an opportunity to actually create an original Order of the Stick character, working directly with the creator, as shown on the right in Figure 3-16.
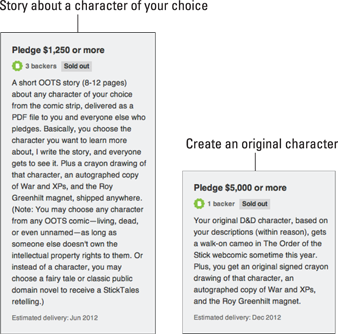
Figure 3-16: (Left) Backers choosing which characters return in the new series as part of the Order of the Stick Kickstarter campaign. (Right) This top-level reward featuring the opportunity to create your own character for The Order of the Stick.
What makes these rewards so successful? Here are a few key points to take away from The Order of the Stick’s successful campaign:
![]() There were many levels to choose from.
There were many levels to choose from.
![]() Rewards built upon each other, making the jumps in backer levels worthwhile.
Rewards built upon each other, making the jumps in backer levels worthwhile.
![]() The rewards were different enough to have something for every type of fan.
The rewards were different enough to have something for every type of fan.
![]() There was a sense of urgency (some rewards only had very limited availability).
There was a sense of urgency (some rewards only had very limited availability).
![]() Many of the rewards were for pledges under $50, allowing a large number of backers to get involved.
Many of the rewards were for pledges under $50, allowing a large number of backers to get involved.
Throwing in the perks
Another area where The Order of the Stick was successful was throwing in perks — added features that served as premiums at various backer levels. What made these add-ons extremely successful is they usually came with an additional backer contribution.
For example, if you chose a backer reward at $25, you could upsell the pledge to $30 in exchange for adding another book to your reward. This incrementally small increase in rewards allowed the campaign creator to increase his overall funding by slightly enhancing the amount each donor pledged.
Figure 3-17 shows a backer perk for raising the pledge by just $5.
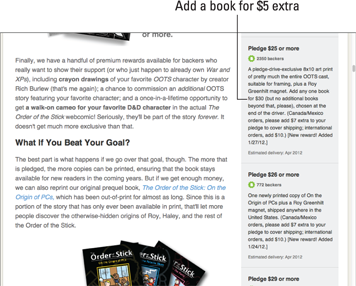
Figure 3-17: Bonus reward for increasing pledge from $25 to $30.