

At this point in the book, you should have a pretty good idea of how to create killer iPhone photos. And so at this point, you’ll probably want to share them with the world…and you can.
There are many apps that let you share your photos to a number of sites, such as Flickr, Facebook, Twitter, Blogger, and WordPress blogs. These apps are AroundShare, PixUp, Twitxr, and Best Camera.
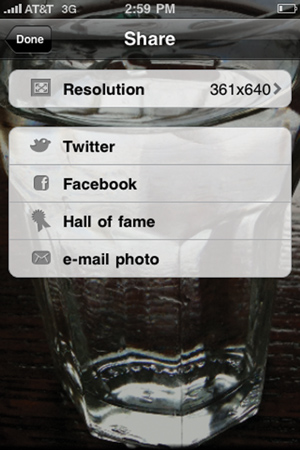
You can also send your photos to photo-sharing sites via Photogene (discussed in Chapter 8). To do that, you tap the check icon at the bottom of the column of icons when you are finished tweaking your image. Then tap Share on the screen that comes up. Figure 11.1 shows you that you have a choice to share your photo on Twitter or Facebook.
Another app that lets you share your photos is PhotoStudio. All you have to do is tap the Disk icon (in the top row of icons) when you’re finished tweaking your image. A pop-up screen will appear, where you can tap on Upload. You then will see two giant buttons that read Facebook and Twitter. Tap either to share on one of those sites.
Finally, ColorSplash also lets you share your photos. After you’re finished tweaking an image, you tap the Menu icon in the top row of icons. On the next screen, you tap Share/Send image. You’ll have a choice to upload to either Facebook, Flickr, or Twitter on the next screen.
For the purposes of this book, I will discuss uploading back and forth from your iPhone to your computer for Flickr and Photobucket.
Because Flickr is a good outlet to display your photos, I’ll start there. The first thing you have to do is get the Flickr app from the App Store. To do that, you just tap the App Store icon on your iPhone’s home page.
Once you’ve tapped the Flickr icon on the home screen of your iPhone, you’ll be taken to the screen shown in Figure 11.2. On that screen, you tap the camera in the upper-right side. If you haven’t used the app yet, you’ll get a message saying, “We will now launch Safari so you can log in and authorize this application.” Tap OK. Sign in on the next screen. The next thing you do is authorize your account.
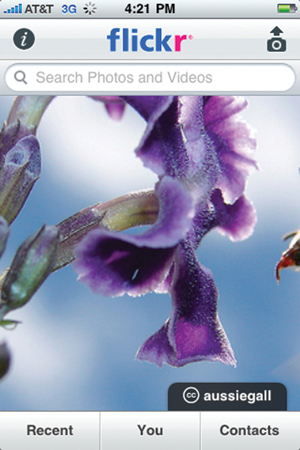
Figure 11.2. Screen that comes up after tapping the Flickr app icon on the home screen of your iPhone.
If you have used the app and are already logged on, you’ll get the screen shown in Figure 10.2 after you’ve tapped on the Flickr icon on your iPhone home screen. When you tap the camera icon in the right corner of the screen, you’ll be prompted to Take Photo or Video or Upload from Library. To get an image from your Camera Roll, tap Upload from Library and navigate to the image you want.
A screen will come up with fields for Title, Description, Sets, Tags, Image Size, and other options for the image (see Figure 11.3). After you fill in those fields (you don’t have to—they are optional), you tap Upload. Flickr will then upload your image to your Photostream.
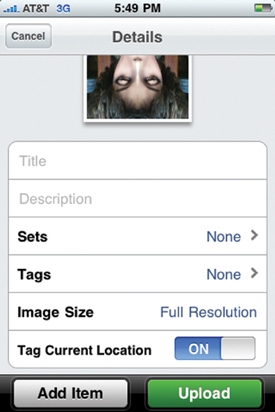
Figure 11.3. You can opt to lower the resolution when uploading a photo from your iPhone to Flickr by tapping Full Resolution, which will change to Medium Resolution after you tap it.
Here’s a review of what the icons do on the Flickr home screen.
i. The i icon in the upper-left corner of the screen gives you general Flickr info.
Camera. The camera icon in the upper-right corner is where you either take a photo or upload one from the library to put on Flickr.
Recent. This shows you the most recent activity and uploads.
Contacts. This is a list of your contacts.
The two most important features of Flickr regarding your iPhone are that you can upload photos from your iPhone to Flickr with your iPhone (in high resolution), as explained a moment ago, and that you can save photos from Flickr to your iPhone (not at high-res yet).
Note
If you want to get a high-res photo from Flickr to your iPhone, email it to yourself from your computer and then access that email on your iPhone and download it.
To download photos from Flickr to your iPhone, tap You on the home screen. Tap one of your photos on the next screen. It comes up by itself on the next screen (see Figure 11.4). On that screen tap the arrow inside the rectangle icon. On the pop-up screen that comes up, tap Save Image.

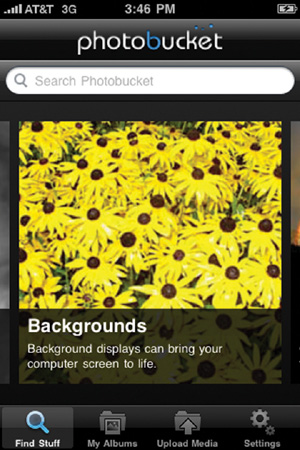
If you don’t have Photobucket preinstalled on your iPhone, you can get it for free from the App Store. After you tap the Photobucket icon, you’re taken to the home screen shown in Figure 11.5. (If you haven’t registered, it will ask you to do so.) On the bottom of the screen are the following options:
Find Stuff. Tap this, and a Search box comes up, which you can use to search for different kinds of photos.
My Albums. After you tap this icon, you’ll be shown the images you have in Photobucket. Tap one of the images, and it is shown full-screen.
Upload Media. This is the place where you can choose an existing photo from your Camera Roll or choose Use Camera to take a shot to upload to Photobucket.
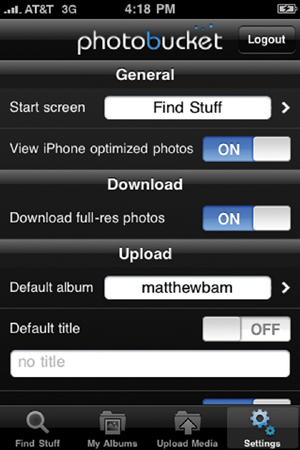
Settings. In the Settings menu, you can turn on and off several features (see Figure 11.6), including Ads, General (Start screen options and an option to view optimized photos), Download (an option to download full-res photos), Upload (default album, title, and description and an option to compress uploads).
Just as with Flickr, the two most important features of Photobucket regarding your iPhone are that you can upload photos from your iPhone to Photobucket (in high resolution) and that you can save photos from Photobucket to your iPhone (not at high resolution yet, but at better resolution than in Flickr).
To upload your photo from your iPhone to Photobucket, tap the Upload Media icon. Tap Choose Existing if you want a photo from your Camera Roll or Use Camera if you want to upload an image you are about to take. Navigate to the photo you want to upload and then click. The upload will proceed automatically.
To download an image from Photobucket to your iPhone, tap My Albums and then tap a photo. It will come up full-screen. Just as in Flickr, tap the arrow inside the rectangle icon and then tap Download when the pop-up menu appears. The photo will automatically download into the Camera Roll.