
CHAPTER 10
Editing Files
Objectives: A text editor lets you edit documents that are stored in plain-text format. The American Standard Code for Information Interchange (ASCII) used to be the common form, but now files typically use Unicode formats to support additional characters. These formats store text documents that, by themselves, include no special formatting or embedded features. Text files cannot include graphics, use multiple fonts, emphasize words by italicizing them, or use other features that you probably associate with word processors (although markup tools provide a partial exception to this rule). ASCII dates to the 1960s. It’s a 7-bit code, meaning that it supports a maximum of 27, or 128, characters. (In practice, ASCII uses 8 bits, so an extra 128 characters are available. These bits encode various control characters or are used in ASCII extensions.) ASCII was created to encode the letters used in English, digits, and symbols. This original intent, combined with ASCII’s limited character count, makes it rather unhelpful for many non-English languages. ASCII just doesn’t have enough characters to handle all the requirements of non-English languages. Over the years, extensions to, and variants of, ASCII have been used to support additional characters and alphabets that ASCII doesn’t support. One way to do this is to use a code page to specify an alphabet. Each code page specifies a variant of ASCII that’s suitable for a particular alphabet. For instance, code page 866 encodes Cyrillic (the alphabet used by Russian and most other Slavic languages). The problem with code pages is that you can generally use only one at a time. Unicode is a more modern approach. It provides a much larger character set, allowing the encoding of any alphabet in common use on Earth, including the huge logographic writing systems used in languages such as Chinese and Japanese. The problem is that Unicode requires many more bits, and several ways to encode it efficiently exist. Fortunately, these Unicode Transformation Format (UTF) schemes are limited in number compared to code pages. Some, such as UTF-8, map the first characters in the same way as ASCII, so an ASCII file is also a valid UTF-8 file. Many text editors today handle UTF-8 (or other Unicode formats) automatically, so you can use a text editor to write text files in any language that you like. You may still need to set localization options to tell Linux what sort of keyboard you use and what code page to use by default for programs that still rely on code pages. If your text file is encoded in ASCII, it’s encoded in Unicode too. ASCII encoding is considered a subset of Unicode. Text files consist of lines that can vary in length from 0 characters to the file’s entire size and that can hold any number of data types. You might want to create or edit some of these as an ordinary user; others are important for administering a Linux system. The main file types include the following:
Some files contain elements of multiple categories. Email, for instance, can be stored in text files. An email file consists largely of human language, but email messages include headers, which describe the origin and destination computers, along with information on how the message traveled from one site to the other, which is similar to formatted text or log file data. All Linux distributions ship with many text editors. Broadly speaking, text editors fall into one of two categories: text-mode and GUI. Beginners are generally more comfortable with GUI editors, which can be more convenient to use even for experts. But when a GUI is not available, you may have to use a text-mode editor. You should therefore familiarize yourself with at least one text-mode editor. Some popular text-mode editors include the following: emacs The emacs editor is another Unix staple. It’s a big editor with lots of features, so it’s less likely to be installed by default, particularly on small, lightweight distributions. Its operating model is more like those of the text editors familiar to novices, but its commands can seem rather odd. nano Several small editors are modeled after emacs, but they omit many of its advanced features in an effort to simplify the editor. One of these editors is nano, which is small, lightweight, and easy to use. The nano editor is probably the best place to start, because of its ease of use. If nano is not already installed, it’s typically available in most distribution’s software repositories. (If you don’t find nano installed on your distribution, see Chapter 9, “Exploring Processes and Process Data,” for help installing the nano package.) Figure 10.1 shows nano in operation within a text-mode login session, editing a file called pets.txt. Figure 10.1 The nano editor enables you to edit a text file in text mode. emacs The emacs editor is both a text-mode editor and a GUI editor. The GUI features of emacs, however, are sometimes a bit odd; for instance, the scroll bar to move through the file appears on the left side of the window rather than on the more common right side. gedit The GNOME desktop environment has an associated text editor known as gedit. It’s a fairly typical text editor, and it’s often installed by default. KWrite and Kate Just as gedit is associated with GNOME, KWrite and Kate are editors that are associated with the K Desktop Environment (KDE). KWrite is slightly more sophisticated than gedit, and Kate adds some more features, but neither is nearly as powerful as emacs. Geany The Geany editor is not tied to any particular desktop environment, and it’s small, lightweight, and rather powerful. It also runs under other OSs besides Linux, such as Windows, which is handy if you want to use one editor for multiple platforms. For a new Linux user, any of these is a good starting GUI editor; all offer the basic features that you need for light text-file editing. Your choice may depend on which is installed by default on your system. In the long term, you should probably try a variety of editors to find the one that you like best. You can launch the nano text editor from the command line. You can do this as a normal user, using your default privileges to edit text files you own. To edit system files, you’ll need to use super user privileges. Chapter 12, “Understanding Basic Security,” describes how to obtain super user privileges needed to edit system text files. This example launches nano: When it opens, you’ll see a display similar to the one shown in Figure 10.1, but the bulk of the window or text-mode console will be empty, since you didn’t specify a filename. Instead, as shown in Figure 10.2, the center of the top line will read New Buffer. You can begin typing in the desired text. When you save the file, as described later in “Saving Your Changes from nano,” nano will ask for a filename. Figure 10.2 The nano editor launched with no filename provided. Alternatively, you can provide a filename when you launch the text editor as follows: This example opens the great_american_novel.txt file and displays it. If the file doesn’t exist, nano displays New File near the bottom of the display, where Read 4 lines appears in Figure 10.1. If you see Warning: no write permission in the third line from the bottom, you’ve loaded a file that you have no permission to change. You’ll need to run nano using super user privileges or modify file permissions, as described in Chapter 14, “Setting Ownership and Permissions,” if you want to save the file’s modified contents. Every text editor has its own conventions for displaying information on the screen, manipulating text, and so on. Most text-mode text editors are similar up to a point—for instance, one or more lines at the top or bottom of the display typically show summary information or brief command prompts. Figure 10.1 and Figure 10.2 show this information for nano, which includes the following: Title Bar The first line of the display is the title bar. This line includes nano’s version number, the name of the file being edited, and the modification status. Status Bar The third line from the bottom of the display is reserved for status information and interactions with the user. This line will prompt you for information such as a filename to write when you save your document or terms that you want to find in the document when you perform a search operation. Shortcut List The bottom two lines of the editor show a summary of some of the most common operations, along with the keystrokes that trigger them. In addition to control characters, nano uses metacharacters to activate some functions. These key combinations use either the Esc, Alt, or Meta key (depending on your keyboard’s configuration) followed by another key. In nano’s documentation, meta sequences are denoted by M-k, where k is a key. For instance, M-? is the key sequence to move to the last line of the document. Note that these are distinct keystrokes, unlike Ctrl key sequences; that is, you would press Esc (or Alt or Meta), release it, and then press the question mark (?) key, including its Shift modifier, to move to the last line of the document. To learn nano, consider the tasks of creating and editing pets.txt, as shown in Figure 10.1. You can easily follow along on your system using this example. First populate the file with the pet types, as shown in Listing 10.1. After you save the file’s data to disk, add a new pet type using the text editor. For this example, the first step to using nano is to launch it and have it create a blank empty file called pets.txt as follows:
At this point, your result should resemble Figure 10.1 (shown earlier), which illustrates nano editing the pets.txt file. You can add a new entry to pets.txt in a couple of ways. The first way is to create a new empty line and type an entry manually. You can do this as follows:
A second way of creating a new entry demonstrates how to copy, cut, and paste text in the editor:
You can make additional changes in a similar way. Although nano lacks a GUI version, most of its principles are the same as the ones in GUI text editors and word processors; you just need to know the keystroke to activate the feature that you want. Pressing Ctrl+G displays the nano help documentation, which summarizes the program’s features. This can be handy as you get to know the editor. Some additional features that you might want to use include the following: Move to the Start or End of the File You can use the arrow keys, PageUp, PageDown, Home, and End to move the cursor around in ways that are common to other editors. To move to the start of the file, press M-, and to move to the end of the file, press M-/. (Remember that M stands for the Meta key covered in the “Using Text Editor Conventions” section of this chapter.) Copy or Move Multiple Lines If you need to copy or move multiple consecutive lines, you can repeat the M-6 or Ctrl+K operation; nano retains all of the lines that you copy or cut so that when you press Ctrl+U, all of them will be pasted back. Insert a File Pressing Ctrl+R or F5 enables you to insert another file into the current one at the cursor’s current position. Search for a String Pressing Ctrl+W or F6 activates a search feature. When activated, nano prompts you for a search term. Type it, followed by the Enter key, and nano finds the next instance of that search term in the file. When you press Ctrl+W or F6 again, the default search term is the last one used, so you can search repeatedly for the same term by pressing Ctrl+W or F6 followed by Enter for each search operation. Alternatively, M-W repeats the last search. Replace a String You can replace one string with another by pressing Ctrl+ or M-R. The program prompts you to enter a search term and the term to take its place. The search then commences, and nano asks you to verify each replacement. If you want to replace all of the occurrences without prompting, you can press the A key at the first prompt. After you’ve made changes to a text file, of course, you probably want to save them. One way to do this is with the Ctrl+O option. (That’s the letter O, not the number 0.) When you press this key, nano asks the following: Ordinarily, the prompt will include the file’s original name, so you can press the Enter key to save the file using that name. If you want to use a different name, you can delete the old one and type a new name. If you launched nano without specifying a filename, you can type one at this prompt. Another way to save the file is to press Ctrl+X. This command exits from nano, but if you’ve modified the file, it produces the following prompt: Type
y at this prompt to save the file. The program then shows you the filename prompt that you’d have seen if you’d pressed Ctrl+O, so you can change the filename if you like. After nano saves the file, it terminates. If you were following along on your system, creating and editing the pets.txt file from earlier in this chapter, here are the steps to follow to save your changes and exit the nano text editor: The status bar should show the words File Name to Write: pets.txt.
To gain more experience, try editing the pets.txt file again with nano, making various changes and trying out the different editing commands. Be sure to peruse the help feature as well, using Ctrl+G to access it and Ctrl+X to exit from the help documentation. Although the vi editor is useful for editing configuration files, it shines in editing program files, such as shell scripts. Thus, you will benefit from learning the vi editor, though it is considered by many to be the most complicated text editor to use. To use vi, you should first understand the modes in which it operates. Then you can begin to learn about the text-editing procedures that vi implements. At any given moment, vi is running in one of three modes: Command Mode The command mode accepts commands, which are usually entered as single letters. For instance, i and a both enter insert mode, though in somewhat different ways as described shortly, and o opens a line below the current one. Ex Mode To manipulate files (including saving your current file and running outside programs), you use ex mode. You enter ex mode from command mode by typing a colon (:), typically directly followed by the name of the ex mode command that you want to use. After you run the ex mode command, vi returns automatically to command mode. Insert Mode You enter text in insert mode. Most keystrokes result in text appearing on the screen. One important exception is the Esc key, which exits insert mode and returns to command mode. Unfortunately, terminology surrounding vi modes is inconsistent at best. For instance, command mode is sometimes referred to as normal mode, and insert mode is sometimes called edit mode or entry mode. Ex mode often isn’t described as a mode at all but is referred to as colon commands. Checking your vi/vim Editor Package Your Linux system may not have the full vi/vim editor package installed by default. For example, your distribution may come only with the vim.tiny or vim.minimal package installed. With these packages, you can still access a form of the vi editor, though you may not have full access to the editor’s various features, including some of those described in this chapter. If you wish to learn and properly use the vi editor, you should have the full vim package installed. To check your system, enter
type vi at the command line. You should receive the program name (vi or vim), including its directory location, similar to what is shown here: When you have the program name and its location, type readlink -f /location/program to determine whether the program is linked to another program. (Linked files are covered in Chapter 7, “Managing Files.”) You may receive something similar to the following: Next, you still need to check the software package that provided the program. (In some cases, the program name does not indicate which software package provided it.) Use the appropriate software package tool to determine this required information. The example here is on a Linux Mint distribution, so the dpkg -S command is used along with super user privileges (obtaining super user privileges is covered in more detail in Chapter 12). You can see that in this case the vim-tiny package is installed. If you find that the vim, vim-enhanced, vim-runtime, or vim-basic package is installed, you should have no problems using the vi editor commands in this chapter. However, if you do not find any of these packages, you’ll want to install the vim package in order to follow along with the rest of this chapter. For the preceding example on the Linux Mint distribution, you would enter
sudo apt-get install vim to install the full vim package. On the Fedora Workstation distribution, type
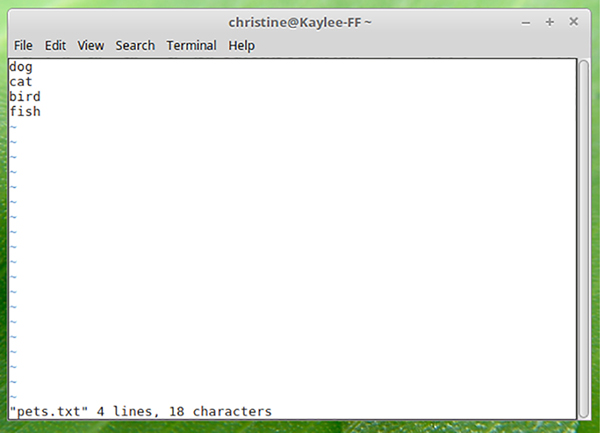
sudo yum install vim. (Installing packages is covered in Chapter 9.) You can now begin to learn about the text-editing procedures that vi implements. You’ll also examine how to save files and exit vi. As a method for learning vi, consider the task of creating and editing the pets.txt file—the same task described earlier in “Exploring Basic nano Text-Editing Procedures.” Listing 10.1 (in that earlier section) shows the pets.txt file to create for the next example. For this example, the first step to using vi is to launch it and have it create a blank file called pets.txt as follows:
Your result should resemble Figure 10.3, which shows vi displaying the pets.txt file in command mode. As shown in Figure 10.3, some systems display a line of tildes (~) down the left side of the screen to indicate the end of the file. The file in Figure 10.3 was newly loaded, and therefore the bottom line shows the status of the last command—an implicit file-load command that loaded 4 lines and 18 characters from the pets.txt file. Figure 10.3 The last line of a vi display is a status line that shows messages from the program. As with nano, you can add a new entry to pets.txt by using vi, either by typing a new line in its entirety or by duplicating an existing line and modifying it. To type a new line, follow these steps:
To practice making changes by modifying an existing entry, follow these steps:
Many additional commands are available that you may want to use in some situations. Here are some highlights: Change Case Suppose that you need to change the case of a word in a file. Instead of entering insert mode and retyping the word, you can use the tilde (~) key in command mode to change the case. Position the cursor on the first character that you want to change, and press ~ repeatedly until the task is done. Undo To undo any change, type
u in command mode. Open Text In command mode, typing
o (a lowercase letter O) opens text—that is, it inserts a new line immediately below the current one and enters insert mode on that line. Search To search forward for text in a file, type
/ in command mode, followed immediately by the text that you want to locate. Typing
? searches backward rather than forward. Change Text The c command changes text from within command mode. You invoke it much like the d or y command, as in cw to change the next word or cc to change an entire line. Go to a Line The G key brings you to a line number that you specify. The H key homes the cursor—that is, it moves the cursor to the top line of the screen. The L key brings the cursor to the bottom line of the screen. Replace Globally To replace all occurrences of one string with another, type
:%s/
original/
replacement/g, where
original is the original string and
replacement is its replacement. Change % to a starting line number, comma, and ending line number to perform this change on a small range of lines. vi offers a great deal more depth than is presented here; the editor is quite capable, and some Linux users are very attached to it. Entire books have been written about vi. Consult one of these, or a vi web page such as www.vim.org, for more information. To save changes to a file without exiting the editor, type
:w in command mode. This enters ex mode and runs the w ex-mode command, which writes the file using whatever filename you specified when you launched vi. Related commands enable other functions: Edit a New File The :e command edits a new file. For instance,
:e /etc/inittab loads /etc/inittab for editing. vi won’t load a new file unless the existing one has been saved since its last change or unless you follow :e with an exclamation mark (!). Keep in mind if you use the explanation point, you’ll lose any modifications made to the original file. Include an Existing File The :r command includes the contents of an old file in an existing one, appending it to the existing file. Execute an External Command The ex mode command :! executes the external command that you specify. For instance, typing
:!ls runs ls, enabling you to see what files are present in the current directory. Quit Use the :q command to quit the program. As with :e, this command won’t work unless changes have been saved or you append an exclamation mark to the command (as in :q!). Keep in mind if you use the exclamation point, you’ll lose any modifications made to the original file. You can combine ex commands such as these to perform multiple actions in sequence. For instance, as shown previously, typing
:wq writes changes and then quits from vi.
Plain-text files, which encode text using ASCII or Unicode, are important on most computer platforms, but they’re particularly important on Linux. This is because many of Linux’s configuration files use plain-text formats, so understanding how to use an editor such as nano or vi to edit these files enables you to edit a wide variety of configuration files. In addition, to be able to create shell scripts on Linux, you must be able to handle at least one text editor. Basic text-editing skills are required, but the more you know about moving around, searching, and modifying a text file, the quicker you can complete needed tasks. Describe editing files with nano. Launch the nano text editor along with the name of the current file you wish to edit or the new file you want to create. You can reach the line you want to change by using arrow or control keys, some of which are displayed in the shortcut list. For editing, basic keyboard keys or control and/or meta keys are also available. For example, Ctrl+K allows you to cut a line of text, whereas Ctrl+U pastes any cut text. Explain how to save modified text files with nano. You can save any changes made to the text file within the nano editor by pressing the Ctrl+O key combination. The editor will prompt for the filename, and if it is the name displayed, you can simply press Enter. You can also initiate this process by pressing Ctrl+X. Describe editing files with vi. Start the vi text editor along with the name of the current file you want to edit or the new file you want to create. The initial editor mode is command mode. It is easiest for those new to vi to start editing by entering insert mode by pressing I on the keyboard. After you have completed your edits, leave insert mode by pressing the Esc key. Detail the various methods to save changes with vi. To save your edits when using the vi editor, you can use ex mode, but you first must be out of insert mode (press the Esc key to leave insert mode if needed). Type
:w to write out the editor’s buffer to the file on the disk. You can save the changes and quit the vi editor at the same time by typing
:wq. If you need to quit without saving changes, type
:q!. You can also use command mode to save your modifications by typing
ZZ. Summarize needed super user privileges for editing. To successfully edit system files, which include some configuration files, you must obtain super user privileges prior to editing them. This also includes other files that only allow users with such privileges to write to the file. When using nano, you will see near the bottom of the editor screen the message Warning: no write permission if you have loaded a file that you have no permission to change. You can find the answers in Appendix A. For which type of file is nano least likely to be useful for examining or editing? Which keystrokes invoke the nano search function? (Choose all that apply.) How would you remove two lines of text from a file when using vi? True or false: Unicode is useful for encoding most European languages but not languages
in Asia. True or false: GUI text editors for ASCII are superior to text-mode ASCII text editors because the GUI editors support underlining, italics, and multiple fonts. True or false: If you have never used a text editor before, the nano text editor is usually the best one to learn first. ASCII supports ________ unique characters (not including control characters). Three keystrokes that can initiate a search-and-replace operation in nano are ________, ________, and . While in vi’s command mode, you can type ________ to undo a change. To save a file and exit the vi text editor in command mode, type ________.
![]() 3.3 Turning Commands into a Script
3.3 Turning Commands into a Script Computer documents come in many forms, but one of the most basic and flexible is a text file. Typically, configuration files and shell scripts are text files. Because you will often be modifying configuration files and creating shell scripts, you must be able to edit text files. This chapter covers this task with an emphasis on the simple text-mode nano and vi editors. A few roles played by text files are described first; then how to select a text editor is explained. To edit text files, of course, you must be able to start the editor, either on an existing document or to create a new one. The nano editor is fairly simple, so its operation is described first, followed by vi, which is a more unusual editor, by modern standards.
Understanding the Role of Text Files
![]() Text files encode the ends of lines by using one or two special ASCII characters. End-of-line encoding differs between Unix (or Linux) and Windows, but most programs can handle either method.
Text files encode the ends of lines by using one or two special ASCII characters. End-of-line encoding differs between Unix (or Linux) and Windows, but most programs can handle either method.![]()
ASCII and Unicode
![]() Formatted text files encode special formatting using unique character sequences. Although you can edit such files with a text editor, specialized editors also exist for many of these file types.
Formatted text files encode special formatting using unique character sequences. Although you can edit such files with a text editor, specialized editors also exist for many of these file types.Choosing an Editor
![]() vi The vi editor is a Unix staple. It’s small and usually installed by default, so you can be fairly certain that it’s present on any Linux computer. It is, however, strange by modern standards—it uses multiple editing modes, and you must switch between them to accomplish various tasks. Many longtime Unix and Linux administrators like vi for its flexibility, power, and small size.
vi The vi editor is a Unix staple. It’s small and usually installed by default, so you can be fairly certain that it’s present on any Linux computer. It is, however, strange by modern standards—it uses multiple editing modes, and you must switch between them to accomplish various tasks. Many longtime Unix and Linux administrators like vi for its flexibility, power, and small size.![]() Most Linux distributions use a version of vi called “vi improved,” or vim; you can typically still launch it by typing
vi.
Most Linux distributions use a version of vi called “vi improved,” or vim; you can typically still launch it by typing
vi.![]() Bash’s text-editing commands are modeled on those of emacs, so learning emacs can improve your ability to work in the Bash shell.
Bash’s text-editing commands are modeled on those of emacs, so learning emacs can improve your ability to work in the Bash shell.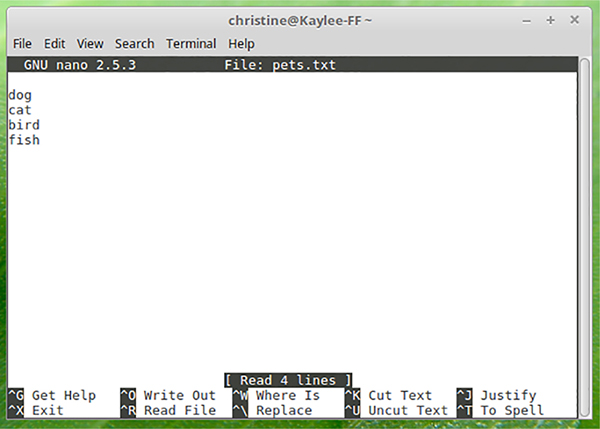
![]() As with text-mode editors, several GUI editors are available, including the following:
As with text-mode editors, several GUI editors are available, including the following:Editing Files with nano
![]() If you’re familiar with text-mode text editors, you should have few problems learning nano. If you’ve used only GUI editors to edit text, you’ll have to learn a few keyboard conventions. You must move about the document by using the keyboard rather than the mouse, for instance. You can insert, replace, and delete text much as you do in a GUI text editor or word processor.
If you’re familiar with text-mode text editors, you should have few problems learning nano. If you’ve used only GUI editors to edit text, you’ll have to learn a few keyboard conventions. You must move about the document by using the keyboard rather than the mouse, for instance. You can insert, replace, and delete text much as you do in a GUI text editor or word processor.![]() If nano is not installed on your system, you can use the information from Chapter 9 to install the nano package.
If nano is not installed on your system, you can use the information from Chapter 9 to install the nano package.$ nano

$ nano great_american_novel.txt
![]() If you mistype the filename of a preexisting file, nano will show an empty file. Thus, if you see an empty file instead of the file that you were expecting to see, you may have mistyped the filename.
If you mistype the filename of a preexisting file, nano will show an empty file. Thus, if you see an empty file instead of the file that you were expecting to see, you may have mistyped the filename.Using Text Editor Conventions
![]() In nano documentation, a caret (^) preceding a letter refers to a control character. In this book, such key combinations are indicated with Ctrl+ rather than a caret.
In nano documentation, a caret (^) preceding a letter refers to a control character. In this book, such key combinations are indicated with Ctrl+ rather than a caret.![]() Typically, modern keyboards do not have a Meta key (consult your keyboard manufacturer’s documentation). As a substitute, first try using the Esc key in place of the Meta key for meta key sequences in nano. If that does not work, try the Alt key as the Meta key.
Typically, modern keyboards do not have a Meta key (consult your keyboard manufacturer’s documentation). As a substitute, first try using the Esc key in place of the Meta key for meta key sequences in nano. If that does not work, try the Alt key as the Meta key.Exploring Basic nano Text-Editing Procedures
Listing 10.1: Sample pets.txt file

dog
cat
bird
fish
![]() To save the new pets.txt file that you created with nano, read the upcoming section, “Saving Your Changes from nano.”
To save the new pets.txt file that you created with nano, read the upcoming section, “Saving Your Changes from nano.”Saving Your Changes from nano
Write Selection to File:
Save modified buffer (ANSWERING "No" WILL DESTROY CHANGES) ?
Editing Files with vi
![]() vi was the first full-screen text editor written for Unix. It was designed to be small enough to fit on the old-fashioned, tiny, floppy-based emergency boot systems. Later, a new version with several improvements was created and called “vi improved,” or vim. Even though most Linux distributions ship with vim, it is still often referred to as the vi editor. vim is upward compatible with the vi editor, and the command to launch vim is typically vi—though some distributions have a vim command instead. The information presented in this chapter applies to both vi and vim.
vi was the first full-screen text editor written for Unix. It was designed to be small enough to fit on the old-fashioned, tiny, floppy-based emergency boot systems. Later, a new version with several improvements was created and called “vi improved,” or vim. Even though most Linux distributions ship with vim, it is still often referred to as the vi editor. vim is upward compatible with the vi editor, and the command to launch vim is typically vi—though some distributions have a vim command instead. The information presented in this chapter applies to both vi and vim.Understanding vi Modes
$ type vi
vi is hashed (/usr/bin/vi)
$ readlink -f /usr/bin/vi

/usr/bin/vim.tiny
$ sudo dkpg -S /usr/bin/vim.tiny

[sudo] password for christine:
vim-tiny: /usr/bin/vim.tiny
Exploring Basic vi Text-Editing Procedures
![]() If you created the pets.txt file earlier and want to follow along in this section, delete the file first by typing rm pets.txt and pressing Enter.
If you created the pets.txt file earlier and want to follow along in this section, delete the file first by typing rm pets.txt and pressing Enter.
![]() It may be tempting to try word processor shortcut keys in a text editor, such as Ctrl+S to save the file. This is not a wise practice, as this keystroke combination may cause your terminal to freeze. If you have done this, you can unfreeze your terminal by pressing Ctrl+Q.
It may be tempting to try word processor shortcut keys in a text editor, such as Ctrl+S to save the file. This is not a wise practice, as this keystroke combination may cause your terminal to freeze. If you have done this, you can unfreeze your terminal by pressing Ctrl+Q.
![]() If you need to change a text file’s end-of-line encoding from the Windows method to the Unix/Linux method, open the file in the vi editor and type the command
:set ff=unix.
If you need to change a text file’s end-of-line encoding from the Windows method to the Unix/Linux method, open the file in the vi editor and type the command
:set ff=unix.![]() The
/g at the command’s end is not needed if
original is listed only one time in each file’s line.
The
/g at the command’s end is not needed if
original is listed only one time in each file’s line.Saving Your Changes from vi
Exercise 10.1
Summary
Exam Essentials
Review Questions