As a multiuser OS, Linux provides tools to help you secure your files against unwanted access—after all, you wouldn’t want another user to accidentally (or intentionally) read personal files or even delete your files! Linux handles these tasks through two features of files and directories: their ownership and their permissions. Every file has an associated owner (that is, an account with which it’s linked) as well as an associated group. Three sets of permissions define what the file’s owner, members of the file’s group, and all other users can do with the file. Thus, ownership and permissions are intertwined, although you use different text-mode commands to manipulate them. (GUI tools often combine the two, as described in this chapter.)
Setting Ownership
The security model for Linux is based on that of Unix, which was designed as a multiuser OS. This security model therefore assumes the presence of multiple users on the computer and provides the means to associate individual files with the users who create them—that is, files have owners. You should thoroughly understand this concept, and with that knowledge, you can help protect your files, using either a GUI file manager or a text-mode shell command.
Ownership also applies to running programs (that is, processes). Most programs you run are tied to the account you used to launch them. This identity, in conjunction with the file’s ownership and permissions, determines whether a program may modify a file.
Understanding Ownership
Chapter 12, “Understanding Basic Security,” and Chapter 13, “Creating Users and Groups,” described Linux’s system of accounts. These accounts are the basis of file ownership. Specifically, every file has an owner—an account with which it’s associated. The user ID (UID) number associates the file with an owner, whereas the group ID (GID) number associates the file with a group.
As described later, in the section “Setting Permissions,” you control access to the file through permissions you set independently for the file’s owner, the file’s group, and all other users of the computer. As root, you can change the owner and group of any file. The file’s owner can also change the file’s group, but only to a group to which the user belongs.
The same principles of ownership apply to directories as apply to files: directories have owners and groups. They can be changed by root or, to a more limited extent, by the directory’s owner.
Setting Ownership in a File Manager
As described in Chapter 4, “Using Common Linux Programs,” you can manipulate files with a file manager. You’re probably familiar with file managers in Windows or macOS. Linux’s ownership and permissions are different from those of Windows, though, so you may want to know how to check on, and perhaps change, ownership features using a Linux file manager. As noted in Chapter 4, you have a choice of several file managers in Linux. Most are similar in broad strokes but differ in some details. In this section we’ll use GNOME Files file manager as an example.
If you want to change the file’s owner, you must run Files as root, but you can change the file’s group to any group to which you belong as an ordinary user. The procedure to perform this task as root is as follows:
Launch a terminal window.
In the terminal window, type su to acquire root privileges.
Some Linux distributions don’t allow you to use the su command to acquire root privileges. For example, if you’re using the GNOME version of Ubuntu you may instead need to use sudo to launch GNOME Files from the command line.
In the terminal window, type nautilus to launch GNOME Files (the Files application was called Nautilus in previous versions of GNOME, and the name has stuck around). You can optionally include the path to the directory in which you want Files to start up. If you don’t include a path, it will begin by displaying the contents of the /root directory.
The /root directory is the root account’s home directory.
Locate the file whose ownership you want to adjust and right-click it.
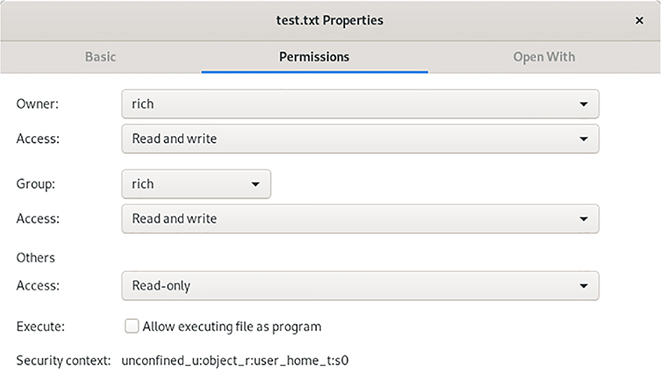
In the resulting menu, select Properties. The result is a Properties dialog.
In the Properties dialog, click the Permissions tab. The result resembles Figure 14.1.
To change the file’s owner, select a new owner in the Owner field. This action is possible only if you run GNOME Files as root.
To change the file’s group, select a new group in the Group field. If you run GNOME Files as an ordinary user, you will be able to select any group to which you belong, but if you run GNOME Files as root, you will be able to select any group.
When you’ve adjusted the features you want to change, click the X in the title bar to close the window.
If you want to change a file’s group but not its owner, and if you’re a member of the target group, you can launch GNOME Files as an ordinary user. You can then pick up the preceding procedure at step 4.
Figure 14.1 Linux file managers give you access to the file’s ownership and permission metadata.
You should be extremely cautious about running GNOME Files as root. If you forget you’re running this program as root, you can easily create new files as root, which will then require root privileges to make any changes to file ownership or permissions later on. It’s also easy to accidentally delete critical system files as root that you could not delete as an ordinary user. For these reasons, I recommend that you use a text-mode shell to adjust file ownership. The change in the prompt makes it easier to notice you’re running as root, and if you’re used to using a GUI, you’re less likely to launch additional programs as root from a text-mode shell than from GNOME Files.
Setting Ownership in a Shell
The command to change the ownership of a file in the preferred text-mode manner is chown. In its most basic form, you pass it the name of a file followed by a username:
The chown command’s name stands for change owner.
# chown rich targetfile.odf
This example gives ownership of targetfile.odf to rich. You can change the file’s principal owner and its group with a single command by separating the owner and group with a colon (:) or a period (.):
# chown bob:users targetfile.odf
This example gives ownership of targetfile.odf to bob and associates the file with the users group. To change the group without changing the owner, you can omit the owner, leaving the colon and group name:
$ chown :users targetfile.odf
Alternatively, you can use the chgrp command, which works in the same way but changes only the group and does not require the colon before the group name:
$ chgrp users targetfile.odf
Note that the commands used to change the owner require root privileges, whereas you can change the group as an ordinary user—but only if you own the file and belong to the target group.
The chown and chgrp commands both support a number of options. The most useful of these is -R (or --recursive), which causes a change in ownership of all the files in an entire directory tree. For instance, suppose that the user christine has left a company and an existing employee, rich, must access her files. If christine’s home directory was /home/christine, you might type:
# chown -R rich /home/christine
This command gives rich ownership of the /home/christine directory; all the files in the /home/christine directory, including all its subdirectories; the files in the subdirectories; and so on. To make the transition a bit easier for rich, you might also want to move christine’s former home directory into rich’s home directory.
Cross-Installation UIDs and GIDs
You may use multiple Linux installations, either dual-booting on one computer or installed on multiple computers. If so, and if you transfer files from one installation to another, you may find that the ownership of files seems to change as you move them around. The same thing can happen with non-Linux Unix-like OSs, such as macOS. The reason is that the filesystems for these OSs store ownership and group information using UID and GID numbers, and a single user or group can have different UID or GID numbers on different computers, even if the name associated with the account or group is identical.
This problem is most likely to occur when using native Linux or Unix filesystems to transfer data, including both disk-based filesystems (such as ext4fs in Linux or HFS+ in macOS) or the Network File System (NFS) for remote file access. This problem is less likely to occur if you use a non-Linux/Unix filesystem, such as the File Allocation Table (FAT) or the New Technology File System (NTFS) for disks, or the Server Message Block/Common Internet File System (SMB/CIFS; handled by Samba in Linux) for network access.
If you run into this problem, several solutions exist, but many of them are beyond the scope of this book. One you can use, though, is to change the UID or GID mappings on one or more installations so that they all match. Chapter 13 describes how to change a user’s UID number with usermod and how to change a group’s GID number with groupmod. When you are transferring data via removable disks, using FAT or NTFS can be a simple solution, provided you don’t need to preserve Unix-style permissions on the files.
Setting Permissions
File ownership is meaningless without some way to specify what particular users can do with their own or other users’ files. That’s where permissions enter the picture. Linux’s permission structure is modeled after that of Unix, and it requires a bit of explanation before you tackle the issue. After you understand the basics, you can begin modifying permissions, using either a GUI file manager or a text-mode shell. You can also set default permissions for new files you create.
Understanding Permissions
To understand Unix (and hence Linux) permissions, you may want to begin with the display created by the ls command, which lists the files in a directory, in conjunction with its -l option, which creates a long directory listing that includes files’ permissions. For instance, to see a long listing of the file test, you might type
Chapter 5, “Getting to Know the Command Line,” introduced the ls command, and describes additional ls options.
$ ls -l test-rwxr-xr-x 1 rich users 111 Oct 13 13:48 test
This line consists of several sections, which provide assorted pieces of information on the file:
Permissions The first column (-rwxr-xr-x in this example) is the file’s permissions.
Number of Links The next column (1 in this example) shows the number of hard links to the file—that is, the number of unique filenames that may be used to access the file.
Chapter 7, “Managing Files,” describes links in more detail.
Username The next column (rich in this example) identifies the file’s owner by username.
Group Name The file’s group (users in this example) appears next.
File Size This example file’s size is quite small—111 bytes.
Time Stamp The time stamp (Oct 13 13:48 in this example) identifies the time the file was last modified.
Filename Finally, ls -l shows the file’s name—test in this example.
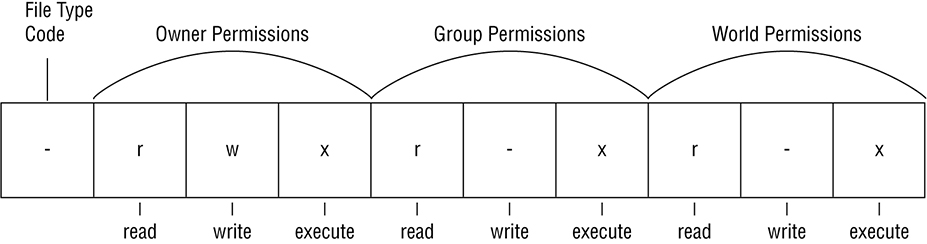
The string that begins this output (-rwxr-xr-x in this example) is a symbolic representation of the permissions string. Figure 14.2 shows how this string is broken into four parts:
Figure 14.2 A symbolic representation of file permissions is broken into four parts.
The File Type Code The first character is the file type code, which represents the file’s type, as summarized in Table 14.1. This type character is sometimes omitted from descriptions when the file type is not relevant or when it’s identified in some other way.
May be text, an executable program, graphics, compressed data, or just about any other type of data.
d
Directory
Disk directories are files, but they contain filenames and pointers to those named files’ data structures.
l
Symbolic link
The symbolic link file contains the name of another file or directory. When Linux accesses the symbolic link, it tries to read the linked-to file.
p
Named pipe
A pipe enables two running Linux programs to communicate with each other in a one-way fashion.
s
Socket
A socket is similar to a named pipe, but it permits network and bidirectional links.
b
Block device
A block device file that corresponds to a hardware device to and from which data is transferred in blocks of more than one byte. Disk devices (hard disks, floppies, CD-ROMs, and so on) are common block devices.
c
Character device
A character device file that corresponds to a hardware device to and from which data is transferred in units of one byte. Examples include parallel and RS-232 serial port devices.
Most of the files you’ll manipulate are normal files, directories, and symbolic links.
Owner Permissions These permissions determine what the file’s owner can do with the file.
Group Permissions These permissions determine what members of the file’s group (who aren’t its owner) can do with the file.
World (or “Other”) Permissions These permissions determine what users who aren’t the file’s owner or members of its group can do with the file
In each of the three sets of permissions, the string identifies the presence or absence of each of three types of access: read, write, and execute. Read and write permissions are fairly self-explanatory. If the execute permission is present, it means that the file may be run as a program. The absence of the permission is denoted by a dash (-) in the permission string. The presence of the permission is indicated by the letter r for read, w for write, or x for execute.
Setting the execute bit on a non-program file doesn’t turn it into a program, of course; it just indicates that a user may run a file that is a program.
Thus, the example permission string -rwxr-xr-x means that the file is a normal data file and that its owner, members of the file’s group, and all other users can read and execute the file. Only the file’s owner has write permission to the file.
Another representation of permissions is possible. It’s compact but a bit confusing; it takes each of the three permissions groupings of the permission string (omitting the file type code) and converts it into a number from 0 to 7 (that is, a base 8 or octal number). The result is a three-digit octal number. Each number is constructed by starting with a value of 0 and then:
Adding 4 if read permissions are present
Adding 2 if write permissions are present
Adding 1 if execute permissions are present
The resulting three-digit code represents permissions for the owner, the group, and the world. Table 14.2 shows some examples of common permissions and their meanings.
These procedures involve binary numbers and logical, not arithmetic, operations. The arithmetic description is easier to understand, though.
Table 14.2Example permissions and their interpretations
Permission string
Octal code
Meaning
rwxrwxrwx
777
Read, write, and execute permissions for all users
rwxr-xr-x
755
Read and execute permission for all users. The file’s owner also has write permission.
rwxr-x---
750
Read and execute permission for the owner and group. The file’s owner also has write permission. Other users have no access to the file.
rwx------
700
Read, write, and execute permissions for the file’s owner only; all others have no access.
rw-rw-rw-
666
Read and write permissions for all users. No execute permissions for anybody.
rw-rw-r--
664
Read and write permissions for the owner and group. Read-only permission for all others.
rw-rw----
660
Read and write permissions for the owner and group. No world permissions.
rw-r--r--
644
Read and write permissions for the owner. Read-only permission for all others.
rw-r-----
640
Read and write permissions for the owner, and read-only permission for the group. No permission for others.
rw-------
600
Read and write permissions for the owner. No permission for anybody else.
r--------
400
Read permission for the owner. No permission for anybody else.
There are 512 possible combinations of permissions, so Table 14.2 is incomplete. It shows the most common and useful combinations.
Several special cases apply to permissions:
Directory Execute Bits Directories use the execute bit to grant permission to enter the directory and access files. Even if you have permission to read a file, you must have execute permission on the directory to access the file. This is a highly desirable characteristic for directories, so you’ll almost always find the execute bit set when the read bit is set.
Directory Write Permissions Directories are files that are interpreted in a special way. As such, if a user can write to a directory, that user can create, delete, or rename files in the directory, even if the user isn’t the owner of those files and does not have permission to write to those files.
The usual rules for writing to directories can be modified with the sticky bit, which is described later in “Using Sticky Bits.”
Symbolic Links Permissions on symbolic links are always 777 (rwxrwxrwx, or lrwxrwxrwx, to include the file type code). This access applies only to the link file itself, not to the linked-to file. In other words, all users can read the contents of the link to discover the name of the file to which it points, but the permissions on the linked-to file determine its file access. Changing the permissions on a symbolic link affects the linked-to file.
rootMany of the permission rules don’t apply to root. The superuser can read or write any file on the computer—even files that grant access to nobody (that is, those that have 000 permissions). The superuser still needs an execute bit set to run a program file.
Setting Permissions in a File Manager
The procedure for setting permissions in a file manager is similar to that for setting the ownership of a file:
You normally adjust these settings using the same dialog used to adjust ownership, such as the GNOME Files dialog shown earlier in Figure 14.1.
You don’t need to be root to adjust the permissions of files you own.
You should use root access for this job only on files you don’t own.
As seen earlier in Figure 14.1, there are three Access items, associated with the Owner, the Group, and Others:
The Owner item provides two options: Read-Only and Read and Write.
The Group and Others items both provide Read-Only and Read and Write plus the None option. You can use these options to set the read and write permission bits on your file.
GNOME Files requires setting the execute bit separately by checking the Allow Executing File As Program box. This check box sets all three execute permission bits; you can’t control execute permission more precisely with GNOME Files. You also can’t adjust the execute permissions on directories with GNOME Files.
Details on setting permissions vary in other file managers, but the principles are the same as those described here for GNOME Files.
Setting Permissions in a Shell
In a text-mode shell, you can use chmod to change permissions. This command is rather complex, mostly because of the complex ways that permissions may be changed. You can specify the permissions in two forms: as an octal number or in a symbolic form, which is a set of codes related to the string representation of the permissions.
The chmod command’s name stands for change mode, mode being another name for permissions.
The octal representation of the mode is the same as that described earlier and summarized in Table 14.2. For instance, to change permissions on report.txt to rw-r--r--, you can issue the following command:
$ chmod 644 report.txt
A symbolic mode, by contrast, consists of three components:
A code indicating the permission set you want to modify—u for the user (that is, the owner), g for the group, o for other users, and a for all permissions
A symbol indicating whether you want to add (+), delete (-), or set the mode equal to (=) the stated value
A code specifying what the permission should be, such as the common r, w, or x symbol, or various others for more advanced operations
Using symbolic modes with chmod can be confusing, so we don’t describe them fully here; however, you should be familiar with a few common types of use, as summarized in Table 14.3. Symbolic modes are more flexible than octal modes because you can specify symbolic modes that modify existing permissions, such as adding or removing execute permissions without affecting other permissions. You can also set only the user, group, or world permissions without affecting the others. With octal modes, you must set all three permission bits equal to a value that you specify.
As with the chown and chgrp commands, you can use the -R (or --recursive) option to chmod to have it operate on an entire directory tree.
Table 14.3Examples of symbolic permissions with
chmod
Command
Initial permissions
End permissions
chmod a+x bigprogram
rw-r--r--
rwxr-xr-x
chmod ug=rw report.txt
r--------
rw-rw----
chmod o-rwx bigprogram
rwxrwxr-x
rwxrwx---
chmod g-w,o-rw report.txt
rw-rw-rw-
rw-r-----
Setting the umask
The user mask, or umask, determines the default permissions for new files and directories. The umask is the value that is removed from 666 (rw-rw-rw-) permissions when creating new files or from 777 (rwxrwxrwx) when creating new directories. For instance, if the umask is 022, then files will be created with 644 permissions by default and new directories will have 755 permissions. Note that the removal operation is not a simple subtraction but a bitwise removal. That is, a 7 value in a umask removes the corresponding rwx permissions, but for files, for which the starting point is rw-, the result is --- (0), not –1 (which is meaningless).
You can adjust the umask with the umask command, which takes the umask value, as in umask 022. Typically, this command appears in a system configuration file, such as /etc/profile, or in a user configuration file, such as ~/.bashrc.
Using Special Permission Bits and File Features
When you investigate the Linux directory tree, you will encounter certain file types that require special attention. Sometimes you may just want to be aware of how these files are handled, since they deviate from what you might expect based on the information presented in Chapter 8. In other cases, you may need to adjust how you use ls or other commands to deal with these files and directories. These special cases include the “sticky bit,” hiding files from view, obtaining long listings of directories, and using special execute permissions.
Using Sticky Bits
Before diving into what sticky bits are, it’s easier to start out with explaining why we need them. Consider the following commands, typed on a system with a few files and subdirectories laid out in a particular way:
$ whoamirich$ ls -ltotal 0drwxrwxrwx 2 root root 80 Oct 14 17:58 subdir$ ls -l subdir/total 2350-rw-r----- 1 root root 2404268 Oct 14 17:59 report.txt
These commands establish the current configuration; the effective user ID is rich and the current directory has one subdirectory, called subdir, which root owns but to which rich, like all the system's users, has full read/write access. This subdirectory has one file, report.txt, which is owned by root and to which rich has no access. You can verify that rich can’t write to the file by attempting to do so with the touch command:
This error message verifies that rich could not write to subdir/report.txt. The file, you might think, is safe from tampering. Not so fast! Try this:
$ rm subdir/report.txt$ ls -l subdir/total 0
The rm command returned no error message, and a subsequent check of subdir verifies that it’s now empty—in other words, rich could delete the file even without write permission to it! This may seem like a bug—after all, if you can’t write to a file, you might think you shouldn’t be able to delete it. Recall, however, that directories are just a special type of file, one that holds other files’ names and pointers to their lower-level data structures. Thus, modifying a file requires write access to the file, but creating or deleting a file requires write access to the directory in which it resides. In this example, rich has write access to the subdir directory but not to the report.txt file within that directory. Thus, rich can delete the file but not modify it. This result is not a bug; it’s just a counterintuitive feature.
Although Linux filesystems were designed to work this way, such behavior is not always desirable. The way to create a more intuitive result is to use a sticky bit, which is a special permission that alters this behavior. With the sticky bit set on a directory, Linux will permit you to delete a file only if you own it or the containing directory; write permission to the containing directory is not enough. You can set the sticky bit with chown, in either of two ways:
Using an Octal Code By prefixing the three-digit octal code described earlier in this chapter with another digit, you can set any of three special permission bits, one of which is the sticky bit. The code for the sticky bit is 1, so you would use an octal code that begins with 1, such as 1755, to set the sticky bit. Specifying a value of 0, as in 0755, removes the sticky bit.
Other odd numbers will set the sticky bit, too, but will also set additional special permission bits, which are described shortly, in “Using Special Execute Permissions.”
Using a Symbolic Code Pass the symbolic code t for the world permissions, as in chmod o+t subdir, to set the sticky bit on subdir. You can remove the sticky bit in a similar way by using a minus sign, as in chmod o-t subdir.
Restoring the file and setting the sticky bit enables you to see the effect:
$ ls -ltotal 0drwxrwxrwt 2 root root 80 Oct 14 18:25 subdir$ ls -l subdir/total 304-rw-r--r-- 1 root root 2404268 Oct 14 18:25 report.txt$ rm subdir/report.txtrm: cannot remove `subdir/report.txt': Operation not permitted
In this example, although rich still has full read/write access to subdir, rich cannot delete another user’s files in that directory.
You can identify a directory with the sticky bit set by a small change in the symbolic mode shown by ls -l. The world execute bit is shown as a t rather than an x. In this example, the result is that subdir’s permission appears as drwxrwxrwt rather than drwxrwxrwx.
The sticky bit is particularly important for directories that are shared by many users. It’s a standard feature on /tmp and /var/tmp, for instance, since many users store temporary files in these directories, and you wouldn’t want one user to be able to delete another’s temporary files. If you want users who collaborate on a project to be able to write files into each other’s home directories, consider setting the sticky bit on those home directories or on the subdirectories in which users are sharing files.
If you delete /tmp or /var/tmp and need to re-create it, be sure to set the sticky bit on your new replacement directory!
Using Special Execute Permissions
As described earlier in this chapter, the execute permission bit enables you to identify program files as such. Linux then enables you to run these programs. Such files run using your own credentials, which is generally a good thing—associating running processes with specific users is a key part of Linux’s security model. Occasionally, though, programs need to run with elevated privileges. For instance, the passwd program, which sets users’ passwords, must run as root to write, and in some cases to read, the configuration files it handles. Thus, if users are to change their own passwords, passwd must have root privileges even when ordinary users run it.
To accomplish this task, two special permission bits exist, similar to the sticky bit described earlier:
Set User ID (SUID) The set user ID(SUID) option tells Linux to run the program with the permissions of whoever owns the file rather than with the permissions of the user who runs the program. For instance, if a file is owned by root and has its SUID bit set, the program runs with root privileges and can therefore read any file on the computer. Some servers and other system programs run this way, which is often called SUID root. SUID programs are indicated by an s in the owner’s execute bit position in the permission string, as in rwsr-xr-x.
Set Group ID (SGID) The set group ID(SGID) option is similar to the SUID option, but it sets the group of the running program to the group of the file. It’s indicated by an s in the group execute bit position in the permission string, as in rwxr-sr-x. When set on a directory, the SGID option ensures that all files created in the directory are set to the group of the directory instead of the person who created the file.
You can set these bits using chmod:
Using an Octal Code In the leading digit of a four-digit octal code, set the leading value to 4 to set the SUID bit, to 2 to set the SGID bit, or to 6 to set both bits. For instance, 4755 sets the SUID bit, but not the SGID bit, on an executable file.
Using a Symbolic Code Use the s symbolic code, in conjunction with u to specify the SGID bit, g to specify the SGID bit, or both to set both bits. For instance, typing chmod u+s myprog sets the SUID bit on myprog, whereas chmod ug-s myprog removes both the SUID bit and the SGID bit.
Ordinarily, you don’t need to set or remove these bits; when necessary, the package management program sets these bits correctly when you install or upgrade a program. You might need to alter these bits if they’ve been mistakenly set or removed on files. In some cases you might want or need to adjust these values on program files that you compile from source code or if you need to modify the way a program works. Be very cautious when doing so, though. If you set the SUID or SGID bit on a garden-variety program, it will run with increased privileges. If the program contains bugs, those bugs will then be able to do more damage. If you accidentally remove these permissions, the results can be just as bad—programs like passwd, sudo, and su all rely on their SUID bits being set, so removing this feature can cause them to stop working.
Hiding Files from View
If you’re used to Windows, you may be familiar with the concept of a hidden bit, which hides files from view in file managers, by the Windows DIR command, and in most programs. If you’re looking for something analogous in Linux, you won’t find it, at least not in the form of a dedicated filesystem feature. Instead, Linux uses a file-naming convention to hide files from view; most tools, such as ls, hide files and directories from view if their names begin with a dot (.). Thus, ls shows the file afile.txt but not .afile.txt. Most file managers and dialogs that deal with files also hide such dot files, as they’re commonly called; however, this practice is not universal.
Many user programs take advantage of this feature to keep their configuration files from cluttering your display. For instance, ~/.bashrc is a Bash user configuration file, Evolution’s configuration files go in the ~/.evolution directory, and ~/.fonts.conf holds user-specific font configuration information.
You can view dot files in various ways depending on the program in question. Some GUI tools have a check box you can set in their configuration options to force the program to display such files. At the command line, you can use the -a option to ls:
$ ls -ltotal 0drwxrwxrwt 2 root root 80 Dec 14 18:25 subdir$ ls -latotal 305drwxr-xr-x 3 kirk users 104 Dec 14 18:44 .drwxr-xr-x 3 kirk users 528 Dec 14 18:21 ..-rw-r--r-- 1 kirk users 309580 Dec 14 18:44 .report.txtdrwxrwxrwt 2 root root 80 Dec 14 18:25 subdir
This example shows the hidden file, .report.txt, in the current directory. It also shows two hidden directory files. The first, ., refers to the current directory. The second, .., refers to the parent directory.
Recall from Chapter 6, “Managing Hardware,” that .. is a relative directory reference. This hidden entry is why it works.
Note that renaming a file so that it begins with a dot will hide it, but this action will also make the file inaccessible to any program that uses the original filename. That is, if you rename report.txt to .report.txt, and if another program or file refers to the file as report.txt, that reference will no longer work. You must include the leading dot in any reference to the hidden file.
Viewing Directories
Chapter 6 introduced the ls command, including many of its options. One of these deserves elaboration at this point: -d. If you’re working in a directory that holds many subdirectories, and if you use a wildcard with ls that matches one or more subdirectories, you may get an unexpected result; the output will show the files in the matched subdirectories, rather than the information on the subdirectories themselves—for instance, starting in a directory with two subdirectories, subdir1 and subdir2:
$ ls -l subdir*subdir1:total 304-rw-r--r-- 1 kirk users 309580 Dec 14 18:54 report.txtsubdir2:total 84-rw-r--r-- 1 kirk users 86016 Dec 14 18:54 mypaper.doc
If instead you want information on the subdirectories, rather than the contents of those subdirectories, you can include the -d option:
$ ls -ld subdir*drwxr-xr-x 2 kirk users 80 Dec 14 18:54 subdir1drwxr-xr-x 2 kirk users 80 Dec 14 18:54 subdir2
Summary
File security is important on a multiuser OS such as Linux, and one of the pieces of the puzzle of security is ownership. In Linux, every file has one owner and one associated group. The superuser can set the owner with chown, and either the superuser or the file’s owner can set the file’s group with chown or chgrp. By itself, ownership is useless, so Linux supports the concept of file permissions, which control which other users can access a file, and in what ways. You can set permissions with the chmod utility. You can view ownership, permissions, and some additional file features using the -l option to the ls command.
Exam Essentials
Describe how Linux tracks file and directory ownership. Each file and directory in the Linux filesystem is assigned one owner and one primary group. You can view the owner and group of a file or directory by using the ls command with the -l option. You can change the owner and primary group assigned to a file or directory using the chown command or just the group by using the chgrp command.
Explain how Linux tracks file and directory permissions. Linux assigns permissions to files and directories based on a three-level hierarchy—the owner, the primary group assigned to the file or directory, and everyone else on the system. To view the permissions for a file or directory, use the ls command with the -l option. The permissions appear as a set of nine characters, three sets of r (for read), w (for write), and x (for execute), ordered rwx. If a permission is not set, it appears as a dash (-). The first set is the owner’s permissions, the second set is the group permissions, and the third set is the permissions assigned to all other users who aren’t the owner or in the primary group of the file or directory. You change the permissions assigned to a file or directory by using the chmod command. You can either use the symbolic r, w, and x characters, or you can use an octal mode, where each permission is assigned an octal value.
Explain how Linux makes files or directories hidden. Linux flags a file or directory as hidden if the file or directory name begins with a period (.). Hidden files and directories don’t appear in a standard ls listing unless you include the -a option.
Describe the special bits used for files. The sticky bit, when assigned to a directory, tells Linux to allow only the owners of files contained in the directory to delete them, even if another user account has write access to the file. The set user ID bit tells Linux to run the file with the permissions of the file owner instead of the actual user account that runs the file. The set group ID bit tells Linux to run the file with the permissions of the file’s primary group instead of the primary group of the user account that runs the file.
Review Questions
You can find the answers in Appendix A.
What command would you type (as root) to change the ownership of somefile.txt from ralph to tony?
chown ralph:tony somefile.txt
chmod somefile.txt tony
chown somefile.txt tony
chown tony somefile.txt
chmod tony somefile.txt
Typing ls -ld wonderjaye reveals a symbolic file mode of drwxr-xr-x. Which of the following are true? (Choose all that apply.)
wonderjaye is a symbolic link.
wonderjaye is an executable program.
wonderjaye is a directory.
wonderjaye may be read by all users of the system.
wonderjaye may be written by any member of the file’s group.
Which of the following commands can you use to change a file’s group?
groupadd
groupmod
chmod
ls
chown
True or false: A file with permissions of 755 can be read by any user on the computer, assuming all users can read the directory in which it resides.
True or false: Only root can use the chmod command.
True or false: Only root can change a file’s ownership with chown.
The ____ option causes chown to change ownership on an entire directory tree.
-L
-R
-H
-P
-f
The three-character symbolic string _______ represents read and execute permission but no write permission.
-wx
--x
r-x
rw-
rwx
The chmod symbolic representation _______ allows all users execute access to a file without affecting other permissions.
u+x
u-x
g+x
a-x
a+x
You want to set the sticky bit on an existing directory, subdir, without otherwise altering its permissions. To do so, you would type chmod _____ subdir.

 As a multiuser OS, Linux provides tools to help you secure your files against unwanted access—after all, you wouldn’t want another user to accidentally (or intentionally) read personal files or even delete your files! Linux handles these tasks through two features of files and directories: their ownership and their permissions. Every file has an associated owner (that is, an account with which it’s linked) as well as an associated group. Three sets of permissions define what the file’s owner, members of the file’s group, and all other users can do with the file. Thus, ownership and permissions are intertwined, although you use different text-mode commands to manipulate them. (GUI tools often combine the two, as described in this chapter.)