
Chapter 15
Managing Network Connections
Objective: This chapter looks at how to configure your Linux system to connect to a network, as well as how to troubleshoot network connections if things go wrong. There are a few different methods for configuring network setting in Linux, and you’ll need to know them all for the Linux Essentials exam. First, we’ll cover the basic settings required for network connectivity. Next, we’ll examine the different tools you have at your disposal that help make configuring the network settings easier. After that, this chapter explores simple network troubleshooting techniques you can use to help find the problem if anything goes wrong.
You have three ways to configure this information in Linux systems:
Trying to manually edit the network configuration files is best left for advanced system administrators and is beyond the scope of this book. For most typical Linux users, you’ll never have to mess with the configuration files; the graphical and command-line tools can do all that work for you. The following sections walk through both the graphical and command-line tools. The Network Manager tool is a popular program used by many Linux distributions to provide a graphical interface for defining network connections. Network Manager starts automatically at boot time and appears in the system tray area of the desktop as an icon. If your system detects a wired network connection, the icon appears as a mini-network with blocks connected together. If your system detects a wireless network connection, the icon appears as an empty radio signal. When you click the icon, you’ll see a list of the available wireless networks detected by the network card (as shown in Figure 15.1). Figure 15.1: Network Manager showing a wireless network connection Click your access point to select it from the list. If your access point is encrypted, you’ll be prompted to enter the password to gain access to the network. After your system is connected to a wireless access point, the icon appears as a radio signal. Click the icon and then select Edit Connections to edit the network connection settings for the system, shown in Figure 15.2. Figure 15.2: The Network Connections dialog Select the network connection you want to configure (either wireless or wired), and then click the Edit button to change the current configuration. Network Manager allows you to specify the host address, network subnet address, default router, and DNS server names by using the manual configuration option, or you can set the configuration to use Dynamic Host Configuration Protocol (DHCP) to determine the settings. Network Manager automatically updates the appropriate network configuration files with the updated settings. One topic that the Linux Essentials exam does expect you to know about network configuration files is DNS. You can manually define a DNS server so that the system can use DNS host names. Fortunately, this is a standard that all Linux systems follow, which is handled in the /etc/resolv.conf configuration file: The domain entry defines the domain name assigned to the network. By default, the system appends this domain name to any host names you specify. The search entry defines any additional domains used to search for host names. The nameserver entry is where you specify the DNS server assigned to your network. Some networks can have more than one DNS server; just add multiple nameserver entries in the file. Be careful, though, as this file may reset the next time you boot your Linux system, depending on how your Linux distribution is configured. To help speed up connections to commonly used hosts, manually enter their host names and IP addresses in the /etc/hosts file on your Linux system. The /etc/nsswitch.conf file defines whether the Linux system checks this file before or after using DNS to look up the host name. If you’re not working with a graphical desktop client environment, you’ll need to use the Linux command-line tools to set the network configuration information. Quite a few different command-line tools are at your disposal. This section covers the ones you’re most likely to run into (and the ones you’ll most likely see on the Linux Essentials exam). Network Manager offers two command-line tools:
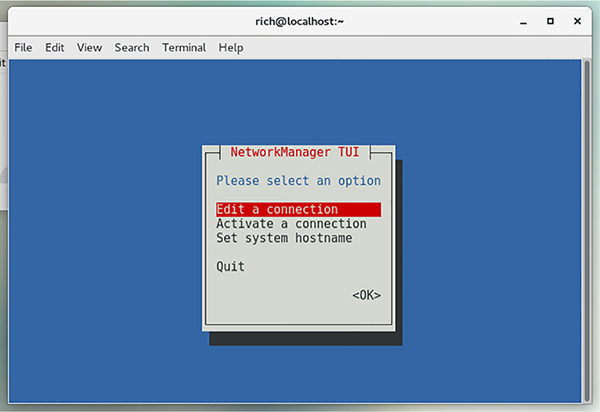
Both of these tools help guide you through the process of setting the required network information for your Linux system. The nmtui tool displays a stripped-down version of the graphical tool where you can select a network interface and assign network properties to it, as shown in Figure 15.3. Figure 15.3: The Network Manager nmtui command-line tool The nmcli tool doesn’t attempt to use any type of graphics capabilities—it just provides a command-line interface where you can view and change the network settings. By default, the command displays the current network devices and their settings, as shown in Listing 15.1. The nmcli command uses command-line options to allow you to set the network settings: In this example, we set the IP address to 192.168.1.15, the subnet mask to /24, and the default router to 192.168.1.254.
The ethtool command allows you to peek inside the network interface card Ethernet settings and change any properties that you may need to communicate with a network device, such as a switch. By default, the ethtool command displays the current configuration settings for the network interface, as shown in Listing 15.2. You can change features such as speed, duplex, and whether or not the network interface attempts to automatically negotiate features with the switch. Table 15.1 The
ip utility command options Each command option uses parameters to define what to do, such as display network settings, or to modify existing network settings. Listing 15.3 demonstrates how to display the current network settings using the show parameter. Listing 15.3 shows two network interfaces on the Linux system:
The local loopback interface is a special virtual network interface. Any local program can use it to communicate with other programs just as if they were across a network. That can simplify transferring data between programs. The enp0s3 network interface is the wired network connection for the Linux system. The ip command shows the IP address assigned to the interface (there’s both an IP and an IPv6 link local address assigned), the netmask value, and some basic statistics about the packets on the interface. If the output doesn’t show a network address assigned to the interface, you can use the ip command to specify the host address and netmask values for the interface: Then finally, make the network interface active by using the link option: You can also use the route command by itself to view the current default router configured for the system: The default router defined for the Linux system is 192.168.1.254 and is available from the enp0s3 network interface. The output also shows that to get to the 192.168.1.0 network you don’t need a gateway, because that’s the local network the Linux system is connected to. If your network is connected to multiple networks via multiple routers, you can manually create the routing table in the system by using the add or del command-line options for the route command. The format is: where
target is the target host or network and
gateway is the router address. If your network uses DHCP, ensure that a proper DHCP client program is running on your Linux system. The DHCP client program communicates with the network DHCP server in the background and assigns the necessary IP address settings as directed by the DHCP server. Three common DHCP client programs available for Linux systems are:
The dhcpcd program is becoming the most popular of the three, but you’ll still see the other two used in some Linux distributions. When you use your Linux system’s software package manager utility to install the DHCP client program, it sets the program to automatically launch at boot time and handles the IP address configuration needed to interact on the network. The essid parameter specifies the access point SSID name, and the key parameter specifies the encryption key required to connect to it. Notice that the encryption key is preceded by an s:. That allows you to specify the encryption key in ASCII text characters—otherwise, you’ll need to specify the key using hexadecimal values. If you don’t know the name of a local wireless connection, you can use the iwlist command to display all the wireless signals your wireless card detects. Just specify the name of the wireless device and use the scan option: Unfortunately, Linux driver support for Wi-Fi hardware is fairly weak. If you don’t see your Wi-Fi hardware when you try to configure it, you may need to track down suitable drivers. You can begin this task with a tool called lspci, which is described in Chapter 6, “Managing Hardware.” Type this command with no options to see a list of available hardware and search that list for a wireless network adapter. For instance, my laptop’s lspci output includes the following line: This line identifies the Wi-Fi adapter as a Realtek RTL8191SEvB. A search on Realtek’s website turns up a driver; however, this driver has to be compiled locally, which is a topic that’s beyond the scope of this book. You also might not be lucky enough to find a driver in this way. An alternative to using a native Linux driver is to use a Windows driver. This unusual option is possible using a package called ndiswrapper (http://ndiswrapper.sourceforge.net), which enables you to install Windows Wi-Fi drivers in Linux. Not all distributions provide ndiswrapper in their standard package sets, but you can usually find a binary package in an add-on repository. If all other options fail, you may need to buy new networking hardware. Many USB Wi-Fi adapters are available, but you should research them to find one that has good Linux support. You can also replace the built-in adapters on some laptops. After you have a Linux kernel installed, you can take a few steps to check that things are operating properly. This section walks through the commands you should know to monitor the network activity, including watching what processes are listening on the network and what connections are active from your system. One way to test network connectivity is to send test packets to known hosts. Linux provides the ping and ping6 commands to do that. The ping and ping6 commands send Internet Control Message Protocol (ICMP) packets to remote hosts using either the IP (ping) or IPv6 (ping6) protocols. ICMP packets work behind the scenes to track connectivity and provide control messages between systems. If the remote host supports ICMP, it will send a reply packet back when it receives a ping packet. The ping command continues sending packets until you press Ctrl+C. You can also use the -c command-line option to specify a set number of packets to send and then stop. With the ping6 command, things get a little more complicated. If you’re using an IPv6 link local address, you also need to tell the command which interface to send the packets out on: %enp0s3 tells the system to send the ping packets out the enp0s3 network interface for the link local address. The host command queries the DNS server to determine the IP addresses assigned to the specified host name. By default, it returns all IP addresses associated with the host name. Some hosts are supported by multiple servers in a load-balancing configuration. The host command will display all the IP addresses associated with those servers: You can also specify an IP address for the host command and it will attempt to find the host name associated with it: Notice, though, that often an IP address will resolve to a generic server host name that hosts the website and not the website alias, as is the case here with the www.linux.org IP address. Another great tool is the dig command. The dig command displays all of the DNS data records associated with a specific host or network. For example, you can look up the information for a specific host name: Or you can look up DNS data records associated with a specific network service, such as a mail server: If you need to look up DNS information for multiple servers or domains, the nslookup command provides an interactive interface where you can enter commands: You can also dynamically specify the address of another DNS server to use for the name lookups, which is a handy way to determine whether your default DNS server is at fault if a name resolution fails. Besides the simple network tests shown in the previous section, Linux has some more advanced programs that can provide complex information about the network environment. Sometimes it helps to be able to see just what network connections are active on a Linux system. There are two ways to troubleshoot that issue: the netstat command and the ss command. The netstat command produces lots of output, because there are normally several programs that use network services on Linux systems. You can limit the output to just TCP or UDP connections by using the –t command-line option for TCP connections or –u for UDP connections: You can get a list of what applications are listening on which network ports by using the –l option: As you can see, just a standard Linux workstation still has lots of things happening in the background, waiting for connections. Yet another great feature of the netstat command is that the –s option displays statistics for the different types of packets the system has used on the network: The netstat statistics output can give you a rough idea of how busy your Linux system is on the network, or if there’s an issue with one of the protocols installed. A program connection to a port is called a socket. The ss command can link which system processes are using which network sockets that are active: The -anpt option displays both listening and established TCP connections, as well as the process they’re associated with. This output shows that the ssh port (port 22) has an established connection and is controlled by process ID 15176, the ssh program. Connecting Linux systems to networks can be painless if you have the correct tools. To connect the Linux system you’ll need an IP address, a netmask address, a default router, a host name, and a DNS server. If you don’t care what IP address is assigned to your Linux system, you can obtain those values automatically using DHCP. Network Manager is the most popular graphical tool used by Linux distributions for configuring network settings. It allows you to configure both wired and wireless network settings from a graphical window. If you must configure your network settings from the command line, there are a few different tools you’ll need to use. For wireless connections, use the iwconfig command to set the wireless access point and SSID key. For both wireless and wired connections, use the ifconfig or ip command to set the IP address and netmask values for the interface. You may also use the route command to define the default router for the local network. When your network configuration is complete, you may have to do some additional troubleshooting for network problems. The ping and ping6 commands allow you to send ICMP packets to remote hosts to test basic connectivity. If you suspect issues with host names, use the host and dig commands to query the DNS server for host names. For more advanced network troubleshooting, you can use the netstat and ss commands to display what applications are using which network ports on the system. Describe the command-line utilities required to configure and manipulate Ethernet network interfaces. To set the IP and netmask addresses on an Ethernet interface, you use the ifconfig or ip command. To set the default router (or gateway) for a network, you use the router command. Some Linux distributions that have Network Manager installed can use the nmtui or nmcli commands, which can configure all three values. Explain how to configure basic access to a wireless network. Linux uses the iwlist command to list all wireless access points detected by the wireless network card. You can configure the settings required to connect to a specific wireless network by using the iwconfig command. At a minimum, you’ll need to configure the access point SSID value and most likely specify the encryption key value to connect to the access point. Describe how to manipulate the routing table on a Linux system. The route command is used to display the existing router table used by the Linux system. You can add a new route by using the add option or remove an existing route by using the del option. Specify the default router (gateway) used by the network by adding the default keyword to the command. Summarize the tools you would need to analyze the status of network devices. The ifconfig and ip commands display the current status of all network interfaces on the system. You can also use the netstat or ss command to display statistics for all listening network ports. Explain how to test network connectivity. The ping and ping6 commands allow you to send ICMP messages to remote hosts and display the response received. Describe how Network Manager is used to configure network settings in Linux. Network Manager provides a graphical interface for changing settings on the network interfaces. Network Manager appears as an icon in the desktop panel area. If your Linux system uses a wireless network card, the icon appears as a radio signal, whereas for wired network connections it appears as a mini-network. When you click the icon, it shows the current network status and, for wireless interfaces, a list of the access points detected. When you open the Network Manager interface, it allows you to set either static IP address information or configure the network to use a DHCP server to dynamically set the network configuration. You can find the answers in Appendix A. Which two commands set the IP address, subnet mask, and default router information on an interface using the command line? (Choose two.) Which command displays the duplex settings for an Ethernet card? Which command displays what processes are using which ports on a Linux systems? What network setting defines the network device that routes packets intended for hosts on remote networks? What device setting defines a host that maps a host name to an IP address? What is used to automatically assign an IP address to a client? Which command would you use to find the mail server for a domain? Which ifconfig format correctly assigns an IP address and netmask to the eth0 interface? What command displays all the available wireless networks in your area? What command can you use to both display and set the IP address, netmask, and default router values?
![]() 4.4 Your Computer on the Network
4.4 Your Computer on the Network These days it’s almost a necessity to have your Linux system connected to some type of network. Whether it’s the need to share files and printers on a local network, or the need to connect to the Internet to download updates and security patches, most Linux systems have some type of network connection.
Configuring Network Features
![]() You need to configure five main pieces of information in your Linux system to interact on a network:
You need to configure five main pieces of information in your Linux system to interact on a network:
![]()
![]() It’s worth noting that there are two types of IP network address schemes in use today. The legacy address scheme is technically referred to as IPv4 but is commonly just called IP. It uses 32 bits to represent a host address. These 32 bits are normally split into four 8-bit values, represented by decimal values, separated by dots (such as 192.168.1.5). Because the world is running out of unique 32-bit addresses to assign to hosts on the Internet, IPv6 was created. It uses 128 bits for addresses. These values are commonly represented as eight groups of four hexadecimal digits, separated by colons (such as 2500:1602:1ce0:eeb0:e900:aa10:fa10:cf33).
It’s worth noting that there are two types of IP network address schemes in use today. The legacy address scheme is technically referred to as IPv4 but is commonly just called IP. It uses 32 bits to represent a host address. These 32 bits are normally split into four 8-bit values, represented by decimal values, separated by dots (such as 192.168.1.5). Because the world is running out of unique 32-bit addresses to assign to hosts on the Internet, IPv6 was created. It uses 128 bits for addresses. These values are commonly represented as eight groups of four hexadecimal digits, separated by colons (such as 2500:1602:1ce0:eeb0:e900:aa10:fa10:cf33).Graphical Tools


![]()
![]()
Manual DNS Configurationsdomain mydomain.com
search mytest.com
nameserver 192.168.1.1
Command-Line Tools
Network Manager Command-Line Tools
Listing 15.1: The default output of the nmcli command
$ nmcli
enp0s3: connected to enp0s3
        "Intel 82540EM Gigabit Ethernet Controller (PRO/1000 MT Desktop
 Adapter)
        ethernet (e1000), 08:00:27:73:1C:6D, hw, mtu 1500
        ip4 default
        inet4 10.0.2.15/24
        route4 0.0.0.0/0
        route4 10.0.2.0/24
        inet6 fe80::5432:eddb:51ea:fb44/64
        route6 ff00::/8
        route6 fe80::/64
        route6 fe80::/64
# nmcli con add type ethernet con-name eth1 ifname enp0s3 ip4
192.168.1.15/24 gw4 192.168.1.254
Traditional Command-Line Tools
![]() If your Linux distribution doesn’t support one of the Network Manager tools, you can use one of four traditional command-line tools:
If your Linux distribution doesn’t support one of the Network Manager tools, you can use one of four traditional command-line tools:
Listing 15.2: Output from the ethtool command
$ ethtool enp0s3
Settings for enp0s3:
       Supported ports: [ TP ]
       Supported link modes:   10baseT/Half 10baseT/Full
                               100baseT/Half 100baseT/Full
                               1000baseT/Full
       Supported pause frame use: No
       Supports auto-negotiation: Yes
       Supported FEC modes: Not reported
       Advertised link modes:  10baseT/Half 10baseT/Full
                               100baseT/Half 100baseT/Full
                               1000baseT/Full
       Advertised pause frame use: No
       Advertised auto-negotiation: Yes
       Advertised FEC modes: Not reported
       Speed: 1000Mb/s
       Duplex: Full
       Port: Twisted Pair
       PHYAD: 0
       Transceiver: internal
       Auto-negotiation: on
       MDI-X: off (auto)
Cannot get wake-on-lan settings: Operation not permitted
       Current message level: 0x00000007 (7)
                            drv probe link
       Link detected: yes
$
![]() The ifconfig command is a legacy command for configuring network device settings. It allows you to set the network address and subnet mask for a network interface:
The ifconfig command is a legacy command for configuring network device settings. It allows you to set the network address and subnet mask for a network interface:$ sudo ifconfig enp0s3 down 10.0.2.10 netmask 255.255.255.0
![]() The ip command is more robust in what it can do, and it is becoming the most popular method to use for defining network settings from the command line. The ip utility uses several command options to display the current network settings or define new network settings. Table .1 show these commands.
The ip command is more robust in what it can do, and it is becoming the most popular method to use for defining network settings from the command line. The ip utility uses several command options to display the current network settings or define new network settings. Table .1 show these commands.
Parameter
Description
address
Display or set the IPv4 or IPv6 address on the device.
addrlabel
Define configuration labels.
l2tp
Tunnel Ethernet over IP.
link
Define a network device.
maddress
Define a multicast address for the system to listen to.
monitor
Watch for netlink messages.
mroute
Define an entry in the multicast routing cache.
mrule
Define a rule in the multicast routing policy database.
neighbor
Manage Address Resolution Protocol (ARP) or Neighbor Discovery (NDISC) cache entries.
netns
Manage network namespaces.
ntable
Manage the neighbor cache operation.
route
Manage the routing table.
rule
Manage entries in the routing policy database.
tcpmetrics
Mange TCP metrics on the interface.
token
Manage tokenized interface identifiers.
tunnel
Tunnel over IP.
tuntap
Manage Network Tunnel (TUN) or Network Bridge (TAP) devices.
xfrm
Manage IPSec policies for secure connections.
Listing 15.3: The ip address show output
$ ip address show
1: lo: <LOOPBACK,UP,LOWER_UP> mtu 65536 qdisc noqueue state UNKNOWN group
default qlen 1000
    link/loopback 00:00:00:00:00:00 brd 00:00:00:00:00:00
    inet 127.0.0.1/8 scope host lo
       valid_lft forever preferred_lft forever
    inet6 ::1/128 scope host
       valid_lft forever preferred_lft forever
2: enp0s3: <BROADCAST,MULTICAST,UP,LOWER_UP> mtu 1500 qdisc pfifo_fast
state UP group default qlen 1000
    link/ether 08:00:27:73:1c:6d brd ff:ff:ff:ff:ff:ff
    inet 10.0.2.15/24 brd 10.0.2.255 scope global noprefixroute dynamic
enp0s3
       valid_lft 84411sec preferred_lft 84411sec
    inet6 fe80::5432:eddb:51ea:fb44/64 scope link noprefixroute
       valid_lft forever preferred_lft forever
$
# ip address add 10.0.2.15/24 dev enp0s3
![]() You can then use the ip command to set the default router for the network interface:
You can then use the ip command to set the default router for the network interface:# ip route add default via 192.168.1.254 dev enp0s3
# ip link set enp0s3 up
![]() Although the ip command is a one-stop method for changing network settings, an alternative way to specify network routing settings for your network is the route command:
Although the ip command is a one-stop method for changing network settings, an alternative way to specify network routing settings for your network is the route command:# route add default gw 192.168.1.254
$ route
Kernel IP routing table
Destination     Gateway         Genmask         Flags Metric Ref Use Iface
default         192.168.1.254   0.0.0.0         UG    0      0   0   enp0s3
192.168.1.0     *               255.255.255.0   U     1      0   0   enp0s3
$
route [add] [del] target gw gateway
![]() Before you can use the ip command to assign an address to a wireless interface, you must assign the wireless SSID and encryption key values using the iwconfig command:
Before you can use the ip command to assign an address to a wireless interface, you must assign the wireless SSID and encryption key values using the iwconfig command:# iwconfig wlan0 essid "MyNetwork" key s:mypassword
$ iwlist wlan0 scan
![]()
Obtaining Wi-Fi Drivers03:00.0 Network controller: Realtek Semiconductor Co., Ltd.m
RTL8191SEvB Wireless LAN Controller (rev 10)
Basic Network Troubleshooting
Sending Test Packets
![]() The basic format for the ping command is to specify the IP address of the remote host:
The basic format for the ping command is to specify the IP address of the remote host:$ ping 10.0.2.2
PING 10.0.2.2 (10.0.2.2) 56(84) bytes of data.
64 bytes from 10.0.2.2: icmp_seq=1 ttl=63 time=14.6 ms
64 bytes from 10.0.2.2: icmp_seq=2 ttl=63 time=3.82 ms
64 bytes from 10.0.2.2: icmp_seq=3 ttl=63 time=2.05 ms
64 bytes from 10.0.2.2: icmp_seq=4 ttl=63 time=0.088 ms
64 bytes from 10.0.2.2: icmp_seq=5 ttl=63 time=3.54 ms
64 bytes from 10.0.2.2: icmp_seq=6 ttl=63 time=3.97 ms
64 bytes from 10.0.2.2: icmp_seq=7 ttl=63 time=0.040 ms
^C
--- 10.0.2.2 ping statistics ---
7 packets transmitted, 7 received, 0% packet loss, time 6020ms
rtt min/avg/max/mdev = 0.040/4.030/14.696/4.620 ms
$
$ ping6 –c 4 fe80::c418:2ed0:aead:cbce%enp0s3
PING fe80::c418:2ed0:aead:cbce%enp0s3(fe80::c418:2ed0:aead:cbce) 56 data
bytes
64 bytes from fe80::c418:2ed0:aead:cbce: icmp_seq=1 ttl=128 time=1.47 ms
64 bytes from fe80::c418:2ed0:aead:cbce: icmp_seq=2 ttl=128 time=0.478 ms
64 bytes from fe80::c418:2ed0:aead:cbce: icmp_seq=3 ttl=128 time=0.777 ms
64 bytes from fe80::c418:2ed0:aead:cbce: icmp_seq=4 ttl=128 time=0.659 ms
--- fe80::c418:2ed0:aead:cbce%enp0s3 ping statistics ---
4 packets transmitted, 4 received, 0% packet loss, time 3003ms
rtt min/avg/max/mdev = 0.478/0.847/1.475/0.378 ms
$
![]() These days, many hosts don’t support ICMP packets because they can be used to create a denial-of-service (DOS) attack against the host. Don’t be surprised if you try to ping a remote host and receive no responses.
These days, many hosts don’t support ICMP packets because they can be used to create a denial-of-service (DOS) attack against the host. Don’t be surprised if you try to ping a remote host and receive no responses.Finding Host Information
![]() Sometimes the problem isn’t with network connectivity but with the DNS host name system. You can test a host name using the host command:
Sometimes the problem isn’t with network connectivity but with the DNS host name system. You can test a host name using the host command:$ host www.linux.org
www.linux.org is an alias for linux.org.
linux.org has address 107.170.40.56
linux.org mail is handled by 20 mx.iqemail.net.
$
$ host www.google.com
www.google.com has address 74.125.138.104
www.google.com has address 74.125.138.105
www.google.com has address 74.125.138.147
www.google.com has address 74.125.138.99
www.google.com has address 74.125.138.103
www.google.com has address 74.125.138.106
www.google.com has IPv6 address 2607:f8b0:4002:c0c::67
$
$ host 107.170.40.56
56.40.170.107.in-addr.arpa domain name pointer iqdig11.iqnection.com.
$
$ dig www.linux.org
; <<>> DiG 9.9.4‐RedHat‐9.9.4‐18.el7_1.5 <<>> www.linux.org
;; global options: +cmd
;; Got answer:
;; ->>HEADER<<- opcode: QUERY, status: NOERROR, id: 45314
;; flags: qr rd ra; QUERY: 1, ANSWER: 2, AUTHORITY: 0, ADDITIONAL: 1
;; OPT PSEUDOSECTION:
; EDNS: version: 0, flags:; udp: 4096
;; QUESTION SECTION:
;www.linux.org. IN A
;; ANSWER SECTION:
www.linux.org. 14400 IN CNAME linux.org.
linux.org. 3600 IN A 107.170.40.56
;; Query time: 75 msec
;; SERVER: 192.168.1.254#53(192.168.1.254)
;; WHEN: Sat Feb 06 17:44:29 EST 2016
;; MSG SIZE rcvd: 72
$
$ dig linux.org MX
; <<>> DiG 9.9.5‐3ubuntu0.5‐Ubuntu <<>> linux.org MX
;; global options: +cmd
;; Got answer:
;; ->>HEADER<<- opcode: QUERY, status: NOERROR, id: 16202
;; flags: qr rd ra; QUERY: 1, ANSWER: 1, AUTHORITY: 0, ADDITIONAL: 1
;; OPT PSEUDOSECTION:
; EDNS: version: 0, flags:; udp: 4096
;; QUESTION SECTION:
;linux.org. IN MX
;; ANSWER SECTION:
linux.org. 3600 IN MX 20 mx.iqemail.net.
;; Query time: 75 msec
;; SERVER: 127.0.1.1#53(127.0.1.1)
;; WHEN: Tue Feb 09 12:35:43 EST 2016
;; MSG SIZE rcvd: 68
$
$ nslookup
> www.google.com
Server:        192.168.1.254
Address:    192.168.1.254#53
Non-authoritative answer:
Name: www.google.com
Address: 172.217.2.228
> www.wikipedia.org
Server:        192.168.1.254
Address:    192.168.1.254#53
Non-authoritative answer:
Name: www.wikipedia.org
Address: 208.80.153.224
> exit
$
Advanced Network Troubleshooting
The netstat Command
![]() The netstat command can provide a wealth of network information for you. By default, it lists all the open network connections on the system:
The netstat command can provide a wealth of network information for you. By default, it lists all the open network connections on the system:# netstat
Active Internet connections (w/o servers)
Proto Recv-Q Send-Q Local Address Foreign Address State
Active UNIX domain sockets (w/o servers)
Proto RefCnt Flags Type State I-Node Path
unix 2 [ ] DGRAM 10825 @/org/freedesktop/systemd1/notify
unix 2 [ ] DGRAM 10933 /run/systemd/shutdownd
unix 6 [ ] DGRAM 6609 /run/systemd/journal/socket
unix 25 [ ] DGRAM 6611 /dev/log
unix 3 [ ] STREAM CONNECTED 25693
unix 3 [ ] STREAM CONNECTED 20770 /var/run/dbus/system_bus_socket
unix 3 [ ] STREAM CONNECTED 19556
unix 3 [ ] STREAM CONNECTED 19511
unix 2 [ ] DGRAM 24125
unix 3 [ ] STREAM CONNECTED 19535
unix 3 [ ] STREAM CONNECTED 18067 /var/run/dbus/system_bus_socket
unix 3 [ ] STREAM CONNECTED 32358
unix 3 [ ] STREAM CONNECTED 24818 /var/run/dbus/system_bus_socket
...
$ netstat -t
Active Internet connections (w/o servers)
Proto Recv-Q Send-Q Local Address      Foreign Address         State
tcp   1      0 10.0.2.15:58630         productsearch.ubu:https CLOSE_WAIT
tcp6  1      0 ip6-localhost:57782     ip6-localhost:ipp       CLOSE_WAIT
$
$ netstat -l
Active Internet connections (only servers)
Proto Recv-Q Send-Q Local Address           Foreign Address         State
tcp        0      0 ubuntu02:domain         *:*                     LISTEN
tcp        0      0 localhost:ipp           *:*                     LISTEN
tcp6       0      0 ip6-localhost:ipp       [::]:*                  LISTEN
udp        0      0 *:ipp                   *:*
udp        0      0 *:mdns                  *:*
udp        0      0 *:36355                 *:*
udp        0      0 ubuntu02:domain         *:*
udp        0      0 *:bootpc                *:*
udp        0      0 *:12461                 *:*
udp6       0      0 [::]:64294              [::]:*
udp6       0      0 [::]:60259              [::]:*
udp6       0      0 [::]:mdns               [::]:*
...
# netstat -s
Ip:
    240762 total packets received
    0 forwarded
    0 incoming packets discarded
    240747 incoming packets delivered
    206940 requests sent out
    32 dropped because of missing route
Icmp:
    57 ICMP messages received
    0 input ICMP message failed.
    ICMP input histogram:
        destination unreachable: 12
        timeout in transit: 38
        echo replies: 7
    7 ICMP messages sent
    0 ICMP messages failed
    ICMP output histogram:
        echo request: 7
IcmpMsg:
        InType0: 7
        InType3: 12
        InType11: 38
        OutType8: 7
Tcp:
    286 active connections openings
    0 passive connection openings
    0 failed connection attempts
    0 connection resets received
    0 connections established
    239933 segments received
    206091 segments send out
    0 segments retransmited
    0 bad segments received.
    0 resets sent
Udp:
    757 packets received
    0 packets to unknown port received.
    0 packet receive errors
    840 packets sent
    0 receive buffer errors
    0 send buffer errors
UdpLite:
TcpExt:
    219 TCP sockets finished time wait in fast timer
    15 delayed acks sent
    26 delayed acks further delayed because of locked socket
    Quick ack mode was activated 1 times
    229343 packet headers predicted
    289 acknowledgments not containing data payload received
    301 predicted acknowledgments
    TCPRcvCoalesce: 72755
IpExt:
    InNoRoutes: 2
    InMcastPkts: 13
    OutMcastPkts: 15
    InOctets: 410722578
    OutOctets: 8363083
    InMcastOctets: 2746
    OutMcastOctets: 2826
#
Examining Sockets
![]() The netstat tool provides a wealth of network information, but it can often be hard to determine just which program is listening on which open port. The ss command can come to your rescue for that.
The netstat tool provides a wealth of network information, but it can often be hard to determine just which program is listening on which open port. The ss command can come to your rescue for that.$ ss -anpt
State Recv-Q Send-Q Local Address:Port Peer Address:Port
LISTEN 0 100 127.0.0.1:25 *:*
LISTEN 0 128 *:111 *:*
LISTEN 0 5 192.168.122.1:53 *:*
LISTEN 0 128 *:22 *:*
LISTEN 0 128 127.0.0.1:631 *:*
LISTEN 0 100 ::1:25 :::*
LISTEN 0 128 :::111 :::*
LISTEN 0 128 :::22 :::*
LISTEN 0 128 ::1:631 :::*
ESTAB 0 0 ::1:22 ::1:40490
ESTAB 0 0 ::1:40490 ::1:22
users:(("ssh",pid=15176,fd=3))
$
Summary
Exam Essentials
Review Questions