
Chapter 2. Setting up your lab environment
Configuration Manager is a hands-on product, so it’s important to have a good lab environment for all of your testing and learning. Setting up ConfigMgr from scratch can be daunting; it sits on top of several prerequisite applications, all of which have to be installed and configured correctly before you can install ConfigMgr, such as the following:
- Microsoft Windows Server
- Microsoft Internet Information Services (IIS)
- Microsoft SQL Server
- Windows Assessment and Deployment Kit (ADK)
The versions of each prerequisite application vary from environment to environment.
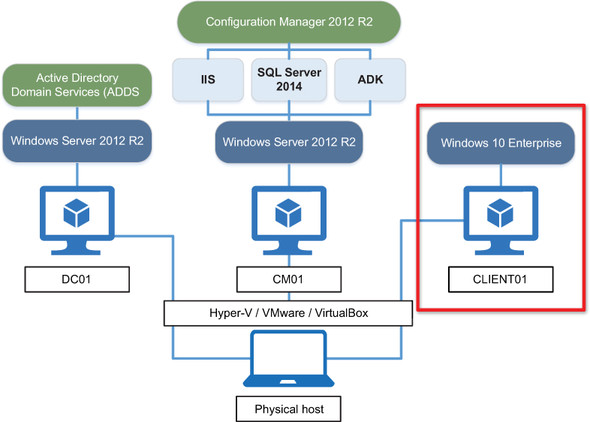
Figure 2.1 shows how the lab environment hangs together, how and where all of the prerequisite applications are installed, and which version you’ll use.
Figure 2.1. The Month of Lunches ConfigMgr lab environment

This environment is a bit complicated, but this is the absolute minimum amount of setup required to create your own ConfigMgr lab environment. And you do need a safe, self-contained lab environment, even if you have access to ConfigMgr in your current environment. Getting things wrong in ConfigMgr can lead to some particularly undesirable outcomes (such as wiping production servers), so you definitely want to run your labs isolated away from the wider network.
The good news is that I have some neat tricks on hand to streamline the whole process of building the lab environment. You’ll create it using virtual machines and then build them using a hydration script: an automated build process developed by Johan Arwidmark, a fellow MVP who’s based in Sweden. I’ve taken Johan’s process and made some changes that customize the environment with settings more appropriate for this lab. Here’s a high-level overview of how the process works:
1. Create the virtual environment.
2. Download the prerequisite software.
3. Install and configure Microsoft Deployment Toolkit (MDT) 2013 Update 2.
4. Populate MDT with all the prerequisite software.
5. Use MDT to generate an automated build DVD (an ISO file).
6. Build the virtual machines with the ISO file.
7. Your lab is created and ready for use.
2.1. Create the virtual environment
The lab consists of two servers—an Active Directory domain controller and the ConfigMgr server, and one workstation. For ease of setup and repeatability, these systems should all be virtual machines.
If you already have a physical machine that hosts virtual machines, that’s perfect. You should be able to use that same environment. If you don’t run a virtual environment, you’ll need to set one up. Here’s a list of what you’ll need:
- A physical machine with a 64-bit processor that supports Intel or AMD hardware-level virtualization, has at least 10 GB RAM (preferably more), and has enough free hard drive space (approximately 300 GB). The machine should preferably be running a 64-bit operating system.
- A virtualization product to host the virtual machines. This could be any of the following:
- Microsoft Hyper-V
- VMware Workstation
- VirtualBox
- Parallels
I won’t go into the pros and cons of each solution. Suffice it to say that my environment is running Windows 10 x64 Enterprise with Hyper-V enabled, and all my lab systems are Hyper-V virtual machines.
You can set up this environment on a machine running Linux or Mac OS X; it doesn’t have to be Windows, because virtualization products are available that run fine on non-Windows platforms.
But you’ll need at least one machine running Windows in order to install and configure the Microsoft Deployment Toolkit so that you can create the media that will build and configure the lab environment.
This extra Windows machine could be a different physical system, or even a third virtual machine, but you’ll have to build it manually.
If you’re fortunate enough to have access to a spare server, that’s even better! You can set up the whole environment on Windows Server Hyper-V or VMware ESXi. But unless the host operating system is running a full version of Windows, you’ll still need an extra Windows system on which to install and configure MDT, because it can be installed only on Windows.
I won’t go into the setup and configuration of each product (that would be a book of its own!), but whichever solution you choose to go with, all have good online documentation to assist you. They’re all also straightforward to install.
So after you have a host ready to host virtual machines, you’ll need to create three VMs (on Hyper-V, they can be either Generation 1 or Generation 2). Tables 2.1, 2.2, and 2.3 detail how they should be configured, and how the hydration process will configure the networking. Unless you have a lot of hard drive space free on the host, configure the hard drives assigned to each virtual machine as dynamically expanding/thin-provisioned disks. The performance is reduced, but in your lab environment (which is more than likely going to be running on a single physical disk) that’s not much of a concern. Better to maximize the hard drive space.
Table 2.1. Lab virtual machine—domain controller
|
VM setting |
Setting value |
|---|---|
| VM name | DC01 |
| vCPU | 1 × CPU |
| RAM | 1 GB (can be dynamic memory on Hyper-V) |
| Hard disk | 1 × 40 GB |
| Network | 1 × NIC |
| Windows hostname | DC01 |
| IP address | 192.168.1.200 |
| Subnet mask | 255.255.255.0 |
| Default gateway | 192.168.1.1 |
| DNS server | 127.0.0.1 |
Table 2.2. Lab virtual machine—ConfigMgr Server
| VM name | CM01 |
| vCPU | 2 × CPU |
| RAM | 6 GB (can be dynamic memory on Hyper-V) |
| Hard disk | 1 × 300 GB |
| Network | 1 × NIC |
| Windows hostname | CM01 |
| IP address | 192.168.1.210 |
| Subnet mask | 255.255.255.0 |
| Default gateway | 192.168.1.1 |
| DNS server | 192.168.1.200 |
Table 2.3. Lab virtual machine—Windows client
|
VM setting |
Setting value |
|---|---|
| VM name | CLIENT01 |
| vCPU | 1 × CPU |
| RAM | 2 GB (can be dynamic memory on Hyper-V) |
| Hard disk | 1 × 80 GB |
| Network | 1 × NIC |
| Windows hostname | CLIENT01 |
| IP address | 192.168.1.220 |
| Subnet mask | 255.255.255.0 |
| Default gateway | 192.168.1.1 |
| DNS server | 192.168.1.200 |
Tip
In this lab environment, you’ll get the best performance by using fast disks—building systems and running ConfigMgr are disk-intensive processes. If you have access to a solid-state drive (SSD), place the VMs on this disk.
Warning
The virtual machines need to be able to talk to the internet as well as to each other. Make sure you configure the virtual networks accordingly; the hydration script will configure the IP information but won’t handle physical connectivity.
Note
The IP address settings and/or the hostname may not be appropriate for your lab environment if you have preexisting virtual machines or networks. For example, in my environment, I use different IP addressing, so using addresses on the 192.168.1.x range isn’t suitable for me. These values can be changed without impacting the build process, and we’ll go through that further along in the chapter.
Now that the virtual machines are ready to go, it’s time to prepare all the software that will be used to build the lab.
2.2. Download the prerequisite software
The hydration script that you’ll use to build the lab uses MDT, the Microsoft Deployment Toolkit, which in turn relies on the availability of prerequisite software. On the Windows system on which MDT will be installed, create a folder called C:Downloads and download the following software packages to this location.
Note
For applications such as Windows Server 2012 R2, Windows 10, or SQL Server 2014, I’ve provided links to download the trial (time-limited) media. If you have access to Volume License or Microsoft Developer Network (MSDN) media, use those instead.
2.2.1. Sysinternals BgInfo
BgInfo is a tool within the Sysinternals suite that gathers information about the local system such as hostname, IP address, and memory, and writes all that information to a bitmap that sits on the desktop. It’s incredibly useful for providing visual cues as to which machine you’re currently logged on to.
Download location:
http://technet.microsoft.com/en-us/sysinternals/bb897557.aspx
2.2.2. Microsoft Deployment Toolkit 2013 Update 2
MDT 2013 is a deployment solution from Microsoft, enabling you to build automated builds of Windows. MDT will be used to generate the automated image from which the VMs will be built.
Download location: www.microsoft.com/en-us/download/details.aspx?id=50407
2.2.3. Microsoft Assessment and Deployment Kit for Windows 10 (Version 1511)
The ADK contains a suite of tools used for system and application compatibility testing as well as enterprise deployment. The latest version of the ADK is required to fully support MDT 2013 Update 2, ConfigMgr, and Windows 10 deployment.
Download location: http://go.microsoft.com/fwlink/p/?LinkId=526740
The ADK file you download is a web installer. It’s designed to download and install only the components you need. Another installation option enables you to download the entire ADK for offline installs—choose this option.
Important
At the time of writing, the latest build of the ADK (Build 1511) is not recommended as a prerequisite for ConfigMgr; however, this build is needed for the MDT lab, so you’ll need to download both the original (RTM) and the latest (1511) builds of the ADK. You can download the RTM build directly from Microsoft via http://download.microsoft.com/download/8/1/9/8197FEB9-FABE-48FD-A537-7D8709586715/adk/adksetup.exe.
2.2.4. Microsoft SQL Server 2014 SP1
All the data stored within ConfigMgr resides in a SQL database, and ConfigMgr reporting uses SQL Server Reporting Services (SSRS) to do its job. ConfigMgr requires either the Standard or Datacenter edition of SQL Server, but for the purposes of the lab Standard is fine. SQL Server Express is not supported for a primary site server.
Download location:
http://technet.microsoft.com/en-us/evalcenter/hh225126.aspx
2.2.5. Windows Server 2012 R2
Windows Server 2012 R2 is the underlying operating system that supports ConfigMgr. Several server roles and features, such as IIS, must be enabled for ConfigMgr to work properly.
Download location:
www.microsoft.com/en-us/evalcenter/evaluate-windows-server-2012-r2
2.2.6. Windows 10 Enterprise x64 (Build 1511)
The first client machine in your lab environment will run the 64-bit version of Windows 10 Enterprise.
Download location: www.microsoft.com/en-us/evalcenter/evaluate-windows-10-enterprise
2.2.7. System Center Configuration Manager and Endpoint Protection
It’s going to be a difficult lab to work with without this!
Download location:
http://technet.microsoft.com/en-us/evalcenter/dn205297.aspx
2.2.8. System Center Configuration Manager Prerequisites
ConfigMgr checks for prerequisite packages such as .NET Framework 4.0 and Silverlight. These are not necessarily used during the ConfigMgr installation, but are required for future functionality.
To download the prerequisites, you’ll need to have downloaded the ConfigMgr installer first. Use a tool such as 7-Zip and run the Setupdl.exe program located in the SMSSETUPBINX64 folder. The application will prompt you for a save location; nominate a temporary folder as in figure 2.2, and the application will download all of the necessary prerequisite packages.
Figure 2.2. Specify a download location for the ConfigMgr prerequisite packages.

Tip
If your operating system can natively mount ISO files (such as Windows 10), this is the easiest way to extract files from within an ISO. Otherwise, a free utility such as 7-Zip will do the job nicely.
2.2.9. Git repository
The MDT hydration package, along with all of the PowerShell code used throughout the book (and with a few miscellaneous samples), are all contained in a Git repository that you’ll need to download.
Access the repository at https://github.com/jamesbannan/configmgr-month-of-lunches. You can either clone it in your favorite Git client (I use both GitHub for Windows and Atlassian SourceTree) or download the whole thing as a zip file.
After everything has been downloaded, your C:Downloads folder should look something like figure 2.3. Don’t worry if some of the names for Windows, SQL, or ConfigMgr source files are slightly different; they can come from different sources (for example, Volume Licensing, MSDN), and all you’re interested in is the content of the images.
Figure 2.3. All of the source content downloaded and ready for use

Now that the content is ready, you can proceed with creating the hydration environment.
2.3. Install and configure MDT 2013 Update 2
On the Windows machine that will be used for MDT 2013 Update 2, the first step is to install certain components of the Windows 10 ADK, as this is a prerequisite:
1. Launch adksetup.exe within the Windows 10 ADK folder. In the application launcher, select only Deployment Tools and Windows Preinstallation Environment (Windows PE), and install to the default location.
2. Launch the MDT installer that’s appropriate for the operating system architecture: MicrosoftDeploymentToolkit2013_x64.msi for 64-bit operating systems or MicrosoftDeploymentToolkit2013_x32.msi for 32-bit operating systems.
3. There’s nothing tricky about the installer—accept all the installation defaults.
4. To be able to run the included PowerShell scripts, you need to change the PowerShell execution policy accordingly, as the scripts are unsigned. Launch an elevated PowerShell window and type Set-ExecutionPolicy RemoteSigned -Force.
Tip
The default execution policy for PowerShell is “Restricted”: configuration files won’t be loaded and scripts won’t be run. For more information, refer to this article on TechNet: http://technet.microsoft.com/en-us/library/hh849812.aspx.
5. The next step is to create an MDT deployment share—a local folder that has been shared—and then populated with MDT tools and scripts and referenced via MDT so that the administrator can manipulate the contents. Clients can then connect back to the share to run MDT task sequences and access content, or a deployment share can be used to generate standalone build images in ISO format (like a DVD).
To create the hydration deployment share, run the following script within the Git repository from an elevated PowerShell session: . HydrationConfigMgr SourceCreate-HydrationDeploymentShare.ps1. The script is verbose, so you should see output like that in figure 2.4, showing you what’s happening behind the scenes.
Figure 2.4. The hydration scripts in action, building a deployment share in MDT
Important
You should change the working folder to .HydrationConfigMgr Source in order to run the script.

2.3.1. Populate MDT with required software
Now that the deployment share has been created, it’s time to populate it with the content that you previously downloaded. The MDT task sequence will reference this content and incorporate it into the build media.
Table 2.4 shows you where each package needs to be downloaded within the C:HydrationConfigMgr folder. When referring to packages that come in an ISO format such as Windows Server, you need to extract the contents of the ISO and copy those across, not the ISO itself.
Table 2.4. Deployment share content locations
|
Package |
Deployment share target (automatically created) |
|---|---|
| BgInfo | .DSApplicationsInstall - BgInfoSource |
| ADK for Windows 10 | .DSApplicationsInstall – Windows 10 ADKSource |
| SQL Server 2014 SP1 | .DSApplicationsInstall - SQL Server 2014Source |
| ConfigMgr | .DSApplicationsInstall - ConfigMgrSource |
| ConfigMgr Prereqs | .DSApplicationsInstall - ConfigMgrPreReqs |
| ConfigMgr EXTADSCH.EXE | .DSApplicationsConfigure - Extend AD for ConfigMgrSource |
| Windows 10 | .DSOperating SystemsW10ENTx64 |
| Windows Server 2012 R2 | .DSOperating SystemsWS2012R2 |
Note
The item “ConfigMgr EXTADSCH.EXE” is an application that extends the Active Directory (AD) schema in order to support ConfigMgr in an AD environment. This file is located in the ConfigMgr installation media in the SMSSETUPBINX64 folder.
Now that the Share is populated, you can create the build image.
2.3.2. Use MDT to generate an automated build image (ISO)
You need to trigger the creation of the image within the MDT Deployment Workbench, which is accessible via the Start menu:
1. Open the Workbench and expand the hydration deployment share. Make sure that the Applications, Operating Systems, and Task Sequences folders are populated with content, as in figure 2.5.
Figure 2.5. The hydration script has populated the MDT deployment share.
Tip
Take a look at each task sequence by going into Properties > Task Sequence. They use similar logic that you’ll use later in the book to deploy Windows 10.

2. Expand the Advanced Configuration folder and select “Media.”
3. In the main window, right-click the MEDIA001 item, select “Properties,” and select the Rules tab. You need to change the TimeZoneName property to whichever is the appropriate time zone for you. The default is “Pacific Standard Time,” but, for example, in my case it needs to be “AUS Eastern Standard Time.”
4. After you’ve modified the TimeZoneName property as in figure 2.6, click “OK” to save and close.
Figure 2.6. Set the TimeZoneName property to the right one for your environment.
Tip
To find out which is the correct time zone name for your environment, from a machine running Windows 7/Server 2008 R2 or higher, open a command window, and type tzutil /l. This brings up a list of all the available time zones and their correct names (use tzutil /g to get the time zone that you’re currently in).
As I mentioned earlier, you might have to change some of the server properties, such as the hostname or IP address, if these would cause problems on your network or with preexisting lab machines.
To change the IP address information for each virtual machine, navigate to C:HydrationConfigMgrISOContentDeployControl and edit the files called CustomSettings_DC01.ini, CustomSettings_CM01.ini, and CustomSettings_CLIENT01.ini. Change the settings that start with “OSDAdapter0...” to values appropriate to your environment. If you change the OSDAdapter0IPAddressList value for DC01, ensure that this change is reflected in the OSDAdapter0DNSServerList for CM01 and CLIENT01, so that the ConfigMgr server and workstation can join the AD domain hosted on DC01.
To change the hostname for any of the systems, edit the value for HydrationOSDComputerName to whatever is appropriate. If you change the hostname for CM01, you’ll also need to reflect this change in the ConfigMgrUnattend.ini file, which is located in C:HydrationConfigMgrISOContentDeployApplicationsInstall - ConfigMgr. You need to change the following entries to the new hostname: SDKServer, ManagementPoint, DistributionPoint, and SQLServerName.
You also can change the domain that’s installed and configured on DC01, but this involves a significant amount of editing, and I suggest that unless this is necessary, you use the default AD configuration.

5. Finally, right-click MEDIA001 again and select “Update Media Content.” This triggers a process that will go through all of the source folders that you populated earlier, as shown in figure 2.7, and will create an ISO image containing all of the content as well as a Windows PE boot image and a portable MDT deployment share. The ISO is completely self-contained and doesn’t need to download any content from the hydration deployment share.
Figure 2.7. Creating the MDT media build that will be used to build the lab environment

The ISO creation process can take a while, depending on the speed of the local hard drive, so this is a good opportunity for a tea break. After it’s complete, you’ll find the newly created image in C: HydrationConfigMgr ISO MoLConfigMgr.iso.
It’s worth noting that although this whole process may seem rather time-consuming and convoluted, what you’ve done is to invest in a process that’s automated and therefore repeatable. Chances are that over the course of your experimentation with ConfigMgr, you’ll want to rebuild the lab environment a few times over. With the hydration process, you can easily rebuild the entire environment with confidence, and you need to do the preparation work only once.
2.4. Build the virtual machines
Everything is now ready to go, so you can start to build the lab systems.
2.4.1. DC01
The first machine you need to build is the domain controller, which, as you can see in figure 2.8, is responsible for providing AD services to the lab environment.
Figure 2.8. DC01 runs AD Domain Services in the lab environment.

1. Attach the hydration ISO to the DC01 virtual machine as a CD/DVD and boot. The machine will boot straight into Windows PE and will load the MDT task sequences.
2. Choose the DC01 task sequence, as shown in figure 2.9, and allow it run all the way through until you see the “Hydration Complete” message. Leave the virtual machine running.
Figure 2.9. The hydration kit comes with predefined task sequences to build and configure each server.

Tip
Virtualization products have their own toolset to improve performance and functionality in guest virtual machines, like Hyper-V Integration Services. The build process doesn’t install these, so to get the most out of your virtual machines, you should install the relevant tools for your virtualization platform.
2.4.2. CM01
The next step is to build the ConfigMgr primary site server, CM01. As you can see in figure 2.10, CM01 requires building blocks on top of Windows Server in order to support ConfigMgr, so the build process will take longer than DC01.
Figure 2.10. The ConfigMgr primary site server is a full web/SQL application server.

Warning
ConfigMgr is completely dependent on Active Directory, so the domain controller must be up and running before the ConfigMgr server is powered on, and must remain running the entire time.
1. Attach the hydration ISO to the CM01 virtual machine and boot.
2. This time, choose the CM01 Full Installation task sequence and let it run all the way through to the “Hydration Complete” message.
After CM01 has been built, it’s worth leaving it turned on, although it doesn’t need to be powered on in order to complete the lab.
2.4.3. CLIENT01
Last but not least, it’s time to build CLIENT01, which, as you can see in figure 2.11, is also joined to the lab domain and will communicate with both DC01 and CM01.
Figure 2.11. CLIENT01 represents a traditional managed system in a business environment.
1. Attach the hydration ISO to the CLIENT01 virtual machine and boot.
2. Choose the CLIENT01 task sequence and let it run all the way through to the end to create the Windows 10 system.
2.5. Verify the ConfigMgr installation
You need to verify that the ConfigMgr installation has completed successfully, and the easiest way to do that is to launch the ConfigMgr console. If that launches without error, the supporting server and application framework should all be good.
1. Log on to the CM01 virtual machine with the local administrator account, using the password P@ssw0rd.
Note
The password for all accounts in this lab environment is “P@ssw0rd.” You can change this without impacting functionality; just make sure you make a note of any password changes.
2. Launch the ConfigMgr console from the server Start menu and verify that the console successfully connects to the ConfigMgr site on CM01.
3. Congratulations; your lab environment is up and running!
The next step is to launch the ConfigMgr PowerShell console. This is an important step, since you’ll need to come back to the console many times in order to perform ConfigMgr tasks using PowerShell.
4. In the top-left corner of the ConfigMgr console, select the blue drop-down arrow, and choose “Connect via Windows PowerShell,” as shown in figure 2.12.
Figure 2.12. You can launch a ConfigMgr PowerShell session from the console.

5. A new PowerShell window launches, with the location automatically set to PS1, which is the locally installed ConfigMgr primary site. Type ls and you’ll see that you’re directly browsing the contents of the site, rather than a traditional Windows file location, as shown in figure 2.13.
Figure 2.13. The ConfigMgr PowerShell session lets you work directly with the primary site.
This is one way of interacting with ConfigMgr via PowerShell, but I recommend launching PowerShell Integrated Scripting Environment (ISE) instead; it’s a richer PowerShell environment and much more helpful if you’re learning the ins and outs of ConfigMgr and PowerShell. You will, however, have to manually import the ConfigMgr PowerShell module, because ISE doesn’t automatically load it, unlike the session window that you launched from the ConfigMgr console, which does.

6. From the Start menu on CM01, search for ise, and you should get two results for Windows PowerShell ISE. One of them is for 32-bit modules (x86), and the other is for 64-bit. The ConfigMgr PowerShell modules are 32-bit, so you want “Windows PowerShell ISE (x86).” Right-click and select “Run as administrator.”
7. Accept the UAC prompt, and a new instance of ISE is launched.
8. Type in the following three lines of PowerShell:

9. Type ls again and you’ll see the same listing as earlier.
Tip
Save those lines of PowerShell into ISE’s script pane for easy future reference. If you don’t see the script pane, go to View > Show Script Pane, or press Ctrl-R. I recommend making heavy use of the script pane, since it saves doing loads of typing and retyping. PowerShell is awesome, so make it as easy as possible!
Now that you have a working lab environment, it’s time to get stuck into some ConfigMgr! And remember: now that you’re in possession of an automated build process, you can re-create this environment easily using the media build anytime you need to.