
Chapter 7. Creating and configuring applications with the AppModel
Deploying and managing software is one of the core activities that you’ll regularly perform as a ConfigMgr administrator. Things changed radically in ConfigMgr 2012 with the introduction of the AppModel, the new framework for deploying software in ConfigMgr. The AppModel completely redefines what applications are and how they’re deployed, so it’s critical to get on top of the myriad of changes.
By the end of this chapter, you’ll know how to prepare, create, and configure a new AppModel-style application by using these key components: deployment types, requirements, and detection methods (see figure 7.1). And in the next chapter, you’ll take this customized application and deploy it.
Figure 7.1. This chapter is all about creating and configuring applications by using the AppModel.

7.1. Exploring the ConfigMgr AppModel
Before you start creating your first application, it’s important to set the scene for the new methods of building and deploying software in ConfigMgr, and understand why they’re so important.
7.1.1. ConfigMgr vs. ConfigMgr 2007
Although ConfigMgr 2007 was good at deploying software, it was largely unaware of the environment into which any individual piece of software was deployed. For example, let’s say you used ConfigMgr 2007 to deploy an application that relied on .NET Framework 3.5.1 being enabled, but that wouldn’t (or couldn’t) automatically enable it. ConfigMgr 2007 would rely on you, as the administrator, to make sure that .NET Framework 3.5.1 was enabled before you deployed the software. By default, the application deployment method couldn’t help you in this, and if you deployed the software to a system without the necessary prerequisites, it would simply fail. ConfigMgr 2007 provided ways around problematic scenarios like this, but they’re definitely workarounds as opposed to elegant solutions.
By comparison, the AppModel in ConfigMgr uses an advanced, highly customizable logic engine, which gives the ConfigMgr server full visibility over software deployments, and gives the ConfigMgr client all the necessary information about each application so that the deployment process doesn’t become a black box, opaque to both the system and the administrator. Table 7.1 gives you a high-level overview of how much has changed in terms of software deployment from ConfigMgr 2007 to ConfigMgr 2012 and later.
Table 7.1. Comparison of software deployment functionality
|
Feature |
ConfigMgr 2007 |
ConfigMgr 2012 |
|---|---|---|
| Deployment to computers | ✓ | ✓ |
| Deployment to users | Partial | ✓ |
| Verify application presence | ✓ | |
| Support application dependencies | ✓ | |
| Self-service deployment | ✓ | |
| App-V deployment | ✓ | ✓ |
| User-initiated uninstall | ✓ | |
| Application revision history | ✓ | |
| Application lifecycle management | ✓ |
Looking at the earlier example of a .NET Framework–dependent application, in ConfigMgr 2012 and later you can deploy the software into your environment, and if the requisite .NET Framework isn’t found, ConfigMgr agent will be able to automatically install it and verify that the installation was successful before proceeding to install the original application. ConfigMgr 2012 offers infinitely greater flexibility and robustness when deploying software, guaranteeing that you get exactly the end result you want. Excited yet? Hope so! Now let’s look at applications: the key components in the AppModel.
7.1.2. Applications vs. packages
With ConfigMgr, you now have two distinct types of software for deployment: legacy packages and modern applications, which inhabit their own separate sections of the ConfigMgr console.
Packages are the equivalent of the software you would deploy with ConfigMgr 2007, such as the ConfigMgr client or the MDT Toolkit. Applications are software that fully support the new and advanced installation logic at the heart of the ConfigMgr AppModel—designed to give you, as the administrator, full control and full visibility over each and every software installation, such as MSI-based or App-V–based software.
Packages still have their uses, and you’ll learn more about them in chapter 8, but in terms of software deployment in ConfigMgr, applications are where the action is. This raises the question: is there a particular reason to create an application rather than a package? Well, at times you have no choice but to create a package; for example, you might need to reference a bundle of PowerShell scripts during operating system deployment, and since these have no installers, they can’t be created or deployed as AppModel applications. But apart from these isolated cases, in ConfigMgr you should always deploy software as applications so that you can take full advantage of the AppModel’s capabilities. It’s important to remember that some major features, such as being able to supersede old software or automatically install prerequisites, can be achieved only if all the individual components are applications; packages can’t handle all the new functionality. So with that, let’s create an application.
7.2. Creating a ConfigMgr application
Now you get to the meat in the sandwich: the AppModel comprises several important pieces of functionality working together to produce a coherent outcome. To illustrate this, you’ll use Paint.NET (an excellent and free graphics-editing package) to create an application in the ConfigMgr console, using this as the basis to examine the AppModel in depth.
7.2.1. Preparing the application source
Before you create the application, it’s important to carefully prepare the source files first. When you create an application, ConfigMgr treats the folder in which the installer resides as the top-level folder, and assumes that everything else within that folder (files and other folders) is necessary and important for successful deployment. Therefore, it copies everything within that top-level folder down, so make sure that the only files that exist alongside the installer are those that are needed.
To avoid confusion, I like to have a top folder called Software (or something similar) and then all applications under that folder contained within their own folders, with a separate folder for each version; for example, SoftwareAdobe Reader 10.1.3, and SoftwareAdobe Reader 10.1.4, as shown in figure 7.2. This keeps everything nicely segregated and avoids the risk of content being included in an application source that isn’t meant to be there.
Figure 7.2. Keep software versions separate from each other when creating your master source folders.

When an application has both a 32-bit and a 64-bit version available, I create an x86 folder and an x64 folder, respectively; for example, SoftwareApp-V 5.0 Clien tx86, and SoftwareApp-V 5.0 Clien tx64.
Paint.NET has advantages that make it an excellent test application. Apart from being good software (always a plus!), it comes in both 32-bit and 64-bit architectures and can be deployed via MSI, which means it’s exactly the type of software that the AppModel is optimized to deploy.
To prepare an application source for deployment, perform the following:
1. Download the Paint.NET installer from www.getpaint.net and extract the compressed file.
2. Open a command window (elevated, if you’re running Windows Vista or higher) and then run paint.net.4.0.9.install.exe /createMsi. This creates a folder on the Desktop called PaintDotNetMsi that contains the 32-bit and 64-bit MSI installers for Paint.NET.
3. Next, rename the PaintDotNetMsi folder to Paint.NET, create a subfolder called 4.0.9, and create two new subfolders called x64 and x86, respectively.
4. Move each installer into the relevant folder, as in figure 7.3.
Figure 7.3. Give each application installer its own source and a separate folder for different architectures.

5. Finally, copy the entire folder to a UNC path that’s accessible by the ConfigMgr server. Now the application source is ready for you to create the application in ConfigMgr.
Follow the steps in section 7.2.1 to create an application source folder structure to house the 32-bit and 64-bit MSI installers for Paint.NET.
Consider your own production environment, and where application source files are stored: are they stored in a logical structure that would serve as a reliable source for ConfigMgr?
7.2.2. Creating your application
Creating an application in ConfigMgr involves pointing the Create Application Wizard at the installer that’s used to install your application (such as an MSI). The wizard then automatically extracts the minimum amount of information needed to create an application with a deployment type.
ConfigMgr supports a wide range of installation sources from which it can automatically create an application, such as MSI and App-V 5.0. The advantage of this approach is that it avoids much of the risk from human error during the creation process as well as embeds a lot of installation logic into the application object from the outset.
To create an application from such an application source, perform the following:
1. Open the ConfigMgr console and go to Software Library > Application Management > Applications.
2. Right-click “Applications” and select “Create Application.” You’re presented with a wizard with the default option “Automatically detect information about this Application from installation files.”
3. Navigate to the PaintDotNet.x86.msi in the source folder you created in section 7.2.1, so that the “Location” field looks like “\UNCPATHPaint.NET4.0.9x8 6 PaintDotNet.x86.msi,” and then click “Next.” You may receive a warning that the publisher of the file couldn’t be verified; this warning is alerting you that the MSI hasn’t been digitally signed by a trusted source. Depending on the circumstances, this may be of concern, but not in this case. Click “Yes” to accept the warning.
4. All of the information contained within the MSI that’s necessary to create the ConfigMgr application is imported. Click “Next” to specify any additional information about the application, as in figure 7.4.
Figure 7.4. Any additional information about the application such as publisher or software version can be entered manually.

5. In the “Specify information about this application” screen, you’ll see that the “Name” and “Installation Program” fields have been automatically populated. Because you imported an MSI, ConfigMgr knows to call MSIEXEC as the installer, and which installation strings are necessary to perform a silent, unattended installation. At this stage, there’s no need to modify any of the application settings, so click “Next,” click “Next” again, and then click “Close.”
The PowerShell script to create a new ConfigMgr application and MSI-based deployment type can be found in .powershellNew-CMLabApplication.ps1.
Congratulations; you’ve created a ConfigMgr application!
Follow the steps detailed in section 7.2.2 to create a new ConfigMgr application: Paint.NET.
Consider the repositories of software in your own production environment: how many of them are based on MSI or App-V, so that ConfigMgr could automatically discover their installation properties?
7.3. Configuring your application
Now that you have a basic application, let’s flesh it out with some more-advanced functionality using the ConfigMgr AppModel. This section covers the following:
- Deployment types
- Requirements
- Detection methods
Each of these AppModel features provides flexibility and power to ConfigMgr applications. Deployment types give you multiple methods to get each application out to your end users in the most appropriate format (such as locally installed or virtualized). Requirements ensure that only the correct Devices or Users receive a particular deployment type, and detection methods give you all the necessary information to be able to tell whether your application has installed successfully.
Let’s start with deployment types.
7.3.1. Deployment types
Deployment types sit at the heart of ConfigMgr’s flexible software delivery mechanism. The concept is a simple one: one application, many ways to deploy. And no, despite appearances, that’s not even Microsoft marketing.
The end goal of multiple deployment types is to allow you, as the administrator, to deploy an application in a variety of ways without having to worry about the mechanics of the deployment after the application has been configured. You focus on deploying the application to the right group of users or machines, and the deployment type ensures that the application is made available using the most appropriate delivery mechanism.
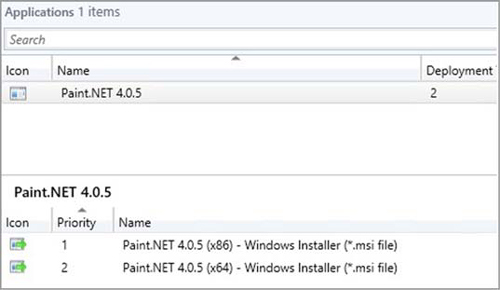
Let’s elaborate further. Say you’re looking to deploy the latest version of WinRAR (an excellent file archiving and compression tool). WinRAR comes in both 32-bit and 64-bit flavors that are usually deployed to 32-bit and 64-bit operating systems, respectively. In a traditional ConfigMgr 2007 environment, this means creating a separate program (and possibly a separate package) for each architecture, as well as separate deployments and some means of targeting the correct operating system (such as custom collections). In ConfigMgr 2012 and later, the AppModel allows you to create just one application with only one deployment, and then use multiple deployment types to handle the software delivery in the most appropriate fashion. Figure 7.5 shows the deployment types that you’ll create for Paint.NET (although you’re probably going to be working with a later version of Paint.NET).
Figure 7.5. ConfigMgr applications handle deployments to different architectures by using a variety of installation methods, such as MSI or App-V.
Prioritizing deployment types
When an application has multiple deployment types, the order in which they appear in the console is important. Each deployment type has a priority, and they’re processed in order from the highest (priority 1) to the lowest. You can change the run order by right-clicking a deployment type and increasing or decreasing the order.
Adding another deployment type to an existing application
Your applications can have as many deployment types as you like in order to cater to a variety of deployment scenarios. For example, you might want to deploy Mozilla Firefox in your environment, but want to be able to install it locally on some systems via MSI, whereas others will receive either an App-V 4.6 or an App-V 5.0 package. In ConfigMgr, all these delivery options are handled by deployment types for the same application, with only one deployment needed.
To add another deployment type to an existing application manually (the PowerShell script from earlier will have already done this for you), do the following:
1. In the ConfigMgr console, select the newly created Paint.NET application.
2. In the properties pane at the bottom of the console, select the Deployment Types tab. You should see one MSI-based deployment type, which was created during the wizard process.
3. Right-click the deployment type and select “Properties.”
4. In the Properties window, change the “Name” from “Paint.NET 4.0.9” to Paint.NET 4.0.9 (x86). This change reflects the fact that the MSI you initially selected was the 32-bit version, and the name change allows you to create another deployment type for the 64-bit version without encountering a duplicate name conflict (application deployment types must have unique names).
5. In the main Applications window, right-click the Paint.NET application and select “Create Deployment Type.”
6. Select “Windows Installer (MSI)” from the drop-down list and then Browse to the 64-bit MSI for Paint.NET, so the field contains \UNCPATHPaint.NET 4.0.9x6 4PaintDotNet.x64.msi.
7. Click “Next” and agree to the digital signature warning.
8. When prompted to select the name for the new deployment type, change the automatically detected name of “Paint.NET 4.0.9” to Paint.NET 4.0.9 (x64). Again, don’t make any other changes at this stage.
9. Click “Next” through the next two screens, which prompt for requirements and dependencies, without making any changes. Requirements and dependencies are important, but you’ll get to them shortly, and you don’t need to specify them during the wizard.
10. Click all the way through the rest of the wizard without making changes, and at the end you’ll have a second deployment type added to your ConfigMgr application, as shown previously in figure 7.5.
The PowerShell script to add a new deployment type to an existing ConfigMgr application is available in .powershellNew-CMLabApplication.ps1.
When you add another deployment type to an application, you’ll be presented with another wizard similar to the one used to initially create the application. Expand the drop-down list. It’s worth noting that although this list is nearly identical to the original wizard, there’s one extra item: Script Installer. Why wasn’t this an option in the original wizard?
The answer is key to how the AppModel works. Legacy installers, like scripts or EXEbased installers, don’t contain enough information for ConfigMgr to be able to automatically create a fully functional application, which is why Script Installer isn’t an option in the wizard when you create an application for the first time.
But with some manual input, script-based installers can be used as deployment types. You’ll tackle this in depth in chapter 8.
Deployment types are rather like basic firewall rules: the firewall assesses an incoming or outgoing network packet against the rule with the highest priority first. If there’s a match for a particular pattern (for example, FTP traffic), the packet gets processed with the matching rule. If there’s no match, the rule with the next-highest priority is assessed, and so on, until a matching rule is found.
Deployment types are the same, in that when an application is deployed, the ConfigMgr agent will look at the deployment type with the highest priority. Whether the deployment type is processed depends upon requirements.
Follow the steps in section 7.3.1 to add a new deployment type to the Paint.NET application that you created earlier.
Consider the applications in your own environment. How many of them need to support both 32-bit and 64-bit versions, which you could combine into a single ConfigMgr application with multiple deployment types?
7.3.2. Requirements
Requirements are one or more properties unique to each deployment type that allow the ConfigMgr client to assess which deployment type gets processed. Although requirements are properties of deployment types, they’re of equal importance in contributing to the capabilities of the AppModel.
Each requirement specified per deployment type will cause the ConfigMgr agent to run a test to see whether the requirement is true. For example, a requirement could be that the client must have at least 10 GB of hard drive space free, have at least 4 GB RAM installed, and that the machine account must sit within a particular Active Directory Organizational Unit (OU); or whether the user requesting the application is a primary user of the device. Each deployment type supports multiple requirements, and if a predefined requirement doesn’t meet your needs, you can define custom requirements.
In the case of your Paint.NET application, you need to configure the deployment types so that they’ll install only on the correct client operating system: 32-bit or 64-bit. To do this, perform the following steps:
1. Right-click the 32-bit deployment type and select “Properties,” and then go to the Requirements tab, shown in figure 7.6.
Figure 7.6. Requirements give you granular control over whether a deployment type will be processed on a client system.

2. Click “Add” to create a new requirement.
3. Ensure that the “Category” field is set to “Device.”
4. Expand the drop-down menu for the “Condition” field and select “Operating System” from the list. You’re presented with a list of all the available Windows operating systems that ConfigMgr supports.
5. Ensure that that the “Operator” field is set to “One of.” Expand “Windows 10” and select the “All Windows 10 (32-bit)” check box.
6. Click “OK” and then “OK” again to close the Deployment Type Properties window.
7. Now you need to do the same thing for the deployment type for the 64-bit MSI. Create a requirement that checks the operating system for Windows 10 x64.
Follow the steps in section 7.3.2 to add operating system requirements to each of the deployment types for the Paint.NET application.
In your own production environment, consider whether other device requirements might be appropriate as deployment type requirements, such as minimum processor speed, amount of available RAM, or hard drive space.
Thanks to the requirements you’ve specified, when Paint.NET is deployed to a ConfigMgr-managed system, the correct architecture will be installed based on the detected operating system, as shown in figure 7.7.
Figure 7.7. Requirements ensure that the correct deployment type is used.

It’s all very well to say that a particular deployment type “will be installed,” but how does the ConfigMgr agent (and indeed, the ConfigMgr administrator) know which one has been installed?
7.3.3. Detection methods
Detection methods provide underlying resilience to the AppModel, guaranteeing that an application that has been installed via a particular deployment type has indeed been installed. A detection method is a single value or set of values that the ConfigMgr agent will check for after an application installation has returned an expected exit code, in order to ensure that the application is indeed present and correct. Although the installer has reported that everything went well, the ConfigMgr agent isn’t going to believe the installer until it goes and checks for itself.
Because the deployment types for your Paint.NET application were automatically created from MSI, each already has a detection rule present, which tests for the presence of the application based on its unique MSI code, as you can see in figure 7.8. For most MSI-based applications, the MSI code is the most reliable detection rule, but you can add in multiple rules for extra resilience or to cater to special circumstances.
Figure 7.8. Detection methods ensure that an application has been successfully installed or removed.

Adding a detection method to a deployment type
To add another detection method to an existing deployment type, perform the following steps:
1. Open the properties of the Paint.NET 32-bit MSI deployment type. Go to the Detection Methods tab and then select “Add Clause” to create a new detection rule.
2. For the “Setting Type,” select “File System.” For the “Type,” select “File.”
3. Set the “Path” to %ProgramFiles%Paint.NET and the filename to PaintDotNet .exe.
4. Untick the “This file or folder is associated with a 32-bit application on a 64-bit system” check box and ensure that “The file system setting must exist on the target system” is selected.
5. Click “OK.” The new detection rule is added beneath the preexisting MSI detection rule. As you can see in figure 7.9, the default connector is set to “And,” which indicates that both detection rules must be satisfied before the application is considered to have been installed successfully. You can change this to “Or” so that only one of the rules needs to be satisfied.
Figure 7.9. Use custom detection methods to give your applications greater resilience—perfect for large-scale enterprise deployments.

6. Click “OK” to close the deployment type. Then perform the same process for the 64-bit MSI deployment type. Because each MSI is architecture-specific, the %ProgramFiles% variable will resolve to the correct installation path on both 32-bit and 64-bit Windows.
Tip
Depending on the deployment type, multiple detection methods are usually unnecessary. For example, the MSI product code is almost always unique, so it makes a resilient detection method. But some applications have updates or patches that don’t modify the MSI code but do modify the filesystem or registry, so in these cases it’s necessary to have multiple detection methods. Each application needs to be assessed based on its capabilities and requirements. ConfigMgr gives you the framework for detecting successful installations, but you still need to understand how each particular application works.
Follow the steps detailed in section 7.3.3 to add another detection method to both the 32-bit and 64-bit deployment types for Paint.NET.
Consider the applications in your own production environment. Think about which detection methods are the most appropriate for your applications, such as registry checks or even custom scripts that check for a particular system value (for example, whether a Windows service is installed and running).
With the addition of another detection method, your deployment types for Paint.NET are more resilient, and will perform additional checks to ensure that the application installed correctly.
Congratulations! Your application is ready to be deployed to clients, which is exactly what you’ll do in the next chapter.
7.4. Lab
Another good software package to import into ConfigMgr is 7-Zip, because it’s freely available and comes as an MSI. Download the 32-bit and 64-bit MSI installers from www.7-zip.org/download.html and create a new ConfigMgr application with two deployment types: one for the 32-bit MSI and another for the 64-bit MSI.