
Chapter 13. Advanced deployment of Windows with ConfigMgr and MDT
Another chapter on operating system deployment? Nooooooooo...!
Before you head-butt the monitor (again), take a deep breath and fear not. You’ve already covered the fundamentals of deploying Windows with ConfigMgr. The purpose of this chapter is to unlock advanced deployment scenarios by integrating the Microsoft Deployment Toolkit (MDT) with ConfigMgr so that you can take what you’ve already learned and run with it, as shown in figure 13.1.
Figure 13.1. You can already deploy, but with MDT you can really deploy!

“What are the benefits of integrating MDT and ConfigMgr?” I hear you ask. By using both products together during your Windows deployments, you get access to all the features of both. MDT brings features to the table including extra task sequence variables and user-driven (Lite Touch) installations. Integrating it with ConfigMgr means that you can use MDT’s deployment capabilities while still using the power and infrastructure of ConfigMgr.
Yes, you can deploy Windows by using pure ConfigMgr (as you did in chapter 12), but pretty much every organization that uses ConfigMgr for operating system deployment also uses MDT integration. You’re overwhelmingly likely to encounter this in every environment outside a lab.
13.1. Integrating MDT with ConfigMgr
Integrating MDT and ConfigMgr is a two-step process. First, you’ll install MDT on CM01 and get ConfigMgr to recognize it. Then, you’ll build all the packages within ConfigMgr that are needed to make use of MDT functionality.
13.1.1. Installing MDT
To get MDT and ConfigMgr to talk, you need to install MDT:
1. Log on to CM01 as MOLAdministrator.
2. If the ConfigMgr console is open, close it.
3. Copy across the 64-bit MDT installer from the source MDT machine that you set up in chapter 2 (MicrosoftDeploymentToolkit2013_x64.msi). If you need to download MDT again, you can grab it here: www.microsoft.com/en-us/download/details.aspx?id=50407.
4. Double-click the MSI to launch the MDT installation wizard. You don’t need to change any of the installation defaults; click all the way through to the end.
5. Go to the Start page on CM01 and type in configmgr to search the installed applications. There will be one result—Configure ConfigMgr Integration—as shown in figure 13.2.
Figure 13.2. Launch the MDT ConfigMgr Integration tool.

6. When the utility launches, the Options page should be automatically configured to install the MDT extensions to ConfigMgr, and both the site server name and site code fields should be prepopulated, as shown in figure 13.3.
Figure 13.3. The integration utility autodetects the site server and site code details.
Info
The integration between MDT and ConfigMgr happens at the level of the console. Installing MDT makes no changes to the ConfigMgr server, and MDT doesn’t need to be launched or configured in any way.

7. Click “Next.” The utility copies the integration binaries to the locally installed ConfigMgr console. The final message in the utility is, “Operation completed successfully.” Click “Finish” to close.
8. Launch the ConfigMgr console and navigate to Software Library > Operating Systems > Task Sequences.
9. Right-click “Task Sequences.” You should see a new option, “Create MDT Task Sequence,” as shown in figure 13.4.
Figure 13.4. The ConfigMgr console has new options for MDT-specific functions.

This proves that MDT is integrated with ConfigMgr. Now to build some functionality.
Tip
Because the integration between MDT and ConfigMgr happens at the console level, you need to install and integrate MDT on every system that has the ConfigMgr console installed, assuming that you want to use the MDT extensions. You can still perform all non-MDT-related functions within ConfigMgr without integration.
Follow the steps in section 13.1.1 to install MDT on CM01 and enable the ConfigMgr integration.
Think about your own production environment: is MDT already integrated with ConfigMgr?
13.1.2. Building MDT packages within ConfigMgr
MDT functionality is exposed to ConfigMgr via the following objects, some of which you’re only just now encountering:
- OSD task sequences using MDT templates, steps, and variables
- MDT scripts (MDT core functionality is contained within these scripts.)
- MDT settings (Settings are used to configure Windows options during deployment.)
- MDT-based boot images (Boot images are enhanced with MDT functionality.)
When you integrate MDT and ConfigMgr, the integration process makes no changes to ConfigMgr content, which means that all the resources in the preceding list don’t yet exist. You have to create them, and the fastest and simplest way to create all resources necessary for using MDT is to let a wizard do it for you.
You’ll create a new MDT-based task sequence to deploy the Windows 10 image. Because it has several package dependencies (as you’ll see), the MDT Task Sequence wizard prompts for the location of these packages and lets you create them if they don’t already exist. The process is a bit lengthy the first time around, but bear with it:
1. Navigate to Software Library > Operating Systems > Task Sequences.
2. Right-click “Task Sequences” and select “Create MDT Task Sequence.”
3. You’ll see numerous options in the drop-down list. Select the first option, “Client Task Sequence,” and click “Next.”
4. Enter MDT Deploy Windows 10 x64 Enterprise as the task sequence name.
5. Under “Join Workgroup or Domain,” set the following, as shown in figure 13.5:
- Domain: mol.sccmlab.net
- Account: MOLCM_JD
- Organization name: MoL ConfigMgr Lab
Figure 13.5. Network settings to join Windows to the MOL domain

6. Click “Next.” For “Capture settings,” choose “This task sequence will never be used to capture an image.”
7. Under “Boot Image,” select “Create a new boot image package,” and enter \cm01SourcesBootMDT Boot x64 as the UNC path.
Tip
You don’t need to create the MDT source folders, since the wizard will do this for you.
8. For the boot image “General Settings,” enter the following:
- Name: MDT 2013 Update 2 Boot Image (x64)
- Version: 10.0.10240.16384
9. For the boot image “Options,” select x64 as the platform and set the scratch space to 128 MB.
Tip
Scratch space is the amount of temporary storage space available to WinPE (remember that a boot image uses WinPE). For an excellent summary about what’s happening under the hood, read this blog post by Johan Arwidmark: www.deploymentresearch.com/Research/tabid/62/EntryId/159/WinPE-5-0-scratch-space-in-MDT-2013-and-ConfigMgr-2012-R2.aspx.
10. For the boot image “Components,” in addition to “Microsoft Data Access Components” (which should already be selected), select “DISM Cmdlets and Windows PowerShell.”
11. For boot image “Customization,” select “Enable command support (F8).” You can also make further customizations, such as adding extra files to the boot image (for example, the log viewer utility) or a custom background image—nice for corporate branding.
Note
Enabling command support means that during an operating system deployment, you can press F8 on the machine being deployed to and get a traditional Windows command prompt. This gives you access to the WinPE system as well as any underlying disks—great for troubleshooting and reading logs on the fly, rather than waiting until the end of a deployment to see what worked.
12. On the MDT Package screen, select “Create a new Microsoft Deployment Toolkit package.” This is the package containing all the MDT scripts that provide the foundation of MDT within ConfigMgr. Enter \cm01SourcesMDT 2013 Update 2 Toolkit as the package source.
13. On the Details screen, enter the following:
- Name: MDT 2013 Update 2 Toolkit
- Version: 1.0
- Language: en-US
- Manufacturer: Microsoft
14. For the OS image, click the “Browse” button next to “Specify an existing OS image” and then select the “Windows 10 x64 Gold” image.
15. For “Deployment Method,” select “Perform a Zero Touch Installation.”
16. For “Client Package,” select “Specify an existing ConfigMgr client package” and then choose “Microsoft Corporation Configuration Manager Client Package.”
17. For “USMT Package,” select “Specify an existing USMT package” and then choose the “User State Migration Tool” package from the package list.
18. For the “Settings Package,” select “Create new settings package” and then enter \cm01SourcesMDT SettingsWindows 10 x64 as the source folder.
19. Enter the following for the settings details:
- Name: MDT Settings - Deploy Windows 10 x64
- Version: 1.0
- Language: en-US
- Manufacturer: Microsoft
20. Phew—that’s it! Click all the way through to Summary, and click “Next” to start the build process. The boot image, Toolkit package, and settings package are all created by the wizard, as shown in figure 13.6. The process takes approximately 5–10 minutes to complete.
Figure 13.6. The Task Sequence wizard creates all the required MDT packages.

And you’re finished! Yes, it’s a long and slightly convoluted process, but the great thing is that you need to do it only once. If you were to create another MDT-based task sequence within ConfigMgr, you’d point the wizard to the Toolkit package and boot image that you’ve already created. If you were deploying a different operating system or architecture, you might need a new MDT settings package, but that’s it.
Now it’s time to take a look at what you’ve created.
Follow the (vast number) of steps in section 13.1.2 to create a new MDT-based operating system task sequence in ConfigMgr and build all the packages required for MDT functionality.
13.2. Making sure that MDT is awesome
Let’s explore CM01 to see where all these new objects and packages have been created. This will give you a good sense of how MDT functionality is accessed within ConfigMgr.
13.2.1. Verifying MDT packages
To verify that the packages required for MDT functionality have been created properly, do the following:
1. Navigate to Software Library > Operating Systems > Task Sequences, and you’ll see the new MDT task sequence.
2. Right-click the task sequence and select “Properties.” Then go to the Advanced tab. As shown in figure 13.7, you’ll see that the task sequence references the newly created MDT boot image.
Figure 13.7. New MDT-based task sequence using the new MDT boot image

3. Close the Properties window and navigate to boot images. You’ll see that the boot image that the task sequence is referencing is now in the list.
4. Choose Application Management > Packages. As shown in figure 13.8, you’ll have two newly created MDT packages.
Figure 13.8. MDT Toolkit and settings packages for use within ConfigMgr

So, great—you have new packages and a task sequence. But how does all this work together?
13.2.2. Exploring MDT functionality
The task sequence is where all of this new functionality merges, so right-click the new MDT deployment task sequence and select “Edit.” The first thing you’ll notice is that, compared to the standard ConfigMgr task sequence, the MDT task sequence is huuuuuuuuuge. That’s because it was built using an MDT deployment template that caters to more deployment scenarios and contains much more logic than the default ConfigMgr templates.
To go through every part of the task sequence in detail would require nearly an entire book by itself. Rather than inflict that on you, this section will draw your attention to the core components of the task sequence.
Gathering information
You’ll see that dispersed throughout the task sequence, the step “Use Toolkit Package” appears quite a few times. This task sequence references the MDT Toolkit package that you created earlier. Its function is to download the Toolkit source to the local computer so that it can refer to scripts that are then called in later steps.
For example, you’ll see that the gather step is often run immediately after (or soon after) the Toolkit package is downloaded. The gather step runs the ZTIGather.wsf script, which gathers environmental information about the deployment and processes rules contained within the MDT settings package.
As shown in figure 13.9, the information gathered gets written to dynamic task sequence variables that can be called on during the task sequence. This enables you to perform specific actions, such as joining a different Active Directory domain or applying a different machine configuration, based on environmental properties.
Figure 13.9. The MDT gather step pulls in dynamic information about the deployment.
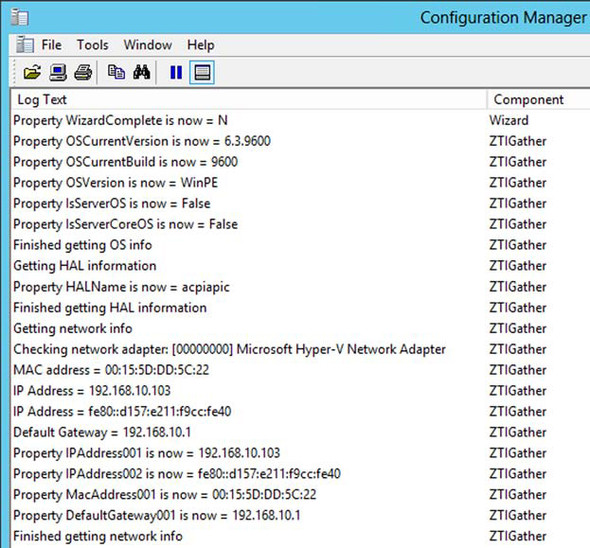
I recall one customer I worked for who needed to deploy machines to two AD domains. The network was segmented into VLANs, which meant that the machine being deployed had a specific IP address and default gateway, depending on which VLAN the machine was attached to.
I was able to use this environment information to join the machine to the correct domain by extracting the DefaultGateway001 property and calling it during the task sequence. As a result, rather than needing two task sequences to deploy machines to two AD domains, the customer needed only one task sequence. MDT to the rescue!
Handling different scenarios
The last couple of chapters have briefly touched on bare metal, refresh, and replace as concepts in OS deployment. By default, the MDT template caters to these scenarios.
Major section groups in the task sequence come into play, depending on the state of the system being imaged. For example, select the “State Capture” group and switch to the Options tab. As shown in figure 13.10, this group runs if the task sequence variable _SMSTSinWinPE is equal to false.
Figure 13.10. Task sequence variables provide conditional logic to the deployment process.

If the task sequence isn’t currently running within WinPE, it must be running within the full Windows operating system. Windows and ConfigMgr must already be installed, which means that this isn’t a bare metal deployment, but rather a refresh or replace.
In a refresh or replace scenario, you’re likely to have to deal with backing up and restoring the user state. This is everything that a user may have built up over time on their system through use—documents, settings, and customizations.
Handling user state backups can be a tricky business. Unless you have an operating environment where users can’t make any changes and have no choice but to store everything on a central server, chances are you won’t know what they may have done on their machines.
As a result, dealing with user state is far more a business concern than a technical problem. Make sure that management sets clear guidelines about what will and won’t be backed up. Sometimes it’s fine for a user to store nonessential data on their machine, as long as they know that the onus is on them to protect it—although, if a user comes to you in tears because all their wedding photos were erased (which has happened to me), it takes a hard heart to cite company policy back at them (yes, I recovered all their wedding photos).
Rich logging
When a task sequence goes bad, you want all the information possible at your disposal to work out why. This logic is built into the MDT deployment template via the use of the ZTICopyLogs.wsf script.
This takes all the logs generated during the task sequence and drops them on a central network share of your choosing. This action is called right at the end of the state-restore group via the copy-logs step (which is reached after the task sequence has completed successfully) or during the “Gather Logs and StateStore on Failure” group (which is called whenever a step in the task sequence fails).
Tip
The location of the log files is controlled by the SlShare task sequence variable (for example, SlShare=\CM01Logs). You can define this variable in the CustomSettings.ini file that’s part of the MDT Settings package, or you can define it as a step within the task sequence itself.
Go through the packages and task sequence created by the MDT wizard. Make sure that you’re comfortable with how the various bits and pieces fit together, and what the major sections of the task sequence do.
Understand that in a bare metal deployment (triggered from within WinPE), some of the grouped sections in the task sequence wouldn’t run at all. Why?
13.3. Lab
Feeling brave? Of course you are!
If you’re feeling up to the challenge, perform a bare metal deployment of Windows 10 by using the MDT task sequence. You’ll need to deploy the task sequence and make sure that the content for all the dependent packages has been distributed.