
INTRODUCTION

Technology influences all aspects of our lives, and computing jobs and opportunities abound. It’s more important than ever for everyone to understand how computers work. It’s especially important that kids, including those from underrepresented groups, know that they have the ability to write software, study computer science, or become computer programmers if they so choose.
In this book, you’ll learn how to make useful and exciting mobile software—apps for phones and tablets—with App Inventor, while exploring key programming concepts along the way. We’ll create apps that send text messages, recognize speech, access a phone’s list of contacts, sense the phone’s location, operate the camera and camcorder, solve math problems, play video and sound, animate graphics, turn text into speech, and even respond to touch and let users draw on the screen!
Many young people around the world are using App Inventor to create apps like these to positively impact their communities. Kids in California developed an app that allows users to record and report graffiti and organize clean-up events. North Dakota middle school students created an app to encourage more recycling in their community. Middle school girls in Texas designed an app that uses the Global Positioning System (GPS) to guide visually impaired students around their school. Teens in Nigeria built an app that uses location sensing to help traffic cops catch offenders. Young women in Europe designed a crowdsourcing app to help residents find safe drinking water. A middle school boy in India developed an app to help parents locate their child’s school bus and check if their child is on the bus. The possibilities for creative problem solving are endless!
As an app developer, you too will have the power to solve real-world problems and help your community using your smartphone. You’ll use your critical thinking and problem-solving skills to develop apps that tell the computer exactly what you want it to do.
WHAT IS APP INVENTOR?
App Inventor is a free online visual programming environment originally developed by Google and now maintained by the Massachusetts Institute of Technology (MIT). It empowers people to create software for their phones and tablets rather than simply use those devices.
In traditional programming environments, you need to type the actual code to develop software in a language like PHP or Java. But App Inventor lets developers create technology relatively quickly by dragging and dropping code blocks onto the screen rather than typing out code. This approach makes it easy for anyone to create and publish a simple app for a smartphone or tablet in under an hour. You can also use App Inventor to program more complex apps with high-tech mobile computing features in significantly less time than you can with traditional text-based programming environments. With App Inventor, you’ll be able to develop software in no time—and with fewer errors too!
Best of all, App Inventor blocks incorporate the same programming logic you would use if you were writing code in text-based environments. This means that the programming concepts you learn here will help you as you start to code with traditional languages.
WHO SHOULD READ THIS BOOK?
This book is for curious coders age 11 and up and any parents or educators who want to introduce kids to programming. The book, along with its supplementary materials and lesson plans, is designed to demystify coding, show you how to build cool apps, and expose you to computational thinking skills and fundamental programming concepts.
This book is also for anyone who wants to build fun, feature-rich apps for mobile devices without getting bogged down by the tedious nuances of a text-based language. Not only will you become familiar with App Inventor and learn how to build the apps in this book, you’ll also be able to create your own powerful apps to share with friends or upload for sale.
WHAT’S IN THIS BOOK?
In this book you’ll learn how to use App Inventor’s drag-and-drop interface to create a fun app in each chapter. Along the way, you’ll learn computational thinking skills like decomposing problems into manageable parts and fundamental computer programming concepts like handling events, storing data in variables and lists, using control structures to direct program flow, creating procedures to perform tasks, refactoring code, and debugging.
The “On Your Own” exercises at the end of each chapter test your understanding of the concepts and prepare you to create your own apps. These problems also reinforce your knowledge of programming principles that can ease your transition to traditional text-based coding.
Here’s what you’ll find in each chapter:
Chapter 1: Building Apps with App Inventor You’ll create the “Hi, World!” app, which lets you text a message via speech recognition to a telephone number from your contact list, and then package the app to send to your friends to install.
Chapter 2: App Inventor and Event-Driven Programming Here you’ll use event handlers to create an app you can use to record, watch, and re-record temporary video clips of yourself practicing a speech or song.
Chapter 3: Fruit Loot: Creating a Simple Animated Game Program animations and use variables to build the “Fruit Loot” game, where you earn points for catching randomly dropping fruit.
Chapter 4: Multiplication Station: Making Decisions with Code Use conditionals and operators to make the “Multiplication Station” app, which generates random, timed multiplication problems for you to solve and then check your answers.
Chapter 5: Beat the Bus: Tracking Location with Maps and Sensors Here you’ll create and use lists to build the “Beat the Bus” app, which lets an approved adult track your ride from school to a preset destination, without using the power-draining location services on the adult’s phone.
Chapter 6: Tic Tac Toe: Using Loops to Create a Game You’ll use loops, conditionals, and operators to create the classic “Tic Tac Toe” game.
Chapter 7: Multiplication Station II: Reusing Code with Procedures In this chapter, you’ll explore how to create and call functions (called procedures in App Inventor) to build “Multiplication Station II,” which lets you choose the difficulty level of the multiplication problems and computes both your raw and percentage scores.
Chapter 8: Virtual Shades: Drawing and Dragging Images You’ll create the “Virtual Shades” app, which lets you take a selfie, virtually try on a variety of sunglasses, and even doodle on the screen.
Appendix: App Inventor Components and Built-in Blocks
HOW TO USE THIS BOOK
To create the app in each chapter, you’ll need to upload the images and any sound files. You can download them at https://nostarch.com/programwithappinventor/. To use your own images and sounds, use JPG or PNG image files and MP3 sound files in the smallest possible sizes. Keep in mind that App Inventor restricts the size of each uploaded file to 1MB, and no app may exceed 5MB (including pictures, sounds, and other assets).
Download the solutions to each chapter’s “On Your Own” exercises and lesson plans for each chapter at https://nostarch.com/programwithappinventor/.
GETTING STARTED WITH APP INVENTOR
Before you can start designing mobile apps, you’ll need to set up an App Inventor account. Having an account lets you work on your apps on the web and save them in the cloud. You’ll also be able to live-test your projects, which means you can see and test all changes as you work.
In this section, you’ll learn how to set up your own account and log in to App Inventor. Then you’ll learn how to test your apps on a device.
To set up an account, visit App Inventor’s home page at http://appinventor.mit.edu/, shown in Figure 1, on a web browser like Chrome or Firefox.
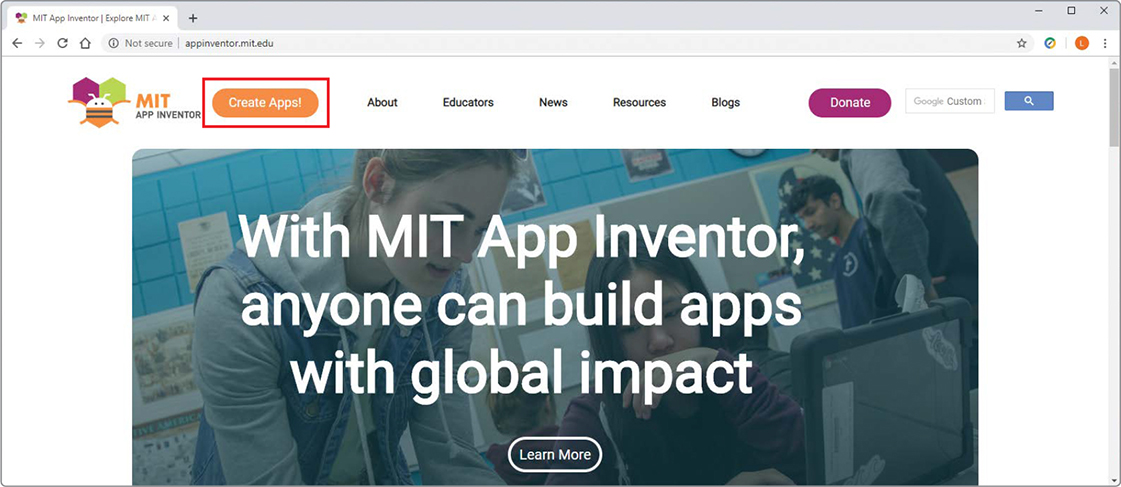
Figure 1: The App Inventor home page
Click the Create apps! button, outlined in red in Figure 1, at the top of the window. That should take you to a Google sign-in page like the one shown in Figure 2, where you’ll be prompted to sign in with your Google account.
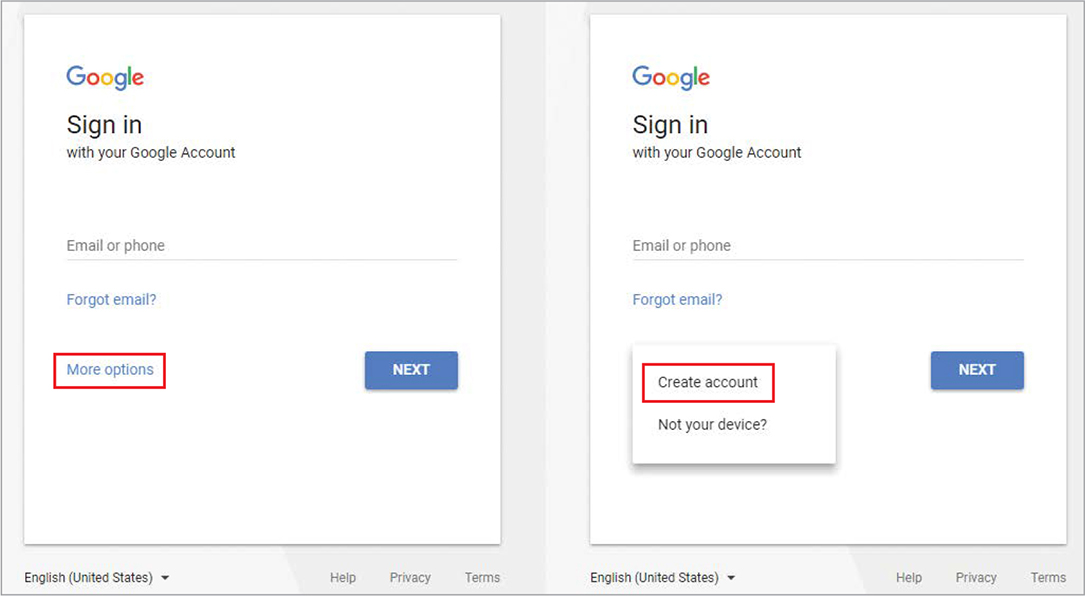
Figure 2: Sign in with your Google account
If you already have a Gmail account, enter that email address and, when prompted, enter your password. If not, create a Gmail account by clicking More options and then Create account. If you’re under age 13, be sure to get permission and help from an adult to create the account.
Once you enter your Gmail address and password, you’ll be asked to allow App Inventor to access your selected Google account, as shown in Figure 3.

Figure 3: After you enter your Gmail address and password, App Inventor requests permission to access your Google account.
Click Allow to log in. If this is your first time logging in, you should see App Inventor’s terms of service, as shown in Figure 4.
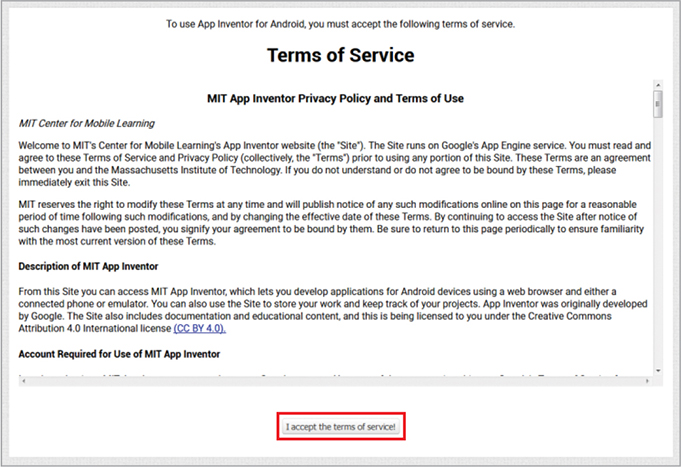
Figure 4: The terms of service window appears the first time you log in to App Inventor.
After you read them, click I accept the terms of service!.
Next you’ll be asked to complete the voluntary user survey, as shown in Figure 5.
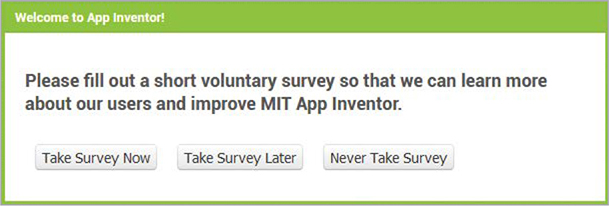
Figure 5: This survey window appears each time you log in until you take the survey or click the Never Take Survey button.
Click Take Survey Now to complete the survey, or click Take Survey Later to take it another time.
Now you should see the “Welcome to MIT App Inventor” screen in Figure 6, which displays each time you log in. This screen will let you know when the App Inventor developers are planning updates or releasing versions of App Inventor with fixes or new features.
Quickly read this screen for any updates, and click Continue to close the screen.
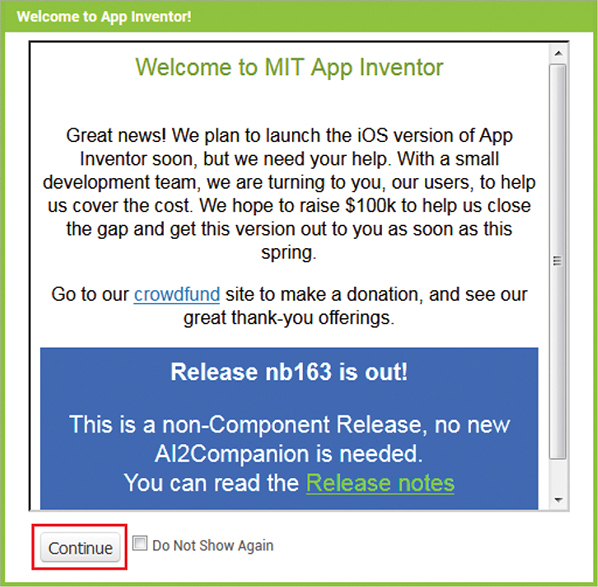
Figure 6: The welcome screen appears each time you log in to App Inventor and provides brief updates.
If this is your first time logging in to App Inventor, you should see the notice in Figure 7 indicating that you don’t have any projects yet.
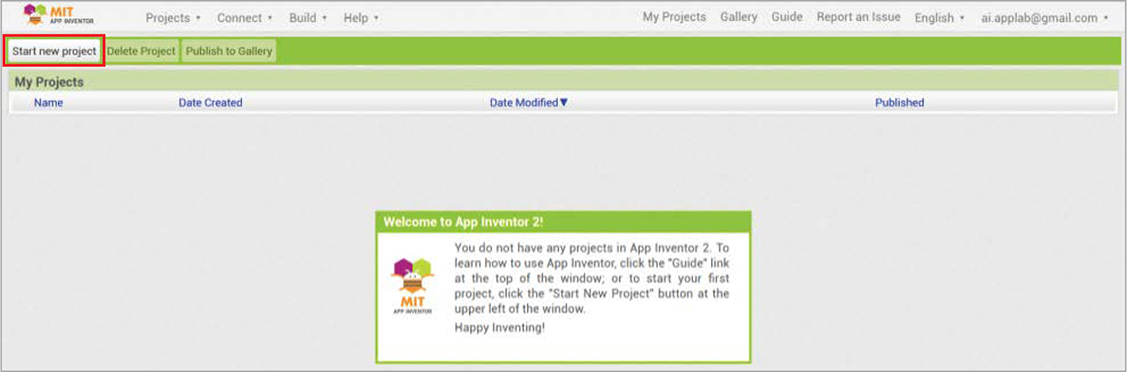
Figure 7: The Start new project screen appears when you log in for the first time.
To start your first project, click Start new project near the top-left corner of the window.
If you’ve logged in and saved a project before, you should see the last app you worked on at this point. To start a new app, click Projects to open the drop-down list and then select Start new project.
Now you’re almost ready to create your first app!
LIVE-TESTING YOUR APPS
To create an app, you need to be able to see how it looks and works as you go. You’ll find several options to test your code on the App Inventor website. For this book, we’ll use App Inventor’s Companion app, called MIT AI2 Companion, to connect your phone to your computer via Wi-Fi.
Although you can test App Inventor apps on all types of mobile Android devices, and testing with iOS devices is in development at the time of this writing, I recommend you use a full-featured phone. Using a full-featured phone ensures you’ll have all of the modern mobile computing features (camera and video recorder; speech recognition, text-to-speech, and GPS capabilities; and a working texting plan) easily available to test in your apps.
CONNECTING YOUR PHONE TO THE COMPUTER
For live-testing to work properly, you must install the MIT AI2 Companion app on your device and connect your device to the internet through Wi-Fi. You don’t need to download anything to your computer; simply follow the instructions in this section to download and install the MIT AI2 Companion app to the device you’ll use for testing.
Installing the MIT AI2 Companion App
To download the MIT AI2 Companion app directly to your testing device, search for the app in your device’s Google Play Store and then install it.
Once you’ve installed the Companion app, be sure that your device is using Wi-Fi (not the cell network) and that you’ve connected both the computer where you’re logged in to App Inventor and your testing device to the same Wi-Fi network so that the two can communicate. You should now be able to open the Companion app on your device whenever you want to see and test your current project in App Inventor.
Testing with Your Device
To test an App Inventor project on your device, select Connect ▸ AI Companion as shown in Figure 8.

Figure 8: The Connect menu for live-testing apps, with the AI Companion option selected
You should see a small window displaying both a QR code and a six-character code, as shown on the left in Figure 9. When you open the Companion app on your device, it should look like the right side of Figure 9.

Figure 9: The App Inventor window that displays the code to scan or type into the AI2 Companion app to live-test on your device (left) and the AI2 Companion app’s home screen (right)
Enter the six-character code in the Companion app’s text box and click connect with code, or click scan QR code to scan the code. A few seconds later, the Companion app should display the project you’re working on, which will automatically update as you make changes on your computer.
USING THE ONSCREEN EMULATOR
If you can’t test with a device, you can test other ways, including using App Inventor’s built-in Android emulator.
I will warn you now that the emulator works slowly and can’t readily test certain mobile computing features, such as making calls, sending text messages, and responding to motion sensors. However, you’ll still be able to check all aspects of your app’s design and some features, like button clicks. To install the emulator, go to http://appinventor.mit.edu/explore/ai2/setup-emulator.html and then follow the instructions for your computer’s operating system.
A NOTE ON CONVENTIONS
The book uses a number of conventions to streamline instructions or save space, as described next. Note that these methods may not always represent best coding practices.
HANDLING DUPLICATE COMPONENTS
A component added to an app is renamed with a more descriptive name only when two or more of the same components are used in an app, to avoid confusion. Otherwise, components retain their default names to limit nonessential instructions.
For example, if an app uses two or more buttons, we’ll give them both meaningful names so we can clearly identify each button’s function. But if an app has just one button, we’ll leave it named Button1, since there’s no possibility we’ll confuse it with another button.
APPEARANCE OF BLOCK INPUTS
App Inventor lets you right-click blocks that require multiple inputs and select whether to display them with inline inputs or external inputs. The two random integer blocks in Figure 10 demonstrate the difference.

Figure 10: Setter blocks attached to two random integer blocks, the top with inline inputs and the bottom with external inputs
The FruitSprite1 setter block on the top shows blocks plugged into the from and to sockets in the random integer block as inline inputs.
But the FruitSprite2 block on the bottom shows blocks plugged into the from and to sockets as external inputs, taking up less horizontal space.
Throughout the book, when you notice that the inputs shown in a figure don’t look exactly like those you’re dragging into an app, it’s because I’ve changed the input to better fit the available space on the page.
APPS CREATED ON WINDOWS
All the apps created in this book were created on a Windows computer. If you create your apps on a Mac, they may look different from those shown in the figures.
Once you’ve set up your App Inventor account and installed either the Companion app on your testing device or otherwise set up live-testing, you’re ready to start creating and testing apps.
Let’s get started!