
4
MULTIPLICATION STATION: MAKING DECISIONS WITH CODE

In programming, you can use three structures to control the flow of a program: sequence, selection, and repetition. With the sequence structure, which is the default and simplest of the three options, code is executed in order, line by line. So far you’ve been using the sequence structure to create apps.
Unlike the sequence structure, the selection or conditional structure enables an app to make decisions by testing for a condition with a Boolean expression. A Boolean expression evaluates to a Boolean value, using relational or comparison operators like =, ≤, and ≥, to test the conditions. Because a Boolean value can only be either true or false, we execute one sequence of code if the condition is true and another if it’s false.
The repetition structure also tests a Boolean condition and runs a sequence of code repeatedly while the condition is true, which is called looping. We’ll use the repetition structure in Chapter 6.
THE SELECTION CONTROL STRUCTURE
In this chapter, we’ll program apps to make decisions by comparing conditions using the if then blocks in the Control blocks drawer. We’ll combine them with comparison operator blocks from the Logic and Math drawers to compare values. Then, we’ll execute different blocks of code depending on whether the comparisons are true or false.
USING AN IF THEN BLOCK IN THE “FRUIT LOOT” GAME
In the “Fruit Loot” game in Chapter 3, we could have used an if then block to streamline some of our code. Remember that we programmed the action the app should take when an ImageSprite hits the picker, as shown here.
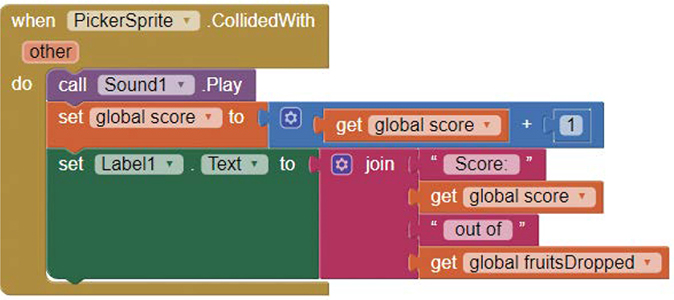
We should have included code in this event handler to make any sprite that collided with the picker disappear. But we couldn’t, because we didn’t yet know how to use the selection control structure to figure out exactly which sprite hit the picker and hide it.
Instead, we repeated CollidedWith event handlers for each fruit ImageSprite.

That’s a lot of blocks! With the selection control structure, however, we don’t have to use three duplicate fruit ImageSprite CollidedWith event handlers to figure out which fruit ImageSprite hit the picker and make it disappear.
Here is the pseudocode, or simple, plain English version of the code that determines which sprite hit the picker:
If (the sprite that hit PickerSprite is FruitSprite1)
then (hide FruitSprite1).
If not, if (the sprite that hit PickerSprite is FruitSprite2)
then (hide FruitSprite2).
If not,
(hide FruitSprite3).
To re-create this pseudocode, we’ll add an if then block to the picker ImageSprite’s CollidedWith event handler, as shown in Figure 4-1.
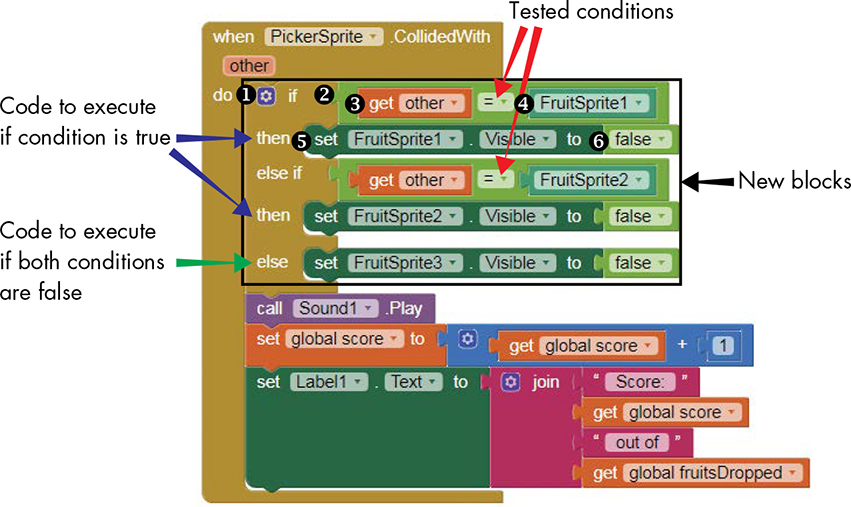
Figure 4-1: “Fruit Loot” blocks to find and hide the ImageSprite that hits the picker
To add the new blocks, go to the “Fruit Loot” game Blocks Editor and place the if then block ➊ inside the whenPickerSprite.CollidedWith block next to the word do.
You should see that the default if then block allows only one if and one then input. To add more inputs, click the blue mutator icon to the left of if, as shown in Figure 4-2.
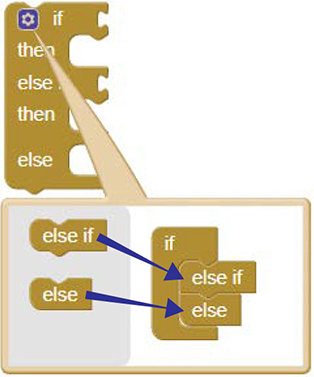
Figure 4-2: Adding else if and else sockets to the if then block
In the dialog that opens, drag an else if block and then an else block into the if block.
Checking Whether Colliding Fruit Is FruitSprite1
The PickerSprite’s CollidedWith event handler provides the other event parameter, which represents the fruit ImageSprite that collided with the picker. Whenever an ImageSprite hits the picker, you compare other to FruitSprite1 to determine if FruitSprite1 is the sprite that hit the picker. If so, the blocks set the Visible property of FruitSprite1 to false to make it disappear.
To place the blocks for this behavior, from the Logic blocks drawer, drag in an = comparison operator block ➋ next to the word if. To fill the = block’s operand sockets, mouse over the other event parameter above the mutator icon until you see a get other block ➌, then drag that block into the left socket. Then click FruitSprite1 in the Blocks pane and drag the FruitSprite1 block ➍ into the right socket. Next, in the Blocks pane, click FruitSprite1 again and drag in the setFruitSprite1.Visibleto block ➎ next to the word then. Finally, snap a false block ➏ from the Logic blocks drawer to the right of the setFruitSprite1.Visibleto block.
Checking Whether Colliding Fruit Is FruitSprite2
If FruitSprite1 is not the fruit that hit the picker, we check for our second condition by comparing other to FruitSprite2. Copy the blocks at ➋ through ➍ in Figure 4-1, place the duplicate blocks next to the words else if, and use the drop-down arrow to change FruitSprite1 to FruitSprite2 in the right operand socket of the duplicate = comparison operator block.
Then copy the blocks at ➎ and ➏, place the duplicate blocks next to the word then, and use the drop-down arrow to change FruitSprite1 to FruitSprite2 in the duplicate setter block. Now, when an ImageSprite other than FruitSprite1 hits the picker, these blocks compare other to FruitSprite2 to determine if FruitSprite2 is the sprite that hit the picker. If so, these blocks set its Visible property to false to make it disappear.
Checking Whether Colliding Fruit Is FruitSprite3
Finally, copy the blocks at ➎ and ➏ again, place the duplicate blocks next to the word else, and use the drop-down arrow to change FruitSprite1 to FruitSprite3 in the duplicate setter block. These last two blocks should execute only if neither FruitSprite1 nor FruitSprite2 matches other as the fruit ImageSprite that collided with the picker. In that case, FruitSprite3, the only sprite left, must have hit the picker and will disappear.
Instead of creating three different CollidedWith event handlers for the fruit ImageSprites, we refactor our code and use one if then block to handle multiple conditions. You now can delete the three original CollidedWith event handlers for the fruit ImageSprites, and, when you test the “Fruit Loot” app, it should work exactly the same.
BUILDING THE “MULTIPLICATION STATION” APP
Now that you’ve seen how if then blocks work, let’s create the “Multiplication Station” quiz app. To build the app, you’ll use if then blocks, along with the Clock timer, random numbers, and arithmetic operators to generate multiplication problems. You’ll also learn how to create an app that has more than one screen and experiment with the TextToSpeech and Notifier components to communicate with app users.
Log into App Inventor, create a new project, name it MultiplicationStation, and click OK.
DECOMPOSING “MULTIPLICATION STATION”
We can decompose the “Multiplication Station” app into five steps:
When the user opens the app, play a welcome message and show the start button.
When the user clicks the start button, open the practice screen.
When the Clock timer fires, display a random multiplication problem and an empty text box for the user to input the answer, and add 1 to the total number of problems.
When the user clicks the check answer button, check the answer and indicate whether it’s right or wrong if an answer exists. If no answer exists, display an alert.
When the user clicks the end button, stop displaying problems and change the user interface to show only the final numeric and percentage practice scores.
You’ll need the following components:
Button (3) for the user to click to manually start and end practice and check answers
Clock to fire after the user clicks the start button to display math problems at a 5-second interval
HorizontalArrangement to hold the answer TextBox, the check answer button, and the answer result Label
Label (3) to display math problems, answer results, and scores
Notifier to display an alert to the user
Screen (2) for the welcome screen and the practice screen
TextBox for the user to input answers
TextToSpeech (2) to say the welcome message and declare answers right or wrong
Variable (7) to store problems, answers, and scores
VerticalArrangement to hold all practice screen user interface components
Now let’s lay out the app in the Designer.
LAYING OUT “MULTIPLICATION STATION” IN THE DESIGNER
Rather than briefly showing and hiding our introductory information like we did in Chapter 2’s “Practice Makes Perfect” app, we’ll use two different screens in this app: one to welcome the user and the other to display problems and evaluate the user’s answers.
SETTING UP THE WELCOME SCREEN
To lay out Screen1, the welcome screen, drag a Button from the User Interface drawer and a non-visible TextToSpeech component from the Media drawer.
Figure 4-3 shows what the welcome screen should look like.

Figure 4-3: The Viewer, Component, and Media panes after laying out Screen1 of “Multiplication Station”
In the Components pane click Screen1. Then, in the Properties pane, adjust its vertical alignment so the Button sits at the bottom of the screen by clicking the drop-down arrow under AlignVertical and selecting Bottom: 3. Then add a background image to the screen by clicking the text box under BackgroundImage and following the image upload instructions outlined in “Uploading a Picture” on page 27. Finally, remove the check marks under ShowStatusBar and TitleVisible to hide the status bar and the title of the screen, Screen1, when the app runs.
Now, let’s style the Button that starts the app. Click Button1 in the Components pane. Then, in the Properties pane, change the background color to black by clicking Default under BackgroundColor and then clicking Black when the color list dialog opens. Next, bold its text by clicking the checkbox under FontBold, and change its shape by clicking the drop-down arrow under Shape and selecting rounded. Next, input Start Practicing in the text box under Text. To make the text white, click Default under TextColor and then White when the color list dialog opens.
Now let’s create Screen2, where most of your app’s action will happen.
CREATING THE PRACTICE SCREEN
To create Screen2, click the Add Screen… button above the Viewer. When the New Screen dialog opens, click OK, and you’ll be taken to a brand new screen.
Now, in the Properties pane, we’ll center Screen2 horizontally and vertically so that all components we place on it will be centered. To do this, click the drop-down arrows under both AlignHorizontal and AlignVertical and select Center. Next, add a background image to the screen by clicking the text box under BackgroundImage and following the image upload procedure. Finally, click the checkbox under TitleVisible to remove the check mark and keep the title of the screen from showing at the top of the app when it runs.
Problem Display
Now let’s set up the components the user can see and interact with, by dragging the components from the Palette pane in the order that we want them to appear onscreen. Let’s also adjust these components as we add them.
First, drag a VerticalArrangement from the Layout drawer, and center its contents horizontally and vertically by clicking the drop-down arrows under both AlignHorizontal and AlignVertical and selecting Center. Then, change the height of VerticalArrangement1 so it takes up half the vertical screen. To do so, click the text box under Height, and, when the dialog opens, input 50 in the text box next to the word percent and click OK. Finally, set its Width to Fill parent.
Now we’ll drag all of the remaining visible components into VerticalArrangement1. Drag a Label from the User Interface drawer into VerticalArrangement1, click the Rename button to rename it as ProblemLbl, and click OK. Next, click the FontBold checkbox to make the text on ProblemLbl bold, input 25 in the FontSize text box to make the text larger, and replace the default Text for Label1 by inputting Problems appear here in the Text text box.
Answer Text Box and Check Answer Button
Next, drag a HorizontalArrangement from the Layout drawer into VerticalArrangement1 under ProblemLbl. Select Center in both its AlignHorizontal and AlignVertical drop-down boxes and set its Width to Fill parent.
Now, drag three components from the User Interface drawer into HorizontalArrangement1. First, drag in a TextBox and rename it AnswerBox. Make its width 100 pixels by clicking the text box under Width, inputting 100 in the text box to the left of the word pixels, and clicking OK. Next, replace the Hint for TextBox1 in the Hint text box by entering Type your answer. Although you can’t see this text in the Viewer, the user should see the hint in AnswerBox on the screen. Finally, click the checkbox under NumbersOnly, which will allow users to enter only numbers into AnswerBox.
Drag a Button into HorizontalArrangement1 to the right of AnswerBox and rename it CheckAnswerBtn. Then replace the default Text for Button1 on CheckAnswerBtn by inputting Check Answer in the Text text box. This is the button users will click to check their answers.
Finally, drag a Label into HorizontalArrangement1 to the right of CheckAnswerBtn, rename it ResultLbl, and delete the default Text for Label1 from its Text text box. This label will remain invisible until it displays “Correct!” or “Incorrect” answer results.
End and Score Button
To display the score and percentage of answers correct, place a Label into VerticalArrangement1 under HorizontalArrangement1, and rename it ScoreLbl. Make the text bold and italic by clicking the checkboxes under FontBold and FontItalic and larger by entering 20 in the FontSize text box. Also, delete the default Text for Label1 from the Text text box so no text will show when the screen opens.
To create a button users can click to stop practicing and see their final scores, drag another Button into VerticalArrangement1 under ScoreLbl and rename it EndBtn. Style it exactly like Button1 on Screen1. Change the background color to black by selecting Black under BackgroundColor, make its text bold by clicking the checkbox under FontBold, and change its shape by clicking the drop-down arrow under Shape and selecting rounded. Then, enter End + Get Percentage in the text box under Text, and make the text white by selecting White under TextColor.
Finally, let’s drag in the non-visible components: a Notifier component from the User Interface drawer, another TextToSpeech component from the Media drawer, and a Clock component from the Sensors drawer. Change the Clock’s timer interval to 5 seconds by replacing the default 1000 with 5000 in the TimerInterval text box so a new problem will display every 5 seconds.
Now, in the Viewer pane, all visible components should show on Screen2, and the non-visible components—Notifier1, TextToSpeech1, and Clock1—should show under the screen. In the Components and Media panes, you should see a list of all components and images added, as shown in Figure 4-4.

Figure 4-4: The Viewer, Component, and Media panes after laying out Screen2 of “Multiplication Station”
Now that you’ve laid out all components, you’re ready to program the app!
PROGRAMMING “MULTIPLICATION STATION”
For “Multiplication Station,” we’ll need five event handlers for the two screens. Three respond to events generated by the user’s button clicks. One directs the app’s action after a timer goes off at the time interval we’ve set. The other triggers action when the screen initializes or opens. We’ll also create seven variables to store important information, and we’ll use an if then block that has another if then block nested within it.
Click the Blocks button to switch to the Blocks Editor to begin programming.
STEP 1: PLAYING THE WELCOME MESSAGE
Let’s start by telling the app what to do when Screen1 opens—namely, we want the TextToSpeech component to say the app’s welcome message. The following code shows the event handler to program this behavior in step 1.

Switch back to Screen1 by selecting Screen1 in the drop-down box to the right of the project’s name. In the Blocks pane, click Screen1 and drag the whenScreen1.Initialize event handler block ➊ to the Viewer. Then, click TextToSpeech1 in the Blocks pane and drag its callTextToSpeech1.Speak built-in method block ➋ next to the word do. Next, in the Blocks pane, click the Text blocks drawer and drag an empty string block ➌ (the first block in the drawer), next to the word message, into the socket for the method’s message parameter.
The message parameter is required by the TextToSpeech1 Speak method in order for the app to speak. Add that message by clicking the empty string block’s text area and entering the following: Welcome to Multiplication Station! You will have 5 seconds to answer each problem. Click the Start Practicing button to begin. Altogether, these blocks program step 1 of the app, greeting the user with a spoken welcome message when the app opens.
STEP 2: MOVING TO THE PRACTICE SCREEN
In addition to hearing the welcome message, users should see Button1, which they can click to display the multiplication problems in Screen2. The following blocks handle this step.

Click Button1 in the Blocks pane and drag the whenButton1.Click block ➊ to the Viewer. Place the open another screen block ➋ inside the whenButton1.Click block next to the word do. From the Text blocks drawer, drag in another empty string block ➌ and snap it onto the open another screen block. Enter Screen2 (the exact name of the screen we want to open) inside the empty string block. Now when the user clicks Button1, the app should open Screen2 just like we planned.
To see how these blocks work, switch back to Screen1 and let’s live-test with a device, as outlined in “Live-Testing Your Apps” on page xxii. Once you click Connect ▸ AI Companion in the top menu bar and scan the QR code with your phone’s AI2 Companion app, the “Multiplication Station” app should open on your phone. As long as the blocks are placed correctly, you should hear the welcome message and, after clicking Button1, you should see Screen2. For now, nothing else should happen. Close AI2 Companion for now, and we’ll reconnect when we test again.
STEP 3: DISPLAYING RANDOM MULTIPLICATION PROBLEMS
Let’s now program step 3 of the app, where we display a random multiplication problem every 5 seconds. When this happens, we’ll count each problem to keep a running total. Make sure you’re in the Blocks Editor for Screen2 to program this step.
Setting Global Variables
We’ll use three global variables in this step: a and b to store the numbers in the multiplication problems and problems to store the total number of problems. We’ll create and initialize the global variables as shown here.
For each variable, click the Variables block drawer and drag an initialize global name block ➊ to the Viewer, click name, and replace it with the name of the variable. Then drag a 0 number block ➋ from the Math drawer and snap it onto the initialize global block. Because all three variables are global, they can be used by all our event handlers and they stand alone in our code, outside of all our event handler blocks.
Choosing Random Numbers to Multiply
Next, we’ll program the Clock’s timer. Because we kept the default setting for the Clock’s TimerEnabled property in the Designer, the timer should automatically begin firing at 5-second intervals once Screen2 opens. The following event handler blocks tell the app what to do each time the timer fires.

In the Blocks pane, click Clock1 and, when the blocks for the component appear, drag the whenClock1.Timer block ➊ to the Viewer. Next, in the Blocks pane, click the Variables blocks drawer, drag the set global a to block ➋ to the Viewer, and snap it inside the whenClock1.Timer block next to the word do. Then click the Math blocks drawer and drag a random integer block ➌ to the right of the set global a to block.
The random integer block will generate a random integer between a specified range of numbers. To set this range, leave the 1 in the left socket of the random integer block as is ➍, click the 100 in the right socket, and replace it by entering 12 ➎.
So far we’ve set the value for variable a, the random number on the left side of each multiplication problem that will show in the app. To set the number for variable b, the right side of the multiplication problems, copy the blocks at ➋ through ➎, place the duplicate blocks under the original, and use the drop-down arrow to change a to b ➏ in the duplicate set global block.
Displaying the Problems
Now we’ll add the blocks to the Timer event handler that display the multiplication problems to the user in ProbemLbl.

In the Blocks pane, click ProbemLbl, drag the setProblemLbl.Textto block ➊ to the Viewer, and snap it inside the whenClock1.Timer block under the set global b to block. Then click the Text blocks drawer, drag a join block ➋ to the Viewer, and snap it to the right of the setProblemLbl.Textto block. This allows us to join the random number values of the a and b variables and the multiplication operator, ×, into one string. For example, if a = 3 and b = 6, we want to join them with the operator to display 3 × 6.
First, we’ll add another string input to the two default inputs in the join block. To do this, click the blue mutator icon to the left of the word join, and drag one additional string block to the join block in the dialog that opens.
Then, for the join block’s top input, click the Variables blocks drawer and drag in the get global a block ➌. For the join block’s second input, drag in an empty string block ➍ from the Text blocks drawer, click the empty string block’s text area, and enter x (with spaces before and after the x). Then, for the join block’s bottom input, click the Variables blocks drawer again and drag in the get global b block ➎. Now, every 5 seconds, these blocks will get new random values for a and b, join them with the multiplication operator, and display the multiplication problem in ProbemLbl.
Counting the Number of Problems Displayed
To keep a running total of the number of problems, we need the app to count each problem as it’s displayed. The next blocks in the Timer event handler program this.
Click the Variables blocks drawer, drag the set global problems to block ➊ to the Viewer, and snap it inside the whenClock1.Timer block under the setProblemLbl.Textto block. Then drag an addition operator block ➋ from the Math drawer and snap it to the right of the set global problems to block. Now click the Variables blocks drawer again and drag the get global problems block ➌ into the addition block’s left operand socket and a 1 number block ➍ from the Math drawer into its right operand socket. These blocks keep a running total of the problems displayed by adding 1 to the current value of the problems variable every 5 seconds, each time a new multiplication problem appears onscreen.
Refreshing the AnswerBox, ResultLbl, and CheckAnswerBtn
We need the app to do three more things each time the Timer fires and it displays a new math problem:
Erase any text left in AnswerBox so the user has a clean box to input answers
Remove the “Correct!” or “Incorrect” text displayed in response to any prior answer
Enable the CheckAnswerBtn, which we’ll later program the app to temporarily disable after the user clicks it
The following blocks accomplish these three tasks.

Let’s prepare the app to accept an answer to a new problem and equip its CheckAnswerBtn to check that answer. Click AnswerBox in the Blocks pane, drag its setAnswerBox.Textto block ➊ to the Viewer, and snap it inside the whenClock1.Timer block under the set global problems to block. Then click the Text blocks drawer, drag in an empty string block ➋, and snap it to the right of the setAnswerBox.Textto block.
Click ResultLbl in the Blocks pane, drag its setResultLbl.Textto block ➌ to the Viewer, and snap it inside the whenClock1.Timer block under the setAnswerBox.Textto block. Then click the Text blocks drawer, drag in another empty string block ➍, and snap it to the right of the setResultLbl.Textto block.
Click CheckAnswerBtn in the Blocks pane, drag its setCheckAnswerBtn.Enabledto block ➎ to the Viewer, and snap it inside the whenClock1.Timer block under the setResultLbl.Textto block. Then click the Logic blocks drawer, drag in a true block ➏, and snap it to the right of the setCheckAnswerBtn.Enabledto block.
Now live-test to see how these blocks work. If the AI2 Companion button is grayed out when you attempt to reconnect the AI2 Companion app, click Connect ▸ Reset Connection in the top menu bar. Then, click Connect ▸ AI Companion and scan the QR code with your device’s AI2 Companion app. You should still see Screen2 since you’re connecting AI2 Companion while working on your Screen2 blocks.
Five seconds after the app opens, you should see a multiplication problem appear in place of “Problems appear here” and then see a new problem every 5 seconds after that. Also, if you enter numbers in AnswerBox, they should disappear after 5 seconds. If you don’t see any multiplication problems, the problems don’t show as desired, or the answers don’t disappear after each 5-second interval, debug your code and test again.
Next, we’ll tell the app what to do when the user clicks the Check Answer button.
STEP 4: CHECKING ANSWERS
Let’s program step 4 of the app, where the user clicks CheckAnswerBtn. First, we want to determine whether the user has entered anything into AnswerBox. If so, we’ll program the app to evaluate the answer and indicate whether it’s wrong or right by speaking and displaying the result in a label. If the answer’s right, the app increases the score by 1. If, on the other hand, the user clicks CheckAnswerBtn without entering anything into AnswerBox, the app displays an alert. In this step, you’re validating user input, which means checking whether the user has entered the type of data required. Programmers commonly validate user form input and use it only if it’s valid or notify the user if it’s not.
We’ll start our code for this step by creating and initializing three more global variables. Create the variables answer, c, and score. Then initialize answer to the value of an empty string block from the Text blocks drawer, and c and score to the value of 0. The variables should look as shown here.
We’ll use these variables to store the user’s answer (answer), the correct answer (c), and the user’s score (score).
Testing Our First Condition: Checking Whether an Answer Exists
Let’s now program the CheckAnswerBtn event handler, which includes two if then blocks, one nested within the then socket of the other. This means that if the first if then condition is true, the app will need to test another condition. The first if then block tests whether the user has entered any numbers into AnswerBox, providing one set of instructions for the app to follow if the user has entered numbers and different instructions if the box is empty.
If the user has entered an answer, the second if then block tests the answer and then tells the app what to do depending on whether it is right or wrong. Here is the code for programming this nested conditional.

To place the blocks that test whether the user has entered an answer, click CheckAnswerBtn in the Blocks pane and drag the whenCheckAnswerBtn.Click block ➊ to the Viewer. Then, in the Blocks pane, click the Control blocks drawer, drag an if then block ➋ to the Viewer, and snap it inside the whenCheckAnswerBtn.Click block next to the word do. Since we’ll need an else statement for this conditional, click the if then block’s blue mutator icon, and drag an else block into the if then block in the dialog that opens.
Then, from the Logic blocks drawer, drag in an = comparison operator block ➌ next to the word if, and click the drop-down arrow by the = sign to select the not equal sign, ≠. To fill the ≠ block’s operand sockets, click AnswerBox in the Blocks pane and drag its AnswerBox.Text block ➍ into the left socket, then click the Text blocks drawer and drag an empty string block ➎ into the right socket. We’ve now set up the test condition that checks whether AnswerBox is empty.
Preparing to Evaluate the User’s Answers
Now we’ll tell the app what to do if AnswerBox isn’t blank (we’ll program what the app should do if it is blank later in this chapter). If AnswerBox isn’t blank, we want the app to disable CheckAnswerBtn so the user can’t click it again while the app’s checking the current answer. Then we want the app to set the value of the global answer variable to the number the user has entered into AnswerBox so the app can check it later, and to set the value of the global c variable to the value of global a multiplied by global b, which is the current problem’s correct answer. The following blocks program these three actions.

Click CheckAnswerBtn in the Blocks pane, drag its setCheckAnswerBtn.Enabledto block ➊ to the Viewer, and snap it into the if then block next to the word then. Then click the Logic blocks drawer, drag in a false block ➋, and snap it to the right of the setCheckAnswerBtn.Enabledto block. This prevents the user from clicking CheckAnswerBtn again while the app’s checking an answer.
Next, click the Variables blocks drawer and drag the set global answer to block ➌ into the if then block under the setCheckAnswerBtn.Enabledto block. Then click AnswerBox in the Blocks pane, drag in its AnswerBox.Text block ➍, and snap it to the right of the set global answer to block. This sets the value of the answer variable to the number the user entered into AnswerBox so we can compare that number with the correct answer.
Now, click the Variables blocks drawer and drag the set global c to block ➎ into the if then block under the set global answer to block. Then click the Math blocks drawer, drag in the multiplication operator block ➏, and snap it to the right of the set global c to block. To fill the multiplication block’s operand sockets, click the Variables blocks drawer and drag the get global a block ➐ into the left socket and the get global b block ➑ into the right socket. These blocks set the value of variable c to the value of variable a multiplied by the value of variable b, which is the correct answer to the problem.
So far, the blocks say: if AnswerBox isn’t blank, disable CheckAnswerBtn, then set the value of answer to the number entered by the user, and set the value of c to the correct answer.
Testing Our Second Condition: Evaluating the Answers
Now we’ll tell the app to compare answer and c and then do one thing if they are equal, which means the user’s answer to the problem is correct, and another thing if they aren’t equal, which means the user’s answer is wrong.
We’ll start by placing the blocks that set up the second test condition.

In the Blocks pane, click the Control blocks drawer and drag another if then block ➊ to the Viewer inside the first if then block under the set global c to block. Then, click this new if then block’s blue mutator icon to the left of the word if, and drag an else block into the if then block in the dialog that opens.
Then, from the Math blocks drawer, drag in an = comparison operator block ➋ next to the word if. To fill the = block’s operand sockets, click the Variables blocks drawer and drag the get global answer block ➌ into the left socket and the get global c block ➍ into the right socket. These blocks set up our second test condition and check whether the user’s answer matches the correct answer.
Handling Correct Answers
The next blocks tell the app what to do if the value of the two variables is the same, meaning the user’s answer is correct.
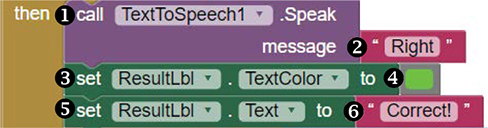
Click TextToSpeech1 in the Blocks pane and drag its callTextToSpeech1.Speak block ➊ into the second if then block next to the word then. Set the argument for its message parameter to Right by snapping an empty string block ➋ from the Text drawer next to the word message, clicking the string block’s text area, and entering Right.
Next, click ResultLbl in the Blocks plane and drag its setResultLbl.TextColorto block ➌ into the second if then block under the callTextToSpeech1.Speak block. Then click the Colors blocks drawer, drag in the green color block ➍, and snap it to the right of the setResultLbl.TextColorto block.
Now click ResultLbl in the Blocks plane again and drag its setResultLbl.Textto block ➎ into the second if then block under the setResultLbl.TextColorto block. Click the Text blocks drawer, drag in an empty text string block ➏, snap it to the right of the setResultLbl.Textto block, and enter Correct! into the text string block’s text area. If the user’s answer is correct, these blocks direct the app to say so and show the result in green in the Label.
Let’s pause now to live-test again. If you’ve placed the blocks as shown, after you enter correct answers to problems and click CheckAnswerBtn, you should hear the device say “Right” and see the word “Correct!” in green text to the right of CheckAnswerBtn. Also, if you try to click CheckAnswerBtn again before the app checks your answer, the button shouldn’t work. Nothing should happen yet when you enter an incorrect answer. Make sure this part of the app is working correctly before continuing.
Increasing the Score
The next blocks increment and display the user’s score, which means we first need the app to count each answer the user gets right.

To program this, click the Variables blocks drawer, drag the set global score to block ➊ to the Viewer, and snap it inside the second if then block under the setResultLbl.Textto block. Then drag an addition operator block ➋ from the Math drawer and snap it to the right of the set global score to block. Now click the Variables blocks drawer again, and drag the get global score block ➌ into the addition block’s left operand socket and a 1 number block from the Math drawer ➍ into its right operand socket. These blocks add 1 to the current value of the score variable each time the user answers a problem correctly.
The next blocks display the user’s score in ScoreLbl. In the Blocks pane, click ScoreLbl, drag the setScoreLbl.Textto block ➎ to the Viewer, and snap it inside the second if then block under the set global score to block. Then click the Text blocks drawer, drag a join block ➏ to the Viewer, and snap it to the right of the setScoreLbl.Textto block.
For the join block’s top input, drag in an empty string block ➐ from the Text blocks drawer, click the string block’s text area, and enter Your Score: (including a space after the colon). Then, for the join block’s bottom input, click the Variables blocks drawer and drag in the get global score block ➑.
Let’s pause here to live-test again. If you’ve placed the blocks as shown, after you enter correct answers to problems and click CheckAnswerBtn, you should see the score display under AnswerBox in ScoreLbl. Nothing should happen yet when you enter an incorrect answer. Make sure this part of the app is working correctly before you move on.
Handling Incorrect Answers
The blocks in the prior section told the app what to do when the user answers a problem correctly. The blocks shown here complete the else portion of the second if then else block and guide the app’s behavior when the user’s answer is wrong.
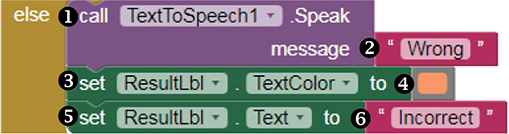
First we’ll place the blocks that make the app speak to tell the user the answer is wrong. Click TextToSpeech1 in the Blocks pane and drag its callTextToSpeech1.Speak block ➊ into the second if then block next to the word else. Set its message to “Wrong” by snapping an empty string block ➋ from the Text drawer next to the word message, clicking the string block’s text area, and entering Wrong.
Next, click ResultLbl in the Blocks plane and drag its setResultLbl.TextColorto block ➌ into the second if then block under the second callTextToSpeech1.Speak block. Then click the Colors blocks drawer, drag in the pink color block ➍, and snap it to the right of the setResultLbl.TextColorto block.
Then click ResultLbl in the Blocks pane again and drag its setResultLbl.Textto block ➎ into the second if then block under the second setResultLbl.TextColorto block. Now click the Text blocks drawer and drag in an empty text string block ➏, snap it to the right of the setResultLbl.Textto block, and enter Incorrect into the text string block’s text area. If the user’s answer is incorrect, these blocks have the app say so and show that result in pink in ResultLbl.
Try live-testing now by entering an incorrect answer and clicking CheckAnswerBtn. If you’ve placed the blocks as shown, you should now hear the device say “Wrong” and see the word “Incorrect” in pink text to the right of CheckAnswerBtn. Make sure this part of the app is working correctly before continuing.
Handling an Empty Answer Box
Until now, the blocks for this step have told the app what to do when the user clicks the CheckAnswerBtn after entering a number into AnswerBox. Now, with the following blocks, we tell the app what to do when the user clicks CheckAnswerBtn when AnswerBox is empty.

Click Notifier1 and drag its callNotifier1.ShowAlert built-in method block ➊ into the second else socket. Then, in the Blocks pane, click the Text blocks drawer and drag an empty string block ➋ into the socket for the method’s notice parameter.
This notice parameter holds information the method needs in order to show an alert. Add that notice by clicking the string block’s text area and entering No answer/Too late!. These blocks direct the app to display a small pop-up notice when the user clicks CheckAnswerBtn without entering an answer.
Now that you’ve fully programmed CheckAnswerBtn, let’s live-test again. If you’ve placed the blocks as shown, once you’ve entered an answer and clicked CheckAnswerBtn, you should hear and see whether it’s right or wrong, and you should see the score displayed under AnswerBox in ScoreLbl. If you click CheckAnswerBtn and haven’t entered an answer in time, you should see a pop-up alert. If any part of this action is working incorrectly, debug your program. Once the Check Answer button is working correctly, close the AI2 Companion on your device, and let’s move on to program the last part of the app: the event handler for EndBtn.
STEP 5: ENDING PRACTICE AND SHOWING THE FINAL SCORE
Let’s now program step 5 of the app, where the user presses EndBtn to stop practicing and see the final score as well as the percentage of problems answered correctly. We’ll create one additional global variable for this part, percentage, which you can initialize to the value of 0.
Now we can program the EndBtn event handler as shown here.

Once the user clicks the button, the first thing we need to do is stop new problems from showing every 5 seconds. To do this, click EndBtn in the Blocks pane and drag the whenEndBtn.Click block ➊ to the Viewer. Then click Clock1 in the Blocks pane, drag the setClock1.TimerEnabledto block ➋ to the Viewer, and snap it inside the whenEndBtn.Click block next to the word do. Then, in the Blocks pane, click the Logic blocks drawer, drag the false block ➌ to the Viewer, and snap it to the right side of the setClock1.TimerEnabledto block. These blocks disable the Clock’s timer so the app stops displaying new problems.
Hiding Elements We Don’t Need
We also want ProblemLbl, HorizontalArrangement1 (which contains AnswerBox, CheckAnswerBtn, and ResultLbl), and EndBtn to disappear, since we no longer need them on the screen. Here are the blocks that hide components the user no longer needs.

To program this behavior, click ProblemLbl in the Blocks pane, drag the setProblemLbl.Visibleto block ➊ to the Viewer, and snap it inside the whenEndBtn.Click block under the setClock1.TimerEnabledto block. Then, in the Blocks pane, click the Logic blocks drawer, drag the false block ➋ to the Viewer, and snap it to the right side of the setProblemLbl.Visibleto block.
These blocks reset the Visible property for ProblemLbl to false so that no problem shows after the user clicks EndBtn. Now place the blocks at ➌, ➍, ➎, and ➏ to do the same for HorizontalArrangement1 and EndBtn, so that after clicking EndBtn, all the user will see on the screen is the score and percentage correct.
Calculating the Percentage of Correct Answers
The app needs to compute the percentage of correct answers before displaying it. The following blocks tell the app how to compute and store the user’s percentage.

Click the Variables blocks drawer, drag the set global percentage to block ➊ to the Viewer, and snap it inside the whenEndBtn.Click block under the setEndBtn.Visibleto block. Then drag a multiplication operator block ➋ from the Math drawer and snap it to the right of the set global percentage to block.
Now click the Math drawer again, drag a division operator block ➌ into the multiplication block’s first operand socket, and drag a 100 number block ➍ into the multiplication block’s second operand socket. Return to the Variables blocks drawer and drag the get global score block ➎ into the division block’s left operand socket and the get global problems block ➏ into its right operand socket. These blocks compute the percentage of problems answered correctly by dividing the user’s score by the total number of problems and multiplying that result by 100.
Showing the Percentage of Correct Answers
Now we’ll display that percentage for the user with the blocks shown here.
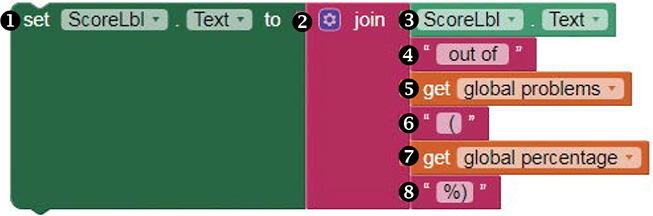
In the Blocks pane, click ScoreLbl, drag the setScoreLbl.Textto block ➊ to the Viewer, and snap it inside the whenEndBtn.Click block under the set global percentage to block. Then click the Text blocks drawer, drag a join block ➋ to the Viewer, and snap it to the right of the setScoreLbl.Textto block. Now click the join block’s mutator icon to add another four string input sockets.
For the join block’s first input, click ScoreLbl and drag in its ScoreLbl.Text block ➌. For the join block’s second input, drag in an empty string block ➍ from the Text blocks drawer, click the string block’s text area, and enter out of (including spaces before the word out and after the word of). For the join block’s third input, click the Variables blocks drawer and drag in the get global problems block ➎.
For its fourth input, drag in another empty string block ➏ from the Text blocks drawer, click the string block’s text area, and enter (, including a space before the parenthesis. For the fifth input, click the Variables blocks drawer again and drag in the get global percentage block ➐. Finally, for the join block’s bottom input, drag in an empty string block ➑ from the Text blocks drawer, click the string block’s text area, and enter %).
These blocks display the user’s score and percentage correct onscreen. For instance, if the user’s score is 20 and the total number of problems is 100, ScoreLbl should display “Your Score: 20 out of 100 (20%)”.
TESTING THE APP
Now we can test the completed app! First, move back to Screen1 by selecting it in the drop-down above the Blocks Viewer. Then, reset the connection to AI2 Companion by clicking Connect ▸ Reset Connection in the top menu bar and then Connect ▸ AI Companion. Next, scan the QR code with your device’s AI2 Companion app.
When the app opens on your device, you should hear the welcome message. Click Start Practicing to move to the next screen. There you should see a new problem appear every 5 seconds and, when you click Check Answer, if your answer TextBox is not empty, you should hear and see whether your answer’s right or wrong, and see the score displayed under AnswerBox. If you click Check Answer and haven’t typed an answer, you should see a pop-up alert.
Now click EndBtn and all components should disappear from the screen except for ScoreLbl, which should correctly display your score and percentage of problems correct. If you placed the blocks correctly, the app should work as expected. You’ve successfully created the “Multiplication Station” quiz app!
SUMMARY
In this chapter, you built the “Multiplication Station” quiz app, where users answer random, timed multiplication problems, learn whether their answers are correct, earn points for correct answers, and view the score and percentage of correctly answered problems.
In the process of building this app, you learned how to use the sophisticated selection control structure, which controls the flow of a program by evaluating conditions and making decisions. To do this, you used App Inventor’s Control blocks along with its pseudorandom number generator and Math and Logic operator blocks. You also created and manipulated data stored in several variables and learned to use the TextToSpeech and Notifier components to communicate with app users.
In the next chapter, you’ll learn how to create and process lists using Lists blocks as we build the “Beat the Bus” app, which uses your device’s GPS and location-sensing capabilities to display your school bus’s location and text your friends or family with periodic updates along the route.
ON YOUR OWN
Save new versions of “Multiplication Station” as you modify and extend it for the following exercises. You can find solutions online at https://nostarch.com/programwithappinventor/.
Change the app so that if a user’s answer is incorrect, new problems stop appearing and the app displays the correct answer, after which the user may continue the practice session. Where will the app display the correct answer? How will the user resume practice, if desired? Will you need another if then block, additional components, or more variables?
Extend the app so that the user can choose to practice multiplication or division. How will your algorithm change? What components and blocks will you need to add and modify?