
5
BEAT THE BUS: TRACKING LOCATION WITH MAPS AND SENSORS

In Chapters 3 and 4, we used variables to store and process information, which allowed us to track and report data to users. In the “Fruit Loot” and “Multiplication Station” apps, we created variables that hold one value at a time, like the game score, number of fruits dropped, and percentage of multiplication problems correct.
But imagine how much more powerful our apps would be if we could store and manipulate multiple values in a single variable! For example, we could display a game’s top 10 scores or allow users to choose from a list of 50 states, without needing to create a different variable for each score or state.
In most programming environments you can store multiple values in a data structure called an array. In App Inventor, you can store multiple values in variables using the built-in Variables, Lists, and Text blocks. The following variable stores multiple values as a list.
You can use Lists blocks to manipulate list variables by adding items to a list, searching inside a list, or removing items from a list. You can also access each list item by referring to its index, the number of its position in the list. For instance, the first item in the size list, S, is at index 1, the second item is at index 2, and so on.
NOTE
App Inventor numbers indexes differently from most traditional programing languages, which number the first item in a list as index 0, the second item as index 1, and so on.
In this chapter, we’ll work with four lists that contain static (unchanging) preset values. Three of the lists will be interrelated, so that you’ll use an index of one list to access values in the two other lists. We’ll also create our first local variable to simplify a somewhat complex event handler.
BUILDING THE “BEAT THE BUS” APP
In this chapter, along with the four lists just mentioned, you’ll use ListPicker, LocationSensor, Texting, and some of App Inventor’s newer Maps components to create the “Beat the Bus” app. This app allows your parents or friends to track your location without using the GPS and location-sensing functions on their phones, which may drain their batteries. Instead, this app relies on the location sensor on your own device.
Log into App Inventor, create a project named BeatTheBus, and click OK.
DECOMPOSING “BEAT THE BUS”
In “Beat the Bus,” the user activates location tracking by selecting a telephone number and destination from preset lists. The app then sends periodic text messages to the selected telephone number, showing the user’s location along the route.
We can decompose the app into the following steps:
When a user opens the app, display a Map showing the user’s current location with a Marker pointing to the user’s home. Show a ListPicker for the user to select a phone number. Once the user selects a number, show a ListPicker for the user to select a destination.
Before the user selects a destination, set the ListPicker options from a list of locations.
Once the user selects a destination, move the Map and Marker to the selected destination, and text the starting location and destination to the selected number.
When the user’s location is 5 miles or less away from the selected destination, periodically text the user’s location to the selected number.
You’ll need the following components:
Global variable (4) to store telephone numbers, destinations, latitudes, and longitudes
Image for app design
ListPicker (2) for the user to select from telephone number and destination lists
Local variable to store distance
LocationSensor to provide periodic data related to the user’s location
Map to show the user’s geographic location and hold the Marker
Marker to point to the user’s selected destination
Texting to send text messages
Now let’s lay out the app.
LAYING OUT “BEAT THE BUS” IN THE DESIGNER
To make sure that all components in Screen1 will be centered at the top of the screen, click the drop-down arrow under AlignHorizontal and select Center: 3. Next, change the screen’s background color to yellow by clicking Default under BackgroundColor and then Yellow when the color list dialog opens. Finally, remove the check mark under TitleVisible to hide the title of the screen when the app runs.
Next, let’s drag the necessary components from their drawers in the Palette pane onto the Viewer pane and adjust their properties as we go. First, drag in an Image from the User Interface drawer and set its Height to Fill parent. Then upload the picture to display by clicking the text box under Picture and following the image upload instructions outlined in “Uploading a Picture” on page 27. Finally, click the checkbox under ScalePictureToFit so the image will take up the entire width of the screen.
To display a Map centered at your user’s starting location, place a Map component from the Maps drawer under Image1. Note that you must place a Map on the screen before you can add any other Maps component. Adjust the Map’s properties by replacing the coordinates in the CenterFromString text box to the latitude and longitude for your app’s starting address, separated by a comma and space.
NOTE
You can locate any place on a map by its latitude and longitude coordinates. The latitude of a place is its distance north or south of the equator, while the longitude is its distance east or west of the prime meridian. You can find the latitude and longitude coordinates for a street address by entering it into the Latitude/Longitude Finder tool at https://www.latlong.net/.
Then, to change the Map’s height to 50 percent so it takes up half the vertical screen, click the text box under Height; when the dialog opens, input 50 in the text box next to the word percent and click OK. Next, set its Width to Fill parent, click the checkbox under ShowUser so an icon representing the user will show on the Map and track the user’s location, and change the Map zoom level from the default 13 to 10 by inputting 10 in the ZoomLevel text box.
Now drag a Marker from the Maps drawer onto the Map. Adjust the Marker in the Properties pane by clicking the text box under Latitude and entering the latitude for the user’s home address, then clicking the text box under Longitude and entering its longitude.
Next, to let users select a destination and a phone number to send it to, under Map1, drag two ListPickers from the User Interface drawer to the Viewer. Rename ListPicker1 to NumberPicker and ListPicker2 to PlacePicker. In the Properties pane for both, change the background color to yellow by clicking Default under BackgroundColor and then Yellow when the color list dialog opens. Then make the text bold by clicking the checkbox under FontBold, and make the text larger by inputting 25 in the FontSize text box. Replace the default Text for ListPicker1 by entering Select a Number in the Text text box for NumberPicker and the default Text for ListPicker2 by entering Select a Place in the Text text box for PlacePicker.
Change the Width for both ListPickers to Fill parent, and change the color of the items in the selection drop-downs to yellow by clicking Default under ItemTextColor and then Yellow when the color list dialog opens. Then, in the Properties pane for PlacePicker, click the checkbox under Visible to remove the check mark and keep PlacePicker from showing when the app first opens. We’ll program it later to appear after the user picks a phone number.
Finally, drag in the non-visible components: the LocationSensor component from the Sensors drawer and the Texting component from the Social drawer. In the Properties pane, change the LocationSensor’s TimeInterval from the default 60,000 milliseconds to 1,000 by choosing 1000 in the drop-down box below TimeInterval. This means that the app’s LocationSensor will report location changes each second if location data is available and the location has changed since the last interval. We’re making this change so that later you can program your app to text updated location information as frequently as every second after new data becomes available.
Now that we’ve added LocationSensor1, click the Map in the Components pane and, in its Properties pane, choose its associated LocationSensor by clicking None under LocationSensor, selecting LocationSensor1 in the dialog that opens, and clicking OK.
Screen1 should look like Figure 5-1.
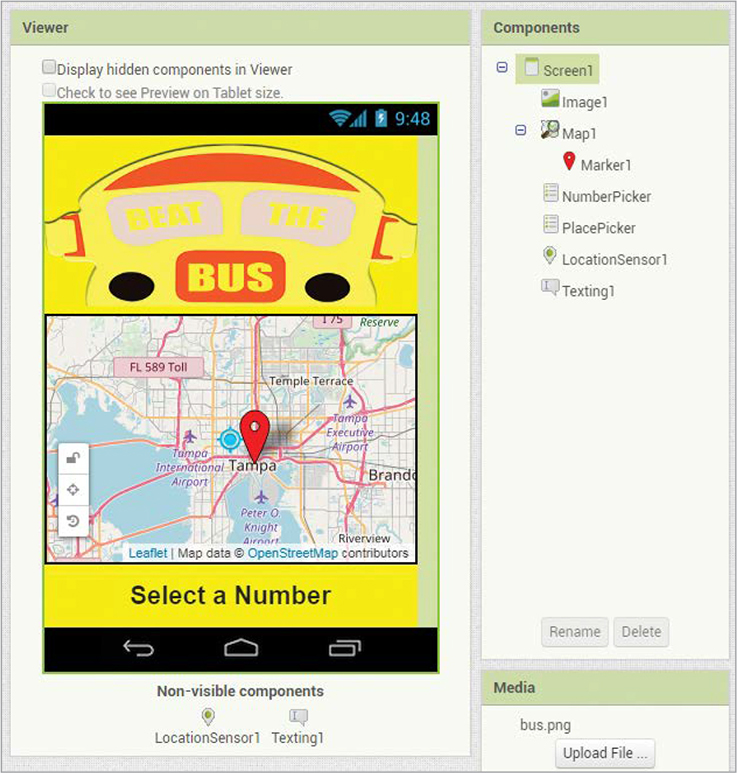
Figure 5-1: The Viewer, Component, and Media panes after laying out “Beat the Bus”
In the Viewer pane, you should see all visible components on the screen and the non-visible components under Screen1. In the Components pane, you should see a list of every component you’ve dragged onto the Viewer pane. In the Media pane, you should see the image you’ve uploaded.
PROGRAMMING “BEAT THE BUS”
Now that you’ve laid out all components, you’re ready to program the app in the Blocks Editor. For “Beat the Bus,” we’ll program five event handlers. Four of these respond to events related to the two ListPickers. The other one directs the app’s action each time the LocationSensor detects a location change. We’ll also create four global list variables and one local variable to store important information, and we’ll use two if then blocks to test conditions to direct the flow of the app’s action.
Click the Blocks button to switch to the Blocks Editor, and let’s start programming the app’s four steps.
STEP 1: CHOOSING THE PHONE NUMBER TO TEXT
When the screen opens, we want the user to see the Map and Marker, both with the properties we set in the Designer. We also want to display NumberPicker, from which the user will select a telephone number for the app to text. Let’s start our code by telling the app what to do before and after the user clicks NumberPicker and selects a number.
Creating a Global List Variable
We’ll use a global list variable to store the telephone numbers in NumberPicker by creating and initializing the phoneNumbers variable.

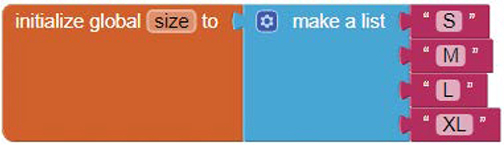
Click the Variables block drawer and drag an initialize global name block ➊ to the Viewer, click name, and replace it with phoneNumbers. Then drag a make a list block ➋ from the Lists drawer and snap it to the right side of the initialize global phoneNumbers block.
Now, in order to add three telephone numbers to the list, we need to add another list item input to the make a list block’s two default inputs. Click the blue mutator icon to the left of the words make a list, and drag one additional item block to the make a list block in the dialog that opens.
Then, drag three empty string blocks ➌ from the Text drawer and snap them into the sockets of the make a list block. Enter a telephone number into each empty string block, without any dashes or spaces (if you don’t have a phone number for any of the empty strings, enter 1111111). Together, these blocks create the global phoneNumbers variable, which we can use in all our event handlers.
Handling NumberPicker’s BeforePicking Event
Now that we’ve created phoneNumbers, we have the data we need for NumberPicker. Before the user selects from NumberPicker, we want the app to set the choices that the user will see in NumberPicker to the items in phoneNumbers. Then, after the user selects a number, we want NumberPicker to disappear, replaced by PlacePicker. Here are the event handlers that we need for step 1.
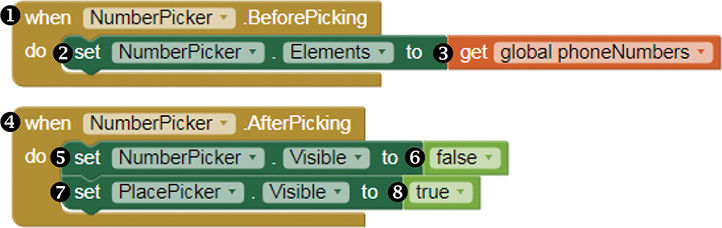
In the Blocks pane, click NumberPicker and drag the whenNumberPicker.BeforePicking event handler block ➊ to the Viewer. Then, click NumberPicker again and drag its setNumberPicker.Elementsto block ➋ next to the word do. Next, in the Blocks pane, click the Variables blocks drawer and drag the get global phoneNumbers block ➌ to the right of the setNumberPicker.Elementsto block. These three blocks create the BeforePicking event handler, which sets the telephone number choices that the user will see in NumberPicker to the telephone numbers in the phoneNumbers variable. Next we’ll create the handler for the AfterPicking event.
Handling NumberPicker’s AfterPicking Event
To replace NumberPicker with PlacePicker after the user chooses a telephone number in NumberPicker, drag the whenNumberPicker.AfterPicking event handler block ➍ to the Viewer. Then, drag the setNumberPicker.Visibleto block ➎ next to the word do. Next, click the Logic blocks drawer and snap the false block ➏ to the right of the setNumberPicker.Visibleto block. Then, click PlacePicker in the Blocks pane and place the setPlacePicker.Visibleto block ➐ under the setNumberPicker.Visibleto block. Finally, click the Logic blocks drawer again and snap the true block ➑ to the right of the setPlacePicker.Visibleto block.
To see how the blocks for step 1 work, live-test with a phone, as outlined in “Live-Testing Your Apps” on page xxii. Once you click Connect ▸ AI Companion in the top menu bar and scan the QR code with your phone’s AI2 Companion app, your “Beat the Bus” app should open on your phone. As long as the blocks are placed as shown, under the app’s title image, you should see the Map with the Marker pointing to the latitude and longitude you set in the Properties pane in the Designer. You may also see a user icon located at your current location, if your location and the Marker point are both visible at the Map’s zoom level.
Below the map, you should see NumberPicker. When you click it, the list of numbers in your phoneNumbers variable should appear, and, after you select one, NumberPicker should disappear and PlacePicker should appear. That’s all that should happen for now. Leave the app open on your phone to keep live-testing.
STEP 2: CHOOSING THE DESTINATION
In step 2, to code the BeforePicking event for the PlacePicker, we’ll need to create a new global list variable called places to store the location choices we’ll display to the user. We’ll also create two related global list variables: placeLats, which will hold the latitudes for the destination options, and placeLongs, which will hold the longitudes.

By creating these as global variables, we can use them in the BeforePicking event handler for PlacePicker and in all other handlers in the app to access the name, latitude, and longitude for the user’s selected location.
Creating Additional Global List Variables
For each variable, click the Variables block drawer and drag an initialize global name block ➊ to the Viewer, click name, and replace it with the variable name. Then drag a make a list block ➋ from the Lists drawer and snap it to the right side of the initialize global block. Finally, drag two empty string blocks ➌ from the Text drawer and snap them into the sockets of the make a list block, and enter data into each empty string block.
When you enter the data for placeLats and placeLongs, be sure that you place the coordinate values in the same positions as their corresponding item in the places variable. For example, the first value you enter for placeLats should be the latitude of the first value in your places variable, which is home in this list. The first value you enter for placeLongs should be the longitude of the first value in your places variable. Likewise, the second value you enter into placeLats must be the latitude for the second value in your places variable (coding class in this list), and the second value you enter into placeLongs should be the longitude for the second value in places.
Handling PlacePicker’s BeforePicking Event
Now that we’ve created places, we have the data we need for PlacePicker. Before the user can select from PlacePicker, we want the app to set the choices that the user will see to the items in places. The PlacePicker BeforePicking event handler does this.

In the Blocks pane, click PlacePicker and drag the whenPlacePicker.BeforePicking event handler block ➊ to the Viewer. Then, click PlacePicker again and drag its setPlacePicker.Elementsto block ➋ next to the word do. Next, in the Blocks pane, click the Variables blocks drawer and drag the get global places block ➌ to the right of the setPlacePicker.Elementsto block. Those three blocks create the BeforePicking event handler, which sets the destination choices that the user will see in PlacePicker to the items in the places variable.
To see how these new blocks work, live-test again. If the blocks are placed as shown, once you choose a number and NumberPicker disappears, you should see PlacePicker. When you click it, the list of destinations in your places variable should appear, and, after you select one, nothing else should happen for now.
STEP 3: STARTING LOCATION TRACKING
Let’s now program the PlacePicker AfterPicking event handler.
These blocks make PlacePicker disappear, move the Marker to the user’s selected destination, and center the Map at that location. They also tell the app to text the user’s starting location and destination to the selected phone number.
Making PlacePicker Disappear
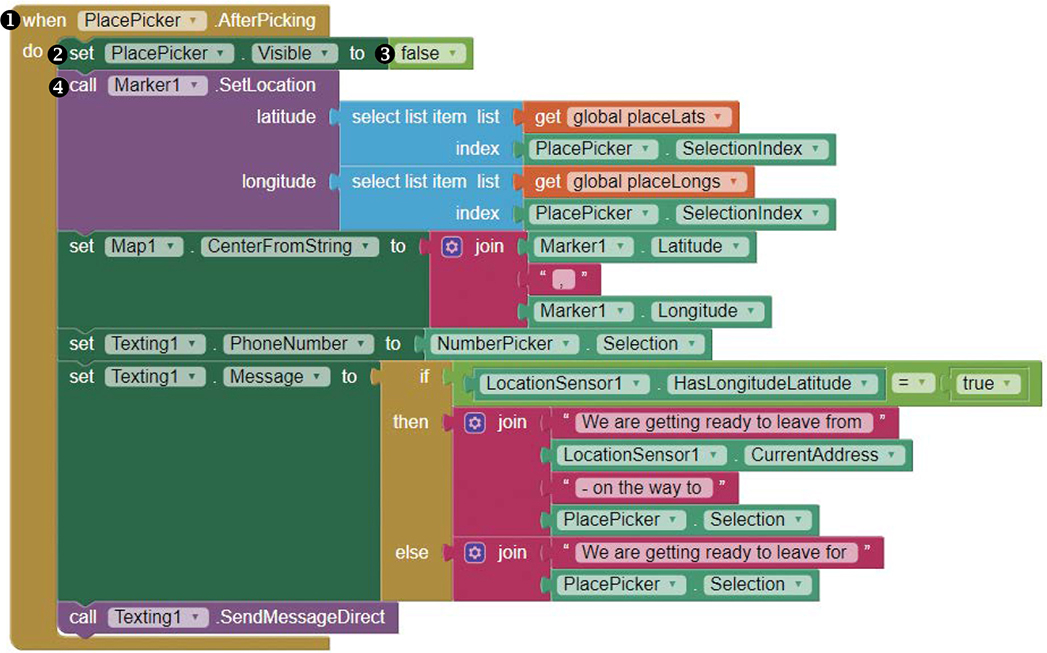
In the Blocks pane, click PlacePicker and drag the whenPlacePicker.AfterPicking event handler block ➊ to the Viewer. Then, click PlacePicker again and drag its setPlacePicker.Visibleto block ➋ next to the word do. Next, in the Blocks pane, click the Logic blocks drawer, drag the false block ➌ to the Viewer, and snap it to the right of the setPlacePicker.Visibleto block. These blocks make PlacePicker disappear after the user chooses a destination.
Resetting the Map Marker Location
Now we’ll add the blocks that set the location of the Marker to the destination selected by the user. In the Blocks pane, click Marker1, drag the callMarker1.SetLocation method block ➍ to the Viewer, and snap it inside the whenPlacePicker.AfterPicking block under the setPlacePicker.Visibleto block. The Marker1 SetLocation method requires arguments for two parameters, latitude and longitude, and will set Marker1 on the Map to the location at the latitude and longitude values provided. We want those values to be the latitude and longitude for the destination chosen by the user in PlacePicker, which we get from the placeLats and placeLongs variables.
Setting the Map Marker Latitude and Longitude
Let’s take a closer look at the blocks in the AfterPicking event handler that set the latitude and longitude parameter arguments for the Marker1 SetLocation method to the latitude and longitude for the user’s destination.

Click the Lists blocks drawer, drag a select list item block ➊ to the Viewer, and snap it to the right of the callMarker1.SetLocation block, next to the word latitude. The select list item block requires arguments for list and index, and then, from the list provided, will select the item at the specified index position.
To provide those arguments, click the Variables blocks drawer and drag the get global placeLats block ➋ to the right of the select list item block next to the word list. Then click PlacePicker and drag the PlacePicker.SelectionIndex block ➌ next to the word index.
These blocks set the list argument for the select list item block to the placeLats variable and the index argument to PlacePicker.SelectionIndex (the index of the item the user selected in the related PlacePicker, which pulls its data from the places variable). For instance, if the user chose home as the destination, PlacePicker.SelectionIndex would equal 1, since home is the first element in PlacePicker from the places variable. If the user selected coding class, PlacePicker.SelectionIndex would equal 2. Altogether, these blocks set the latitude for Marker1 to the latitude listed in the placeLats variable at the PlacePicker.SelectionIndex position, which is the latitude for the user’s selected destination.
To set the longitude for Marker1, copy the blocks at ➊, ➋, and ➌ and snap the copy to the right of the callMarker1.SetLocation block, next to the word longitude ➍. Then change the list argument in the duplicate blocks by clicking the drop-down arrow next to get global placeLats and selecting get global placeLongs ➎. These blocks set the longitude for Marker1 to the longitude value listed in the placeLongs variable at the PlacePicker.SelectionIndex position. The app will use this longitude and the latitude we just set to move Marker1 to the destination selected by the user.
Re-centering the Map
Now let’s add the blocks to re-center the Map to the same location—the selected destination.

In the Blocks pane, click Map1, drag the setMap1.CenterFromStringto block ➊ to the Viewer, and snap it inside the whenPlacePicker.AfterPicking block under the callMarker1.SetLocation method block. Then, click the Text blocks drawer and drag a join block ➋ to the Viewer. Add an input to it by clicking the blue mutator icon to the left of the word join and dragging one additional string block to the join block in the dialog that opens.
Next, for the join block’s top input, click Marker1 in the Blocks pane and drag in the Marker1.Latitude block ➌. For the join block’s second input, drag in an empty string block ➍ from the Text blocks drawer, click the string block’s text area, and enter , . Then, for the join block’s bottom input, click Marker1 in the Blocks pane drawer again and drag in the Marker1.Longitude block ➎. After the user picks a destination, these blocks center the Map to Marker1’s latitude and longitude, which are the coordinates for the destination the user selected in PlacePicker.
Texting the Selected Phone Number
The last action we need to program for step 3 is the texting. After the user selects a destination, we want the app to text the destination and the user’s current location to the phone number the user chose. The following blocks in the AfterPicking event handler set the PhoneNumber for Texting1.
Click Texting1 in the Blocks pane, drag the setTexting1.PhoneNumberto block ➊ to the Viewer, and snap it inside the whenPlacePicker.AfterPicking block under the setMap1.CenterFromStringto block. Then click NumberPicker and drag the NumberPicker.Selection block ➋ to the Viewer to the right of the setTexting1.PhoneNumberto block. These blocks set the required phone number for Texting1 to the number selected by the user from the NumberPicker drop-down list.
Deciding the Message to Send
Now we need to add the conditional blocks that set the message for Texting1 to send. That message will consist of one statement if the app has received the user’s current longitude and latitude and another statement if the app has not yet received those coordinates. The next blocks in the AfterPicking event handler set the message.

Click Texting1 again, drag the setTexting1.Messageto block ➊ to the Viewer, and snap it inside the whenPlacePicker.AfterPicking block under the setTexting1.PhoneNumberto block.
Then, click the Control blocks drawer, drag an if then else block with a left plug ➋ to the Viewer, and snap it to the right of the setTexting1.Messageto block. The left plug indicates that this block is a return block, which means it returns a value after evaluating a condition rather than only executing commands like the if then blocks we’ve used before.
Here, the if then else block directs the app to evaluate a condition and return one of two joined strings to use for Texting1’s Message—either the value from the blocks in the then socket or the value from the blocks in the else socket. To provide the condition we want the app to evaluate, click the Logics blocks drawer and drag an = comparison block ➌ to the Viewer next to the word if. To fill the = comparison operator block’s left operand socket, click LocationSensor1 in the Blocks pane and drag in its LocationSensor1.HasLongitudeLatitude block ➍. Fill its right operand socket by clicking the Logic blocks drawer and dragging in the true block ➎. So far, these blocks set the test condition for the app to evaluate in order to determine the message to text, which is whether LocationSensor1 has gotten the user’s longitude and latitude.
Texting One Message If the App Knows the User’s Longitude and Latitude
The next blocks tell the app the message to send if LocationSensor1 has the user’s longitude and latitude, which means the test condition evaluates to true.

Click the Text blocks drawer and drag a join block ➊ to the Viewer to the right of the word then in the if then else block. Add two more inputs to the join block by clicking the blue mutator icon to the left of the word join and dragging two additional string blocks in the dialog that opens. For the join block’s top input, drag in an empty string block ➋ from the Text blocks drawer, click the string block’s text area, and enter We are getting ready to leave from (with a space after the word from).
For the join block’s second input, click LocationSensor1 in the Blocks pane and drag in its LocationSensor1.CurrentAddress block ➌. For the join block’s third input, drag in an empty string block ➍ from the Text blocks drawer, click the string block’s text area, and enter - on the way to (with a space after the word to). Then, for the join block’s bottom input, click PlacePicker in the Blocks pane drawer and drag in its PlacePicker.Selection block ➎. These blocks set the message for the app to send if the app’s LocationSensor has received the user’s longitude and latitude, which means the message will indicate the user’s destination and also include the user’s starting point—the current address.
Texting a Different Message If the App Doesn’t Know the User’s Longtitude and Latitude
Next, we’ll add the blocks that dictate the message the app will text if LocationSensor1 hasn’t yet received those coordinates, meaning the if then else test condition evaluates to false.

Click the Text blocks drawer and drag another join block ➊ to the Viewer to the right of the word else in the if then else block. For the join block’s top input, drag in an empty string block ➋ from the Text blocks drawer, click the string block’s text area, and enter We are getting ready to leave for (with a space after the word for).
For the join block’s bottom input, click PlacePicker in the Blocks pane drawer and drag in another PlacePicker.Selection block ➌. These blocks set the message for the app to send to a statement that indicates the destination but does not include the user’s current address, since the app’s LocationSensor doesn’t yet know it.
Sending the First Text Message
Finally, click Texting1 again and drag its callTexting1.SendMessageDirect block into the whenPlacePicker.AfterPicking block under the setTexting1.Messageto block. This block sends the text message.
In plain English, the blocks for step 3 move the map Marker to the user’s selected destination, re-center the map, and then direct the app to decide the message to text based on whether LocationSensor1 has retrieved the user’s current latitude and longitude. If it has, the app should send a message to the selected telephone number that includes the user’s current location and the destination. If not, the app sends a message that includes only the destination.
Use both your tester phone and the phone with the selected phone number to live-test these blocks. If you’ve placed the blocks exactly as shown, once you choose a number and NumberPicker disappears, you should see PlacePicker. When you click it, the list of destinations in your places variable should appear.
After you select a destination, PlacePicker should disappear and your Map and Marker should shift to the selected destination’s latitude and longitude, if those properties are different from those you set in the Designer. Also, your phone should text a message to your selected number, as long as you have texting enabled on your phone. If anything’s not working as planned, take the time to debug before moving on. Then close the AI2 Companion app on your phone.
STEP 4: TRACKING THE JOURNEY
Let’s now program step 4 so that the app texts the user’s location to the selected phone number periodically as the user travels the route, but only when the user is less than or equal to 5 miles away from the selected destination. This means that we’ll need to use another conditional to check whether the user’s current location is within 5 miles of the chosen location. Use the following LocationChanged event handler blocks.

Click LocationSensor1 in the Blocks pane and drag the whenLocationSensor1.LocationChanged block ➊ to the Viewer. You’ll notice that this LocationChanged event handler provides arguments for four event parameters when the app’s location changes: the new location’s latitude, longitude, altitude, and speed. These parameters are local in scope, meaning we can use their values only in the event handler in which they’re created, just like the local variable we’ll create in the next section.
Creating a Local distance Variable
To simplify the code, we’ll use the arguments provided for the LocationChanged event handler parameters to create a local variable, distance, to hold the value of the app’s current distance from Marker1, which we’ve positioned on the Map at the user’s selected destination. Since distance is a local variable, we can use it in this event handler only.
Click the Variables blocks drawer and drag the initialize local name to block ➋ to the right of the whenLocationSensor1.LocationChanged block next to the word do. Click name in the initialize local name to block and replace it with distance. Then click Marker1 and snap its callMarker1.DistanceToPoint method block ➌ to the right of the initialize local distance to block. To fill the method block’s required latitude and longitude parameter sockets, mouse over the latitude event parameter above the word do and drag the get latitude block ➍ into the method’s latitude socket; then, mouse over the longitude event parameter above the word do and drag the get longitude block ➎ into the method’s longitude socket.
Now that we’ve created distance, we can use it in this event handler wherever we need to refer to the app’s current distance from the user’s selected destination.
Next, let’s direct the app to text information about the user’s location only if distance is less than or equal to 5 miles.
Deciding Whether to Text Current Distance
To test whether distance is less than or equal to 5 miles, we need to set another test condition using the following blocks.

Click the Control blocks drawer and drag an if then block ➊ inside the initialize local distance to block under the callMarker1.DistanceToPoint block. Now click the Math blocks drawer, drag an = comparison operator block ➋ to the Viewer next to the word if, and turn = into a ≤ comparison block by clicking the drop-down arrow to the right of the equal sign and selecting the less than or equal sign.
To fill the ≤ comparison block’s left operand socket, mouse over the local distance variable and drag in its get distance block ➌. To fill the ≤ comparison block’s right operand socket, click the Math blocks drawer, drag in a 8046.72 number block ➍ for the metric equivalent to 5 miles. This code sets the test condition that determines whether the user is less than or equal to 5 miles away from the selected destination. The condition must evaluate to true in order for the app to send a text message in this step.
Setting and Sending Text Messages Along the Route
The next blocks set the text of the message for the app to send if our test condition is met—that is, the user is less than or equal to 5 miles from the selected destination.
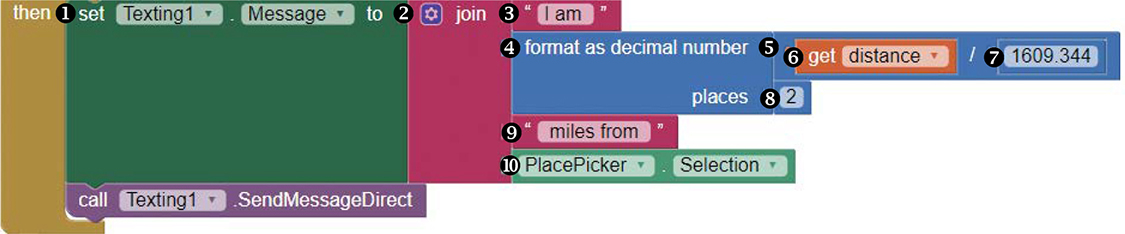
Click Texting1 and drag its setTexting1.Messageto block ➊ into the if then block next to the word then. Now, click the Text blocks drawer and drag a join block ➋ to the Viewer to the right of the setTexting1.Messageto block. Add two more inputs to it by clicking the blue mutator icon to the left of the word join and dragging two additional string blocks to the join block in the dialog that opens. For the join block’s top input, drag in an empty string block ➌ from the Text blocks drawer, click the string block’s text area, and enter I am (including a space after the word am).
For the join block’s second input, drag in a format as decimal block ➍ from the Math drawer and fill its number socket by dragging in a division operation block ➎, also from the Math drawer. Mouse over distance to drag its get distance block ➏ into the division block’s left operand socket. Then, drag a 1609.344 number block ➐ into the division block’s right operand socket for the metric equivalent to 1 mile. Finally, fill the format as decimal number block’s places socket with a 2 number block ➑ from the Math drawer. This second join block input computes the user’s distance in miles, presents it as a decimal number with two decimal places, and adds it to the text message the app will send. Since App Inventor calculates distances in meters, we’re converting it to miles for users in the US.
Next, fill the join block’s third input with another empty string block ➒ from the Text blocks drawer, click the string block’s text area, and enter miles from (including a space before the word miles and after the word from). Then, for the join block’s bottom input, click PlacePicker in the Blocks pane and drag in its PlacePicker.Selection block ➓.
Finally, click Texting1 again, and drag its callTexting1.SendMessageDirect block into the if then block under the setTexting1.Messageto block to send the message. These blocks set the text message to “I am [x.xx] miles from [selected destination]” and send it to the phone number the user selected.
Now, altogether, the blocks for step 4 tell the app to text the user’s location to the selected phone number periodically as the user is en route, but only if the user is less than or equal to 5 miles away from the destination.
Now we can test the completed app! To do so, you need to build the app and install it so you can run it as you are moving along the route. For testing, you can install the app on your phone quickly after creating a temporary QR code that you can scan with your phone’s AI2 Companion app.
WARNING
Please do not try to test this app while you are driving. If you test in a vehicle, have someone else drive so that you can safely operate and monitor the two phones. You also can test the app while walking.
With the app project open on your computer screen, click Build ▸ App ( provide QR code for .apk ) in the top menu bar, as shown in Figure 5-2.
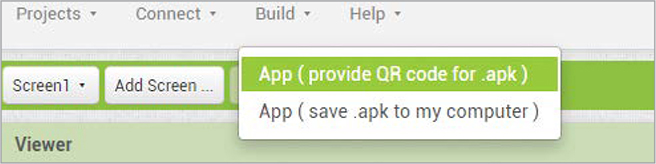
Figure 5-2: The Build menu link that creates the QR code you can scan to install the app
You should see a progress bar showing that the QR code is being generated. Once the code is ready, you should see a small window containing a temporary QR code link to your app’s source file. Scan the code with the AI2 Companion app on your phone and click OK to close the small window.
Note that since “Beat the Bus” is a nonmarket app, you’ll first need to make sure your phone’s settings allow installation of applications from “Unknown Sources.” When you install the app, be sure to allow it to receive text messages and access approximate location, precise location, and extra location provider commands.
Once you’ve installed and opened the app, you should see the Map with the Marker pointing to the latitude and longitude you set in the Properties pane in the Designer. You may also see a user icon located at your current location, if your location and the Marker are both visible at the Map’s zoom level.
You should also see NumberPicker, which should disappear after you click it and choose a number. Then you should see PlacePicker, which will disappear after you click it and select a destination. Next, your Map and Marker should shift to the selected destination’s latitude and longitude, if those properties are different from those you set in the Designer. The app should also text a message to your selected number.
As you travel along, you should see the user icon move occasionally on the Map, and when you get within 5 miles of your destination, the app should text periodic messages to your selected number until you close the app.
You may notice that, although you’ve set LocationSensor1 to check for location changes every second, the app may not send a message each second. According to the App Inventor documentation, the LocationSensor component receives location updates only when the location of the phone actually changes, and the chosen time interval is not guaranteed. Nonetheless, your selected phone number should receive several messages between the time you reach the 5-mile mark and arrive at the destination. Note that, if you feel the messages are coming in too frequently, you can increase the LocationSensor’s TimeInterval in the Designer.
If anything’s not working as planned, take time to debug. If you make any changes, you’ll need to reinstall the app to test them. If you placed the blocks correctly, the app should work as expected. You’ve successfully created the “Beat the Bus” tracking app!
SUMMARY
In this chapter, you built the “Beat the Bus” app, which uses App Inventor’s exciting LocationSensor, Texting, and Maps components along with ListPickers to allow others to track your location, without using the power-draining location services on their phone. While building this app, you learned how to create list variables that can hold multiple values and local variables that can make your code more efficient. You also continued to use the programming selection control structure to direct the app’s flow.
In Chapter 6, you’ll learn how to use App Inventor’s built-in Control and Logic blocks to control an app’s flow using the repetitive program structure. We’ll use more lists with that structure as we create the “Tic Tac Toe” game app, which allows users to play the classic two-person game and keeps track of the players’ turns.
ON YOUR OWN
Save new versions of “Beat the Bus” as you modify and extend it for the following exercises. You can find solutions online at https://nostarch.com/programwithappinventor/.
Change the app so that it also provides the destination street address in all text messages sent and retrieves that information from a list variable.
Change the app so that it requires users to enter the destination instead of choosing it from the preset list.
Extend the app for Android devices so that the app responds to specific text messages from the selected number by texting the user’s current location at that time. How will your algorithm change? What components and blocks will you need to add and modify?