
7
MULTIPLICATION STATION II: REUSING CODE WITH PROCEDURES

Sometimes you’ll want to reuse a section of code to complete a specific task you’ve completed before. In these situations, you can define or create a procedure that includes those lines of code, and then give that procedure a unique name.
This way, whenever you want to execute that task, you can call the procedure by name instead of writing the same lines of code over and over again. This also means that when you have to correct something in that code, you only have to fix the code inside the procedure once.
In this chapter, you’ll learn how to create procedures in App Inventor and use them to make the “Multiplication Station II” app. As you’ll see, procedures not only help you avoid repeating the same code, they also make long and complicated code more organized and easier to read.
PROCEDURES CAN TAKE PARAMETERS
Let’s use a simple example to see how procedures work. Say you’ve written code that calculates how many days there are until someone’s birthday. You can use those lines of code to create a procedure and give it a name like BdayCountDown. Now, whenever you need to count down to someone’s birthday, all you have to do is call the BdayCountDown procedure. Pretty handy!
Like the built-in methods we’ve used in some of our apps, a procedure might require parameters that you’ll have to declare and name when defining the procedure itself. In the birthday example, the BdayCountDown procedure would take a person’s birth month and day as parameters to calculate the result. This means that when calling BdayCountDown, you’ll need to provide the arguments that the procedure needs to complete that task. In this case, the procedure would take numbers (for the date of birth) as its arguments.
Since the arguments passed into the procedure at each call may be different, a procedure might produce a different result every time you call it. This makes sense in the birthday example, too: since most people have different birthdays, the procedure would return different values.
CREATING YOUR OWN PROCEDURE
You’ve already used several of App Inventor’s built-in procedures, both with and without parameters. For instance, in “Hi, World!” in Chapter 1, you used the call to the built-in SpeechRecognizer.GetText method to convert spoken messages to text. And in Chapter 3’s “Fruit Loot” app, you moved the ImageSprites around the Canvas using the ImageSprite.Move method call, which required x- and y-coordinates as parameters.
In addition to built-in methods, App Inventor provides blocks that let you create your own procedures, which can return results or not and can have numerous parameters or none at all. Once you create a procedure with its own unique name, App Inventor creates a block just for that procedure that you can use to call it, complete with sockets to plug in any parameter arguments. You’ll find the call block in the Procedures blocks drawer.
Let’s try creating our own procedures to change the code in some of the apps we’ve already made. We’ll refactor the code in “Fruit Loot” so that we don’t repeat the same blocks in the three EdgeReached event handlers that tell the app what to do after each fruit ImageSprite reaches the edge of the Canvas.
The following code shows the EdgeReached event handlers we coded in Chapter 3.
As you can see, we duplicated blocks to create the three separate EdgeReached event handlers for FruitSprite1, FruitSprite2, and FruitSprite3. In each copy, we changed only the few blocks that set the ImageSprite’s X property to make sure that the fruit ImageSprites never collide with each other as they fall down the Canvas.

Now compare this with the following code, which shows a backToTop procedure that completes the same tasks, but uses a lot fewer blocks if we call it within the event handlers for all three fruit ImageSprites.
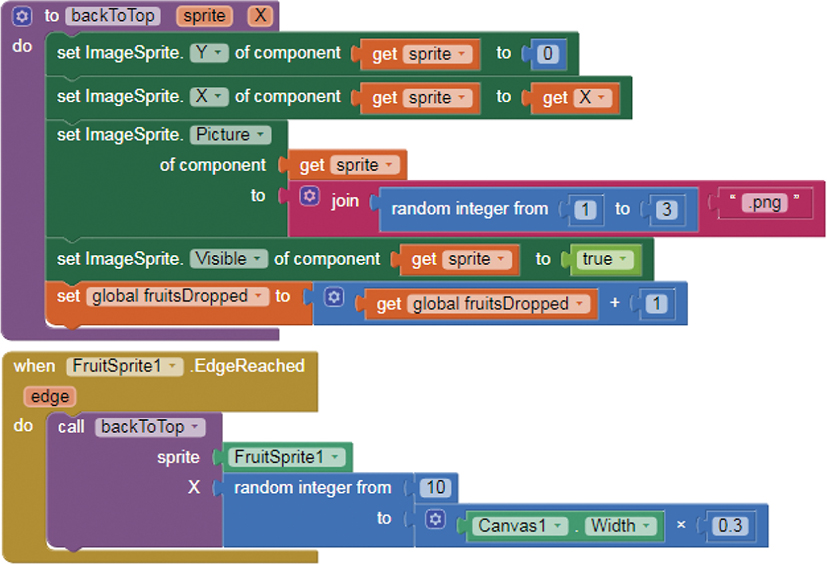
To create the backToTop procedure, we’ll need to define the parameters sprite and X, which are the two pieces of information that may change each time the procedure is called—the ImageSprite to adjust and the x-coordinate for the point at the top of the screen where we want to move that ImageSprite.
DEFINING THE PARAMETERS
Log into App Inventor, and open your “Fruit Loot” app by selecting Projects ▸ My Projects and choosing the “Fruit Loot” app from your list of projects.
Go to the Blocks Editor and click the Procedures blocks drawer in the Blocks pane. Drag the to procedure do block to the Viewer, click procedure, and rename it by entering backToTop.
Then click the blue mutator icon to the left of the words to backToTop, drag two input:x blocks to the inputs block in the dialog that opens, and rename them input:sprite and input:X. Your inputs should look like Figure 7-1. Once the mutator dialog closes, you also should see the parameters sprite and X listed to the right of the words to backToTop in the to backToTop block, as shown in the previous code.
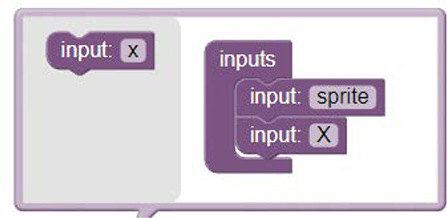
Figure 7-1: The blocks that add the parameters for the backToTop procedure
Now we can program backToTop so that it can have the app execute the exact same commands that we coded in each of the original EdgeReached handlers. But instead of using blocks for a specific ImageSprite, we’ll use the generic Any ImageSprite setter blocks. That way, each time we call the procedure, the setter blocks will make changes to the ImageSprite referred to in the procedure’s sprite parameter, which will be the ImageSprite that hit the edge.
To add the setter blocks, click the plus sign to the left of the Any Component category listing at the bottom of the Blocks pane and then click the Any ImageSprite drawer, drag the setImageSprite.Enabled block to the Viewer, and make three copies of it. You should now have four copies of the set ImageSprite.Enabled block on the Viewer. You’ll use these to set the ImageSprite’s Y, X, Picture, and Visible properties as shown earlier.
Setting the ImageSprite’s Y and X Properties
We’ll start by setting the given ImageSprite’s Y and X properties to make the ImageSprite return to a random spot at the top of the screen before dropping again.

These blocks first take the Y property of the ImageSprite that is given as the argument for the sprite parameter in the backToTop procedure call (the ImageSprite that dropped and hit the edge) and set it to 0. This moves the ImageSprite back up to the top of the screen. Drag the first copy of the setImageSprite.Enabled block ➊ inside the to backToTop procedure block next to the word do, click the drop-down arrow to the right of the word Enabled, and replace Enabled by selecting Y. Then mouse over the procedure’s sprite parameter and drag its get sprite block ➋ into the setImageSprite.Y block’s first socket. Drag the number 0 block ➌ from the Y property setter block in the original FruitSprite1 EdgeReached handler into the second socket.
Now, we’ll add blocks that set the given ImageSprite’s X property to the given random X value, which moves the ImageSprite to a random spot at the top of the screen. To do this, drag the second setImageSprite.Enabled block ➍ into the procedure block under the setImageSprite.Y block, and replace Enabled by selecting X in the drop-down. Drag another get sprite block ➎ into the setImageSprite.X block’s first socket, mouse over the procedure’s X parameter, and drag its get X block ➏ into the second socket.
Setting the ImageSprite’s Picture and Visible Properties and Adding to fruitsDropped
Next, we’ll add blocks that set the given ImageSprite’s new Picture and Visible properties and increment the value of the fruitsDropped variable.

First, we’ll place the blocks that set the given ImageSprite’s Picture property randomly to 1.png, 2.png, or 3.png, each of which is a picture of a different piece of fruit. This ensures that players won’t know whether an apple, lemon, or orange will drop next. To do this, drag the third setImageSprite.Enabled block ➊ into the procedure block under the setImageSprite.X block, and replace Enabled by selecting Picture in the drop-down. Drag another get sprite block ➋ into its first socket, and drag the join block ➌ from the Picture setter block in the original EdgeReached handler into the second socket.
Then, we’ll add another set of blocks to make the given ImageSprite visible in case it hit the picker earlier and disappeared. Drag the fourth setImageSprite.Enabled block ➍ into the procedure block under the setImageSprite.Picture block, and replace Enabled by selecting Visible in the drop-down menu. Drag another get sprite block ➎ into its first socket, and drag the true block ➏ from the Visible setter block in the original EdgeReached handler into the second socket.
Finally, to complete the backToTop procedure, we’ll add blocks that increment the value of the fruitsDropped variable by 1 when the procedure is called. This will enable us to keep track of the total number of pieces of fruit dropped in the game. To do this, drag the set global fruitsDropped blocks ➐ from the original EdgeReached handler into the procedure block under the setImageSprite.Visible block.
CALLING THE PROCEDURE
With this procedure in place, we no longer need to add the five setter blocks to each EdgeReached event handler.
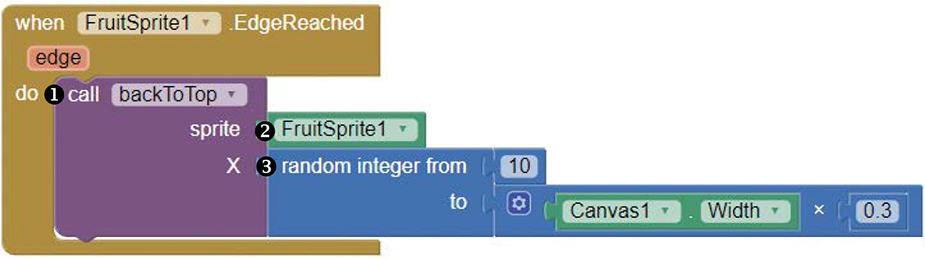
We can handle the EdgeReached event for each fruit ImageSprite simply by snapping the call backToTop block ➊ from the Procedures drawer inside each ImageSprite’s EdgeReached event handler.
We can then click the ImageSprite in the Blocks pane; drag the very last block, its getter block ➋, into the call backToTop sprite socket to provide the argument for the sprite parameter; and drag the random integer blocks ➌ from the X setter block in its original EdgeReached handler into the call backToTop X socket to provide the argument for the X parameter. Once you add the call block to the EdgeReached handler for each ImageSprite and fill the parameter sockets as described, be sure to delete the five original setter blocks from all three EdgeReached event handlers.
Now we can use the backToTop procedure not just in the “Fruit Loot” game, but in any other similar game. Since we’ve created this procedure here, we never have to figure out again how to keep moving randomly dropping, non-colliding images back to the top of a screen to drop again, whether they’re images of balls, birds, or anything else.
NOTE
You can transfer a procedure, or any other block, from one app project to another by right-clicking on the blocks and selecting Add to Backpack. This action adds a copy of the blocks to the backpack located at the top right of the Viewer in the Blocks Editor window. To take blocks out of the backpack, click the backpack and drag the blocks to the Viewer.
BUILDING THE “MULTIPLICATION STATION II” APP
Let’s define another multiparameter procedure to build on the original “Multiplication Station” app from Chapter 4. When we’re done, users should be able to select from two difficulty levels of multiplication problems. We’ll also rework the user interface of the app’s welcome screen, create new global list variables to present choices, and include an if then block to tell the app what to display when a user selects each level of practice problems.
To get started, open your original “Multiplication Station” app by selecting Projects ▸ My Projects, as shown in Figure 7-2, and choosing the “Multiplication Station” app from your list of projects.
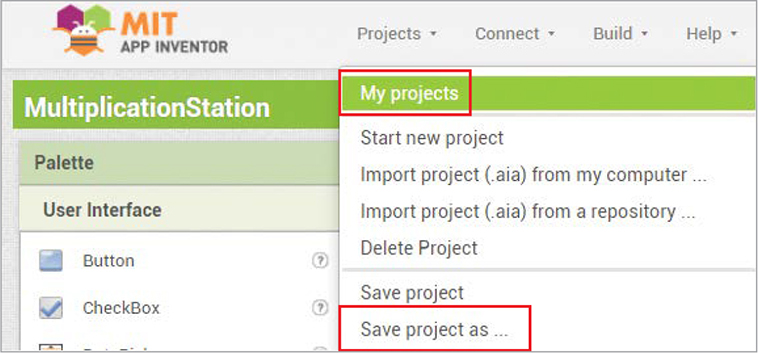
Figure 7-2: The Projects menu where you open and save projects
Once “Multiplication Station” opens, select Projects ▸ Save project as… and rename the project by entering MultiplicationStationII without any spaces, and then click OK.
DECOMPOSING “MULTIPLICATION STATION II”
We want to change the original “Multiplication Station” app so that when users open the app, they can choose level 1 (easier) or level 2 (more challenging) problems to practice and will have more time to solve level 2 problems.
We can decompose the new action for “Multiplication Station II” into three steps:
When the user opens the app, play a welcome message. Display the ListPicker for the user to click to choose a practice level.
After the user clicks the ListPicker to choose a practice level, play another message stating the number of seconds available to answer each problem. Open and pass the selected problem level to the practice screen.
When the Clock’s timer fires, display a random multiplication problem at the correct time interval for the selected problem level.
You’ll need the following new components:
ListPicker for the user to click to select problem level and open the practice screen (this replaces the original start button on the welcome screen)
Procedure to display problems and set the Clock timer interval according to the selected problem level
Variable (2) to store problem level and timer interval
LAYING OUT “MULTIPLICATION STATION II” IN THE DESIGNER
Right now, the welcome screen gives users only one option—to click the start button and start practicing. To allow users to first choose the level of multiplication problems, all we have to do is remove Button1 from the welcome screen and replace it with a ListPicker. Once we adjust the ListPicker’s properties to make it look similar to Button1, the new welcome screen should look something like Figure 7-3.

Figure 7-3: The Viewer, Component, and Media panes showing the Screen1 layout for “Multiplication Station II”
To make these changes, first go to the Designer for Screen1. Click Button1 in the Components pane, and click Delete and then Delete again in the dialog that opens.
Now drag a ListPicker from the User Interface drawer and place it on the Viewer where you just deleted Button1. Adjust the ListPicker’s properties so that it looks like Button1. In the Properties pane, change the background color to black by clicking Default under BackgroundColor and then clicking Black when the color list dialog opens. Make its text bold by clicking the checkbox under FontBold, and change its shape by clicking the drop-down arrow under Shape and selecting rounded.
Next, enter Choose Your Level in the text box under Text so users know to click the ListPicker to choose their problem level. Then, center the text by clicking the drop-down arrow under TextAlignment and selecting center: 1, and make the text white by clicking Default under TextColor and then clicking White when the color list dialog opens. Screen1 should now look like Figure 7-3 in the Viewer.
PROGRAMMING “MULTIPLICATION STATION II”
Now let’s program the new features for “Multiplication Station II” following the steps outlined earlier. To show the correct problems for the selected problem level, we’ll create two new list variables and a procedure with parameters. We’ll add an if then block to the procedure so that the app will know whether to display problems for level 1 or level 2 at each Clock timer interval.
We’ll also program two new event handlers so that the app will know what to do before and after the user selects a level with the ListPicker. To begin programming, click the Blocks button to switch to the Blocks Editor and make sure you’re on Screen1.
STEP 1: SETTING PROBLEM LEVEL CHOICES AND PLAYING THE NEW WELCOME MESSAGE
As soon as the screen opens, we want to display the ListPicker with the problem level options for the user to select. We’ll prompt the user to select a practice problem level by playing the app’s welcome message.
Creating the Global level and seconds List Variables
We’ll use two global list variables in this step: level, which stores the two problem level choices for ListPicker1, and seconds, which holds the number of seconds available to solve problems in each level. Create the two lists with the blocks shown here.

To create each variable, click the Variables block drawer and drag an initialize global name block ➊ to the Viewer, click name, and replace it with the variable name (in this case, level and seconds). Then drag a make a list block ➋ from the Lists drawer and snap it to the right side of the initialize global block. Finally, drag two 0 number blocks ➌ from the Math drawer and snap them into the sockets of the make a list block. Then, replace the 0 in each number block with 1 and 2 in level for the two possible problem levels and 5 and 10 in seconds for the number of seconds available for each level.
The items we’ve placed in the same index position in the two variables correspond to each other. This means that we can see how many seconds are available to solve problems for each level by looking at the items that are placed in the same position in the level and seconds variables. Here you can see that there are 5 seconds available for level 1 problems, and 10 seconds available for level 2.
Programming the Welcome Screen Event Handlers
Now we can start coding the app’s response to the two events in this step: the ListPicker BeforePicking and the ScreenInitialize events. This is where we want to set the problem level choices for the ListPicker and play the welcome message.
Having created level, we have the data we need to set ListPicker1’s choices. Before the user selects from ListPicker1, we need to set those choices to the items in the level list so users can choose between level 1 and level 2. We’ll program this action with the ListPicker BeforePicking event handler.
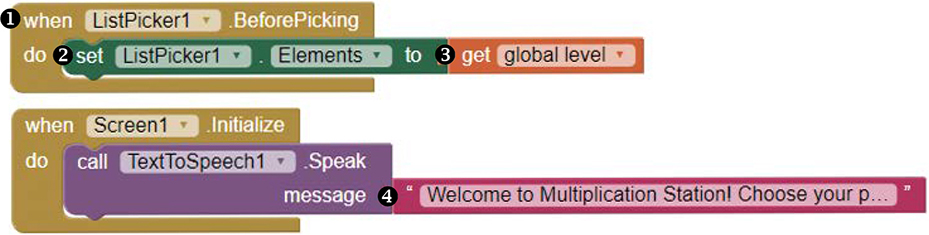
In the Blocks pane, click ListPicker1 and drag the whenListPicker1.BeforePicking event handler block ➊ to the Viewer. Then, click ListPicker1 again and drag its setListPicker.Elementsto block ➋ into the whenListPicker1.BeforePicking block next to the word do. Next, in the Blocks pane, click the Variables blocks drawer, drag the get global level block ➌ in, and snap it to the right of the setListPicker1.Elementsto block. These three blocks create the BeforePicking event handler, which sets the problem level choices that the user will see when clicking ListPicker1.
Finally, for the whenScreen1.Initialize event handler, which we already dragged to the Viewer for the original “Multiplication Station” app, we can leave all blocks the same, except for the string block that holds the argument for the message parameter of the callTextToSpeech1.Speak block. In that string block ➍, change the text to read Welcome to Multiplication Station! Choose your problem level to begin practicing. so users will hear that message when the app opens.
Live-test these event handlers with a device. When your “Multiplication Station II” app opens on your device, you should hear the welcome message. You also should see the Choose Your Level button on the screen, and when you click it, you should see the two choices, 1 and 2. Right now, if you try to select either choice, nothing should happen. We’ll program that AfterPicking action next.
If the app’s not working as described, debug and make sure you’ve created and placed your blocks correctly. When everything’s working, leave the app open on your device to keep live-testing.
STEP 2: STATING THE NUMBER OF SECONDS FOR EACH PROBLEM AND OPENING THE PRACTICE SCREEN
Let’s use the ListPicker AfterPicking event to tell users how many seconds they have to answer each problem, depending on the level they selected. Then we’ll program the app to open the practice screen and transfer the value of the selected problem level to that screen. Here are the blocks that direct this action.

Let’s first program the app to speak after the user chooses a problem level.
Telling the User the Time Limit
In the Blocks pane, click ListPicker1 and drag the whenListPicker1.AfterPicking event handler block ➊ to the Viewer. Then, click TextToSpeech1 and drag its callTexttoSpeech1.Speak block ➋ into the whenListPicker1.AfterPicking block next to the word do.
Next, to provide the argument for the callTexttoSpeech1.Speak block’s message parameter so the app will know what to say, drag a join block ➌ from the Text blocks drawer to the Viewer. Then add another string input to the join block and snap it to the right of the callTexttoSpeech1.Speak block next to the word message. This lets us join three strings together to form the message for TextToSpeech1. If the user selected problem level 1, we fill the join block’s inputs to set the message to You will have 5 seconds to answer each problem., and if the user selected problem level 2, we set the message to You will have 10 seconds to answer each problem.
To fill the join block’s top and bottom inputs, drag in two empty string blocks from the Text blocks drawer, click their text areas, and enter You will have (with a space after the word have) in the top string block ➍ and seconds to answer each problem (with a space before the word seconds) in the bottom ➎.
Then, for the join block’s middle input, we need to add the number of seconds the user will have to answer each problem. We’ll get that value by directing the app to select the item from the seconds list that holds the same index position as the user’s ListPicker selection in the level list.
To program this, drag in a select list item block ➏ from the List blocks drawer and snap it into the join block’s middle input. Then, identify the list from which we want the app to select the item by clicking the Variables blocks drawer and dragging the get global seconds block ➐ into the select list item block’s list socket. Finally, identify the index position of the item selected from the seconds list by clicking ListPicker1 and dragging the ListPicker1.SelectionIndex block ➑ into the select list item block’s index socket.
Moving to the Practice Screen
Once the user selects a problem level, we’ll open Screen2, the practice screen, and pass the value the user selected in the ListPicker to that screen.

In the Blocks pane, click the Control blocks drawer, drag in the open another screen with start value block ➊, and snap it inside the whenListPicker1.AfterPicking block under the callTexttoSpeech1.Speak block.
This open another screen with start value block requires us to provide a screenName, the name of the screen we want to open (Screen2), and the startValue to pass to Screen2 (the problem level the user selected in ListPicker1). To provide these values, in the Blocks pane, click the Text blocks drawer, drag in another empty string block ➋, and snap it into the screenName socket. Enter Screen2 inside the empty string block to provide the name of the screen we want to open.
Then, to identify the start value we want to pass to Screen2, click ListPicker1, drag in its ListPicker1.Selection block ➌, and snap it into the startValue socket.
Test to see how these blocks work. Once you open the app, you should hear the welcome message and see the Choose Your Level button. Once you click the button, you should see the numbers 1 and 2 as your choices. When you click the number 1, you should hear the app say you have 5 seconds to answer each problem, and when you click 2, it should say you have 10 seconds. Then the app should take you to the practice screen.
Let’s wait to test whether the app properly transfers the start value to the practice screen until after we program the next step. Make sure everything else you’ve programmed in the app is working as described, and leave it open on your phone for more live-testing.
STEP 3: DISPLAYING THE PRACTICE PROBLEMS
Just like the original “Multiplication Station” app, this app displays multiplication problems by joining one random integer (the value of global variable a), the multiplication operator (×), and another random integer (the value of global variable b). The app also gives users a set time interval to answer each problem. In this step, we’ll create the setLevel procedure that sets the values of a and b and the Clock timer interval value in each procedure call, depending on the problem level the user selected.
We’ll make the setLevel procedure require arguments for five parameters: a1, a2, b1, b2, and interval. Parameters a1 and a2 set the random integer range for global variable a, the first random number in each multiplication problem, and parameters b1 and b2 set the random integer range for global variable b, the second random number. The interval parameter holds the time interval in milliseconds. Once setLevel receives these arguments in a procedure call, it sets global variable a to a random number ranging from a1 to a2, sets global variable b to a random number ranging from b1 to b2, and sets the Clock timer interval to interval.
Here’s what the setLevel procedure looks like.
We’ll call setLevel inside an if then block to place the correct numbers in the multiplication problems and give the user the right amount of practice time based on the selected problem level.
Creating the setLevel Procedure
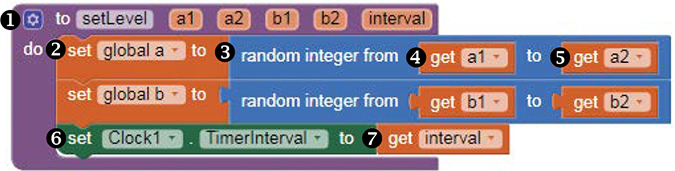
To make setLevel, click the Procedures block drawer in the Screen2 Blocks pane, drag a to procedure do block ➊ to the Viewer, and click procedure to rename it by entering setLevel. This procedure block, like the global variables, will stand alone outside of all event handlers, allowing us to call the procedure within each event handler if we need to.
Next, list the required procedure parameters by clicking the blue mutator icon to the left of the words to setLevel and dragging five input:x blocks to the inputs block in the dialog that opens. Rename them input:a1, input:a2, input:b1, input:b2, and input:interval.
Now let’s program the action setLevel will perform. We’ll start with the blocks that set global variable a to a random number ranging from the argument provided for a1 to the argument provided for a2. Click the Variables blocks drawer and drag a set global a block ➋ into the to setLevel block next to the word do. Then drag a random integer block ➌ from the Math drawer and snap it to the right of the set global a block. Fill the random integer block’s first socket by mousing over the procedure’s a1 parameter and dragging in a get a1 block ➍, and fill its second socket by mousing over the a2 parameter and dragging in a get a2 block ➎.
To set global variable b to a random number ranging from b1 to b2, simply repeat the process above for global variable b by copying the blocks at ➋ through ➎, and snapping the copy under the set global a block. Use the drop-down arrows to change global a to global b, a1 to b1, and a2 to b2.
Finally, to complete the setLevel procedure, we’ll set the Clock’s TimerInterval to the argument provided for interval in the procedure call. Click Clock1 in the Blocks pane and drag its setClock1.TimerIntervalto block ➏ into the to setLevel block under the set global b block. Then mouse over the procedure’s interval parameter and snap its get interval block ➐ to the right of the setClock1.TimerIntervalto block.
Calling setLevel
We can now call setLevel in the ClockTimer event handler so that the app displays the correct problems for each level at the right time. The following code shows how we’ll call setLevel in a new if then else block within the whenClock1.Timer block, providing one set of arguments for the required parameters if the start value passed in from Screen1 equals 1 and another set of arguments if it doesn’t.

Here, we change the original “Multiplication Station” app’s whenClock1.Timer event handler block by replacing the global variable a and global variable b setter blocks at the top with an if then else block. Delete the two setters, drag an if then block ➊ to the Viewer from the Control blocks drawer, click the blue mutator icon to add an else input, and snap the if then else block inside the whenClock1.Timer block next to the word do.
Now we’ll add blocks to test whether the start value passed in from Screen1 equals 1, which means that the user selected problem level 1 in the ListPicker on Screen1. Drag an = comparison block ➋ from the Math drawer and snap it into the if then else block’s if socket. Fill the = comparison block’s left operand socket with a get start value block ➌ from the Control drawer and its right operand socket with a 1 number block ➍.
The next blocks tell the app how to respond to the answer to that test condition, which is whether the start value equals 1. If the answer is yes, we want the app to set the correct problems and time interval for level 1 problems. If the answer is no, we want the app to set the correct problems and time interval for level 2 problems. In each instance, we’ll direct the action with a call to the setLevel procedure.
To add the blocks for these procedure calls, click the Procedures drawer, drag one call setLevel block ➎, and snap it into the if then else block’s then socket. Then drag another call setLevel block ➏ and snap it into the if then else block’s else socket. Next, fill the parameter arguments for each call block with the values shown in Table 7-1.
Table 7-1: Setting Parameters for Calls to setLevel
if then else block socket |
a1 |
a2 |
b1 |
b2 |
interval |
then |
1 |
12 |
1 |
12 |
5000 |
else |
13 |
99 |
10 |
99 |
10000 |
Each time the Clock timer fires, if the start value passed from the welcome screen equals 1 (then, user chose problem level 1), the app calls the setLevel procedure to set global variable a to a random number ranging from 1 to 12, set global variable b to a random number ranging from 1 to 12, and set the Clock timer interval to 5 seconds.
If the start value passed from the welcome screen doesn’t equal 1 (else, user chose level 2), the app calls setLevel to set global variable a to a random number ranging from 13 to 99, set global variable b to a random number ranging from 10 to 99, and set the Clock timer interval to 10 seconds.
Now let’s switch to Screen1 and test the completed app! When the welcome screen opens in your device, you should see the ListPicker and hear the welcome message. When you click Choose Your Level and make a selection, the app should tell you how many seconds you have to answer each problem. The practice screen should also open, and, if you chose level 1, problems should appear every 5 seconds, or, if you chose level 2, problems should appear every 10 seconds. Also, the problems should include numbers from the range expected for the selected problem level.
If any part of the app isn’t working as planned, debug and try again. If you placed your blocks correctly, the app should work as expected, and you’ve successfully created “Multiplication Station II”!
SUMMARY
In this chapter, you built the “Multiplication Station II” app, which builds on the original “Multiplication Station” app you created in Chapter 4 to let users choose the difficulty level of the problems and pass that choice from one screen to the next. Instead of having to use the same code blocks over and over again, you learned how to use a procedure to reuse the code that sets the problems and time limit. You also worked more with lists, if then, and relational operator blocks to control app flow.
In the next chapter, you’ll learn how to create apps that let users draw on the screen and drag images around. You’ll create the “Virtual Shades” app, where a user can take a selfie, “try on” a variety of sunglasses by dragging them into place over the picture, and draw and type on the picture with different-colored “ink.”
ON YOUR OWN
When you’re ready for a challenge, save new versions of your previous apps, and try these exercises. You can find solutions online at https://nostarch.com/programwithappinventor/.
In “Multiplication Station II,” try adding a pause button to the practice screen so users can temporarily stop practicing when they need to. Write and call a procedure as part of this extension.
Write and call a procedure that changes the code you wrote in Chapter 4 to allow users to choose to practice multiplication or division problems.