9
Painting Textures
Textures are simply images that give color (or define other parameters, such as the amount of reflection or shininess an object has) to your models when projected onto their surfaces. In Chapter 8, “Unwrapping and UVs in Blender,” you unwrapped the parts of Jim that need textures. Now it’s time to use those UVs to paint a texture and give your character a layer of paint to move your project closer to the final result. Although Blender provides some texturing tools, textures are typically created with third-party 2D image-editing software such as Adobe Photoshop, Affinity Photo, GIMP, and Krita, or dedicated programs for 3D texturing such as Substance, Quixel, and Mari. These programs and the artistic skills needed to paint complex textures are outside the scope of this book, but this chapter briefly explains the general workflow with both 2D image editors and 3D texturing programs, as well as the basics of how you can paint textures in Blender itself.
Before we get started, I’d like to point out that textures and materials work together, so it may be difficult for you to understand one without the other. I recommend that you check out Chapter 10, “Materials and Shaders,” for a complete view of how they interact.
Defining the Main Workflow
There are two main workflows for using textures on 3D models:
Texturing before unwrapping: Sometimes, depending on your needs, it’s easiest to create a texture and then adapt the UVs to fit that texture. In this case, of course, you need to create the texture before you start unwrapping. A good example of this method is a wooden floor. You may have a photo of wood, and to apply it to the surface, you load that photo and adapt the UVs so that the wood in the photo has the right size and position on your 3D model. This method works best in simple models; in complex models, the projected image needs to be adapted to the model.
Texturing after unwrapping: This method is the usual texturing method for characters or complex objects because it specifically tailors textures to that model. First, you unwrap the model; then, if you’re using 2D image editors to create your textures, you export the UVs as an image to use for a reference when painting and adjusting your textures to make sure that they fit the faces in your model. If you’re using Blender for texturing, you can just start painting on the 3D model. In the case of using another 3D texturing software, you can export your 3D model after unwrapping and paint textures on that model. As Jim is a complex model, we’ll be using this method of texturing after unwrapping.
The unwrapping part of workflows mentioned in the preceding list is discussed in Chapter 8, but it’s worth noting so that it will be fresh in your mind.
I’ll talk about painting textures within Blender first. Then I’ll explore other options (2D image editors and 3D texturing software) and talk about the pros and cons of each.
Texture Painting in Blender
Yes, you can paint textures right inside Blender, directly on the 3D model! In this section, you explore the Texture Paint Workspace and learn about the options that you have access to when using Texture Paint Mode on an object.
Texture Paint Workspace
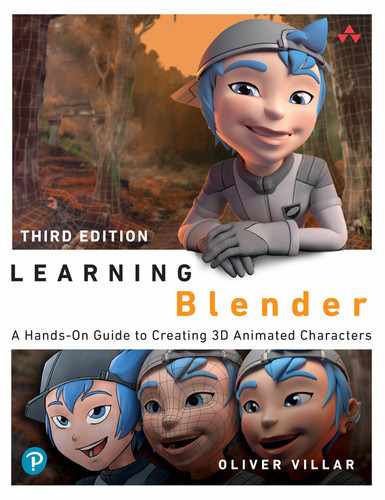
The quickest way to start painting textures in Blender is to jump into the Texture Paint Workspace (in the list of predefined Workspaces at the top of the interface). You can see the Texture Paint Workspace in Figure 9.1.
In the Texture Paint Workspace, you can find all you need to start painting:
Image Editor, where you can see the UVs of the selected object and paint the texture in 2D.
3D Viewport, where you can see the 3D model and paint on it. What you paint also immediately shows up in the Image Editor (correctly projected onto the UVs), as long as you select the same image to be displayed in both editors (a topic that I’ll get to later).
Outliner, where you can see the different elements of the scene if you need to select them to paint on other objects.
Properties Editor, which is conveniently set up to show the current tool properties. In both the 3D Viewport and the Image Editor, you have access to the toolbar, the default tool being the brush. In the tool properties, you can find everything you need to configure your brush, such as color, tip shape, strength, the effect of pressure (if you use a pen tablet) on the stroke, the stroke type, and so on. You can also find the tool options in the Sidebar of the 3D Viewport and the Editors header.
When you’re in the Texture Paint Workspace, you’re ready to start painting, but first you need to understand a few things, such as how Texture Paint interaction mode works and what conditions the selected object must have for you to paint on it.
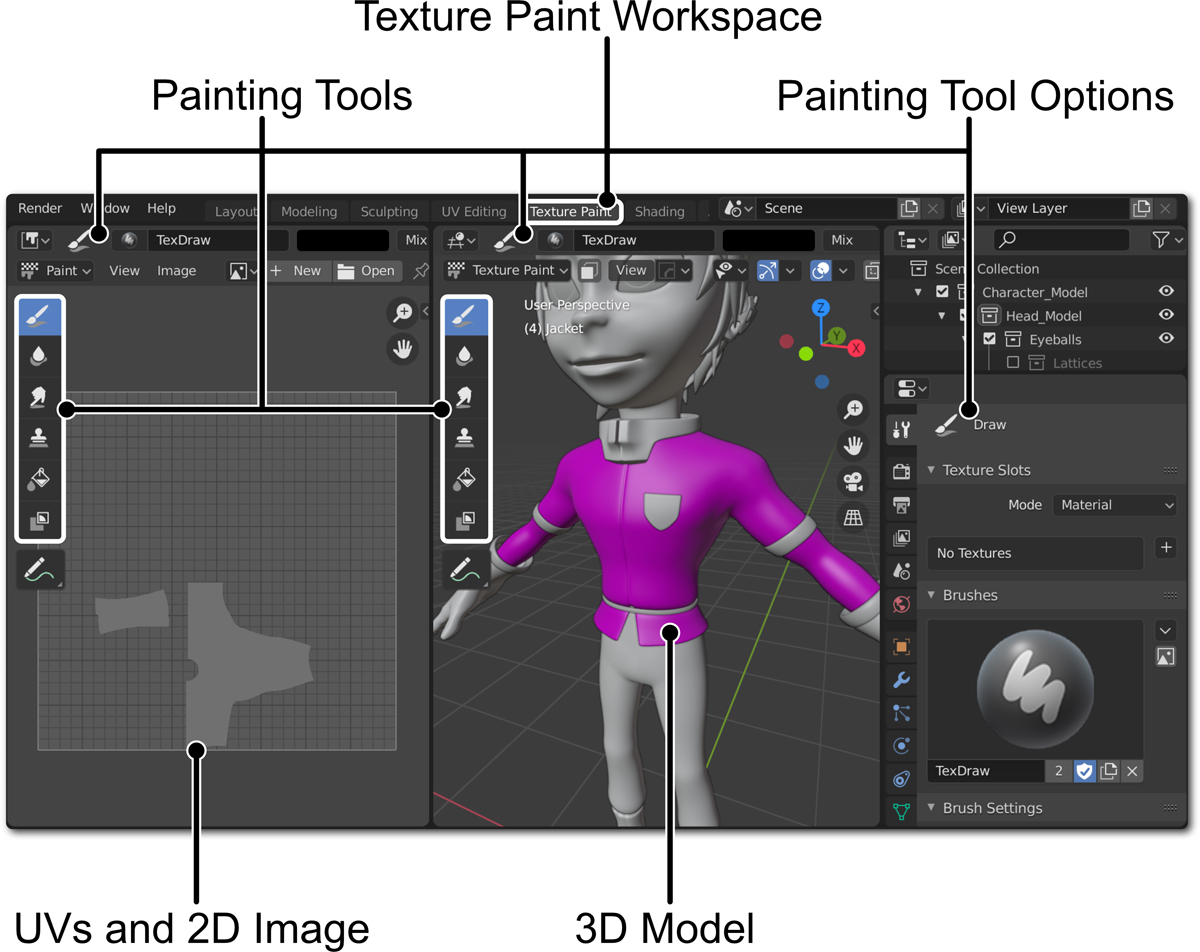
Figure 9.1 The Texture Paint Workspace shows the most important things you need to start painting: UVs, the 3D model, and the texture painting tools. The jacket appears to be magenta because it’s the selected object, but it’s not ready to be painted on just yet.
Texture Paint Interaction Mode
One of the object interaction modes (such as Object and Edit) is Texture Paint interaction mode, which you can access from the interaction mode drop-down list in the left corner of the 3D Viewport’s header or in the pie menu that appears when you press Ctrl+Tab in the 3D Viewport. When you switch to Texture Paint Mode, the interface of the 3D Viewport changes to accommodate the painting tools and options (see Figure 9.2).
Even though this mode is meant to paint textures, the object needs a small setup process first, so I’ll describe the tools here so that you understand what’s going on. Later, you’ll set up the object.
Here are the main things that change when you switch to Texture Paint interaction mode:
The toolbar in the 3D Viewport shows tools and automatically select the brush as the current Active Tool.
The 3D Viewport’s header shows the options for configuring the brush (the Active Tool).

Figure 9.2 Texture Paint Mode and its options in the Sidebar.
If you open the Tool tab in the Sidebar (press N in the 3D Viewport to show or hide this region), you see all the available options for configuring the brush (the Active Tool). You can also see these options in the Properties Editor if you click the Active Tool tab (the one with the wrench-and-screwdriver icon).
You can choose among a variety of tools (brushes) on the left side of the 3D Viewport, such as Fill, Clone, Smear, and Soften (similar to a blur). You can adjust the options and behavior of each tool in the aforementioned menus. You can adjust, for example, radius and strength (opacity), texture, and profile curve; you can even use the stroke stabilization feature to stabilize the stroke while you move the brush. You can also create your own tool presets for fast access, as well as pick a color for your brush.
For the radius and strength of the brush, it’s worth noting that you can quickly change those two values directly in the 3D Viewport. Press F, move the mouse to define the radius (you see a preview of the resulting brush radius as you move your mouse), and press LMB to change the radius. Press Shift+F, move the mouse, and press LMB to change the strength of your brush.
As you saw in the previous section, the Texture Paint Workspace also shows the image texture, and you can paint on it in the Image Editor. While you’re in the Texture Paint Workspace, the Image Editor is set up for painting, but it’s important to know how to set it up for painting manually. When you open the Image Editor, you see a drop-down menu in the left corner of its header. This menu is set to View by default, but you can click it and select Paint; when you do, you’ll be able to access the same painting tools that you do in the 3D Viewport within the Image Editor. The tools will even be synced if you’re also in Texture Paint Mode in the 3D Viewport, so adjusting the tool or other settings (such as selecting the texture you’re painting on, discussed later in this chapter) in one of them affects the other. It’s very convenient to be able to see and work on the 3D model and the 2D flat texture simultaneously.
Before You Start Painting
Before you begin painting, you must make sure that
The object to be painted on is unwrapped. Otherwise, you won’t be able to paint on it.
The object has at least one assigned texture in its material, or there is an image in the .blend file that you can use to paint on.
In the latest versions of Blender, the workflow to start painting has been heavily improved. If you don’t fulfill these two conditions, Blender gives you options to create UVs and images or materials with just a few clicks. I go through this process in the next section.
If you’ve followed along with the previous chapters, you’ve unwrapped Jim’s parts that need textures, and you have a material with an UV grid texture in the base color. After unwrapping, you may want to remove the UV test material from those objects and add the definitive material with the final texture assigned to it. Alternatively, you could rename the UV test material (if you don’t plan to use it anymore), load the UV test grid in the Image Editor, go to the image properties (press N to show the Sidebar), and switch the image type from UV Grid to Blank.
Generally, if you switch to Texture Paint interaction mode after selecting an object that has a material with an image texture assigned to its base color, you should be able to start painting. Just press LMB and drag on top of the 3D model to start painting!
In the next section, you’ll see what to do if your model doesn’t fulfill the main requirements to paint on it, along with how to set it up if it doesn’t work initially.
Conditions for Painting
As mentioned earlier, Blender has improved the texturing workflow in recent versions. These improvements include options in Texture Paint Mode that can be used when the selected object isn’t ready to be painted on (see Figure 9.3). To see these problems, you’ll have to pay attention to the Texture Slots panel, on the Tool tab of the Sidebar. (You can also find this panel in the 3D Viewport’s header and on the Active Tool tab of the Properties Editor.) You’ll learn how to use texture slots later in this chapter.
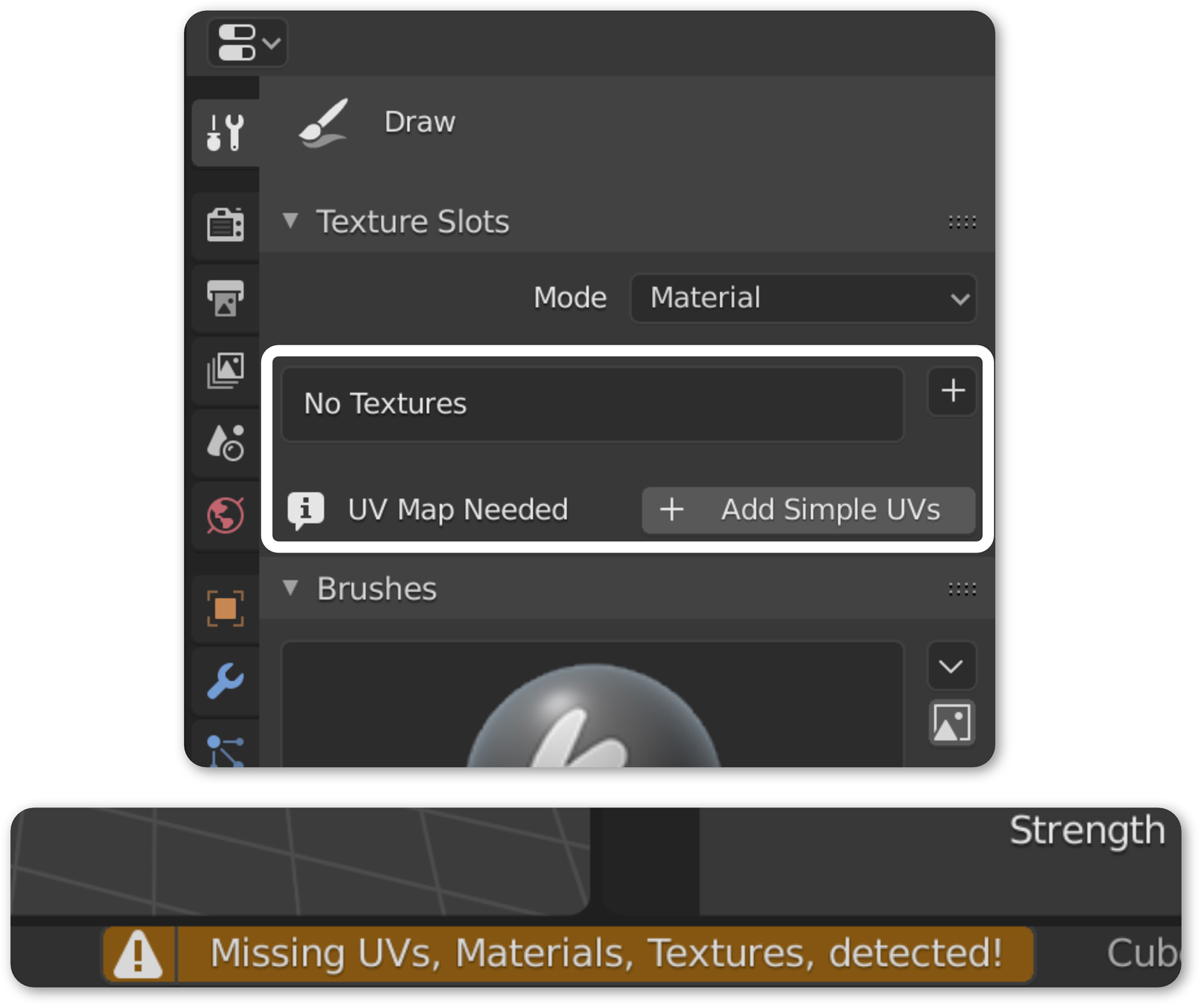
Figure 9.3 If the object you’re trying to paint on doesn’t meet the conditions for texture painting, Blender displays messages to let you know and options for fixing the problem.
These are the ways in which Blender helps you meet the required conditions for painting textures on your model:
If you try to paint on an object that doesn’t meet the requirements, you’ll see an error in the Status Bar (at the bottom of the interface) to let you know what’s wrong.
Blender detects whether the object has UVs. If not, Blender displays the message UV Map Needed in the Texture Slots panel and shows a button that automatically generates simple UVs for the selected object. These UVs won’t be perfect, but most times, they’re good enough for texturing simple objects.
Blender also detects whether the object has an image or material to paint on. If not, the message No Textures appears in the Texture Slots panel. You’ll also see an error message in the Status Bar if you try to paint on an object that has UVs but not images assigned to paint on. If this happens, you can create a new image directly from this menu; you will learn how to do this in the next section.
Texture Slots
You’ll often have different image textures in your object’s materials (see Chapter 10, “Materials and Shaders”), each of which uses a slot. You can access all the image textures in the file or material from the Texture Slots panel mentioned in the previous section. This panel has options that let you specify which texture you want to paint on (see Figure 9.4). You can use two types of slots:
Material: When you select Material on the Slots tab, you can paint on the available textures inside the material that you assigned to the active object. All the textures are listed inside the Available Paint Slots section of the panel, which allows you to switch among them quickly (see Figure 9.4).
Single Image: If you select Single Image, you gain access to an image selector from which you can select any image that you created in the file or create a new one. This image is projected onto the active object, allowing you to paint on it. You can also select the UV map on which you want the image to be projected and then save all the images. (This option isn’t available when you’re working with Material Slots, as images inside materials already have their UVs defined.) Keep in mind that painting with this option can be very convenient, and you can switch the texture or create a new one at any time, but if you want it to be part of the object’s material, you’ll have to assign it manually later.
Figure 9.4 Texture Slots panel and the options to create new texture slots in a material
Below all these options, you’ll find a button that allows you to save all the modified textures. If you close Blender without saving textures, a warning message asks whether you want to save them. If you don’t want to save some changes in given textures, you can save them individually from the Image menu on the Image Editor’s header. (An asterisk appears next to the Image menu if the current image has unsaved changes.)
Keep the following things in mind when you’re working with texture slots:
Single Image can be seen only while the 3D Viewport uses Solid shading mode. In Material Preview or Rendered mode, the object’s material overrides the selected image.
When you’re using the Material Slots option, if the viewport shading is Solid, you’ll see only the selected slot. If you’re in Material Preview or Rendered viewport shading, you’ll see the combined effects of all the textures, even though you’ll still be painting only the selected slot.
If you choose the Material Slots option and click the + button on the right side of the slots, you can create a new slot. If the selected object doesn’t have a material assigned, creating a new slot generates a new material. When you generate a new slot, a menu allows you to choose which channel of the material you want the new image to affect; this menu is linked and set up with the corresponding material options. After choosing a channel (see Chapter 10, “Materials and Shaders”), a menu allows you to create a new image that you’ll be painting on.
Limitations of Blender’s Texture Paint Mode
Although Blender’s Texture Paint Mode is powerful and has a lot of options (which you should explore further, as I discuss only the basics in this chapter), it does have limitations. The system has no layers, for example, and layers are useful for texture painting. Add-ons are available that provide Blender some layering capabilities, but they’re not nearly as good as the layers you can work with in other specialized software.
Blender isn’t a substitute for proper 2D image-editing or 3D texturing software, of course, but it does provide tools that allow you to do basic texture painting. Some people have taken Blender’s painting options to the extreme and made impressive artworks with them!
You can use Texture Paint Mode to texture an entire character, but the decision depends on the character, of course, and on whether you feel comfortable texturing within Blender or need more powerful tools. Instead, you might try working with other software to use layers, make color corrections, add effects and filters, or apply masks—things you can’t do in Blender’s Texture Paint Mode.
That said, Texture Paint Mode proves to be really useful for a lot of things. It works well for creating a base for textures that you can complete in other software, for example. It may be difficult to see where a detail should be placed when editing a texture in 2D image-editing software, for example, so you have to find where it’s supposed to go in the 3D model. But because you can paint in 3D in Blender, you have a good opportunity to start your texture by painting the details on the surface of the 3D model and using the resulting image as a reference for the final texture, which you’ll make in different software.
Creating the Base Texture
It’s time to paint the details over Jim’s model. You won’t do anything fancy for the base texture—just a quick black-and-white drawing that you can use later as a base in your 2D image editor of choice.
Placing Texture Elements
Using the character’s reference images to see where to place the basic texture elements, start painting over the 3D character. This time, the reference images are not the ones in the 3D Viewport (by the way, at this point you can turn them off from the Outliner or delete them), but you can divide your interface to have an Image Editor display them if your prefer that to have them open in a different window. If you happen to have a second monitor, you can use it to see the references at all times without having to use space in your main Workspace. When you have all the basic texture elements in place (see Figure 9.5), save the image so that you can keep working on it in external software.
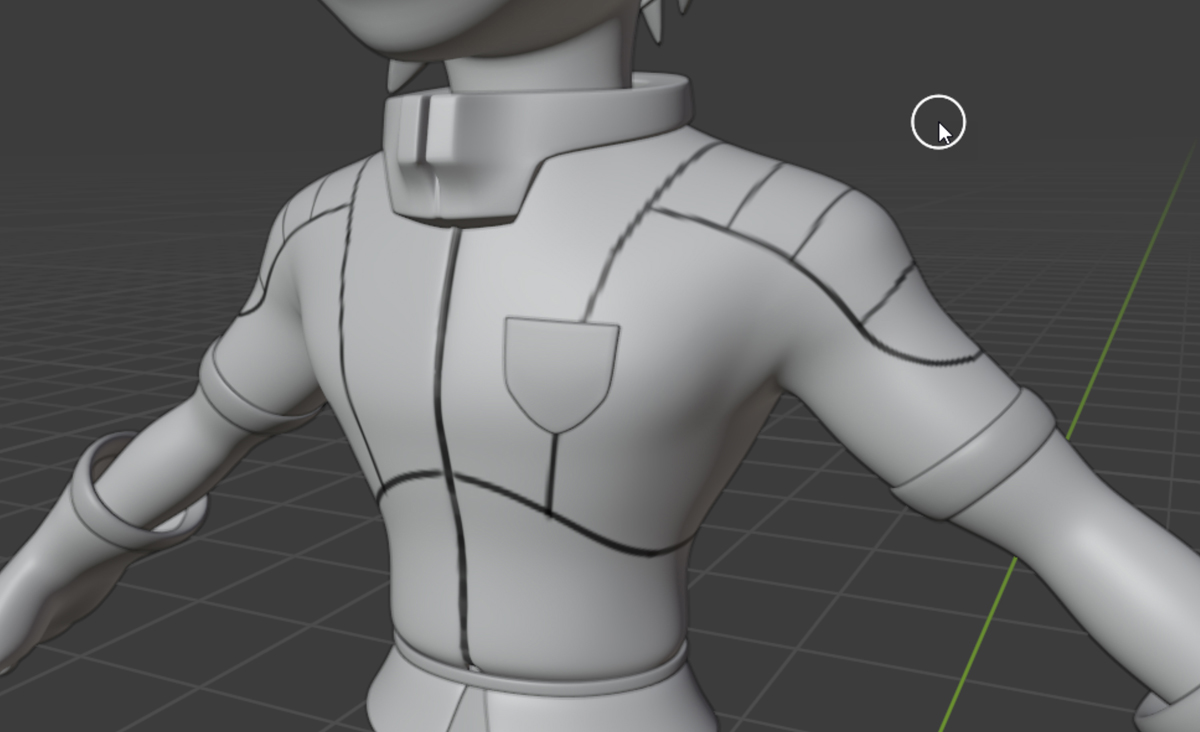
Figure 9.5 Jim’s jacket with reference elements painted on to define their positions
Saving Your Image
Blender tells you when you have made changes to an image that you haven’t yet saved. The Image menu on the Image Editor header shows an asterisk (*) that indicates unsaved changes. Open the Image menu, and you see the save options. Also, pressing Alt+S inside the UV/Image Editor saves the image. Pressing Shift+Alt+S performs a Save As operation for the image.
If you used the Texture Slots option to save the images up to this point, the textures are saved within the .blend file, but they don’t really exist in your computer’s folders. See the next section for more information.
Saving images through the Image menu allows you to save them as external files on your computer.
Packing Your Images
In this case, packing has nothing to do with the packing in UV maps. Blender has another packing feature that allows you to include external files (such as images) in the .blend file itself. This feature is very useful when you work on multiple computers or are collaborating with other people. Suppose that you loaded some textures from your hard drive into your model, and you want to send that model to a friend. If you send the model as it is, your friend won’t see the textures because he doesn’t have them on his computer, where Blender will look for them. In this case, you can pack the images. The images will be incorporated into the .blend file, and your friend will be amazed by your textured model!
To pack an image into the .blend file, go to the Image menu, and choose the Pack option. (This option won’t appear if the image is already packed.) If you want to pack every single external file into the .blend file, go to the File menu, select External Data, and click Pack All Into .blend. In the same menu, you can find the Automatically Pack into .blend option, which, when enabled, automatically packs into the .blend file every image that you load from that moment on.
Keep in mind that saving all these files in the .blend file increases the file’s size, which continues to multiply if you like to save your files in different versions as you progress.
Understanding the Elements of a Texture
Before I jump into the world of texturing, it’s important to give you a basic understanding of how materials work and how textures affect them. You’ll learn more about materials in Chapter 10, but textures and materials work together, so it’s difficult to understand one without the other.
Introduction to PBR Materials
First of all, materials define how a surface looks and reacts to light and color when rendered. They need different properties, such as what color they are, how reflective they are, and whether they’re metallic.
In the past few years, PBR (physically based rendering) materials have become commonplace and essentially standard in the 3D industry, so most 3D software and game engines need to support them.
PBR materials became very popular thanks to how consistent they are, and in recent years, advances in hardware and technology have made it possible to use them even in real-time environments.
Why are these materials consistent? As the name PBR implies, they follow rules based on how materials act in real life, which makes it easier to generate realistic materials that work well in any environment. Before PBR, materials had properties that could mimic real-life materials but were more rudimentary, making it more difficult to achieve realistic results.
Each property of a material can be controlled by a different texture, as some areas of the material can have different colors, be more or less reflective, and so on.
Understanding Material Channels
The fact that a material is made up of different properties that define how it looks, which we can call channels, means that we need multiple image textures for a single material. This requirement is one of the limiting factors of Blender: It’s not possible to paint multiple textures at the same time.
2D image editors can paint in only one layer at a time, although it’s possible to use filters and tricks to generate channels later.
3D texturing software such as Substance Painter, on the other hand, have been created in recent years with PBR materials in mind, so when we paint, the brush is simultaneously affecting multiple images, one for each channel. The brush can be set up to have different effects on each channel, and painting affects all the properties of the material on which you decide.
To sum up, you need to create textures, and you have many ways to create them:
The channels can be independent, or you may not need some of them for a given material, so you can paint them as different images in Blender or other software.
You can paint one of the images, such as the base color, and then use filters and other tricks in 2D image-editing software to generate the other images for the rest of the channels.
You can use 3D texturing software and paint all the channels at the same time.
Many times, you can even mix some of these methods to achieve the results that you want.
Texturing in Other Software
As mentioned at the beginning of this chapter, you have multiple ways to generate textures for your objects. So far, I’ve explored the basics of painting textures within Blender. Now I’ll discuss the pros and cons of different methods, and then share the main workflows of each.
Pros and Cons of Texturing in Blender and Other Software
Each method of painting textures has upsides and downsides:
Texturing with Blender: Painting textures in Blender has a clear advantage, in that you don’t have to go outside Blender at any time, so you avoid potential import/export issues. This approach is brilliant for basic texturing work because it’s quick and efficient. It also makes it possible for you to adjust the textures at any point in time while working on the model. The downside is that the texturing tools in Blender aren’t very powerful.
Texturing with 2D image-editing software: 2D is in the title. You can’t work with 3D models in this software (Photoshop, Affinity Photo, Gimp, Krita, Corel Painter, and so on), so you have the disadvantage of having to work in two dimensions without seeing the result of the work. On the other hand, when it comes to creating images, nothing is as powerful as these programs, which are designed to paint and edit photos. Chances are that you’ll find many tools that can do anything you need, such as color correcting, applying all types of filters, adding and formatting texts, and even distorting images in these types of software—features you won’t find (or that won’t be very advanced) in 3D software.
Texturing with 3D texturing software: This type of software has the most modern set of tools, designed specifically to create textures for 3D models. This software is very powerful for that purpose but requires all work on the model to be done somewhere else, so if you need to change something, you have to export and then reimport the files. It’s very efficient to generate textures with these programs, even though the image-editing tools are not as powerful as the ones in 2D image editors. Software in this category includes Substance Painter, Mari, and Armor Paint.
Other factors in selecting a method are deciding which method is most effective for the style of texturing you want to achieve and what you feel most comfortable working with.
Texturing in 2D Image-Editing Software
You can take the base texture elements you created in Blender and keep working on them in your 2D image-editing software. I used Photoshop for the examples in this section, but you can use any software you want.
Exporting the UVs as an Image
It’s important to see the UVs while you work on the textures; you need to make the textures fit those UVs so that they project correctly onto the model later. Here are the steps you need to follow to export Jim’s UVs to an image file:
Select the object.
In Edit Mode, select everything (A).
Open the UV Editor.
On the UV Editor’s header, click the UV menu, and select Export UV Layout.
In the interface for saving the image, on the right side of the window, you need to adjust a few options. Select the Modified option to display the meshes with their modifiers applied, such as Subdivision Surface. (This setting is important because it allows you to see how the final mesh, on which the textures are going to be projected, will appear.) The All UVs option ensures that every UV is shown in the image, so enable it as well. For the resolution, 2048 × 2048 could work, but increase it to 4096 × 4096 so that you have enough room for details and so that it fits the final texture’s size. As for the format, select .png. (You can also export vector images in .svg or .eps format.)
Select where you want to save the image, type its name, and click Export UV Layout. If you open the generated image, you should see something similar to Figure 9.6.
In the next section, I describe a typical method you can use to create your texture in 2D image-editing software.
Loading the UVs and Base Elements
First, load the reference images: the base elements you painted inside Blender. Then load the UV Layout image you exported from Blender. Place these images on the top layers, using Multiply blend mode (which makes only the dark areas visible and leaves the rest of the image transparent), so that you can turn the images on and off over your texture to check that everything is in place.
Adding Base Colors
The next steps are refining and cleaning the lines you painted in Blender. Then you can start filling the areas with colors. You can pick these colors from the color-scheme images you created during the character’s design process.
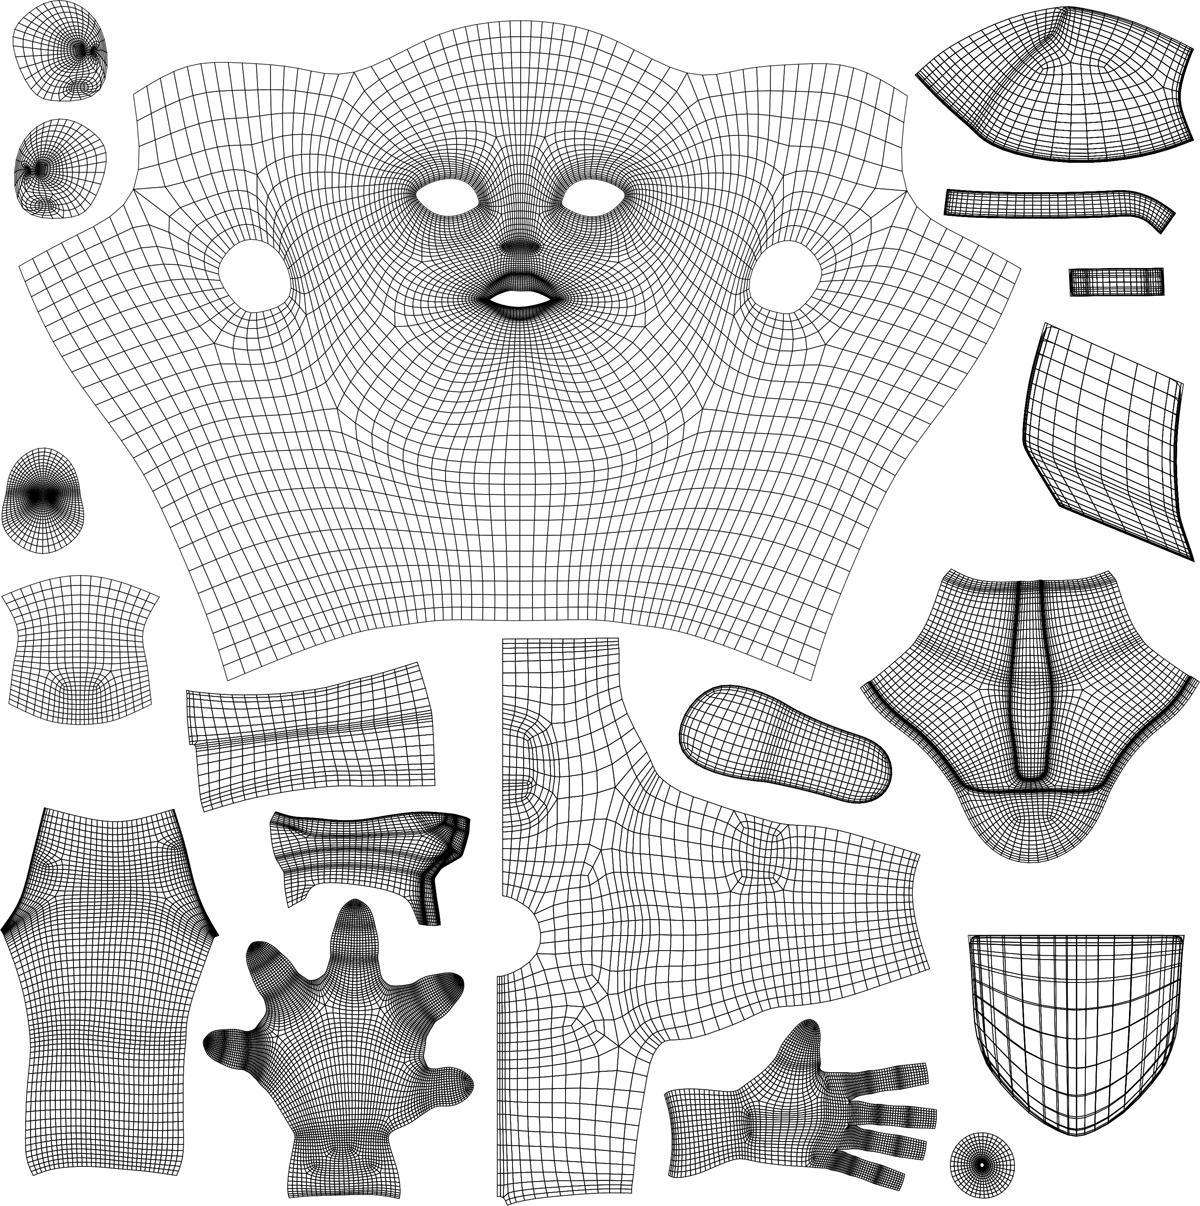
Figure 9.6 You can export the UVs in an image format and then adapt your images and painting to those UVs. This way, the images are projected correctly onto the surface of your 3D model.
Adding Details
When you’re done with the texture’s base colors, you can start painting the details. This example is pretty simple, with flat colors, but you can add as much detail as you want (depending on what you want to achieve in terms of the character’s style).
You could add details such as thick gray lines in the clothing seams, a symbol on the badge, a darker lip color, and a little blush on the cheeks. You can also add soft shadows, wrinkles in the cloth, and other small details.
Applying the Final Touches
Finally, add a little more life to the texture by overlaying a photo of some noisy texture (such as leather or dirt) or perhaps painting with a brush that uses a texture. You can also define certain parts a little more. This stage is where you finish the texture. You can see the resulting texture in Figure 9.7.

Figure 9.7 Example of a texture created with this method, taken from an edition of this book published before 3D texturing software was commonplace
Generating Other Texture Channels
As mentioned earlier in this chapter, materials have different channels, and they need textures in each channel to control how they affect the result. If you’re using 2D image-editing software, you’d need to adjust the created image to generate those other channels.
Although this process is possible (and was common for many years), it’s cumbersome, and a lot of trial and error is involved in achieving the proper results.
You’ll see examples of other textures for different channels in the next section.
3D Texturing Software
This modern texturing process has become a standard, and the textures generated here are the ones that Jim will finally use. You can use other programs, but in this case, I use Substance Painter, one of the texturing programs from the Substance Suite by Adobe.
Exporting/Importing the 3D Model
The first step is exporting the parts of the model that need textures from Blender to Substance Painter. Generally, the most common format for such things nowadays is .fbx, supported by nearly every kind of 3D software.
To export the file, select the objects that need textures in Blender, choose File > Export option, and select .fbx format in the resulting list. The Export window pops up. Name the file, choose where it will be saved, and select the Selected Only option to ensure that only the objects that need textures are sent to Substance Painter.
When you create a new project in Substance Painter, you simply need to load the .fbx file you just exported.
Something else to remember is that there are two systems for calculating normal maps (textures that can give the illusion of bumps on the surface): OpenGL and DirectX. Blender uses OpenGL, so you should choose that option to avoid issues when you export the textures to Blender later.
Texturing Process
I won’t go into details here, as Substance Painter is outside the scope of this book, but I’d like to briefly explain how the process works so you understand it.
First, after loading the model, you generally bake maps. What does this mean? Substance Painter generates several images based on the model, such as proximity of objects (Ambient Occlusion), the directions in which different parts of the model look (World Normals), the angles and corners (Curvature), and the objects that make up the model (ID Colors). These images generally aren’t seen in the final textures, but they can be used to create effects, masks, and so on.
Jim is made up of many materials, but you don’t need a different material for each part of the object. The appearance of each part of the object is defined by the textures you paint, so you can paint Jim’s face to have different properties from those of his jacket or pants, such as different colors, roughness (how intense the reflections are), or metalness (whether a surface is metallic).
Each part of the character typically starts with a Fill layer that allows you to set the base parameters for that area; then that layer can be mixed with other layers to add details and effects.
In 2D image-editing software, a layers stack allows you to have different elements on different layers so that you can edit them separately and control how they mix with the layers below. In Substance Painter, you have several parallel layers, each for a different channel. Bit by bit, you keep adding layers, effects, and details until you’re happy with the result.
You can also add automatic effects or use particle brushes, perhaps to spray dirt on the character and see how the falling particles of dirt paint on the surface of the material.
While you paint, you can preview the 3D model under different lighting situations by selecting an environment, and you can see the textures on the UVs in case some operation might be easier to do in two dimensions.
When you’re done, export the created textures in an image format that can be loaded into the Blender materials.
Painting textures is a really fun experience, and I highly recommend trying these techniques. You can see the resulting images in Figure 9.8. You’ll learn more about what these textures do to the material in Chapter 10, “Materials and Shaders.”
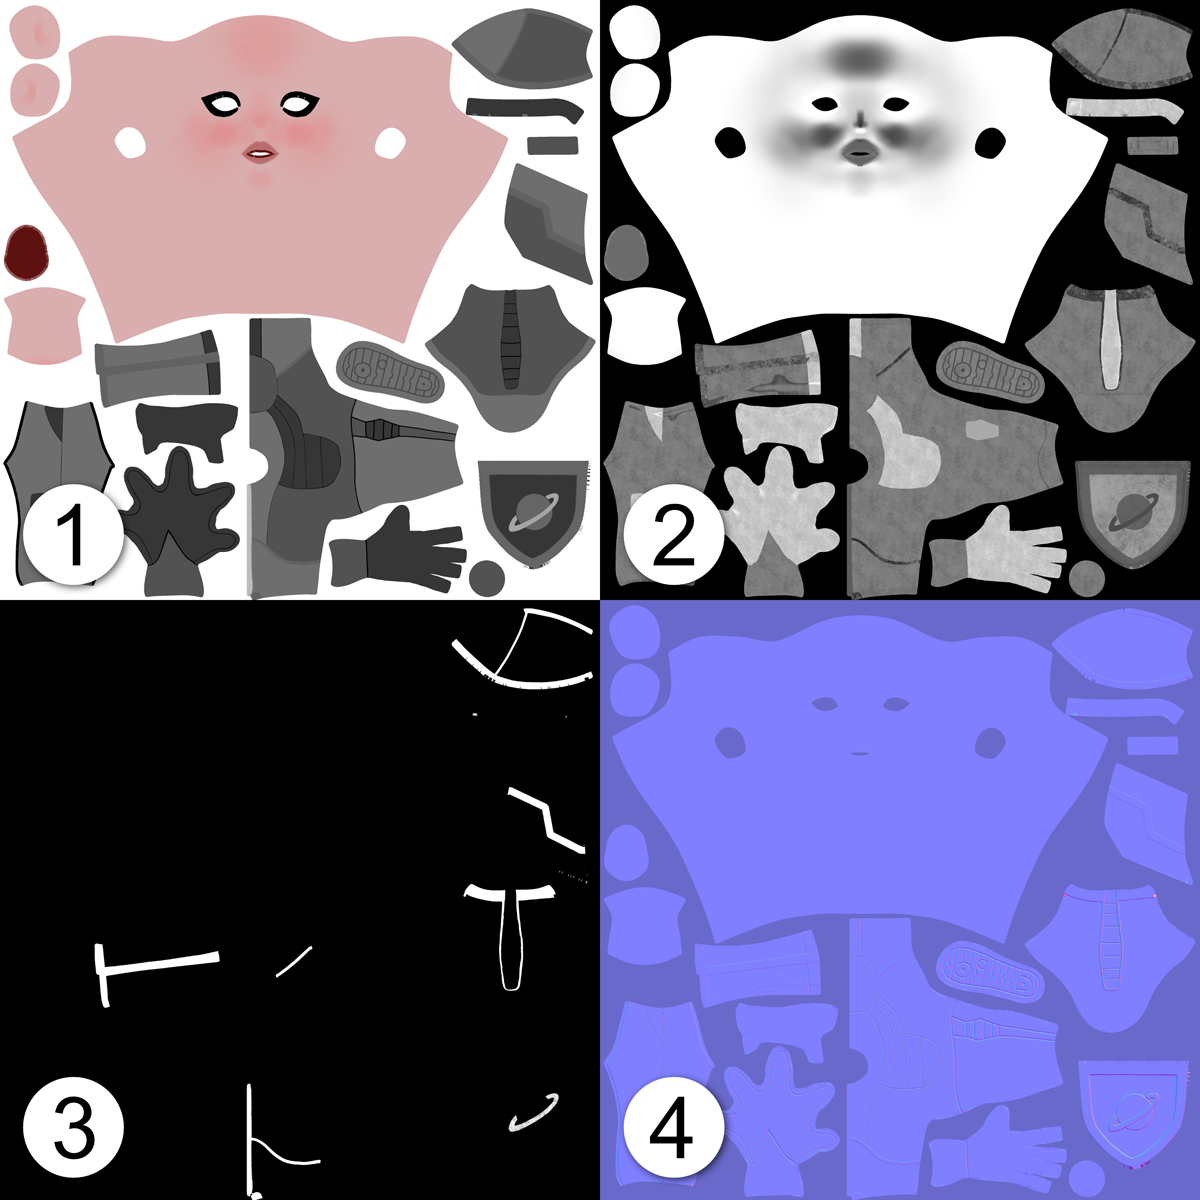
Figure 9.8 Textures generated with Substance Painter: base color (1), roughness (2), metalness (3), and normals (4)
Seeing the Painted Character in Blender
If you haven’t done so already, it’s time to load the texture into Blender to see how it looks on various parts of the character. Don’t hesitate to go back and forth between your 2D editing software and Blender to refine the texture as needed and to test it on your model. Figure 9.9 shows Jim’s model with the texture projected onto it. To do that, load the base color texture in the base-color parameter of the objects’ material. In Chapter 10, you’ll learn how to load the textures for other channels to complete the look of the materials.
Some parts still have the mesh color without texture or anything else on them. Those parts will get their color from the Blender material that you apply to them in Chapter 10, so they don’t need textures.

Figure 9.9 Base color texture applied to Jim’s material in the objects that will use textures instead of flat-colored materials
Summary
Texturing can be a lot of fun; it’s a creative process, and you can take it as far as you want. Applying textures is the point in the process where you have the opportunity to make a character model look the way you want it. If you want realism, I recommend that you use photos to create your textures (skin, wood, grass, sand, and virtually everything else) instead of painting them manually. In Jim’s case, the style isn’t photorealistic, so using basic textures to define the colors and adding some details is fine.
I mentioned it at the start of the chapter, but I’ll say it again: Textures and materials work together, so it may be difficult for you to understand one without the other. I recommend that you also check out Chapter 10 for a complete view of how they interact.
If you’re interested in creating really cool textures, you may want to learn how to use programs to edit images and paint textures and then combine them with Blender. These programs are only tools, of course, so it would also be helpful to learn the artistic part of painting (such as color theory) so that you can make the most of your textures and achieve great results. These programs are really powerful, allowing you to create awesome textures that bring your characters to life!
Exercises
Use the method of unwrapping after texturing by downloading the texture from this book’s companion website and making the UVs fit that texture.
Compose photos of skin or cloth in your image editor to make the texture look more realistic.