
We need to get started with Unreal Engine.
Tip
A word of warning: when you open your first Unreal project, you will find that the code looks very complicated. Don't get discouraged. Simply focus on the highlighted parts. Throughout your career as a programmer, you will often have to deal with very large code bases containing sections that you do not understand. However, focusing on the parts that you do understand will make this section productive.
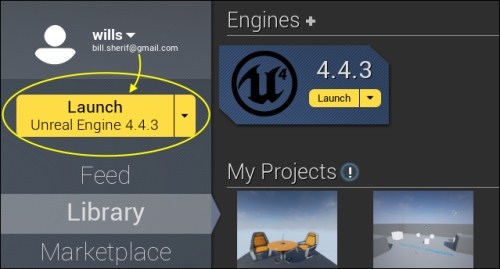
Open the Unreal Engine Launcher app (which has the blue-colored UE4 icon ![]() ). Select Launch Unreal Engine 4.4.3, as shown in the following screenshot:
). Select Launch Unreal Engine 4.4.3, as shown in the following screenshot:
Once the engine is launched (which might take a few seconds), you will be in the Unreal Project Browser screen (black-colored UE4 icon ![]() ), as shown in the following screenshot.
), as shown in the following screenshot.
Now, select the New Project tab in the UE4 project browser. Scroll down until you reach Code Puzzle. This is one of the simpler projects that doesn't have too much code, so it's good to start with. We'll go to the 3D projects later.
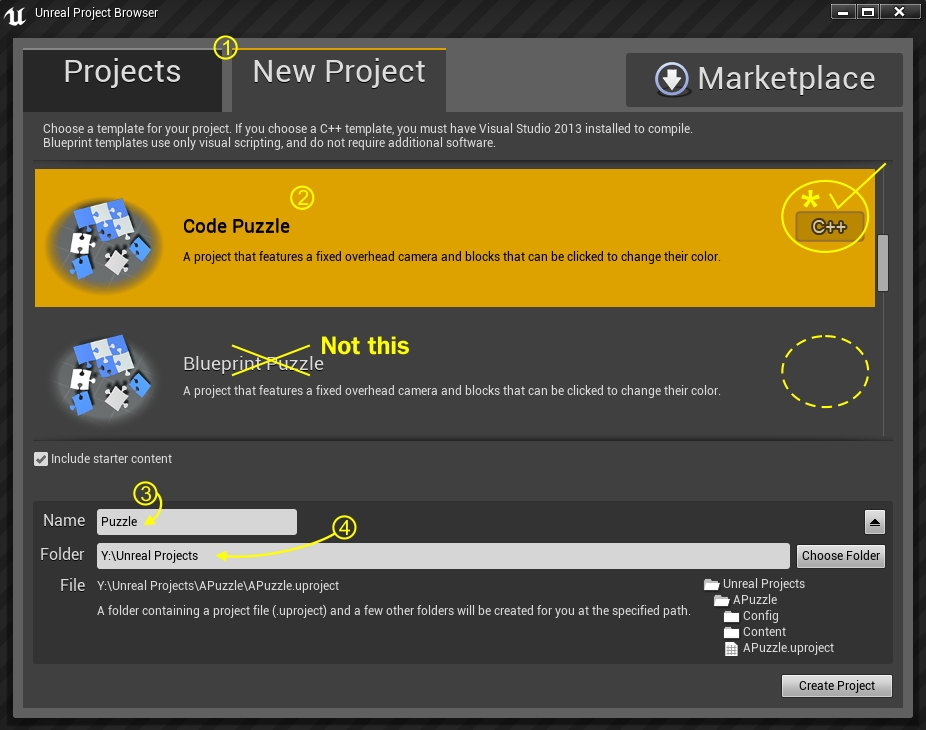
Here are a few things to make a note of in this screen:
- Be sure you're in the New Project tab
- When you click on Code Puzzle, make sure that it is the one with the C++ icon at the right, not Blueprint Puzzle
- Enter a name for your project,
Puzzle, in the Name box (this is important for the example code I will give you to work on later) - If you want to change the storage folder (to a different drive), click the down arrow so that the folder appears. Then, name the directory where you want to store your project.
After you've done all this, select Create Project.
Visual Studio 2013 will open with the code of your project.
Press Ctrl+F5 to build and launch the project.
Once the project compiles and runs, you should see the Unreal Editor, as shown in the following screenshot:

Looks complicated? Oh boy, it sure is! We'll explore some of the functionality in the toolbars at the side later. For now, just select Play (marked in yellow), as shown in the preceding screenshot.
This launches the game. This is how it should look:

Now, try clicking on the blocks. As soon as you click on a block, it turns orange, and this increases your score.
What we're going to do is find the section that does this and change the behavior a little.
Find and open the PuzzleBlock.cpp file.
Inside this file, scroll down to the bottom, where you'll find a section that begins with the following words:
void APuzzleBlock::BlockClicked(UPrimitiveComponent* ClickedComp)
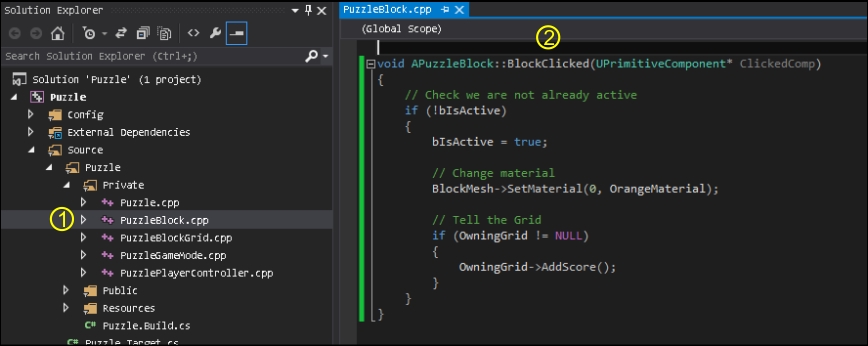
APuzzleBlock is the class name, and
BlockClicked is the function name. Whenever a puzzle block gets clicked on, the section of code from the starting { to the ending } is run. Hopefully, exactly how this happens will make more sense later.
It's kind of like an if statement in a way. If a puzzle piece is clicked on, then this group of the code is run for that puzzle piece.
We're going to walk through the steps to make the blocks flip colors when they are clicked on (so, a second click will change the color of the block from orange back to blue).
Perform the following steps with the utmost care:
- Open
PuzzleBlock.hfile. After line 25 (which has this code):/** Pointer to orange material used on active blocks */ UPROPERTY() class UMaterialInstance* OrangeMaterial;
Insert the following code after the preceding lines of code:
UPROPERTY()
class UMaterialInstance* BlueMaterial;
- Now, open
PuzzleBlock.cppfile. After line 40 (which has this code):// Save a pointer to the orange material OrangeMaterial = ConstructorStatics.OrangeMaterial.Get();
Insert the following code after the preceding lines:
BlueMaterial = ConstructorStatics.BlueMaterial.Get();
- Finally, in
PuzzleBlock.cpp, replace the contents of thevoid APuzzleBlock::BlockClickedsection of code (line 44) with the following code:void APuzzleBlock::BlockClicked(UPrimitiveComponent* ClickedComp) { // --REPLACE FROM HERE-- bIsActive = !bIsActive; // flip the value of bIsActive // (if it was true, it becomes false, or vice versa) if ( bIsActive ) { BlockMesh->SetMaterial(0, OrangeMaterial); } else { BlockMesh->SetMaterial(0, BlueMaterial); } // Tell the Grid if(OwningGrid != NULL) { OwningGrid->AddScore(); } // --TO HERE-- }
So, let's analyze this. This is the first line of code:
bIsActive = !bIsActive; // flip the value of bIsActive
This line of code simply flips the value of bIsActive. bIsActive is a bool variable (it is created in APuzzleBlock.h). If bIsActive is true, !bIsActive will be false. So, whenever this line of code is hit (which happens with a click on any block), the bIsActive value is reversed (from true to false or from false to true).
Let's consider the next block of code:
if ( bIsActive )
  {
    BlockMesh->SetMaterial(0, OrangeMaterial);
  }
  else
  {
    BlockMesh->SetMaterial(0, BlueMaterial);
  }
We are simply changing the block color. If bIsActive is true, then the block becomes orange. Otherwise, the block turns blue.
By now, you should notice that the best way to get better at programming is by doing it. You have to practice programming a lot to get significantly better at it.
Create two integer variables, called x and y, and read them in from the user. Write an if/else statement pair that prints the name of the bigger-valued variable.
The solution of the preceding exercise is shown in the following block of code:
int x, y;
cout << "Enter two numbers integers, separated by a space " << endl;
cin >> x >> y;
if( x < y )
{
  cout << "x is less than y" << endl;
}
else
{
  cout << "x is greater than y" << endl;
}In the previous sections, we were only able to make the code branch in one of the two ways. In pseudocode, we had the following code:
if( some condition is true )
{
  execute this;
}
else // otherwise
{
  execute that;
}This code is a little bit like a metaphorical fork in the road, with only one of two directions to choose from.
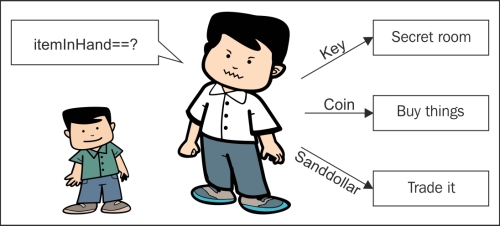
Sometimes, we might want to branch the code in more than just two directions. We might want the code to branch in three ways, or even more. For example, say the direction in which the code goes depends on what item the player is currently holding. The player can be holding one of three different items: a coin, key, or sand dollar. And C++ allows that! In fact, in C++, you can branch in any number of directions as you wish.
The
else if statement is a way to code in more than just two possible branch directions. In the following code example, the code will go in one of the three different ways, depending on whether the player is holding the Coin, Key, or Sanddollar objects:
#include <iostream>
using namespace std;
int main()
{
  enum Item  // enums define a new type of variable!
  {
    Coin, Key, Sanddollar // variables of type Item can have
    // any one of these 3 values
  }
  Item itemInHand = Key;  // Try changing this value to Coin,
                          // Sanddollar
  if( itemInHand == Key )
  {
    cout << "The key has a lionshead on the handle." << endl;
    cout << "You got into a secret room using the Key!" << endl;
  }
  else if( itemInHand == Coin )
  {
    cout << "The coin is a rusted brassy color. It has a picture  of a lady with a skirt." << endl;
    cout << "Using this coin you could buy a few things" << endl;
  }
  else if( itemInHand == Sanddollar )
  {
    cout << "The sanddollar has a little star on it." << endl;
    cout << "You might be able to trade it for something." <<  endl;
  }
  return 0;
}
Use C++ program to answer the questions that follow. Be sure to try these exercises in order to gain fluency with these equality operators.
#include <iostream>
using namespace std;
int main()
{
  int x;
  int y;
  cout << "Enter an integer value for x:" << endl;
  cin >> x; // This will read in a value from the console
  // The read in value will be stored in the integer
  // variable x, so the typed value better be an integer!
  cout << "Enter an integer value for y:" << endl;
  cin >> y;
  cout << "x = " << x << ", y = " << y << endl;
  // *** Write new lines of code here
}
Write some new lines of code at the spot that says (// *** Write new...):
- Check whether
xandyare equal. If they are equal, printx and y are equal. Otherwise, printx and y are not equal. - An exercise on inequalities: check whether
xis greater thany. If it is, printx is greater than y. Otherwise, printy is greater than x.
To evaluate equality, insert the following code:
if( x == y )
{
  cout << "x and y are equal" << endl;
}
else
{
  cout << "x and y are not equal" << endl;
}
To check which value is greater insert the following code:
if( x > y )
{
  cout << "x is greater than y" << endl;
}
else if( x < y )
{
  cout << "y is greater than x" << endl;
}
else // in this case neither x > y nor y > x
{
  cout << "x and y are equal" << endl;
}
The switch statement allows your code to branch in multiple ways. What the switch statement will do is look at the value of a variable, and depending on its value, the code will go in a different direction.
We'll also introduce the enum construct here:
#include <iostream>
using namespace std;
enum Food // enums define a new type of variable!
{
// a variable of type Food can have any of these values
Fish,
Bread,
Apple,
Orange
};
int main()
{
Food food = Bread; // Change the food here
switch( food )
{
case Fish:
cout << "Here fishy fishy fishy" << endl;
break;
case Bread:
cout << "Chomp! Delicious bread!" << endl;
break;
case Apple:
cout << "Mm fruits are good for you" << endl;
break;
case Orange:
cout << "Orange you glad I didn't say banana" << endl;
break;
default: // This is where you go in case none
// of the cases above caught
cout << "Invalid food" << endl;
break;
}
return 0;
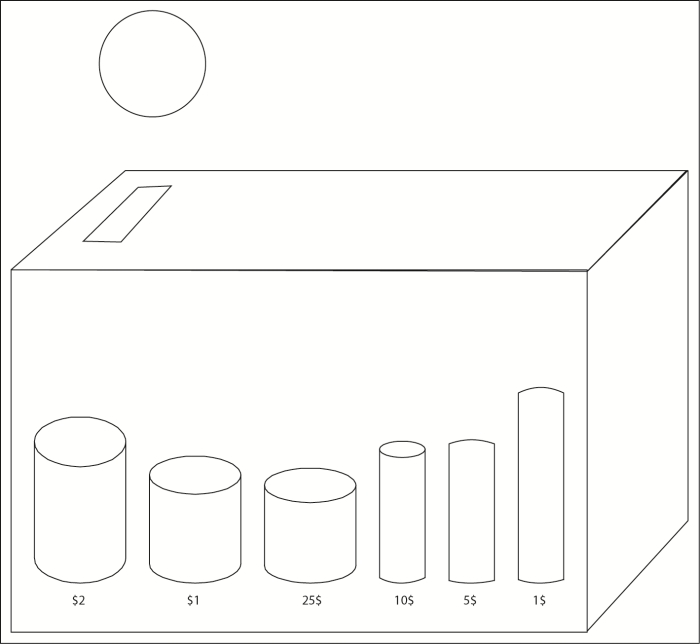
}Switches are like coin sorters. When you drop 25 cent into the coin sorter, it finds its way into the 25 cent pile. Similarly, a switch statement will simply allow the code to jump down to the appropriate section. The example of sorting the coins is shown in the following figure:
The code inside the switch statement will continue to run (line by line) until the break; statement is hit. The break statement jumps you out of the switch statement. Take a look at the following diagram to understand how the switch works:
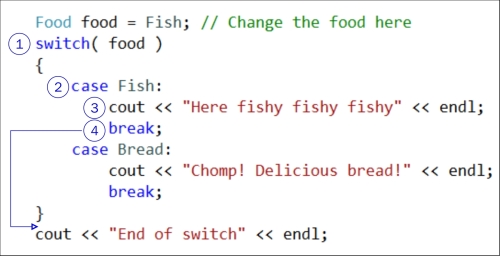
- First, the
Foodvariable is inspected. What value does it have? In this case, it hasFishinside it. - The
switchcommand jumps down to the correct case label. (If there is no matching case label, the switch will just be skipped). - The
coutstatement is run, andHere fishy fishy fishyappears on the console. - After inspecting the variable and printing the user response, the break statement is hit. This makes us stop running lines of code in the switch and exit the switch. The next line of code that is run is just what would otherwise have been the next line of code in the program if the switch had not been there at all (after the closing curly brace of the switch statement). It is the print statement at the bottom, which says "End of switch".
Switches are like the if / else if / else chains from earlier. However, switches can generate code faster than if / else if / else if / else chains. Intuitively, switches only jump to the appropriate section of the code to execute. If / else if / else chains might involve more complicated comparisons (including logical comparisons), which might take more CPU time. The main reason you will use the if statements is to do more with your own custom comparisons inside the brackets.
Sometimes, programmers want to group multiple values under the same switch case label. Say, we have an enum, object as follows:
enum Vegetables { Potato, Cabbage, Broccoli, Zucchini };A programmer wants to group all the greens together, so he writes a switch statement as follows:
switch( veg )
{
case Zucchini:	// zucchini falls through because no break
case Broccoli:	// was written here
  cout << "Greens!" << endl;
  break;
default:
  cout << "Not greens!" << endl;
  break;
}
In this case, Zucchini falls through and executes the same code as Broccoli. The non-green vegetables are in the default case label. To prevent a fall through, you have to remember to insert an explicit break statement after each case label.
We can write another version of the same switch that does not let Zucchini fall through, by the explicit use of the keyword break in the switch:
switch( veg )
{
case Zucchini:	// zucchini no longer falls due to break
  cout << "Zucchini is a green" << endl;
  break;// stops case zucchini from falling through
case Broccoli:	// was written here
  cout << "Broccoli is a green" << endl;
  break;
default:
  cout << "Not greens!" << endl;
  break;
}
Note that it is good programming practice to break the default case as well, even though it is the last case listed.
Complete the following program, which has an enum object with a series of mounts to choose from. Write a switch statement that prints the following messages for the mount selected:
|
Horse |
The steed is valiant and mighty |
|
Mare |
This mare is white and beautiful |
|
Mule |
You are given a mule to ride. You resent that. |
|
Sheep |
Baa! The sheep can barely support your weight. |
|
Chocobo |
Chocobo! |
Remember, an enum object is really an int statement. The first entry in an enum object is by default 0, but you can give the enum object any starting value you wish using the = operator. Subsequent values in the enum object are ints arranged in order.
Tip
Bit-shifted enum
A common thing to do in an enum object is to assign a bit-shifted value to each entry:
enum WindowProperties
{
  Bordered    = 1 << 0, // binary 001
  Transparent = 1 << 1, // binary 010
  Modal       = 1 << 2  // binary 100
};
The bit-shifted values should be able to combine the window properties. This is how the assignment will look:
// bitwise OR combines properties
WindowProperties wp = Bordered | Modal;
Checking which WindowProperties have been set involves a check using bitwise AND:
// bitwise AND checks to see if wp is Modal
if( wp & Modal )
{
cout << "You are looking at a modal window" << endl;
}
Bit shifting is a technique that is slightly beyond the scope of this text, but I've included this tip just so you know about it.
The solution of the preceding exercise is shown in the following code:
#include <iostream>
using namespace std;
enum Mount
{
  Horse=1, Mare, Mule, Sheep, Chocobo
  // Since Horse=1, Mare=2, Mule=3, Sheep=4, and Chocobo=5.
};
int main()
{
  int mount;  // We'll use an int variable for mount
              // so cin works
  cout << "Choose your mount:" << endl;
  cout << Horse << " Horse" << endl;
  cout << Mare << " Mare" << endl;
  cout << Mule << " Mule" << endl;
  cout << Sheep << " Sheep" << endl;
  cout << Chocobo << " Chocobo" << endl;
  cout << "Enter a number from 1 to 5 to choose a mount" << endl;
  cin >> mount;
    // Write your switch here. Describe what happens
    // when you mount each animal in the switch below
  switch( mount )
  {
    default:
      cout << "Invalid mount" << endl;
      break;
  }
return 0;
}