
There are a few different types of attacks that monsters can do. Depending on the type of the Monster character, a monster's attack might be melee (close range) or ranged (projectile weapon).
The Monster character will attack the player whenever the player is in his AttackRangeSphere. If the player is out of the range of the monster's AttackRangeSphere but the player is in the SightSphere object of the monster, then the monster will move closer to the player until the player is in the monster's AttackRangeSphere.
The dictionary definition of melee is a confused mass of people. A melee attack is one that is done at a close range. Picture a bunch of zerglings battling it out with a bunch of ultralisks (if you're a StarCraft player, you'll know that both zerglings and ultralisks are melee units). Melee attacks are basically close range, hand-to-hand combat. To do a melee attack, you need a melee attack animation that turns on when the monster begins his melee attack. To do this, you need to edit the animation blueprint in Persona, UE4's animation editor.
Tip
Zak Parrish's Persona series is an excellent place to get started with in order to program animations in blueprints: https://www.youtube.com/watch?v=AqYmC2wn7Cg&list=PL6VDVOqa_mdNW6JEu9UAS_s40OCD_u6yp&index=8.
For now, we will just program the melee attack and then worry about modifying the animation in blueprints later.
There are going to be three parts to defining our melee weapon. The first part is the C++ code that represents it. The second is the model, and the third is to connect the code and model together using a UE4 blueprint.
We will define a new class, AMeleeWeapon (derived from AActor), to represent hand-held combat weapons. I will attach a couple of blueprint-editable properties to the AMeleeWeapon class, and the AMeleeWeapon class will look as shown in the following code:
class AMonster;

UCLASS()
class GOLDENEGG_API AMeleeWeapon : public AActor
{
  GENERATED_UCLASS_BODY()

  // The amount of damage attacks by this weapon do
  UPROPERTY(EditAnywhere, BlueprintReadWrite, Category =  MeleeWeapon)
  float AttackDamage;

  // A list of things the melee weapon already hit this swing
  // Ensures each thing sword passes thru only gets hit once
  TArray<AActor*> ThingsHit;

  // prevents damage from occurring in frames where
  // the sword is not swinging
  bool Swinging;

  // "Stop hitting yourself" - used to check if the
  // actor holding the weapon is hitting himself
  AMonster *WeaponHolder;

  // bounding box that determines when melee weapon hit
  UPROPERTY(VisibleDefaultsOnly, BlueprintReadOnly, Category =  MeleeWeapon)
  UBoxComponent* ProxBox;

  UPROPERTY(VisibleDefaultsOnly, BlueprintReadOnly, Category =  MeleeWeapon)
  UStaticMeshComponent* Mesh;

  UFUNCTION(BlueprintNativeEvent, Category = Collision)
  void Prox( AActor* OtherActor, UPrimitiveComponent* OtherComp,  int32 OtherBodyIndex, bool bFromSweep, const FHitResult &  SweepResult );
  void Swing();
  void Rest();
};
Notice how I used a bounding box for ProxBox, and not a bounding sphere. This is because swords and axes will be better approximated by boxes rather than spheres. There are two member functions, Rest() and Swing(), which let MeleeWeapon know what state the actor is in (resting or swinging). There's also a TArray<AActor*> ThingsHit property inside this class that keeps track of the actors hit by this melee weapon on each swing. We are programming it so that the weapon can only hit each thing once per swing.
The AMeleeWeapon.cpp file will contain just a basic constructor and some simple code to send damages to OtherActor when our sword hits him. We will also implement the Rest() and Swing() functions to clear the list of things hit. The MeleeWeapon.cpp file has the following code:
AMeleeWeapon::AMeleeWeapon(const class FObjectInitializer& PCIP) :  Super(PCIP)
{
  AttackDamage = 1;
  Swinging = false;
  WeaponHolder = NULL;

  Mesh = PCIP.CreateDefaultSubobject<UStaticMeshComponent>(this,  TEXT("Mesh"));
  RootComponent = Mesh;

  ProxBox = PCIP.CreateDefaultSubobject<UBoxComponent>(this,  TEXT("ProxBox"));
  ProxBox->OnComponentBeginOverlap.AddDynamic( this,  &AMeleeWeapon::Prox );
  ProxBox->AttachTo( RootComponent );
}

void AMeleeWeapon::Prox_Implementation( AActor* OtherActor,  UPrimitiveComponent* OtherComp, int32 OtherBodyIndex, bool  bFromSweep, const FHitResult & SweepResult )
{
  // don't hit non root components
  if( OtherComp != OtherActor->GetRootComponent() )
  {
    return;
  }

  // avoid hitting things while sword isn't swinging,
  // avoid hitting yourself, and
  // avoid hitting the same OtherActor twice
  if( Swinging && OtherActor != WeaponHolder &&  !ThingsHit.Contains(OtherActor) )
  {
    OtherActor->TakeDamage( AttackDamage + WeaponHolder- >BaseAttackDamage, FDamageEvent(), NULL, this );
    ThingsHit.Add( OtherActor );
  }
}
void AMeleeWeapon::Swing()
{
  ThingsHit.Empty();  // empty the list
  Swinging = true;
}
void AMeleeWeapon::Rest()
{
  ThingsHit.Empty();
  Swinging = false;
}To complete this exercise, we need a sword to put into the model's hand. I added a sword to the project called Kilic from http://tf3dm.com/3d-model/sword-95782.html by Kaan Gülhan. The following is a list of other places where you will get free models:
Tip
Secret tip
It might appear at first on TurboSquid.com that there are no free models. In fact, the secret is that you have to search in the price range $0-$0 to find them. $0 means free.

TurboSquid's search for free swords
I had to edit the kilic sword mesh slightly to fix the initial sizing and rotation. You can import any mesh in the Filmbox (FBX) format into your game. The kilic sword model is in the sample code package for Chapter 11, Monsters.
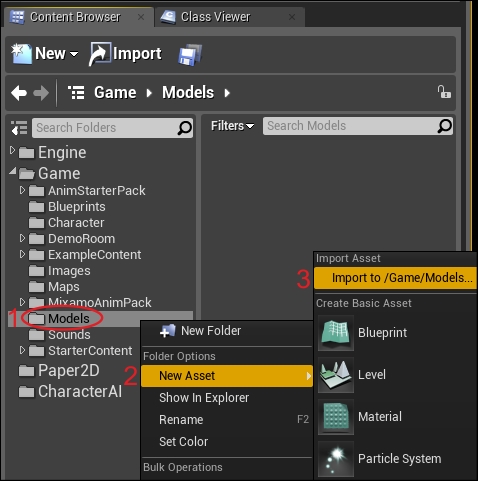
To import your sword into the UE4 editor, right-click on any folder you want to add the model to. Navigate to New Asset | Import to | Game | Models..., and from the file explorer that pops up, select the new asset you want to import. If a Models folder doesn't exist, you can create one by simply right-clicking on the tree view at the left and selecting New Folder in the pane on the left-hand side of the Content Browser tab. I selected the kilic.fbx asset from my desktop.
Importing to your project
Inside the UE4 editor, create a blueprint based off of AMeleeWeapon called BP_MeleeSword. Configure BP_MeleeSword to use the kilic blade model (or any blade model you choose), as shown in the following screenshot:
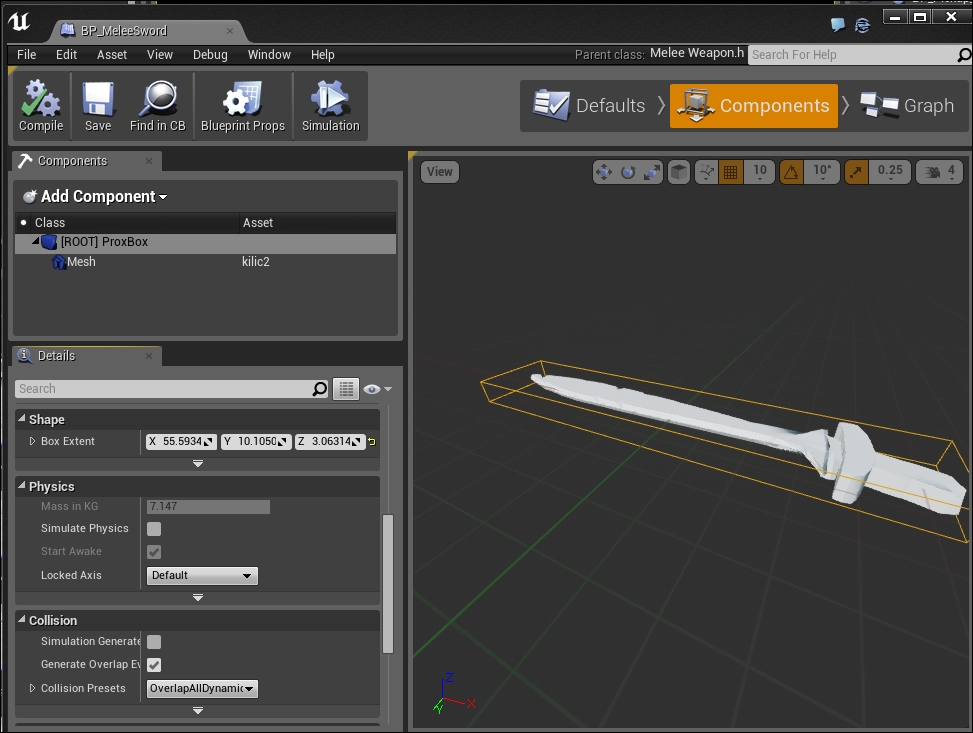
The ProxBox class will determine whether something was hit by the weapon, so we will modify the ProxBox class such that it just encloses the blade of the sword, as shown in the following screenshot:
Also, under the Collision Presets panel, it is important to select the NoCollision option for the mesh (not BlockAll). This is illustrated in the following screenshot:
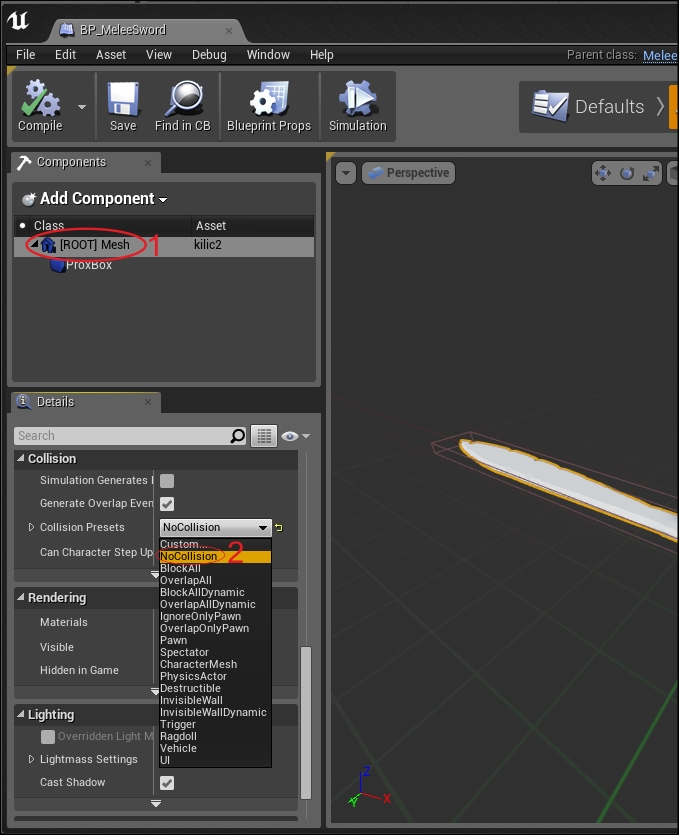
If you select BlockAll, then the game engine will automatically resolve all the interpenetration between the sword and the characters by pushing away things that the sword touches whenever it is swung. The result is that your characters will appear to go flying whenever a sword is swung.
A socket in UE4 is a receptacle on one skeletal mesh for another Actor. You can place a socket anywhere on a skeletal mesh body. After you have correctly placed the socket, you can attach another Actor to this socket in UE4 code.
For example, if we want to put a sword in our monster's hand, we'd just have to create a socket in our monster's hand. We can attach a helmet to the player by creating a socket on his head.
To attach a socket to the monster's hand, we have to edit the skeletal mesh that the monster is using. Since we used the Mixamo_Adam skeletal mesh for the monster, we have to open and edit this skeletal mesh.
To do so, double-click on the Mixamo_Adam skeletal mesh in the Content Browser tab (this will appear as the T-pose) to open the skeletal mesh editor. If you don't see Mixamo Adam in your Content Browser tab, make sure that you have imported the Mixamo Animation Pack file into your project from the Unreal Launcher app.
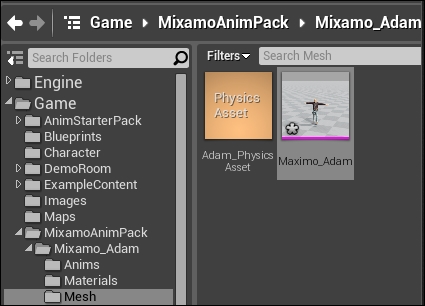
Edit the Maximo_Adam mesh by double-clicking on the Maximo_Adam skeletal mesh object
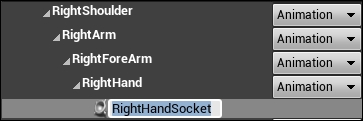
Click on Skeleton at the top-right corner of the screen. Scroll down the tree of bones in the left-hand side panel until you find the RightHand bone. We will attach a socket to this bone. Right-click on the RightHand bone and select Add Socket, as shown in the following screenshot:

You can leave the default name (RightHandSocket) or rename the socket if you like, as shown in the following screenshot:
Next, we need to add a sword to the actor's hand.
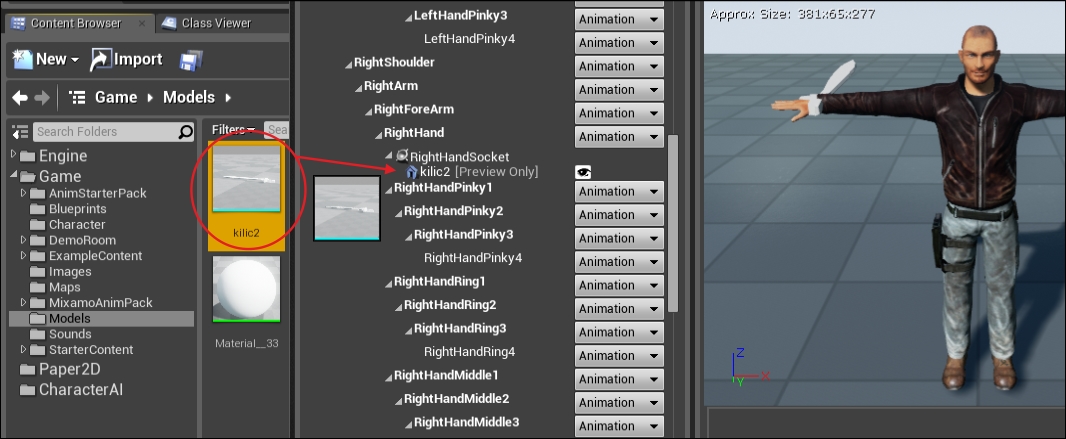
With the Adam skeletal mesh open, find the RightHandSocket option in the tree view. Since Adam swings with his right hand, you should attach the sword to his right hand. Drag and drop your sword model into the RightHandSocket option. You should see Adam grip the sword in the image of the model at the right-hand side of the following screenshot:
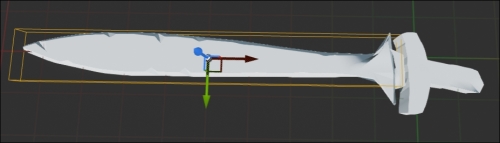
Now, click on RightHandSocket and zoom in on Adam's hand. We need to adjust the positioning of the socket in the preview so that the sword fits in it correctly. Use the move and rotate manipulators to line the sword up so that it fits in his hand correctly.
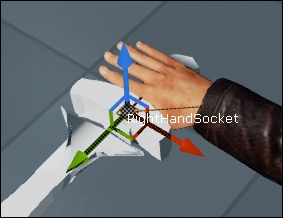
Positioning the socket in the right hand so that the sword rests correctly
You can preview your animations with the sword in the hand by going to the Animation tab in the top-right corner of the screen.
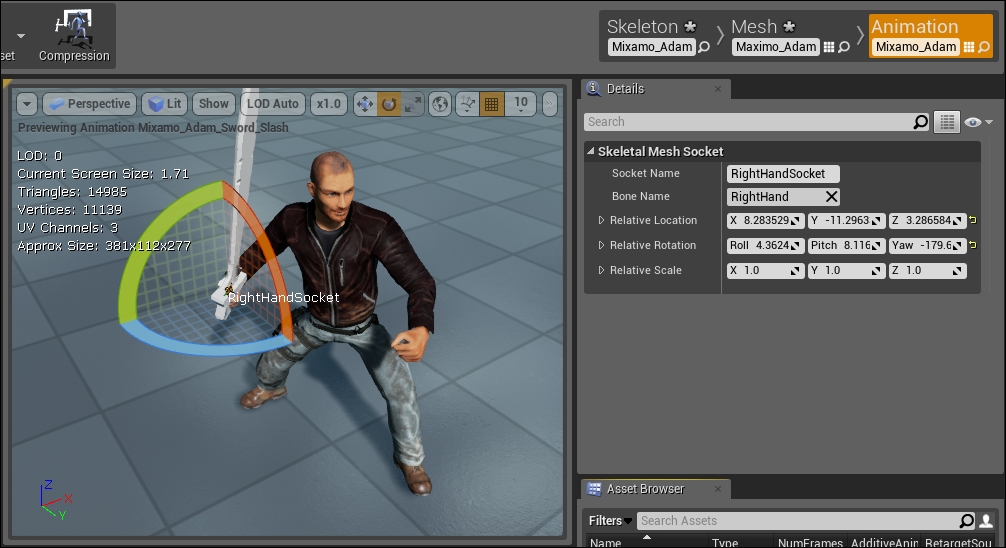
Equipping the model with a sword
However, if you launch your game, Adam won't be holding a sword. That's because adding the sword to the socket in Persona is for preview purposes only.
To equip your player with a sword from the code and permanently bind it to the actor, instantiate an AMeleeWeapon instance and attach it to RightHandSocket after the monster instance is initialized. We do this in PostInitializeComponents() since in this function the Mesh object will have been fully initialized already.
In the Monster.h file, add a hook to select the Blueprint class name (UClass) of a melee weapon to use. Also add a hook for a variable to actually store the MeleeWeapon instance using the following code:
// The MeleeWeapon class the monster uses
// If this is not set, he uses a melee attack
UPROPERTY(EditAnywhere, BlueprintReadWrite, Category =  MonsterProperties)
UClass* BPMeleeWeapon;

// The MeleeWeapon instance (set if the character is using
// a melee weapon)
AActor* MeleeWeapon;
Now, select the BP_MeleeSword blueprint in your monster's blueprint class.
In the C++ code, you need to instantiate the weapon. To do so, we need to declare and implement a PostInitializeComponents function for the Monster class. In Monster.h, add a prototype declaration:
virtual void PostInitializeComponents() override;
PostInitializeComponents runs after the monster object's constructor has completed and all the components of the object are initialized (including the blueprint construction). So it is the perfect time to check whether the monster has a MeleeWeapon blueprint attached to it or not and to instantiate this weapon if it does. The following code is added to instantiate the weapon in the Monster.cpp implementation of AMonster::PostInitializeComponents():
void AMonster::PostInitializeComponents()
{
  Super::PostInitializeComponents();

  // instantiate the melee weapon if a bp was selected
  if( BPMeleeWeapon )
  {
    MeleeWeapon = GetWorld()->SpawnActor<AMeleeWeapon>(
      BPMeleeWeapon, FVector(), FRotator() );

    if( MeleeWeapon )
    {
      const USkeletalMeshSocket *socket = Mesh->GetSocketByName(  "RightHandSocket" ); // be sure to use correct
                           // socket name!
      socket->AttachActor( MeleeWeapon, Mesh );
    }
  }
}
The monsters will now start with swords in hand if BPMeleeWeapon is selected for that monster's blueprint.
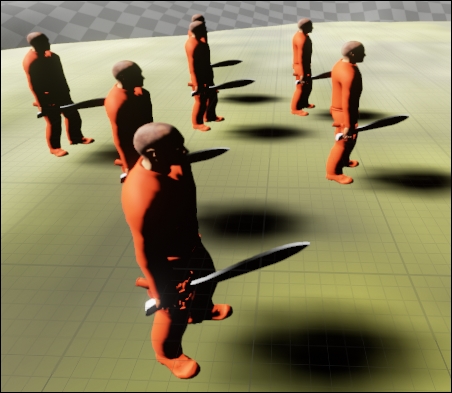
Monsters holding weapons
By default, there is no connection between our C++ Monster class and triggering the attack animation; in other words, the MixamoAnimBP_Adam class has no way of knowing when the monster is in the attack state.
Therefore, we need to update the animation blueprint of the Adam skeleton (MixamoAnimBP_Adam) to include a query in the Monster class variable listing and check whether the monster is in an attacking state. We haven't worked with animation blueprints (or blueprints in general) in this book before, but follow it step by step and you should see it come together.
Tip
I will introduce blueprints terminology gently here, but I will encourage you to have a look at Zak Parrish's tutorial series at https://www.youtube.com/playlist?list=PLZlv_N0_O1gbYMYfhhdzfW1tUV4jU0YxH for your first introduction to blueprints.
A UE4 blueprint is a visual realization of the code (not to be confused with how sometimes people say that a C++ class is a metaphorical blueprint of a class instance). In UE4 blueprints, instead of actually writing code, you drag and drop elements onto a graph and connect them to achieve desired play. By connecting the right nodes to the right elements, you can program anything you want in your game.
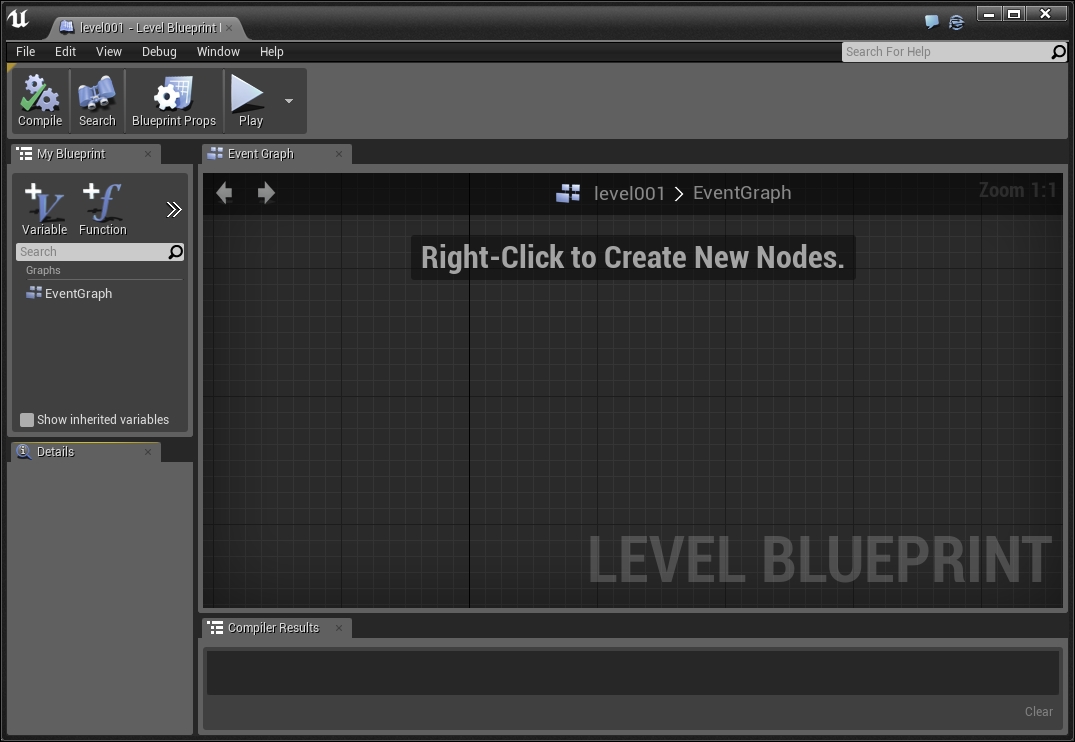
Let's start writing a sample blueprint to get a feel how they work. First, click on the blueprint menu bar at the top and select Open Level Blueprint, as shown in the following screenshot:

The Level Blueprint option executes automatically when you begin the level. Once you open this window, you should see a blank slate to create your gameplay on, as shown here:
Right-click anywhere on the graph paper. Start typing begin and click on the Event Begin Play option from the drop-down list that appears. Ensure that the Context Sensitive checkbox is checked, as shown in the following screenshot:

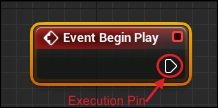
Immediately after you click on the Event Begin Play option, a red box will appear on your screen. It has a single white pin at the right-hand side. This is called the execution pin, as shown here:
The first thing that you need to know about animation blueprints is the white pin execution path (the white line). If you've seen a blueprint graph before, you must have noticed a white line going through the graph, as shown in the following diagram:
The white pin execution path is pretty much equivalent to having lines of code lined up and run one after the other. The white line determines which nodes will get executed and in what order. If a node does not have a white execution pin attached to it, then that node will not get executed at all.
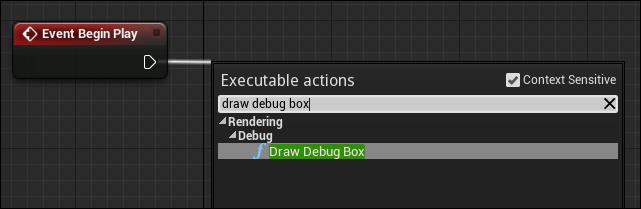
Drag off the white execution pin from Event Begin Play. Start by typing draw debug box in the Executable actions dialog. Select the first thing that pops up (f Draw Debug Box), as shown here:
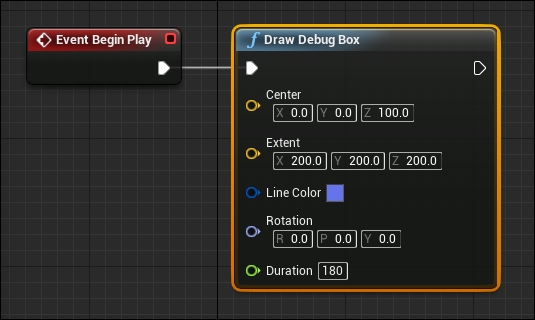
Fill in some details for how you want the box to look. Here, I selected the color blue for the box, the center of the box at (0, 0, 100), the size of the box to be (200, 200, 200), and a duration of 180 seconds (be sure to enter a duration that is long enough to see the result), as shown in the following screenshot:
Now click on the Play button to realize the graph. Remember that you have to find the world's origin to see the debug box.
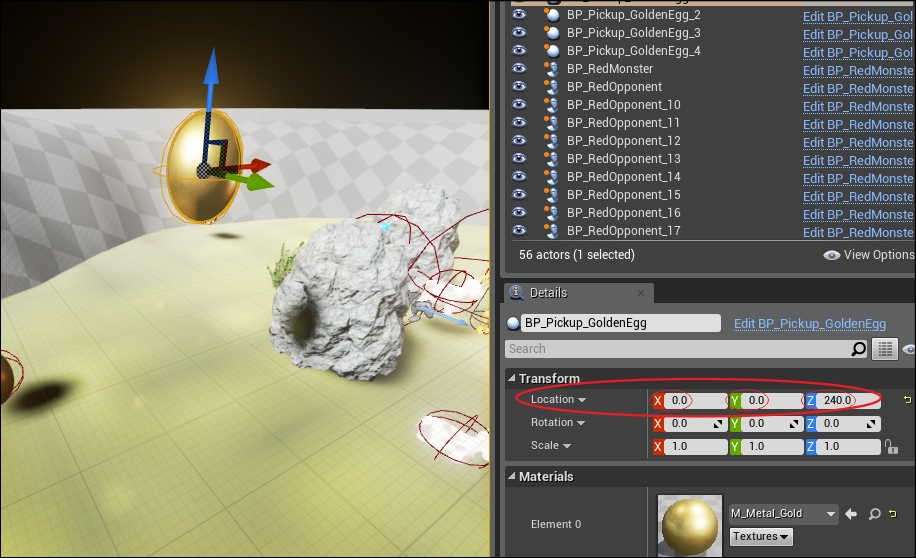
Find the world's origin by placing a golden egg at (0, 0, (some z value)), as shown in the following screenshot:
This is how the box will look in the level:

A debug box rendered at the origin
To integrate our attack animation, we have to modify the blueprint. Under Content Browser, open up MixamoAnimBP_Adam.
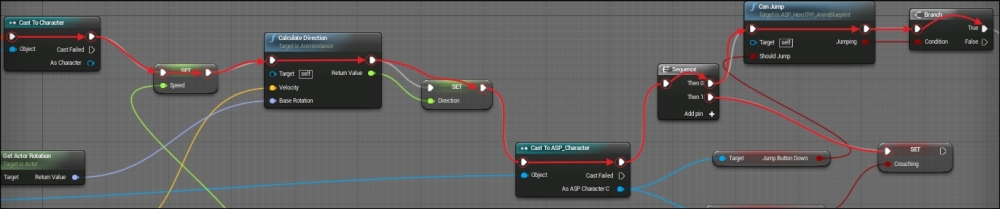
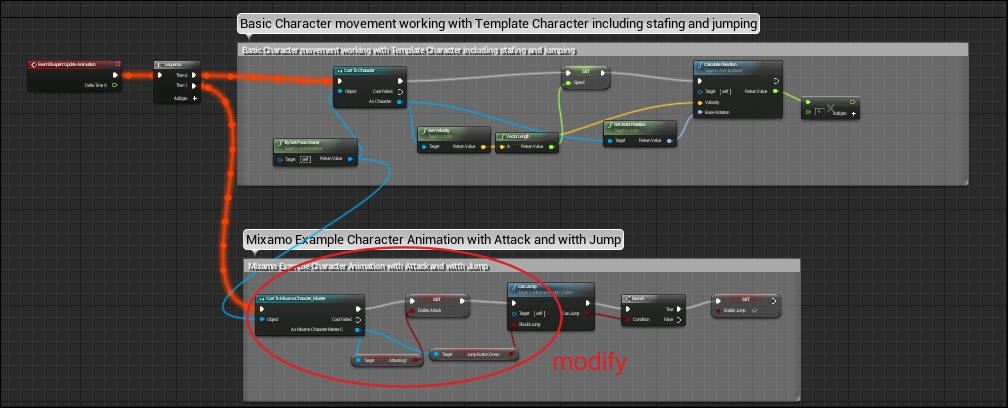
The first thing you'll notice is that the graph has two sections: a top section and a bottom section. The top section is marked "Basic Character movement...," while the bottom section says "Mixamo Example Character Animation...." Basic character movement is in charge of the walking and running movements of the model. We will be working in the Mixamo Example Character Animation with Attack and Jump section, which is responsible for the attack animation. We will be working in the latter section of the graph, shown in the following screenshot:
When you first open the graph, it starts out by zooming in on a section near the bottom. To scroll up, right-click the mouse and drag it upwards. You can also zoom out using the mouse wheel or by holding down the Alt key and the right mouse button while moving the mouse up.
Before proceeding, you might want to duplicate the MixamoAnimBP_Adam resource so that you don't damage the original, in case you need to go back and change something later. This allows you to easily go back and correct things if you find that you've made a mistake in one of your modifications, without having to reinstall a fresh copy of the whole animation package into your project.

Making a duplicate of the MixamoAnimBP_Adam resource to avoid damaging the original asset
We're going to do only a few things to make Adam swing the sword when he is attacking. Let's do it in order.
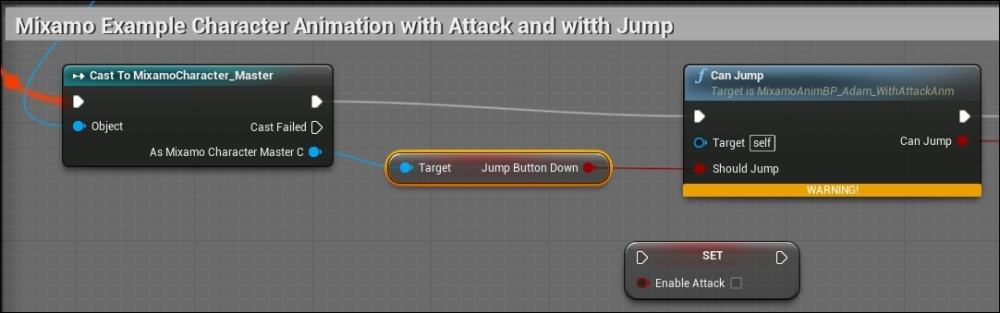
- Deleting the node that says Attacking?:
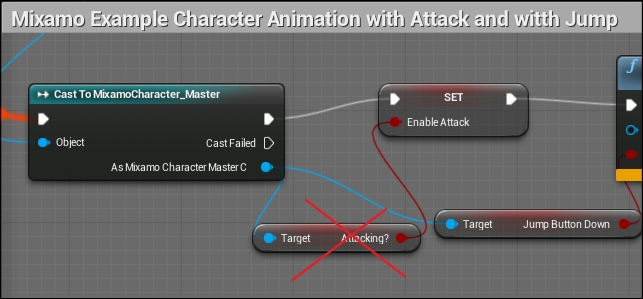
- Rearrange the nodes, as follows, with the Enable Attack node by itself at the bottom:
- Next we're going to handle the monster that this animation is animating. Scroll up the graph a bit and drag the blue dot marked as Return Value in the Try Get Pawn Owner dialog. Drop it into your graph, and when the pop-up menu appears, select Cast to Monster (ensure that Context Sensitive is checked, or the Cast to Monster option will not appear). The Try Get Pawn Owner option gets the
Monsterinstance that owns the animation, which is just theAMonsterclass object, as shown in the following screenshot: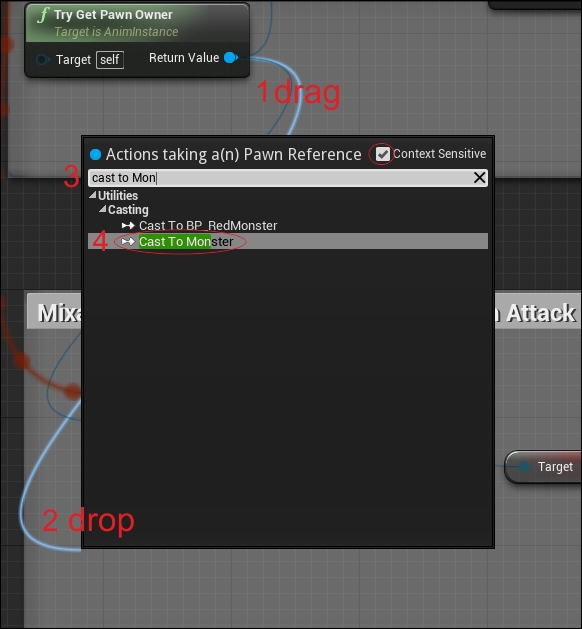
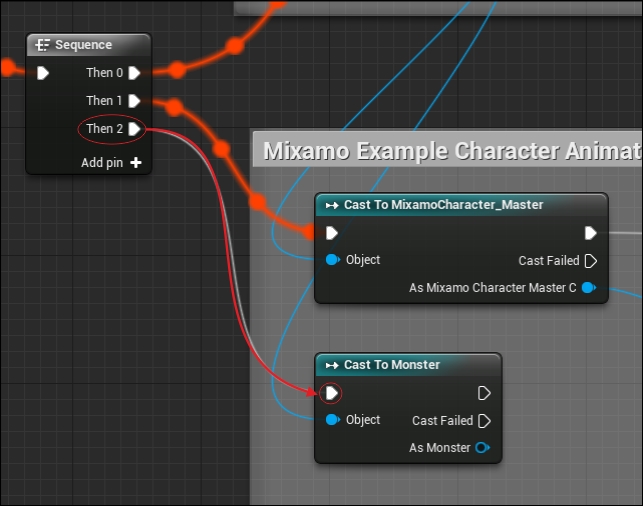
- Click on + in the Sequence dialog and drag another execution pin from the Sequence group to the Cast to Monster node instance, as shown in the following screenshot. This ensures that the Cast to Monster instance actually gets executed.
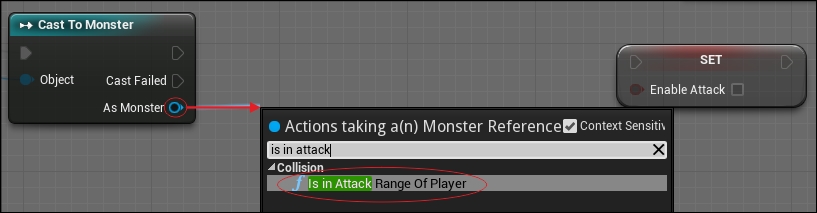
- The next step is to pull out the pin from the As Monster terminal of the Cast to Monster node and look for the Is in Attack Range Of Player property:
- Take the white execution pin from the Cast to Monster node at the left-hand side and drop it into the Is in Attack Range Of Player node at the right-hand side:
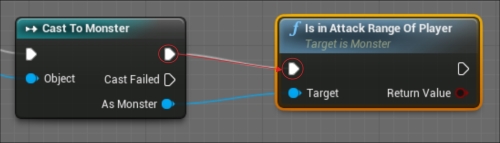
This ensures a transfer of control from the Cast to Monster operation to the Is in Attack Range Of Player node.
- Pull the white and red pins over to the SET node, as shown here:

Test your animation. The monster should swing only when he is within the player's range.
We want to add an animation notify event when the sword is swung. First, declare and add a blueprint callable C++ function to your Monster class:
// in Monster.h:
UFUNCTION( BlueprintCallable, Category = Collision )
void SwordSwung();
The BlueprintCallable statement means that it will be possible to call this function from blueprints. In other words, SwordSwung() will be a C++ function that we can invoke from a blueprints node, as shown here:
// in Monster.cpp
void AMonster::SwordSwung()
{
  if( MeleeWeapon )
  {
    MeleeWeapon->Swing();
  }
}
Next open the Mixamo_Adam_Sword_Slash animation by double-clicking on it from your Content Browser (it should be in MixamoAnimPack/Mixamo_Adam/Anims/Mixamo_Adam_Sword_Slash). Scrub the animation to the point where Adam starts swinging his sword. Right-click on the animation bar and select New Notify under Add Notify..., as shown in the following screenshot:

Name the notification SwordSwung:
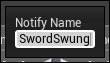
The notification name should appear in your animation's timeline, shown as follows:

Save the animation and then open up your version of MixamoAnimBP_Adam again. Underneath the SET group of nodes, create the following graph:
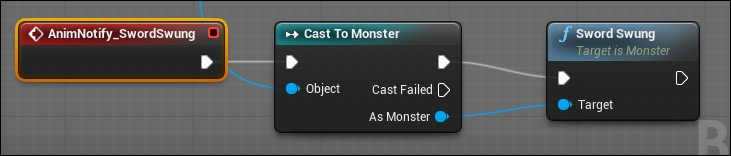
The AnimNotify_SwordSwung node appears when you right-click in the graph (with Context Sensitive turned on) and start typing SwordSwung. The Cast To Monster node is again fed in from the Try Get Pawn Owner node as in step 2 of the Modifying the animation blueprint for Mixamo Adam section. Finally, Sword Swung is our blueprint-callable C++ function in the AMonster class.
If you start the game now, your monsters will execute their attack animation whenever they actually attack. When the sword's bounding box comes in contact with you, you should see your HP bar go down a bit (recall that the HP bar was added at the end of Chapter 8, Actors and Pawns, as an exercise).

Monsters attacking the player
Ranged attacks usually involve a projectile of some sort. Projectiles are things such as bullets, but they can also include things such as lightning magic attacks or fireball attacks. To program a projectile attack, you should spawn a new object and only apply the damage to the player if the projectile reaches the player.
To implement a basic bullet in UE4, we should derive a new object type. I derived a ABullet class from the AActor class, as shown in the following code:
UCLASS()
class GOLDENEGG_API ABullet : public AActor
{
  GENERATED_UCLASS_BODY()

  // How much damage the bullet does.
  UPROPERTY(EditAnywhere, BlueprintReadWrite, Category =  Properties)
  float Damage;

  // The visible Mesh for the component, so we can see
  // the shooting object
  UPROPERTY(VisibleDefaultsOnly, BlueprintReadOnly, Category =  Collision)
  UStaticMeshComponent* Mesh;

  // the sphere you collide with to do impact damage
  UPROPERTY(VisibleDefaultsOnly, BlueprintReadOnly, Category =  Collision)
  USphereComponent* ProxSphere;

  UFUNCTION(BlueprintNativeEvent, Category = Collision)
  void Prox( AActor* OtherActor, UPrimitiveComponent* OtherComp,  int32 OtherBodyIndex, bool bFromSweep, const FHitResult &  SweepResult );
};
The ABullet class has a couple of important members in it, as follows:
- A
floatvariable for the damage that a bullet does on contact - A
Meshvariable for the body of the bullet - A
ProxSpherevariable to detect when the bullet finally hits something - A function to be run when
Proxnear an object is detected
The constructor for the ABullet class should have the initialization of the Mesh and ProxSphere variables. In the constructor, we set RootComponent to being the Mesh variable and then attach the ProxSphere variable to the Mesh variable. The ProxSphere variable will be used for collision checking, and collision checking for the Mesh variable should be turned off, as shown in the following code:
ABullet::ABullet(const class FObjectInitializer& PCIP) : Super(PCIP)
{
  Mesh = PCIP.CreateDefaultSubobject<UStaticMeshComponent>(this,  TEXT("Mesh"));
  RootComponent = Mesh;

  ProxSphere = PCIP.CreateDefaultSubobject<USphereComponent>(this,  TEXT("ProxSphere"));
  ProxSphere->AttachTo( RootComponent );

  ProxSphere->OnComponentBeginOverlap.AddDynamic( this,  &ABullet::Prox );
  Damage = 1;
}
We initialized the Damage variable to 1 in the constructor, but this can be changed in the UE4 editor once we create a blueprint out of the ABullet class. Next, the ABullet::Prox_Implementation() function should deal damages to the actor hit if we collide with the other actor's RootComponent, using the following code:
void ABullet::Prox_Implementation( AActor* OtherActor, UPrimitiveComponent* OtherComp, int32 OtherBodyIndex, bool bFromSweep, const FHitResult & SweepResult )
{
  if( OtherComp != OtherActor->GetRootComponent() )
  {
    // don't collide w/ anything other than
    // the actor's root component
    return;
  }

  OtherActor->TakeDamage( Damage, FDamageEvent(), NULL, this );
  Destroy();
}To make bullets fly through the level, you can use UE4's physics engine.
Create a blueprint based on the ABullet class. I selected Shape_Sphere for the mesh. The bullet's mesh should not have collision physics enabled; instead we'll enable physics on the bullet's bounding sphere.
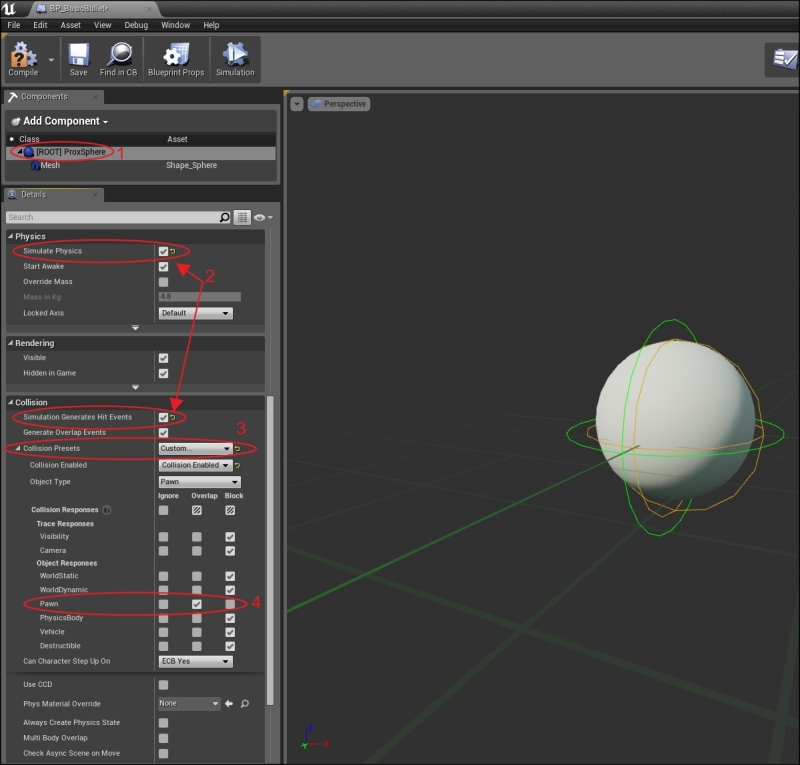
Configuring the bullet to behave properly is mildly tricky, so we'll cover this in four steps, as follows:
- Select [ROOT] ProxSphere in the Components tab. The
ProxSpherevariable should be the root component and should appear at the top of the hierarchy. - In the Details tab, check both Simulate Physics and Simulation Generates Hit Events.
- From the Collision Presets dropdown, select Custom….
- Check the Collision Responses boxes as shown; check Block for most types (WorldStatic, WorldDynamic, and so on) and check Overlap only for Pawn:
The
Simulate Physics checkbox makes the ProxSphere property experience gravity and the impulse forces exerted on it. An impulse is a momentary thrust of force, which we'll use to drive the shot of the bullet. If you do not check the Simulation Generate Hit Events checkbox, then the ball will drop on the floor. What BlockAll Collision Preset does is ensure that the ball can't pass through anything.
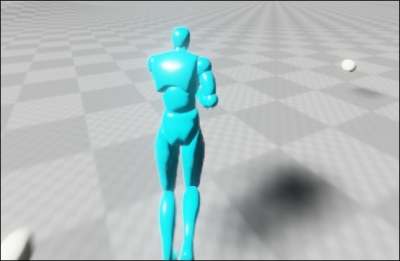
If you drag and drop a couple of these BP_Bullet objects from the Content Browser tab directly into the world now, they will simply fall to the floor. You can kick them once they are on the the floor. The following screenshot shows the ball object on the floor:
However, we don't want our bullets falling on the floor. We want them to be shot. So let's put our bullets in the Monster class.
Add a member to the Monster class that receives a blueprint instance reference. That's what the UClass object type is for. Also, add a blueprint configurable float property to adjust the force that shoots the bullet, as shown in the following code:
// The blueprint of the bullet class the monster uses
UPROPERTY(EditAnywhere, BlueprintReadWrite, Category =  MonsterProperties)
UClass* BPBullet;
// Thrust behind bullet launches
UPROPERTY(EditAnywhere, BlueprintReadWrite, Category =  MonsterProperties)
float BulletLaunchImpulse;
Compile and run the C++ project and open your BP_Monster blueprint. You can now select a blueprint class under BPBullet, as shown in the following screenshot:

Once you've selected a blueprint class type to instantiate when the monster shoots, you have to program the monster to shoot when the player is in his range.
Where does the monster shoot from? Actually, he should shoot from a bone. If you're not familiar with the terminology, bones are just reference points in the model mesh. A model mesh is usually made up of many "bones." To see some bones, open up the Mixamo_Adam mesh by double-clicking on the asset in the Content Browser tab, as shown in the following screenshot:
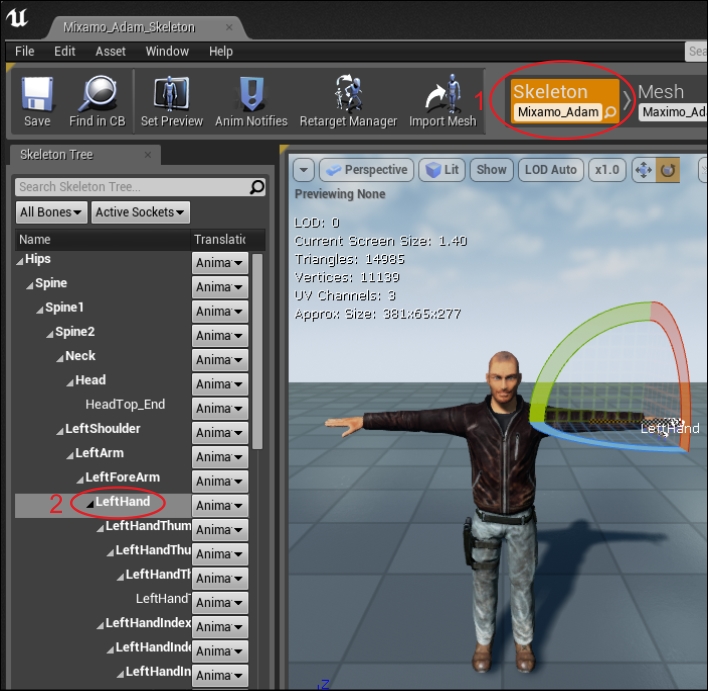
Go to the Skeleton tab and you will see all the monster's bones in a tree view list in the left-hand side. What we want to do is select a bone from which bullets will be emitted. Here I've selected the LeftHand option.
Working from the base model mesh, we can get the Mesh bone's location and have the monster emit the Bullet instances from that bone in the code.
The complete monster Tick and Attack functions can be obtained using the following code:
void AMonster::Tick(float DeltaSeconds)
{
  Super::Tick( DeltaSeconds );

  // move the monster towards the player
  AAvatar *avatar = Cast<AAvatar>(  UGameplayStatics::GetPlayerPawn(GetWorld(), 0) );
  if( !avatar ) return;

  FVector playerPos = avatar->GetActorLocation();
  FVector toPlayer = playerPos - GetActorLocation();
  float distanceToPlayer = toPlayer.Size();

  // If the player is not the SightSphere of the monster,
  // go back
  if( distanceToPlayer > SightSphere->GetScaledSphereRadius() )
  {
    // If the player is OS, then the enemy cannot chase
    return;
  }

  toPlayer /= distanceToPlayer;  // normalizes the vector

  // At least face the target
  // Gets you the rotator to turn something
  // that looks in the `toPlayer` direction
  FRotator toPlayerRotation = toPlayer.Rotation();
  toPlayerRotation.Pitch = 0; // 0 off the pitch
  RootComponent->SetWorldRotation( toPlayerRotation );

  if( isInAttackRange(distanceToPlayer) )
  {
    // Perform the attack
    if( !TimeSinceLastStrike )
    {
      Attack(avatar);
    }

    TimeSinceLastStrike += DeltaSeconds;
    if( TimeSinceLastStrike > AttackTimeout )
    {
      TimeSinceLastStrike = 0;
    }

    return;  // nothing else to do
  }
  else
  {
    // not in attack range, so walk towards player
    AddMovementInput(toPlayer, Speed*DeltaSeconds);
  }
}
The AMonster::Attack function is relatively simple. Of course, we first need to add a prototype declaration in the Monster.h file in order to write our function in the .cpp file:
void AMonster::Attack(AActor* thing);
In Monster.cpp, we implement the Attack function, as follows:
void AMonster::Attack(AActor* thing)
{
  if( MeleeWeapon )
  {
    // code for the melee weapon swing, if
    // a melee weapon is used
    MeleeWeapon->Swing();
  }
  else if( BPBullet )
  {
    // If a blueprint for a bullet to use was assigned,
    // then use that. Note we wouldn't execute this code
    // bullet firing code if a MeleeWeapon was equipped
    FVector fwd = GetActorForwardVector();
    FVector nozzle = GetMesh()->GetBoneLocation( "RightHand" );
    nozzle += fwd * 155;// move it fwd of the monster so it  doesn't
    // collide with the monster model
    FVector toOpponent = thing->GetActorLocation() - nozzle;
    toOpponent.Normalize();
    ABullet *bullet = GetWorld()->SpawnActor<ABullet>(  BPBullet, nozzle, RootComponent->GetComponentRotation());

    if( bullet )
    {
      bullet->Firer = this;
      bullet->ProxSphere->AddImpulse(
        fwd*BulletLaunchImpulse );
    }
    else
    {
      GEngine->AddOnScreenDebugMessage( 0, 5.f,
      FColor::Yellow, "monster: no bullet actor could be spawned.  is the bullet overlapping something?" );
    }
  }
}
We leave the code that implements the melee attack as it is. Assuming that the monster is not holding a melee weapon, we then check whether the BPBullet member is set. If the BPBullet member is set, it means that the monster will create and fire an instance of the BPBullet blueprinted class.
Pay special attention to the following line:
ABullet *bullet = GetWorld()->SpawnActor<ABullet>(BPBullet, nozzle, RootComponent->GetComponentRotation() );
This is how we add a new actor to the world. The SpawnActor() function puts an instance of UCLASS that you pass, at spawnLoc, with some initial orientation.
After we spawn the bullet, we call the AddImpulse() function on its ProxSphere variable to rocket it forward.
To add a knockback to the player, I added a member variable to the Avatar class called knockback. A knockback happens whenever the avatar gets hurt:
FVector knockback; // in class AAvatar
In order to figure out the direction to knock the player back when he gets hit, we need to add some code to AAvatar::TakeDamage. Compute the direction vector from the attacker towards the player and store this vector in the knockback variable:
float AAvatar::TakeDamage(float Damage, struct FDamageEvent const&  DamageEvent, AController* EventInstigator, AActor* DamageCauser)
{
  // add some knockback that gets applied over a few frames
  knockback = GetActorLocation() - DamageCauser- >GetActorLocation();
  knockback.Normalize();
  knockback *= Damage * 500; // knockback proportional to damage
}
In AAvatar::Tick, we apply the knockback to the avatar's position:
void AAvatar::Tick( float DeltaSeconds )
{
  Super::Tick( DeltaSeconds );

  // apply knockback vector
  AddMovementInput( knockback, 1.f );

  // half the size of the knockback each frame
  knockback *= 0.5f;
}
Since the knockback vector reduces in size with each frame, it becomes weaker over time, unless the knockback vector gets renewed with another hit.