
4. Resource Caching
In Chapter 3, “Service Workers,” we added a service worker to a web app and learned all about the service worker lifecycle. The service worker didn’t do much of anything, but at least we got one working in the app. In this chapter, we cover many of the ways you can cache web app content using a service worker.
Web apps use a cache for two reasons: to speed up app loading and so the app, or parts of the app, function when the system running the app does not have network connectivity. Launching a web app using cached resources is one of the things that makes Progressive Web Apps (PWAs) perform more like native mobile apps. When the app UI appears quickly, users don’t mind too much if it takes a little longer to populate the page with data, whereas users get frustrated when it takes a long time to load the app UI and then even longer to load its data.
The caching strategy you pick depends on the nature of the web app you’re writing and how much of it you want available when the browser running the app is offline.
Service Worker Cache Interface
One of the core capabilities enabling service workers is the browser’s Cache Interface.1 This cache provides service workers with a built-in way to cache resources used by a web app. The cache is a local repository of request/response pairs; the request is an object representing the resource request from the web app, and the response is an object representing the response from the server for that specific resource.
1. https://developer.mozilla.org/en-US/docs/Web/API/Cache
With a properly populated cache, a service worker can respond to resource requests from the cache and the app doesn’t know any better; as far as the app is concerned, those resources came directly from the web server. The cache doesn’t just cache the resource files (for example, .css, .html, or .js files), it caches the full server response for the requested resource (which includes headers, other stuff, plus the actual requested file).
2. https://developers.google.com/web/fundamentals/primers/promises
The Cache interface exposes the following methods:
add—Retrieves the requested resource from the network and adds the request (and associated response) to the cache.addAll—For an array of request objects, retrieves the requested resource represented by each object in the array and adds each result to the cache.delete—Deletes the specified request entry from the cache.keys—Returns a promise that resolves to an array of keys from the cache; keys in this case are request objects.match—Returns a promise that resolves to the response for the first matching request in the cache. Basically, the app passes in a request object, and this method returns the first matching response from the cache.matchAll—Returns a promise that resolves to an array of all request responses matching the specified request in the cache.put—Adds a request/response object pair to the cache.
We use most of these methods throughout the remainder of this chapter.
Preparing to Code
The work we do in this chapter revolves around the code for the server app available in the book’s GitHub repository at https://github.com/johnwargo/learning-pwa-code. I provided complete instructions for how to download the code and configure your development environment in the section “Preparing to Code” in Chapter 3. If you haven’t already completed those steps, go there and complete them first before picking up here again.
Open a terminal window and navigate the terminal into the cloned project’s learning-pwa-codechapter-04 folder. This folder contains the Chapter 4 version of the PWA News server app (which has all the code changes you were supposed to make in Chapter 3).
Install all the dependencies required by the app by executing the following command:
npm install
This command uses the Node Package Manager (npm) to install Node.js modules used by the server.
If you ran the copy-config command during the setup process in Chapter 3, you’re good—skip ahead to running the npm command after the next paragraph. If not, copy the config.ts file from learning-pwa-codechapter-03app to learning-pwa-codechapter-04app. This copies the configuration file holding the Bing API key you used in Chapter 3. With the file copied, execute the following command:
tsc
This compiles the server’s .ts files (including the copied config.ts file) into the .js files you see in the project root folder. You’ll see some errors and warnings from the code’s references to some of the objects in the code, but you should be OK if it all worked in Chapter 3.
With all the parts in place, it’s time to start the server; in the terminal window, execute the following command:
npm start
If everything’s set up properly in the code, the server will respond with the following text in the terminal:
[email protected] start D:learning-pwa-codechapter-04
node ./bin/www
At this point, you’re all set—the server is up and running and ready to serve content. If you see an error message, you must dig through any reported errors and resolve them before continuing.
To see the web app in its current state, open Google Chrome or a browser that supports service workers and navigate to
http://localhost:3000
After a short delay, the server should render the app as shown in Figure 3.1.
Caching Application Resources
One option for enabling app resource caching in a PWA is to preload the app with all the resources the app needs to launch. In the case of the PWA News app, it means caching the app UI and other required parts, then letting the app’s code reach out to the server to get the latest data once the UI completes loading.
To do this, you can use a simple array like the following:
var urlList = [
  '/',
  '/app.webmanifest',
  '/index.html',
  '/css/custom.css',
  '/img/bing-logo.png',
  '/js/index.js',
  '/js/sw-reg.js',
  '/js/utils.js'
];
In this example, I built the array from the files I knew I had to have to render the app’s home page in the browser. The first entry in the array is probably a surprise. When I tested this app against my local server, as you soon will, I found the server accepts either / or /index.html to load the app, so I had to accommodate both options in the cache.
You don’t need the app.manifest file either, since it doesn’t matter when the app is already installed. I added it here to avoid the error the index.html file generates when loading the app offline and it tries to load the manifest.
Let’s add this to the service worker and use it to cache some data. Open the project’s service worker file (sw.js) located in learning-pwa-codechapter-04publicsw.js. Copy the urlList array code from the previous example to the top of the file.
Next, update the install event listener to cache the web resources during service worker installation. Copy or type the following code to replace the existing install event in the sw.js file:
self.addEventListener('install', event => {
  console.log(`SW: ${event.type} event fired`);
  // the service worker is installing, so it's our chance
  // to set up the app. In this case, we're telling
  // the browser to wait until we've populated the cache
  // before considering this service worker installed
  event.waitUntil(
    // create a local cache for our app resources
    caches.open('pwa-learn-cache')
      // Once it's open...
      .then(cache => {
        console.log('SW: Cache opened');
        // cache all the resources from the array
        return cache.addAll(urlList);
      })
      .catch(error => {
        console.error(error);
      })
  );
});
What this code does is use the service worker event object’s waitUntil method to instruct the browser to hold off completing the service worker installation process until the code in the parentheses completes. The method expects a promise, so internally it doesn’t do anything until the promise resolves.
The code opens the cache, but other interesting stuff happens inside as well:
The call to
caches.openopens thepwa-learn-cachecache and returns a promiseWhen the cache opens, the
.thenmethod ofcaches.opencalls the cache’saddAllmethod, which returns a promiseThe cache’s
addAllmethod uses theurlListarray to request all the resources needed by the app. Given an array of URLs,addAllretrieves each target URL and adds the resulting response object for each to the cache. Our array doesn’t look like an array of URLs, but from the scope of the running web app, it is.
At the end of all this code, the app has a new cache populated with the response objects for each element in the urlList array.
This code is just the first example of why I mentioned in the sidebar that you must understand promises to work with service workers and caches. The code is a lot less complicated than it would be with callbacks, but there’s still a lot going on. Keeping your code’s .then methods with the right promise or making sure you’re returning a promise when you should will save you some troubleshooting time later.
Finally, update the fetch event listener so it looks to the cache first before reverting to the network for requested resources. Copy or type the following code to replace the existing fetch event in the project’s sw.js file:
self.addEventListener('fetch', event => {
  console.log(`SW: ${event.type} ${event.request.url}`);
  // fires whenever the app requests a resource (file or data)
  event.respondWith(
    // check to see if it's in the cache
    caches.match(event.request)
      .then(response => {
        // if it is, then return the cached response
        // object from the cache
        if (response) {
          console.log(`SW: Return Cache ${event.request.url}`);
          return response;
        }
        // otherwise, tell the browser to go get the
        // resource from the network
        console.log(`SW: Return Network ${event.request.url}`);
        return fetch(event.request);
      })
  );
});
In this event listener, the code responds to the request with a promise; in this case, it is the promise from the call to caches.match. The match method returns a promise that should resolve to a fetch response. If the call to match finds the request, the code returns the response object from the cached request (essentially the result of the same request processed during the install event).
If the requested resource is not in the cache, the code returns a promise from the call to fetch to get the requested resource from the network. When the fetch completes, the code returns the result of the fetch (a response object containing the requested resource or an error) to the browser for processing.
Listing 4.1 shows the complete listing for this version of the service worker. The file is in the project’s learning-pwa-codechapter-04publicservice-workers folder along with any other service worker files we create in this chapter.
Listing 4.1 First Service Worker Example: sw-41.js
var urlList = [
  '/',
  '/app.webmanifest',
  '/index.html',
  '/css/custom.css',
  '/img/bing-logo.png',
  '/js/index.js',
  '/js/sw-reg.js',
  '/js/utils.js',
];

self.addEventListener('install', event => {
  console.log(`SW: ${event.type} event fired`);
  // the service worker is installing, so it's our chance
  // to setup the app. In this case, we're telling
  // the browser to wait until we've populated the cache
  // before considering this service worker installed
  event.waitUntil(
    // create a local cache for our app resources
    caches.open('pwa-learn-cache')
      // once it's open...
      .then(cache => {
        console.log('SW: Cache opened');
        // cache all of resources from the array
        return cache.addAll(urlList);
      })
      .catch(error => {
        console.error(error);
      })
  );
});

self.addEventListener('activate', event => {
  // fires after the service worker completes its
  // installation. It's a place for the service worker
  // to clean up from previous service worker versions
  console.log(`SW: ${event.type} event fired`);
});

self.addEventListener('fetch', event => {
  console.log(`SW: ${event.type} ${event.request.url}`);
  // fires whenever the app requests a resource (file or data)
  event.respondWith(
    // check to see if it's in the cache
    caches.match(event.request)
      .then(response => {
        // if it is, then return the cached response

        // object from the cache
        if (response) {
          console.log(`SW: Return Cache ${event.request.url}`);
          return response;
        }
        // otherwise, tell the browser to go get the
        // resource from the network
        console.log(`SW: Return Network ${event.request.url}`);
        return fetch(event.request);
      })
  );
});
If you launched the app after you started the server, you have an existing service worker active for the app. Unregister the current service worker, as shown in Figure 3.5, then reload the app in the browser. When you open the developer tools pane and switch to the Console tab, you’ll see that the cache opened, as shown in Figure 4.1.

Figure 4.1 Chrome Developer Tools—Service Worker Cache Opened
The service worker doesn’t activate until you reload the app again, so do that now and look at the output. You should see the service worker grabbing files from the cache or the network, depending on the resource, as shown in Figure 4.2.
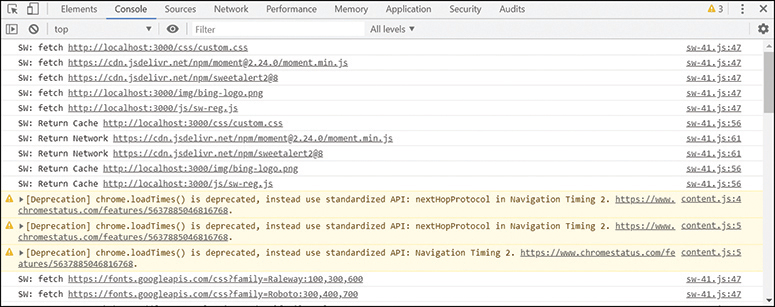
Figure 4.2 Chrome Developer Tools—Service Worker Activated
Now, if you navigate to the Developer Tools Cache Storage tab, shown in Figure 4.3, you’ll see the cache we created as well as the contents of the cache. As you work with different caching strategies and test out your apps, you can use this tool to view cached resources, delete the cache, and even delete individual cached resources.
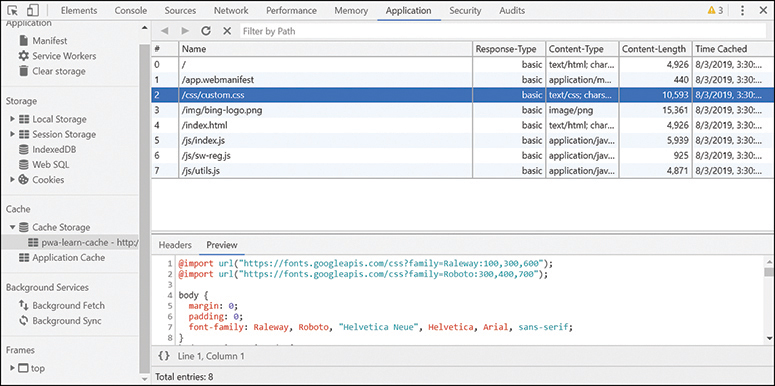
Figure 4.3 Chrome Developer Tools—Cache Storage
Earlier, I mentioned that many cache methods return response objects instead of just the cached resource (such as an HTML, a CSS, or a JavaScript file). Each column shown in the figure maps to the individual properties of the response object.
Let’s take the app offline and see how the code works; there are three ways to do this:
Stop the server by pressing Ctrl-C in the terminal window.
Enable the Offline checkbox in the browser, as shown in the top-left corner of the Developer Tools Service Workers panel highlighted in Figure 4.4.
Change the network status from Online to Offline in the Developer Tools Network pane highlighted in Figure 4.5.

Figure 4.4 Chrome Developer Tools—Service Workers Panel
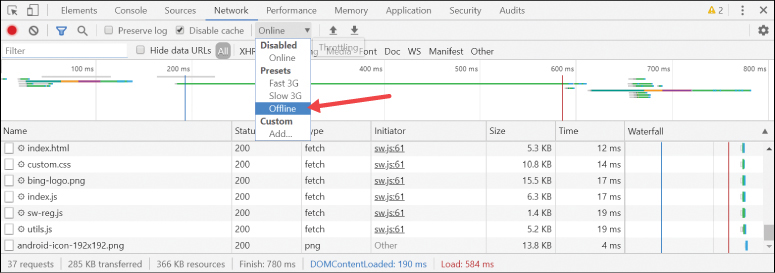
Figure 4.5 Chrome Developer Tools—Network Panel
Take the browser offline, then reload the page. When you look at the console output, you should see many of the app’s resources loaded from cache and network errors for a bunch of other resources. That’s good, that’s what we expected.
Next, look at the page; it should appear as expected except that there’s no data from Bing displayed. All you see is an error message, but we can probably do better than that. When you try to load the app’s About and Feedback pages, you get the browser’s default “Can’t find that page” error message. We can do better there too. I’ll show you how to fix those issues, but only after I show you first how to manage an app’s caches.
Cache Management
We updated our service worker so it caches the main resources the app uses, but what do you do when you update your app? How do you get the new versions of the app’s resources into the cache? In this section, we discuss strategies for managing your local cache before we get back into caching strategies in the sections that follow.
The first question we must answer as we address the issue of cache management is, How can the app recognize that there’s a new version of the web app? In Chapter 2, “Web App Manifest Files,” I mentioned that the browser downloads the service worker every time you reload the app and checks to make sure it is the same as the one currently installed in the browser. If it’s different (if it changes by at least one byte), the browser parses the service worker, executes it, and completes the installation and activation process for the downloaded service worker. This process gives us a useful option: at the top of the service worker file, add a simple variable or constant like this:
// service worker version number
const SW_VERSION = 1;
This constant defines a simple service worker version identifier, and when you publish a new version of the app, you simply increment this value. With that in place, the browser detects the new service worker version, installs the updated service worker, and rebuilds the cache with the new resources for the app.
What if the new app version uses different file names for app resources? What do you do now? Well, one option is to simply cache the new resources and ignore the old ones using the code we already have in place in Listing 4.1. The problem with that approach is that you’ll be caching data you’ll never need again, and that’s wasteful (especially on mobile devices).
Thinking out loud here for a while (no changes for you to make to the app), you could delete the cache using something like the following:
caches.delete('pwa-learn-cache').then(() => {
  console.log('SW: Cache deleted');
  // do something else here...

});
From the service worker lifecycle, we know that the current service worker is active and still using this cache. If we delete the cache under the current service worker, who knows what would happen (probably something bad). No, there must be a better way.
You could extend the earlier example to something like this:
// service worker version number
const SW_VERSION = 1;
// generates a custom cache name per service worker version
const CACHE_NAME = `pwa-learn-cache-v${SW-VERSION}`;
This generates a custom name for each app cache version: pwa-learn-cache-v1, pwa-learn-cache-v2, pwa-learn-cache-v3, and so on. Every time the swVersion value changes, the code generates a new cacheName and therefore a new cache. This requires a small change to the service worker’s install event handler, replacing the original version’s
caches.open('pwa-learn-cache')
with
caches.open(CACHE_NAME)
Here’s the complete listing for the new event handler:
self.addEventListener('install', event => {
  console.log(`SW: ${event.type} event fired`);
  event.waitUntil(
    // create a local cache for our app resources
    caches.open(CACHE_NAME)
      // once it's open...
      .then(cache => {
        console.log('SW: Cache opened');
        // cache all of resources from the array
        return cache.addAll(urlList);
      })
      .catch(error => {
        console.error(error);
      })
  );
});
Well, this gets us part way there. We’ve created and populated a new cache for this new service worker version, but we left behind the previous cache. This would work, but we’re still leaving around cached files we’ll never use again. Users would never notice, but it would bother me.
OK, so what do we do? Well, the service worker activate event fires after the service worker installs and just as the service worker becomes the active service worker. At this point, the previous service worker is no longer active, so this seems like a perfect place for us to clean up the earlier cache. The following code shows an updated service worker activate event that deletes all caches that don’t match the name of the current service worker’s cache:
self.addEventListener('activate', event => {
  // fires after the service worker completes its installation.
  // it's a place for the service worker to clean up from
  // previous service worker versions
  console.log(`SW: ${event.type} event fired`);

  // don't complete the activation until all the code runs
  event.waitUntil(
    // get the list of cache keys (cache names)
    caches.keys().then(cacheList => {
      // don't stop until all complete
      return Promise.all(
        cacheList.map(theCache => {
          // is the cache key different than the
          // current cache name?
          if (CACHE_NAME !== theCache ) {
            // if yes, then delete it.
            return caches.delete(theCache);
          }
        })
      );
    })
  );
});
The problem with this code is that it whacks all caches except for the current one used by the service worker. That’s fine if the app has only one cache, but if the app opened other caches, this process would delete all caches except for the only one the service worker cares about.
In the following example, I added a CACHE_ROOT constant the service worker uses to build the cache name. We can use this to identify all versions of the service worker cache separately from all others:
// service worker version number
const SW_VERSION = 1;
// the root name for our cache
const CACHE_ROOT = 'pwa-learn-cache'
// generates a custom cache name per service worker version
const CACHE_NAME = `${CACHE_ROOT}-v${SW_VERSION}`;
All it requires is a slight change to the if statement buried deep within the activate event listener:
if ((CACHE_NAME !== theCache) && (theCache.startsWith(CACHE_ROOT))) {
Here’s the complete listing for the event listener:
self.addEventListener('activate', event => {
  // fires after the service worker completes its installation.
  // it's a place for the service worker to clean up from previous
  // service worker versions
  console.log(`SW: ${event.type} event fired`);
  // don't complete the activation until all the code runs
  event.waitUntil(
    // get the list of cache keys (cache names)
    caches.keys().then(cacheList => {
      // don't stop until all complete
      return Promise.all(

        cacheList.map(theCache => {
          // is the cache key different than the
          // current cache name and has the same root?
          if ((CACHE_NAME !== theCache) && (theCache.startsWith(CACHE_ROOT))) {
            // if yes, then delete it.
            console.log(`SW: deleting cache ${theCache}`);
            return caches.delete(theCache);
          }
        })
      );
    })
  );
});
With this in place, the service worker creates a new cache during the install event and whacks all its older caches during the activate event, leaving other caches alone.
Listing 4.2 shows the complete code listing for this updated service worker. Take a moment to update the app’s service worker with the code shown in Listing 4.2 and check it out. Make sure to check the contents of the local cache in the browser’s Developer Tools (refer to Figure 4.3) to validate correct operation.
Listing 4.2 Second Service Worker Example: sw-42.js
// service worker version number
const SW_VERSION = 1;
// the root name for our cache
const CACHE_ROOT = 'pwa-learn-cache';
// generates a custom cache name per service worker version
const CACHE_NAME = `${CACHE_ROOT}-v${SW_VERSION}`;

var urlList = [
  '/',
  '/app.webmanifest',
  '/index.html',
  '/css/custom.css',
  '/img/bing-logo.png',
  '/js/index.js',
  '/js/sw-reg.js',
  '/js/utils.js',
];

self.addEventListener('install', event => {
  console.log(`SW: ${event.type} event fired`);
  // the service worker is installing, so it's our chance
  // to setup the app. In this case, we're telling
  // the browser to wait until we've populated the cache
  // before considering this service worker installed
  event.waitUntil(
    // create a local cache for our app resources
    caches.open(CACHE_NAME)

      // once it's open...
      .then(cache => {
        console.log('SW: Cache opened');
        // cache all of resources from the array
        return cache.addAll(urlList);
      })
      .catch(error => {
        console.error(error);
      })
  );
});

self.addEventListener('activate', event => {
  // fires after the service worker completes its installation.
  // it's a place for the service worker to clean up from previous
  // service worker versions
  console.log(`SW: ${event.type} event fired`);
  // don't complete the activation until all the code runs
  event.waitUntil(
    // get the list of cache keys (cache names)
    caches.keys().then(cacheList => {
      // don't stop until all complete
      return Promise.all(
        cacheList.map(theCache => {
          // is the cache key different than the
          // current cache name and has the same root?
          if ((CACHE_NAME !== theCache) &&
            (theCache.startsWith(CACHE_ROOT))) {
            // if yes, then delete it.
            console.log(`SW: deleting cache ${theCache}`);
            return caches.delete(theCache);
          }
        })
      );
    })
  );
});

self.addEventListener('fetch', event => {
  console.log(`SW: ${event.type} ${event.request.url}`);
  // fires whenever the app requests a resource (file or data)
  event.respondWith(
    // check to see if it's in the cache
    caches.match(event.request)
      .then(response => {
        // if it is, then return the cached response
        // object from the cache
        if (response) {

          console.log(`SW: Return Cache ${event.request.url}`);
          return response;
        }
        // otherwise, tell the browser to go get the
        // resource from the network
        console.log(`SW: Return Network ${event.request.url}`);
        return fetch(event.request)
      })
  );
});
Return a Data Object on Error
In the app’s current state, when the browser can’t fetch news data from the server, the page displays the generic error highlighted above the footer in Figure 4.6. The app knows it received an error retrieving the data, so it correctly updates the status in the bottom-right corner of the page, but we can do better. Since we have a service worker working on our behalf, let’s let it manage dealing with the fetch error.

Figure 4.6 PWA News Data Fetch Error
What we want to do is to make the service worker return an empty data set plus the error code the app needs to update the footer. To do this, first add the following constant to the top of the project’s public/sw.js file:
const EMPTY_NEWS_OBJECT = {
  "status": 3,
  "lastUpdated": 0,
  "items": []
};
What this does is create a generic results object the service worker serves up when it can’t fetch the data live from the server. Next, update the fetch event listener so it deals differently with data requests than with the other resources used by the app. Start by refactoring the existing event listener so it looks like the following:
self.addEventListener('fetch', event => {
  console.log(`SW: ${event.type} ${event.request.url}`);
  // is the request for news data?
  if (event.request.url == `${location.origin}/api/news`) {
    console.log('SW: Data request detected');

  } else {
    // non-data request, so respond with fetch results
    event.respondWith(
      // check to see if it's in the cache
      caches.match(event.request)
        .then(response => {
          // if it is, then return the cached response
          // object from the cache
          if (response) {
            console.log(`SW: Return Cache ${event.request.url}`);
            return response;
          }
          // otherwise, tell the browser to go get the
          // resource from the network
          console.log(`SW: Return Network ${event.request.url}`);
          return fetch(event.request);
        })
    );
  }
});
The if clause checks to see whether the requested resource is the call to the server’s News API. The else clause includes the original code from the initial event listener. If you load the app now, it should work exactly as it did before, even when offline, as all we’ve really done is add a log item for the special data case.
Now, in the event listener’s if clause, after the log item, copy in the following code:
event.respondWith(
  // then see if you can get the data
  fetch(event.request)
    // oops, error, can't complete the fetch
    .catch(() => {
      // return the empty news object
      return new Response(JSON.stringify(EMPTY_NEWS_OBJECT),
        { "status": 200, "statusText": "Dummy data!" });
    })
);
The code tries to get the data from the server; if it can’t, the catch method kicks in and responds with the empty news object we added at the top of the file. Now when you try to load the page while offline, you’ll get the friendlier message already built into the app, as shown in Figure 4.7.

Figure 4.7 Delivering a Nicer Offline Error Message
Here’s the complete source code listing for the new event handler:
self.addEventListener('fetch', event => {
  console.log(`SW: ${event.type} ${event.request.url}`);
  // is the request for news data?
  if (event.request.url == `${location.origin}/api/news`) {
    console.log('SW: Data request detected');
    event.respondWith(
      // then see if you can get the data
      fetch(event.request)
        // oops, error, can't complete the fetch
        .catch(() => {
          // return the empty news object
          return new Response(JSON.stringify(EMPTY_NEWS_OBJECT),
            { "status": 200, "statusText": "Dummy data!" });
        })
    );
  } else {
    // non-data request, so respond with fetch results
    event.respondWith(
      // check to see if it's in the cache

      caches.match(event.request)
        .then(response => {
          // if it is, then return the cached response
          // object from the cache
          if (response) {
            console.log(`SW: Return Cache ${event.request.url}`);
            return response;
          }
          // otherwise, tell the browser to go get the
          // resource from the network
          console.log(`SW: Return Network ${event.request.url}`);
          return fetch(event.request);
        })
    );
  }
});
You can easily tweak this code to deliver a different data object for each type of data request.
The complete service worker code for this example is in the project folder’s publicservice-workerssw-43.js file.
Adding an Offline Page
At the beginning of this chapter, I omitted the app’s other pages, About and Feedback, from the list of cached resources. I did this not because I hate those pages but because I needed some pages to not be available offline for this section of the chapter.
When you take the browser offline and try to load the About or Feedback page, you’ll see an error page like the one shown in Figure 4.8. This isn’t the best experience for the user, as it’s a stark change from the look and style of our app and doesn’t say much about what really happened. The browser tries to explain some of the possible causes for the current error condition but fails rather spectacularly.
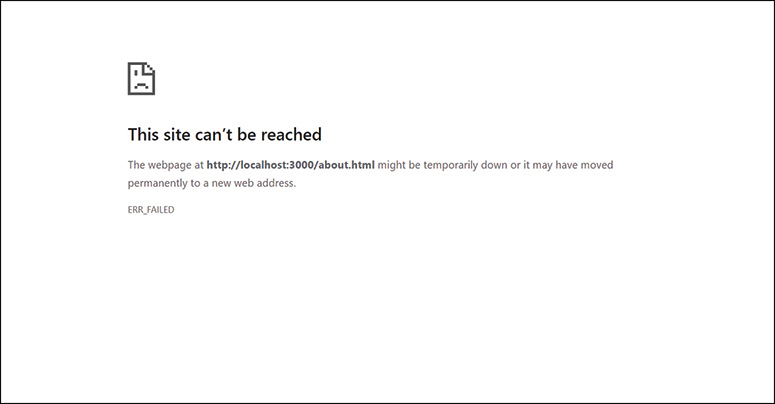
Figure 4.8 Browser Page Error
We, on the other hand, know a lot more about why the pages didn’t appear and can give the user a better experience through service workers. There are a lot of different options for doing this, ranging from simple to complex. I’ll highlight a few here and leave it up to you to figure out some others.
One option is to use the approach taken in the previous section and return custom content whenever a fetch request fails. Rather than return a data object as we did in the previous section, you return text or HTML content.
Here’s an example of a fetch event listener that does just that:
self.addEventListener('fetch', event => {
  console.log(`SW: ${event.type} ${event.request.url}`);
  event.respondWith(
    // check to see if it's in the cache
    caches.match(event.request)
      .then(response => {
        // if it is, then return the cached response
        // object from the cache
        if (response) {
          console.log(`SW: Return Cache ${event.request.url}`);
          return response;
        }
        // otherwise, tell the browser to go get the
        // resource from the network
        console.log(`SW: Return Network ${event.request.url}`);
        return fetch(event.request)
        .catch(() => {

          return new Response("Hmmm, I can't seem to access that page.");
        })
      })
  );
});
In this case, when the fetch fails, the code creates a new Response object with the content and returns it as the response for the fetch operation. When you try this in a browser in offline mode, you get the page shown in Figure 4.9.

Figure 4.9 Custom Content in Response to an Error
Now, you can get fancy and return HTML in the response; the affected portion of the code would look like this:
return fetch(event.request)
  .catch(() => {
    return new Response(
      "<!DOCTYPE html><html><body>" +
      "<h1>Access Error</h1>" +
      "<p>Hmmm, I can't seem to access that page.</p>" +
      "</body></html>",
      { headers: { "Content-Type": "text/html" } }
    );
  })
The code returns an HTML page to the browser, but the browser doesn’t recognize it as an HTML page until you add the headers as a parameter when creating the response object. When you load the page in an offline browser, you get a slightly better experience because the resulting page has a formal heading and some styling around the body, as shown in Figure 4.10.

Figure 4.10 An HTML Response to an Error
Now, you can spruce the content up with styling and other bells and whistles, but you’re still generating HTML on the fly in your service worker, and that’s not efficient. Another issue is that this is a rather brute-force approach, as it affects any requested resource even though the browser is already quite capable of dealing with missing images, CSS files, and other stuff. What we need is something that returns HTML only when the request says it can handle HTML, like this:
if (event.request.headers.get('accept').includes('text/html')) {
  // do something cool

}
Here’s a full implementation with the accepts check and generated HTML content:
return fetch(event.request)
  .catch(() => {
    if (event.request.headers.get('accept').includes('text/html')) {
      return new Response(
        "<!DOCTYPE html><html><body>" +
        "<h1>Access Error</h1>" +
        "<p>Hmmm, I can't seem to access that page.</p>" +
        "</body></html>",
        { headers: { "Content-Type": "text/html" } }
      );
    }
  })
This approach limits when the service worker responds with HTML, but we’re still sending generated HTML. What we should do is send a custom HTML page that looks like the rest of our site. We’ve already cached the site’s CSS file, so all we need to do is add the page we want returned when the app is offline, or the browser can’t locate the page.
The app already has this offline page located at the project’s publicoffline.html. Let’s add the file to the cache using a slightly different approach. First, add the following line to the top of the project’s sw.js file:
const OFFLINE_PAGE = '/offline.html';
This creates a reference to the offline file we’ll use when we serve it up when a resource can’t be found. Next, update the urlList array by adding OFFLINE_PAGE as the last item in the array:
var urlList = [
  '/',
  '/app.webmanifest',
  '/index.html',
  '/css/custom.css',
  '/img/bing-logo.png',
  '/js/index.js',
  '/js/sw-reg.js',
  '/js/utils.js',
  OFFLINE_PAGE
];
With this in place, the app knows about the offline file and will cache it during service worker installation. Finally, in the fetch event listener, add the following code to the end of the event listener when the service worker knows the resource isn’t in the cache:
return fetch(event.request)
  .catch(() => {
    if (event.request.headers.get('accept').includes('text/html')) {
      return caches.match(OFFLINE_PAGE);
    }
  })
At this point, the service worker has given up; it knows the requested resource isn’t in the cache, and it tried to fetch it from the network and failed. All that’s left to do is serve up the offline file if it happens to be in the cache. Here’s the complete event listener code:
self.addEventListener('fetch', event => {
  console.log(`SW: ${event.type} ${event.request.url}`);
  // is the request for news data?
  if (event.request.url == `${location.origin}/api/news`) {
    console.log('SW: Data request detected');
    event.respondWith(
      // then see if you can get the data
      fetch(event.request)
        // oops, error, can't complete the fetch
        .catch(() => {
          // return the empty news object
          return new Response(JSON.stringify(EMPTY_NEWS_OBJECT),
            { "status": 200, "statusText": "Dummy data!" });
        })
    );
  } else {
    // non-data request, so respond with fetch results
    event.respondWith(
      // check to see if it's in the cache
      caches.match(event.request)
        .then(response => {
          // if it is, then return the cached response
          // object from the cache
          if (response) {
            console.log(`SW: Return Cache ${event.request.url}`);
            return response;
          }
          // otherwise, tell the browser to go get the
          // resource from the network
          console.log(`SW: Return Network ${event.request.url}`);
          return fetch(event.request)
            .catch(() => {
              if (event.request.headers.get('accept')

                .includes('text/html')) {
                return caches.match(OFFLINE_PAGE);
              }
            })
        })
    );
  }
});
Bring the app back online, reload the page in the browser, then go offline again. When you try to load the About page while the browser is offline, you get the much prettier page, shown in Figure 4.11, which includes the app header, menu, and footer, just like the rest of the app’s pages. This is a much better user experience, don’t you agree?
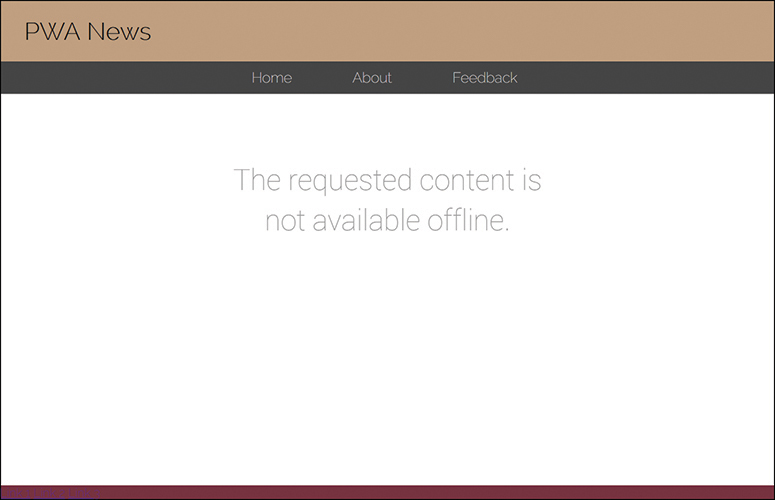
Figure 4.11 Serving an Offline Page from Cache
The complete service worker code for this example is in the project folder’s publicservice-workerssw-44.js file.
Implementing Additional Caching Strategies
Up to this point, we’ve built a powerful set of skills you can use to make your web apps more resilient to network issues. Our service worker example from the previous chapter delivered a service worker that merely logged each request and then went to the network for the latest version of every resource (no big deal). In this chapter so far, you’ve seen different variations on a service worker caching strategy that caches resources just in case they’re not available from the network but gets the latest from the network whenever possible. Where a resource can’t be dragged from the network and isn’t in the cache, I’ve shown you several ways to soften the blow for your app users.
In this section, I expand coverage to include additional caching strategies you can use in your PWAs. This will by no means be complete coverage of all possible options, but with these as a base, you can probably cobble together any weird or obscure caching strategy you want for your own apps. What you implement for your apps depends on the app and how frequently app resources change.
For the following examples, I don’t expect you to update the app with the different caching strategies shown. You can if you want to, but the purpose of the remainder of the chapter is to simply highlight other options for you to use.
Cache-Only
For an installed PWA, especially simple apps such as the Tip Calculator from Chapter 2, the app is entirely static; there’s no dynamic content in the app. You can easily build a URL array into the service worker and use it to cache all app resources at startup, as I showed in an earlier example. With that in place, the app works regardless of whether the browser has network connectivity.
In the PWA News app, only parts of the app rarely change. To enable the app to run even if the device running the app doesn’t have network connectivity, you can update the urlList array from our recent service worker examples to contain every possible static resource needed by the app. With that in place, you can implement the cache-only approach highlighted in the following fetch event listener:
self.addEventListener('fetch', event => {
  console.log(`SW: ${event.type} ${event.request.url}`);
  // fires whenever the app requests a resource (file or data)
  event.respondWith(
    // check to see if it's in the cache
    caches.match(event.request)
      .then(function (response) {
        // if it is, then return the cached response
        // object from the cache
        if (response) {
          console.log(`SW: Return Cache ${event.request.url}`);
          return response;
        }
      })
  );
});
If the resource isn’t in the cache, the code does nothing; the service worker lets the browser deal with its failure. In this case, the browser displays the generic resource-not-found error page shown in Figure 3.8. You can add an offline file to the resource array, as shown in an earlier example, which is needed only if you forget to put a file in the resource array. The fetch event listener code looks like the following:
self.addEventListener('fetch', event => {
  console.log(`SW: ${event.type} ${event.request.url}`);
  // fires whenever the app requests a resource (file or data)
  event.respondWith(
    // check to see if it's in the cache
    caches.match(event.request)
      .then(function (response) {
        // if it is, then return the cached response
        // object from the cache
        if (response) {
          console.log(`SW: Return Cache ${event.request.url}`);
          return response;
        }
        // otherwise check to see that the request accepts HTML
        if (event.request.headers.get('accept').includes('text/html')) {
          // then return the offline page
          console.log(`SW: serving offline page ${OFFLINE_PAGE}`);
          return caches.match(OFFLINE_PAGE);
        }
      })
  );
});
For this approach, I had to make sure every file the app needed to run was in the cache. What caused me the most pain was figuring out that I also needed the service worker file even though it was already installed. Remember, the browser requests the service worker file every time the page loads, regardless of whether the service worker changed.
The complete service worker code for this example is in the project folder’s publicservice-workerssw-45.js file.
Network First, Then Cache
For many apps, especially ones that display dynamic data, you want the app to always pull content from the network if possible, then fall back to the cache when the device running the app is offline.
Like the cache-only example from the previous section, with this approach, you build the list of static resources and use it to populate the cache at service worker activation. The service worker attempts to pull requested resources from the network and serves them from the cache if the network version is not available.
For dynamic sites, your cache of local files is a little different. What you need in the cache is all the resources required to render the app UI plus cached data or some extra content to explain why there’s no data. You can spoof the data as we did earlier in the chapter, or, in the next chapter, I’ll show you how to cache data for offline use.
With the list of cached resources in place, the following fetch event listener shows how to implement a network-first, cache-next approach:
self.addEventListener('fetch', event => {
  console.log(`SW: ${event.type} ${event.request.url}`);
  // fires whenever the app requests a resource (file or data)
  event.respondWith(
    // try to get the file from the network
    fetch(event.request)
      .catch(() => {
        // rats, network resources are not available
        // do we have it in the cache?
        console.log(`SW: Trying Cache ${event.request.url}`);
        return caches.match(event.request)
          .then(response => {
            // if it is, then return the cached response
            // object from the cache
            if (response) {
              console.log(`SW: Return Cache ${event.request.url}`);
              return response;
            }
          })
      })
  );
});
The complete service worker code for this example is in the project folder’s publicservice-workerssw-46.js file.
Network First, Update Cache
In all the examples so far, the cache we used was static, populated during service worker installation and never updated again. That’s not very exciting, is it? This approach forces the service worker to manually rebuild the cache with every version, even if the file didn’t change or wasn’t used again.
Another approach is to let the service worker build the cache as the app runs, automatically populating the cache with every resource requested by the app. This one’s a little tricky, so hold on while I lay it all out for you.
For the Tip Calculator app from Chapter 2, this is the perfect caching strategy. Every request the app makes is automatically cached. So, if you install the app or later try to hit the app while the device is out of network connectivity, the app will load, in its entirety, from cache.
When I implemented this caching strategy for the PWA News app, I was a little worried about the app’s news data. The way that Bing structures its news results, the data comes back as a JSON object with URLs pointing to any images associated with the articles (typically thumbnail images). I didn’t want to cache those images because they’d change with every news update and I didn’t want to fill up the cache with unused images, nor did I want to figure out a way to clean them up either.
As I tested the code I’ll share with you in a minute, I noticed that everything was taken care of automatically for me. Woohoo! Let me explain.
The following code implements a service worker fetch event listener that caches every request made by the server. What I found in my testing was that it cached every resource request, even the API request to the server to retrieve new data. What it didn’t do was cache the image files—automatically, not because I did anything special to make that happen. Not only did it not cache the image files for me, the web app still displayed the image files for me when I disabled the network and reloaded the page. Surprised? Yeah, me too. Take a moment to look through the code, and I’ll explain everything on the other side.
self.addEventListener('fetch', event => {
  console.log(`SW: ${event.type} ${event.request.url}`);
  // fires whenever the app requests a resource (file or data)
  event.respondWith(
    // try to get the file from the network
    fetch(event.request)
      // whew, we got it
      .then(response => {
        // do we have a valid response?
        if (response && response.status == 200) {
          // clone the response; it's a stream, so we can't
          // write it to the cache and return it as well
          let responseClone = response.clone();
          // try to open the cache
          caches.open(CACHE_NAME)
            // if we successfully opened the cache
            .then(function (cache) {
              console.log(`SW: Adding ${event.request.url} to the cache`);
              // then write our cloned response to the cache
              cache.put(event.request, responseClone);
            });
          // return the original response
          return response;
        } else {
          // return whatever error response we got from the server
          return response;
        }
      })
      .catch(() => {
        // rats, network resources not available
        // do we have it in the cache?
        console.log(`SW: Trying Cache ${event.request.url}`);
        return caches.match(event.request)
          .then(response => {
            // if it is, then return the cached response
            // object from the cache
            if (response) {
              console.log(`SW: Return Cache ${event.request.url}`);
              return response;
            }
          })
      })  // catch
  );
});
The complete service worker code for this example is in the project folder’s publicservice-workerssw-47.js file.
All right, for every resource request, this service worker does the following:
Tries to retrieve the resource from the network.
If it gets a response, it
Checks to see if the response is a valid response and not an error.
Clones the response (responses are streams, so the service worker can’t pass a response to the browser and write it to the cache at the same time).
Writes the cloned response to the cache.
Returns the original response to the requestor.
If the response is not an HTTP response of 200 (success), it returns whatever it has to the requestor for the requestor to process the error.
If it gets an outright error, it
Checks the cache to see if it has the resource there.
If it does, it returns the cached resource.
Otherwise, it does nothing and lets the requestor deal with the problem (usually by showing the page shown in Figure 4.8).
As it processes all of the app’s requests, the requests return with different response types5 depending on how the browser views the resource origin based on security settings in the browser and in the app. Remember, service workers are all about security, so if you request a resource that’s not from the same origin as the page requesting the resource, the service worker’s going to complain. The way it complains here is by not caching the resource.
5. https://developer.mozilla.org/en-US/docs/Web/API/Response/type
The service worker checks to see if the response is valid using the following code:
if (response && response.status == 200)
Some examples you see online do it this way:
if (response && response.status == 200 && response.type == 'basic')
What I learned while testing this code is that the service worker will cache only resources with a type of basic. There’s no need to check the type before caching. All the same origin requests arrive as basic, but the image requests, because their origin is Bing and not the local API server, are ignored and not added to the cache. To prove this, look at Figure 4.12; it shows the complete resource cache generated by this fetch event listener.
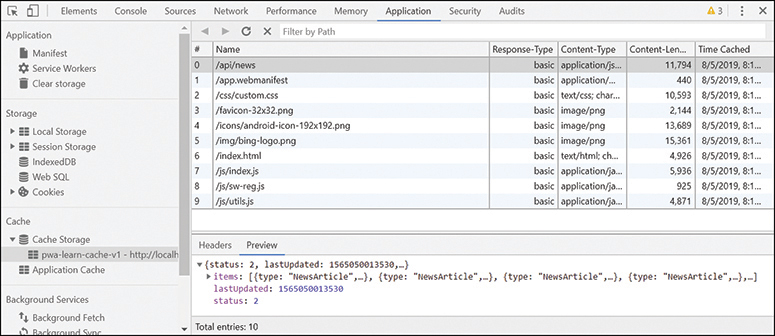
Figure 4.12 Populated PWA News Cache
I mentioned that when I disabled the network, the news thumbnail image files appeared properly in the app anyway. Why is that? Well, even though I have a service worker managing my cache for me, the browser still respects the cache headers6 in the response headers. If you look at a Bing image request response header in Fiddler,7 as shown in Figure 4.13, you’ll see that Bing sets a Cache-Control max-age header for the resource in the highlighted portion of the image. This tells the browser it can hold onto the image for 1,209,600 seconds if it wants to.
6. https://developer.mozilla.org/en-US/docs/Web/HTTP/Headers/Cache-Control
7. https://www.telerik.com/fiddler

Figure 4.13 Bing Image Headers in Fiddler
So, even though you think the service worker has complete control over the cache, it doesn’t; it has complete control over cache storage, but the browser controls the HTTP cache. If you’re testing away and notice that things aren’t refreshing properly for you, that’s because the browser may be interfering. You may have to clear the browser cache for your latest resources to show.
Now, I’m not saying you couldn’t configure the cross-origin resource sharing (CORS) settings for the app and allow the service worker to cache resources from another origin—you probably can. My point is that this extra security protection worked in my favor as I implemented this service worker caching example.
Wrap-Up
In this chapter, I demonstrated many ways to build service workers to cache resources for a PWA. I didn’t show you every possible caching strategy, but I did give you a strong foundational skill set to use when you’re building your own PWAs.
In the next chapter, I’ll demonstrate how to use other capabilities of the browser to cache web app data and deliver a different sort of offline operation than what I showed here.