
8. Assessment, Automation, and Deployment
Throughout this book, we focused on the core capabilities of the browser, and we handcrafted the manifest files and code that make a PWA a PWA. Now that we’re past all that, it’s time to talk about available tools to help you build and deploy PWAs.
In this chapter, I show tools from Google that developers use to validate the quality of a PWA, identifying where an app fulfills PWA requirements and what must be done to make the app a full-featured PWA. Next, I show some tools from Microsoft that developers can use to convert a web app into a PWA. The first tool shows you how well you’ve done at delivering your PWA, and the second tool automates much of the stuff you need to do to create a PWA.
Assessing PWA Quality Using Lighthouse
As I described at the beginning of the book, there are different views of what makes a PWA a PWA. Google tells the story that PWAs are
Reliable
Fast
Engaging
But I argued that there are specific capabilities that define a PWA:
PWAs are installable: mobile and desktop users can install them on their phone’s home screen or desktop using an installation UI provided in the app.
PWAs cache the app’s core UI on the local device, so when the user opens the app, the UI loads quickly before the app goes out to get updated data from the network.
PWAs run background tasks, enabling background processing and offline resource caching.
PWAs can receive push notifications from a backend server regardless of whether the app is running.
To make it easier for developers to deliver PWAs that meet either criteria, Google created Lighthouse.1 Lighthouse is an open source tool that assesses web apps against Google’s criteria for PWAs; the good news is that Google’s criteria encompass mine. The tool tests your app, then delivers a report highlighting what must be fixed to create a complete PWA.
1. https://developers.google.com/web/tools/lighthouse/
There are three ways to run Lighthouse:
Google Chrome extension
Google Chrome DevTools
Node Module
In the sections that follow, I show you how each approach works plus show some sample reports from running Lighthouse against two different versions of the Tip Calculator app from Chapter 2, “Web App Manifest Files.”
Preparing to Code
In this chapter, we work with a stripped-down version of the Tip Calculator app, which doesn’t require a lot of coding for our purposes.
The app in Chapter 2 had a rudimentary service worker but no manifest file, so we built out the manifest and associated code to make the app installable. In this chapter, there’s no manifest file or service worker; it’s just a bare bones web app. You can find the app in the cloned project’s learning-pwa-codechapter-08 ip-calc folder.
Assuming you’ve worked along with all the code in the book so far and have all the prerequisites installed, you’re good to go. If not, please hop over to the Preparing to Code section of Chapter 2 and complete the steps outlined therein before picking back up here.
To use this chapter’s version of the app, open a terminal window or command prompt, navigate to the project folder, and execute the following command:
http-server
You should then be able to open a web browser, navigate to http://localhost:8080/index.html, and see the Tip Calculator we’re so familiar with.
We’re going to use the Chrome browser next, so if you don’t already have it installed, please open a browser, navigate to https://www.google.com/chrome/, and install the latest Chrome version.
Using the Lighthouse Plugin
The easiest way to use Lighthouse is through the Lighthouse extension2 Google publishes. To install the extension,
2. https://chrome.google.com/webstore/detail/lighthouse/blipmdconlkpinefehnmjammfjpmpbjk
Open Chrome or one of the browsers built using Chromium (like Microsoft Edge), and open the Chrome Web Store (by either opening the Extensions page or searching for it).
Search for the Lighthouse extension in the store.
Click the Add to Chrome button to install the extension in the browser.
With the extension installed, Chrome adds a lighthouse icon to the toolbar, as shown in Figure 8.1.

Figure 8.1 Invoking Lighthouse in Chrome
In the browser, navigate to the Tip Calculator app running in the local server process (started in Preparing to Code), then click the Lighthouse button.
When you click the Options button, Chrome opens a dialog allowing you to set the scope for the audit performed by the extension, as shown in Figure 8.2. All we care about right now is the PWA report, so enable the Progressive Web App option and disable all others, then click the OK button to return to Lighthouse. You can come back later and try out the other options.
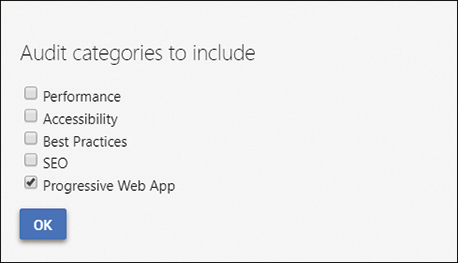
Figure 8.2 Lighthouse Options
Click the Generate Report button shown in Figure 8.1, and Chrome opens a new window hosting the selected web app in a simulated mobile device and exercises the app in different conditions. I haven’t studied exactly what tests it performs, but you can tell that it’s loading the app with and without network connectivity and recording what happens in the app. When it completes its assessment, Chrome opens the page shown in Figure 8.3 listing the results of the audit.
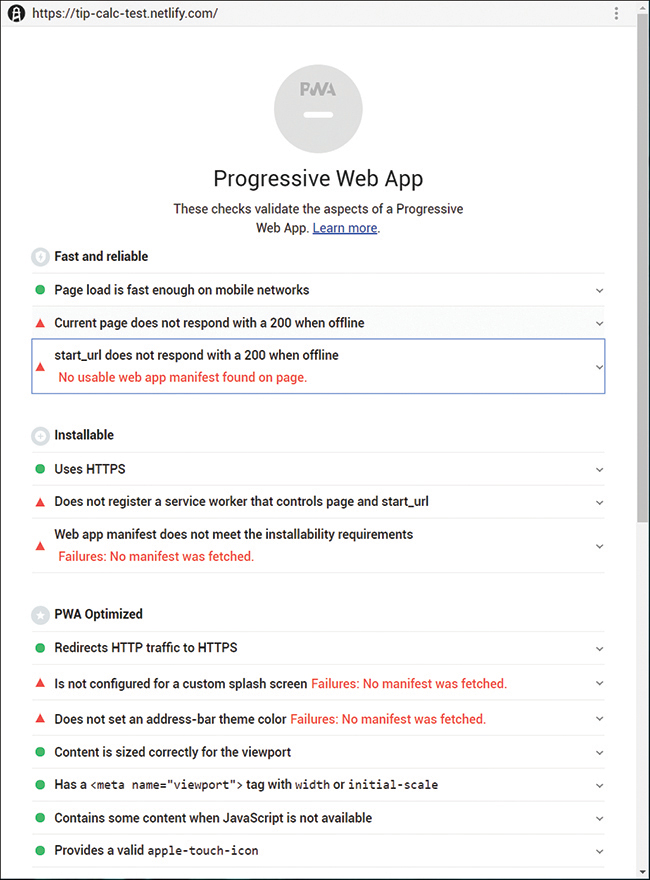
Figure 8.3 Lighthouse Results for the Basic Tip Calculator App
As you can see from the figure, the results are dismal. Remember though, this is the bare bones version of the Tip Calculator app; it doesn’t have a manifest file or a service worker, so the results should not be a surprise. Knowing what you know by now about service workers and manifest files, you should be able to see where these files would bolster the results.
Since I’m hosting the app on Netlify, and they automatically provide an SSL certificate, I get a few extra points here. For your locally hosted app, this result should be different, although in my testing, Lighthouse seemed to incorrectly think I was hosting over an HTTPS connection even when I wasn’t. This is probably an internal browser hack that enables the browser to run PWAs from localhost.
It’s a little hard to see, but at the top of the page is the PWA logo I highlighted in Figure 1.1 so many pages ago. In the report in Figure 8.3, it’s greyed out and hard to see because the app is not a PWA, and that’s a simple way the extension highlights this fact.
If you rerun the report against the complete PWA from the end of Chapter 2, you get the happier results shown in Figure 8.4. Notice that the PWA logo at the top of the report is complete and colored, plus you have this bold green checkmark proudly proclaiming success.
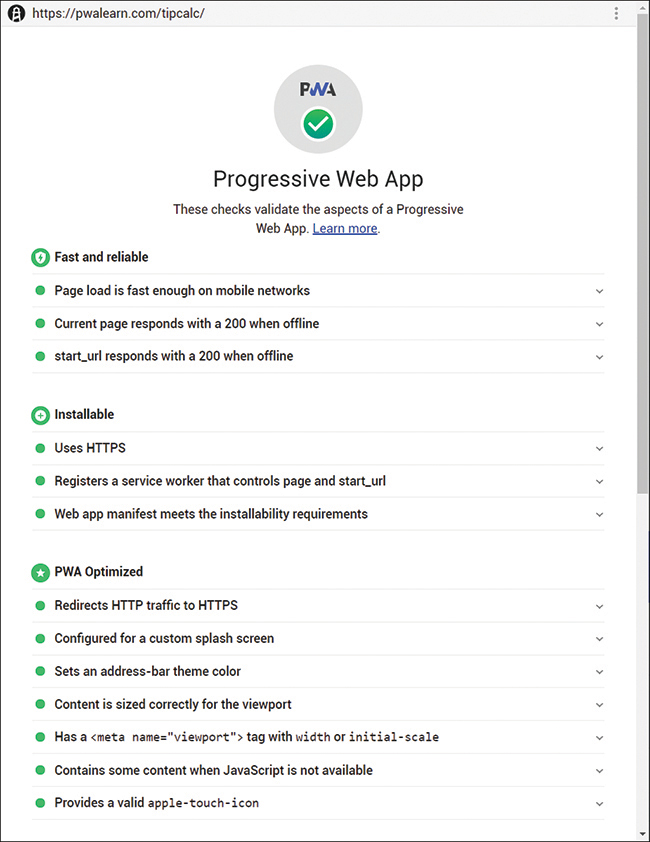
Figure 8.4 Lighthouse Results for the PWA Version of the Tip Calculator App
Lighthouse offers several output options, shown in the upper-right corner of Figure 8.5. You can print short or expanded versions of the report or get the report as HTML or JSON.

Figure 8.5 Lighthouse Report Output Options
The report lets you know what work you need to do to deliver the full PWA version of the selected app. You may or may not want to do all the work it recommends, but that’s up to you. Lighthouse is just a quick and simple litmus test for PWAs.
The browser extension is my preferred approach for running Lighthouse, although I expect that most developers prefer the option outlined in the following section. Generating the report through the extension delivers the report in a new browser window, making it easy to review and print for later reference.
Using the Lighthouse Tools in the Browser
To make it easier for developers to run Lighthouse during the development process, Google provides a Lighthouse audit right inside the Chrome DevTools. There’s no extension to install or any extra setup—it’s just there, ready to go to work.
To access Lighthouse through Chrome DevTools, open a web app in the browser, then open DevTools and look for the Audits tab, shown in Figure 8.6.

Figure 8.6 Running Lighthouse through Chrome DevTools
Here you have a few more options than what’s available through the extension; you can specify to test the mobile or desktop version of the app and control how the tools throttle the network connection during the audit. Select the options that work for your app, then click the Run Audits button to start the test. When Lighthouse finishes its test, it displays the results in the audit window shown in Figure 8.7.

Figure 8.7 Lighthouse Results in Chrome DevTools
From the report page, you have limited options: you can (1) create a new audit, clear (2) the report, or (3) download the report in JSON format.
Using the Lighthouse Node Module
You can also install Lighthouse as a node module and run it from a command-line or in a node app. To install the module, open a terminal window or command prompt, then execute the following command:
npm install -g lighthouse
With the module installed, you can run the report against a site using the following command:
lighthouse <url>
In this example, <url> is the site URL you want to audit. For the book’s public Tip Calculator app, you would use the following:
lighthouse https://learningpwa.com/tipcalc/
The module launches Chrome and performs the same tests you’ve seen before. The only difference is what it does with the results, as shown in the following output:
status Generating results... +1ms
Printer html output written to /Users/johnwargo/learningpwa.com_2019-09-05_07-28-40.
  report.html +79ms
CLI Protip: Run lighthouse with `--view` to immediately open the HTML report in your
  browser +2ms
ChromeLauncher Killing Chrome instance 54056 +1ms
The Lighthouse module generates its output directly to an .html file in the current folder. If you want the module to launch the report in the browser immediately after generating it, you must add the –-view parameter to the command line, as shown in the following example:
lighthouse https://learningpwa.com/tipcalc/ --view
Since the module writes its results to the current folder, you must make sure you have write rights to the folder before running the test. As I tested this for this chapter’s content, I opened a command prompt in Windows, switched to the root of my system’s C drive, and executed the command. When the report completed, I received the following error:
ChromeLauncher Killing Chrome instance 52092 +80ms
Runtime error encountered: EPERM: operation not permitted, open
  'C:	ip-calc-test.netlify.com_2019-08-31_15-43-46.report.html'
Error: EPERM: operation not permitted, open
  'C:	ip-calc-test.netlify.com_2019-08-31_15-43-46.report.html'
This happened because Windows users don’t have access to the root of drive C by default. When I switched to a folder where I had write permissions, the module worked as expected.
You can also use the module in a node app, and Google provides complete instructions.3 I must admit that I struggle to find a use case for this; the results you get from running Lighthouse is a lot of data, and I can’t see the need to write an app that parses and understands the results.
3. https://github.com/GoogleChrome/lighthouse/blob/master/docs/readme.md#using-programmatically
PWABuilder
When you’re just getting started building PWAs, Google’s Lighthouse is a great tool to help you understand what you must do to your app to make it a PWA and validate your work as you do it. What beginning PWA developers really need is something that helps them do the work to convert an app into a PWA. To address that need, Microsoft created the open source PWABuilder4 project.
4. https://www.pwabuilder.com/
As with Lighthouse, you can use PWABuilder to scan your web site to determine what must be done to it to make it into a PWA, but PWABuilder takes it a step further and actually gives you the code you need to convert the web app to a PWA. You can even use PWABuilder to use your PWA to generate native apps for deployment to Android, iOS, macOS, and Windows devices.
Microsoft also offers a command-line version of PWABuilder that you can use to validate web app manifest settings and generate apps for deployment to Android, iOS, macOS, and Windows devices. By the time you read this, Microsoft should have released the PWABuilder extension for Visual Studio Code.
Using the PWABuilder UI
To use PWABuilder, fire up your browser of choice and navigate to https://pwabuilder.com; the browser will open the page shown in Figure 8.8. Enter the URL for a publicly available web app in the input field, then click the Start button to continue. You can use my https://tip-calc-test.netlify.com/ app if you’d like.

Figure 8.8 PWABuilder Home Page
The app churns for a little while, then delivers the report shown in Figure 8.9. Here, PWABuilder highlights the PWA deficiencies for the provided web app. Reading through this report, you should see that it lists a lot of the same information provided by Lighthouse. What happens next is what differentiates PWABuilder from Lighthouse.

Figure 8.9 PWABuilder Scan Results
Notice the options on the report page to View Generated Manifest and Choose a Service Worker. As part of the work it did scanning the app, it built a manifest file using information it gleaned from the app. PWABuilder also offers a catalog of service workers you can use in your app. I’ll cover both options in a minute.
If you scroll down the report page, you’ll see a list of options for adding additional features to an app, shown in Figure 8.10. This links you to a catalog of free code snippets you can use. The snippet catalog lists some standard browser capabilities, such as geolocation, copy to clipboard, and the ability to install a PWA (a topic covered in Chapter 2), plus some code to interact with several Microsoft services from Microsoft Graph.
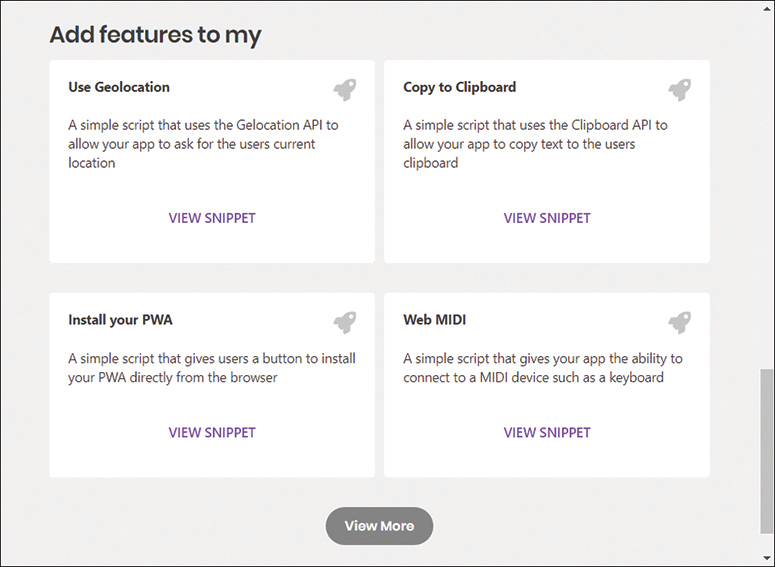
Figure 8.10 PWABuilder Add Features Pane
This version of the Tip Calculator app doesn’t have a manifest file, so PWABuilder generates one for the app automatically and gives you the ability to tweak it through the web UI. If the app had a manifest file configured, PWABuilder would let you edit it.
At the top of Figure 8.9 is a Manifest tab; click it and you’ll see the page shown in Figure 8.11. PWABuilder builds this manifest file using information it’s able to learn about the app by scanning its contents. For example, it pulls the values for the manifest file’s name and short_name properties from the index.html file’s title attribute. For app icons, it pulls in all of the icons referenced in the index.html file’s icon link elements.

Figure 8.11 PWABuilder Manifest Editor Page
Use the edit fields, shown on the left side of the figure, to change the properties in the manifest file. You can use the Images and Settings tabs in the editor to tweak other aspects of the manifest, adding or removing image files, setting the scope for the app, and more.
With all manifest settings in place, use the code areas on the right side of the page to copy the manifest file and the link to load it over to your web app. The code box in the top-right corner contains the code you must add to your index.html file’s head section to load the manifest. The code box in the lower-right corner of the editor contains the actual manifest file content. You should copy the content, then make a new file in the web app project’s root folder called manifest.webmanifest and place the copied code there.
This process adds the manifest to the project. To make the app installable, use the code snippet available by clicking View Snippet, as shown in the lower-left corner of Figure 8.10. What you’ll find there is pretty much the same code you’ll find in early code examples in Chapter 2.
Next, click on the Service Worker tab, and you’ll see the page shown in Figure 8.12. Here you’ll find sample code and implementation instructions for many of the caching strategies discussed in Chapter 4, “Resource Caching.” PWABuilder doesn’t generate anything here specific to your web app. It just offers some standard options you can copy over into your web app and configure for your app’s needs.
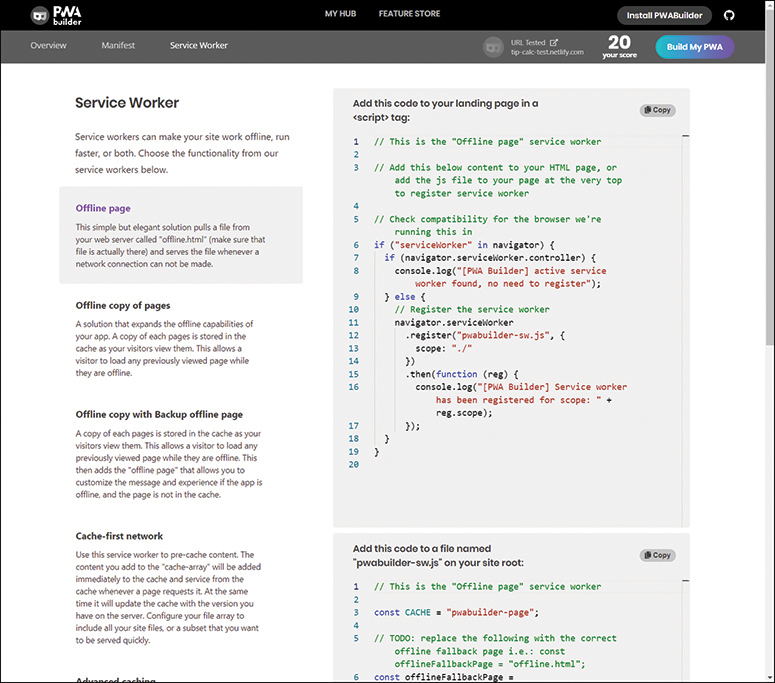
Figure 8.12 PWABuilder Service Worker Page
When you add the manifest file to the project and implement a service worker, then run the scan again; you should see different, and hopefully better, results than the ones shown in Figure 8.9. As you can see, letting PWABuilder help you through the process is much easier than all that coding we did in earlier chapters of this book.
Creating Deployable Apps
Another feature of PWABuilder is its ability to generate starter projects for deployable apps for Android, iOS, macOS, and Windows, as shown in Figure 8.13. The technologies used to build or package these apps vary depending on the selected target platform.
For Android, PWABuilder generates a Trusted Web Activities (TWA)5 app, a type of Android app that enables PWAs to run in a simple app shell on Android devices. For iOS, PWABuilder generates an Apache Cordova app you can build and deploy to iOS devices. I cover the options for Windows in PWAs and the Microsoft Store later in the chapter. In my testing, I found that some of the projects were half-baked and missing complete instructions. My suggestion is that you download the packages from this page and look at them; perhaps by the time you read this, what’s available will be more useful.
5. https://developers.google.com/web/updates/2019/02/using-twa

Figure 8.13 PWABuilder Packaged App Options
Using the PWABuilder CLI
PWABuilder supports a command-line option as well, and what you get is essentially an updated version of what was available with the ManifoldJS project many years ago: the ability to generate deployable apps for multiple target platforms based on a single manifest file.
To install the PWABuilder command-line interface (CLI), open a terminal window or command prompt and execute the following command:
npm install -g pwabuilder
Next, to generate apps based on the web app at a specific URL, execute the following command:
pwabuilder <url>
Replace <url> with the full URL pointing to the source web app. For example, to generate apps for the public Tip Calculator app, you would execute the following command:
pwabuilder https://learningpwa.com/tipcalc/
For a locally hosted web app like the ones we created in this book, use the following command:
pwabuilder http://localhost:3001
The PWABuilder CLI will scan the file and warn you if it finds any issues with the app, as shown in the top of Figure 8.14. Since it’s generating apps for each target platform, you should fix these errors before continuing. Next, the tool creates app for multiple target platforms in a folder named with the short name of the scanned app.
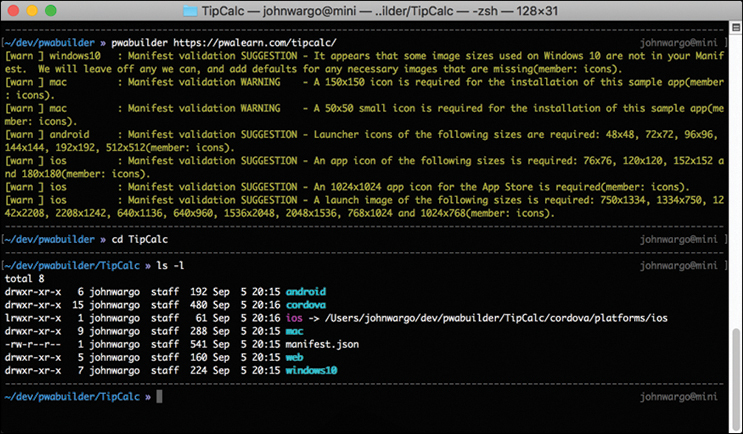
Figure 8.14 PWABuilder CLI Output and Results
You can open the newly created folder and read through the instructions provided with each target platform to build and deploy apps for each.
PWABuilder and Visual Studio
Right after I finished this chapter, Microsoft released a preview version of the PWABuilder extension for Visual Studio Code. It’s still in preview, so I don’t know exactly how this will work when it’s released, but I can at least show you how it works today and hope it’s not too much different in its final form.
To get the extension, open Visual Studio Code and then open the extensions pane, as shown in Figure 8.15. Type pwabuilder in the search field, as shown in the figure, and you should see the extension appear. Click the Install button to add the extension to your Visual Studio Code installation.

Figure 8.15 Visual Studio Code: PWABuilder Extension
With the extension in place, open a web app project in Visual Studio Code, then open the command palette, as shown in Figure 8.16. Type pwa, and the command dropdown should show the available options for PWABuilder, as shown in the figure.

Figure 8.16 Visual Studio Code Command Palette
Right now, the only available options are to generate a manifest file or generate a service worker for the selected app project. Since it’s PWABuilder under the covers, what happens next shouldn’t be a surprise. If you select Generate Manifest, Visual Studio Code opens the Manifest Generator page, shown in Figure 8.17.
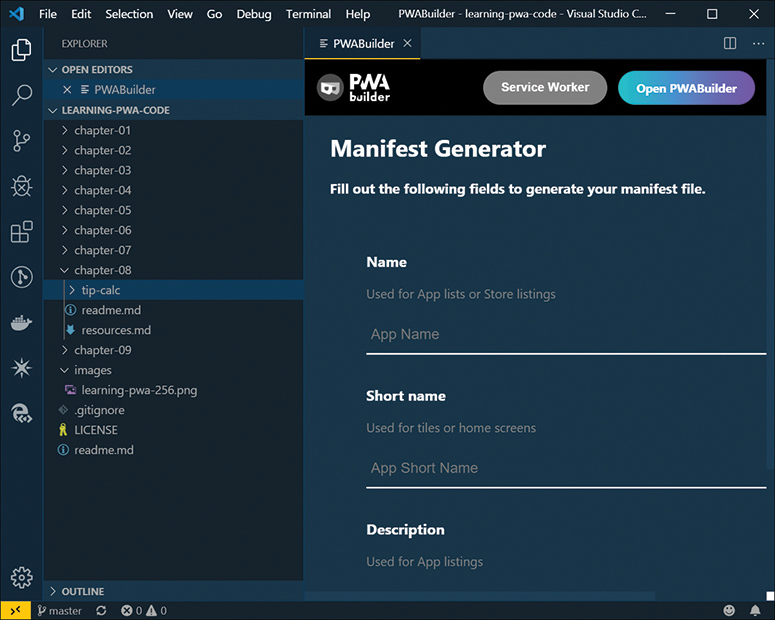
Figure 8.17 Visual Studio Code: PWABuilder Manifest Generator
Populate the form with the same options discussed earlier in the chapter, selecting an icon for the app as well as providing additional settings for the manifest file. When you’re done, click the Generate button on the bottom of the form. At this point, Visual Studio Code prompts you to select the target folder for the manifest, which should be the root folder of the app. When you make your selection, the extension saves the manifest file in a file called manifest.json, then opens the file for editing, as shown in Figure 8.18.

Figure 8.18 Visual Studio Code: PWABuilder Generated Manifest File
The extension doesn’t update your project’s index.html file to use the manifest, so at this point, you should open that file and add the following line to the <head> section of the file:
<link rel="manifest" href="manifest.json">
Save your changes to the file, and your app has the first requirement of an installable PWA: a manifest file.
Adding a service worker to your project follows the same process: open the command palette, type pwa, then select Generate Service Worker. When you select this option, you’ll see the screen shown in Figure 8.19. In this case, the extension isn’t generating a service worker for your project, it’s merely displaying the same service worker options you saw in Figure 8.12.
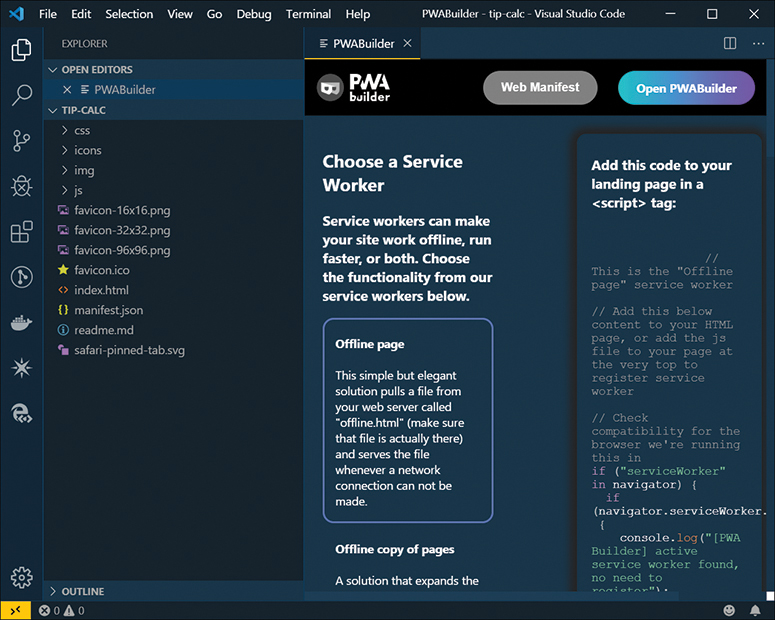
Figure 8.19 Visual Studio Code: PWABuilder Options
Follow the instructions on the page to update your project’s landing page (typically the project’s index.html file) with the code necessary to load a service worker, then select the service worker you want to use and add it to the project as well.
PWAs and the Microsoft Store
On the Microsoft Windows platform, Microsoft took a unique approach and announced that it would scan the Internet for PWAs and automatically add them to the Microsoft Store. What this means is that Microsoft Windows customers now have a searchable database of PWAs they can install.
The process is automatic, but you can opt out if you don’t want your app in the store. To do so, add a robots.txt file to the root folder of the app (if one doesn’t already exist) and add the following to the file:
User-agent: bingbot
Disallow: /manifest.json
This tells Bing to ignore the app’s manifest for PWA indexing purposes.
You can also package your PWA and deploy it to the Microsoft Store in several ways. One way is through the Windows option shown in Figure 8.12. When you click the Download icon on the Windows section in that figure, PWABuilder displays the dialog shown in Figure 8.20. When you click the Download button, you get a zip file you can use to create a package you can submit to the Microsoft Store. Just download the file, extract the contents to a folder, and follow the instructions in the extracted file’s projectswindows10Windows10-next-steps.md file.

Figure 8.20 PWABuilder Windows App Options
When you click the Generate button, PWABuilder opens the dialog shown in Figure 8.21. Populate the form with the appropriate values from your Microsoft Dev Center account, and PWABuilder will generate the package you need to deploy this app through the Microsoft Store.
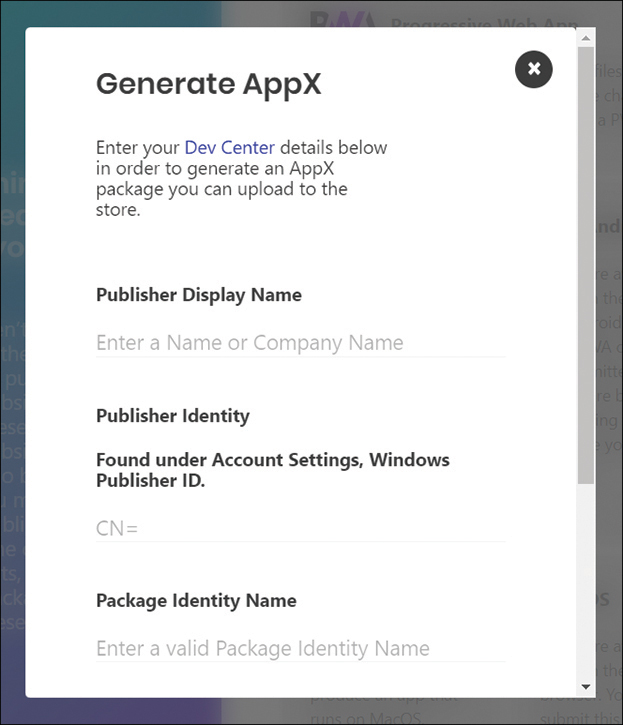
Figure 8.21 PWABuilder Generate Windows Store AppX Package
A third option involves using Visual Studio to package the app for deployment manually. Visual Studio 2017 included a special project type for Progressive Web Apps, as shown in Figure 8.22. When you create a project using this project type, you can add your PWA files to the project and package it for deployment using the instructions in Progressive Web Apps in the Microsoft Store.6
6. https://docs.microsoft.com/en-us/microsoft-edge/progressive-web-apps/microsoft-store

Figure 8.22 Visual Studio PWA Project
Wrap-Up
In this chapter, I showed you some of the tools available to web developers to help them deliver better PWAs. When you’re just starting out, these tools help kickstart your efforts and help you get the job done. I also showed how to use PWABuilder to help you build deployable versions of your PWAs.
In the next, and final, chapter, I’ll show you another tool from Google called Workbox7 that automates adding offline support to web apps.