
3. Service Workers
If building Progressive Web Apps (PWAs) is like building a house, the web app manifest file is like a real estate agent working to get people interested in buying your house and prepping it so that it’s move-in ready for buyers. Service workers, on the other hand, are live-in general contractors working behind the scenes to make sure the house has a solid foundation and all the walls stay up after the buyer moves in.
This chapter introduces service workers and shows how to use them to enable cool background processing in your web app. Here we build a foundation of what service workers do and how they do it, starting with simple web app resource caching and the service worker lifecycle. In the chapters that follow, I show how to add additional functionality to an app’s service worker to give the app some pizazz.
PWA News
For this and the next few chapters of the book, you’ll work with the PWA News web app shown in Figure 3.1. The app is publicly available at https://pwa-news.com, but you’ll run a version of the app on a local server as you work through the chapter. I’d like to give a special shout out to my friend Scott Good who created the app UI and, through the application of some masterful styling, made it into the beautiful app you see in the figure.

Figure 3.1 PWA News Web Site
The app is a simple news site, aggregating news articles on PWAs from sites around the world. The app’s server process uses the Microsoft Bing News Search API1 to locate articles with the keyword PWA and displays the top 20 results. The app hosts a simple About page describing the site (and promoting the book) plus a Feedback page that renders data about how people feel about the site. You’ll play with that one in a later chapter. In Chapter 5, “Going the Rest of the Way Offline with Background Sync,” we’ll add the ability for visitors to submit their feedback when we talk about going offline.
1. https://azure.microsoft.com/en-us/services/cognitive-services/bing-news-search-api/
Introducing Service Workers
A service worker is a block of JavaScript code a web app installs in the browser under certain conditions and runs when the browser needs it to (based on events that fire). Web apps use service workers to add additional capabilities to the app, capabilities that aren’t generally available to web apps but are available in many mobile apps.
For install conditions, a browser installs a service worker if
The browser supports service workers.
The browser loaded the web app using a TLS (HTTPS) connection or from the system’s
localhostaddress (referring to the local device running the browser).The web app loads the service worker code within the same context (from the same server location) as the web app for which it’s associated.
Unlike with web app manifest files, most modern browsers support service workers; you can check the current support matrix on Can I Use.2 As I write this, the following browsers support service workers: Chrome (Google), Edge (Microsoft), Firefox (Mozilla), Opera (Opera), and Safari (Apple). Many other browsers support them as well; check first if you know your app’s target audience prefers a specific browser that’s not in that list.
2. https://caniuse.com/#feat=serviceworkers
Depending on how web developers take advantage of service workers in their apps, service workers:
Cache app content. Google calls service workers programmable network proxies; as you’ll see in this chapter and the next, you have a lot of options for controlling which resources the browser caches and which ones are pulled from the server when requested by the app. You can even replace requested resources (files or data) dynamically at runtime using a service worker.
Perform background processing. Web apps use service workers to deliver background data synchronization and offline support. Service workers install in the browser, they’re associated with the web app, but they run in the browser’s execution context. This means they’re available to do work whenever the browser is open, even when the app is not loaded. You’ll learn more about this in Chapter 5, “Going the Rest of the Way Offline with Background Sync” and Chapter 6, “Push Notifications.”
Receive push notifications. With the right protocols and a backend server to send notifications, web apps use the background processing capabilities of service workers to enable the processing and display of push notifications sent to the app. You’ll learn more about this in Chapter 7, “Passing Data between Service Workers and Web Applications.”
The primary reasons browsers require a TLS connection to install and enable a service worker are those included in the bulleted list you just read through. Considering all you can do with the capabilities described in that list, the service worker has complete control over data coming in and out of the app. Browsers require the TLS connection to enforce that the web app and service worker load from the same location.
Without a TLS connection and the requirement that the service worker loads from the same context as the web app, hackers could compromise a site and load service worker code from another location and take complete control of the app. A rogue service worker could redirect all requests to alternate servers, capture auth and push tokens, and more.
5. https://developer.mozilla.org/en-US/docs/Web/API/CacheStorage
Of course, service workers have limitations:
Service workers don’t run unless the browser is open. The web app doesn’t have to be open, but the browser does.
Service workers don’t have access to the web app’s document object model (DOM), but we’ll discuss workarounds for this in Chapter 7.
The first limitation may not be a big deal depending on the browser and operating system (OS). On many mobile devices, the browser always runs, so it’s there to run the service worker. On desktop systems, some browsers run in the background as well or can be configured to do so. Chrome exposes an advanced setting. Continue running background apps when Google Chrome is closed, as highlighted in Figure 3.2.
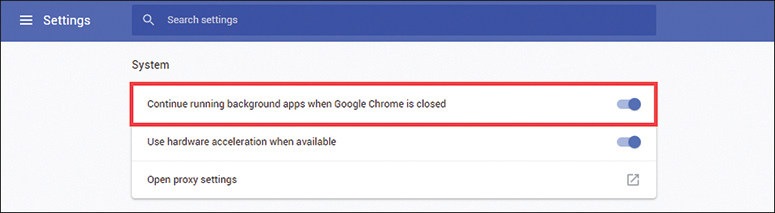
Figure 3.2 Chrome Advanced Settings
I’ll show you more about what service workers can do and how they do it as we work through the rest of the chapter.
Preparing to Code
Throughout the remainder of the chapter, you’ll start with a base version of the PWA News site and add a service worker to it. Then we’ll tweak and tune the service worker to demonstrate its capabilities. Before we do that, you must configure your local development environment with the components you’ll need.
Prerequisites
Before we start modifying code to enhance the PWA News app, you must install some software prerequisites you’ll use as you follow along. Who knows, you may already have them installed (you should). This setup is different from previous chapters, so please don’t skip ahead until you’ve ensured that you have everything you need in place.
Node.js
I built the PWA News site using Node.js and Express (a web framework for Node.js). It hosts the static PWA News web site plus the application programming interface (API) used by the web app. If your development workstation already has Node.js installed, then skip ahead to the next section. If not, hop over to https://nodejs.org and follow the instructions to install the client on your development workstation.
To confirm that you have Node.js installed, open a new terminal window and execute the following command:
node -v
If the terminal returns a version number (mine reports v10.16.0), then Node.js is properly installed. If you see an error message, then you have some work to do resolving the error before continuing.
TypeScript
With Node.js installed, now it’s time to install the TypeScript compiler. In the terminal window, execute the following command:
npm install -g typescript
This installs the tsc command you’ll use many times through the remainder of the book to compile the web server app TypeScript code into JavaScript.
Git Client
I published the source code for the book in a GitHub repository at https://github.com/johnwargo/learning-pwa-code. The easiest way to get the code, and to update your local copy when I publish changes, is through Git. If your development workstation already has Git installed, then you’re good. If not, hop over to https://git-scm.com and follow the instructions to install the client on your development workstation.
To confirm that you have Git installed, open a new terminal window and execute the following command:
git --version
If the terminal returns a version number (mine reports git version 2.22.0.windows.1), then Git is properly installed. If you see an error message, then you have some work to do resolving the error before continuing.
With Git installed, open a terminal window or command prompt, navigate to the folder where you want to store the book’s code, and then execute the following command:
git clone https://github.com/johnwargo/learning-pwa-code
Once the cloning process completes, navigate the terminal into the cloned project’s learning-pwa-codechapter-03 folder. This folder contains the PWA News server app, and that’s where we’ll work.
While we’re here, we might as well install all the dependencies required by the app. In the terminal window pointing to the project folder (learning-pwa-codechapter-03), execute the following command:
npm install
This command uses the Node Package Manager (npm) to install Node.js modules used by the server.
Visual Studio Code
I use Visual Studio Code as my primary code editor for most projects; this is not because I work for Microsoft (I do), but because it’s a very capable editor, and the large catalog of available extensions enables me to configure the editor environment with some really cool capabilities to make coding easier. If you haven’t tried it out yet, hop over to https://code.visualstudio.com/ and give it a try.
Navigating the App Source
The folder structure for the PWA News app source is shown in Figure 3.3. The public folder shown in the figure holds the web app files we’ll use in this chapter. The code you’re looking at is for a web server app, and the public folder is where the web server looks for the static files it serves.
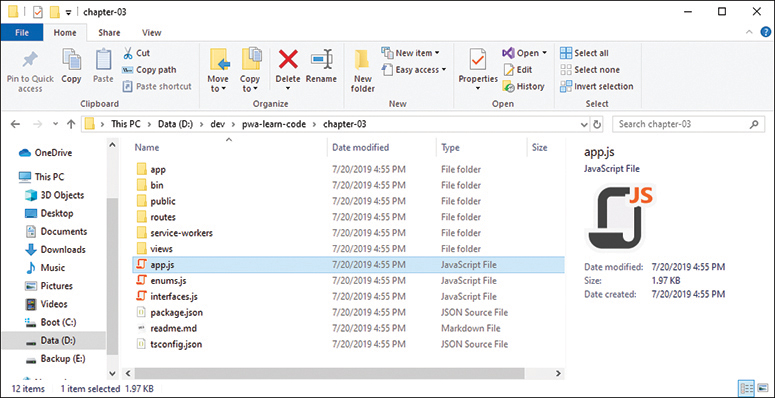
Figure 3.3 PWA News App Source Folder
I wrote server code (the APIs the web app uses) using TypeScript,6 a typed superset of JavaScript. Using TypeScript allowed me to define types for all my app’s variables and more easily find errors (based on that typing). TypeScript code compiles to JavaScript using the TypeScript Compiler (tsc), so the .js files you see in the figure are compiled versions of my code located in the project’s app folder.
6. https://www.typescriptlang.org/
If you decide you want to make changes to how the server and API work, you must make your modifications in the app folder. Once you’re ready to apply your changes, open a terminal window, navigate to the root project folder (the one shown in Figure 3.3), and execute the following command:
tsc
This compiles the server’s .ts files into the .js files you see in the root folder shown in the figure. You’ll see some errors and warnings from the code’s references to some of the objects, but the unmodified code runs as is, so look for errors from the code you modified.
Configuring the Server API
The server process consumes the Bing News Search API from Microsoft Azure to collect the news data displayed in the app. You’ll need an Azure account and a Bing API key to work with the code in this chapter.
If you already have an Azure account, log in to your account at https://portal.azure.com. If you don’t have an account, create a free one at https://azure.microsoft.com/en-us/free/. Once you’ve created the account, log in to the portal using your new account at https://portal.azure.com.
To use the Bing Search API, you must first generate an API key for the service. The key is free, and you can use up to 3,000 searches per month in the free tier. Point your browser of choice to https://portal.azure.com/#create/Microsoft.CognitiveServicesBingSearch-v7 and log in. Populate the form with the following information:
Name: Enter a name for the resource (use something such as Learning PWA, or PWA News).
Subscription: Select Pay-As-You-Go.
Location: Select an Azure Region from the drop-down. It doesn’t matter which one you pick; I suggest you pick one near your current location (I selected East US).
Pricing Tier: Select the free tier.
Resource Group: Create a new one, and give it any name you want (use something such as RG-PWA or RG-PWA-News).
Click the Create button when you’re done with the form.
When you get to the page shown in Figure 3.4, click the copy icon to the far right of either the KEY 1 or KEY 2 field to copy the selected key to the clipboard. You’ll need one of these keys in the next step.

Figure 3.4 Azure Portal
Next, in the project source code folder, open the project’s app/congfig.ts file. This file exports a single property, the BING_ACCESS_KEY shown in Listing 3.1. Paste the key you just copied to the clipboard between the empty quotes in the file.
Listing 3.1 PWA News app/config.ts File
export const config = {
  // enter your private Bing Search API access key
  BING_ACCESS_KEY: ''
};
For example, you’ll change
BING_ACCESS_KEY: ''
to something like this:
BING_ACCESS_KEY: 'your-super-secret-api-key'
Save the file, then open a terminal window, navigate to the root project folder (the one shown in Figure 3.3), and execute the following command:
tsc
This step invokes the TypeScript compiler to compile the config.ts file into a new config.js file in the project root folder (not shown in Figure 3.3). With this in place, you’re all set to start the server process and begin interacting with the app.
You’ll need this same config.js file as you work through the code in subsequent chapters, so I included a batch file and shell script to automate copying the compiled file to the other project folders. If your development system runs Windows, in the terminal window pointing to learning-pwa-codechapter-03, execute the following command:
copy-config.cmd
If your development system runs macOS, in the terminal window pointing to learning-pwa-codechapter-03, execute the following command:
./copy-config.sh
At the end of either process, you should see the config.js file copied into the root project folder for each chapter folder that uses the PWA News app.
Starting the Server
With all the parts in place, it’s time to start the server. If you don’t have a terminal window open pointing to the project folder, open one now, and navigate to the learning-pwa-codechapter-03 folder. Once there, execute the following command:
npm start
If everything’s set up properly in the code, the server will respond with the following text in the terminal:
[email protected] start D:learning-pwa-codechapter-03
node ./bin/www
At this point, you’re all set—the server is up and running and ready to serve content. If you see an error message, you must dig through any reported errors and resolve them before continuing.
To see the web app in its current state, open Google Chrome or one of the browsers that supports service workers and navigate to
http://localhost:3000
After a short delay, the server should render the app as shown in Figure 3.1. When you look in the terminal window, you should see the server process start, then log messages as it serves the different parts of the app, as shown here:
> [email protected] start D:learning-pwa-codechapter-03
> node ./bin/www

2019-07-29T22:27:25.054Z GET / 304 8.365 ms - -
2019-07-29T22:27:25.075Z GET /css/custom.css 304 2.004 ms - -
2019-07-29T22:27:25.079Z GET /img/bing-logo.png 304 0.935 ms - -
2019-07-29T22:27:25.104Z GET /js/sw-reg.js 304 0.746 ms - -
2019-07-29T22:27:25.114Z GET /js/utils.js 304 0.756 ms - -
2019-07-29T22:27:25.115Z GET /js/index.js 304 0.731 ms - -
Router: GET /api/news
2019-07-29T22:27:26.376Z GET /sw-34.js 404 1132.392 ms - 565
2019-07-29T22:27:26.381Z GET /app.webmanifest 304 1.766 ms - -
2019-07-29T22:27:26.420Z GET /icons/android-icon-192x192.png 404 20.681 ms - 565
Returning result (1)
2019-07-29T22:27:26.788Z GET /api/news 200 1645.317 ms - 12222
The server hosts the app at port 3000 by default (the port number is the numeric value after the last colon in the example), but if your system has another process listening on that port, then it’s not going to work. To change the port number used by the app, open the project’s bin/www file and look for the following line:
var port = normalizePort(process.env.PORT || '3000');
Change the '3000' to another port (hopefully an available one), save your changes, then restart the server and access the site at the new port. You can also set the port using local environment variables7 if you want.
7. https://stackoverflow.com/questions/18008620/node-js-express-js-app-only-works-on-port-3000
Registering a Service Worker
Web apps follow a specific process to install a service worker; there’s no automatic way to do it today. The app basically executes some JavaScript code to register the service worker with the browser. In the Tip Calculator app in Chapter 1, “Introducing Progressive Web Apps,” I added the code to do this directly in the app’s index.html file. For the PWA News app, we use a different approach.
In this section, you’ll modify the project’s existing public/index.html file plus add two JavaScript files: public/js/sw-reg.js and public/sw.js.
In the <head> section of the project’s public/index.html file, add the following code:
<!-- Register the service worker -->
<script src='js/sw-reg.js'></script>
This tells the web app to load a JavaScript file that registers the service worker for us. Next, let’s create that file. Create a new file called public/js/sw-reg.js and populate the file with the code shown in Listing 3.2.
Listing 3.2 PWA News sw-reg.js File
// does the browser support service workers?
if ('serviceWorker' in navigator) {
  // then register our service worker
  navigator.serviceWorker.register('/sw.js')
    .then(reg => {
      // display a success message
      console.log(`Service Worker Registration (Scope: ${reg.scope})`);
    })
    .catch(error => {
      // display an error message
      let msg = `Service Worker Error (${error})`;
      console.error(msg);
      // display a warning dialog (using Sweet Alert 2)
      Swal.fire('', msg, 'error');
    });
} else {
  // happens when the app isn't served over a TLS connection (HTTPS)
  // or if the browser doesn't support service workers
  console.warn('Service Worker not available');
}
The code here isn’t very complicated; it all centers around the call to navigator.serviceWorker.register. The code first checks to see if the serviceWorker object exists in the browser’s navigator object. If it does, then this browser supports service workers. After the code verifies it can register the service worker, it does so through the call to navigator.serviceWorker.register.
The register method returns a promise, so the code includes then and catch methods to act depending on whether the installation succeeded or failed. If it succeeds, it tosses a simple message out to the console. If the call to register fails (caught with the catch method), we warn the user with an alert dialog.
Two potential error conditions exist here: if the browser doesn’t support service workers and if service worker registration fails. When the browser doesn’t support service workers, I log a simple warning to the console (using console.warn). I don’t do anything special to warn the user because this is progressive enhancement, right? If the browser doesn’t support service workers, the user just continues to use the app as is, with no special capabilities provided through service workers.
On the other hand, if registration fails, then the code is broken (because we already know the browser supports service workers), and I want to let you know more obnoxiously with an alert dialog. I did this because you’re learning how this works, and I wanted the error condition to be easily recognized. I probably wouldn’t do this for production apps because if the service worker doesn’t register, the app simply falls back to the normal mode of operation.
Service workers don’t start working until the next page loads anyway, so to keep things clean, you can defer registering the service worker until the app finishes loading, as shown in Listing 3.3.
Listing 3.3 PWA News sw-reg.js File (Alternate Version)
// does the browser support service workers?
if ('serviceWorker' in navigator) {
  // Defer service worker installation until the page completes loading
  window.addEventListener('load', () => {
    // then register our service worker
    navigator.serviceWorker.register('/sw.js')
      .then(reg => {
        // display a success message
        console.log(`Service Worker Registration (Scope: ${reg.scope})`);
      })
      .catch(error) => {
        // display an error message
        let msg = `Service Worker Error (${error})`;
        console.error(msg);
        // display a warning dialog (using Sweet Alert 2)
        Swal.fire('', msg, 'error');
      });
  })
} else {
    // happens when the app isn't served over a TLS connection (HTTPS)
    // or if the browser doesn't support service workers
    console.warn('Service Worker not available');
}
In this example, the code adds an event listener for the load event and starts service worker registration after that event fires. All this does is defer the additional work until the app is done with all its other startup stuff and shouldn’t even be noticeable to the user.
Next, let’s create a service worker. Create a new file called public/sw.js and populate it with the code shown in Listing 3.4. Notice that we created the service worker registration file in the project’s public/js/ folder, but this one goes into the web app’s root folder (public/); I’ll explain why in “Service Worker Scope” later in this chapter—I’m just mentioning it now to save you a potential problem later if you put it in the wrong place.
Listing 3.4 First Service Worker Example: sw-34.js
self.addEventListener('fetch', event => {
  // fires whenever the app requests a resource (file or data)
  console.log(`SW: Fetching ${event.request.url}`);
});
This code is simple as well. All it does is create an event listener for the browser’s fetch event, then logs the requested resource to the console. The fetch event fires whenever the browser, or an app running in the browser, requests an external resource (such as a file or data). This is different from the JavaScript fetch method, which enables an app’s JavaScript code to request data or resources from the network. The browser requesting resources (such as a JavaScript or image file referenced in an HTML script or img tag) and a web app’s JavaScript code requesting a resource using the fetch method will both cause the fetch event to fire.
This is the core functionality of a service worker, intercepting fetch events and doing something with the request—such as getting the requested resource from the network, pulling the requested file from cache, or even sending something completely different to the app requesting the resource. It’s all up to you: your service worker delivers as much or as little enhancement as needed for your app.
With this file in place, refresh the app in the browser and watch what happens. Nothing, right? There’s not much to see here since, everything happens under the covers. In this example, the service worker does nothing except log the event; as you can see in the browser, the app loaded as expected, so the app’s still working the same as it did before.
Open the browser’s developer tools and look for a tab labeled Application (or something similar) and a side tab labeled Service Workers. If you did everything right, you should see your service worker properly registered in the browser, as shown in Figure 3.5 (in Google Chrome).
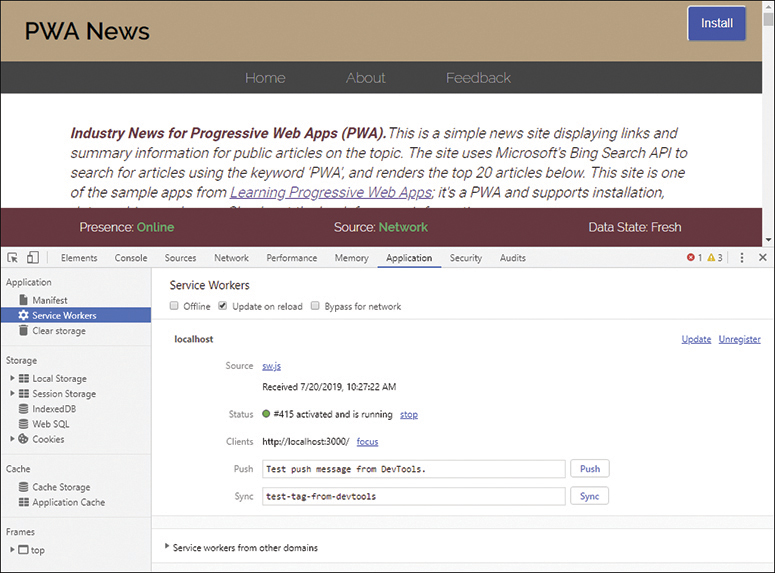
Figure 3.5 Chrome Developer Tools Application Tab
If the browser can’t register the service worker, it displays error messages in this panel to let you know.
In the latest Chrome browser and the Chromium-based Edge browser, you can also open a special page that displays information about all service workers registered in the browser. Open the browser and enter the following value in the address bar:
chrome://serviceworker-internals/
The browser opens the page shown in Figure 3.6, listing all registered service workers.

Figure 3.6 Chrome Service Worker Internals Page
The one thing missing from the service worker as it stands today is for it to actually do something with the fetch request. Listing 3.5 adds an additional line of code to our existing service worker:
event.respondWith(fetch(event.request));
This code instructs the browser to go ahead and get the requested file from the network. Without this statement in the event listener, the browser was doing this anyway. Since the event listener didn’t act on the request and return a promise telling the browser it was dealing with it, then the browser goes ahead and gets the file anyway. That’s why the app works without this line. Adding the line just completes the event listener.
Listing 3.5 Second Service Worker Example: sw-35.js
self.addEventListener('fetch', event => {
  // fires whenever the app requests a resource (file or data)
  console.log(`SW: Fetching ${event.request.url}`);
  // next, go get the requested resource from the network,
  // nothing fancy going on here.
  event.respondWith(fetch(event.request));
});
The browser passes the fetch event listener an event object service workers query to determine which resource was requested. Service workers use this mechanism to determine whether to get the resource from cache or request it from the network. I cover this in more detail later (in this chapter and the next), but for now this extra line of code simply enforces what we’ve already seen the browser do—get the requested resource from the network.
The browser fires two other events of interest to the service worker developer: install and activate. Listing 3.6 shows a service worker with event listeners for both included.
Listing 3.6 Third Service Worker Example: sw-36.js
self.addEventListener('install', event => {
  // fires when the browser installs the app
  // here we're just logging the event and the contents
  // of the object passed to the event. the purpose of this event
  // is to give the service worker a place to setup the local
  // environment after the installation completes.
  console.log(`SW: Event fired: ${event.type}`);
  console.dir(event);
});

self.addEventListener('activate', event => {
  // fires after the service worker completes its installation.
  // It's a place for the service worker to clean up from
  // previous service worker versions.
  console.log(`SW: Event fired: ${event.type}`);
  console.dir(event);
});

self.addEventListener('fetch', event => {
  // fires whenever the app requests a resource (file or data)
  console.log(`SW: Fetching ${event.request.url}`);
  // next, go get the requested resource from the network,
  // nothing fancy going on here.
  event.respondWith(fetch(event.request));
});
The browser fires the install event when it completes installation of the service worker. The event provides the app with an opportunity to do the setup work required by the service worker. At this point, the service worker is installed but not yet operational (it doesn’t do anything yet).
The browser fires the activate event when the current service worker becomes the active service worker for the app. A service worker works at the browser level, not the app level, so when the browser installs it, it doesn’t become active until the app reloads in all browser tabs running the app. Once it activates, it stays active for any browser tabs running the app until the browser closes all tabs for the app or the browser restarts.
The activate event provides service workers with an opportunity to perform tasks when the service worker becomes the active service worker. Usually, this means cleaning up any cached data from a previous version of the app (or service worker). You’ll learn a lot more about this in Chapter 4, “Resource Caching”; for now, let’s add this code to our existing service worker and see what happens.
Once you’ve updated the code, reload the page in the browser, then open the developer tools console panel and look for the output shown in Figure 3.7. Chances are, you won’t see it—that’s because the previous version of the service worker is still active. You should see the install event fire but not the activate event.

Figure 3.7 Chrome Browser Tools Console Pane with Installation Output
You have several options for activating this new service worker. I explain two here and cover programmatic options in “The Service Worker Lifecycle” later in the chapter. One option is to close and reopen the browser, then reload the app; this automatically enables the registered service worker.
Another option is to configure the browser developer tools to automatically activate the new service worker once it registers the service worker; this approach is useful only when debugging or testing a PWA. At the top of the service workers pane shown in Figure 3.5 is a checkbox labeled Update on reload; when you enable (check) this checkbox, the browser automatically updates and activates new service workers every time you reload the page with a new service worker.
Force the browser to activate the new service worker, then look at the console page. You should now see the output shown in Figure 3.8 with each network request logged to the console.
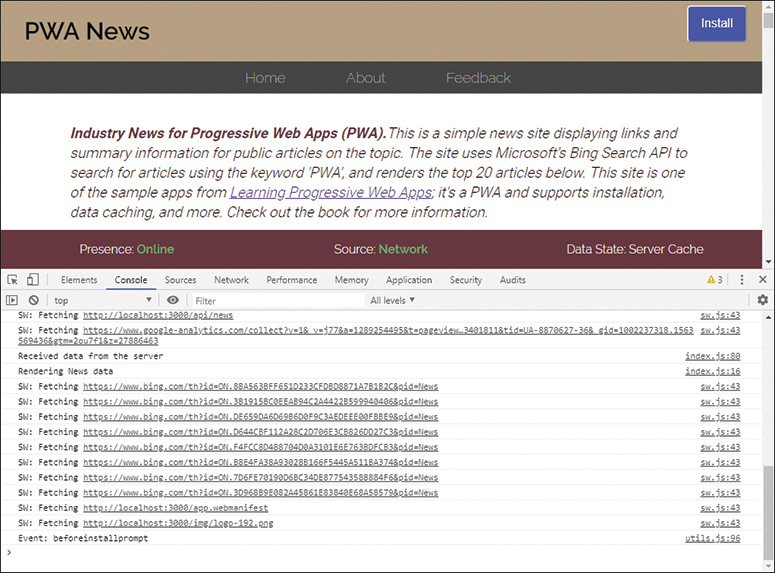
Figure 3.8 Chrome Browser Tools Console Pane with Service Worker Output
At this point, the app has a functioning service worker listening for all relevant events and fetching all requested resources from the network. In the next sections, we talk about service worker scope (as promised) and the service worker lifecycle; then I’ll show you more you can do with service workers.
Service Worker Scope
Remember early on when I said that one of the requirements for PWAs was that the browser accesses the app using a TLS (HTTPS) or localhost connection? This layer of security helps protect apps from rogue agents loading a service worker from another location.
As another layer of security, the location of the service worker file matters. When an app registers a service worker, by default the service worker can work only with resources hosted in the same folder location and below; anything higher up in the folder structure is ignored.
If you remember the code that registers the app’s service worker (Listing 3.2), when registration completes successfully, the code executes the following line:
console.log(`Service Worker Registration (Scope: ${reg.scope})`);
This lets the developer know that the service worker registered correctly, and it outputs the contents of the reg object’s scope property:
Service Worker Registration (Scope: http://localhost:3000/)
This scope defines the service worker’s operational domain, the part of the web app over which the service worker has providence. In this example, the service worker scope begins at localhost and covers anything available under that host.
If your app includes content and code in subfolders, for example, app1 and app2, and you want to register a separate service worker for each, you can easily do that. One option is to place the appropriate service worker in each folder; they automatically inherit scope from the folder where the service worker code is hosted when you register the service worker.
Another option is to set the scope for the service worker during registration; as an example, look at the following code:
navigator.serviceWorker.register('/sw1.js', {scope: '/app1/'})
This example registers the sw1.js service worker and sets the scope for the service worker to the app1 folder. With this in place, this service worker will process fetch requests only for resources located in the app1 folder and below (subfolders).
The Service Worker Lifecycle
Each service worker cycles through multiple states from the moment the browser calls navigator.serviceworker.register until it’s discarded or replaced by the browser. The states defined in the service worker specification are
Installing
Waiting
Active
When an app registers a service worker, the browser
Locates the service worker (requests it from a server)
Downloads the service worker
Parses and executes the service worker
If the browser can’t download or execute the service worker, it discards the service worker (if it has it) and informs the code that called navigator.serviceworker.register. In Listing 3.3, that means that the catch clause executes and whatever code is there executes.
If the browser successfully downloads the service worker, it executes the service worker, and that’s how the service worker registers the install and activate event listeners in the service worker code.
At this point, the install event listener fires; that’s where a service worker creates its local cache and performs any additional setup steps. A representation of the service worker (version 1) at the Installing state is shown in Figure 3.9.

Figure 3.9 Service Worker 1 Installing
If a service worker isn’t currently registered, the service worker transitions to the Active state, and it’s ready to process fetch requests the next time the app reloads, as shown in Figure 3.10.

Figure 3.10 Service Worker 1 Active
If the web app attempts to install a new version of the service worker (version 2, for example), then the process starts all over again for the new service worker. The browser downloads and executes service worker v2, the v2 install event fires, and it completes its initial setup.
At this point, the app is still active and has an active service worker (v1) in play. Remember, the current service worker remains active until you close the browser (or at least all tabs running the web app) or the browser is configured to force reloading the service worker. With an existing service worker active, service worker v2 goes into a waiting state, as shown in Figure 3.11.

Figure 3.11 Two Service Workers in Play
Once the user closes all browser tabs running the app or restarts the browser, the browser discards service worker v1 and sets service worker v2 to active as shown in Figure 3.12.

Figure 3.12 Service Worker V2 Active
When you update the service worker and a user navigates to the app, the browser attempts to download the service worker again. If the newly downloaded service worker is as little as one byte different from the one currently registered, the browser registers the new service worker and the activation process kicks off again. Regardless of whether or not it has changed, the browser downloads the service worker every time the page reloads.
Forcing Activation
Earlier I described ways to force the browser to activate a service worker by reloading the page or enabling the Reload option in the browser developer tools. Both of those options are great but require some action by the user. To force the browser to activate a service worker programmatically, simply execute the following line of code somewhere in your service worker:
// force service worker activation
self.skipWaiting();
You’ll typically perform this action during the install event, as shown in Listing 3.7.
Listing 3.7 Fourth Service Worker Example: sw-37.js
self.addEventListener('install', event => {
  // fires when the browser installs the app
  // here we're just logging the event and the contents
  // of the object passed to the event. the purpose of this event
  // is to give the service worker a place to setup the local
  // environment after the installation completes.
  console.log(`SW: Event fired: ${event.type}`);

  console.dir(event);
  // force service worker activation
  self.skipWaiting();
});

self.addEventListener('activate', event => {
  // fires after the service worker completes its installation.
  // It's a place for the service worker to clean up from previous
  // service worker versions
  console.log(`SW: Event fired: ${event.type}`);
  console.dir(event);
});

self.addEventListener('fetch', event => {
  // fires whenever the app requests a resource (file or data)
  console.log(`SW: Fetching ${event.request.url}`);
  // next, go get the requested resource from the network,
  // nothing fancy going on here.
  event.respondWith(fetch(event.request));
});
Claiming Additional Browser Tabs
In some cases, users may have multiple instances of your app running in separate browser tabs. When you register a new service worker, you can apply that new service worker across all relevant tabs. To do this, in the service worker’s activate event listener, add the following code:
// apply this service worker to all tabs running the app
self.clients.claim()
A complete listing for a service worker using this feature is provided in Listing 3.8.
Listing 3.8 Fifth Service Worker Example: sw-38.js
self.addEventListener('install', event => {
    // fires when the browser installs the app
    // here we're just logging the event and the contents
    // of the object passed to the event. the purpose of this event
    // is to give the service worker a place to setup the local
    // environment after the installation completes.
    console.log(`SW: Event fired: ${event.type}`);
    console.dir(event);
    // force service worker activation
    self.skipWaiting();
});

self.addEventListener('activate', event => {
    // fires after the service worker completes its installation.
    // It's a place for the service worker to clean up from previous
    // service worker versions
    console.log(`SW: Event fired: ${event.type}`);
    console.dir(event);
    // apply this service worker to all tabs running the app
    self.clients.claim()
});

self.addEventListener('fetch', event => {
    // fires whenever the app requests a resource (file or data)
    console.log(`SW: Fetching ${event.request.url}`);
    // next, go get the requested resource from the network,
    // nothing fancy going on here.
    event.respondWith(fetch(event.request));
});
Observing a Service Worker Change
In the previous section, I showed how to claim service worker control over other browser tabs running the same web app after a new service worker activation. In this case, you have at least two browser tabs open running the same app, and in one tab a new version of the service worker was just activated.
To enable the app running in the other tabs to recognize the activation of the new service worker, add the following event listener to the bottom of the project’s sw.js file:
navigator.serviceWorker.addEventListener('controllerchange', () => {
  console.log("Hmmm, we’re operating under a new service worker");
});
The service worker controllerchange event fires when the browser detects a new service worker in play, and you’ll use this event listener to inform the user or force the current tab to reload.
Forcing a Service Worker Update
In the world of single-page apps (SPAs), browsers load the framework of a web app once, and the app then swaps in the variable content as often as needed while the user works. These apps don’t get reloaded much because users simply don’t need to. This is kind of a stretch case, but if you’re doing frequent development on the app or know you’re going to update your app’s service worker frequently, the service worker’s registration object (reg in all the source code examples so far) provides a way to request an update check from the app’s code
To enable this, simply execute the following line of code periodically to check for updates:
reg.update();
The trick is that you must maintain access to the registration object long enough that you can do this. In Listing 3.9, I took the service worker registration code from Listing 3.2 and modified it a bit.
First, I created a variable called regObject, which the code uses to capture a pointer to the reg object exposed by the call to navigator.serviceWorker.register. Next, I added some code to the registration success case (the .then method) that stores a pointer to the reg object in the regObject variable and sets up an interval timer for every 10 minutes. Finally, I added a requestUpgrade function that triggers every 10 minutes to check for a service worker update.
Listing 3.9 Alternate Service Worker Registration: sw-reg2.js
// define a variable to hold a reference to the
// registration object (reg)
var regObject;

// does the browser support service workers?
if ('serviceWorker' in navigator) {
  // then register our service worker
  navigator.serviceWorker.register('/sw.js')
    .then(reg => {
      // display a success message
      console.log(`Service Worker Registration (Scope: ${reg.scope})`);
      // Store the `reg` object away for later use
      regObject = reg;
      // setup the interval timer
      setInterval(requestUpgrade, 600000);
    })
    .catch(error => {
      // display an error message
      let msg = `Service Worker Error (${error})`;
      console.error(msg);
      // display a warning dialog (using Sweet Alert 2)
      Swal.fire('Registration Error', msg, 'error');
    });
} else {
  // happens when the app isn't served over a TLS connection
  // (HTTPS) or if the browser doesn't support service workers
  console.warn('Service Worker not available');
  // we're not going to use an alert dialog here
  // because if it doesn't work, it doesn't work;
  // this doesn't change the behavior of the app
  // for the user
}

function requestUpgrade(){
  console.log('Requesting an upgrade');
  regObject.update();
}
You could even trigger execution of this code through a push notification if you wanted to force the update only when you publish updates by sending a special notification message whenever you publish a new version of the service worker.
Service Worker ready Promise
There’s one final service worker lifecycle topic I haven’t covered yet. The serviceWorker object has a read-only ready property that returns a promise that never rejects and sits there waiting patiently until the service worker registration is active. This gives your service worker registration code a place to do things when a page loads with an active service worker.
We already have the install and activate events, both of which get involved during service worker registration and replacement. If your app wants to execute code only when a service worker is active, use the following:
if ('serviceWorker' in navigator) {
  navigator.serviceWorker.ready.then((reg) => {
    // we have an active service worker working for us
    console.log(`Service Worker ready (Scope: ${reg.scope})`);
    // do something interesting...

  });

} else {
  // happens when the app isn't served over a TLS connection (HTTPS)
  console.warn('Service Worker not available');
}
You’ll see an example of this in action in Chapter 6.
Wrap-Up
In this chapter, we covered a lot about service workers and have one running in our app. You learned all about the service worker lifecycle and the special events and methods the service worker provides developers.
Unfortunately, the service worker we have doesn’t do much. In the next chapter, we’ll expand the capabilities of the service worker and explore many ways to manage caching the resources used by the app.