
7. Passing Data between Service Workers and Web Applications
Service workers and web apps have a symbiotic relationship on modern browsers that support service workers; the two work closely together to deliver an improved experience for users. So far, the only interactions I showed between web apps and service workers are situations in which the service worker helps the web app, such as by managing resource fetching and processing push notifications as they arrive. In this chapter, I show how to pass data between a service worker and a web app running in a browser (desktop or mobile). This data communication goes both ways: from a service worker to the web app, from a web app to the service worker, or even from the service worker to all browser tabs running the web app (I show examples of each in this chapter).
As I’ve described throughout this book, the service worker isn’t running all the time: the browser awakens it only when there’s work for the service worker to do. Therefore, you cannot implement a full data synchronization solution in a web app using a service worker, as described in Chapter 5, “Going the Rest of the Way Offline with Background Sync.” We can, however, use event-triggered actions in a service worker or web app to split processing between the service worker and the app. A web app, for example, could
Pass data calculation activities off to the service worker to complete.
Let the service worker know when page data changed so it can let other app instances running in other browser tabs know they need to refresh page content.
Share application state, such as logged-in user or shopping cart data, across browser tabs through the service worker.
Web developers can already use the window.postMessage method to send messages between window objects (between a window and a pop-up it created or between different page components like the page and an iframe embedded in the page). In this chapter, we cover the serviceWorker.postMessage method that enables similar communication between a service worker and the web app it serves. We also cover how the MessageChannel object creates a two-way communication channel that apps can use to streamline communication between a service worker and the web app it serves.
We build upon the simple push client app we used in Chapter 6, “Push Notifications.” Our task in this chapter doesn’t relate to push, but the app exhibits certain behavior that lends itself well to the topics in this chapter. For this topic, I deliberately didn’t try to manufacture contrived app scenarios because I didn’t want to detract from the core capabilities provided by the browser for interprocess communication. I leave it up to you to figure out how to apply these capabilities in your own apps.
Preparing to Code
The work we do in this chapter revolves around adding some enhancements to the app used in the previous chapter. The code for the server app is available in the book’s GitHub repository at https://github.com/johnwargo/learning-pwa-code. I provided complete instructions for how to download the code and configure your development environment in the section “Preparing to Code” in Chapter 3, “Service Workers.” If you haven’t already completed those steps, go there and complete them first before picking up here again.
Open a terminal window and navigate the terminal into the cloned project’s learning-pwa-codechapter-07 folder. This folder contains the completed version of the app as of the end of the previous chapter. Install the app’s dependencies by executing the following command:
npm install
Next, execute the following command:
node generate-keys.js
This executes a little node.js utility I wrote to generate a set of Voluntary Application Server Identification (VAPID) keys and write them to the configuration files used by the web app. The utility calls the web-push module’s webpush.generateVAPIDKeys() method, which handles the whole process1 for us.
1. You can read about the process at https://www.npmjs.com/package/web-push#usage.
As in previous chapters, I coded the server app in TypeScript, so before you can use the new configuration files just created, you must execute the following command to compile the code into JavaScript:
tsc
With all the parts in place, it’s time to start the server; in the terminal window, execute the following command:
npm start
If everything’s set up properly in the code, the server will respond with the following text in the terminal:
[email protected] start D:devlearning-pwa-codechapter-07
node ./bin/www
At this point, you’re all set—the server is up and running and ready to serve content. If you see an error message, you must dig through any reported errors and resolve them before continuing.
To see the web app in its current state, open Google Chrome or a browser that supports service workers and navigate to
http://localhost:3001
After a short delay, the server should render the simple web page shown in Figure 6.6. We’ll add some extra stuff to the page as we work through this chapter.
Send Data from a Web App to a Service Worker
We kick off the coding sections of this chapter highlighting how to send data between a web app and a service worker. In the sample app from Chapter 6, the state of the browser changes when the user clicks or taps the Subscribe and Unsubscribe buttons. When that happens, what if the service worker needed to know this and act in some way with that information? The service worker’s postMessage method enables an app to do this.
When an app needs to send data to a service worker, it can send the data using the following:
navigator.serviceWorker.controller.postMessage(DATA_OBJECT);
In this example, the DATA_OBJECT object is simply a JavaScript object containing whatever data the app wants delivered to the service worker.
To see this in action, open the project’s chapter-07publicjsindex.js file, and in the file’s doSubscribe function, look for the block of code that executes after the browser successfully subscribes for notifications. There you’ll find the following code:
console.log('doSubscribe: Browser subscribed');
Immediately following that line of code, add the following:
// send a message to the service worker letting it know
navigator.serviceWorker.controller.postMessage({ subscription: true });
This code sends a message to the service worker with a data object consisting of the subscription property with a value of true. This data tells the service worker the notification subscription state for this browser (true) immediately after the browser subscribes. I show you soon how the service worker uses this information.
Next, in the file’s doUnsubscribe function, look for the following:
if (status) {
Immediately following that line of code, add
// tell the service worker we unsubscribed
navigator.serviceWorker.controller.postMessage({ subscription: false });
This sends the same data object to the service worker with a different subscription property value (false). This tells the service worker that the browser is no longer subscribed for notifications immediately after the unsubscribe completes.
Now that our app informs the service worker when subscription status changes, let’s look at how the service worker responds to the message. As you probably expect, the arrival of the message from the web app triggers an event in the service worker. To process the message, the service worker must register the message event.
Open the project’s chapter-07publicsw.js file and add the following code to the end of the file:
self.addEventListener('message', event => {
  console.log('SW: Message event fired');
  console.dir(event);
  console.log(`SW: Subscription status: ${event.data.subscription}`);
  // do something interesting with the subscription status

});
If you save your changes, open the web app in the browser (http://localhost:3001), and click the Subscribe and Unsubscribe button on the page, you should see output from both the web app and the service worker in the console as shown in Figure 7.1. The “Browser Subscribed” text is from the web app’s index.js file, and the items prefaced with SW: come from the service worker.

Figure 7.1 Web App Output from PostMessage
The service worker accesses the content of the data object passed with the message through the event.data.subscription object. I had you write the event’s event object to the console so you can inspect it and see what other data elements it exposes for the service worker to use.
Now, I agree that the example provided here isn’t very exciting, but all I’m trying to do is show the moving parts—how you’ll use this in your app will vary. What I’ve shown is getting data from the web app to the service worker and the distinct place where that data goes into the service worker. In the next section, we do something interesting with the data.
Send Data from a Service Worker to a Web App
To send data from a service worker to a web app window, the process is a little more complicated. Notice that I said web app window instead of web app. That’s because it’s easy for a web app to send data to a service worker, since there’s only one service worker. On the service worker side, it can send data to any browser window or browser tab running the web app serviced by the service worker. Because of that, the service worker must do extra work to figure out which window should get the message.
The browser maintains a list of the client windows served by the service worker in the service worker’s clients object. The service worker needs the ID for the sending window to send a message back to the window. Fortunately, the sending window includes that value in the message event’s event.source.id property. In its simplest form, the service worker can send a message back to the sending window using the following code:
self.clients.get(event.source.id).then(client => {
  client.postMessage(DATA_OBJECT);
});
Knowing the service worker has access to an object storing an array of all the client windows served by the service worker, a service worker can send a message to every associated browser window using the following code:
self.clients.matchAll().then(clients => {
  clients.forEach(client => {
    client.postMessage(DATA_OBJECT);
  })
});
If the browser has copies of the web app open in other windows or tabs, we can use this approach to reset each window to the correct state when one window subscribes or unsubscribes to notifications. Open the project’s chapter-07/public/sw.js file, and update the service worker message event listener from the earlier example to the following code:
self.addEventListener('message', function (event) {
  console.log('SW: Message event fired');
  console.dir(event);
  console.log(`Subscription status: ${event.data.subscription}`);
  // get all the client windows
  self.clients.matchAll().then(clients => {
    // loop though each window
    clients.forEach(client => {
      // send a message to the window
      client.postMessage({ subscription: event.data.subscription });
    })
  });
});
In this example, the listener uses self.clients.matchAll to build an array of all the client windows. It returns a clients object, which we can iterate over using JavaScript’s forEach iterator. The code sends, to each client window, a simple data object containing the current subscription status for the app:
{ subscription: event.data.subscription }
You could also accomplish the same result using
client.postMessage(event.data});
For the web app to process the message, we must add a message event listener there. Open the project’s chapter-07publicjsindex.js file and add the following event listener to the bottom of the file:
navigator.serviceWorker.addEventListener('message', event => {
  console.log('Message listener fired');
  console.dir(event);
  // do we have a subscription object?
  if (typeof event.data.subscription !== 'undefined') {
    console.log(`Subscription event: ${event.data.subscription}`);
    updateUI();
  }
}, false);
This code checks to see if the message event includes the subscription property. If it does, it logs the subscription status to the console and then calls the app’s updateUI function to refresh the page. It’s in this function that the app decides whether to enable the Subscribe and Unsub-scribe buttons depending on subscription status. The result of this is that the subscription state reflected in the button shown by the app synchronizes across all browser windows.
The web app doesn’t use the data passed to it from the service worker because the updateUI function checks subscription status anyway. But there’s no reason the app couldn’t use the data—we just don’t need it to in this case.
Looking at that code, it’s clear that there’s one flaw with it. The preceding example sends the message to all browser windows, but if you think about it, there’s no need to send the message to the window that triggered the original message to the service worker. Let’s update the code a bit by adding a check to see if the window we’re sending to is the same one that sent the original message. If it is, we skip it and move on to the next one.
self.addEventListener('message', function (event) {
  console.log('SW: Message event fired');
  console.dir(event);
  console.log(`SW: Subscription status: ${event.data.subscription}`);
  // get all the client windows
  self.clients.matchAll().then(clients => {
    // loop though each window
    clients.forEach(client => {
      if (client.id === event.source.id) {
        // is the window the same one that told us about
        // the subscription event?
        console.log(`SW: Skipping affected window (${client.id})`);
      } else {
        // send a message to the window
        console.log(`SW: Notifying ${client.id}`);
        client.postMessage({ subscription: event.data.subscription });
      }
    })
  });
});
Save all the changes and refresh the app in the browser, then open additional browser windows or tabs pointing to the web app. When you’re all set, subscribe or unsubscribe one of the windows and watch what happens in the others.
Pretty cool, right? I know I often have multiple Amazon windows open as I decide what to purchase; this approach could easily enable Amazon’s web app to synchronize shopping cart item count across all browser windows, saving me a refresh to see what the current count is as I switch windows.
The complete code for these modifications is in the project’s index-71.js and service worker-71.js files in the project’s chapter-07publicchapter-code folder.
Two-Way Communication Using MessageChannel
The browser and service worker also support a two-way communication channel using postMessage; this approach uses the browser’s MessageChannel2 interface. When you create a message channel, you essentially create two communications ports: port1 and port2; and each participant uses one of the ports exclusively to send messages and data to the other.
2. https://developer.mozilla.org/en-US/docs/Web/API/MessageChannel
A message channel was essentially designed to let two parts of a web app (for example, the app’s main page and an iFrame embedded in it) to create a channel and communicate across it. When used with service workers, things get a little weird because service workers don’t run all the time—they’re awakened when the browser needs them. Service workers don’t maintain state, so a message channel is active only until the service worker is shut down by the browser.
Using a message channel in a web app looks like this:
const messageChannel = new MessageChannel();
messageChannel.port1.onmessage = function (event) {
  console.log('Message received on channel');
  // do something with the message
};

// send the message to the service worker
navigator.serviceWorker.controller.postMessage(DATA_OBJECT,
  [messageChannel.port2]);
Start by creating the message channel, then define an event listener for the messages sent to this side of the channel using port 1. Finally, send a message to the other participant, passing in port 2 as the second parameter to postMessage. It doesn’t matter which side uses which port: all that matters is that the app uses one for each end of the communication channel and uses that port exclusively on that end of the conversation.
In the service worker, the message event handler uses the value in event.ports[0] to send a response back to the web app. The value in event.ports[0] contains the value the web app passed in the second parameter to the call to postMessage.
self.addEventListener('message', function (event) {
  console.log('SW: Message event fired');
  let responsePort = event.ports[0];
  // send a message back to the web app using
  reponsePort.postMessage("Some message");
});
Let me show you the whole process in an example. Open the project’s chapter-07/public/index.html file. Add the following HTML to the bottom of the existing page’s content, before the script tags:
<div id='actionsContainer'>
  <div id='playback'>
    <div>
      <label for="playbackText">Playback Text</label>
      <input id="playbackText" placeholder="Enter some text here"><br>
      <button type="button" id="btnPlayback">Playback</button>
    </div>
  </div>
</div>
This adds an input field and a button to the page.
Open the project’s chapter-07publicjsindex.js file then add the following code to the bottom of the file:
document.getElementById("btnPlayback")
  .addEventListener("click", doPlayback);
This creates a click event listener for the Playback button on the page.
Finally, add the doPlayback function above the event listener you just added:
function doPlayback() {
  console.log('doPlayback()');
  // create the new message channel
  const messageChannel = new MessageChannel();
  messageChannel.port1.onmessage = function (event) {
    console.log('Message received on channel');
    Swal.fire({
      type: 'info',
      title: 'Message Channel',
      text: JSON.stringify(event.data)
    });
  };
  // send the message to the service worker
  navigator.serviceWorker.controller.postMessage({
    action: 'playback',
    content: $('#playbackText').val()
  }, [messageChannel.port2]);
}
This function creates the message channel, defines the message event handler for messages returned across the channel, and sends a message with some data (including the channel’s port 2—which the service worker will use to send data back to it) to the service worker for processing. The message sent to the service worker includes the content entered in the input field we just added.
What we’re going to do next is update the service worker code to process the message when it arrives, then parrot back the text it received from the web app. It will convert the provided text into upper case then send it back to the web app across the message channel’s port 2. Back in the web app, the message event handler grabs the result and displays it in a fancy dialog.
Open the project’s service worker file located in chapter-07publicsw.js. Refactor the message event listener so it looks like the following:
self.addEventListener('message', event => {
  console.log('SW: Message event fired');
  console.dir(event);
  // do we have an 'action' message?
  if (typeof event.data.action !== 'undefined') {
    console.log('SW: Action message received');

  } else {
    console.log(`SW: Subscription status: ${event.data.subscription}`);
    // get all the client windows
    self.clients.matchAll().then(clients => {
      // loop though each window
      clients.forEach(client => {
        if (client.id === event.source.id) {
          // is the window the same one that told us about
          // the subscription event?
          console.log(`SW: Skipping affected window (${client.id})`);
        } else {
          // send a message to the window
          console.log(`SW: Notifying ${client.id}`);
          client.postMessage({ subscription: event.data.subscription });
        }
      })
    });
  }
});
What you’re doing here is making room for a couple of actions sent through message channels. In this case, we relegated the existing subscription processing message to the else clause and added a new check for an action object to the message event handler.
With that in place, we need something to process the actions as they come in. Here’s what we use to do that:
let theAction = event.data.action;
switch (theAction) {
  case 'playback':
    console.log('SW: Processing Playback message');
    event.ports[0].postMessage(event.data.content.toUpperCase());
    break;
  default:
    console.log('SW: Unrecognized action (ignored)');
}
The code pulls the value for the action object from the received message and uses it in a case statement we’ll add to later. In the solo playback case, it takes the content passed in the message, converts it to uppercase, and sends it back to the web app. Add that code to the message event listener inside the if portion of the if/then statement, as highlighted in the following code.
Here’s the complete code for the event listener:
self.addEventListener('message', function (event) {
  console.log('SW: Message event fired');
  console.dir(event);
  // do we have an 'action' message?
  if (typeof event.data.action !== 'undefined') {
    console.log('SW: Action message received');
    let theAction = event.data.action;
    switch (theAction) {
      case 'playback':
        console.log('SW: Processing Playback message');
        event.ports[0].postMessage(event.data.content.toUpperCase());
        break;
      default:
        console.log('SW: Unrecognized action (ignored)');
    }
  } else {
    console.log(`SW: Subscription status: ${event.data.subscription}`);
    // get all the client windows
    self.clients.matchAll().then(clients => {
      // loop though each window
      clients.forEach(client => {
        if (client.id === event.source.id) {
          // is the window the same one that told us about
          // the subscription event?
          console.log(`SW: Skipping affected window (${client.id})`);
        } else {
          // send a message to the window
          console.log(`SW: Notifying ${client.id}`);
          client.postMessage({ subscription: event.data.subscription });
        }
      })
    });
  }
});
Save your changes to both files, refresh the web app in the browser, enter some text in the input field, and click the Playback button. You’ll see the inputted text returned in uppercase letters, as shown in Figure 7.2.
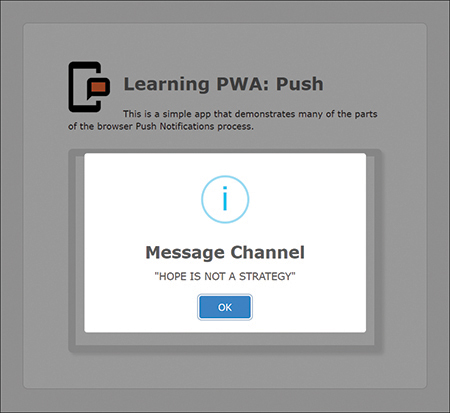
Figure 7.2 Playing Text Back through a Service Worker
I agree that this example is a little silly, but I merely wanted to show how to define a communications channel between the two entities. You can use this capability to pass calculations on to the service worker to perform, or you can even ask the service worker to fetch and process data (from a local database or server) using this approach.
If your service-worker-side processing will take a little while to complete, remember that you must wrap it in a waitUntil to keep the browser from shutting down the service worker until the job’s complete. Let me show you an example of this in action.
In the project’s index.html file, add the following div to the bottom of the actionsContainer div:
<div id="longAction">
  <button type="button" id="btnLongAction">Long Action</button>
  <div id="longActionOutput"></div>
</div>
When you’re done, the actionsContainer div will look like this:
<div id='actionsContainer'>
  <div id='playback'>
    <div>
      <label for="playbackText">Playback Text</label>
      <input id="playbackText" placeholder="Enter some text here"><br>
      <button type="button" id="btnPlayback">Playback</button>
    </div>
  </div>
  <div id="longAction">
    <button type="button" id="btnLongAction">Long Action</button>
    <div id="longActionOutput"></div>
  </div>
</div>
Next, in the project’s index.js file, add the following code to the bottom of the file (near the other click event listeners):
document.getElementById("btnLongAction")
.addEventListener("click", doLongAction);
Finally, add the doLongAction function to the file, somewhere above the event listener you just added:
function doLongAction() {
  console.log('doLongAction()');
  // clear any previous content if we have it
  $("#longActionOutput").empty();
  // create a message channel
  const messageChannel = new MessageChannel();
  // set up the message listener for the message channel
  messageChannel.port1.onmessage = function (event) {
    console.log('Message received on channel');
    // append content to the page element
    $("#longActionOutput").append(`<p>${event.data}</p>`);
  };
  // send the message to the service worker
  navigator.serviceWorker.controller.postMessage(
    { action: 'longaction' }, [messageChannel.port2]);
}
In the service worker (sw.js), add the following new case to the existing message listener:
case 'longaction':
  let limerick = [
    'There once was a farmer from Leeds',
    'Who swallowed a packet of seeds.',
    'It soon came to pass',
    'He was covered with grass',
    'But has all the tomatoes he needs.'
  ]
  console.log('SW: Processing longAction message');
  // do something interesting here
  event.waitUntil(
    new Promise(resolve => {
      // loop around for 5 seconds
      let i = 0;
      let wait = setInterval(() => {
        // increment the counter
        let msg = `${limerick[i]}`
        ++i;
        event.ports[0].postMessage(msg);
        // are we done?
        if (i > 4) {
          // shut down the timer
          clearInterval(wait);
          // resolve the promise
          resolve();
        }
      }, 1000);
    })
  )
  break;
For the new long action, the event listener wraps a waitUntil around a promise. Inside the promise, the code sends a limerick back to the page one line at a time, one second apart, until all five lines have been transmitted and displayed. This is another silly example, but at least you can see clearly how to create a promise in a waitUntil.
Here’s the complete listing for the service worker’s message listener:
self.addEventListener('message', function (event) {
  console.log('SW: Message event fired');
  console.dir(event);
  // do we have an 'action' message?
  if (typeof event.data.action !== 'undefined') {
    console.log('SW: Action message received');
    let theAction = event.data.action;
    switch (theAction) {
      case 'playback':
        console.log('SW: Processing Playback message');
        event.ports[0].postMessage(event.data.content.toUpperCase());
        break;
      case 'longaction':
        console.log('SW: Processing longAction message');
        // do something interesting here
        event.waitUntil(
          new Promise(resolve => {
            // loop around for 5 seconds
            let i = 0;
            let wait = setInterval(() => {
              // increment the counter
              ++i;
              console.log(`Loop #${i}`);
              event.ports[0].postMessage(i);
              // are we done?
              if (i > 4) {
                // shut down the timer
                clearInterval(wait);
                // resolve the promise
                resolve();
              }
            }, 1000);
          })
        )
        break;
      default:
        console.log('SW: Unrecognized action (ignored)');
    }
  } else {
    console.log(`SW: Subscription status: ${event.data.subscription}`);
    // get all the client windows
    self.clients.matchAll().then(clients => {
      // loop though each window
      clients.forEach(client => {
        if (client.id === event.source.id) {
          // is the window the same one that told us about
          // the subscription event?
          console.log(`SW: Skipping affected window (${client.id})`);
        } else {
          // send a message to the window
          console.log(`SW: Notifying ${client.id}`);
          client.postMessage({ subscription: event.data.subscription });
        }
      })
    });
  }
});
Save your changes, refresh the page in the browser, then click the Long Action button. The browser should respond with the limerick, one line every second, as shown in Figure 7.3.

Figure 7.3 Long Action Results
The complete code for these modifications is in the project’s index-72.js and sw-72.js files in the project’s chapter-07publicchapter-code folder.
Wrap-Up
In this chapter, I showed several ways to pass data between a web app and the service worker that services it. With this skill, you have a simple way to manage content across multiple browser windows through a service worker.
This is the last service worker chapter in the book. The remaining chapters deal with the tools available to PWA developers to make their lives easier.