
9. Automating Service Workers with Google Workbox
In Chapter 4, “Resource Caching,” we wrote a lot of code to implement different caching strategies for the PWA News app. You probably completed that chapter and said something along the lines of “there’s got to be a better way.” Well, there is. With Google Workbox,1 Google, along with the PWA developer community, provides a toolkit developers can use to more easily deliver robust and capable service workers. I’d like to say that you’re writing less code with Workbox, but that’s not the case. You’re still writing code, but you’re writing code that describes how you want your service worker to work rather than the code to actually make it work.
1. https://developers.google.com/web/tools/workbox/
In this chapter, I introduce you to Workbox and show you how you can use it to implement caching strategies for your web apps. I don’t cover every capability of Workbox; the library documentation is good, thorough, and full of examples. What I’ll show here is how to apply Workbox to an app, using the Tip Calculator app from the beginning of the book.
In the source code for this chapter, I included a slightly modified version of the Tip Calculator used in Chapter 2, “Web App Manifest Files.” Rather than start with a clean project and enhance it as you work through the chapter, in this chapter, you’ll copy the clean version and work in a copy as you proceed through the different sections.
Introducing Workbox
Workbox is a service worker toolbox consisting of JavaScript libraries, a Node command-line interface (CLI), and Node modules developers use to create service workers and manage how they work. The JavaScript libraries deliver the service worker–side capabilities of the toolbox, something Google describes as “adding offline support to web apps.” The CLI and Node modules automate app resource precaching during the coding and build process.
With Workbox, you can build a service worker that
Precaches the resources used by a web app and serves them from the cache.
Implements multiple caching strategies for your web app’s resources.
Implements offline capabilities for Google Analytics.
Queues network requests for later processing using background sync (similar to what you learned in Chapter 5, “Going the Rest of the Way Offline with Background Sync”).
Programmatically sets expiration for cached resources.
Does all sorts of other stuff.
Workbox abstracts away the complexity of the work that service workers do, letting you describe how you want things to work, and the toolbox handles everything else for you.
In this chapter’s examples, I show you how to use the CLI and the JavaScript framework in your PWAs. I leave working with the Node module and build tools for you to research later. Everything you learn in this chapter easily applies to those other topics as well.
Generating a Precaching Service Worker
With precaching and service workers, you build a list of all the local file resources used by your app, then use code to preload those resources into a device’s local cache the first time the app runs on the device; we implemented an example of this in Listing 4.1. In Workbox, Google delivers tools that automate generating that file list plus generating the service worker that caches the files and serves them from the cache.
Start by making a copy of the project’s chapter-09/tip-calc folder. Copy the folder, then paste it back to the same location, renaming the folder copy to tc1 during the process. When you’re done, you’ll have two folders in the chapter-09 folder: tip-calc and tc1.
Next, open a terminal window or command prompt, navigate into the tc1 folder, and execute the following command:
npm install –g workbox-cli
This command installs the Workbox CLI for us to use. After the installation completes, execute the following command:
workbox wizard
This starts the process Workbox uses to generate the resource list and service worker for your PWA. The wizard will ask you a few questions, then create the configuration file that drives the precaching and service worker generation process. Figure 9.1 shows the first step in the process.
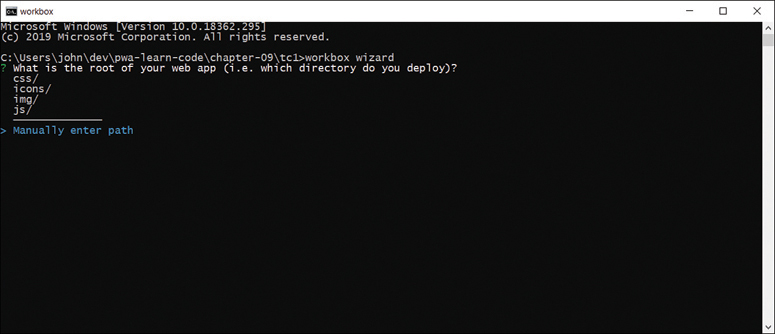
Figure 9.1 Workbox Wizard Starting Up
The wizard assumes you have a folder structure with a source and distribution folder (or some variant), so the first thing it does is ask for the location of the app’s source files. For this simple project, everything is in the tc1 folder, so select Manually enter the path, as highlighted in the figure, then press Enter.
The wizard then requests the following:
? Please enter the path to the root of your web app:
Enter a single period (.), then press Enter. The period indicates the current folder (make sure you’re in the tc1 folder when you start the wizard).
Next, the wizard asks you to select the subfolders containing resources that require precaching:
? Which file types would you like to precache? (Press <space> to select, <a> to toggle all, <i> to invert selection)
>(*) css
 (*) png
 (*) ico
 (*) html
 (*) js
 (*) md
 (*) svg
The wizard selects all folders by default, so for this project just press Enter to accept the defaults. If you want to omit a folder, use the arrow keys to move up or down the list, then press the a key to toggle the selected folder or i to invert the current selections.
Next, the wizard asks for the file name for the generated service worker file. In this project, I’ve already configured the code that registers the service worker (in /js/sw-reg.js) to look for the service worker in a file called sw.js, so you can just press Enter to accept the default value provided.
? Where would you like your service worker file to be saved? (sw.js)
Finally, the wizard asks for the file name for the configuration file used by Workbox to store the settings you just provided. Press Enter to accept the default (workbox-config.js).
? Where would you like to save these configuration options? (workbox-config.js)
When you press Enter, the Workbox CLI writes the configuration values you provided to the configuration file you specified in the last step. At the conclusion of the process, the CLI outputs the following message:
To build your service worker, run

  workbox generateSW workbox-config.js

as part of a build process. See https://goo.gl/fdTQBf for details.
You can further customize your service worker by making changes to workbox-config.js.
  See https://goo.gl/8bs14N for details.
At this point, all you have is the Workbox configuration file shown in Listing 9.1. Nothing’s been done to generate the service worker file we need for this app; we’ll do that next.
Listing 9.1 Workbox Configuration File: workbox-config.js
module.exports = {
  "globDirectory": ".",
  "globPatterns": [
    "**/*.{css,png,ico,html,js,svg}"
  ],
  "swDest": "sw.js"
};
In the terminal window, execute the following command:
workbox generateSW workbox-config.js
This launches the Workbox process that generates the service worker file specified in the configuration file. Since we used the default configuration file name, you can simplify things and execute the following instead:
workbox generateSW
At this point, Workbox scans the selected source code folders, then generates the service worker shown in Listing 9.2 (redacted to show only the first and last resources in the precache manifest array).
Listing 9.2 Workbox Generated sw.js File in tc1
/**
 * Welcome to your Workbox-powered service worker!
 *
 * you'll need to register this file in your web app, and you should
 * disable HTTP caching for this file too.
 * see https://goo.gl/nhQhGp
 *
 * the rest of the code is auto-generated. Please don't update this
 * file directly; instead, make changes to your Workbox build
 * configuration and rerun your build process.
 * see https://goo.gl/2aRDsh
 */

importScripts("https://storage.googleapis.com/workbox-cdn/releases/4.3.1/
  workbox-sw.js");

self.addEventListener('message', (event) => {
  if (event.data && event.data.type === 'SKIP_WAITING') {
    self.skipWaiting();
  }
});

/**
 * the workboxSW.precacheAndRoute() method efficiently caches and
 * responds to requests for URLs in the manifest.
 * see https://goo.gl/S9QRab
 */
self.__precacheManifest = [
  {
    "url": "css/main.css",
    "revision": "50c72ce0e72508baa767491be65455cd"
  },

  // redacted: MORE RESOURCE FILES HERE

  {
    "url": "workbox-config.js",
    "revision": "ffc90338931ec8f867b11b3c6da129fd"
  }
].concat(self.__precacheManifest || []);
workbox.precaching.precacheAndRoute(self.__precacheManifest, {});
If you look at the file, you’ll see that it starts with the following import:
importScripts("https://storage.googleapis.com/workbox-cdn/releases/4.3.1/
  workbox-sw.js");
This loads the Workbox JavaScript library used by everything in the file.
What follows is a complete service worker for the app. The most important part is the precacheManifest, an array of objects representing every file resource in the app. Each object consists of a url property containing a relative path pointing to the resource file, and the revision property, which is a hash of the file. Workbox uses this hash to determine when the file changes so it can update the cache.
At the end of the generated file is the following code:
workbox.precaching.precacheAndRoute(self.__precacheManifest, {});
This code initiates resource precaching and instructs the Workbox JavaScript library to serve resources from the cache. That’s it; that’s a complete precaching service worker using Workbox.
Switch back to the terminal window and start the local web server we used in Chapter 2 by executing the following command:
http-server
Open a browser and point it to http://localhost:8080/index.html; the browser will show the page you’ve already seen from Figure 2.1. Nothing has changed in the UI; what’s different is under the covers. Open the browser’s developer tools panel and look at the console. You should see the output shown in Figure 9.2.

Figure 9.2 Workbox Precaching Tip Calculator Files
Our generated service worker cached 40 files, and those resources are cached and ready to enable the browser to run the app offline. To test it, turn off the network, reload the app, and look at the console output. You’ll see output indicating the service worker serving resource files from cache, as shown in Figure 9.3.

Figure 9.3 Chrome DevTools Error: Missing Service Worker File
When you look at the local cache, there are some extra files in the cached file list that we know we’ll never need, such as the sw-start.js and workbox-config.js files. Fortunately for us, there’s a solution. The workbox-config.js file supports a globIgnores property you can use to list the files or file specifications for files you want ignored during the cache manifest generation process. To omit those two files, add the following property to the workbox-config.js file:
"globIgnores": [
  '**/sw-start.js',
  '**/workbox-config.js'
],
You’ll find the complete contents for the file in Listing 9.3.
Listing 9.3 Workbox Configuration File: workbox-config.js in tc1
module.exports = {
  "globDirectory": ".",
  "globPatterns": [
    "**/*.{css,png,ico,html,js,svg}"
  ],
  "globIgnores": [
    '**/sw-start.js',
    '**/workbox-config.js'
  ],
  "swDest": "sw.js"
};
Figure 9.3 shows a few errors as well, so apparently not everything the app needs is cached correctly.
The last error in the list doesn’t tell you much about its cause; the browser generates that error when it attempts to load the service worker file as it loads the page. If you look at the precache array, you’ll see that the service worker isn’t listed. As you probably remember from Chapter 3, “Service Workers,” the browser loads the service worker with every page load to check whether there’s a new version to install. Since Workbox omits the service worker, you get this error.
I got around this error in Chapter 3 when I included the service worker in the list of cached files. You don’t need to include your service worker in the cache. If it’s not there, the browser generates an error and continues. To help me learn more about how Workbox works, and to avoid the error, I set about trying to figure out how to include the service worker in the cache (just for fun).
Since we’re using Workbox to generate the service worker, I don’t want to manually add the file to the precache array because Workbox will overwrite it whenever I generate the file.
I thought a possible solution existed in the workbox-config.js file. Open the file and look for the following:
"globPatterns": [
  "**/*.{css,png,ico,html,js,svg}"
],
This is the file specification that tells Workbox how to identify files we want precached. I tried adding the service worker to the list of precached files by adding the following entry to the globPatterns array:
"./sw.js"
Here’s the complete array definition:
"globPatterns": [
  "**/*.{css,png,ico,html,js,svg}",
  "./sw.js"
],
When I regenerated the service worker and tested it in the browser, Workbox dutifully added the service worker to the cache as instructed, but the browser still reported the same error. Apparently, Workbox can’t handle caching its own service worker. Sorry.
I’m going to ask you to ignore the other errors for now; I’ll cover them in “Controlling Caching” Strategies later in the chapter.
As you can see, for simple static sites, this approach generates a service worker in no time and immediately improves the offline performance of the site. Unfortunately, it caches everything for the site, even if it’s not used (like many of the icon files I have in the app).
You can also use the Workbox NodeJS module and Webpack plugin to generate or update the service worker in your project at build time. Since the focus of this book is service workers and PWAs, I’m going leave the details of that for your future research.2
2. You can learn more about this topic at https://developers.google.com/web/tools/workbox/modules/workbox-build.
Add Precaching to an Existing Service Worker
Many developers want more control over their app’s service worker, so Workbox supports a workflow for that use case as well. With this approach, you make some simple changes to a service worker, then use the Workbox CLI to populate the resource array you saw in the previous section. With the resource list in place, you add code to the service worker to enable the appropriate caching strategies for your app’s resource types.
To get started, make another copy (our second) of the project’s chapter-09/tip-calc folder, and call this version tc2. If, for some reason, you didn’t complete the Node module installation in the previous section, open a terminal window, navigate to the new tc2 folder, then execute the following command:
npm install –g workbox-cli
The chapter’s sample project includes a simple service worker in a file called sw-start.js. Open that file now in the tc2 folder and add the following lines of code to the top of the file:
importScripts('https://storage.googleapis.com/workbox-cdn/releases/4.3.1/
  workbox-sw.js');

workbox.precaching.precacheAndRoute([]);
This adds the Workbox library to the service worker and a placeholder for the resource array you saw in the previous section.
In the same terminal window, execute the following command:
workbox wizard –injectManifest
This runs the Workbox Wizard, as we did in the previous section, enabling a mode that instructs the CLI that it must prepare its configuration file to update an existing service worker rather than generate a new one. The wizard works the same way we saw in the previous section with only one additional change.
The wizard starts by asking for the app’s source code folder:
? Please enter the path to the root of your web app:
Enter a single period (.), then press Enter. The period indicates the current folder (make sure you’re in the tc2 folder).
Next, the wizard asks you to select the subfolders containing resources that require precaching:
? Which file types would you like to precache? (Press <space> to select, <a> to toggle all, <i> to invert selection)
>(*) css
 (*) png
 (*) ico
 (*) html
 (*) js
 (*) md
 (*) svg
At this point, the wizard asks for the existing service worker file you want updated with the resource array:
? Where's your existing service worker file? To be used with injectManifest, it
  should include a call to 'workbox.precaching.precacheAndRoute([])'
Enter sw-start.js and press Enter.
Next, the wizard asks for the file name for the generated service worker file. In this project, I’ve already configured the software that registers the service worker (/js/sw-reg.js) to look for the service worker in a file called sw.js, so you can just press Enter to accept the default value.
? Where would you like your service worker file to be saved? (sw.js)
Finally, the wizard asks for the file name for the configuration file used by Workbox to store the settings you just entered or selected. Press Enter to accept the default (workbox-config.js).
? Where would you like to save these configuration options? (workbox-config.js)
When you press Enter, the Workbox CLI writes the configuration values you provided to the configuration file you specified in the last step. At the conclusion of the process, the CLI outputs the following message:
To build your service worker, run

  workbox injectManifest workbox-config.js

as part of a build process. See https://goo.gl/fdTQBf for details.
You can further customize your service worker by making changes to
  workbox-config.js. See https://goo.gl/8bs14N for details.
At this point, all you did is create the Workbox configuration file shown in Listing 9.4.
Listing 9.4 Workbox Configuration File: workbox-config.js in tc2
module.exports = {
  "globDirectory": ".",
  "globPatterns": [
    "**/*.{css,png,ico,html,js,svg}"
  ],

  "swDest": "sw.js",
  "swSrc": "sw-start.js"
};
For the most part, the configuration file has a lot of the same settings from the previous section. What’s new is the swSrc property, which tells Workbox what file to use as the base for the updated service worker.
In the terminal window, execute the following command:
workbox injectManifest
This command kicks off the resource manifest generation we saw in the previous section. Remember, we selected the default configuration file name, so we don’t have to pass its file name on the command line here.
In this case, it updates the existing service worker shown in Listing 9.5 (redacted to show only the first and last resources in the precache manifest array).
Listing 9.5 Workbox Generated sw.js File in tc2
self.addEventListener('install', event => {
  // fires when the browser installs the app
  // here we're just logging the event and the contents
  // of the object passed to the event. the purpose of this event
  // is to give the service worker a place to setup the local
  // environment after the installation completes.
  console.log(`Event fired: ${event.type}`);
  console.dir(event);
});

self.addEventListener('activate', event => {
  // fires after the service worker completes its installation.
  // it's a place for the service worker to clean up from previous
  // service worker versions
  console.log(`Event fired: ${event.type}`);
  console.dir(event);
});

importScripts('https://storage.googleapis.com/workbox-cdn/releases/4.3.1/
  workbox-sw.js');

workbox.precaching.precacheAndRoute([
  {
    "url": "css/main.css",
    "revision": "50c72ce0e72508baa767491be65455cd"
  },

  // redacted: MORE RESOURCE FILES HERE

  {
    "url": "safari-pinned-tab.svg",
    "revision": "7a812aea31a92da37ba82be39fa3084a"
  }
]);
When you load this version of the Tip Calculator app in the browser, you should see the same results from the previous section. The only difference between the two is that we provided the starter service worker file for this version.
You can also use the Workbox Node module and Webpack plugin to generate or update the service worker in your project at build time. Since the focus of this book is service workers and PWAs, I’m going to leave the details of that for your future research.3
3. You can learn more about this topic at https://developers.google.com/web/tools/workbox/modules/workbox-build.
Controlling Cache Strategies
Many developers want more control over what’s cached by the service worker and how the service worker caches the resources. If you look at the cache from one of the examples from the previous sections, shown in Figure 9.4, you’ll see that the app cached all application icons even though the app doesn’t need all of them on this browser.
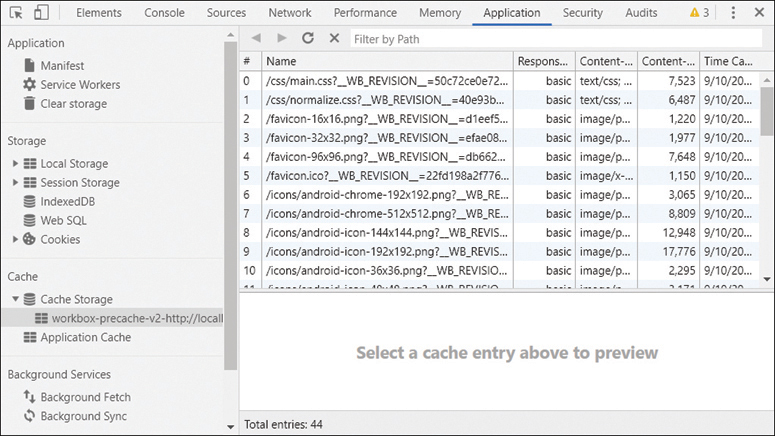
Figure 9.4 Tip Calculator Precached Files
When we skip the whole precaching process, we can build a service worker that uses Workbox to implement caching strategies for only the app resources needed by the app. Before I show you how to do that, I must first cover the different caching strategies available through Workbox. Here we go!
Workbox provides support for the following caching strategies:
CacheFirst: Return the cached version of a resource, retrieving the resource from the network (and adding it to the cache) if it’s not already in the cache.CacheOnly: Return the resource from the cache. If the resource is not in the cache, the fetch will fail. Your service worker must populate the cache during service worker installation to enable this option.NetworkFirst: Return the network version of the resource, retrieving the resource from the cache if the network is not available. The fetch fails when the network version is not available and the resource is not in the cache.NetworkOnly: Return the network version of the resource, failing if it’s not available.StaleWhileRevalidate: Return the cached version of a resource, then update the cached version from the network so it’s there the next time the app requests the resource. This gets resources to an app quickly, but it may not always be the most recent version.
To use a caching strategy when a web app requests resources, register a route to the resource using the following code:
workbox.routing.registerRoute( match, handler );
In this example, the match parameter refers to one of the following options used to match the requested resource with this route:
Callback function
Regular expression
String
The handler parameter refers to one of the caching strategies listed earlier in this section.
Let’s see all of this in action.
For the callback option, you provide a function Workbox executes to determine whether the requested resource matches the selection criteria for this route. Here’s an example:
const matchX = ({ url, event }) => {
  return url.href.includes('x');
};

workbox.routing.registerRoute(
  matchX,
  new workbox.strategies.StaleWhileRevalidate()
);
In this example, the route matches the request URL if the full URL to the requested resource contains an x. If it does, the service worker uses the StaleWhileRevalidate strategy for the resource. If not, this resource is ignored and hopefully picked up by some other route.
You can match resources using a regular expression, as shown in the following example:
workbox.routing.registerRoute(
  /.(?:html)$/,
  new workbox.strategies.NetworkFirst(),
);
In this example, the regular expression in the first parameter matches any file that has .html in the resource path. When the app requests an HTML file, the service worker will return the resource using the NetworkFirst strategy.
You can also use different caching strategies for different types of files. For example, the following code uses the StaleWhileRevalidate strategy for .js and .css files, but NetworkFirst for .html files:
workbox.routing.registerRoute(
  /.(?:js|css)$/,
  new workbox.strategies.StaleWhileRevalidate(),
);

workbox.routing.registerRoute(
  /.(?:html)$/,
  new workbox.strategies.NetworkFirst(),
);
Finally, you can match resources using a string value, as shown in the following example:
workbox.routing.registerRoute(
  '/img/my-logo.png',
  new workbox.strategies.CacheFirst(),
);
In this example, the route matches if the requested resource is the app’s /img/my-logo.png file. When the app requests the logo file, the service worker will return the resource using the CacheFirst strategy.
Let’s add some caching to the Tip Calculator app. Make another copy of the project’s chapter-09/tip-calc folder, and call this version tc3. Next, rename the copied project’s sw-start.js file to sw.js and open the renamed file in your code editor.
At the top of the file, add the following import:
importScripts('https://storage.googleapis.com/workbox-cdn/releases/4.3.1/
  workbox-sw.js');
This adds the Workbox library to the app.
Next, at the bottom of the file, add the following code:
workbox.routing.registerRoute(
  /.(?:png|svg|js|css|html)$/,
  new workbox.strategies.StaleWhileRevalidate()
);
This uses a regular expression to apply the StaleWhileRevalidate caching strategy to all .png, .svg, .js, .css, and .html files for the app. This is a simple but effective approach to caching app resources and should cover most web app resource types.
If you have other file types in your web app, you can add the resource’s file extension to the regular expression.
When you load the app in the browser and look at its cache storage, as shown in Figure 9.5, you’ll see that all matching file types are cached.

Figure 9.5 Workbox Cache in Action
To see the caching strategy in action, disable the network in the browser developer tools, then look at the results in the Network panel, shown in Figure 9.6. As you can see from the figure, the service worker returns the requested resource if it has it, then the fetchWrapper.mjs file tries to retrieve an updated version of the file from the network (and fails).

Figure 9.6 Workbox Caching Shown through Developer Tools Network Panel
Workbox supports plugins as well, and there are many available for you to use. For example, there’s an expiration plugin you can use to keep resources in a cache for a specific number of seconds:
workbox.routing.registerRoute(
  /.(?:png|jpg|svg)$/,
  new workbox.strategies.CacheFirst({
    cacheName: 'app-images',
    plugins: [
      new workbox.expiration.Plugin({
        maxEntries: 50,
        maxAgeSeconds: 864000
      }),
    ],
  }),
);
This example caches a maximum of 50 .png, .jpg, and .svg files for 10 days (864,000 seconds). The example also adds an additional cache called app-images just for those image files.
When you turn off the network connection in the browser developer tools and reload the app, you’ll see that this version of the app has some of the same problems highlighted in Figure 9.3. In this case, the issue is that our caching strategy isn’t caching several of the external resources used by the app (some fonts and the SweetAlert2 library). There are several approaches to solving this problem.
You can add handlers for specific resources, putting them in a separate cache, as follows:
workbox.routing.registerRoute(
  'https://cdn.jsdelivr.net/npm/sweetalert2@8',
  new workbox.strategies.CacheFirst({
    cacheName: 'external-cache',
    plugins: [
      new workbox.cacheableResponse.Plugin({
        statuses: [0, 200],
      })
    ]
  })
);
In this example, I use the cacheableResponse plugin to enable caching resources that won’t normally be cached by a service worker because of cross-origin resource sharing (CORS) issues. I explained this issue in Chapter 4, “Resource Caching.”
You can also implement a route that matches any requests for fonts from https://fonts.googleapis.com and stores them off in a cache:
workbox.routing.registerRoute(
  /^https://fonts.googleapis.com/,
  new workbox.strategies.StaleWhileRevalidate({
    cacheName: 'external-cache',
  }),
);
Probably the easiest solution in this case is to just set a default handler for any missed resources, catching any resources that aren’t matched using any other routes. Add the following code to the bottom of the service worker:
workbox.routing.setDefaultHandler(
  new workbox.strategies.NetworkFirst({
    cacheName: 'default-cache'
  })
);
In this example, we added a cache called default-cache and told Workbox to put all unmatched resources there. When you reload the app and look at cache storage, you’ll see the external resources cached, as shown in Figure 9.7.

Figure 9.7 The Tip Calculator’s Default Cache
Wrap-Up
In this whirlwind chapter, I showed you how to use Google’s Workbox toolkit to generate service workers for your app or build service workers using Workbox’s modular caching strategies rather than writing and maintaining all the caching code yourself. The material provided in this chapter merely scratches the surface of what you can do with Workbox. You should spend some time with Google’s Workbox documentation and samples to learn more about how Workbox can make your life easier.
This chapter wraps up the book as well. I truly hope you enjoyed this journey from manifest files to service workers and all the capabilities they provide. You now have the knowledge you need to supercharge your web apps with PWA capabilities. Enjoy!