Now it’s time to put everything you have learned so far in this book to good use. In this chapter you will learn how to create your first robotic project, the Go Bot, a four-wheeled robot. It uses two servo motors to drive it. It will be programmed to move forward and backward, talk, and display friendly text messages. Go Bot is a great first robotic development project, providing an effective example of the fundamental steps involved in robotic development. It will also provide you with the opportunity to put your programming skills to good use.
The major topics covered in this chapter include:
Developing a basic understanding of how to create modular robots.
A review of Go Bot’s features and capabilities.
Step-by-step instructions for building Go Bot.
Learning how to remote control Go Bot.
A complete review of the NXT-G program that makes Go Bot come to life.
Robotic development is usually completed through a series of steps, beginning with design, then assembly, and, finally, programming and testing. In each chapter that follows, you will be presented with a brief introduction that provides a high-level overview and design of a different robot.
More often than not, development involves a lot of experimentation and plenty of mistakes, corrections, and modifications. As you work, make sure that you build structures that are strong and functional. In addition, approach development in a modular manner by breaking down your robots into a series of distinct subassemblies that, when put together, make up your robot. Once assembly is completed, you will wrap things up by programming and then testing your robot.
Hint
When you’re done with a robot that you are proud of, it’s a good idea to document what you have accomplished. This can be done as easily as snapping a picture of your robot, or it can be as complex as developing a complete set of build instructions, which you can create using various CAD programs like the Lego Digital Designer or LDRAW. You might even consider creating a video of your robot’s assembly and operation.
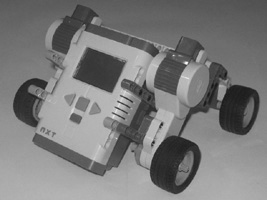
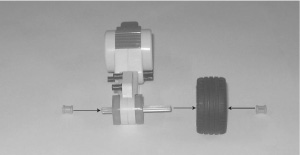
Moving vehicles are a popular type of robot and make for an excellent starting point. Go Bot is such a robot. As shown in Figure 9.1, Go Bot is a four-wheeled robotic vehicle. The two front wheels are connected to and operated by servo motors and are responsible for the vehicle’s propulsion. The back two wheels provide additional support.
Go Bot will be programmed to begin by saying and displaying the word Hello on the NXT Brick’s LCD. Next it will play a tone, move forward, pause, and play another tone. Go Bot will then move backward to its starting point, play a tone, and spin in place before saying Goodbye and halting.
Hint
The Go Bot can be used as the basis for creating all sorts of other vehicles. It will serve as the starting point for the robotic projects in Chapters 10 and 11.
Go Bot is a relatively simple and straightforward robotic project. You will create it in six high level steps as outlined below.
Preparing the NXT Brick
Assembling the left motor drive
Assembling the right motor drive
Assembling the rear wheel chassis
Assembling Go Bot
Programming and testing Go Bot
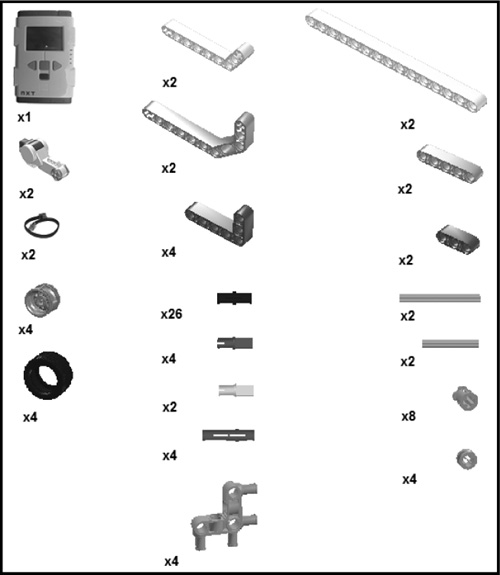
Figure 9.2 provides a complete listing of all the different electronic components and parts needed to make Go Bot. Begin your work on this project by retrieving these pieces from your Lego Mindstorms NXT 2.0 kit and setting them aside to work with.
Begin the development of Go Bot by preparing the NXT Brick. This involves the attachment of several pieces to the NXT Brick. This facilitates the connection of the servo motor assemblies that will be created in Steps 2 and 3 and then added to the NXT Brick in Step 5.
Step 1—. Take two 5M straight beams, four connector peg with friction 3M pegs, and two 3 × 5M perpendicular beams and connect them as shown in Figure 9.3.

Step 2—. Take the components created in Step 1 and connect them to the NXT Brick as shown in Figure 9.4.

Now it is time to begin working on Go Bot’s servo drive assemblies, beginning with the left motor drive. This is accomplished in four steps.
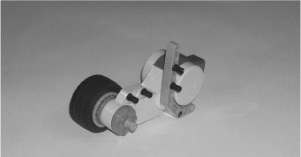
Step 1—. Create the robot’s left wheel by connecting a rim to a tire as shown in Figure 9.5.

Step 2—. Connect one connector peg with friction and cross axles and six connector pegs with friction to one of the servo motors as shown in Figure 9.6.

Step 3—. Connect the completed wheel to the servo motor using one 7M cross axle and two bushings as shown in Figure 9.7.

Step 4—. Connect two connector pegs with friction to a 3 × 7 double broken angle beam, as shown in Figure 9.8, and then connect the double broken angle beam to the servo motor as also shown in Figure 9.8.

Hint
The completed left motor drive should look like the example shown in Figure 9.9.
The steps required to create the right motor drive assembly closely mirror the steps that you followed to assemble the left motor assembly and are accomplished in four steps.
Step 1—. Create the robot’s right wheel by connecting a rim to a tire as shown in Figure 9.10.

Step 2—. Connect one connector peg with friction and cross axles and six connector pegs with friction to one of the robot’s servo motors as shown in Figure 9.11.

Step 3—. Connect the completed wheel to the servo motor using one 7M cross axle and two bushings as shown in Figure 9.12.
Step 4—. Connect two connector pegs with friction to a 3 × 7 double broken angle beam, as shown in Figure 9.13, and then connect the double broken angle beam to the servo motor, as also shown in Figure 9.13.

Hint
The completed right motor drive should look like the example shown in Figure 9.14.

With the NXT Brick now prepared and the Go Bot’s left and right servo motor assemblies complete, it’s time to create the robot’s rear wheel chassis. This will be accomplished in four steps.
Step 1—. Connect two 15M straight beams and two 3 × 7 angle beams using four pegged perpendicular block 5M pieces as shown in Figure 9.15. Make sure that when connecting the pegged perpendicular block 5M pieces to the 15M straight beams that you insert the peg ends of the pegged perpendicular block 5M pieces into the first and third holes on each end of the 15M straight beam.

Step 2—. Connect two 3 × 5M perpendicular beams to the upper left and right ends of the chassis using a connector peg with friction and connector peg with friction and cross axle, as shown in Figure 9.16.

Step 3—. Connect a 3M straight beam to the left side of the rear chassis using a connector peg with friction and connector peg with friction and cross axle, as shown in Figure 9.17. Add a second 3M straight beam to the right side of the rear chassis using a second connector peg with friction and connector peg with friction and cross axle (not shown in Figure 9.17).

Step 4—. Assemble a new wheel using a rim and tire and add the wheel to the rear chassis using a 5M cross axle, two bushings, and two half-bushings as shown in Figure 9.18.

Hint
The completed rear wheel chassis should look like the example shown in Figure 9.19.

Now that all of the major subassemblies that make up Go Bot have been put together, it is time to assemble these subassemblies into a completed robot.
Step 1—. Attach the left and right servo motor assemblies to the NXT Brick, as shown in Figure 9.20.

Step 2—. As shown in Figure 9.21, connect the robot’s rear wheel chassis to the robot by connecting its 3 × 5M perpendicular beam to the left and right servo motors using the two sets of connector pegs with friction that are already connected to the servo motors.


Step 3—. To operate, the robot’s two servo motors must be connected to the NXT Brick. Set this up by connecting the left servo motor to the NXT Brick’s C port and the right servo motor to the NXT Brick’s B port using a pair of 35cm/14-inch cables, as shown in Figure 9.23.

Now that Go Bot has been assembled, it is time to begin work on the NXT-G program that will bring it to life. The NXT-G program itself will be relatively simple. It will provide instructions to the Go Bot to perform the following actions:
Drive forward
Drive backward
Spin in place
Talk
Display different text messages
The NXT-G program will be created in three distinct stages. In the first stage, the programming blocks needed to control the robot’s movement will be added to the program and configured. The robot’s operation will then be tested to ensure that things work as they should. Next, Sound and Display blocks will be added to the NXT-G program to give the robot some personality. This will complete the development of the robot’s programming. The robot’s operations will again be tested. Lastly, you will add comments to the NXT-G program that document its operation, and then you will perform one last test of the robot’s operations.
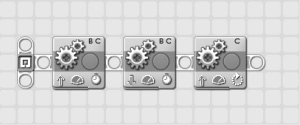
Begin the development of Go Bot’s NXT-G program by creating a new NXT-G program named Go_Bot. Once created, drag and drop three instances of the Move block onto the program’s main sequence beam.
The first Move block will be responsible for moving the robot forward in a straight line. Select it and configure it as follows:
Port—. Select ports B and C.
Direction—. Select Forward.
Steering—. Make sure the slide is centered in the middle of the slider bar, configuring the robot to move forward in a straight line.
Power—. Set power to 75 percent.
Duration—. Set duration to 5 seconds.
Next Action—. Select Brake.
The second Move block will move the robot backward in a straight line to its original starting position. Select it and configure it as follows:
Port—. Select ports B and C.
Direction—. Select Backward.
Steering—. Make sure the slide is centered in the middle of the slider bar, configuring the robot to move backward in a straight line.
Power—. Set power to 75 percent.
Duration—. Set duration to 5 seconds.
Next Action—. Select Brake.
The third Move block will be used to spin the robot full circle, pivoting it along its left front wheel (which is connected to Port C). Select the third Move block and configure it as follows:
Port—. Select port C.
Direction—. Select Forward.
Steering—. N/A.
Power—. Set power to 75 percent.
Duration—. Set duration to 2900 degrees.
Next Action—. Select Brake.
Figure 9.24 shows how the NXT-G program should look at this point. Save the program and then turn on and connect the robot (e.g. NXT Brick) to your computer and download the program by clicking on the NXT Download button located at the bottom right corner of the work area. Once the NXT-G program has been downloaded, disconnect Go Bot and place it on the floor in an area free of obstacles. Press the NXT Brick’s orange button four times to select and run the NXT-G program.
Ensure that, once started, the Go Bot moves forward and backward and that it then spins in place. If it does not perform all of these tasks correctly, go back and review each of the programming blocks that make up the NXT-G program and ensure that their configuration matches up with the configuration settings specified for each block. Once you have found and corrected any block configuration errors, download and retest Go Bot’s operation before proceeding to the second stage of the program’s development.
Now that Go Bot’s base functionality has been programmed and validated, it’s time to provide the robot with a little personality through the addition and configuration of Sound, Display, and Wait Sensor programming blocks that together enable the robot to:
Say “Hello” when first started.
Display the text string “Hi. I am Go Bot!” on the NXT Brick’s LCD.
Pause for two seconds.
Play a tone before and after each movement made by Go Bot.
Say “Goodbye.”
Display the text string “Goodbye” on the NXT Brick’s LCD.
Begin by inserting a Sound block on the sequence beam immediately before the first of the three Move blocks. Select the Sound block and configure it as follows:
Action—. Select Sound File.
Control—. Select Play.
Volume—. Set value level to 75 percent.
Function—. Ensure that Repeat is not selected.
File—. Select Hello from the list of files in the scrolling list box.
Wait—. Select Wait for Completion.
Insert a Display block between the Sound block and the first of the three Move blocks. Select the Display block and configure it as follows:
Action—. Select Text from the drop-down list.
Display—. Select Clear.
Text—. Type Hi. I am Go Bot! in the text entry field.
Position—. Specify a value of 3 for X and 26 for Y.
Insert a Sensor Wait block in between the Display block and the first of the three Move blocks. Select the Sensor block and configure it as follows:
Control—. Select Time from the drop-down list.
Until—. Type a value of 2 in the Seconds entry field.
Insert a Sound block between the Sensor Time block and the first of the three Move blocks. Select the Sound block and configure it as follows:
Action—. Select Tone.
Control—. Select Play.
Volume—. Set value level to 75 percent.
Function—. Ensure that Repeat is not selected.
Note—. Specify a note value of C and set it to play for .5 seconds.
Wait—. Select Wait for Completion.
Insert a new Sound block just after the first of the three Move blocks. Select the Sound block and configure it exactly the same way as you did the previous Sound block.
Insert another Sound block just after the second of the three Move blocks. Select the Sound block and configure it exactly the same way as you did the two previous Sound blocks.
Insert another Sound block just after the third of the three Move blocks. Select the Sound block and configure it as follows:
Action—. Select Sound File.
Control—. Select Play.
Volume—. Set value level to 75 percent.
Function—. Ensure that Repeat is not selected.
File—. Select Goodbye from the list of files in the scrolling list box.
Wait—. Select Wait for Completion.
Next, add a Display block to the end of the sequence beam and configure it as follows:
Action—. Select Text from the drop-down list.
Display—. Select Clear.
Text—. Type Goodbye in the text entry field.
Position—. Specify a value of 30 for X and 29 for Y.
Lastly, add a Sensor Wait block at the end of the sequence beam. Select the Sensor block and configure it as follows:
Control—. Select Time from the drop-down list.
Until—. Type a value of 1 in the Seconds entry field.
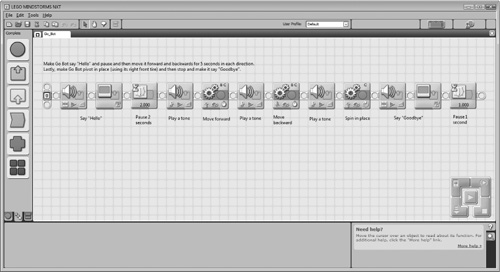
Figure 9.25 shows how the NXT-G program should now look. Save the program and then turn on and connect the robot (e.g. NXT Brick) to your computer and download the program by clicking on the NXT Download button located at the bottom right corner of the work area. Once the NXT-G program has been downloaded, disconnect Go Bot and place it on the floor in an area free of obstacles. Press on the NXT Brick’s orange button four times to select and run the NXT-G program.

Figure 9.25. This version of the Go_Bot NXT-G program contains all of the robot’s programming logic.
Before continuing to the final stage of the NXT-G program’s development, test the robot and make sure it operates as previously described.
At this point Go Bot’s NXT-G program is almost done. All that remains is for you to document its operation. Update the Go_Bot program so that it contains all of the comments shown in Figure 9.26.
Congratulations on the creation of your very first robot. This is a considerable achievement. Before moving on to Chapter 10, “Tracker Bot,” to learn how to further enhance the robot, take a few minutes to fully test the operation of Go Bot, ensuring that it works as described. If it does not perform exactly as has been described, go back and review each of the programming blocks that make up the NXT-G program and ensure that their configuration matches up correctly with the configuration settings that were previously specified for each block.
As a moving robot, Go Bot’s movement can be controlled via NXT-G programs that you develop and download into the NXT Brick. Alternatively, you can use the Remote Control window to control Go Bot with your mouse or keyboard. To access the Remote Control window, shown in Figure 9.27, click on Tools > Remote Control.

Hint
In order to be able to make effective use of the Remote Control feature, you either need a relatively long USB cable or a wireless Bluetooth connection.
For the remote control to work, the NXT Brick must be powered on and a connection must exist between the robot (e.g. NXT Brick) and your computer. Otherwise, the Remote Control window will appear grayed out and you will not be able to access any of the controls shown on it. Often, Lego Mindstorms NXT 2.0 automatically detects and establishes a connection with the NXT Brick. However, sometimes you may have to do it yourself. To do so, click on the Connections button and then select your NXT Brick and click on the Connections button followed by the Close button.
With a connection established, use your mouse to click on the Forward, Backward, Left, and Right button to remotely control the movement of Go Bot. Alternatively, you can use the keyboard’s Up, Down, Right, and Left keys to control Go Bot’s movement. You can adjust the speed at which Go Bot moves by clicking on either the Increase Speed or Decrease Speed buttons or by clicking directly on the graphic speed meter to indicate the speed at which you want Go Bot to move.
This chapter showed you how to create your first robotic creation, Go Bot. In developing Go Bot, you learned the fundamental steps involved in robotic development: design, build, program, and test. This chapter explained the importance of breaking down robot development into subassemblies. You also learned how to develop Go Bot’s NXT-G program in several stages, testing the robot’s operation at the end of each stage. Finally, you learned how to use the Remote Control window to manually take control of Go Bot.