Now that you know the basics of how to navigate around the Lego Mindstorms NXT 2.0 GUI and have a basic understanding of all the different pieces and parts supplied with the Lego Mindstorms NXT 2.0 kit, it is time to begin learning about NXT-G programming. Using NXT-G, you will write programs that control the operation of your robotic creations. NXT-G programs send instructions to the NXT Brick telling it how and when to operate attached servo motors and sensors. In this chapter you will learn a number of basic programming concepts and see how they apply to Lego Mindstorms NXT 2.0.
The major topics covered in this chapter include:
Setting up personal profiles
An overview of the program execution process
An introduction to pseudocode and flowcharts
Learning how to create new NXT-G programs
Learning how to access programming blocks
On their own, computers are not very smart. To do anything, they must be given very specific instructions. These instructions are provided in the form of computer programs. Figure 5.1 depicts the basic steps involved in the execution of a computer program.

Once a program is loaded into a computer’s memory, the computer’s processor processes the commands that make up the program. Programs process data passed to them as input and, in turn, generate output. In the case of NXT-G programs, input typically comes in the form of real-world data collected from sensors, and output is represented by the commands that NXT-G programs tell the NXT Brick to execute. This output might be commands telling the NXT Brick to engage its turbo motors, or it might be commands that tell the NXT Brick to play a sound file or display text or graphics on its LCD.
NXT-G differs from most other programming languages in that it does not support a text-based approach to program development. For example, the following statements are an excerpt taken from a Visual Basic application program.
//Excerpt from a Visual Basic application
If strCurrentAction = "FillCircle" Then
     Dim objCoordinates As Rectangle
          objCoordinates = _
     New Rectangle(Math.Min(objEnd.X, objStart.X), _
     Math.Min(objEnd.Y, objStart.Y), _
     Math.Abs(objEnd.X - objStart.X), _
     Math.Abs(objEnd.Y - objStart.Y))
     Pick_Color_And_Draw("FillCircle", objCoordinates)
End If
In text-based programming languages, program statements must follow a very specific set of syntax rules. Any failure to follow these rules results in syntax errors that cause programs to fail with errors. NXT-G, on the other hand, is a graphical programming language that makes use of graphical programming blocks, each representing a different task. NXT-G programs are built by dragging and dropping different combinations of programming blocks together on the work area as demonstrated in Figure 5.2.
By using programming blocks in place of complex program code statements, NXT-G simplifies program development while at the same time supporting the use of the very same programming logic and concepts implemented in traditional text-based programming languages. For example, NXT-G supports variables, conditional logic, and iterative programming logic. NXT-G also supports the manipulation of graphics and sound files.
Before you sit down at your computer to begin developing a NXT-G program for the purpose of bringing one of your robotic creations to life, you need to first know what you want to accomplish. A good way to get started is to outline your thoughts on paper, using regular old English as demonstrated in the following example.
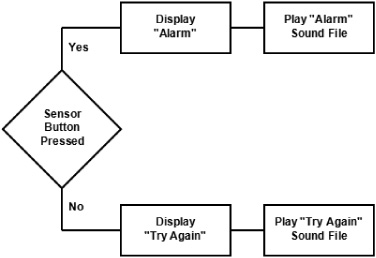
If the user presses the sensor button
  Display a text message of "Alarm"
  Play the "Alarm" sound file
If the user does not press the sensor button
  Display a text message of "Try Again"
  Play the "Try Again" sound file
End
This high-level outline of the programming logic is an example of pseudocode. Pseudocode is an English-like outline of some or all of the logic involved in the development of a computer program. When initially outlining a program using pseudocode, your focus should be on the development of the high-level logic required to accomplish a given task. Don’t worry at this point about specific programming blocks or their configuration. Once complete you can use your pseudocode as an outline when sitting down to write your NXT-G program.
In this particular pseudocode example, programming logic is outlined that would tell the NXT Brick what to do when it checks to see if a Touch Sensor has been pressed. The first line states the condition that is to be tested. If the condition proves true, the two lines that follow it are executed, displaying a text string and then playing a sound file. The fourth statement outlines the programming logic that is executed if the sensor has not been pressed. Here, a different text message is displayed and a different sound file is played.
Another way of outlining the programming logic required to develop all or part of a NXT-G program is to use flowcharts. Figure 5.3 shows a flowchart that outlines the same logic that was presented in the previous pseudocode example.
Hint
A flowchart is a graphical depiction of some or all of a program’s logic. Programmers create flowcharts in order to outline the overall logic involved in developing a computer program. Once developed, the graphical nature of flowcharts helps make their review easy. By reviewing a flowchart, you can verify that your approach to solving a particular programming challenge makes sense. This gives you a chance to identify any design flaws in the logic of your program before you invest the time and effort required to develop it.
In this flowchart example, two separate courses of action are outlined. Which one is executed depends on whether a NXT Brick sensor button has been pressed. If the sensor button has been pressed, the actions outlined at the top of the flowchart are executed. Otherwise, the actions listed at the bottom of the flowchart are executed.
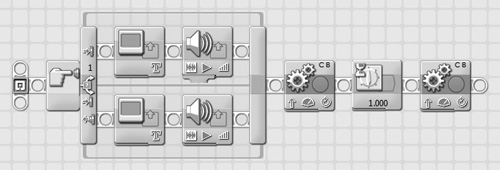
Once developed, you can translate the program logic outlined in a flowchart into NXT-G programming logic as demonstrated in Figure 5.4.

Here, a switch programming block is used to execute either of two sets of embedded programming blocks, depending on whether the NXT Brick’s sensor button has been pressed. If you look closely at this example, you will see how clearly it reflects the programming logic that was outlined in the previous pseudocode and flowchart examples.
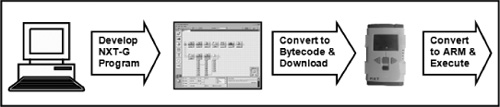
NXT-G programs are created on your computer using the Lego Mindstorms NXT 2.0 GUI. Both Windows and Mac OS X are supported. Once you have created a NXT-G program, you must download it to your NXT Brick. Once downloaded into the NXT Brick memory, your program is converted into ARM, allowing the NXT Bricks 32-bit ARM7 microcontroller to execute it. This process is depicted in Figure 5.5.
NXT-G is a graphical programming language in which programs are constructed using programming blocks, which are dragged and dropped onto the work area and then configured to perform specific tasks. In order to access the work area, you must first open an existing NXT-G program or create a new NXT-G program.
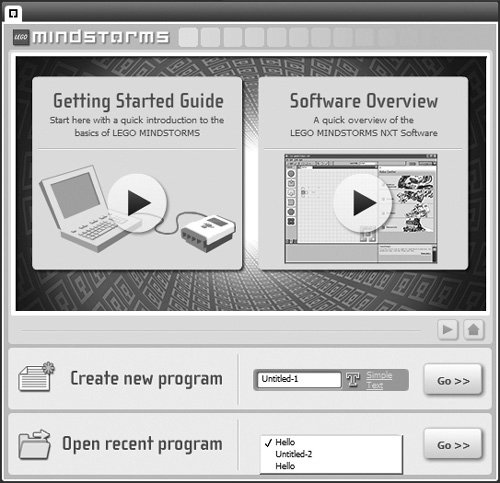
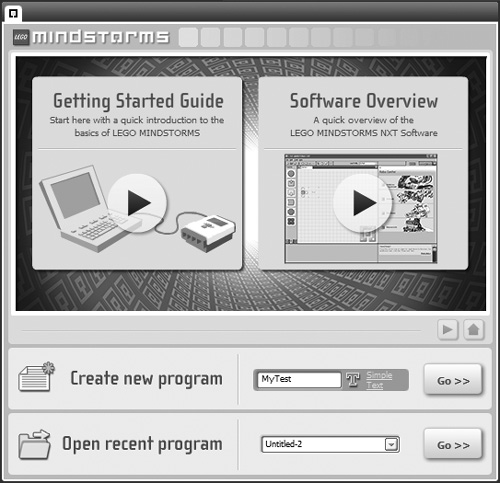
To open an existing program, you must specify the name of the program by keying it into the Open recent program drop-down list or by selecting it from the drop-down list as shown in Figure 5.6 and then clicking on the associated Go>> button.
Hint
You can also access program files for the currently selected profile by pressing Ctrl+O on Windows or Command-O on Mac OS X. In addition, you can select program files by clicking on File > Open.
To create a new NXT-G program, type a name for the program in the Create new program field as shown in Figure 5.7 and click on the associated Go>> button.
Hint
You can also create a new NXT-G program by pressing Ctrl+N on Windows or Command-N on Mac OS X. Alternatively, you can create a new program file by clicking on File > New.
The Lego Mindstorms NXT 2.0 GUI automatically assigns the default name Untitled-1 to your first new program. The number at the end of the new program name is automatically incremented with each new program you create after that. However, you can and should provide your NXT-G programs with unique names of your own choosing, preferably assigning names that help identify programs and describe their purpose.
The Lego Mindstorms NXT 2.0 GUI associates NXT-G program files with the developer profile that is used to create them. When installed, Lego Mindstorms NXT 2.0 automatically defines a single profile named Default. Unless new profiles are created, all NXT-G programs that are created are automatically associated with this profile, meaning that they are readily visible to each developer who works with the computer.
When more than one developer shares a single computer, it’s a good practice to set up a unique profile for each developer. This way, each developer will only see the NXT-G programs that she has created. This helps prevent one developer from accidentally opening and modifying someone else’s NXT-G program.
Hint
In addition to keeping NXT-G programs separate, developer profiles also keep other program files separated, including things like sound and graphic files. Note, however, that developer profiles are not a security feature. There is nothing to prevent you from selecting someone else’s profile.
Selecting a Developer Profile
To select your profile, all you have to do is click on the User Profile: drop-down list located on the Lego Mindstorms NXT 2.0 toolbar shown in Figure 5.8 and select it.

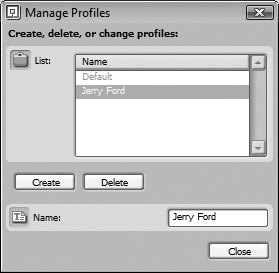
To create a new developer profile select Edit > Manage Profiles from the Lego Mindstorms NXT 2.0 toolbar. In response, the Manage Profiles dialog is displayed, as shown in Figure 5.9. From here you can create, delete, and rename developer profiles.

The following procedure outlines the steps involved in creating a new developer profile.
Step-by-Step
Click on the Create button. This adds a new profile with a default name of Profile_1 to the list of developer profiles and enables the Name: field.
Overtype the default profile name with a unique name of your own choosing, as demonstrated in Figure 5.10.
Press Enter to assign the new name to the profile.
Repeat the above steps to create as many profiles as needed and then click on the Close button when done.
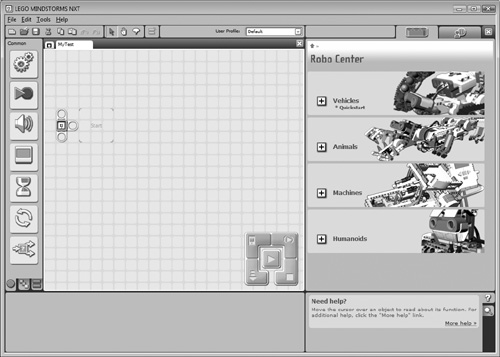
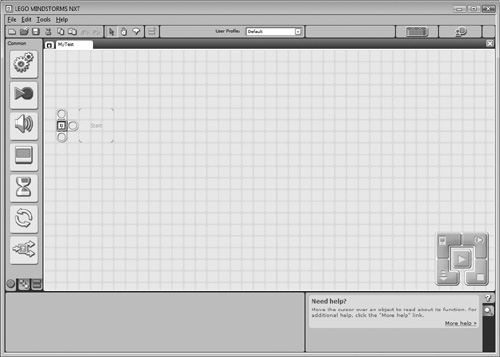
Once you have created or opened a NXT-G program, the Lego Mindstorms NXT 2.0 GUI displays a new tab in the work area. This tab displays the name of the NXT-G program you have opened or created. You can simultaneously open or create and work with as many NXT-G programs as you wish and then switch between them by clicking on their tab at the top of the work area.
As shown in Figure 5.11, the work area is a gridded window that displays the Starting Point and the NXT Controller. The Starting Point identifies the location where your NXT-G program’s first programming block will go. The NXT Controller is used to download and execute all or part of your NXT-G program onto your NXT Brick.
By allowing you to switch between NXT-G programs by clicking on their tabs, the Lego Mindstorms NXT 2.0 GUI makes efficient use of work area space. The work area represents a boundless space with no height or width limits. As your NXT-G programs grow in size, they may exceed the viewable limits of the work area, in which case the GUI automatically shifts downward or to the right as needed to allow more room for programming blocks.
If you wish, you can increase the amount of visible space allocated to the work area by clicking on the orange Remove button located on the far right side of the GUI toolbar. This action hides the Robo Center, increasing the size of the work area, as demonstrated in Figure 5.12.
You can restore the work area to its original size and redisplay the Robo Center at any time by clicking on the Robo Center Icon (an orange 3M beam) located on the GUI toolbar.
NXT-G programs are made up of programming blocks. Each programming block represents a different type of action. Each programming block is configurable. Programming blocks have plain, easy to understand, English names and are used to formulate the programming logic in NXT-G programs. As shown in Figure 5.13, programming blocks are organized and presented on the three tabs that make up the Programming palette.
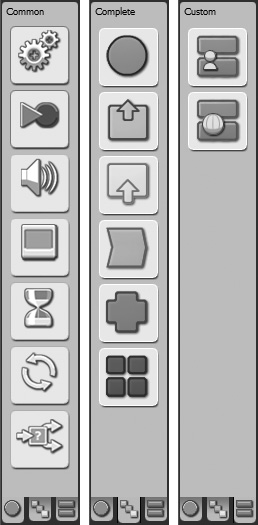
The Programming palette is located on the left side of the GUI and only one of its tabs is visible at a time. Programming blocks are added to the NXT-G program by dragging and dropping them onto the work area. After programming blocks are added to a NXT-G program, you can configure the manner in which each programming block executes by modifying parameters that are displayed in the Configuration Panel whenever a programming block is selected. Each programming block is unique and therefore has different parameters, specific to the tasks that the programming block performs.
Common Palette Programming Blocks
The programming blocks that you are likely to use most often are all located on the Programming palette’s Common tab as shown in Figure 5.14.

As shown in Figure 5.15, there are seven programming blocks displayed on the Common palette. These blocks and their purpose are outlined in Table 5.1.
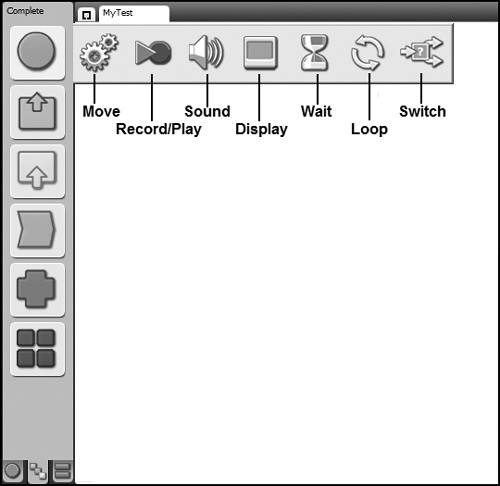
Figure 5.15. The Common group provides access to the same programming blocks found on the Common palette.
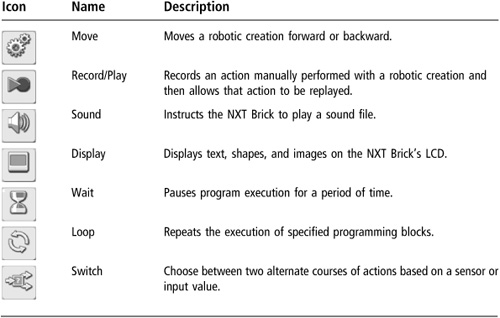
Each entry listed in Table 5.1 corresponds to an individual programming block except for the Wait entry. As shown in Figure 5.15, when you move the mouse pointer over the Wait programming block icon, the Programming palette expands to show the six most commonly used variations of this block: Time, Touch, Light, Sound, Distance, and Sensor Color. Other variations of the Wait programming block are accessible when configuring the Wait programming block.
The Complete palette provides access to all programming blocks, even those displayed on the Common tab. In total, the Complete palette provides access to 39 programming blocks, organized into 6 categories. These categories are outlined in Table 5.2.
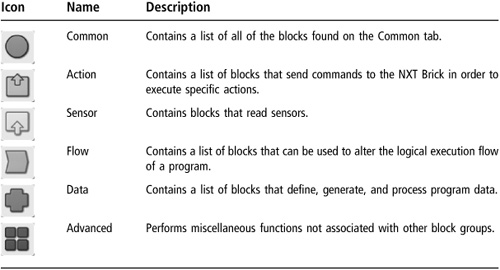
As shown in Figure 5.15, the Common group on the Complete palette contains a list of all of the blocks found on the Common palette.
These Common programming blocks are outlined in Table 5.3.
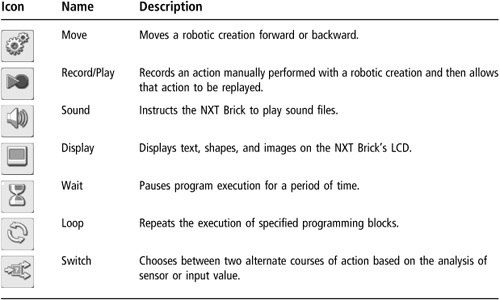
As shown in Figure 5.16, the Action group on the Complete palette contains a list of blocks that send commands to the NXT Blocks in order to execute specific actions.

These programming blocks are outlined in Table 5.4.
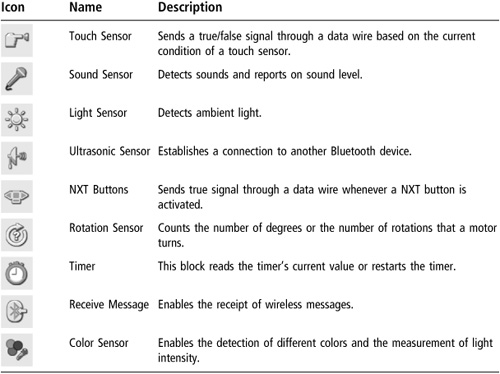
As shown in Figure 5.17, the Sensor Group on the Complete palette contains programming blocks that read sensor data from robotic sensors and pass data to other programming blocks through data wires.
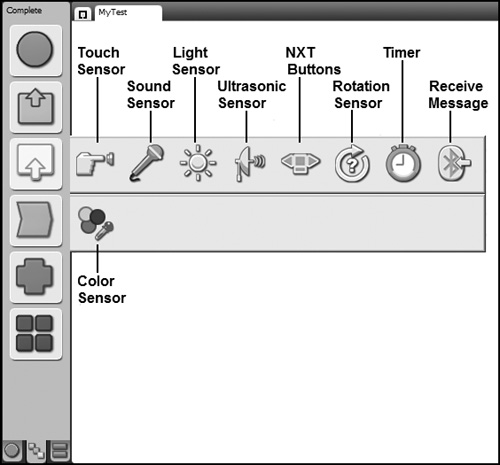
Hint
Data wires are data pathways that you can draw between programming blocks in order to pass data from one programming block to another.
There are a total of nine Sensor programming blocks, as outlined in Table 5.5.
As shown in Figure 5.18, the Flow group on the Complete palette contains a list of blocks that can be used to alter the logical execution flow of a program.
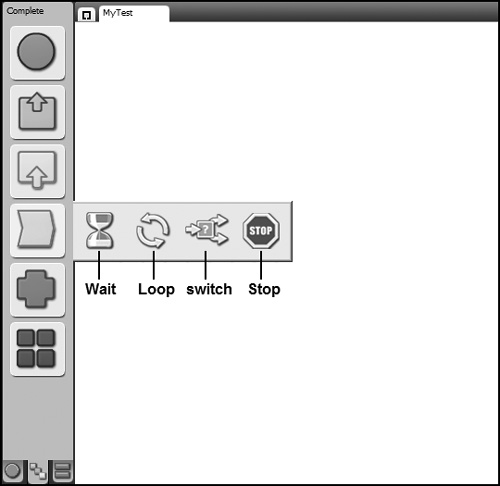
There are a total of four Flow programming blocks, as outlined in Table 5.6.

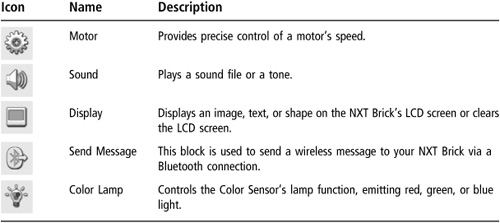
As shown in Figure 5.19, the Data group on the Complete palette contains a list of blocks that define, generate, and process program data in a variety of different ways.
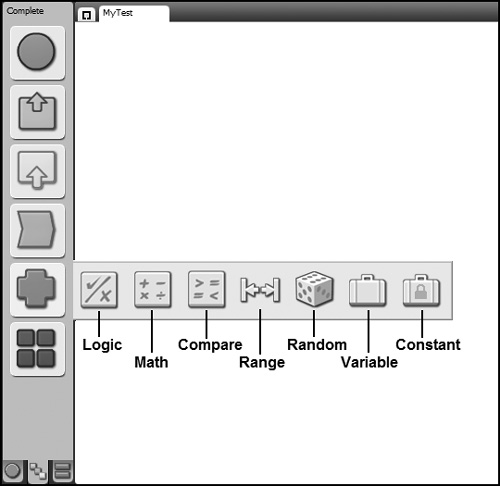
Data programming blocks also pass data to other programming blocks via data wires. There are a total of seven Data programming blocks, as outlined in Table 5.7.

As shown in Figure 5.20, the Advanced group on the Complete palette contains a list of blocks that perform functions not associated with other block groups.
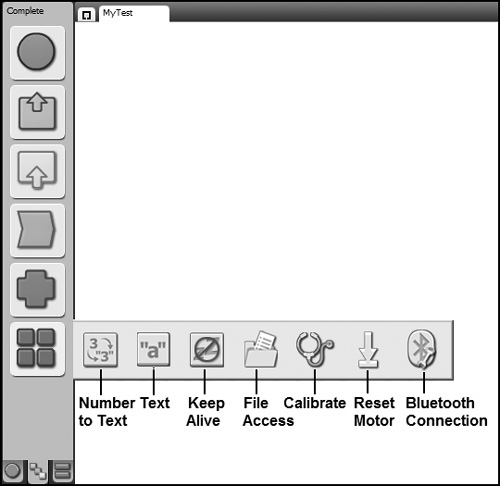
There are a total of seven Advanced programming blocks, as outlined in Table 5.8.

Custom Palette Programming Blocks
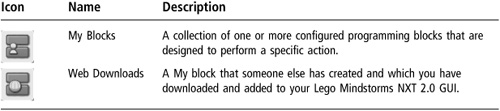
The Custom tab displays programming blocks that you have custom created or that you have downloaded from the Internet. Custom blocks are visible only on the Custom palette. There are two categories of custom programming blocks, My blocks and Web blocks. To display your My blocks or Web blocks, simply click on the Programming pallete’s Custom tab and then move the mouse pointer over their icons. Any blocks of these types are then displayed. By default, you don’t have any My Block programming blocks. Table 5.9 provides an overview of these blocks and their purpose.
This chapter provided you with foundational information needed to begin programming using NXT-G. You learned about the execution of computer programs and how NXT-G programs are developed. You were introduced to pseudocode and flowcharts and given examples of these important program planning and design tools. This chapter showed you how to create and switch between different developer profiles and how to open and create NXT-G programs. This chapter also showed where to find programming blocks and reviewed their location on the Programming palette.