
Lesson 4. Recording Audio and MIDI
Lesson Files: None
Time: This lesson takes approximately 60 minutes to complete.
Goals: Choose digital audio settings
Record audio
Delete unused audio files
Record additional takes
Record in Cycle mode
Record MIDI
Merge a MIDI recording with an existing MIDI region
Record MIDI takes
Re-record sections by punching in (manually and automatically)
Record MIDI and audio in Live Loop cells
To build a song, you need to come up with the raw material that you will later arrange and mix. You might start with an idea you have in your head, a part you rehearsed on an instrument, or a prerecorded sample or loop, or you may just start experimenting until inspiration strikes. To sustain and develop that initial inspiration, you need to master the techniques that Logic Pro offers to record, create, and edit the audio and MIDI regions that constitute the building blocks of your project.
In this lesson, you will record audio and MIDI in Logic and study activities you will typically perform when working with live musicians: recording a single instrument, recording additional takes of the same instrument, cycle recording, punching on the fly, automatic punching, and recording into Live Loop cells.
Setting Up Digital Audio Recording
Before you record audio in Logic, you must connect a sound source (such as a microphone, an electric guitar, or a synthesizer) to your Mac. You then choose the desired recording settings and adjust the recording level of your sound source to avoid distortion.
In the following exercises, you will set up Logic to prepare for a music recording.
Note ▶
Most audio interfaces include analog-to-digital converters, and many include microphone preamps. Also, most modern Mac computers include a built-in audio interface. Many MacBook and iMac computers even have internal microphones. Although those microphones are generally not intended to produce professional-quality recording, you can use the internal microphones to perform the exercises in this lesson in the absence of an external microphone.
By default, Logic records with a bit depth of 24 bits, which is fine for most uses. However, you may need to use different sample rates for different projects.
Creating the Project and Setting the Sample Rate
By setting your project’s sample rate before starting your first recording, you help to ensure that all the audio files used in that project will be recorded and played at the same sample rate. Playing an audio file at the wrong sample rate results in the wrong pitch and tempo, much like playing a tape or vinyl record at the wrong transport speed.
Choose File > New.
The New Track dialog opens. You’ll first create an audio track for a drum loop that you’ll import later, so you don’t need to change the settings in the Details area at the bottom of the New Track dialog right now.
In the New Track dialog, select Audio and click Create (or press Return).

Before you start recording any audio in the project, you will make sure the desired sample rate is selected.
Choose File > Project Settings > Audio, and make sure the General tab is selected.
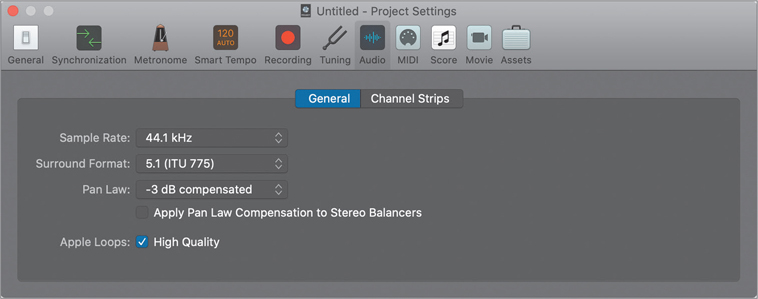
The Project Settings window opens, and you can see your Audio settings.
By default, the sample rate is set to 44.1 kHz.
To determine which sample rate to choose, consider the sample rate of any prerecorded material you will use (such as samples) and the sample rate of the target delivery medium. Some producers who make intensive use of 44.1 kHz samples choose to work at that sample rate. Traditionally, music was recorded at 44.1 kHz (which is the sample rate of compact discs). Audio for video is recorded at 48 kHz (which is the sample rate used on DVDs). Nowadays, many music producers in the United States choose to work at 48 kHz. Note that higher sample rates, such as 88.2 kHz and above, put more strain on your system.
Note that Apple Loops (such as those you used in the previous lessons) always play at the pitch and tempo determined by the project’s key and tempo settings, independent of the project sample rate.
Note ▶
The Audio Engineering Society recommends a 48 kHz sample rate for most applications but recognizes the use of 44.1 kHz for compact disc and other consumer uses.
Let’s switch to a 48 kHz sample rate.
Click the Sample Rate pop-up menu and choose 48 kHz.
Note ▶
In the sample rate pop-up menu, sample rates not supported by the connected audio device appear in italics.

After a short delay, Logic changes the sample rate of your audio interface to 48 kHz.
Press Command-W to close the Project Settings window.
Note ▶
In Logic, settings fall into two categories: Project settings, such as the sample rate, can be set individually for each project so that each project can have unique project settings; Logic preferences are global and apply to all projects.
To avoid losing your work, save your project right away.
Choose File > Save (or press Command-S).
In the Save dialog, name your project Recording Test and choose a location.
To be able to quickly access the audio files you will record in the Finder, you can select options that put the audio files in a folder named Audio Files inside the project folder.
In the Save dialog, select the options to organize your project as a folder and to copy the audio files into the project folder, and then deselect all other options.

Click Save (or press Return).
The project name appears in Logic’s main window title bar (just above the LCD display).
Note ▶
To find the audio files inside a project that was saved organized as a package, Control-click the project package in the Finder, choose Show Package Contents, and then navigate to Media > Audio Files.
The Logic project is saved, and its folder structure was created in the Finder, with an Audio Files folder inside the project folder, where you will later find all the audio files you record in that project.
Choosing an Audio Interface and Setting Up Monitoring
In most situations, Logic automatically detects an audio interface when you connect it to your Mac, and it asks if you want to use that interface. If you choose to use it, Logic selects that interface as both an input and an output device in its Audio preferences. Let’s open the Audio preferences to check that the correct audio interface is selected, and then select monitoring options that let you monitor the instrument you’re recording through Logic.
Choose Logic Pro X > Preferences > Audio.
The Audio preferences appear on the Devices tab.
From the Output Device and Input Device menus, choose the desired audio interfaces.

Output Device is the device connected to your monitors or headphones.
Input Device is the device into which you plug your microphones or instruments.
If you do not have an audio interface connected to your Mac, choose from the built-in output and input devices.
You will now set up Logic so that record-enabling a track allows you to hear the source you’re recording.
In the Audio Preferences window, click General.

In order for you to hear the instrument you’re recording through Logic’s mixer, you need to select Software Monitoring.
Note ▶
If you are using Built-in Microphone as an input device and Built-in Output as an output device and no headphones are connected to your Mac, then the Software Monitoring option is dimmed and software monitoring is disabled to avoid feedback.
Make sure Software Monitoring is selected.
Note ▶
If you are already using a hardware mixer or your audio interface’s software to monitor the audio signal routed to record-enabled tracks, turn off Software Monitoring in Logic’s Audio preferences. Otherwise, you will be monitoring the signal twice, resulting in a flangey or robotic sound.
Make sure “Input monitoring only for the focused track, and only when input monitoring is enabled (as in GarageBand)” is unselected.

Turning off this option ensures that you can hear your instrument when you record-enable its track.
Press Command-W to close the Preferences window.
If you chose a new output or input device earlier in step 2, Logic automatically reinitializes the Core Audio engine when you close the window.
The desired audio interface and monitoring preferences have been selected. There’s no need to save your Logic project at this point; Logic preferences are global, and they’re saved inside a Logic preference file that is independent from your Logic project files.
Recording Audio
In this example, you will record a single instrument. The exercise describes recording an electric guitar plugged directly into an instrument input on your audio interface, but feel free to record your voice or any instrument you have.
Preparing a Track for Recording
You’ll start a new project with a simple drum track made of an Apple Loop that has inspired major producers with hit songs such as “Umbrella” (by Rihanna) or “One More Night” (by Maroon 5). Next you’ll create a new audio track, select the correct input (the input number on your audio interface where the guitar is plugged in), and enable that new track for recording.
In the control bar, click the Loop button (or press O).
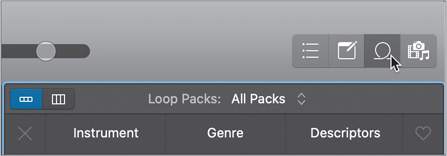
The Loop Browser opens.
In the Loop Browser, search for Vintage Funk Kit 03.
Drag Vintage Funk Kit 03 to bar 1 on the audio track.

Click the Loop button (or press O) to close the Loop Browser.
In the Region inspector, click the Loop checkbox (or press L).
The drum track is ready. Feel free to give it a listen! If you are familiar with the hit songs named earlier, you will recognize this drumbeat. Let’s now create the audio track you will use to record your instrument.
Above the track headers, click the Add Tracks button (+) (or press Command-Option-N).
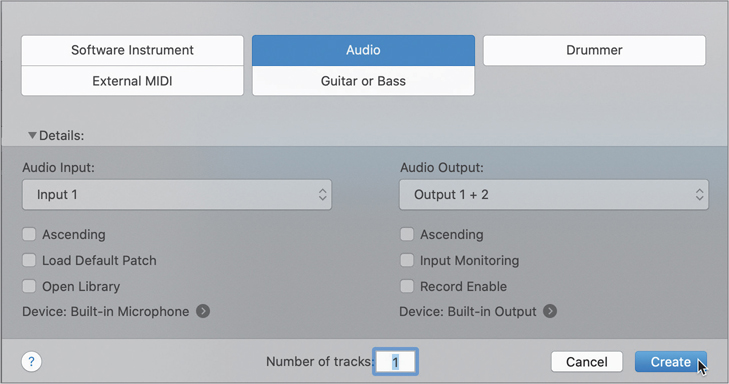
The New Tracks dialog appears.
Make sure the Audio track type is selected.
From the Input menu, choose the audio interface input number to which you’ve connected your instrument or microphone. If you are using your Mac computer’s built-in audio interface or your notebook’s microphone, choose Input 1.
Note ▶
Below the Input and Output menus, the input and output devices selected earlier in your Audio preferences are displayed. Should you need to change the input and/or output device, click one of the arrow buttons to the right of the device names to open the Audio preferences.
You can record-enable the track by selecting the Record Enable option below the Output menu; however, in some situations creating a record-enabled track may produce feedback. You will later take precautions to avoid feedback and then record-enable the track from the track header.
Ensure that “Number of tracks” is set to 1.
Note ▶
To record multiple sources onto multiple tracks simultaneously, assign the different input numbers where your sources are connected to different tracks, record-enable them, and click Record.
Click Create (or press Return).
A new audio track set to Input 1 is created (Audio 2). Let’s rename it.
Tip
Logic automatically assigns the name of a track to the audio files recorded on that track, so naming a track before recording on it is always a good idea. If you don’t name the track, Logic assigns the name of the project to the audio files. More descriptive names will help you identify files in the future.
In the Audio 2 track header, double-click the name, and type Guitar.
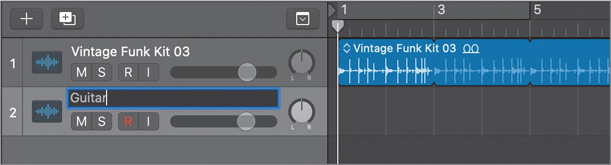
The new track has a generic audio waveform icon. Let’s choose a more descriptive icon.
In the Guitar track header, Control-click the icon, and from the shortcut menu, choose the desired icon.
A region created by recording on a track inherits the track color. Let’s first configure the track headers so that you can see your track colors, and then choose a color for the guitar track.
Control-click a track header, and choose Configure Track Header (or press Option-T).
In the Track Header Components pane, select Color Bars, and click outside the pane to close it.
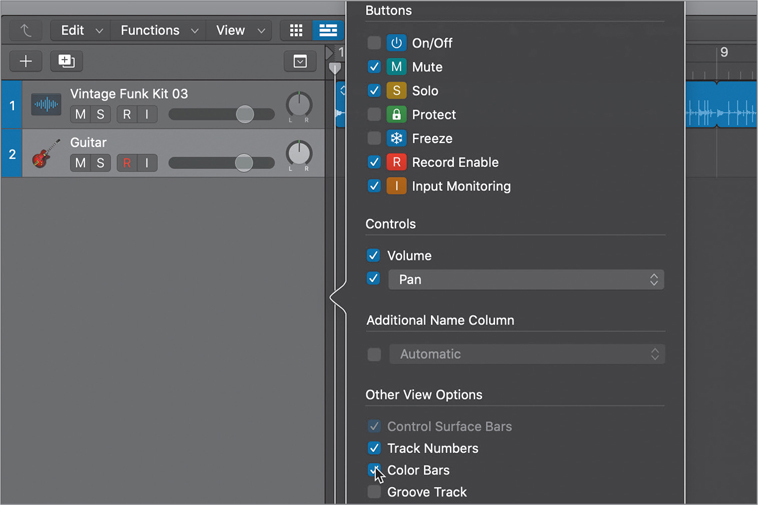
Both tracks have a blue bar. To help distinguish the guitar track from the drum track, choose a different color for your guitar track.
Choose View > Show Colors (or press Option-C).
Make sure the guitar track is selected, and in the color palette, click the desired color.

Choose View > Hide Colors (or press Option-C) to close the color palette.
Choose File > Save (or press Command-S) to save your project.
You’ve created your audio track, and selected the desired name, color, and icon to help identify the track. The regions you record later on that track will inherit the track name and color.
Monitoring Effects During Recording
When a guitar or bass is plugged directly into an audio interface’s instrument preamp, the sound is clean and raw. To emulate the character that a guitar amp can give to a guitar sound, you can use Amp Designer, a guitar amplifier modeling plug-in.
Note that you are still recording a dry guitar sound. The effect plug-in processes the dry audio signal in real time during the recording and playback. Recording a dry signal means that you can continue fine-tuning the effect plug-ins (or exchange them for other plug-ins) after the recording is completed.
Note ▶
To avoid feedback when recording with a microphone, monitor your recording using headphones and make sure your speakers are off.
In the Guitar track header, click the R (Record Enable) button.

You can now hear your guitar and see its input level on the Guitar channel strip meter in the inspector.
Note ▶
You may hear a short delay between the time you play a note and when you hear it. This delay is called latency. To reduce latency, you can try choosing a smaller I/O Buffer Size in Logic’s Audio preferences; however, smaller buffer sizes put more strain on your computer.
Tip
When using latency inducing plug-ins, choose Record > Low Latency Mode to bypass those plug-ins.
Because your new audio track is record-enabled (the R button on the track header is red and blinking), the next recording will create an audio region on that track.
In the inspector, on the Guitar channel strip, click the Audio FX insert, and choose Amps and Pedals > Amp Designer.
Amp Designer opens. Here, you can dial in a sound or choose a preset. To find a preset, you can use the Library, or you can choose a plug-in preset directly from the plug-in header.
In the Amp Designer window, click the Settings pop-up menu, and then choose a setting that inspires you.
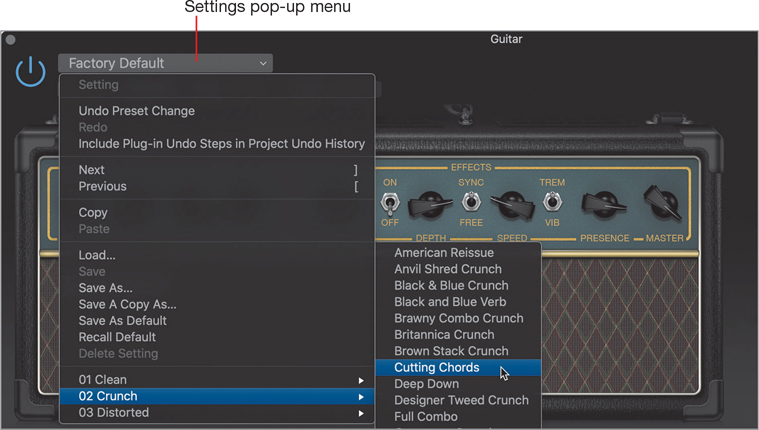
You can now hear your guitar processed through Amp Designer. It sounds like a guitar plugged into a guitar amp and recorded by a microphone in front of the amp’s speaker cabinet. Feel free to spend a few minutes exploring various settings and tweaking the amp’s knobs until you’re happy with your sound.
Press Command-W to close the Amp Designer window.
The track is record-enabled, you can hear your guitar, and you’ve dialed in a sound using a plug-in. You’re almost ready to record!
Adjusting the Recording Level
Before recording, you should adjust the source audio level to avoid overloading the converters. On the channel strip, look at the peak level meter, and make sure it stays below 0 dBFS (decibels full scale, the unit used to measure levels in digital audio); a level above 0 dBFS would indicate that you are clipping the input of your converter. Keep in mind that you need to adjust the audio level before the converter input by using your microphone preamp gain knob. Allow some headroom, especially if you know that the artist might play or sing louder during the actual recording. Working with a lower-level recording is better than clipping the input.
Compatible audio interfaces (such as a Mac computer’s built-in audio device and some third-party interfaces) allow you to adjust the gain of your microphone preamp directly at the top of the audio track’s channel strip in the inspector or in the Mixer. (Some interfaces also support other input settings, such as phantom power, hi-pass filter, and phase.)

If you cannot see the Gain knob at the top of the channel strip, Control-click the channel strip and choose Channel Strip Components > Audio Device Controls.
If Audio Device Controls is selected but you still can’t see the Gain knob, it means that the feature is not supported by your audio interface.
Let’s adjust the recording and monitoring levels and tune the guitar.
Play the loudest part of the performance you are about to record, and as you watch the peak level meter on the channel strip, adjust the level on the instrument preamp.
If the peak level meter turns yellow or red, lower the gain on the preamp, and click the peak level meter to reset it.
Make sure the peak sits comfortably below 0 dBFS; the wider the dynamic range of the source, the more headroom it needs to avoid clipping.

When your signal peaks below −2.0 dBFS, the peak level meter value is green. When it peaks between −2.0 and 0 dBFS, the peak level meter value is yellow to indicate that you are within 2 dB of clipping (that is, you have less than 2 dB of headroom). When it peaks above 0 dBFS, the peak level meter turns orange to indicate the audio is clipping.
Tuning the Instrument
Making sure an instrument is in tune before recording is always a good idea. The control bar’s Tuner button gives you quick access to the Tuner plug-in.
In the control bar, click the Tuner button.

The Tuner opens.
Note ▶
The Tuner is available in the control bar only when an audio track is selected and an input is selected in the input slot of the corresponding channel strip. You can also insert the Tuner as a plug-in on a channel strip; click an Audio FX slot, and choose Metering > Tuner.
One by one, tune the guitar strings, trying to get each string as close as possible to a 0 cents deviation of the target pitch.

Close the Tuner window.
Checking the Balance
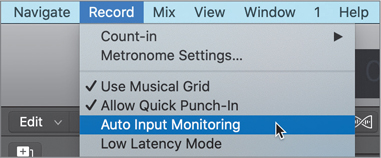
Now that the guitar is tuned, you can practice the performance and make sure that you can hear yourself and the other instruments comfortably. First, you’ll turn off Auto Input Monitoring so that during playback you can hear the guitar you connected.
Ensure that Record > Auto-Input Monitoring is unselected.
Press the Space bar to start playback, and play along with the song. If the guitar is now too loud or too soft in comparison to the other tracks, in the inspector, drag the Volume fader on the Guitar channel strip to adjust the monitoring level, or drag the Volume slider in the Guitar track header.
The track header’s Volume slider and the channel strip’s Volume fader adjust the monitoring and playback level, but they do not alter the recording level.
Press the Space bar to stop playback.
Recording Audio
You have set the desired sample rate, adjusted the recording and monitoring levels, inserted a plug-in to emulate the sound of a guitar amp, and tuned the instrument. You are now ready to start recording.
In the control bar, click the Go to Beginning button (or press Return).
Feel free to press Command-Down Arrow and Command-Right Arrow a few times to zoom in so that you can clearly see the waveforms in the workspace.
In the control bar, click the Record button (or press R).

The playhead and the LCD display in the control bar both turn red to indicate that Logic is recording. The playhead jumps one bar earlier and gives you a four-beat count-in with an audible metronome click before the recording starts. A new red region is created behind the playhead on the record-enabled track, and you can see the recording’s waveform drawn in as you play or sing.

Tip
To set the count-in length, choose Record > Count-in, and then choose the number of bars from the submenu. To change the Metronome settings, choose Record > Metronome Settings.
After you’ve recorded a few bars, in the control bar, click the Stop button (or press the Space bar).

The new recording, Guitar#01, appears as an audio region of the color you selected earlier for that track. Logic appends the number of the recording to the track name. Note that this new region is selected, which makes listening to it easy using the “Play from Selection” key command.
Press Shift-Space bar.
The playhead jumps to the beginning of the selected region and playback starts.
Stop playback.
If you are not happy with your new recording, you can delete it and start over. Let’s see how that works.
Press Delete.
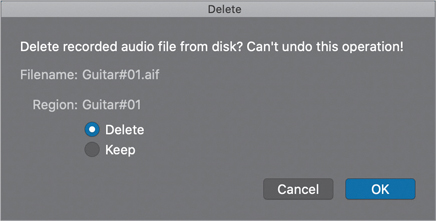
A Delete alert appears with two choices:
Delete—The audio region is removed from the Tracks area, and the audio file is removed from the Project Audio Browser. In the Finder, the audio file is moved from inside the project package to the Trash.
Keep—The audio region is removed from the Tracks area. The audio file stays in the Project Audio Browser and is still present inside the project package, allowing you to later drag it back to the workspace if necessary.
This alert appears only when you try to delete a recording made since you most recently opened the project. When deleting an audio region that was previously recorded, the behavior corresponding to the Keep option is automatically applied and an alert does not appear.
Tip
Despite what the alert says, if you chose Delete and clicked OK by mistake, you could still choose Edit > Undo (or press Command-Z) to undo the operation (as long as you didn’t empty the Trash).
You will keep your recording so that you can experiment with recording additional takes in the next exercise. Later in this lesson, you’ll open the Project Audio Browser to delete unused audio files.
In the Delete pop-up window, click Cancel.
Choose File > Save (or press Command-S).
You have created an audio track, used a plug-in to get the desired sound, adjusted the recording and monitoring levels, and finally recorded your first audio region in Logic. Simple enough! You will now explore more complex scenarios that involve more advanced recording techniques, such as take folders and punching in and out.
Recording Additional Takes
When recording a live performance, musicians can make mistakes. Rather than deleting the previous recording and repeatedly recording until you get a flawless performance, you can record several takes (repeat performances of the same musical part) and later choose the best take, or even combine the best parts of each take to create a comp (composite take).
To preserve multiple takes in Logic, you can record new performances over previous ones. By default, all the takes (including the original recording) will be placed into a take folder (you can change that behavior under Record > Overlapping Audio Recordings).
Make sure the Guitar track is still record-enabled.
Position the playhead at the beginning.
In the control bar, click the Record button (or press R) to record a second take slightly longer than the first.

The new recording (in red) appears to be recorded over the previous blue audio region.
Stop the recording.

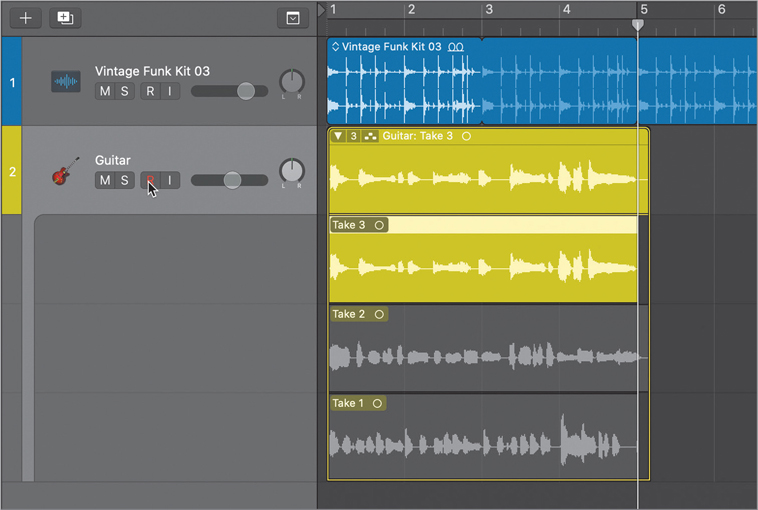
Both the original recording (Take 1) and the new recording (Take 2) have been saved into a take folder. The take folder is on the Guitar track. It is currently open, so the two takes you recorded are displayed on subtracks below.
The take folder is named Guitar: Take 2, the name of the track appended with the name of the take it’s playing. By default, the take folder plays the most recent take you recorded: Take 2, in this case. The previous take, Take 1, is dimmed and muted.
Note ▶
If the recent take you recorded is shorter than a take you recorded earlier, the take folder is named Guitar: Comp A, and plays a comp made of the recent take and the end of the previous take.
Record a third take.
In the Guitar track header, click the R (Record Enable) button to disable it.
The track is disarmed, and you can no longer hear the sound coming from Input 1 on your audio interface.
The take folder now contains three takes. It plays back the most recent one, Take 3, and the two previous ones, Take 1 and Take 2, are muted.
Click Take 1.
Listen to the take folder; you hear Take 1.
Click Take 2.
Listen to the take folder; you hear Take 2.
At the top left of the Guitar take folder, click the disclosure triangle to close the folder.

Tip
You can also double-click a take folder to open or close it.
Recording Takes in Cycle Mode
Recording multiple takes in a single operation can be very useful when you are both the engineer and the musician because switching from playing your instrument to operating Logic between each take isn’t always practical (and it can destroy your creative vibe). Recording in Cycle mode allows you to repeatedly record a single section, thereby creating a new take for each pass of the cycle. When you stop recording, all the takes are saved inside a take folder. To clean up the track, let’s first remove the guitar regions you recorded in the previous exercise while keeping the audio recordings in the Project Audio Browser, just in case you want to use those recordings later.
Click the take folder on Track 1 to select it, and press Delete.
A Delete alert appears for the first take; however, a checkbox allows you to replicate your choice for all takes inside the take folder you’re deleting. If you don’t want to make the hard decision to delete the recordings just yet, you can delete the regions from the Tracks view but keep the audio files in your Project Audio Browser for now. You will later open the Project Audio Browser and clean up the unused files.
In the Delete alert, make sure Keep is selected, and select For All.

The take folder is deleted. In the Finder, the three audio files for all three takes are moved to the Trash.
In the upper half of the ruler, click the dimmed cycle area (or press C).

The cycle area is yellow to indicate that Cycle mode is on.
Tip
You don’t have to position the playhead when recording in Cycle mode; recording automatically starts at the beginning of the cycle, after the count-in.
Make sure the Guitar track is selected, and in the control bar, click Record (or press R).
The Guitar track is automatically record-enabled. The playhead jumps a bar ahead of the cycle for a one-measure count-in, and starts recording the first take. When it reaches bar 5, the end of the cycle area, it jumps back to bar 1 and starts recording a new take.
Note ▶
If no track is record-enabled, Logic automatically record-enables the selected track during recording.
Logic keeps looping the cycle area, recording new takes until you stop recording. Record two or three takes.
Click Stop (or press the Space bar).

All the takes recorded in Cycle mode are packed into a take folder. The Guitar track is automatically disabled for recording. Feel free to click a take to select it, and listen to the project with that take selected.
Note ▶
When you stop recording, if the recent take is shorter than a bar, Logic automatically discards it. To keep the last take of a cycle recording, make sure you stop the recording more than one bar after the beginning of the cycle area.
At the top left of the take folder, click the disclosure triangle.
The take folder closes. Let’s discard the take folder so that you can experiment with punching techniques on the Guitar track in the next exercises.
Click the take folder to select it, and press Delete.
A Delete alert pops up for the audio file you just recorded in Cycle mode. Because you clicked Record only once and recorded all three takes successively while in Cycle mode, all the takes are contained in a single audio file, so there’s only one audio file to delete.
In the Delete alert, make sure Keep is selected and click OK (or press Return).
In the ruler, click the cycle area (or press C) to turn it off.
You have recorded an audio source onto an audio track. You have recorded additional takes into a take folder onto the same track, and used cycle recording to record a take folder while repeating a cycle area. In the next section you’ll explore techniques to re-record over specific sections in an existing recording—for example, to fix mistakes.
Punching In and Out
When you want to correct a specific section of a recording—usually to fix a performance mistake—you can start playback before the mistake, punch in to engage recording just before the section you wish to fix, and then punch out to stop recording immediately after the section while playback continues. A take folder is created, containing a comp that combines the old recording outside the punch-in/punch-out range with the new recording inside that range. This technique allows you to fix smaller mistakes in a recording while still listening to the continuity of the performance.
Tip
Punching is nondestructive. At any time, you can open the take folder and select the original recording.
There are two punching methods: on the fly and automatic. Punching on the fly allows you to press a key to punch in and out while Logic plays, whereas automatic punching requires you to identify the autopunch area in the ruler before recording. Punching on the fly is fast but usually requires an engineer to perform the punch-in and punch-out while the musician is performing. Automatic punching is ideal for the musician-producer who is working alone.
Assigning Key Commands
To punch on the fly, you will use the Record Toggle command, which is unassigned by default. First, you’ll open the Key Commands window and assign Record Toggle to a key combination.
Choose Logic Pro X > Key Commands > Edit (or press Option-K) to open the Key Commands window. Click the disclosure triangle next to Global Commands.

The Key Commands window lists all available Logic commands and their keyboard shortcuts, if any.
Tip
Many commands are unassigned by default. When looking for a specific functionality in Logic Pro X, open the Key Commands window and try to locate the function using the search field. A command likely exists for that functionality that may or may not be assigned.
In the Command list, click the Record Toggle command to select it.
Click Learn by Key Label.

When Learn by Key Label is selected, you can press a key, or a key plus a combination of modifiers (Command, Control, Shift, Option), to create a keyboard command for the selected function.
Press R.
An alert indicates that the R key is already assigned to the Record command. You could click Replace to assign R to Record Toggle, but then Record would no longer be assigned to a keyboard shortcut. Instead, let’s use another key combination.
Click Cancel (or press Esc).
Press Option-1.

Option-1 is now listed in the Key column next to Record Toggle, indicating that the command was successfully assigned.
Tip
To unassign a key command, select the command, make sure Learn by Key Label is selected, and press Delete.
Close the Key Commands window.
Tip
To reset all key commands to their defaults, choose Logic Pro X > Key Commands > Presets > U.S. (or the language of your choice).
You have assigned your first custom Logic key command. There are many functions in Logic that can be easily accessed with key commands, so feel free to explore the Key Commands window and assign useful key commands to speed up the tasks you perform often.
Tip
When choosing a function in a menu, hold down the Control key to open the Key Commands window with the equivalent key command.
Punching on the Fly
You will now use the Record Toggle key command you assigned in the previous exercise to punch on the Guitar track. First let’s make a new recording, and then you’ll punch on the fly to re-record a specific area of that new recording.
Make sure the Guitar track is still record-enabled.
Click Record (or press R).

Record at least five bars of guitar.
When punching on the fly, you may first want to listen to the performance to determine which section needs to be re-recorded, and to be ready to punch in and out at the desired locations.
In the control bar, click the Go to Beginning button (or press Return).
Click Play (or press the Space bar) to start playback.
Position your fingers on the keyboard to be ready to press your Record Toggle key command when you reach the point where you want to punch in.
Note ▶
To be able to punch on the fly, make sure Record > Allow Quick Punch-In is selected.
Press Option-1 (Record Toggle).

The playhead continues moving, but Logic is now recording a new take on top of the previous recording. Keep your fingers in position to be ready to punch out.
Press Option-1 again.
The recording stops while the playhead continues playing the project.
Stop the playback.

On the Guitars track, a take folder was created. It contains your original recording (Take 1) and the new take (Take 2). A comp is automatically created (Comp A) that combines the original recording up to the punch-in point, the new take between the punch-in and punch-out points, and the original recording after the punch-out point. Fades are automatically applied at the punch-in and punch-out points.
Listen to your Guitar track.
In the next exercise, you will examine another punching technique, so let’s undo this last recording (the new take), but keep the longer five-bar recording.
Choose Edit > Undo Recording (or press Command-Z).
The take folder disappears, and you once again see the longer region you recorded at the beginning of this exercise.
Punching on the fly is a great technique that allows musicians to focus on their performance while the engineer takes care of punching in and out at the right times. On the other hand, if you worked alone through this exercise and tried to punch in and punch out while playing your instrument or singing, you realize how challenging it can be. When working alone, punching automatically is recommended.
Punching Automatically
To prepare for automatic punching, you enable the Autopunch mode and set the autopunch area. Setting the punch-in and punch-out points in advance allows you to focus entirely on your performance during recording.
First, you will customize the control bar to add the Autopunch button.
Control-click the control bar, and choose Customize Control Bar and Display.

A dialog opens in which you can choose the buttons you would like to see in the control bar, and the information you’d like to see in its LCD display.
In the dialog’s Modes and Functions column, select Autopunch to add the Autopunch button to the control bar.

Note ▶
The control bar is customized independently for each Logic project file, which allows you to show different buttons and displays, depending on the specific needs of each project.
In the control bar, click the Autopunch button (or press Command-Control-Option-P).

Note ▶
When the main window is not wide enough for the control bar to display all the buttons selected in the control bar customization dialog, you can click the chevron (>>) to the right of the mode buttons to access the hidden functions in a shortcut menu.

The ruler becomes taller to accommodate for the red autopunch area that defines the section to be re-recorded.

Tip
Option-Command-click the ruler to toggle the Autopunch mode.
Adjust the autopunch area so that it encompasses the area you want to re-record.
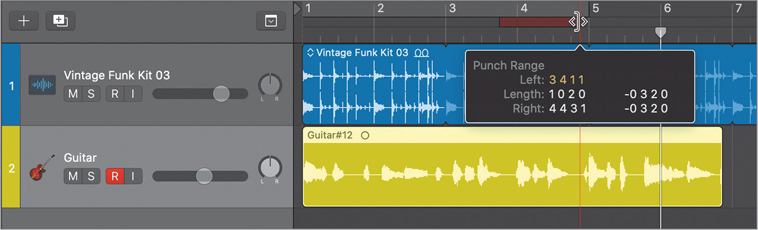
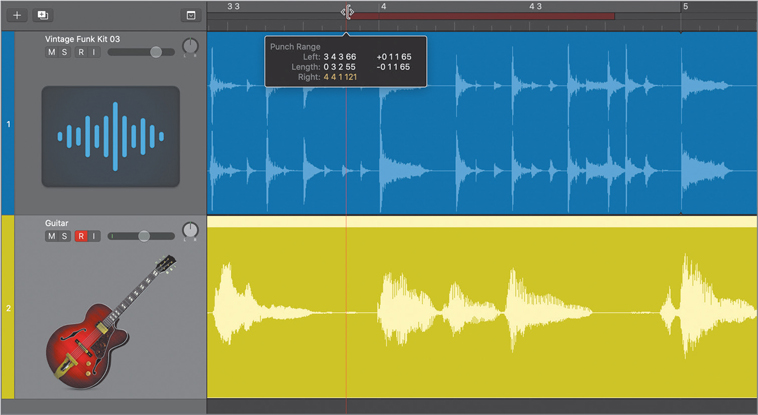
You can drag the edges of the autopunch area to resize it, or drag the entire area to move it. Red vertical guidelines help you align the punch-in and punch-out points with the waveform. You can zoom in to make sure you’re re-recording exactly what you want.
Control-Option-drag to zoom in on the area you want to re-record.
If needed, resize the autopunch area.
Control-Option-click to zoom out.
Click Go to Beginning (or press Return).
Click Record (or press R).

Playback starts. In the control bar, the Record button blinks; Logic isn’t yet recording.
Tip
To hear the live instrument you’re monitoring only during recording, select Record > Auto-Input Monitoring.
When the playhead reaches the punch-in point (the left edge of the autopunch area), the Record button turns solid red and Logic starts recording a new take.
When the playhead reaches the punch-out point (the right edge of the autopunch area), the recording stops but the playback continues.
Stop playback.

A take folder, Guitar: Comp A, is created on the track.
Just as when you punched on the fly in the previous exercise, a comp is automatically created that plays the original recording up to the punch-in point, inserts the new take between the punch-in and punch-out points, and continues with the original recording after the punch-out point.
Click the R button on the Guitar track to disable it.
In the control bar, click the Autopunch button (or press Command-Control-Option-P) to disable Autopunch mode.
At the upper left of the take folder, click the disclosure triangle to close the take folder.
Save your work and close the project.
Tip
To speed up the Autopunch recording process, use the Marquee tool described in Lesson 1. When a marquee selection is present, starting a recording automatically turns on the Autopunch mode, and the autopunch area matches the marquee selection.
Deleting Unused Audio Files
During a recording session, the focus is on capturing the best possible performance, and you may want to avoid burdening yourself with the decision making that comes with deleting bad takes. The unused recordings take up unnecessary space on your hard drive and make the project folder bigger than it needs to be. At some point, you’ll want to clean up the project and reclaim that valuable hard drive space.
In this next exercise, you will select and delete all unused audio files from your hard drive. The Project Audio Browser shows all the audio files and audio regions that have been imported or recorded in your project.
In the control bar, click the Browsers button (or press F) and ensure that the Project tab is selected.

The Project Audio Browser opens, listing the Vintage Funk Kit 03 Apple Loops used on the first track, and all the audio files you’ve recorded during this lesson. You can even see all the files that you removed earlier from the Tracks view but elected to keep in the Delete alert.
For each audio file, the Info column shows:
Sample rate (44,100 Hz for the Apple Loop, 48,000 Hz for the audio files you recorded)
Bit depth (24 bits)
Format icon (a single circle indicates a mono audio file)
File size
Clicking the disclosure triangle in front of the audio filename toggles the display of audio regions referring to that audio file.
Note ▶
Resizing, cutting, or copying regions in the workspace is called nondestructive editing. The audio data in the audio file stays intact, and the regions merely point to different sections of the audio file.
From the Project Audio Browser menu, choose Edit > Select Unused (or press Shift-U).

All the audio files that do not have an associated region in the workspace are selected.
Note ▶
If you’re not sure about deleting the files, preview a region by selecting it and clicking the Prelisten button (or press Option-Space bar). While the region plays, a small white playhead travels through the regions.

Tip
In the Project Audio Browser, to play a region from a specific point, hold down the mouse button over its waveform at the desired location.
Once you feel satisfied that the selected audio files do not contain any useful material, you can delete them.
From the Project Audio Browser menu bar, choose Audio File > Delete File(s).
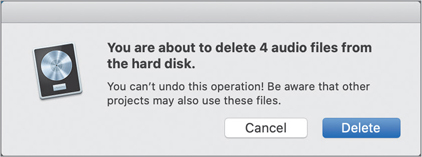
An alert asks you to confirm the deletion.
Click Delete.
The audio files are removed from the Project Audio Browser. In the Finder, the files are moved to the Trash.
In the control bar, click the Browsers button (or press F) to close the Project Audio Browser.
Recording MIDI
Note ▶
When connecting certain MIDI controllers, Logic opens a dialog asking if you want to automatically assign its controls. To follow the exercises in this lesson, click No. If you’ve clicked Auto Assign before in this dialog, choose Logic Pro X > Control Surfaces > Preferences, click the MIDI Controllers tab, and deselect the Auto checkbox for all listed controllers.
Tip
You will use the Logic Remote app to use your iPad as a wireless MIDI controller in Lesson 6.
Recording MIDI
In Logic, the basic techniques used to record MIDI are similar to the techniques you used to record audio. You will now observe the MIDI In display in the control bar as you send MIDI events to Logic and record a simple piano part.
Above the track headers, click the Add Tracks button (+) (or press Command-Option-N).
In the New Tracks dialog, choose Software Instrument. Make sure the Instrument pop-up menu is set to Empty Channel Strip, select Open Library, and click Create.

An empty software instrument track is created, and the Library opens.
Note ▶
If no MIDI controller keyboard is connected to your Mac, the Musical Typing window opens. That window turns your Mac keyboard into a polyphonic MIDI controller. Press Z or X to transpose the octave range down or up, and press C or V to decrease or increase note velocities. Keep in mind that you may need to close the Musical Typing window to use some key commands. To toggle the Musical Typing window, choose Window > Show (or Hide) Musical Typing (or press Command-K).

In the Library, choose Piano > Steinway Grand Piano.
Play a few notes on your MIDI keyboard while observing the LCD display.

A small dot appears at the upper right of the LCD display to indicate that Logic is receiving MIDI events. These small dots can be useful to quickly troubleshoot MIDI connections.
Note ▶
When Logic sends MIDI events to external MIDI devices, a small dot appears at the lower right of the LCD display.
Play a chord on your MIDI keyboard.

The chord name appears in the LCD display.
Logic can provide a more detailed view of the incoming MIDI events.
To the right of the LCD display, click the small arrow, and choose Custom.

The Custom LCD display appears, with a MIDI input activity monitor that shows incoming MIDI events in more detail.
Hold down a key on your MIDI keyboard.

A note icon indicates that the event received is a MIDI note on event. You can also see the MIDI channel number of the MIDI event, the note’s pitch, and its velocity. In the previous image, the event’s MIDI channel is 1, its pitch is F#1, and its velocity is 98.
Note ▶
MIDI events can be sent on up to 16 different MIDI channels, which allows you to control different timbres on different channels when using multi-timbral instruments.
Release the key on your MIDI keyboard.
Depending on your controller, in the LCD display you may see a note on event with a velocity of zero, or you may see a note with a strike through it, which represents a note off event.
Note ▶
Pressing and releasing a key on a MIDI keyboard sends two events: a note on event and a note off event. In its MIDI editors, Logic represents the two events as a single note event with a length attribute.
You could start recording a piano part now, but first let’s open the Piano Roll so that you can watch the MIDI notes appear on the grid as they are recorded.
In the control bar, click the Editors button, and at the top of the Editors pane, ensure that Piano Roll is selected (or press P).
The Piano Roll opens at the bottom of the main window.
Make sure the playhead is at the beginning of the project, and click the Record button (or press R).
The LCD display and the playhead turn red to indicate that Logic is recording. The playhead jumps back one bar, giving you a four-beat count-in, and you can hear the metronome.
When the playhead appears, play quarter notes for a couple of bars to record a very simple bass line melody on the piano.
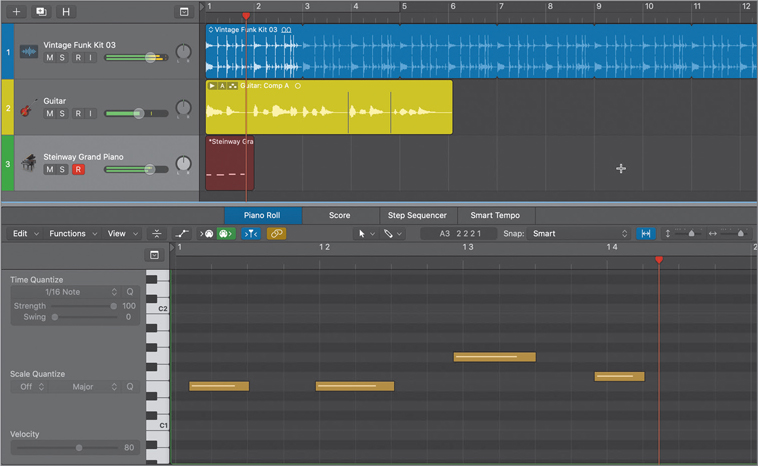
When you play the first note, a red MIDI region appears on the record-enabled track. The region’s length constantly updates to include the most recent MIDI event received.
The MIDI notes appear in the Piano Roll and on the region in the workspace as you record them.
Stop recording.
The region is now shaded green. It is named Steinway Grand Piano. You can see the recorded notes in the Piano Roll.
Tip
To see all the notes in the Piano Roll, make sure they are all unselected and press Z.
In the Piano Roll, click the Play button at the upper left of the region.

The region starts playback in Solo and Cycle modes. If you are not happy with your performance, you can undo it (Command-Z) and try again.
If you are mostly happy but one or two notes need correction, you can quickly fix them in the Piano Roll:
Drag a note vertically to change its pitch.
Drag a note horizontally to change its timing.
Click a note, and press Delete to remove it.
More Info ▶
You will learn how to edit MIDI events in more detail in Lesson 7.
Click the region’s Play button again (or press the Space bar) to stop playback.
Solo and Cycle modes are both turned off.
Tip
If you want to keep a performance you played while Logic was in playback mode, click Stop and press Shift-R (Capture as Recording). A MIDI region containing your last performance is created on the track.
You’ve recorded MIDI notes into a MIDI region to trigger a software instrument track and explored the basics of editing the notes in your MIDI recording. You can use the same recording techniques you’ve used earlier to record MIDI, but as you’ll see, you won’t always get the same results as when recording audio.
Selecting a software instrument track automatically record-enables it, but the instrument is not always in Live mode (for example, when selecting a software instrument track during playback). An instrument in Live mode requires more CPU resources. When an instrument is not in Live mode, the first note you play will take about 100 ms (milliseconds) to trigger the instrument, which is then placed in Live mode.
You can put an instrument in Live mode by sending any MIDI event to it (playing a dummy note, moving the modulation wheel, and so on), by clicking the R button in the track header to make it solid red, or by starting playback.

Correcting the Timing of a MIDI Recording
If you are not happy with the timing of your MIDI performance, you can correct the timing of the notes using a time-correction method called quantization. To quantize a MIDI region, you choose a note value from the Quantize menu in the Region inspector, and inside the region, the notes snap to the nearest absolute value.
Quantizing MIDI Regions
In this exercise, you will quantize the simple piano passage you recorded in the previous exercise so that the notes are in sync with the metronome.
Note ▶
If you were quite happy with the timing of your performance, you may want to undo your previous recording and record again with a less accurate timing so that you can more clearly hear the benefits of quantization.
In the workspace, make sure the piano region is still selected.
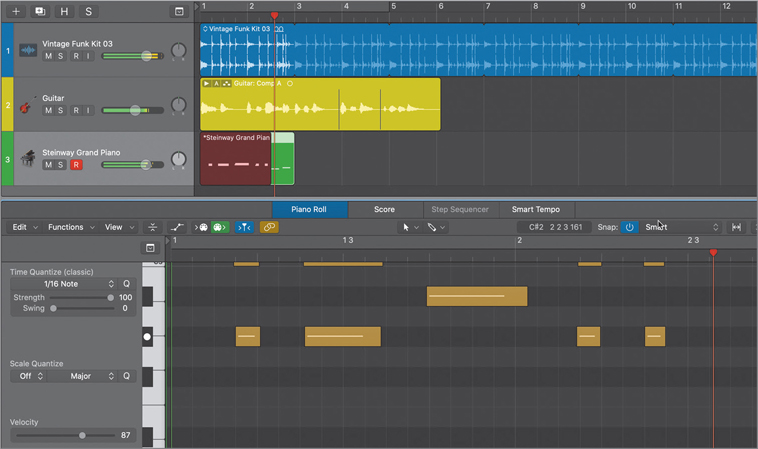
In the Region inspector, click the Quantize value (currently set to off) and choose 1/4 Note while looking at the notes in the Piano Roll.

All the MIDI notes in the piano region snap to the nearest quarter note on the grid.
In the control bar, click the Metronome button (or press K) to turn it on.

At the upper left in the Piano Roll, click the Play button to listen to the soloed piano region with the metronome.
The notes are now perfectly in sync with the metronome. In Logic, quantizing is a nondestructive operation. You can always revert the notes to their original position.
In the Region inspector, set Quantize to off.
In the Piano Roll, the notes return to their original recording positions.
In the Piano Roll, click the Play button.
The notes in their original recording positions may sound a bit out of sync with the metronome.
In the Region inspector, set Quantize back to 1/4 Note.
The notes are once more in sync with the metronome.
Turn off the metronome, and stop playback.
The quantize function makes it easy to correct the timing of your MIDI recordings. And because it is nondestructive, you can experiment with different quantize values or turn it back off.
Choosing Default Quantization Settings
You can choose a default MIDI quantization setting so that any new MIDI recording is automatically quantized to that value. This is very useful when you are not completely confident of your timing chops. Because the Quantize setting is nondestructive, you can always adjust it or turn it off for that region after you’re finished recording.
In the workspace, click the background.
All regions are deselected, and the Region inspector now displays the MIDI Defaults parameters. The MIDI Defaults settings will be automatically applied to any new MIDI region you record.
In the MIDI Defaults parameters, set Quantize to 1/8 Note.

In the workspace, click the piano region, and press Delete to delete the region.
Move the playhead to the beginning of the project, and click the Record button (or press R).
Record another simple bass line, as you did in the previous exercise. Feel free to play eighth notes this time, since that’s the Quantize value you selected.
Stop recording.

In the Piano Roll, the notes immediately snap to the nearest eighth note on the grid. In the Region inspector, the Quantize parameter for the new piano region is set to 1/8 Note. Remember that the Quantize setting is nondestructive, which means that you can still turn it off.
In the Region inspector, set Quantize to off. In the Piano Roll, the notes move to their original recorded positions.
Set Quantize back to 1/8 Note.
Recording Over a MIDI Region
Sometimes you may want to record a MIDI performance in several passes. For example, when recording piano, you want to record just the left hand, and then record the right hand in a second pass. Or you could record drums in multiple passes, recording the kick drum first, then the snare drum, then the hi-hat, then the crash cymbal, building up a drumbeat by focusing on a single piece of the drum kit at a time.
In Logic, when recording MIDI events on top of an existing MIDI region, you can choose to merge the new recording with the existing MIDI region.
Merging Recordings and Recording Takes
In the previous exercise, you recorded a simple bass line onto a piano track. Now you will record chords as you listen to your bass line, merging the new chords with that bass line inside the same MIDI region. When recording over an existing MIDI region, the default behavior is to merge the new notes with the existing region on the track. Then you’ll change your preferences to record takes into a take folder, the same behavior you experienced earlier on audio tracks.
Move the playhead to the beginning and start recording.
This time, play only a couple of chords that complement the bass line you previously recorded.
Stop recording.
You may need to zoom out the Piano Roll to see all your notes.
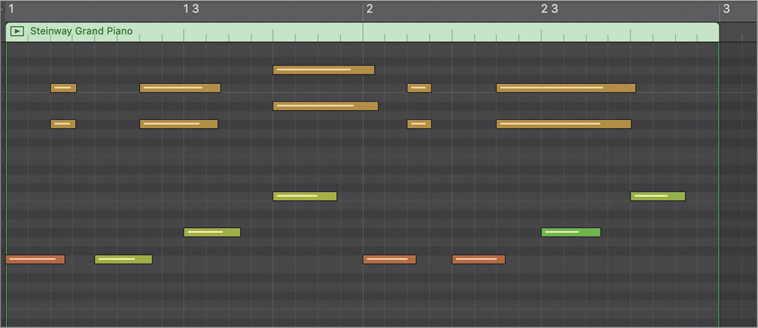
The new notes immediately snap to the nearest eighth note on the grid. On the track, the Steinway Grand Piano MIDI region contains all the notes recorded in this exercise and the previous one.
Let’s try to record take folders.
Choose Logic Pro X > Preferences > Recording.
You can change the behavior independently for MIDI and Audio overlapping recordings, depending on whether Cycle mode is on or off.
Under MIDI, click the Cycle off pop-up menu and choose Create Take Folder.

Close the preference window.
Move the playhead to the beginning and start recording a new piano melody.
Stop recording.

A take folder is created. Logic records your new performance as a new take while the previous take is muted. Feel free to open the MIDI take folder, select the desired take, and listen to your project.
Choose File > Save (or press Command-S).
Choose File > Close Project (or press Option-Command-W).
Note ▶
When recording MIDI, you can use the same manual or automatic punching techniques you used earlier.
You have merged a new MIDI performance into an existing MIDI region, and you have recorded different MIDI performances as individual takes in a take folder. Choosing preferences for overlapping recordings for both MIDI and audio, depending on the status of the Cycle mode, provides a lot of flexibility. For example, try the Merge preference for overlapping MIDI recordings in Cycle mode to record a drum kit, one drum kit piece at a time for each pass of the cycle (first the kick, then the snare, then the hi-hat, and so on), or try the Create Take Folder preference to experiment with recording different bass lines over a groove.
Recording Into Live Loop Cells
Many songs are born from drum grooves, melody ideas, guitar riffs, chord progressions, or bass lines. Before getting a clear idea of the entire arrangement and how you’ll organize the different song sections, you can use the Live Loops grid as a sketch pad to experiment with diverse combinations of your loop-based material. When inspiration strikes, you can capture your ideas by recording both audio and MIDI directly into a cell. You can elect to predetermine the number of bars and beats before starting the recording, and use the mouse, a key command, or a controller to start and end the recording while the Live Loops grid keeps all your loops playing perfectly in sync.
More Info ▶
You will learn how to control Live Loop functions from a MIDI Controller or the Logic Remote app on the iPad in Lesson 6.
Recording a MIDI Cell
First you will import a drum loop to use as the rhythm reference for your recording, and then you’ll choose a software instrument bass patch and record a bass line.
Choose File > New from Template.
In the Project Chooser, double-click the Live Loops project template.

The Live Loops template opens with one audio track and one software instrument track, and the Loop Browser is open. You’ll drag a drum loop to the audio track and record MIDI into a cell on the software instrument track.
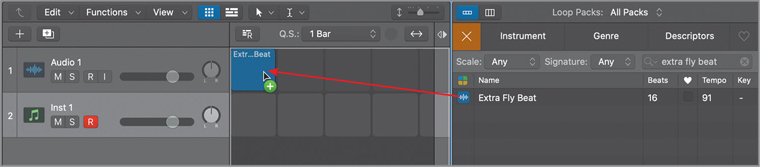
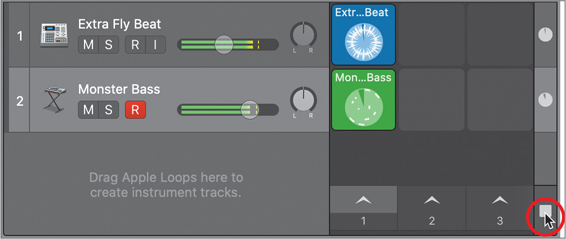
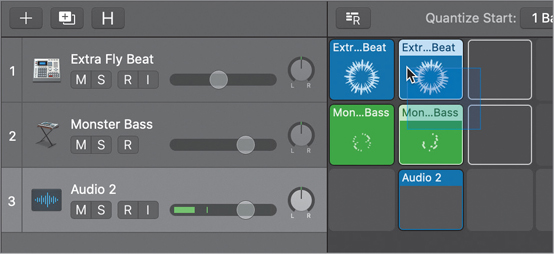
In the Loop Browser, search for Extra Fly Beat.
Drag Extra Fly Beat to the first cell on Track 1.
Let’s choose a patch for the software instrument track (Track 2).
In the control bar, click the Library button (or press Y) and make sure Track 2 is selected in the Live Loops grid.
In the Library, choose Synthesizer > Bass > Monster Bass.
Click the Scene 1 trigger.

The drum loop starts looping. Play some notes on your MIDI controller keyboard to come up with a simple and fun bass line idea to record.
Move the pointer to the cell and click the Record button (or click the cell to select it and press Option-R).

A count-in appears in the cell counting off the remaining beats in the current bar.

At the beginning of the next bar, recording starts. Play your bass line on your controller for one or two bars.

Before the next bar starts, move the pointer to the cell and click the Play button (or press Return).

The cell flashes and at the beginning of the next bar, the recording stops, and the cell you just recorded starts playing back.

Tip
Use the Quantize parameter in the Cell inspector to quantize your recording.
Click the Grid Stop button.
All cells stop flashing, indicating they are dequeued.
In the control bar, click Stop (or press the Space bar).
You’ve recorded your first MIDI loop on a software instrument track in the Live Loops grid. Keeping the beat going while starting and stopping the recording exactly on the first beat of a bar sure makes it easy to keep your juices flowing without having to worry about carefully positioning a playhead or perfectly resizing a region before you can loop it. These recording techniques unleash a world of possibilities! Let’s explore them a bit further.
Choosing Cell Parameters Before Recording
You will now create a new scene to record a new bass line. Before you start recording, you’ll set the cell length to two bars so that you don’t have to press play to end your two-bar recording. You will also choose a Quantize value beforehand so that your recording is automatically quantized as soon as it plays back.
First, let’s copy the drum loop to Scene 2.
On the Extra Fly Beat track (Track 1), Option-drag the Extra Fly Beat loop to Scene 2. Make sure you Option-drag the cell name area, and not the center of the cell.

On the Monster Bass track (Track 2) in Scene 2, click the empty cell away from the Record button that appears.
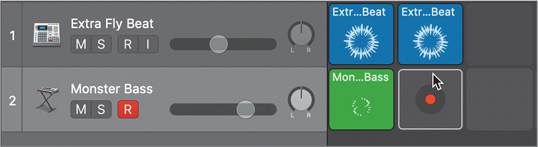
A white frame appears around the cell to indicate it is selected, and the Cell inspector displays the parameters for the empty MIDI cell.
In the Cell inspector, click the disclosure triangle next to Play From to view the cell length, and then set the Cell length to two bars (2 0).
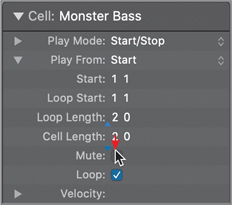
In the cell, a MIDI cell named Monster Bass is created, and the Cell inspector now displays the parameters for the selected Monster Bass cell.
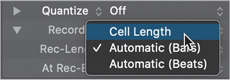
In the Cell inspector, click the disclosure triangle next to Recording to view Rec-Length, and then set Rec-Length to Cell Length.
In the Cell inspector, set the Quantize parameter to 1/8 Note.

Click the Scene 2 trigger.

The drums start to play, and you can practice your new bass melody idea.
In Scene 2, click the Record button on the selected Monster Bass cell (or press Option-R).

The count-in appears in the center of the cell; then the recording starts at the beginning of the next bar. After two bars, recording stops, and the cell automatically starts playing the recording.
In the control bar, click Stop (or press the Space bar).
At the lower right of the grid, click the Live Loops grid stop button.
Tip
To record multiple takes into a take folder, in the Cell inspector, set Recording to Takes.
By taking the time to choose the desired options in the Cell inspector before you record into a cell, you can free yourself up from having to reach for a mouse, keyboard, or controller to stop at the end of your recording.
Recording an Audio Cell
You will now add a new audio track to your Live Loops grid and record audio into a cell. Make sure your guitar or microphone is still connected and the recording level properly adjusted, as described at the beginning of this lesson.
Above the track headers, click the New Tracks button (+) (or press Option-Command-N).
The New Tracks dialog opens.
Select Audio, make sure the correct input number is selected, select Record enable, and click Create.
In Scene 2, click the first cell in the new audio track (Track 3) to select it.

A white frame appears around the cell to indicate it is selected.
In the Cell inspector, set Cell Length to 2 0 and Rec-Length to Cell Length.

Because you’re now familiar with the drums in that scene, you no longer need to practice, and you can try recording right away, only with a metronome count-in. Still, you have to queue the drums and bass cells so that they are triggered when the recording starts, after the count-in.
Drag a rectangle to select the drums and bass cells in Scene 2.
The two cells are highlighted to indicate they are selected.
Control-click a selected cell and choose Queue Cell Playback (or press Option-Return).
The selected cells are flashing to indicate they are queued.
Move the pointer over the Audio 2 cell and click the Record button (or press Option-R).

The count-in appears on the cell, while you hear the metronome, and recording starts at the beginning of the next bar. Both drums and bass start playing when recording begins.
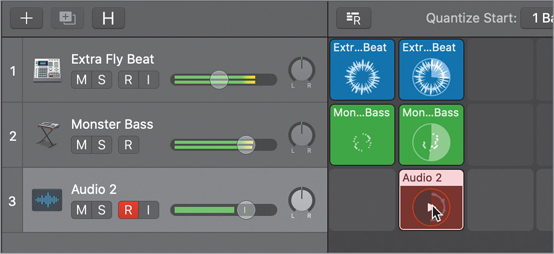
Play a riff on your instrument (or sing a melody) along to the drum and bass cells for the next two bars. At the end of the two-bar recording, the recording stops and your new audio cell starts playing back.
In the control bar, click Stop (or press the Space bar).
Feel free to continue creating software instrument and audio tracks and recording new cells to populate a few scenes!
If you want to save your project, choose File > Save (or press Command-S), choose a name and location for your project, and click Save (or press Return).
Choose File > Close Project (or press Option-Command-W).
You have recorded both MIDI and audio into cells in the Live Loops grid, adjusted cell length and recording length settings, and quantized your MIDI cells. Creating your own cell content to combine with Apple Loops can be an exhilarating way to start sketching out beats, riffs, or melody ideas that you can organize as scenes and trigger in real time. Later, in Lesson 8, you will learn to record the results from your cell triggering performance as regions in the Tracks view so that you can start laying out a structured arrangement.
Recording Without a Metronome
Musicians often use a tempo reference when recording. In most modern music genres, when live drums are used, drummers record their performance while listening to a metronome or a click track. When electronic drums are used, they are often recorded or programmed first, and then quantized to a grid so that they follow a constant tempo. The other musicians later record their parts while listening to this drum track.
Still, some musicians prefer to play to their own beat and record their instrumental tracks without following a metronome, click track, or drum track. When recording audio in Logic, you can set up Smart Tempo to analyze a recording and automatically create a tempo map that follows the performance so that the notes end up on the correct bars and beats. Subsequent recording or MIDI programming can then follow that tempo map, ensuring that all tracks play in sync.
Choose File > New.
An empty project template opens, and the New Tracks dialog opens.
In the New Tracks dialog, ensure that Audio is selected, and click Create.
To make Logic analyze the audio recording and create a corresponding tempo map, you should set the Project Tempo mode to Adapt.
Below the tempo value, click the Project Tempo mode, and choose ADAPT – Adapt Project Tempo.

The Global Tempo track opens, and the tempo curve is shaded in orange. The orange color indicates that those parameters will be affected by a new recording.
Get ready to record. You can sing or play any instrument you’d like as long as your performance has a clearly audible rhythm.
Click Record (or press R).
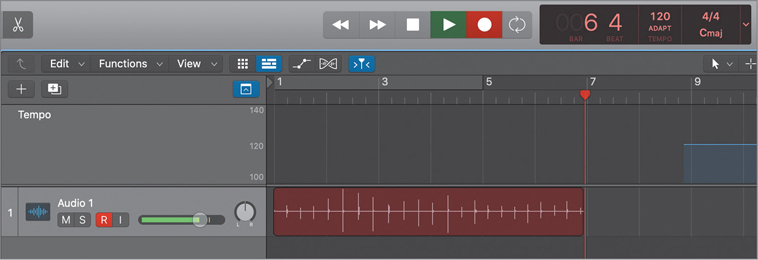
Because the Project Tempo mode is set to Adapt, the metronome does not automatically play (unlike the Project Tempo mode set to Keep mode). You no longer need it!
Because you have no time reference, you needn’t rush. You can choose to start performing whenever you’re ready. Try playing something that has an obvious rhythmic quality to it, such as a staccato rhythm part in which you can clearly distinguish the individual chords or notes.
During the recording, Logic displays red vertical lines over the recording when it detects beats.
Note ▶
You can perform the same recording with Smart Tempo in Adapt mode with a MIDI recording.
Click Stop, or press the Space bar.
An alert offers to open the File Tempo Editor so that you can preview the recording and adjust the positions of the beat markers that Logic created while analyzing the file.
Click Don’t Show.

In the Global Tempo track, you can see multiple tempo changes. This new tempo map reflects the tempo at which you played during the recording, and unless you’re a human metronome, chances are good that the tempo fluctuates from bar to bar, and sometimes even from beat to beat. Let’s see how close Logic got to detecting the tempo of your performance.
Click the Metronome button (or press K).
Listen to your recording.
If you’re lucky, the metronome follows the tempo of the performance and sounds in sync with your recording. If you’re unlucky, Logic got it wrong and the result can be messy. In that case, perform this exercise again, making sure you can hear a strong rhythmic reference in your recording. (For example, try tapping a very basic beat with your fingers in front of the microphone.)
Close the project without saving it.
You have recorded a rubato performance without listening to a timing reference. Logic automatically detected your tempo changes and applied them to the project tempo. You’ve just begun to scratch the surface of what you can do with Smart Tempo, which you will explore further in Lesson 7.
You are now ready to tackle many recording situations: you can create audio and MIDI, add new takes in a take folder, merge MIDI recordings, and fix mistakes by punching on the fly or automatically. You know where to adjust the sample rate, and you understand which settings affect the behavior of the software during a recording session. And you can reduce the file size of your projects by deleting unused audio files—which will save disk space, and download and upload time should you wish to collaborate with other Logic users over the internet.
Key Commands
Keyboard Shortcuts
Recording |
|
|---|---|
R |
Starts recording |
Command-Control-Option-P |
Toggles Autopunch mode |
Option-Command-click the ruler |
Toggles Autopunch mode |
|
|
Tracks |
|
Command-Option-N |
Opens the New Tracks dialog |
Option-C |
Toggles the Color palette |
|
|
Live Loops |
|
Option-R |
Records into the selected cell |
Return |
Plays the selected cell |
Option-Return |
Queues the selected cell playback |
|
|
Key Commands |
|
Option-K |
Opens the Key Commands window |
|
|
Project Audio Browser |
|
F |
Opens or closes the Browser pane |
Shift-U |
Selects unused audio files |