
Lesson 2. Producing a Virtual Drum Track
Lesson Files: None
Time: This lesson takes approximately 75 minutes to complete.
Goals: Create a new project with a Drummer track
Choose a drummer and drum kit
Edit the drummer performance
Arrange the song structure
Edit performances in the new sections
Customize the drum kit
Tune and dampen individual kit pieces
Convert Drummer regions to MIDI regions
Work with electronic drummers
Customize drum machines
In most popular modern music genres, drums are the backbone of the instrumentation. They provide the foundation for the tempo and groove of the piece. For live recording sessions in which the instruments are not tracked at the same time, drums are usually recorded or programmed first so that the other musicians can record while listening to their rhythmic reference.
To meet today’s high production standards, producing drum tracks usually involves using several techniques, including live recording, programming, sampling, audio quantizing, and sound replacement. In Logic Pro X, you can speed up the process by taking advantage of the Drummer feature along with its companion software instruments, Drum Kit Designer and Drum Machine Designer.
In this lesson, you will produce virtual indie-rock, hip-hop, and electro-house drum tracks. After selecting a genre and choosing the best drummer for your project, you will adjust the performance, making the drummer play busier patterns or simpler ones, louder or softer, and changing the feel, almost like a producer would communicate with a real drummer in a recording session.
Creating a Drummer Track
Drummer is a Logic Pro X feature that allows you to produce drum tracks using a virtual drummer with its own personal playing style. Its performance is placed in Drummer regions on a Drummer track. Using the Drummer Editor, you can edit the performance data contained in a Drummer region. Each virtual drummer also comes with its own drum kit software instrument plug-ins: Drum Kit Designer to emulate live acoustic drum kits, or Drum Machine Designer for electronic sampled and synthesized drums.
First, let’s open a new project, add a Drummer track, and examine the display of the drum performance in the Drummer region.
Choose File > New (or press Command-Shift-N).
A new project opens along with the New Tracks dialog.
In the New Tracks dialog, select Drummer, make sure the Genre pop-up menu is set to Rock, and click Create (or press Return).
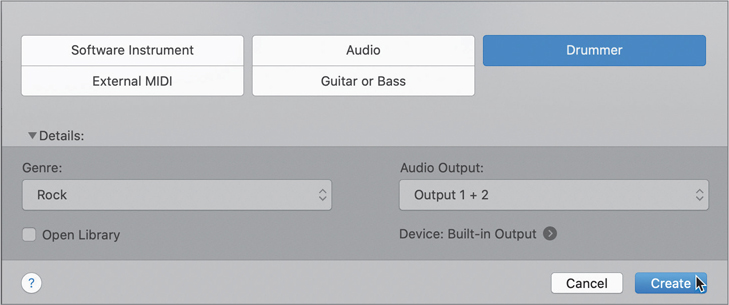
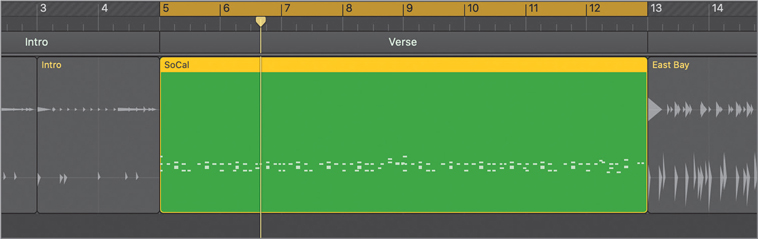
A Drummer track is created along with an eight-bar Drummer region. At the bottom of the main window, the Drummer Editor opens, allowing you to edit the performance in the Drummer region that is selected in the workspace. The track is named SoCal (Kyle), which is the name of the default drum kit and default virtual drummer in the Rock category. The project tempo is set to 110 bpm, which suits the selected music genre.

Press the Space bar to listen to the Drummer region.
The drummer starts with a crash cymbal and plays a straightforward rock pattern. At the end of the Drummer region, a drum fill leads into the next section, which you will add later.
Let’s take a closer look at the Drummer region.
Control-Option-drag over the first bar of the Drummer region. If necessary, continue zooming vertically by dragging the vertical zoom slider (or pressing Command-Down Arrow) until you can see two lanes in the Drummer region.

The Drummer region displays drum hits as triangles on lanes, roughly emulating the look of drum hits on an audio waveform. Kicks and snares are shown on the bottom lane; cymbals, toms, and hand percussions are on the top lane.
To create a cycle range of the desired length, you can drag the ruler horizontally.
In the upper half of the ruler, drag from bar 1 to bar 2.

A cycle range is created for the section you drag, and Cycle mode is turned on.
Listen to the first bar a few times while looking at the drum hits in the Drummer region.
Although you cannot edit individual drum hits in the Drummer region, the region display gives you a quick glance at the drummer’s performance.
More Info ▶
At the end of this lesson you will convert Drummer regions to MIDI regions. In Lesson 7, you will learn how to edit MIDI regions.
Turn off Cycle mode.
Control-Option-click the workspace to zoom out and see the entire Drummer region.
Now you can read the Drummer region. In the next exercise, you will listen to multiple drummers and several performance presets. Later, you will zoom in again to see the pattern update in the Drummer region as you adjust its settings in the Drummer Editor.
Choosing a Drummer and a Style
Each drummer has their own playing style and drum kit, and those combine to create a unique drum sound. Before you start fine-tuning the drummer’s performance, you need to choose the right drummer for the song.
In the Library, drummers are categorized by music genres. By default, choosing a new drummer means loading a new virtual drum kit and updating Drummer region settings. But sometimes you may want to keep the same drum kit while changing the drummer, which you will do in this exercise.
In the control bar, click the Library button (or press Y).
The Library lets you access drummers and drum kit patches.
Move the pointer over Anders.
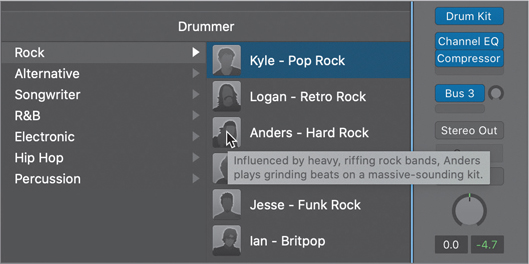
A help tag describes the drummer’s playing style and the sound of their drum kit. Let’s get to know the other drummers.
Continue by placing the pointer over other rock drummers to read their descriptions. When you’re through, click the drummer named Jesse.

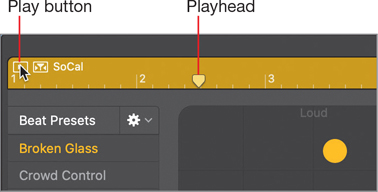
In the Library, Jesse’s drum kit Smash is selected. In the workspace, the Drummer region updates to display Jesse’s performance. In the control bar, the project tempo changes to 95 bpm.
In the workspace, make sure the Drummer region is still selected.
The Drummer Editor shows the settings for the selected Drummer region. A yellow ruler allows you to position the playhead anywhere within the region, and you can click the Play button to the left of the ruler to preview the Drummer region. As in the Tracks area, you can also double-click the ruler to start and stop playback.
In the Drummer Editor, click the Play button.
The selected region plays in Cycle mode, and the cycle area automatically matches the region position and length. The selected region is soloed—indicated by a thin yellow frame. Soloing the region helps you focus on the drums when you have other tracks in the project.
Although you will later fine-tune the drummer’s performance, Jesse’s busy, syncopated drum patterns are not a good fit for this indie-rock song. You are looking for a drummer with a simple, straightforward style that more appropriately serves the song.
Stop playback.
In the Tracks area, Cycle mode is automatically turned off, the dimmed cycle area returns to its original position and length, and the selected region is no longer soloed.
In the Library, click the Alternative category, and click the first drummer, Aidan.
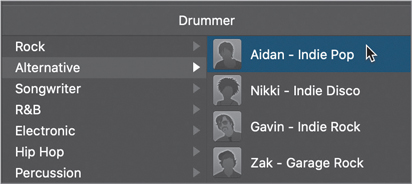
In the control bar, the project tempo changes to 100 bpm.
In the Drummer Editor, click the Play button.
While the region is playing back in Cycle mode, you can try selecting other region settings presets to explore Aidan’s full range of playing style.
In the Presets column, click a few different presets while the region plays back.

When you click a preset, the region settings update and you can hear another performance from the same drummer.
Without stopping playback, in the Library, choose the Rock category.
Click the fourth drummer, Max – Punk Rock. If a dialog explaining how to keep region settings when changing the drummer appears, select “do not show this message again,” and click Change Drummer.
Tip
To keep region settings when changing drummers, click the action menu at the top of the Beat Presets list and choose “Keep settings when changing drummers.”
The project tempo changes to 140 bpm. Listen to a few of Max’s presets.
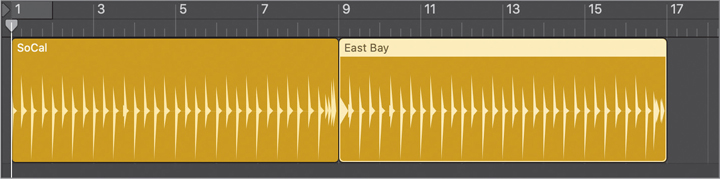
Although Max’s hyperactive performance is not what you’re looking for, the drum kit sounds punchy. Let’s assign the first drummer, Kyle, to play on Max’s drum kit, East Bay.
In the Library, click the padlock icon in the Sounds section.

The current patch is locked, and changing the drummer will no longer load a new drum kit.
In the Library, click Kyle - Pop Rock.

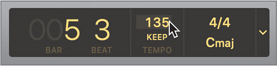
Kyle is now playing Max’s East Bay drum kit and the project tempo updates to 110 bpm. Let’s make Kyle play a bit faster.
In the control bar, set the tempo to 135 bpm.
Stop playback.
In the control bar, click the Library button (or press Y) to close the library.
You have found a drummer that plays the straightforward style you’re seeking for this project, paired a punchy-sounding drum kit, and set a tempo that will drive your indie-rock song. You are now ready to customize the performance.
Editing the Drum Performance
In a recording session with a live drummer, the artist, the producer, or the musical director must communicate their vision of the completed song. They may ask the drummer to play behind or ahead of the beat to change the feel of the groove, switch from the hi-hat to the ride cymbal during the chorus, or play a drum fill in a specific location.
In Logic Pro X, editing a drummer performance is almost like giving instructions to a real drummer. In this exercise, you will play a drum region in Cycle mode as you adjust the drummer settings.
In the workspace, make sure the Drummer region is still selected, and in the Drummer Editor, click the Play button.
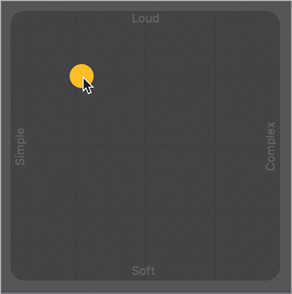
Next to the presets, an XY pad with a yellow puck lets you adjust both the loudness and the complexity of the drum pattern.
As the region plays, drag the puck, or click different locations inside the pad to reposition it.

Tip
To undo a Drummer Editor adjustment, press Command-Z.
After positioning the puck, you may need to wait for the region to update (depending on your computer). If you continuously drag the puck without stopping, the region will not update.
As you position the puck farther to the right, the drum pattern becomes more complex, and as you move the puck toward the top of the pad, the drummer plays louder. Try placing the puck in the pad’s corners for extreme settings, such as soft and simple or loud and complex.
As the drummer plays softer, he closes the hi-hat and switches from hitting the snare drum on the skin to playing rim clicks (hitting only the rim of the drum). As he plays louder, he opens the hi-hat and starts playing rim shots (hitting the skin and the rim simultaneously for accent).
Let’s make the drummer play a solid, straightforward beat in the Drummer region, which will be used for the first verse of the song.
Settle for a puck position where the drummer plays a rather simple and fairly loud pattern.
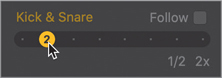
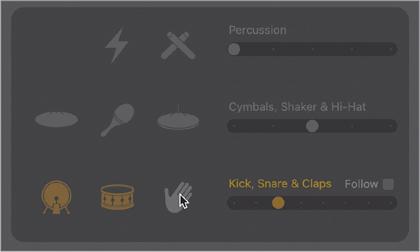
The kick drum is still playing a pattern that’s a bit too busy. To the right of the XY pad, you can choose from several Kick & Snare pattern variations.
Drag the Kick & Snare slider to position 2 (or click the second increment on the slider).
Tip
In multitrack projects, when you select the Follow checkbox, a pop-up menu appears instead of the Kick & Snare slider. The menu lets you choose a track to influence what the drummer plays on the kick and snare.
The drummer now simply alternates kick and snare on every beat. If you don’t hear the drummer play the snare on beats 2 and 4, slightly readjust the horizontal position of the puck in the XY pad so it’s in the same position as in the figure following step 3.
Listen to the hi-hat. It is currently playing eighth notes.
Click the first increment on the Hi-Hat slider.

The hi-hat now plays only on the beat (quarter notes), which works well for up-tempo songs.
The drummer is playing a fill in the middle of the region (before bar 5) and another at the end (before bar 9). Let’s get rid of the first fill and keep only one at the end.
Look at the region in the workspace while trying different positions for the Fills knob, and drag the Fills knob down until you see the fill before bar 5 disappear. You should still see a fill at the end of the region.

Note ▶
Clicking the small lock icon next to the Fills and Swing knobs locks the knob into position as you preview presets or drummers.
Tip
Each time you adjust a setting in the Drummer Editor, the selected region is refreshed, and the drummer plays a new subtle variation. Dragging the Fills knob by a tiny amount is a quick way to refresh a region. You can also click the Action pop-up menu next to the Presets menu and choose Refresh Region. Or you can Control-click the region in the workspace, and from the shortcut menu, choose Edit > Refresh Region.

You now have a very straightforward beat. Because the drummer plays less now, he can make the hi-hat ring a bit more.
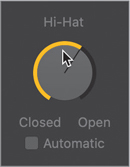
In the Drummer Editor, click the Details button to display three knobs.
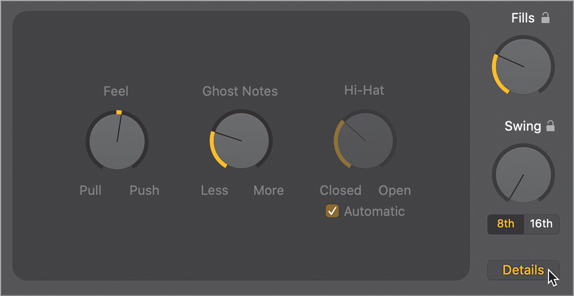
Below the Hi-Hat knob, deselect the Automatic option.
Drag the Hi-Hat knob up to open it a little bit.
This verse’s drum pattern now sounds great, so let’s add a new Drummer region, which you’ll use for the chorus.
Stop playback.
In the Tracks area, adjust your zoom level to see some empty space after the Drummer region, position the pointer over the Drummer track, and click the + sign that appears to the right of the Drummer region.

A new eight-bar Drummer region is created at bar 9. The new region is selected, and the Drummer Editor displays its region settings, the same as the original Drummer region on the track. Let’s make the drummer switch from playing the hi-hat to playing a cymbal during the chorus.
In the Drummer Editor, click the Play button.
You can hear the second region in Cycle mode.
In the Drummer editor, click the Details button to go back to the basic view.
On the drum kit, click a cymbal.

The hi-hat is dimmed, the cymbals are yellow, and you can hear the drummer play a ride cymbal instead of the hi-hat. The drummer is playing the ride cymbal on every eighth note. For a more powerful chorus, you instead want it to play crash cymbals on every beat.
Click the first increment of the Cymbals slider.

You now hear crash cymbals on every beat and the beat has more impact.
Let’s listen to the verse going into the chorus.
Stop playback.
Go to the beginning of the song and listen to both Drummer regions.
You now have a simple, straightforward beat for the verse, and then the drummer switches to the crash cymbal for the chorus pattern.
You have carefully crafted two eight-measure drum grooves: one for the verse and one for the chorus. They are the two most important building blocks of the song you will now start arranging.
Arranging the Drum Track
In this exercise, you will lay out the song structure and populate the Drummer track with Drummer regions for the whole song.
Using Markers in the Arrangement Track
Using the Arrangement track, you will now create arrangement markers for all the sections of your song. You’ll adjust their lengths, positions, and order, and fill all the new sections with Drummer regions.
At the top of the track headers, click the Global Tracks button (or press G).

The global tracks open, with the Arrangement track at the top. You won’t need the other global tracks, so you can hide them.
Control-click a global track header, and choose Configure Global Tracks (or press Option-G).

A shortcut menu opens in which you select the global tracks you want to display.
Deselect the Marker, Signature, and Tempo tracks, and click outside the shortcut menu to close it.
The Arrangement track is now closer to the regions in the workspace, making it easier to see their relationships.
In the Arrangement track header, click the Add Marker button (+).
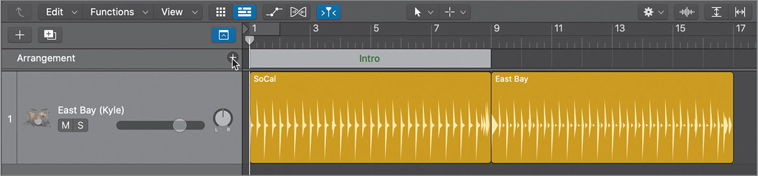
An eight-measure arrangement marker named Intro is created at the beginning of the song. By default, arrangement markers are eight bars long and are placed one after the other, starting from the beginning of the song. Let’s rename the marker.
Click the name of the marker, and from the menu, choose Verse.

Click the Add Marker button (+) to create a new marker, and make sure it’s named Chorus.
You will now create a marker for a new intro section and insert it before the Verse and Chorus markers.
In the Arrangement track header, click the Add Marker (+) button.
An eight-bar marker is created.
Click the name of the new marker, and from the pop-up menu, choose Intro.
A four-measure intro will be long enough, so you can resize the Intro marker before moving it.
Drag the right edge of the Intro marker toward the left to shorten it to four bars.

Click the marker away from its name (to avoid opening the Name pop-up menu), and drag the Intro marker to bar 1.

The Intro marker is inserted at bar 1, and the Verse and Chorus markers move to the right of the new Intro section. In the workspace, the Drummer regions move along with their respective arrangement markers.
As with regions in the workspace, you can Option-drag a marker to copy it.
Press Command-Left Arrow a few times to zoom out horizontally so that you can see space to the right of the existing song sections.
You’re going to copy the verse and chorus together.
Click the Verse marker to select it.
Shift-click the Chorus marker to add it to the selection.
Option-drag the selected markers to bar 21, right after the chorus.
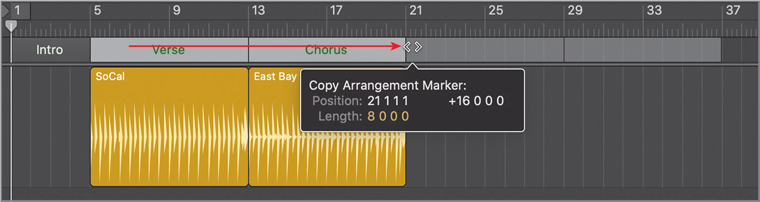
The Verse and Chorus markers and their respective Drummer regions are copied together.
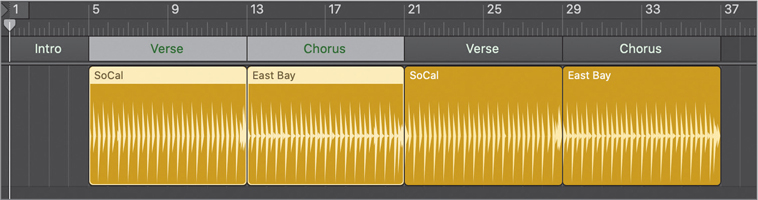
The song is taking shape. You will now finish arranging the song to make it end with an outro section.
In the Arrangement track header, click the Add Marker (+) button.
A Bridge marker is created after the last chorus.
Click the name of the Bridge marker and choose Outro.
Let’s shorten the outro section a bit.
Resize the Outro marker to make it four bars long.

The song structure is now complete, and you can add Drummer regions to fill out the empty sections.
On the Drummer track, Control-click the background and choose Populate with Drummer Regions.

New Drummer regions are created for all the empty arrangement markers.
Listen to the drum track, focusing on the new sections.
New patterns were automatically created for each new Drummer region.
Tip
To delete all the regions below an arrangement marker, select the marker and press Delete. To remove the arrangement marker, press Delete again.
Amazing as the playing is, Kyle (the drummer) might not have guessed what you had in mind for each section. You will now edit some of the new regions to adjust the drummer’s performance.
Editing the Intro Drum Performance
In this exercise, you will make the drummer play the hi-hat instead of the toms. Later, you’ll cut the Intro region in two so that you can use different settings for the second part of the intro and make the drummer play a progressively louder and more complex pattern.
In the workspace, click the background to deselect all regions, and click the Intro region to select it.
The Drummer Editor shows its settings.
Throughout the next exercises you can click the Play button in the Drummer Editor to start and stop playback, or you can navigate the workspace by pressing the Space bar (Play or Stop) and the Return key (Go to Beginning).
Tip
To start playback at the beginning of the selected region, press Shift-Space bar.
Listen to the Intro.
Let’s make the drummer play the hi-hat instead of the toms.
In the Drummer Editor, click the hi-hat.
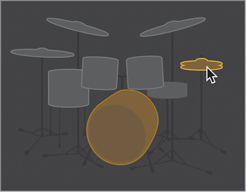
When you click the hi-hat, the toms are muted automatically. Aside from the kick and snare, the drummer can focus on either the toms, or the hi-hat, the cymbals (ride and crash).
The drums are still a little too loud and busy for this intro.
In the XY pad, drag the puck toward the lower left.

The drums are softer, but the transition into the first verse at bar 5 is a little abrupt. Making the drums play crescendo (increasingly louder) during the intro will help build up some tension leading into that verse. To make the loudness evolve throughout the intro, you will cut the Intro region in two.
Stop playback.
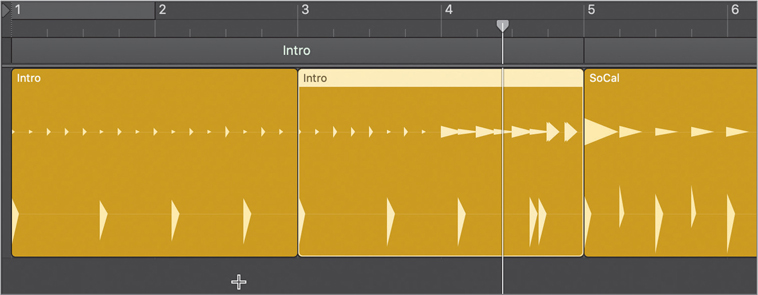
Hold down Command to use the Marquee tool, and double-click the Intro region at bar 3.

The region is divided into two two-measure regions. When a region is divided, the drummer automatically adapts his performance and plays a fill at the end of each new region. A fill in the middle of the intro doesn’t work for this song.
Select the first Intro region.
In the Drummer Editor, drag the Fills knob all the way down.
Notice how the crash disappears from the first beat of the following region. Even though it is in another region, the crash is actually a part of the fill. Now let’s create the crescendo.
Tip
Select multiple Drummer regions to edit them together in the Drummer Editor.
Select the second Intro region, and in the XY pad, drag the puck up to make the drummer play louder.

Listen to the whole intro going into the first verse.
The drummer plays a syncopated kick drumbeat with eighth-notes on the hi-hat, and starts playing louder before the end of the first intro region, which transitions into the louder second region, creating a nice tension at the start of the song. At bar 5, a crash punctuates the fill at the end of the intro where the snare comes in, starting the beat for the song. A more straightforward groove is played in the Verse section, which leaves space to later add more instruments.
Editing the Outro Section
You will now finish editing the drummer’s performance by adjusting the settings of the outro drummer region in your workspace.
Select the Outro region at bar 37 and listen to it.
That Outro region was created when you populated the track with Drummer regions earlier in this lesson. Let’s make the drummer play a more tribal pattern on the kick and toms.
On the drum kit, click a tom drum.

The drummer stops playing cymbals. Instead he plays a pattern on mid tom and snare. To make this section even more primal and mysterious, you’ll make the drummer focus only on the toms.
On the drum kit, click the snare to mute it.
The drummer now replaces the snare hits with high tom hits, making for a melodic low and high tom groove.
On the Kick & Snare slider, click the increment 4.

Because the snare hits are now played on the high toms, the Kick & Snare slider now controls the kick and toms pattern. This groove is a little busier, which works great for the song’s outro.
Listen to the outro and the end of the song at bar 41.
The outro has the required power to drive the last four measures; however, it seems like the drummer stops abruptly before finishing the fill. Usually, drummers end a song by playing the last note on the first beat of a new bar, but here a crash cymbal is missing on the downbeat at bar 41. You will resize the last Outro region in the workspace to accommodate that last drum hit. Don’t forget that you can zoom in if it makes it easier for you to edit a region.
Bring the pointer over the lower-right corner of the Outro Drummer region.
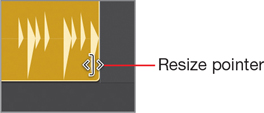
A Resize pointer appears.
Resize the last Outro region to lengthen it by one beat (until the help tag reads Length: 4 1 0 0 +0 1 0 0).

The Drummer region updates, and you can see a kick and a crash on the downbeat at bar 41.
Listen to the outro. The drummer finishes the fill, punctuating it with the last hit at bar 41.
Note ▶
The final crash cymbal continues ringing until its natural sustain fades out, well after the playhead has passed the end of the last Outro region.
You’ve laid out the entire song structure by creating section markers in the arrangement track, populated each section with Drummer regions, and edited each region’s settings to customize its drum pattern. You are now done editing the drum performance and can focus on the sound of the drums.
Customizing the Drum Kit
When recording a live drummer in a studio, the engineer often positions microphones on each drum. This allows control over the recorded sound of each drum, so the drummer can individually equalize or compress the sound of each kit piece. The producer may also want the drummer to try different kicks or snares or to experiment with hitting the cymbals softer before they begin recording.
In Logic, when using Drummer, the sounds of each drum are already recorded. However, you can still use several tools to customize the drum kit and adjust the sound of each drum.
Adjusting the Drum Levels Using Smart Controls
Smart Controls are a set of knobs and switches that are premapped to the most important parameters of the plug-ins on the channel strip of the selected track. You will study Smart Controls in more detail in Lesson 6.
In this exercise, you will use Smart Controls to quickly adjust the levels and tones of different drums. Then you’ll open Drum Kit Designer to swap one snare for another and fine-tune the crash cymbal sound.
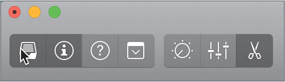
In the control bar, click the Smart Controls button (or press B).

The Smart Controls pane opens at the bottom of the main window, replacing the Drummer Editor. It is divided into three sections: Mix, Compression, and Effects.

In the Mix section, six knobs allow you to balance the levels of the drums. To the right of each knob, a button lets you mute the corresponding drum or group of drums.
Position the playhead before the first chorus and start playback.
The chorus has a lot of energy, but the cymbals are a little loud.
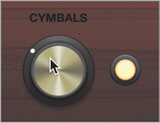
Turn the cymbals down a bit by dragging the Cymbals knob.
You can now change the equalization of the drum track to make it a bit clearer.
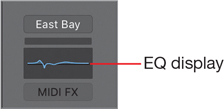
In the Effects section, drag the Tone knob up.

As you drag up the knob, the drums’ sound changes timbre and becomes brighter. At the top of the left channel strip in the inspector, the EQ curve on the channel strip’s EQ display reflects the changes made to the Channel EQ plug-in.
More Info ▶
You will further examine the Channel EQ plug-in in Lesson 10.
In the control bar, click the Editors button (or press E) to open the Drummer Editor.

Tip
You can also double-click a Drummer region to open the Drummer Editor.
You have adjusted the levels and timbres of the drums, and you’re now ready to fine-tune the sound of the individual drum kit pieces.
Customizing the Kit with Drum Kit Designer
Drum Kit Designer is a software instrument plug-in that plays drum samples triggered by Drummer. It allows you to customize the drum kit by choosing from a collection of drums and cymbals and tuning and dampening them.
In the inspector, click in the middle of the Drum Kit Designer plug-in slot to open the plug-in.

Tip
To have the Drummer regions play a different instrument, you can choose another patch from the Library or insert another software instrument plug-in on the channel strip. You can also drag Drummer regions to another software instrument track, and they are automatically converted to MIDI regions. (You will learn more about MIDI regions in Lesson 7.)
In Drum Kit Designer, click the snare.

You can hear the snare sample. The snare stays lit, and the rest of the drum kit is in shadow. To the left, a Snares panel contains your choice of three snare drums, and to the right, an Edit panel includes three setting knobs.
The left panel shows only a limited selection of snares. To gain access to the entire collection of drum samples included with Logic Pro X, you need to choose a Producer Kit in the Library.
Tip
To trigger Drum Kit Designer from your iPad in Logic Remote, tap the View menu and then tap Kits (you will learn how to use the Logic Remote app in Lesson 6).
In the control bar, click the Library button (or press Y).

To the left of the inspector, the Library opens, listing patches for the selected track. The current patch, East Bay, is selected.
In the Library, select Producer Kits, and then select East Bay+.

The plug-in window now displays a Channel EQ plug-in. Let’s reopen Drum Kit Designer.
Close the Channel EQ plug-in window.
At the top of the Library, move your pointer over the drum kit icon and click the sliders symbol that appears.

The Drum Kit Designer plug-in window opens. The East Bay+ kit sounds the same as East Bay but allows a wide array of options to customize the drum kit and its mix.
More Info ▶
In the track header, you may have noticed that the drum icon is now framed in a darker rectangle with a disclosure triangle; the track is now a Track Stack that contains one track for each microphone used to record the drum kit. Clicking the disclosure triangle displays the individual tracks and their channel strips. You will use Track Stacks in Lesson 3.
Click the Library button (or press Y) to close the Library window.
In Drum Kit Designer, click the snare.
This time the left pane displays a choice of many more snare drums (scroll to see more of the list). The current snare, Black Brass, is selected.
Click another snare, and then click the Info button next to it.

A detailed description of the selected snare opens.

Continue previewing different snares, and try listening to a verse or a chorus to hear your customized drum kit in action.
At the top of the left pane, click the Bell Brass snare.
In Drum Kit Designer, click the kick drum.

The info pop-up window updates to show you information on the selected kick drum.
Listen to the kick drum. This kick is the right choice for your song, but it has a long resonance. Typically, the faster the tempo of the song, the less resonance you want on the kick; otherwise, low frequencies build up and could become a problem during the mix. You may have seen drummers stuff an old blanket in their kick drum to dampen them. In Drum Kit Designer, you only have to raise the dampening level.
In the right pane, drag the Dampen knob up to about 75%, and click the kick to listen to it.
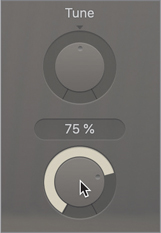
The kick’s resonance is shortened.
You will now tune the toms, which are mainly used in the bridge section.
In the workspace, select the Outro region.
In the Drummer Editor, click the Play button.
On the drumkit in the Drummer Editor, mute the kick.

You can hear only the low and mid toms.
In Drum Kit Designer, click one of the toms.
The Edit panel opens with four tabs: All (for adjusting settings of all three toms in the kit together), and Low, Mid, and High (for adjusting settings of each individual tom).
Click the Mid tab and raise the Tune knob to around –152 cent.

You can hear the mid tom being pitched down as Kyle continues repeating the outro. This accentuates the primal percussion feel of the groove.
If you want, feel free to continue exploring Drum Kit Designer and adjusting the sound of the hi-hat, ride, and crash cymbals.
In the Drummer Editor, unmute the kick.
Stop playback and close the Drum Kit Designer window.
You have exchanged the snare for another one that sounds a little clearer, dampened the kick drum to tame its resonance, and tuned the mid tom to pitch it a bit lower. You have now fully customized both the drum performance and the drum kit.
Working with an Electronic Drummer
When drum machines first made their appearance in recording studios, drummers feared for their careers. The 1980s produced a number of hit songs in which live drummers were replaced by electronic drums programmed by music producers.
However, many producers quickly realized that to program exciting electronic drumbeats, they needed to develop the chops of a real drummer, whereas others simply chose to hire drummers for this task. In more recent times, many pop music producers have freed themselves from seeking to emulate real drummer performances, expanding the range of creative drum machine uses. In Logic, you can use Drummer to create virtual drum machine performances, turning beat creation into a fast and fun exercise.
Creating Hip Hop Beats
In this exercise, you will work with one of the Hip Hop drummers, adjusting its feel to control the human quality in the timing, and later you’ll convert the Drummer region to a MIDI region to exercise complete control over each individual drum hit.
To make sure that the next drummer you choose brings along their own drum sound, you need to first verify that the padlock is no longer highlighted in the Sounds section of the Library.
In the Library, click the padlock to dim it.

In the Drummer section, choose Hip Hop > Maurice – Boom Bap.
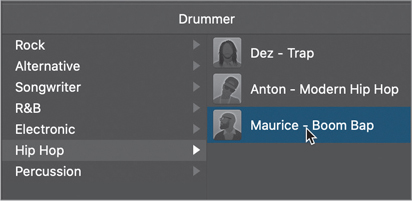
In the inspector, Drum Machine Designer (DMD) is inserted at the top of the Drummer track channel strip. The Drummer Editor updates to display drum machine samples such as kick, snare, claps, shaker, hi-hat, and percussions. On the track, all the Drummer regions are refreshed to reflect Maurice’s playing style.
Listen to a few sections.
Maurice plays a very loose, swung hip-hop groove. Your project tempo is still set to 135 bpm, but the drummer plays half-time, so it sounds like 67.5 bpm. Let’s adjust the tempo.
Tip
In Logic, Hip Hop Drummer regions automatically generate half-time patterns when the project tempo is 110 bpm or more. To play Hip Hop patterns at these fast tempos, in the Drummer Editor, click the Details button and deselect “Auto half-time.”
In the LCD display, set the tempo to 82 bpm.
The beat is a little faster. Let’s work with the verse.
Select the Drummer region in the first Verse section at bar 5, and click the Play button in the Drummer Editor.
Maurice plays a very loose, almost sloppy beat. Let’s tighten the performance.
In the Drummer Editor, click the Details button.

Turn the Humanize knob all the way down.
The groove is now machine tight.
Turn the Swing knob up to 66%.

The drummer swings a little more, making the beat bouncier. Except for the fills at the end of the fourth and eighth bars in the region, it keeps repeating a fairly similar pattern. Let’s make it vary the pattern a little more.
Turn the Phrase Variation knob all the way up.
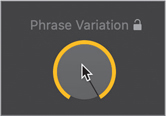
Now the beat is slightly different in every bar.
Let’s get rid of the crash cymbal on the first downbeat. Since the Drummer Editor doesn’t give you complete control over every single drum hit, you need to convert the Drummer region to a MIDI region.
In the workspace, Control-click the selected Drummer region and choose Convert > Convert to MIDI Region.

The yellow Drummer region is replaced by a green MIDI region that plays the same performance. The Drummer Editor is replaced by the Piano Roll Editor.
In the Piano Roll, the notes are represented by beams on a grid. The beams are positioned across a vertical piano keyboard that shows the MIDI note pitches. As long as your vertical zoom level is not too small, drum names are also displayed next to each key.
On the downbeat of bar 5, click the note representing the Crash cymbal (C#2).

Press Delete to delete the selected note.
The crash cymbal is no longer triggered at the beginning of the verse.
Stop playback.
You have replaced the acoustic drummer with a Hip Hop producer performing beats on a drum machine and made his playing sound tighter and more varied. Finally, you converted a Drummer region to a MIDI region to delete a single crash cymbal. In the next exercise, you’ll explore the remaining parameters of the electronic Drummer Editor.
Creating an Electro-House Track
When you are working with Drum Machine Designer, the Drummer Editor allows you to restrict the complexity range of individual samples, making it possible to have, for example, a simple kick and snare beat while another sample follows a more complex pattern.
You will now switch drummers to create an electro-house drum track, and you’ll create a ubiquitous four-on-the-floor kick and snare beat with a complex shaker pattern.
On the Drummer track, Control-click the MIDI region and choose Convert > Convert to Drummer Region.
In the Drummer region, the crash at the beginning of the region reappears. When you convert a MIDI region to a Drummer region, the region reverts to the Drummer performance you had before converting the region to MIDI.
In the Library, choose Electronic > Magnus – Big Room.
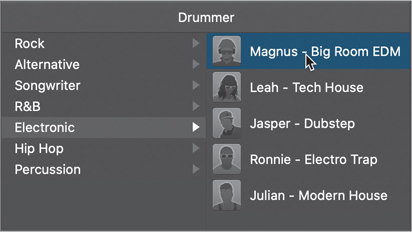
In the control bar, change the tempo to 132.
Listen to the intro and the verse.
You hear a rather straightforward dance groove. You will first work on the kick and snare beat in the first verse.
In the Tracks view, select the Drummer region in the first verse at bar 5.
In the Drummer Editor, click the Play button.
In the Drummer Editor, click the Details button to go back to the basic view, and mute the shaker, hi-hat, and handclaps.
Only the kick and snare are playing. On the upper line in the Drummer region, a secondary kick plays every bar. Let’s get rid of it.
In the XY pad, drag the puck slightly to the left until the secondary kick disappears.

Make sure you don’t drag the puck too far to the left so that the snare continues playing on beats 2 and 4 in every bar. If necessary, you can temporarily mute the kick to visually check the position of the snare hits. The kick and snare now play a classic four-on-the-floor dance beat.
In the Drummer Editor, click the Details button.
You can drag the Complexity Range sliders for each individual drum piece to offset the complexity set by the puck in the XY pad. Let’s add a shaker to the party.
Click the shaker to unmute it.
The shaker plays an eighth note pattern, with three sixteenth notes at the end of every bar. You are looking for a busier shaker groove.
Drag the shaker’s left Complexity Range slider all the way to the right.
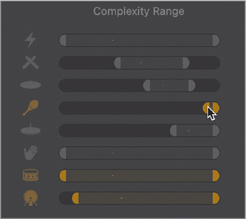
The shaker now plays the three sixteenth notes every other beat.
After exploring the Complexity Range sliders, you now have a solid understanding of all the parameters in the Drummer Editor used by electronic drummers. It’s now time to move on to the drum machine itself so that you can customize the drum sounds.
Customizing the Drum Machine Sounds
Now that you’re happy with the drummer performance, you can open Drum Machine Designer to adjust the mix, change the snare sample, tune it, and add some reverb.
At the top of the Big Room channel strip, click the Drum Machine Designer plug-in slot (DMD).

The Drum Machine Designer interface opens.

The Drum Machine Designer interface consists of two parts:
The Grid has pads to select and trigger individual kit pieces.
The Smart Controls / Plug-in pane gives access to global kit parameters and individual pad parameters. Click the kit name pad at the top to adjust global effects and control settings for the entire kit. Click any kit piece pad to adjust individual kit piece settings.
In the Grid, click the Shaker 1 pad.

Note ▶
At the bottom of the Drum Machine Designer, if you see a waveform display instead of knobs, click the Pad Controls button at the lower right of the kit piece pads to continue this exercise.
The shaker pad is selected, and the shaker parameters are displayed in the Smart Controls pane below. In the inspector, the right channel strip updates to display the Shaker 1 — Big Room channel strip, and the Library displays shaker patches.
Tip
To trigger Drum Machine Designer from your iPad, in Logic Remote tap the View menu and then tap Drum Pads. (You will learn how to use the Logic Remote app in Lesson 6.)
In the Smart Controls pane, drag the Volume knob up a bit.
The shaker sounds a little louder.
Turn up the Tone knob.
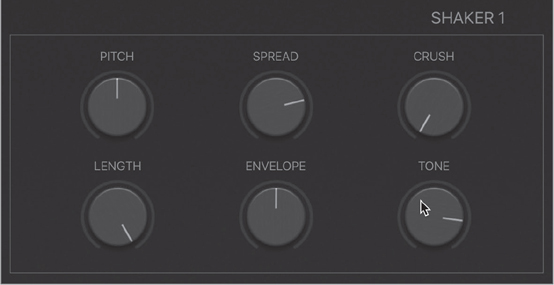
The Tone knob controls the Channel EQ plug-in on the Shaker 1 — Big Room channel strip, and the shaker sounds thinner. On the EQ display at the top of the channel strip, you can see more of the low frequencies being cut off.

Tip
To open the plug-in that a Smart Controls knob is mapped to, Control-click the knob and choose Open Plug-in Window.
Let’s have a look under the hood at how the shaker sound is produced. Note that at the top of the Shaker 1 — Big Room channel strip, the instrument producing the shaker sound is a Quick Sampler. You can access the Quick Sampler plug-in’s parameters directly in Drum Machine Designer.
At the top of the Smart Controls pane, click the Q-Sampler Main button.
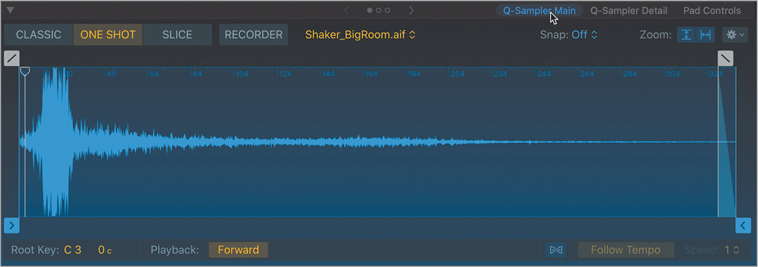
The pane shows the Quick Sampler Waveform display editor, and you can see the waveform of the Shaker_BigRoom.aif sample being triggered by the selected pad.
At the top of the Q-Sampler Plug-in pane, click the Q-Sampler Detail button.

The pane shows the Quick Sampler synthesis parameters for Shaker 1.
More Info ▶
You will learn how to use Quick Sampler in Lesson 5.
At the top of the Q-Sampler Plug-in pane, click the Pad Controls button.
You can see the Smart Controls for the selected pad.
You will now swap the snare sound for another snare.
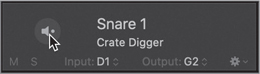
In the Grid, click the Snare 1 cell.

The Snare 1 cell is selected, and the Smart Controls update to display knobs affecting that cell. In the inspector, the right channel strip updates to display the Snare 1 — Big Room channel strip. The Library shows snare kit piece patches, and the Snare 1 — Big Room patch is selected.
In the Snare 1 cell, click the S button.

The snare is soloed.
In the Library, in the Snares folder, choose Snare 1 – Atlanta.

You hear the snare you just selected. In Drum Machine Designer, the cell displays the new patch name.
Tip
To use your own sample, drag the sample onto the desired Drum Machine Designer pad.
In Drum Machine Designer, click the S button in the Snare 1 pad to turn solo off.
Continue previewing different snare patches in the Library until you find one you like.
Tip
To trigger a sound in Drum Machine Designer, you can click the speaker icon that appears when your pointer is over a kit piece pad.
Let’s make that snare sound like it’s in a huge room.
In the Smart Controls pane, turn up the Reverb knob.

The snare sounds huge!
More Info ▶
You will learn how to record knob movements as automation to make sounds change over time in Lesson 10.
You have adjusted the volume of the shaker, changed its tone to thin it out, had a quick look at Quick Sampler—which you will explore in Lesson 5—swapped the snare drum patch, adjusted its sound, and added more reverb to it to get the sound you wanted.
You have produced drums for a whole song, in different genres, and you’ve learned many ways to edit the drummer’s performance and change the feel. You also customized drum kits to get your desired sound. With Drummer, Drum Kit Designer, and Drum Machine Designer, Logic Pro X allows you to quickly lay down a rhythmic foundation for a wide range of modern music genres.
Key Commands
Keyboard Shortcuts
Main Window |
|
|---|---|
B |
Opens the Smart Controls |
G |
Opens the global tracks |
Command-Shift-N |
Opens a new file without opening the Templates dialog |
Option-G |
Opens the Global Tracks Configuration dialog |
E |
Opens the Editors area |
Y |
Opens the Library |