
Lesson 5. Sampling Audio
Lesson Files: Logic Book Projects > Media > Just Like This Vocal.wav
Logic Book Projects > 05 Sample Feast
Time: This lesson takes approximately 60 minutes to complete.
Goals: Import audio files into Quick Sampler
Record audio into Quick Sampler
Edit sample start, end, and loop points on the waveform display
Turn a sustained vocal note into a pad synthesizer sound
Import a drumbeat and slice it into individual drum hits
Modulate sample pitch and volume with LFOs and envelopes
Splice different audio regions into a sound collage
Use a vocal recording to produce vocal chops
Shortly after the first analog tape recorders appeared around 1935, composers started using the recording medium as a compositional tool—manipulating the audio playback using reverberation and echo; using voltage control devices that changed the tape speed and thus altered playback speed and pitch; and using punch recording to splice different sounds together. Throughout the following decades, electroacoustic composers—and later pioneering electronic musicians—fascinated by the new unique sounds they could come up with, continued exploring audio transformation techniques involving recording devices to stray away from the classic acoustic instrument sounds of composers from past centuries.
In 1988, Roger Linn designed the AKAI MPC60, which quickly became the most legendary sampler and had a major impact on hip-hop music. The iconic MIDI sampler made it easy to trigger patches by finger drumming on its built-in square pads, while recording the performance onto its built-in sequencer. Today, you would be hard-pressed to find a music genre where sampling isn’t used.
In this lesson, you will explore Quick Sampler, a new Logic Pro X software instrument plug-in. You will import a finger snap and record a hand clap, and then turn a sustained vocal note into a pad synthesizer sound. You will slice a drum loop, shortening the volume envelope of the individual slices, and add a gritty filter to give it a low-fidelity sound. You’ll splice loops together to combine notes from different instruments into a composite melody, creating an exhilarating rhythmic sound collage. Finally, you will edit samples into an effect called vocal chops.
Always consider the source of your sampling, and if any of that material is copyrighted, make sure you thoroughly research sample clearance. Two easy ways to avoid worrying about potential legal issues are to sample your own instruments or noises around you, or to sample the royalty-free Apple Sound Library content that you downloaded along with Logic Pro X (such as software instruments or Apple Loops).
Sampling Single Notes
The easiest way to use samples in your productions is to import or record a single note into Quick Sampler and then trigger that single note from your MIDI keyboard. In Quick Sampler, you can modulate the sample’s pitch to give it a vibrato effect, adjust the volume envelope, and loop a section of the sample so that you can sustain its sound.
Importing Audio in Quick Sampler and Selecting a Mode
In this exercise, you will use an Apple Loop of finger snaps to create a Quick Sampler instrument so that you can trigger the audio file using your MIDI controller keyboard. To get started with a rhythmic reference, you’ll first import a loop to create a drum track.
Choose File > New (or press Command-N).
An empty project is created, and the New Track dialog opens.
In the New Track dialog, select Audio, and click Create (or press Return).
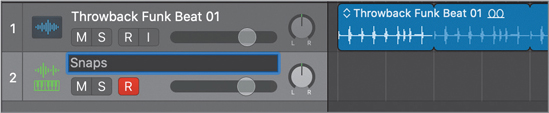
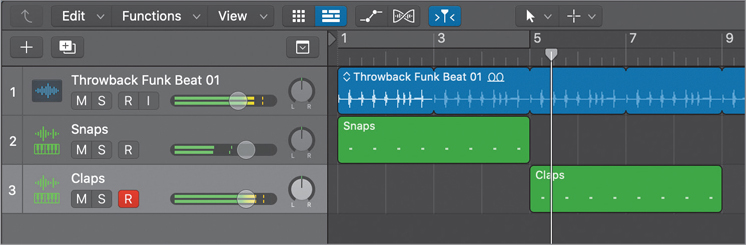
Open the Loop Browser, find Throwback Funk Beat 01, and drag it to the audio track at bar 1.

In the Region inspector, click the Loop checkbox (or press L).
In the workspace, the audio region is looped throughout the project. Now let’s create a new track for Quick Sampler.
At the top of the track headers, click the + button (or press Command-Option-N).
In the New Track dialog, choose Software Instrument, make sure the Instrument pop-up menu is set to Empty Channel Strip, and click Create (or press Return).
Click the Instrument slot, and choose Quick Sampler (Single Sample).
In the Loop Browser, search for bounce snap.

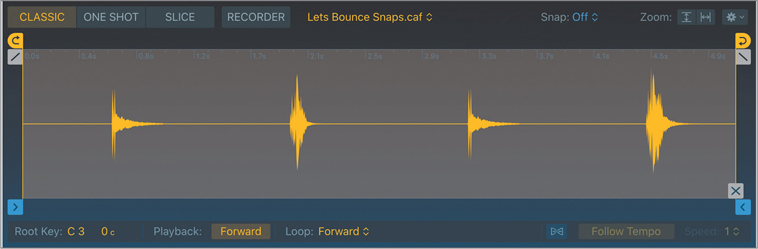
Drag Lets Bounce Snaps to the waveform display in Quick Sampler.
In the waveform display, two areas appear (Original and Optimized).
Drop the file onto Original.

The audio file is imported into Quick Sampler, and its waveform is displayed. Below the waveform display on the left, the root key is C3.
Tip
You will trigger samples using specific note pitches throughout this lesson. If you need to see incoming MIDI note pitches in the MIDI input activity monitor, click the small arrow to the right in the LCD display and choose Custom.
Play a C3 on your keyboard.
In Classic mode, the sample plays back while you hold down the key on your keyboard and stops playing when you release the key. Play a C3, and hold down the key for a while. The audio file starts with silence and contains four finger snaps. To turn it into a playable instrument, in the next exercise you will adjust the start and end markers so that a C3 note immediately triggers a single finger snap.
Play notes other than C3 on your keyboard.
The sample is transposed chromatically across the keyboard, according to the pitch of the note you play. Higher pitches make the sample play back faster, and lower pitches make it slower, much like classic samplers, and also like the results you’d get from manipulating the speed of analog tape or a turntable. You will change that behavior for other samples later. For this finger snap sample, you’ll play only C3 notes to trigger the sample at its original speed and pitch.
To avoid having to hold down the key for the whole duration of the sample, you will use the One Shot mode.
Click One Shot.

Play a C3.
In One Shot mode, the sample plays back from the start marker to the end marker, even if you release the key earlier. This mode is adapted for drum sounds, as you can trigger drum hits with pads or drum controllers that send very short notes, and still play the full duration of the drum sample.
Tip
To stop a sample from playing back in One Shot mode, turn the Quick Sampler plug-in off and on, or press the Space bar twice to start and stop playback.
You have created your first sampler instrument with a finger snap sample and selected the One Shot mode. You are now ready to start editing the portion of the sample you want to play back in the waveform display.
Editing Markers in the Waveform Display
When editing a drum sample, it’s crucial to make sure the sample starts playing exactly when you trigger it. You will now use the waveform display in Quick Sampler to precisely adjust the start and end marker locations, making sure only the fourth finger snap on the waveform is triggered. Don’t worry about finding the perfect position right away. You will later zoom in to readjust the start marker position with more precision.
In the waveform display, drag the start marker to beginning of the last finger snap.
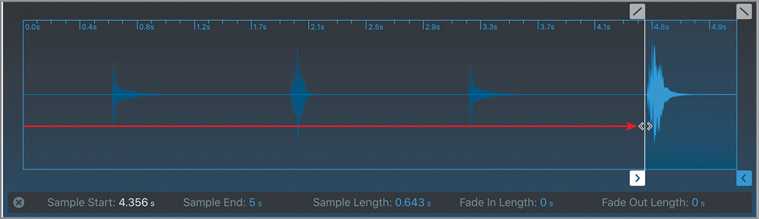
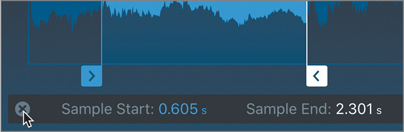
Below the waveform display, parameters and values related to the current action are displayed.
Play a C3.
This time only the fourth finger snap plays.
Drag the end marker a little closer to the end of the waveform.

You will now zoom in on the waveform between the start and end marker.
At the upper right of the waveform display, click the Zoom horizontal button.
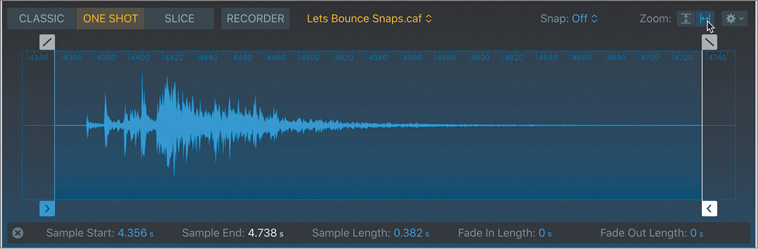
The zoom level is optimized to show the area between the sample start and end markers. To help positioning the start marker exactly at the beginning of the finger snap sound, you can make the markers snap to transients.
At the upper right of the waveform display, click the Snap pop-up menu and choose Transient+Note.

Drag the start marker toward the beginning of the waveform.
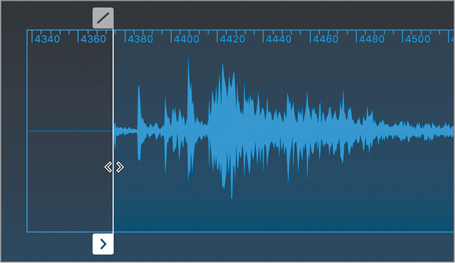
The start marker snaps precisely to the first transient on the waveform.
Play a C3.
The sample is triggered right away. Your sampler instrument is now ready to be played!
Adjusting the positions of sample start and end markers lets you determine exactly which portion of an audio file you want to trigger when playing your keyboard, and it represents the foundation of creating a quality sampler instrument. Using Quick Sampler’s zoom and snap functions, you were able to get the job done efficiently and can now focus on the performance.
Recording a MIDI Region to Trigger Samples
You will now put the recording chops you acquired in the previous lesson to good use and record a very simple finger snapping performance. You will play a finger snap on the second and fourth beat of each bar throughout the first five bars of this project to double the snare in the drum loop on Track 1. Let’s open the Piano Roll to see the notes you record.
In the control bar, click the Editors button (or press P) to open the Piano Roll.

Regions recorded on a track are assigned the track name, so it’s always a good idea to give your track a descriptive name before you start recording.
In the Inst 1 track header, double-click the track name, and then enter Snaps.
When using only Apple Loops and MIDI regions, as is the case so far in this project, don’t hesitate to lower the tempo as needed to make it easier to perform what you’re recording.
In the LCD display, lower the tempo down to 107 bpm.

In the control bar, click the Record button (or press R).
You get a four-beat metronome count-in, the playhead reaches bar 1, and the drum loop starts playing back.
Play a C3 on beats 2 and 4 of every bar until the playhead reaches bar 5.

In the control bar, click the Stop button (or press the Space bar).
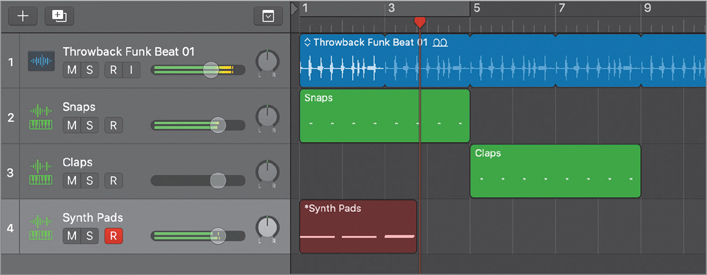
Recording stops, and you have a four-bar green MIDI region on the Inst 1 track. To make the rhythm track, you’ll quantize your recording. If you’re unhappy with your performance, choose Edit > Undo Recording (or press Command-Z) and try again!
In the Region inspector, click the Quantize pop-up menu, and choose 1/4 Note.
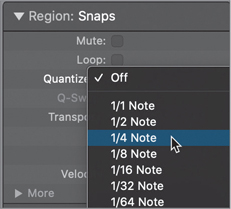
In the Piano Roll, the notes snap to the nearest beat.
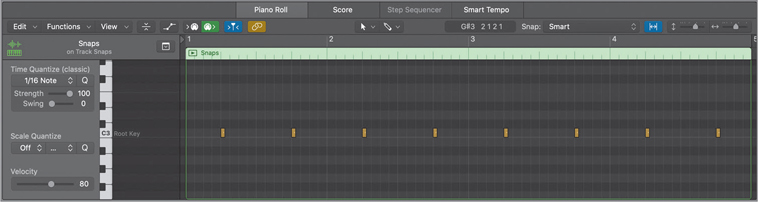
Listen to your recording.
The finger snaps double the snare drum, bringing energy and a human character to the beat.
Modulating the Sample’s Pitch
To make the snaps a bit more human sounding, you will now modulate their pitch. In Quick Sampler, you’ll use a low-frequency oscillator (LFO) to generate a random signal and route it to the pitch parameter so that each note triggers the finger snaps sample at a slightly different pitch.
Now that you have a MIDI region on the Snaps track to trigger your samples, you can click the play button in the Piano Roll to cycle through the MIDI region in Solo mode, allowing you to give your full attention to the sample’s sound while you adjust the parameters in Quick Sampler.
In the Piano Roll, click the Play button.

Cycle mode and Solo mode are on, and the MIDI region plays back. In Quick Sampler, you will route LFO 1 to the pitch.
In the lower section of Quick Sampler, click the Mod Matrix tab.

The Mod Matrix opens, and you can assign up to four routings. You could choose a controller such as the modulation wheel as the source and the pitch as a target, to control the pitch with your modulation wheel. However, in order to create an automatic random pitch modulation, you’ll route an LFO to the pitch, and then set the LFO to produce a random control signal.
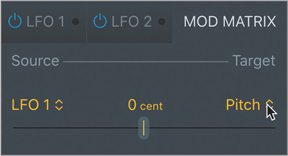
On the first matrix, click the Source pop-up menu and choose LFO 1.

Click the Target pop-up menu and choose Pitch.
To clearly hear the modulation you’re routing, you can exaggerate the amount of modulation for now. Once you are satisfied that you’ve successfully set up your modulation routing and are getting the desired effect, you can dial the Amount slider back down to a more reasonable value.
Drag the Amount slider all the way up to 1200 cents.

In the Pitch section, an orange ring appears around the Coarse knob that represents the modulation range. A white dot shows the current value for the Coarse knob, determined by the value sent by LFO 1. Let’s make sure LFO 1 generates a random signal.
Click LFO 1.

Click the Waveform pop-up menu and choose Random.
Each finger snap is triggered at a random pitch within a wide range of pitch modulation. Let’s now bring that range to a more subtle value.
Click the Mod Matrix tab.
In the LFO 1 to Pitch assignment, drag the Amount slider down to around 140 cents.
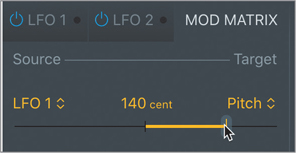
The pitch modulation is quite subtle now, making each finger snap slightly different sounding than the previous one.
Close the Quick Sampler plug-in window.
Stop playback.
You’ve assigned a low-frequency oscillator with a random waveform to modulate the pitch of the sampler in subtle amounts. That pitch randomization is just enough to make the sampled finger snaps sound a bit more human.
Recording Audio in Quick Sampler
You will now create a new software instrument track and record your own handclap sample directly into Quick Sampler. You’ll then copy the MIDI region you recorded for your finger snaps to the new track so that you can trigger your hand clap sample using the same note sequence. For this exercise, you will need to make sure the correct input device is selected in Logic’s audio preferences, the same way you did in Lesson 4.
At the top of the track headers, click the + button (or press Option-Command-N) and create a new software instrument track.
In the instrument slot, insert Quick Sampler.
Above the waveform display, click the Recorder button.
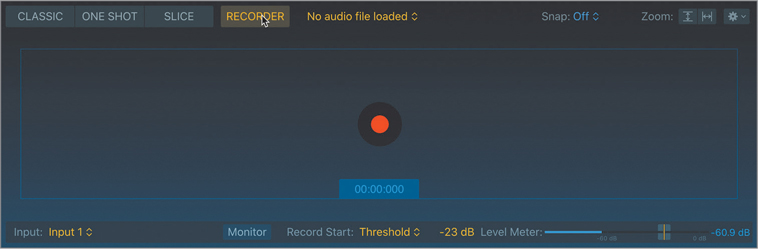
A record button appears in the middle of the waveform display. To the lower left of the waveform display, make sure the input where you’ve connected your microphone is selected from the Input pop-up menu. To use your Mac computer’s built-in microphone, use Input 1.
Tip
To record the output of a track in real time into Quick Sampler, choose the desired track from the Input pop-up menu.
Tip
To monitor the audio signal you’re recording, click the Monitor button below the waveform display.
Below the waveform display, the Record Start pop-up menu is set to Threshold. After you click the record button on the waveform display, Quick Sampler waits for the audio signal at the selected input to reach the threshold set by the slider on the Level Meter slider.
Clap your hands a few times and, if needed, adjust the Level Meter slider.

Watch the Level Meter. The input signal level should reach above the Level Meter slider position when you clap your hands. Make sure the peak value displayed to the right of the Level Meter does not turn red, which would indicate you’re clipping the signal. If needed, adjust the input gain on your audio interface.
Tip
When using your Mac computer’s built-in microphone, to adjust the input gain, choose Apple menu > System Preferences, click the Sound icon, click the Input button, and adjust the Input volume slider.
In the waveform display, click the Record button.
Quick Sampler is waiting for the input level to reach the threshold set by the Level Meter slider to start recording.
Clap your hands once.
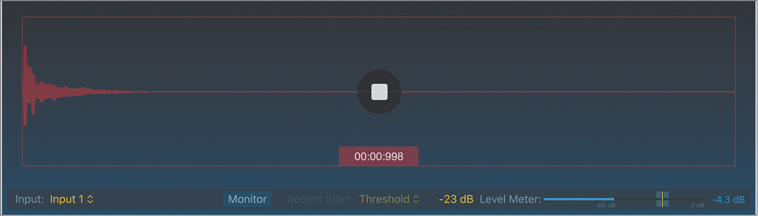
If all went well, you can see a waveform for your hand clap, and the peak detector to the right of the Level Meter does not go red. If your clap wasn’t loud enough, the recording doesn’t start, and you can clap again, louder this time. If your clap was too loud, the peak detector turns red; you can click the peak detector to reset it, click the stop button in the waveform display, and try again.
In the waveform display, click the Stop button.
The recording stops, and your sample is ready to be triggered.
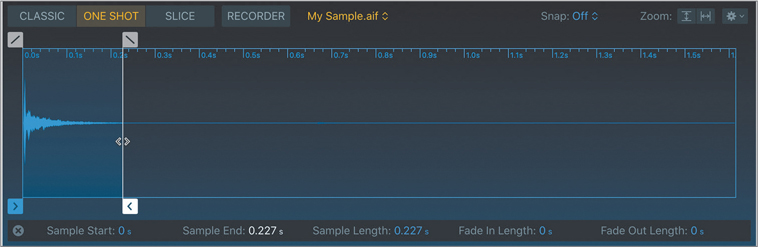
Above the waveform display, click the One Shot button.
Since Quick Sampler started recording exactly when you clapped your hands, the start marker is at the right position.
Drag the end marker toward the end of your clap sample.
In the Tracks view, Option-drag the MIDI region from the Snaps track to the Claps track at bar 5.

Let’s rename the new Quick Sampler track and region.
On the Inst 2 track (Track 3), double-click the name and enter Claps.
In the Tracks view menu bar, choose Functions > Name Regions/Cells by Track Name (or press Option-Shift-N).
The selected region on the Claps track is renamed Claps.
Listen to your claps.
Note ▶
If you’re happy with a Quick Sampler instrument that you made in this lesson, save it as a patch in the Library as you learned in Lesson 3.
Close the Quick Sampler plug-in window.
Don’t hesitate to use the volume sliders in the track headers to readjust the balance between the drum loop on Track 1 and the Snaps and Claps tracks.
Handclaps are easy and fun to record. If you’re not alone, try sampling a group of people clapping together. Don’t limit yourself to finger snaps and hand claps. When Trevor Horn recorded the 1980s hit song “Relax” by Frankie Goes to Hollywood, he recorded the whole band jumping into the pool, and you can hear the resulting samples play toward the end of the song! Just look around you and experiment with whatever inspires you. Try stomping on plastic cups, punching cardboard boxes, shredding paper, and so on. All these sound effect samples can add great texture to your beats.
Creating a Quick Sampler Track Using Drag and Drop
For the intro, you will turn a vocal recording into a pad synthesizer instrument so that you can play melodies or chords with your keyboard. This time you will speed up the process of importing an audio file in Quick Sampler by using the shortcuts that appear when dragging an audio file directly to the empty space below the track headers.
In the Loop Browser, search for inara.
Preview Inara Lyric 03.

The loop’s key is F; however, it’s currently previewed in the project key (C). It sounds unnaturally low.
In the Loop Browser, click the action menu at the bottom left, and choose Play in Original Key.

Inara’s vocals sound more natural. Let’s import that loop into Quick Sampler.
Drag Inara Lyric 03 to the empty area below the track headers.

A menu opens, giving you choices to create a new track.
In the menu, choose Quick Sampler (original).
A new software instrument track is created with Quick Sampler in the instrument slot, and the audio file you dragged is imported in Quick Sampler. Quick Sampler recognized multiple notes in the audio file and determined it was appropriate to use Slice mode; however, you’ll switch to a Classic mode in the next exercise to play a single-note sample.
Dragging audio files from the browsers, the workspace, or the Finder to the empty area below the track headers saves you the tedious work of creating a new track and inserting the Quick Sampler plug-in every time you want to experiment with sampling something.
Looping Sample Playback to Sustain Sound
When sampling material that you want to turn into a software instrument to play melodies or chords, you can loop a section of the sample. A sample loop keeps repeating until you release the key, allowing you to sustain the sample as long as you want.
To loop samples in Quick Sampler, you must choose Classic mode.
In Quick Sampler, click the Classic button.
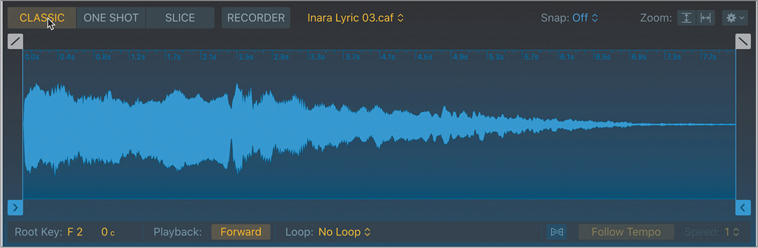
To the lower right of the waveform display, the root key is F2.
Play an F2 note, and then play different notes on your keyboard.
The entire vocal sample plays back, transposed according to the note you play. You will adjust the start and end markers so that a single note plays back.
Drag the start marker to the beginning of the second note in the sample (around 0.600 s).
Drag the end marker to the end of the same note (around 2.300 s).
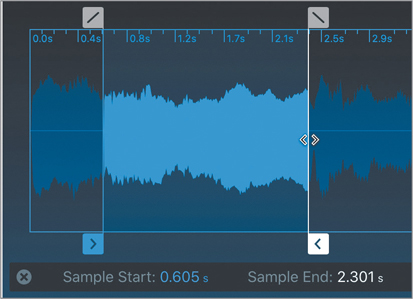
Play a note.
Now only the note between the start and end markers plays. If you continue holding down a key, the note still stops when the Quick Sampler playhead reaches the end marker. Let’s create a loop section. Since you adjusted marker positions, the parameter display bar below the waveform display is hiding the Loop mode pop-up menu, so let’s close it.
You may notice that the section of the sample you chose to trigger is actually not an F note. You will later tune your instrument to make sure it plays the correct pitches.
Below the waveform display, click the X to the left of the parameter display bar.
The parameters revert to the default view, and you can see the Loop parameter.
Click the Loop mode pop-up menu, and choose Forward.

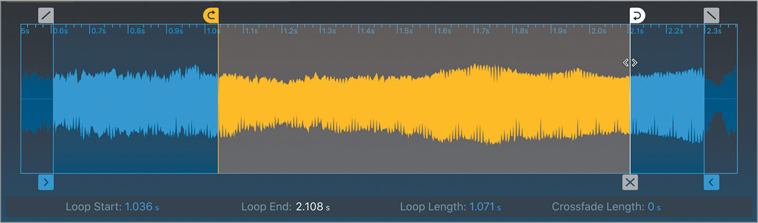
In the waveform display, yellow loop start and end markers let you set the loop boundaries. The loop section between the loop markers is yellow.
At the upper left of the waveform display, click the Zoom horizontal button.

Adjust the loop start and end markers.
Continue playing an F2 note while you adjust parameters in Quick Sampler. The goal is to have the loop sound as seamless as possible. Unless you’re lucky, you’re probably hearing a popping sound as the playhead skips from the loop end marker to the loop start marker. There are a few tools in Quick Sampler that can help that situation.
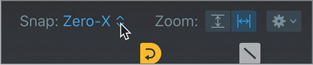
First, you can snap your markers to zero crossings, positions where the waveform crosses the horizontal zero line in the middle of the waveform.
Click the Snap pop-up menu and choose Zero Crossing.
Continue adjusting the loop markers. You should hear less of a popping sound. To make the loop sound even smoother, you can use the Alternate loop mode, which plays the loop alternatively from the loop start marker to the loop end marker, and then from the loop end marker to the loop start marker.
Move the pointer away from the loop markers to see the default parameters below the waveform display. Click the Loop mode pop-up menu, and then choose Alternate.

Playback no longer jumps from the loop end marker to the loop start marker, making the loop more even. You can probably still hear some skipping at the loop start and end markers, but for now, try to focus on having the pitch and amplitude of the note sound fairly continuous. Once you’re happy with your loop section, you can further polish the loop using a crossfade at the loop start and end markers.
Drag the crossfade marker to the left to create a crossfade at the loop start and end points.

Adjust the length of the crossfade so that the popping sound disappears and the loop sounds smooth. You may need to readjust your loop start and end marker positions.
Tip
In the waveform display, move your pointer in between the loop start and end markers and drag left or right to move the entire loop section.
Finding the right position for a sample loop can take finessing and experimentation, so take your time and keep trying.
Play and sustain a chord on your keyboard.
This sampler instrument still retains the original timbre of Inara’s voice, but now you can play it like a synthesizer on your keyboard!
Finding the best positions in an audio file for your sample start, sample end, loop start, and loop end markers is the foundation of good sampling. Ultimately, not all audio files will give you good-sounding results when looped. As you acquire more experience, you’ll get better at recognizing parts of recordings that will work when sampled by listening but also by looking at the waveform, and you’ll get faster at editing the samples.
Modulating Samples with LFOs and Envelopes
Now that you’ve turned audio material into a sampler instrument, you can use the modulation section in the lower section of the Quick Sampler interface to affect different playback parameters. You will adjust the amp envelope to give your vocal a soft, slow attack and a long release, turning the instrument into a synthesizer pad. You will then record long sustained chords to lay down the background harmony while adding texture. Then you’ll modulate the pitch of the samples to create a vibrato effect.
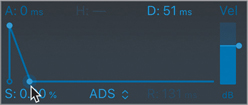
At the bottom of the Amp section, the envelope display lets you control how the level changes over time when a sample is triggered. The selected envelope type, ADSR, stands for Attack, Decay, Sustain, and Release—the four segments that determine the shape of the envelope.
At the bottom of the Amp section, move the pointer over the Attack handle (the first point in the envelope display).

The Attack field (A) is highlighted.
Drag the point toward the right.

Tip
To adjust a handle numerically, drag its corresponding field vertically, or double-click the field and enter a value.
To check your work, keep playing an F2 note after adjusting parameters in Quick Sampler. The Attack segment is slopped, and the samples fade in slowly rather than starting abruptly. Try different attack lengths, and finally settle for around 400 ms.
At the lower right of the envelope shape, drag the Release handle to set the release to around 600 ms.

The sound takes 600 ms to fade out when you release keys on your keyboard, almost like the sound of a reverb tail. This soft envelope is great for a pad sound. Let’s dial in a vibrato effect.
Click the Mod Matrix tab.
On the first routing, click the Source pop-up menu and choose LFO 1.
Click the Target pop-up menu and choose Pitch.
Drag the Amount slider to around 500 cents.

In the Pitch section, note the orange ring around the Coarse knob, representing the range of pitch modulation applied by your routing.
Play a few notes on your keyboard.
You can hear a very wide pitch range vibrato—it sounds like a siren! A white dot moves around the Pitch knob to indicate the pitch in real time. Let’s dial in a more reasonable pitch range.
In Mod Matrix, drag the Amount slider to 110 cents.

That is still a fair amount of vibrato. When you listen to and observe classical string players, they often attack a note with a constant pitch at first, and start applying vibrato with an increasing pitch range as the note is sustained. To reproduce this effect, you will apply a delay to LFO 1.
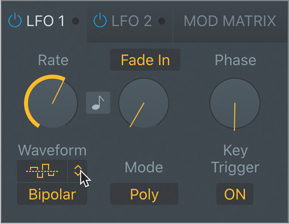
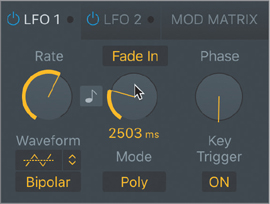
Click the LFO 1 tab.
Drag the Fade In knob to around 2500 ms.
Before you start recording, you need to tune the instrument. When you play an F2, you hear a G2 instead, so let’s fix that.
At the lower left of the waveform display, set the root key to G2.

Let’s rename the track and record some chords.
On the Inara Lyric 03 track header, double-click the name and enter Synth Pads.
Record one-bar long notes or chords from bar 1 to bar 5 to lay down a harmony in the intro section.
You are just experimenting for now, so feel free to play any notes you want. However, if you can, keep all melodies and chords you record in this lesson in the key of C minor, and you will later be able to arrange all your tracks together into a cohesive song.
If needed, use the Quantize pop-up menu in the Region inspector to correct the timing of your performance. If some of the notes need to be edited, open the Piano Roll to drag the notes to the desired position or pitch. Don’t hesitate to readjust Quick Sampler settings to your tasting, adjusting the attack or release of the Amp envelope, and the amount or delay of vibrato. In the inspector, feel free to add audio effect plug-ins to the Synth Pads channel strips.
Close the Quick Sampler plug-in window.
You have explored several methods for sampling single notes. You have imported a finger snap audio file, recorded your own hand claps, and sampled a vocal note to turn it into a new software instrument. In the process, you’ve gained familiarity with Quick Sampler—using the Mod Matrix to route LFO to pitch, adjusting the Amp envelope, adjusting sample start and end markers, and creating a loop and making sure it cycles smoothly.
Sampling and Slicing Drums
Bringing an audio file into Quick Sampler allows for sound manipulation that opens new horizons. When you import a drum loop, Quick Sampler detects the transients and Slice mode is automatically selected. Each drum hit is separated into a slice and mapped to a note pitch so that it can be triggered by a specific key.
You will use the Throwback Funk Beat 01 drum loop on Track 1 to create a new sampler instrument track that you can use for the song intro. You will shorten the individual slices with the Amp envelope, give the loop a lo-fi (low-fidelity) sound with a distorting filter, and reprogram the MIDI note sequence in the Piano Roll to switch around the pattern a bit.
On Track 1, click the Throwback Funk Beat 01 drum loop to select it.
To import only one loop in Quick Sampler, you will temporarily turn the looping off.
In the Region inspector, deselect Loop (or press L).
Drag the Throwback Funk Beat 01 region on Track 1 to the empty area at the bottom of the track headers and choose Quick Sampler (Original).


A Quick Sampler track is created, and Quick Sampler opens in Slice mode. Slice markers are positioned at each detected transient on the waveform display. Below the waveform display, MIDI note pitches are assigned to each slice, starting on C1 and ascending chromatically.
Tip
You can click the waveform display to create a slice marker, drag a slice marker to move it, and double-click a slice marker to delete it.
Rename the new track Sliced Drums.
On your keyboard, play some of the notes assigned to the sample slices.
For each note you play, the corresponding slice is triggered. First, you will re-create the note pattern that triggers the entire original loop on the track.
Control-click the waveform display away from a slice marker, and choose Copy MIDI Pattern.
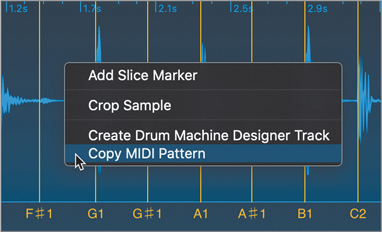
The MIDI pattern is stored in the clipboard, ready to be pasted.
In the control bar, click the Go to Beginning button (or press Return).
In the workspace, on the Sliced Drums track, Control-click in bar 1, and choose Paste (or click the Tracks view to give it key focus, and then press Command-V).
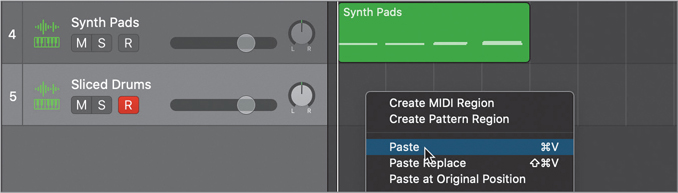
A MIDI region is created on the track at the playhead position.
Double-click the MIDI region.
The Piano Roll opens, and you see the pattern of chromatically ascending notes that trigger the successive slices in Quick Sampler.
At the upper left of the MIDI region in the Piano Roll, click the Play button.

In Quick Sampler, the slices are triggered in succession, and it sounds just like the original loop. You are now ready to start mangling this drum loop to give it the lo-fi treatment that will give you an intriguing sound for the song intro. Keep the loop playing while you tweak its sound. First, let’s shorten the envelope of each slice to give the loop a muffled, cut-up sound.
In Quick Sampler, on the envelope display at the bottom of the Amp section, drag the Decay handle to set Sustain to 0% and Decay to 20 ms.
Each drum hit is cut up, as if it was harshly gated, giving a bouncy, staccato feel to the loop. You will now further distort the loop using a filter.
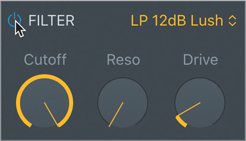
In the Filter section, click the On/Off button.
Drag down the Cutoff knob to around 63%.
Some of the high frequencies are filtered, and the loop sounds are muffled.
Drag up the Drive knob to around 50%.
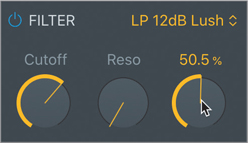
The filter is overdriven, and the loop sounds slightly distorted and punchy. To give the loop a more mid-rangey sound, you’ll use one of the band pass filters.
Click the Filter mode pop-up menu and choose BP 6dB Gritty.
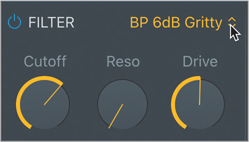
The loop sounds small and lo-fi, and the kick drum is quite distorted. Use the Filter On/Off button to compare the sound of your sampled drums with and without filtering.
You will quickly rearrange the regions in your workspace to create an intro section.
Press the Space bar to stop playback.
Close the Quick Sampler plug-in window.
On the Slice Drums track, loop the MIDI region once so it lasts for four bars (from bar 1 to bar 5).

On the Throwback Funk Beat 01 track (Track 1), drag the Throwback Funk Beat 01 region to bar 5.

In the Region inspector, select Loop (or press L).
The Throwback Funk Beat 01 region on Track 1 is looped.
Listen to your intro.
From bar 1 to bar 5, the sliced drum loop introduces the beat with a small, lo-fi sound punctuated by your finger snap samples. The small drums leave ample sonic room for the pad sound that you sampled from Inara’s voice. At bar 5, the full-sounding drumbeat takes over. The use of a filtered drum loop in the intro makes the original drum loop sound bigger by contrast when it kicks in.
Resequencing Drum Slices in the Piano Roll
On the Sliced Drums track, in Quick Sampler, each slice of the drum loop is triggered by different MIDI notes. That means you can now change the pitches of the notes in the Piano Roll to switch the beat around while keeping the same rhythm.
On the Sliced Drums track, click the MIDI region to select it.
The Piano Roll opens, and you see the MIDI notes that trigger the drum slices.
In the Piano Roll, on the keyboard on the left, click a key next to a slice number label.

The corresponding slice plays. Let’s use key commands to select different notes in the Piano Roll and transpose them. You will press the Left Arrow or Right Arrow key to select the previous or next note, and Option-Up Arrow or Option-Down Arrow to transpose the selected note up or down by one semitone.
Click the first note.

The corresponding slice plays.
Press the Right Arrow key a few times.
With every key press, the next note to the right is selected, and the corresponding slice plays.
Use the Left Arrow and Right Arrow keys to select the second note.
Press Option-Up Arrow.

The selected note is transposed one semitone up.
At the upper left of the region in the Piano Roll, click the Play button.
The MIDI region plays in Cycle and Solo modes. You hear your new pattern with two successive snares at the beginning of the loop. The note is deselected.
Click any note to select it.
Continue using the same key commands to navigate from one note to the next and transpose some of the notes so that they trigger the desired slice.
Tip
Press Shift-Option-Up/Down Arrow to transpose a note up or down one octave (12 semitones).
Stop playback.
Listen to the intro leading into the next section.
You created a Quick Sampler track to slice the main drum loop of your song. You distorted its sound, shortening the envelope and filtering the loop, and then reordered the individual drum loop slices in the Piano Roll to customize the loop and make it your own. Sampling existing material from the current song to transform it and make it sound different is an efficient way to come up with new, interesting parts for different song sections.
Transposing a Sample While Keeping It Synced to the Project Tempo
Sometimes you hear a recording and fall in love with the sound of an instrument. Unfortunately, the instrument is playing a melody that doesn’t work for your song, or you have a better idea for what you would have done, if only you could have access to the original instrument. That’s exactly what sampling can help you achieve.
In this exercise, you’ll sample an arpeggiated bass synth and turn it into a Quick Sampler instrument, making sure the arpeggiated notes play at the song’s tempo no matter what pitch they’re transposed to.
In the Loop Browser, search for Alpha Matrix Bass.
Drag Alpha Matrix Bass to the empty area at the bottom of the track headers and choose Quick Sampler (Original).
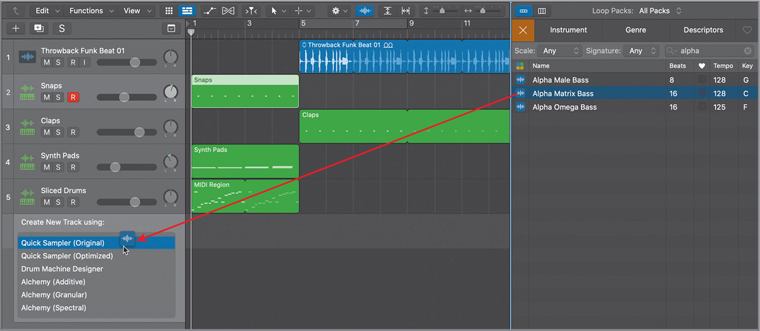
A new Alpha Matrix Bass track is created, and Quick Sampler opens with the Alpha Matrix Bass loop loaded.
At the upper left of the waveform display, click the Classic button.

Play different keys on your keyboard.
The root key of the sample is C2. If you play a C2, you hear the original pitch and speed. If you play a note above C2, the sample is pitched up and sped up. If you play a note below C2, the sample is pitched down and slowed down. Let’s make sure the playback speed doesn’t change when playing different notes.
Below the waveform display, click the Flex button.

Play the project from the beginning, and exactly on the first downbeat of bar 5, play and hold down a C2 note, and then try playing other notes on downbeats.
All notes play at the same tempo. Because the Follow Tempo button next to the Flex button is on, the arpeggiated notes play at the project tempo and are in sync with the Throwback Funk Beat 01 drum loop.
Let’s create a short loop section so that each key triggers only a small section of the original Alpha Matrix Bass loop.
Stop playback.
Below the waveform display, click the Loop mode pop-up menu, and choose Forward.
The yellow loop markers are displayed and the waveform is yellow.
Above the waveform display, click the Snap pop-up menu, and choose Beat.

With the loop markers snapping to the nearest beat, it’s now easy to create a loop that has an exact number of beats.
Drag the loop end marker to Beat 3.
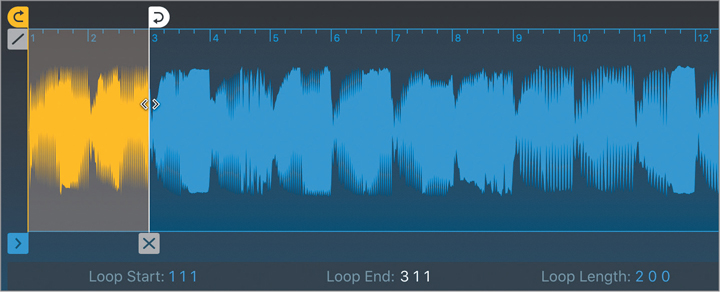
The loop keeps repeating the same four notes on the same pitch. With this type of sound, and because you’re synced to the project tempo and snapping to the beat, there’s no need to add a crossfade. It’s not easy to play melodies. A fun effect you can play with is the pitch glide from one note to another.
In the Pitch section, drag the Glide knob up to around 170 ms.

When you play a note, the pitch slides from the pitch of the previous note to the pitch of the new note, creating a nice portamento effect. You may notice a clicking sound on the attack of the notes you play. Let’s remove it.
In the Amp section, on the envelope display, drag the Attack handle to about 6 ms.
Record a simple bass line over four bars, starting at bar 5 after the intro.
Don’t stray too far away from the original C2 pitch, or you may get too many artifacts in the sound of the samples and the glide effect may ruin the sync of the loop. Quantize your recording in the Region inspector and edit the notes in the Piano Roll until you’re happy with your bass line.
To complete this new song section, loop the Claps and Alpha Matrix Bass tracks until bar 13.
You’ve sampled and looped only a short slice of a bass Apple Loop to turn it into a software instrument that you can play on your MIDI keyboard, allowing you to use that bass sound to play your own melody. Imagine the vast array of opportunities now that you can sample from any Apple Loops or other recordings, and then turn them into instruments to use in your own productions!
Chopping Loops in a Take Folder
While a sampler can often greatly speed up your workflow, you can do sampling work without one. To cut up your samples, mangle them by processing them through effects, and splice them, you are free to use any other tool at your disposal. One of the most obvious and immediate techniques is to drag your samples directly to the Tracks view, and then edit the regions to cut and process your samples.
Packing Regions into a Take Folder
In the previous lesson, you recorded several takes of a guitar performance packed into a take folder. That lets you experiment with different ideas during the recording session, and then later assemble a composite take by choosing sections from multiple takes—a process called comping.
Comping techniques can be useful, for example, when a musician can’t get an entire song right in one single take. You record several takes, each with its own good and bad qualities, and later you create a perfect comp using the best parts of each take.
In this exercise, you will use a take folder for a more creative music production goal. You will pack four loops of various instruments playing different melodies, and then create a comp by selecting slices from the different loops to combine them into a patchwork loop—like a rhythmic collage of bits and pieces that each have a different timbre.
In the Loop Browser, search for the following loops and drag them to create new tracks at the bottom of the workspace at bar 13.
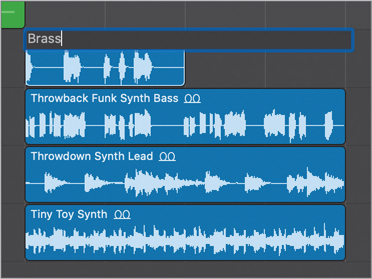
Throwback Funk Brass 01
Throwback Funk Synth Bass
Throwdown Synth Lead
Tiny Toy Synth

To help identify the loops, let’s give them different colors and simple names.
Click the Throwback Funk Brass 01 region to select it.
Press Shift-N and enter Brass.
Choose View > Show Colors (or press Option-C).
The color palette opens.
Click a yellow color square.

The Brass region is yellow.
Tip
The Color palette displays a white frame around the color(s) of the selected region(s). This is useful when you need to assign other regions the same color.
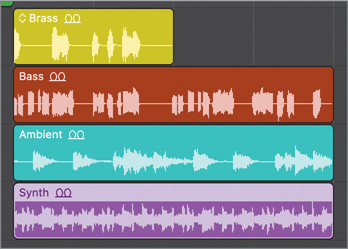
Repeat this process to rename and color the remaining three loops in the take folder.
Rename Throwback Funk Synth Bass Bass, and color it brown.
Rename Throwdown Synth Lead Ambient, and color it turquoise.
Rename Tiny Toy Synth Synth, and color it pink.
Choose View > Hide Colors (or press Option-C) to close the Color palette.
Select the four regions at bar 13.
In the Tracks view menu bar, choose Functions > Folder > Pack Take Folder.

The four loops are packed inside a take folder on the selected track, leaving you with three empty tracks that you can delete.
Choose Track > Delete Unused Tracks (or press Shift-Command-Delete).
The empty tracks are deleted. Let’s rename the track where the take folder is.
On the Throwback Funk Brass 01 track header, double-click the track name and enter Splice.
The take folder is selected, and you can name it after the track name.
Choose Functions > Name Regions/Cells by Track Name (or press Option-Shift-N).
Control-click the icon on the Splice track and choose the desired icon.
Resize the take folder so that it’s two bars long.

Double-click the take folder to open it.
Choose Navigate > Set Rounded Locators by Selection and Enable Cycle (or press U).
To zoom in on the selection, you can press Z (Toggle Zoom to Fit Selection or All Contents).
Press Z.

The take folder fills the workspace, making it comfortable for you to see the waveforms on each take.
You’ve imported four Apple Loops into your workspace and packed them into a take folder. A little organization goes a long way, and taking the time to give your region simple descriptive names and easy-to-identify colors, and optimizing your zoom level sets you up nicely for the next exercise, where you’ll assemble your composite take.
Comping Takes
Before you start comping, you need to preview the takes so that you can become familiar with them. Then you’ll start comping the takes, swiping your mouse across the parts of the takes you want to hear in your comp. To create a rhythmic effect synced to the project tempo, you’ll snap your edits to the nearest 1/16 note.
In the Tracks view menu bar, click the Snap pop-up menu, and choose Snap Quick Swipe Comping.

Click the Snap pop-up menu again, and choose Division.
By default, the division is a 1/16 note, so swiping takes will snap to the nearest 1/16 note on the grid.
Option-click the Brass take to select it.
On the Bass take, drag to select from 13 1 3 0 to 13 2 0 0 so that the help tag reads Position 1 1 3 1, Length 0 0 2 0.

The pointer snaps to a 1/16 note grid, making it easy for you to select a section that has musical meaning (for example, a 1/16 note, an 1/8 note, or a beat).
Tip
To temporarily disable snapping, start dragging and hold down Control, or Control-Shift for even greater precision.
Listen to your comp.
The comp starts with a brass note, and then the following syncopated note is from the distorted bass synth loop.
On the Ambient take, select the note right after the bass slice so that the help tag reads Position 1 2 1 1, Length 0 1 1 0.
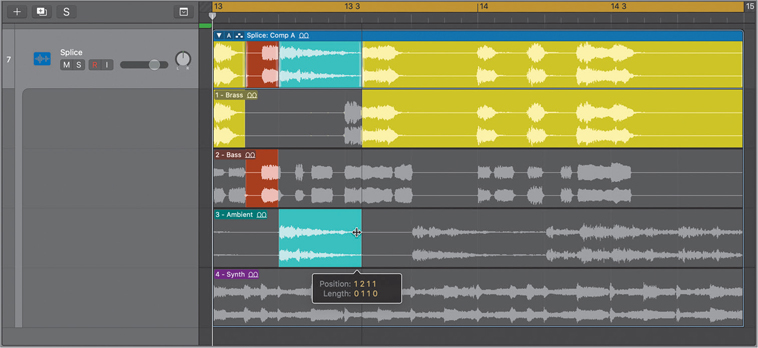
The comp now plays successive notes from the brass, then the distorted bass synth, then the ambient synth. The rapid rhythmic timbre switching creates an exhilarating sensation that is sure to make people get up and dance!
When you select a section, you can hear that section in different takes.
Try clicking different takes in the same section as that last note.

A different take is selected only for that section. This gives you an easy way to experiment with selecting the same section in different takes.
Within that section, click the Ambient take again.
Continue making selections of single or multiple notes (or even portions of notes) from different takes throughout the rest of the take folder.

Feel free to have fun and experiment to find what sounds good to you; then, for the next exercise try to reproduce the comp on the previous screenshot as close as possible.
You’ve comped the four loops into an exciting 1/16 note–based rhythmic collage. Keep this technique in mind and be creative with your use of material. For example, think of comping vocal regions to create a vocal chop, or drum regions to create a breakbeat.
Processing a Selection with Audio Effect Plug-ins
When you are happy with your comp, you can flatten it to export all the selections as individual audio regions on the track so that you can further edit or process them. You will now flatten the take folder you comped in the previous exercise so that you can use the Region inspector to transpose individual notes and apply selection-based processing to process individual sections with audio effect plug-ins.
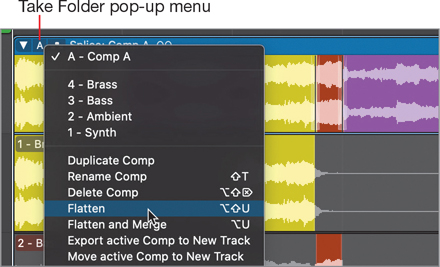
At the upper left of the take folder, click the Take Folder pop-up menu, and choose Flatten.
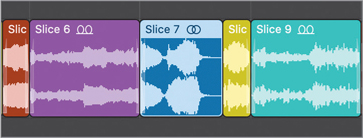
Each section of the comp is now an individual region of the color of the original take. All regions have the same name (Splice: Comp A). Let’s give the regions individual names. When multiple regions are selected, giving one of them a name that ends with a number results in the regions getting the same name but with incremental numbers.
Press Shift-N.
A text field opens on top of the first region.
Enter Slice 1.

The regions are named Slice with incremental numbers. Let’s transpose the Slice 3 region (the turquoise region that contains a note from the Ambient loop).
Click the background in the workspace to deselect all regions (or press Shift-D).
Click the Slice 3 region to select it.
In the Region inspector, click the double-arrow symbol next to Transpose, and choose –12.

Use the Space bar to start and stop playback when you need to hear your work. The Slice 3 region now plays one octave lower. Continue transposing some of the regions to +12 or –12 semitones so that they play an octave higher or lower. Feel free to experiment with other values; however, in that case, make sure the transposition amounts you choose maintain all the notes in the right key or the loop may sound out of key with the other sections in the project.
You will now apply an effect plug-in to only one region using selection-based processing. To make it easier for you to hear the result of your processing, you may want to start with one of your longer regions. If you reproduced the same comp as in the screenshot in the previous exercise, you’ll apply the effect to the Slice 7 region.
Select the Slice 7 region (or one of your longer regions) on the Splice track.

Tip
To apply selection-based processing to only a portion of a region, select the portion with the Marquee tool (your default Command-click tool).
In the Tracks view menu bar, choose Functions > Selection-Based Processing (or press Option-Shift-P).
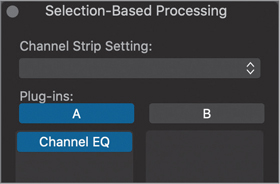
The Selection-Based Processing window lets you choose between two sets of plug-ins (A or B) so that you can experiment with and compare two audio processing signal chains. You will use only one plug-in, so let’s insert it in set A.
Click an empty slot in set A, and choose EQ > Channel EQ > Stereo.
The Channel EQ plug-in window opens.
In the Channel EQ plug-in header, click the Setting pop-up menu and choose 07 EQ Tools > Phone Filter Notch.

This severe EQ preset filters most of the low and high frequencies, letting through only a narrow band of midrange frequency, reminiscent of the low-fidelity sound of older phones. Before you preview the result, you will make sure the preview function does not affect your current cycle area so that you can preview the effect of the EQ plug-in in the context of the entire loop.
At the lower left of the Selection-Based Processing window, click the action menu and deselect “Preview enables Cycle.”

Click the Preview button.
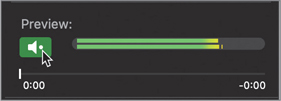
Playback starts at the beginning of the cycle area at bar 13, and you can hear the EQ’ed Slice 7 region in the context of the entire section. The EQ cuts off so many frequencies that the processed region sounds too soft now.
Click the Preview button to stop playback.
In the Selection-Based Processing window, click the Gain pop-up menu and choose Loudness Compensation.

At the lower right of the Selection-Based Processing window, click Apply.
In the workspace, the selected region is processed by the Phone Filter Notch Channel EQ preset. The new region is automatically assigned the color of the track (blue).
Press the Space bar.
The processed region now sounds loud enough. All the different timbres in the samples combined together create a fun, syncopated new loop!
Tip
To change the level of one or more regions, select the region(s) and use the Gain parameter in the Region inspector.
Close the Selection-Based Processing and Channel EQ plug-in windows.
Click the cycle area (or press C) to turn off Cycle mode.
You flattened your take folder to export the selected portions of your takes into individual regions in the workspace. You then transposed some of the regions in the Region inspector and processed one region with a plug-in, completing your patchwork sample collage.
Creating Vocal Chops
Vocal chops, a vocal editing technique pervasive in today’s pop songs, are cut-up vocal samples sequenced together in a new way. The cuts are often small, unrecognizable pieces of words, sometimes just individual vowels, and the goal is to create a fun, creative sound effect that may sound like the singer’s voice but that doesn’t have any comprehensible lyrics. Tiny samples are sometimes repeated in rapid fashion to create stuttering effects, and the use of pads to trigger the samples in a rhythmic fashion often results in syncopated grooves.
Slicing a Vocal Recording in Quick Sampler
To get started building your vocal chops, you’ll turn a vocal recording into a Quick Sampler instrument.
Go to Logic Book Projects > Media, drag Just Like This Vocal.wav to the empty area at the bottom of the track headers, and choose Quick Sampler (Original).
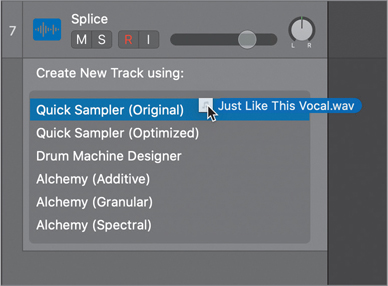
A new software instrument track is created, and Quick Sampler opens with the Just Like This Vocal.wav sample loaded.
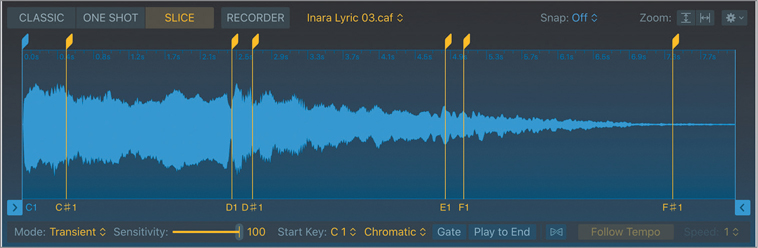
At the top in Quick Sampler, click the Slice mode button.
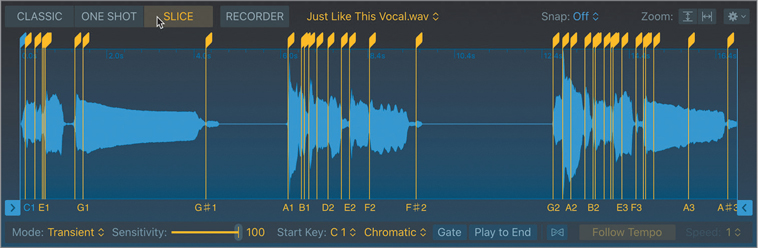
Slice markers appear on the waveform display where transients were detected. Too many transients were detected, so you need to reduce the number of slices.
Below the waveform display, drag the Sensitivity slider to 40.

That’s much better, but there are still a few misplaced slice markers that you will later edit on the waveform display. Look at the long sample slice assigned to D#1.
Play a D#1 on your keyboard.
You hear the word “this.” The entire sample plays, as in One Shot mode. To better control the length of the vocal notes you perform, you’ll use Gate mode. In Gate mode, the sample plays only for as long as you hold down the key (or for the duration of the MIDI note on the track).
Below the waveform display, click the Gate button.

Play a short D#1 note on your keyboard.
Now only the beginning of the slice plays, and playback stops when you release the key. For greater control, let’s make the envelope release more abrupt.
In the Amp section, on the envelope display, drag the Release handle all the way to the left so that the Release field reads 0 ms.

Play short D#1 notes in rapid succession.
Now you can play some percussive stuttering riffs with this sample.
You’ve imported your vocal sample in Quick Sampler, chosen the Slice mode, adjusted the sensitivity slider to get the right amount of slices, and turned on Gate mode to make sure the samples you trigger stop playing back when you release the key.
Editing Slice Markers
Adjusting the Sensitivity slider in the previous exercise gave you approximately the slices you wanted on this vocal sample; however, you’ll fine-tune the slice markers to make sure you’re in complete control over what portion of the file gets triggered by your keys.
To zoom in on the waveform display, you can use Control-Option-drag (and Control-Option-click to zoom out), or a pinch gesture if you’re using a trackpad.
Control-Option-drag to zoom in on the first four slices.

Play a C1.
The first slice plays. You hear the word “just”; however, the word is cut off at the end.
Play a C#1.
The second slice plays. You hear the “s” sound at the end of the word “just.” The first and second slices are the same word and should be only one slice. Let’s delete the second slice marker.
Double-click the second slice marker to delete it.

Play a C1.
The first slice plays and you hear the entire word.
Play a C#1 (and hold it down for the full duration of the slice).
You hear the word “like” and, at the end of the slice, the beginning of the next word, “this.”
Play a D1.
You hear the word “this”; however, the very beginning is cut off. Let’s readjust this slice marker.
Drag the D1 slice marker slightly to the left.

Continue playing C#1 and D1 notes and adjusting the slice marker until you no longer hear anything at the end of the C#1 slice and you clearly hear the beginning of the word “this” at the beginning of the D1 slice.
Let’s continue cleaning up slice markers.
Play F#1, G1, and G#1.
The three notes are each one a piece of the word “moment.” Let’s make sure a single key triggers the entire word.
Scroll right to see F#1, and delete the two slice markers directly to the right of the F#1 note.
The note F#1 should trigger the entire word “moment.”
Delete the two slice markers directly to the right of the G1 note.
The note G1 should trigger the entire word “just.” The slice markers now all fall at the beginning of a word, so let’s practice playing this new chopped vocal.
Play short notes, trying some rapid short notes, between C1 and A1.
For some fun, chopped vocal-stuttering effects, you can trigger slices in the middle of word so that you can play only the vowel part, without the consonants at the beginning.
Click the Zoom horizontal button.
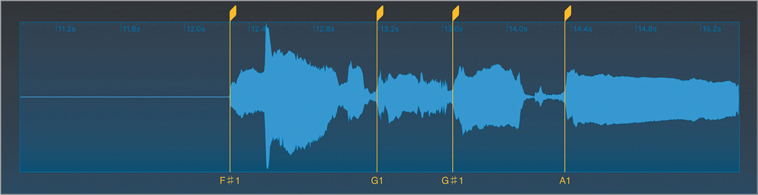
Create a flex marker after D1, in the middle of the word “this.”

Play the D#1 key and alternate it with D1.
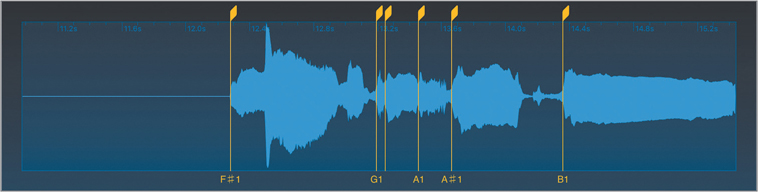
You can already hear the kind of stuttering sequences you’ll be able to program in the next exercise. If you play fast, syncopated beats by hitting keys or drum pads on your controller, you may notice that some of the samples don’t trigger fast enough. For such percussive performances, results are often better when moving the slice markers a little bit further into the word, cutting off some of the slow attack to trigger right into the vowel of each word. Try zooming in and moving your slice markers a little farther past the attack of each word, as in this screenshot. Experiment and see what works best for you!

Triggering and Recording a Vocal Chop
With all your slice markers at the right positions, you can practice a groove on your controller and then record it. This kind of sampling work lends itself well to playing syncopated rhythms. Let’s give it a try.
Position the playhead after the chopped samples on the Splice track (at bar 15).
Press Record.

You get a four-beat count-in. Get ready! Play your favorite vocal chop groove within the C1 to A1 key range. If you don’t get it right the first time, don’t hesitate to continue recording, and you can later cut the MIDI region to keep only the good part of the performance. Or stop the recording, choose Edit > Undo Recording (or press Command-Z), and try again.
Stop the recording.
Don’t forget that you can quantize the MIDI region in the Region inspector, or double-click the region and edit notes in the Piano Roll.
To give your vocal chops a sound that resembles the pitch variations heard when DJs scratch vinyl records, you can add pitch glide to Quick Sampler.
In Quick Sampler, in the Pitch section, drag the Glide knob up to around 100 ms.

Now each slice attack has a 100 ms pitch ramp up or down from the previous pitch.
If you’re so inspired, take a moment to continue adjusting the sound of all your tracks, add effect plug-ins, and move or copy your regions in the workspace to create different sections. When you’re done, you can save your work and open an example project that uses the techniques you’ve learned in this lesson.
Choose File > Save (or press Command-S).
Choose File > Close Project (or press Option-Command-W).
Open Logic Book Projects > 05 Sample Feast.
Play the project.
Listen to the different sections, and use Solo mode to focus on each track individually. Explore this project: open the Quick Sampler plug-ins, zoom in on the audio regions, look at their Transpose values in the Region inspector, and open the MIDI regions in the Piano Roll to look at the MIDI notes.
Note that the Just Like This Vocal track has some automation that makes the envelope release increase while the reverb goes crescendo in bars 19 and 20. You will learn how to add automation to your tracks in Lesson 10.
You’ve used samples both in a sampler plug-in and directly in the workspace. The Quick Sampler plug-in is now familiar to you, and you know how to import audio, switch modes, edit markers, and add modulation to your samples. You’re now well on your way to becoming a sampling ninja!
Key Commands
Keyboard Shortcuts
Piano Roll |
|
|---|---|
Left Arrow |
Selects the previous note |
Right Arrow |
Selects the next note |
Option-Up Arrow |
Transposes the selection up one semitone |
Option-Down Arrow |
Transposes the selection down one semitone |
Shift-Option-Up Arrow |
Transposes the selection up one octave |
Shift-Option-Down Arrow |
Transposes the selection down one octave |
|
|
Tracks View |
|
Command-Option-N |
Opens the New Tracks dialog |
Shift-Option-P |
Opens the Selection-Based Processing window |
Shift-Option-Delete |
Deletes unused tracks |
Option-Shift-N |
Names selected regions by track name |
|
|
General |
|
Shift-D |
Deselects all |