
Lesson 8. Integrating Your Workflow
Lesson Files: Logic Book Projects > Media > Drum Samples
Time: This lesson takes approximately 40 minutes to complete.
Goals: Drag and drop audio files to create a Drum Machine Designer patch
Edit a pattern cell in Step Sequencer and a MIDI cell in the Piano Roll
Copy scenes to Tracks view
Record a Live Loops performance to Tracks view
In the previous lessons, you focused on isolated steps of the music production process, such as triggering scenes in the Live Loops grid, editing and arranging regions into song sections in the Tracks view, producing drum tracks with Drum Machine Designer, sampling audio, creating patterns in Step Sequencer, and editing MIDI in the Piano Roll. In this lesson, you’ll take a brief look at an example of a music production workflow that integrates some of those techniques. You’ll use a drag-and-drop workflow to turn a few drum samples into a Drum Machine Designer patch, create content for that new patch and others in cells on the Live Loops grid, and record a real-time Live Loops grid performance to the Tracks view area.
Importing Audio into Drum Machine Designer
To quickly create a Drum Machine Designer (DMD) patch, you can drag and drop drum samples to the empty area at the bottom of the track headers. The samples are automatically mapped to individual pads inside DMD so that you can trigger them from your MIDI keyboard, or you can create content using the Piano Roll or Step Sequencer.
In this exercise, you’ll create a simple DMD patch using five drum samples that you will map to MIDI notes according to the General MIDI (GM) standard. The GM standard specifies which MIDI note pitch should trigger which drum kit piece on drum instruments.
Choose File > New from Template (or press Command-N).
In the Project Chooser, double-click the Live Loops project template.
To find your drum samples, you will use the All Files browser.
In the control bar, click the Browsers button, and click the All Files tab.

Navigate to Logic Book Projects > Media > Drum Samples, and then click the audio files to preview them.
Each audio file is a sample of a drum kit piece: a closed hi-hat, an open hi-hat, a pedal hi-hat, a kick, and a snare. Let’s make a DMD patch out of these samples.
Press Command-A to select all five audio files.
Drag and drop the five selected files to the empty area below the track headers, and in the menu that opens, choose Drum Machine Designer.

After a moment, a new Untitled track is created, and Drum Machine Designer opens. In DMD, five pads are assigned to the five samples you imported.
In DMD, double-click the drum kit name and enter Sampled Kit.

In the Live Loops grid, the track is renamed Sampled Kit.
In DMD, at the lower left, click the Hi-Hat Closed pad.
At the bottom of DMD in the plug-in pane, Quick Sampler opened in One Shot mode, and you can see the Hi-Hat Closed.aif file on the waveform display.
Click the speaker icon on the Hi-Hat Open pad to preview it.

That sample is very long; let’s shorten its Amp envelope in Quick Sampler.
To the upper right of the waveform display, click the Q-Sampler Detail button.

In DMD, the bottom pane shows the Quick Sampler synthesis parameters for Hi-Hat Open.
In the Envelope display at the bottom of the Amp section, drag the Decay handle all the way down and to the left to set Sustain to 0% and Decay to around 400 ms.

The Hi-Hat Open sample sustains a little less. Let’s assign more descriptive icons to each pad.
On each pad, Control-click the speaker icon and choose an appropriate icon.

Each pad has a MIDI Note pitch and drum kit piece name displayed at the bottom (such as C1 – Kick 1 on the first pad at the bottom left) that follows the General MIDI standard mapping. Let’s reorder your samples so they’re mapped to the right MIDI notes.
Drag the pads to their correct position:

Hi-hat Pedal to G#1
Kick to C1
Hi-Hat Open to A#1
Hi-Hat Closed to F#1
Snare to D1
Close the DMD plug-in window.
You have created a custom DMD patch with your own drum samples mapped according to the GM standard. You can save that patch in the Library and use it in your productions or share it with other Logic users.
Populating Scenes in the Live Loops Grid
In Lesson 7, you used Step Sequencer and the Piano Roll to create content inside pattern regions or MIDI regions in the Tracks view. You can use the same tools to create content inside cells in the Live Loops grid.
Editing a Pattern Cell in Step Sequencer
In this exercise, you will browse some patterns triggering the DMD patch you just made to create a pattern cell in the Live Loops grid.
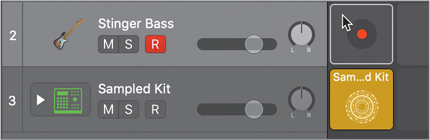
On the Live Loops grid, Control-click the first cell in the Sampled Kit track, and choose Create Pattern Cell.

A Sampled Kit pattern cell is created.
Double-click the pattern cell.
Step Sequencer opens at the bottom of the Live Loops grid.
In Step Sequencer, click the Pattern Browser button (or press Shift-Option-B).

Let’s first lower the tempo and then preview some patterns.
In the LCD display, drag the tempo down to around 86 bpm.
In Step Sequencer, in the Pattern Browser, choose Patterns > Drums > CR-78 Beat.
In the Live Loops grid, click the Play button in the middle of the Sampled Kit pattern cell.

The CR-78 Beat preset pattern plays your new Sampled Kit DMD patch. If you want, try selecting other patterns in the Pattern Browser, or toggle some steps on and off and open subrows to adjust their velocities to create your own beat.
Populating Scenes
To continue populating a few scenes in your Live Loops grid, you’ll record a MIDI cell, program another MIDI cell in the Piano Roll, and drag a few Apple Loops from the Loop Browser.
Select the software instrument track (Track 2).
In the control bar, click the Library button (or press Y) to open the Library.
In the Library, choose Bass > Stinger Bass.
Close the Library, and play a few notes on your MIDI keyboard to hear the bass patch.
Let’s adjust the cell parameters to record a two-bar bass loop.
Select the first cell on Track 2.
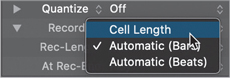
In the Cell inspector, set the Cell Length to 2 0.

In the lower part of the Cell inspector, set Rec-Length to Cell Length.
At the bottom of the Live Loops grid, click the scene 1 trigger.
The Sampled Kit drum loop starts playing. To find an idea, practice your bass performance on your MIDI keyboard until you’re ready to record a two-bar-long bass line.
Click the Record button in the middle of the cell.
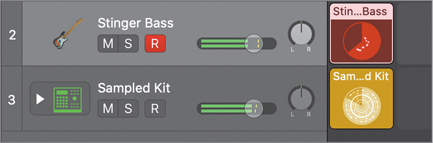
In the middle of the cell, a count-in counts the remaining beats in the current bar. Recording starts at the beginning of the next bar and stops after a two-bar recording, and your recorded bass line starts playing back. If necessary, choose a Quantize setting for your recording in the Cell inspector, or edit the recorded MIDI notes in the Piano Roll.
Continue populating a few cells in three scenes, triggering the scenes to hear them.
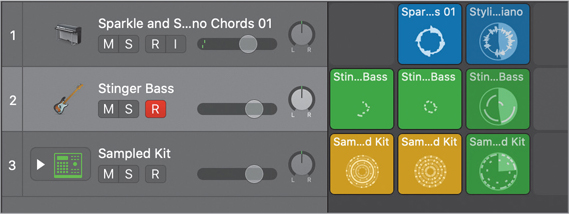
Choose your favorite methods to continue populating three scenes in the Live Loops grid. To put content in a cell, you can:
Control-click the cell to create an empty pattern cell, and then program notes in Step Sequencer.
Control-click the cell to create an empty MIDI cell, and then program notes in the Piano Roll.
Option-drag an existing pattern or MIDI cell.
Drag an Apple Loop.
Record a MIDI or Audio cell.
In the control bar, click the Stop button to stop playback.
Copying or Recording Scenes in the Tracks View
Once you’ve combined your different cells into scenes on the Live Loops grid, and experimented with triggering cells or scenes to determine for how long they should play back and in which order, you can copy scenes to the playhead position in the Tracks view or record your real-time Live Loops performance into the Tracks view. During recording, when a cell is playing back in the Live Loops grid, a region is recorded on the same track in the Tracks view.
In the Live Loops grid menu bar, click the Tracks View button (or press Option-B).

Tip
To toggle between only the Live Loops grid or only the Tracks view, press Option-V.
Both the Live Loops grid and Tracks view are displayed. First, let’s make sure the playhead is at the beginning of the song and Cycle mode is off.
In the control bar, click the Go to Beginning button (or make sure the Tracks view has key focus and press Return) to position the playhead on 1 1 1 1.

In the Tracks view, click the cycle area to turn off Cycle mode.
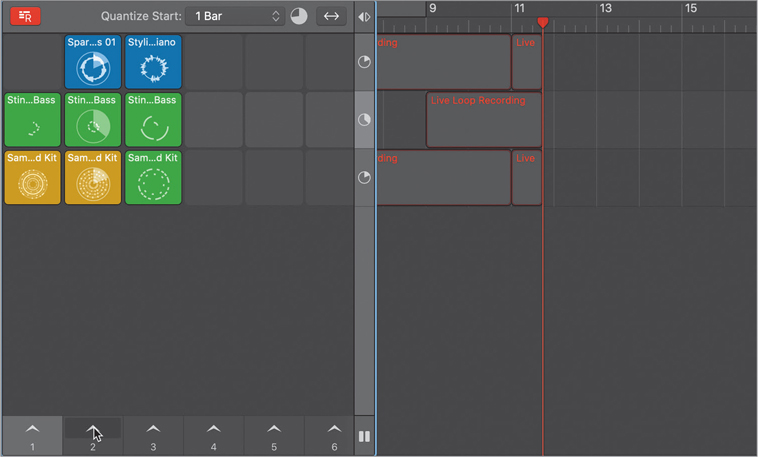
At the bottom of the Live Loops grid, Control-click the Scene 1 number and choose “Copy Scene to playhead.”

In the Tracks view, regions are created corresponding to the cells in Scene 1. The regions are grayed out to indicate the tracks are currently inactive; you will activate them later. On the bass track, the MIDI region is looped once so that it lasts as long as the Pattern region on Track 3. The playhead is located at the end of the copied scene (at bar 5) so that you can copy more scenes or start to record your Live Loops performance.
In the Live Loops grid menu bar, click the Enable Performance Recording button (or press Control-P).

The Tracks view is ready to record your Live Loops performance into regions.
In the control bar, click the Record button (or press R).
In the Tracks view, the playhead moves to bar 4 to give you a four-beat count-in and start recording at bar 5.
Trigger scenes, and toggle cells on or off.
Your Live Loops performance is recorded as regions in the Tracks view.
At the lower right of the Live Loops grid, click the Grid Stop button.

All the loops flash, indicating they’re unqueued. At the beginning of the next bar, the loops stop playing.
In the control bar, click the Stop button.
Let’s listen to the new arrangement that you recorded in the Tracks view.
In the control bar, click the Go to Beginning button.
On each track, you can play either cells in the Live Loops grid or regions in the Tracks view. When you play cells in the Live Loops grid, the tracks in the Tracks view become inactive. You can choose to make either tracks or cells active using the Track Activation buttons in the Divider column between the Live Loops grid and the Tracks view either for each track individually (for example, to perform Live Loops on some tracks while playing other tracks in the Tracks view) or for all tracks at once, which is what you’ll do here.
At the upper right of the Live Loops grid, click the Track Activation button.

In the Tracks view, all tracks are activated.
In the control bar, click the Play button (or press the Space bar).
Playback starts and you hear the regions in the Tracks view.
In the control bar, click the Stop button (or press the Space bar).
Close the project, and save it only if you want to keep it.
You have recorded a live performance of triggering scenes or individual loops in the Live Loops grid into the Tracks view. This workflow gives you an overview of how you can use the Live Loops grid for ideation and experiment with song section length and arrangement based on live real-time feel. You can then perform the arrangement, triggering scenes or toggling individual cells in real time while recording the performance to the Tracks view. Once in the Tracks view, you can take advantage of the ruler to continue editing your regions and song sections with more precision, fine-tune your mix, and finalize your project.
Key Commands
Keyboard Shortcuts
Main window |
|
|---|---|
Option-B |
Shows both the Live Loops grid and the Tracks view |
Option-V |
Toggles between the Live Loops grid and the Tracks view |