
Lesson 7. Creating Content
Lesson Files: Logic Book Projects > 07 Future Nostalgia
Time: This lesson takes approximately 75 minutes to complete.
Goals: Program drumbeats in Step Sequencer
Program plug-in step automation in Step Sequencer
Program MIDI notes and region automation in the Piano Roll
Add volume and speed fades to Audio regions
Create custom Apple Loops
To gather the musical material you need to assemble for your productions, you can record both real and virtual instruments live (you learned to record audio and MIDI in Lesson 4), or you can create material by writing your ideas as MIDI notes in a region, toggling steps in a sequencer, or editing regions in the Tracks view (which is the focus of this lesson). When creating content, you can take your time, experiment, and explore complex rhythms, melodies, or harmonies without requiring sharp performance skills. On the other hand, for instruments playing simple, repetitive patterns throughout a song, you can build tracks in much less time than it would take to record them. You can start simple, and come back later to edit a MIDI performance and fine-tune it or make it more complex. You can add, remove, and edit notes as you go, listening and adjusting note sequences at will, and come up with musical ideas that go way beyond the limitations of a real-time performance.
In this lesson, you will use Step Sequencer to program a drumbeat and to create step automation for a Remix FX plug-in, adding a rhythmic filtering effect to an audio track. You will create and edit notes in the Piano Roll to write a bass line, and edit Audio regions in the Tracks view to slice a loop, add volume fades, and produce turntable start and stop effects. Finally, you will make your own Apple Loop using the material you created.
Step Sequencing
Among the first analog drum machines in history was the iconic Roland TR-808 (commonly referred to as the 808), which is heard on many hit songs of the eighties. The 808 featured a row of 16 small square keys to program patterns and record them into its built-in step sequencer, making it quick and easy to come up with a beat. Logic Pro’s Step Sequencer is designed around the same basic principle but with many additional features, making it suited to program not only the most complex beats you could imagine, but also note patterns for melodic and harmonic instruments, or even step automation of plug-in and channel strip parameters.
Turning Steps On and Off
To get a feel for creating beats in Step Sequencer, you will toggle steps on and off first with your mouse and then by using key commands. You will later clear your pattern to make a specific drumbeat, so in this next exercise, feel free to experiment.
Choose File > New (or press Shift-Command-N).
In the New Tracks dialog, choose Software Instrument and click Create (or press Return).
In the Library, choose Electronic Drum Kit > Silverlake.
The Silverlake Drum Machine Designer patch is loaded on the left channel strip in the inspector.
On the Silverlake track in bar 1, Control-click the workspace and choose Create Pattern Region.

On the track, an empty four-bar Pattern region is created, and at the bottom of the main window, Step Sequencer opens.

At the top of Step Sequencer, the name of the selected region (Silverlake) is displayed. You can toggle steps on and off to create notes on rows for a dozen of the patch’s kit pieces. In the Step Sequencer menu bar on the left, the Step Rate pop-up menu is set to /16 notes; on the right, the Pattern Length pop-up menu is set to 16 steps. The 16 steps on the grid are grouped in four one-beat-long groups of four sixteenth notes each, which makes a one-bar long pattern.
Let’s turn on some of the steps to get a beat going.
Tip
To use Step Sequencer when working in the Live Loops grid, Control-click an empty cell, choose Create Pattern Cell, and then double-click the pattern cell.
On the Kick 1 - Silverlake row, click the first steps of beat 1 and beat 3.

The steps are turned on.
On the Snare 1 - Silverlake row, click the first steps of beat 2 and beat 4.
In the Step Sequencer menu bar, click the Preview Pattern button (or press Option-Space bar).

Your pattern plays, and on each row, a white frame is around the current step. You can toggle steps while previewing the pattern, and you can drag the pointer over multiple steps to activate them.
On the Clap 1 – Silverlake row, drag the pointer over a few steps at a time (or over the entire row).

Tip
Hold Shift while dragging to create notes in only one row.
While the pattern continues playing, keep adding or removing notes. Click inactive steps to turn them on and click active steps to turn them off.
You can use key commands to select a step and toggle it on or off. Note the white frame around the last step you clicked, indicating that the step is selected.
Use the Left, Right, Up, and Down Arrow keys to move the white frame and select a step on the grid.
Note ▶
To use key commands to select steps, make sure the key focus is on Step Sequencer.
When you select a step, that row’s kit piece is triggered. That is undesirable when programming a pattern while previewing it, so let’s make sure you can select and toggle steps silently.
In the Step Sequencer menu bar, click the MIDI Out button (or press Option-O) to turn it off.

Use the arrow keys to move the white frame and select a different step.
This time, no sound is triggered as you move the white frame. Selecting a step doesn’t trigger sound, so you hear the pattern you’re programming without being disturbed.
Press ’ (apostrophe) (Toggle Selected Step) to toggle the selected step on or off.
Continue experimenting, selecting steps with the arrow keys, and turning them on or off with the Toggle Selected Step key command.
In the Step Sequencer menu bar, click the Pattern Preview button (or press Option-Space bar) to stop playback.
Loading and Saving Patterns
Step Sequencer’s Pattern Browser is where you can find preset patterns that you can use to trigger whatever instrument or patch you loaded on the track. There are also empty templates for drums and for musical scale modes that you can use when creating patterns for melodic or harmonic instruments.
In the Step Sequencer menu bar, click the Pattern Browser button (or press Option-Shift-B).

The Pattern Browser opens to the left of the grid.
In the Pattern Browser, choose Templates > Chromatic - 2 Oct.
Twenty-five empty rows are created, for all the notes of the chromatic scale (all 12 semitones per octave) over 2 octaves. Because the current patch is a Drum Machine Designer patch, you can see the names of all your kit pieces (plus a row for the C3 note that isn’t assigned to a kit piece). In the Pattern Browser, you can find templates for many musical scales and modes, which can be useful when you’re programming melodic or harmonic instruments.
In the Pattern Browser, choose Patterns > Drums > Just in Time.
Seven drum kit piece rows are displayed, and a beat is programmed on the grid. Let’s use Cycle mode so that you can press the Space bar to toggle playback.
Choose Navigate > Set Rounded Locators by Selection and Enable Cycle (or make sure the Tracks view has key focus and press U).
Cycle mode is on and the cycle area matches the Silverlake pattern region in the Tracks view. From now on in this lesson, use the Space bar to toggle playback on and off whenever you want. Feel free to stop playback to complete steps in the exercises, and then resume playback to hear the result of your actions, or to keep playback continuously looping as you’re working.
Listen to the Just in Time pattern. It’s a 32-step swung pattern, so it is divided in two pages showing 16 steps each, and you’re seeing only the first page. An overview of each page appears above the step grid. You can click an overview to see the corresponding page. Feel free to preview a few more drum patterns.
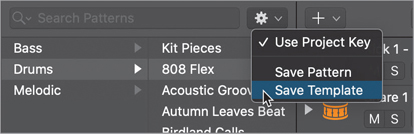
In the Pattern Browser, choose Patterns > Drums > 808 Flex.

This pattern is 64 steps long. You will clear this pattern, delete unneeded rows, and save it as a user template.
In the Step Sequencer menu bar, choose Functions > Clear Pattern (or press Control-Shift-Command-Delete).
All steps on the grid are inactive and the pattern is now 16 steps long.
Click the Bonk – Silverlake row header (fourth row) to select it.
Choose Edit > Delete Row (or press Delete).
Continue deleting rows so that you end up keeping only three rows: Kick 1, Snare 1, and Clap 1.
In the Step Sequencer menu bar, click the Vertical Auto Zoom button to turn it off.

In the upper right of Step Sequencer, click the Pattern Length pop-up menu and choose 32 Steps.

Depending on the width of your Step Sequencer, you may see your pattern divided into two 16-step pages, and two overviews appear above the step grid. If your pattern is showing you only 16 steps, you can zoom out horizontally to see all 32 steps at once.
In the upper right of Step Sequencer, click the minimum Step Width button.

On the grid, the steps are narrower, and you can see all 32 steps.
In the Pattern Browser, click the action menu, choose Save Template, and name the template Basic Kit.
In the Step Sequencer menu bar, click the Pattern Browser button (or press Option-Shift-B) to close it.
Chose File > Save (or press Command-S), name your project Future Nostalgia, and save it on the desktop or in a folder of your choice.
You have saved your own basic drum kit template with only kick, snare, and hi-hat. The next time you want to program a drum pattern, you can load your template to reduce the clutter and see only the kit piece rows you need.
Programming a Drumbeat
In this exercise, you will program the pattern that makes up the drumbeat that you’ll be using as a basis for the musical piece you’re creating in this lesson. You’ll carefully select steps to turn on, adjust loop lengths, use a different kit piece for one of the rows, and change step velocities to create accents on the hi-hats.
On the kick row, click steps to turn on the following kick notes.

Beat 1: steps 1 and 4
Beat 3: step 3
Beat 4: step 2
Beat 5: step 1
Beat 7: step 3
On the snare row, turn on step 1 in beats 2, 4, 6, and 8.

Listen to your beat. You have a syncopated kick playing against a regular snare. The pattern is coming together. The beat sounds a little fast at the current project tempo (120 bpm).
In the LCD display, lower your tempo to 100 bpm.
You can use edit modes to adjust various step parameters.
In the Edit Mode selector in the Step Sequencer menu bar, click the Velocity / Value button.

Inside each step on the grid, the note velocity is displayed, and you can drag vertically in the step to adjust the note velocity.
On the fourth kick note in beat 4, drag down to a velocity of around 7.

That kick sounds softer than the others, like a drummer playing a ghost note. Let’s lower the velocity of all the snare notes. To raise or lower all step velocities on a row, you can use the Increment/Decrement Value buttons in the row header.
In the snare row header, drag the Decrement Value button down so all your snares have a velocity of around 40.

The snares are softer. They also have a shorter decay and sound tighter.
For the clap, you are going to loop a one-beat pattern, so let’s adjust the loop end on that row to make the loop four steps long.
In the Edit Mode selector, open the menu to the right, and choose Loop Start/End.

Colored frames appear around the steps in each row. The frames define the loop start and end positions.
On the clap row, drag the right edge of the frame to set the loop end after the fourth step (at the end of beat 1).

On the Edit Mode selector, click the Step On/Off button.
For each row, you can open subrows to edit multiple parameters.
On the clap row header, click the disclosure triangle.

You can now edit Step On/Off, Velocity, and Note Repeat for that row.
Tip
To open other Edit Modes on additional subrows, move the pointer over a subrow header, click the + sign that appears at the lower left of the subrow header, and then choose an Edit mode from the pop-up menu at the upper right of the subrow header. To remove a subrow, move the pointer to the subrow header and click the x sign that appears at the upper left of the subrow header.
On the clap Step On/Off row, turn on steps 1 and 3.
On the clap, the same beat (4 steps) keeps looping while on the kick and snare rows; the loops last the whole 8 beats (32 steps) of the Pattern region.
That clap sound is too obnoxious and doesn’t work well for that beat. Let’s replace it with a hi-hat.
On the clap row header, click the Row Assignment pop-up menu, and choose Kit Pieces > Hi-Hat 1 - Silverlake.

This hi-hat sounds more subtle than the clap and works great. To give the hi-hat an accent, let’s make sure the hi-hat played on the upbeat is softer than the downbeat.
On the hi-hat Velocity subrow, lower the velocity in step 3 to around 27.

On the hi-hat row, click the disclosure triangle to hide the subrows.
You have created your first drumbeat in Step Sequencer. You customized your own template, chose a pattern length, and turned on the steps to program your beat. You adjusted velocities to create accents and reduced the loop length to make a shorter pattern for the hi-hat row. You now have a tight, syncopated and nuanced drumbeat that will be the foundation of the song you’re creating.
Adding a Pattern Region to an Audio Track
To automate a plug-in on a channel strip using Step Sequencer, you need to route the Pattern region’s data to that channel strip. To set this up, you will import an audio Apple Loop to the workspace—which creates an audio track—and insert the plug-in on the audio channel strip. You will then create a new track assigned to the same channel strip and create the Pattern region on that new track.
In the control bar, click the Loop Browser button.
In the Loop Browser, search for Free Fall Piano and drag it to bar 1 below the drum track.

The Audio region is 8 bars long. On the drum track, for the Pattern region to match the Audio region, you will double its length.
Note ▶
The Silverlake Drum Machine Designer track (Track 1) is a track stack that contains one main track and 24 subtracks, so the new track is numbered Track 26.
Make sure the Pattern region on Track 1 is selected and choose Edit > Length > Double.
Tip
To assign a key command to a function, open the menu where the function is, and then hold down the Control key as you choose the function. The Key Commands window opens with that function selected, and you can click Learn by Key Label and then press the desired key combination.
Inside the Pattern region, the pattern repeats for the whole length of the region. Let’s make the cycle area 8 bars long as well.
Choose Navigate > Set Rounded Locators by Selection and Enable Cycle (or press U).

The drums and piano sound good together but the piano is pretty static, playing four two-bar long sustained chords. You will add a filter plug-in and later create step automation for its cutoff to make the frequency spectrum of the piano evolve in a rhythmic way, adding motion to the piano sound.
Click the Free Fall Piano track header.
In the inspector, on the Free Fall Piano channel strip, click the Audio FX section and choose Multi Effects > Remix FX.
Note ▶
If you can’t find Remix FX in the Multi Effects folder, choose Specialized > Multi Effects.
Drag the pointer in the Filter XY pad while the loop is playing.
To create a Pattern region at the same position as the Free Fall Piano audio region and route its data to the same Free Fall Piano channel strip, you need to create a new track assigned to the same channel strip.
Choose Track > Other > New Track With Same Channel (or press Control-Shift-Return).
A new track is created (Track 27), and it is routed to the same Free Fall Piano channel strip as the previous track (Track 26).
On Track 27, Control-click the workspace and choose Create Pattern Region.
At the bottom of the main window, Step Sequencer shows the notes in the key of C Major over one octave (from C2 to C3). You will later customize the rows. In the Tracks view, the Pattern region is shorter than the cycle area, so let’s fix that.
Choose Edit > Trim > Fill Within Locators (or press Option-).

The Free Fall Piano pattern region is resized to match the length of the cycle area. You’re all set up to automate the Remix FX plug-in in Step Sequencer.
Creating Step Automation
Now that your Pattern region is created, you will use Step Sequencer’s Learn mode to create rows for the Remix FX filter parameters that you want to automate. You will then adjust the step rate to make the filter step through different cutoff values on every beat and adjust the loop length to create a two-bar pattern.
At the top of the row headers, click the Add Row pop-up menu (+) and choose Learn (or press Option-Command-L).

A red Learn button appears in place of the Add Row pop-up menu, indicating you are in Learn mode.
In the Remix FX plug-in window, click anywhere on the Filter XY pad.
In Step Sequencer, three new rows are added: Filter On/Off, Filter Cutoff, and Filter Resonance. You will automate only Filter On/Off and Filter Cutoff, so you can delete all other rows.
At the top of the row headers, click the red Learn button to turn off Learn mode.
Select the unneeded row headers and press Delete to keep only Filter On/Off and Filter Cutoff.
In the Filter On/Off row header, click the disclosure triangle.
In the Filter On/Off Step On/Off row, click the first step to turn it on.
In the Filter On/Off Automation Value subrow, drag the automation value up in the first step to set it to 1.

You will create step automation, modulating the filter value on every beat (quarter note).
Above the row headers, click the Step Rate pop-up menu and choose /4.

Let’s adjust the loop to only eight beats to repeat the same automation loop for every two-bar chord in the Free Fall Piano region on Track 26.
In the Edit Mode selector, open the menu to the right, and choose Loop Start/End.
On the Filter Cutoff row, drag the right edge of the colored frame to reduce the loop length to eight steps.

In the Edit Mode selector, click the Step On/Off button.
On the Filter Cutoff Step On/Off row, drag and click to turn on all eight steps.

Click the disclosure triangle on the Filter Cutoff row header.
On the Filter Cutoff Automation Value subrow, drag up or down in each step to adjust the values.
In the Filter Cutoff Step On/Off row, click a couple of steps to turn them off.

In the Remix FX plug-in window, during playback, the white light point on the Filter XYY pad moves on every quarter note (or every half note in places where you turned Filter Cutoff steps off). The frequency spectrum of the Free Fall Piano changes abruptly in sync with the beat, creating an intriguing, enigmatic effect.
Close the Remix FX plug-in window.
You have used the basic functions of Step Sequencer to program a drumbeat and to create step automation for an audio effect plug-in. If you enjoy this method of creation, continue exploring the various edit modes when programming drums, but also experiment with creating melody or chord progression patterns for pitched instruments, such as basses and synthesizers.
Programming MIDI in the Piano Roll
When creating or editing MIDI notes in the Piano Roll, you can precisely determine each note’s position, length, pitch, and velocity. You can edit or add MIDI controller events to automate the instrument’s volume, panning, pitch bend, and other parameters. Programming MIDI notes gives you a lot of freedom to create your ideas from scratch, similar to the way traditionally trained composers write music on staff paper.
You will program a bass line in the Piano Roll. Starting from a copy of the Pattern region on the drum track, you’ll use the kick drum pattern as the basic rhythm for the bass notes. Then you’ll create more notes, transpose them to create a melody that complements the chord progression in the piano loop, and adjust their lengths and velocities. Finally, you’ll draw in region automation to bend the pitch of some notes.
Converting a Pattern Region to a MIDI Region
To create a track for your bass, you’ll copy the drum track and its Pattern region. You’ll then choose a bass patch for the new track in the Library, remove any unwanted notes from the Pattern region, and convert it to a MIDI region so that you can edit the notes in the Piano Roll.
In the Tracks view, Option-drag the drum track icon down .

The Silverlake drum track is duplicated along with the Pattern region on the track. The duplicate track (Track 26) is selected, so you can choose a bass patch in the Library.
In the Library, choose Synthesizer > Bass > Jump Up Bass.
Although you won’t be recording the bass line in real time, you can use your MIDI keyboard to preview sounds you choose in the Library, and get some kind of idea of the bass line you’ll be programming.
Play a few notes on your MIDI keyboard.
That patch sounds great. Now let’s hear what it sounds like when you use the drum pattern to trigger it. Cycle mode is still on, so you can use the Space bar to preview your bass line throughout the next exercises.
On the Jump Up Bass track, click the Pattern region.
You can see the pattern in Step Sequencer. Listen to the bass; it sounds horrible! The note pitches are all over the place and aren’t in the right key at all. Let’s clean up this pattern to get the bass line in the ballpark before you convert it to MIDI. First, you’ll keep only the kick drum notes (C1).
In Step Sequencer, click the D1 row header to select it, and choose Edit > Delete Row (or press Command-Delete).
Delete the F#1 row.

Now you’re starting to hear a rhythm that will work for the bass line. Let’s see all 32 steps in the pattern.
At the upper right in Step Sequencer, click the minimum Step Width button.

On the C1 row, click the Row Assignment pop-up menu and choose Notes > G# > G#1. Make sure you don’t choose G#-1, which is two octaves lower.
To get started on the right pitch, let’s make the notes in the Pattern region play a G#, the root note of the first chord on the piano track.
Let’s delete a couple of notes to make the rhythm even simpler.
On the G#1 row, click the second and last active steps to turn them off.

In the Tracks view, on the Jump Up Bass track, Control-click the Pattern region and choose Convert > Convert to MIDI region (or press Control-Option-Command-M).
The Pattern region is converted to a MIDI region, and at the bottom of the main window, you can see the MIDI notes in the Piano Roll. (You may need to scroll up or down to see the G#1 notes.)
You copied the pattern from the drums to a new track and chose a bass patch to start creating a bass line. This production technique is a good shortcut to create new tracks based on existing ones. You could, for example, make a few copies of a violin track to create viola and cello tracks and edit their notes to come up with a string ensemble part.
Transposing Notes
Now that you’ve converted the Pattern region into a MIDI region, you can edit the notes in the Piano Roll. To follow the two-bar chords in the piano track, you’ll select groups of MIDI notes spanning two bars and transpose them to the corresponding root notes. Let’s use the same key commands you used in Lesson 5 to transpose the notes triggering your drum slices in Quick Sampler: Option-Up Arrow and Option-Down Arrow.
In the Piano Roll, select all the notes in bars 3 and 4.

Press Option-Down Arrow three times.

Look at the highlighted note on the keyboard on the left: The selected notes are transposed three semitones down, to F1. Each key press triggers a bass note, which can be useful if you need to hear the pitch you want to settle on but can be undesirable if you are editing the notes during playback. If you’d rather not hear bass notes triggered as you transpose them, turn off the MIDI Out button in the Piano Roll menu bar.
Select all the notes in bars 5 and 6.
Press Option-Up Arrow four times.

The selected notes are transposed to C2.
Select all the notes in bars 7 and 8.
Press Option-Up Arrow six times.

The selected notes are transposed to D2.
The notes in the bass line follow the chords on the piano track and now they play in harmony. You will give a little movement at the end of the bass line to make the melody lead back down toward the G# note at the beginning of the region.
To transpose notes, you can drag them up or down; however, you have to take care not to shift their position. While you’re dragging notes, you can press and release Shift to limit the dragging motion to only one direction: horizontal (same pitch, different timing) or vertical (same timing, different pitch). While you continue dragging, you can press and release Shift again to toggle that limit off and on.
Select the last two notes in the Piano Roll.
Click-hold the selection, and while you’re holding the mouse button, press Shift, and then continue dragging the selection down by two semitones (to C2).
In the Piano Roll, click the background of the workspace to deselect all notes (or press Shift-D).
Click-hold the last note in the Piano Roll, press Shift, and then drag the note down two semitones (to A#1).

The melody of the bass line works well with the piano chords, but the notes are very short, which makes the bass line sound too staccato and a little stiff. You’ll fix that in the next exercise.
Changing Note Length and Velocity
To make the bass line groove, you’ll lengthen some of the notes to make them sustain longer. To speed up the workflow, you’ll edit multiple notes at a time. First, you’ll lengthen all the notes that are on downbeats.
In the Piano Roll, click the first note to select it.
You will now select all the notes that have the same position (the downbeat) in every bar in the MIDI region.
Choose Edit > Select > Same Subposition (or press Shift-P).
All the notes positioned on a downbeat are selected.
Position the pointer to the right edge of the first note.
The pointer turns into a Resize pointer.
Drag the Resize pointer to lengthen the note to one quarter note (0 1 0 0).

All the selected notes are one quarter note long. Now that you have sustained notes on the downbeats alternating with shorter syncopated notes, the bass line sounds more expressive. Let’s make the last note in the region even longer.
In the Piano Roll, click an empty area (or press Shift-D) to deselect all notes.
Resize the last note in the Piano Roll to three quarter notes (0 3 0 0).

In the Piano Roll, the velocity value is indicated by the color of the note, ranging from cold colors (low velocity) to warm colors (high velocity). Here, a few of the short syncopated notes have a different color (blue), indicating they have a low velocity (they correspond to the kick drum ghost notes you adjusted in Step Sequencer earlier). They sound too soft for this bass line, so you will raise their velocity.
Click one of the blue notes to select it.
Choose Edit > Select > Same Subposition (or press Shift-P).
All the blue notes are selected.
In the Piano Roll inspector, raise the Velocity slider to 100.

The bass line grooves much better with all the notes having a strong velocity. The bass line is loud compared to your drums. Let’s lower it.
In the inspector, on the Jump Up Bass channel strip, lower the Volume fader to around −10 dB.
The bass line is lower in volume. If needed, raise the monitoring volume on your audio interface (or using the Mac computer’s volume control if you’re using the built-in output) to compensate. The resulting level balance of the mix should sound like you’ve raise the volume of your drums.
Tip
While adjusting the velocities of a group of notes, hold down Option-Shift to make all selected notes the same velocity.
Tip
To adjust note velocity, Control-Command-drag the note(s) up or down.
Creating Notes in the Piano Roll
You can use the Pencil tool to create notes in the Piano Roll. You’re going to create a couple of pick-up notes just before the downbeat in bar 3, so feel free to zoom in around bars 2 and 3 for this exercise. In the menu bar, the info display helps you determine the exact pitch and position of the note you’re about to create.
Position the pointer on a G2 on bar 2, beat 4, third sixteenth note (the info display reads G2 2 4 3 1).

Notes you create snap to the previous sixteenth gridline so that even if your info display reads, for example, 2 4 3 193, the note will still be created on 2 4 3 1. To create the G2 note, you will click at that position with the Pencil tool, your Command-click tool. Clicking the Pencil tool creates a note of the length and velocity of the last note you edited or selected.
Command-click.

A sixteenth note is created at 2 4 3 1. You will create a note one semitone higher on the next sixteenth note gridline (2 4 4 1).
Tip
Hover your pointer over a note to display a help tag with the note position, length, and pitch.

Command-click to create a note on G#2 on the next gridline (2 4 4 1).

The two pickup notes sound good; however, let’s lengthen them a little to make them sound legato.
Select the two pickup notes you just created and resize them to make them slightly longer than a sixteenth note (for example, 0 0 1 80).

Now the pickup notes sound legato (their pitch slides from one note to the next). Let’s transpose them one octave lower so that they’re closer to the range of the other notes.
Make sure the two pickup notes are still selected and press Shift-Option-Down Arrow.
The selected notes are transposed one octave down to G1 and G#1. The bass line sounds better. To copy the two notes to every other bar, you’ll use a snap mode.
In the Piano Roll menu bar, click the Snap pop-up menu and choose Bar.

Click one of the two pickup notes and Option-drag to the same pitch, just before bar 5.

The pickup notes are copied just before bar 5. Remember that after you start Option-dragging the notes, you can press Shift to avoid transposing them to another pitch.
Option-drag the two pickup notes to copy them just before bar 7.
The bass line sounds simple, yet it supports the harmony from the piano nicely and is tightly synced with the kick drum in your beat. And the repetitive pickup notes add just enough melodic movement to give the bass line personality and make it stand out.
Creating Pitch Bend Automation in the Piano Roll
To make the bass line more expressive, you can add pitch bend automation, making it sound like a keyboard player is using their pitch bend wheel. You will make the pitch ramp up at the beginning of the first note and the pitch ramp back down at the end of the last note. You will also briefly open the instrument plug-in to adjust the pitch range of the automation you’re creating.
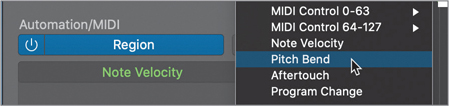
In the Piano Roll menu bar, click the Show/Hide Automation button (or press A).

At the bottom of the Piano Roll, the automation area opens and displays the velocity of each MIDI note. Let’s switch to displaying pitch bend.
At the bottom left of the Piano Roll, click the Automation/MIDI Parameter pop-up menu, and choose Pitch Bend.
In the automation area, click anywhere to create an automation curve.

A point is created at the beginning of the region, and a green horizontal line represents your pitch bend automation curve.
Drag the line vertically to a value of 0.
Let’s make the pitch ramp up on the first note of the bass line.
In the Piano Roll workspace, Control-Option-drag around the first note to zoom in.
In the automation area, click the automation curve to create a point around the middle of the first note.

Drag the first automation point all the way down (to −63).

To zoom out so that you can see all the notes inside a region, make sure no notes are selected, and then press Z (Toggle Zoom to fit Selection or All Content).
Click an empty area of the Piano Roll to deselect all notes, make sure the Piano Roll has key focus, and then press Z.
Listen to the bass line. The pitch of the first note raises two semitones. The MIDI pitch bend events do not include any pitch bend range information, so it’s up to the instrument receiving the events to determine the pitch bend range. You will now open the ES2 instrument plug-in on the Jump Up Bass channel strip in the inspector to increase its pitch bend range.
On the Jump Up Bass channel strip, click the middle of the ES2 plug-in slot.
The ES2 plug-in window opens.
In the ES2, drag the upward Bend range field to 12 semitones (one octave).

The downward Bend range field is set to link, which means that the downward Bend range value is set the same as the upward Bend range value. Now the first note at the beginning of the bass line ramps up one octave.
Close the ES2 plug-in window (or press Command-W).
Continue automating the pitch bend on your bass line; for example, make the pitch drop in the middle of the last note of the bass line.
Tip
Hold down Control-Shift to turn the pointer into an Automation Curve tool and drag the lines joining two points of different values to curve them (you can’t curve a horizontal line).

Tip
To convert a MIDI or Pattern region to audio, Control-click the region and choose Bounce and Join > Bounce in Place (or press Control-B).
You created a MIDI bass line in the Piano Roll. To ensure a tight groove, you used the kick drum notes as a starting point, transposed the notes to the desired pitch, created a few more notes and copied them, and adjusted their length and velocity. You then created MIDI controller data to automate pitch bend, adding expression to the performance. You now have the foundational toolset to program MIDI sequences for any instrument.
Editing Audio Regions and Adding Fades
Audio regions give you a different kind of control over MIDI regions. For example, you can chop them up and slice them to create stuttering and gating effects. You can apply fades at their beginnings and ends to make the volume slowly ramp up and down, avoiding the clicks sometimes generated by cutting Audio regions. And for a bit of fun, you can apply speed fades, emulating the sounds of tape or turntables stopping and starting, a popular effect heard in many recent pop or hip-hop songs.
Slicing a Region
You will import an Apple Loop playing a synth melody and slice it into many smaller regions. You will then resize the individual regions to make them shorter, creating a rhythmic gating effect.
Click the Loop Browser button (or press O).
Search for yearning lead.
Drag Yearning Synth Lead to the empty area at the bottom of the workspace at bar 1.

The synth plays a sustained, legato melody. Let’s zoom in on the region and slice it up.
Control-Option-drag to zoom in on the Yearning Synth Lead region.
You need to zoom in close enough so that you can see the division lines representing sixteenth notes in the ruler.
Click the Left-click Tool menu (or press T).
Click the Scissors tool (or press I).

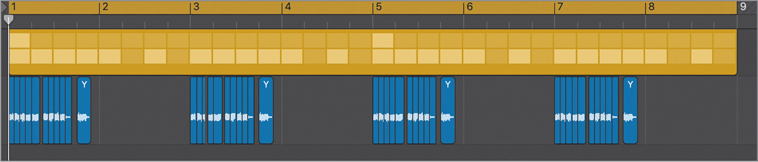
Option-drag the Scissors tool toward the beginning of the Yearning Synth Lead region until the help tag displays Position: 1 1 2 1, release the mouse button first, and then release the Option key.

You have sliced the original region into many new regions following a sixteenth note grid. Note that the first region is not selected. You will select them all and make them shorter to achieve the desired gating effect.

Click the Tool menu and choose the Pointer tool (or press T twice).
Click the Yearning Synth Lead track header to select all the regions on the track.
Choose Edit > Length > Halve.

You now hear a rhythmic, choppy gating effect. It is very repetitive and regular for now; however, having individual Audio regions for each slice gives you a lot of editing flexibility.
Joining and Repeating Regions
Now that you have small Audio regions on every sixteenth note grid line, you will delete some of them and join others together, creating silent gaps and sustained notes to produce a grooving rhythmic pattern. You will be working mainly in bars 1 and 2, so feel free to zoom in and out as needed to perform the edits in this exercise.
On the Yearning Synth Lead track, select the fifth and sixth regions.

Choose Edit > Bounce and Join > Join (or press Command-J).

Because the two regions refer to the same audio file, the cut between the two regions is healed and the audio material in the original audio file is used for the longer region that is now replacing the short ones you joined together. To create a rhythm pattern for this sliced synthesizer, let’s remove some regions and join a few others.
Select the region just before the fourth beat of bar 1 (at 1 3 4 1).
Press Delete.
Select the following three regions (at 1 4 1 1).
Choose Edit > Bounce and Join > Join (or press Command-J).

The cuts between the selected regions are healed and you have a longer region. You will now delete all the regions to the right of that longer region.
Select the region immediately to the right of the selected region (or press Right Arrow).
Choose Edit > Select > All Following (or press Shift-F).
All the regions to the right of the selected region are also selected.
Press Delete.
You now have your chopped synth pattern. To repeat it every two bars, you will first make a marquee selection to determine the section of the track you want to repeat. Make sure you zoom out to prepare for that next step. By default, the Marquee tool is the Command-click tool.
Command-drag to select 1 1 1 1 to 3 1 1 1.

Choose Edit > Repeat Once (or press Command-R) three times.
The marquee selection is repeated three times.
Click an empty area in the workspace to clear your marquee selection and listen to your work.
The sliced synth loop adds a fun gated sound effect, which adds energy to the song. It’s a little choppy right now, so in the next exercise you’ll use fades to soften the edits.
Adding Fades to Audio Regions
To remove all the clicks you heard earlier, and to smooth out the attack and release of all the regions, you will select all the regions on the Yearning Synth Lead track and apply fade-ins at the beginning and fade-outs at the end of all the regions at once. You will later convert some of these volume fades into speed fades to create the classic turntable start/stop effects.
Click the Yearning Synth Lead track header.
All regions on the track are selected. When you apply a fade to one of the regions, all the selected regions will have the same fade applied.
Click the Solo button on the Yearning Synth Lead track header (or press S).
Listen to the soloed synth track; each region starts and stops abruptly. If you pay close attention, you can hear clicking sounds at the region start and end positions.
In the Tracks view menu bar, click the Left-click Tool menu and choose Fade Tool (or press T to open the Tool menu and then A to choose Fade Tool).
Control-Option drag around two or three regions to zoom in.
To draw fades on multiple regions, you need to make sure all the regions stay selected, so you can’t start dragging by clicking an empty space between regions. You will start dragging by clicking inside the region, and draw a fade-in from right to left over the beginning of the region.
On one of the Yearning Synth Lead regions, drag from inside the region toward the left, outside the region.

To apply a fade, always ensure that you drag over a region’s boundary, or nothing will happen. You can create fades only over region boundaries. Here, the rectangular frame should cover the beginning of the region.

Fade-ins are created on all the selected regions. The position where the rectangular frame ends in the region determines the length of the fade. When you release your mouse button a fade-in of the same length is applied to all selected regions on the track. Let’s add fade-outs now.
Tip
To remove a fade, Option-click the fade with the Fade tool.
Drag the Fade tool from inside the region toward the right outside the region.

Fade-outs are created on all selected regions. You can adjust the lengths and curves of your fades to fine-tune their sound. When moving the pointer over the side or a middle of a fade, the pointer changes, indicating that you can resize or curve the fade, respectively.
Place the Fade tool on the right side of a fade-in (or the left side of a fade-out), and drag horizontally to resize it.

Place the Fade tool in the middle of a fade, and drag horizontally to curve it.

Feel free to continue adjusting all your fade lengths and curves, listening to your edits each time, until you get them to sound the way you want. The beginning of all the regions have a smoother attack and no longer produce a click sound.
Click the Tool menu and choose the Pointer tool (or press T twice).
You can convert a volume fade into a speed fade to emulate the sound of a tape or turntable starting or stopping at a region boundary. In each two-bar pattern, let’s add a speed-up fade at the beginning of the first region and a slow-down fade at the end of the last region. You will use the Select > Same Subposition key command you used earlier in the Piano Roll.
Click an empty area in the workspace (or press Shift-D) to deselect all regions.
On the Yearning Synth Lead track, click the first region to select it, and then press Shift-P.
All four regions positioned on a downbeat are selected (at bars 1, 3, 5, and 7). You may need to zoom out if you want to see the four selected regions.
On the first selected region, Control-click the fade-in and choose Speed Up.

The fade-in turns orange, indicating that it is now a speed fade. Listen to it; the speed-up fade sounds just like a tape or turntable starting. Feel free to adjust the length and curve of the speed fade just as you would a volume fade.
Click the last region in bar 1 to select it, and then press Shift-P.
All four regions at the same subposition are selected.
On one of the selected regions, Control-click the fade-out and choose Slow Down.

Adjust your speed fades lengths and curves until it sounds good.
Tip
To create a fade or to adjust its length or curve with the Pointer tool, Control-Shift-drag.
Choose File > Save (or press Command-S) to save your project.
Creating Apple Loops
To save a beat, bass line, or riff that you may want to reuse in future projects, you can convert Audio, MIDI, Pattern, or Drummer regions into Apple Loops. Your Apple Loops will automatically match the tempo (and when appropriate, the key) of the project into which you import them. In this exercise, you will save your sliced Yearning Synth Lead region into a new Apple Loop. First, you’ll consolidate all the slices into a new 8-bar audio file.
Command-drag from 1 1 1 1 to 9 1 1 1.

Choose Edit > Bounce and Join > Join (or press Command-J).
An alert asks you to confirm that you want to create a new audio file.
In the alert, click Create.
A new 8-bar-long Yearning Synth Lead audio region is created on the track.
Drag the Yearning Synth Lead merged region to the Loop Browser.

The “Add Region to Apple Loops Library” dialog opens.
Note ▶
When dragging a region to the Loop Browser, you can create loops only when the number of beats in the region is an integer. This function uses the project tempo to tag the transient positions and works best for audio files that match the project tempo. If the selected region’s number of beats is not an integer, the Type parameter will be set to One-shot and dimmed, and the resulting Apple Loop will not automatically match a project’s tempo and key.
In the dialog, enter or choose the following:

Name: Sliced Synth
Type: Loop
Scale: Minor
Genre: Hip Hop/R&B
Key: C
Instrument Descriptors: Keyboards > Synths
Keyword buttons: Single, Clean, Electric, Relaxed, Cheerful, Dry, Grooving, Melodic, and Part
Click Create (or press Return).
Logic bounces the section as a new Apple Loop and indexes it in the Loop Browser. Let’s try to find it.
In the Loop Browser, search for sliced.

Your new Apple Loop appears in the search results.
Choose File > Close Project (or press Option-Command-W) and don’t save.
If you want to hear the result of the completed exercises in this lesson, you can open an example project and compare it with your work.
Open Logic Book Projects > 07 Future Nostalgia.
Take a moment to explore the project and listen to the individual tracks.
Choose File > Close Project (or press Option-Command-W) and don’t save.
Creating your own Apple Loops is a good way to catalog your own production elements. The next time you stumble upon a great idea for a beat, a riff, a bass line, or a chord progression that may not be a good fit for the current project, don’t throw it away—consider adding it to your Apple Loops library to save it for later.
In this lesson, you have edited Pattern regions in Step Sequencer to create a drumbeat and step automation for a plug-in, programmed a bass line’s MIDI notes and pitch bend automation in the Piano Roll, and edited a synthesizer Apple Loop in the Tracks view, slicing and joining Audio regions and applying volume fades and speed fades. With a growing number of tools and techniques to make your musical ideas come to life, you’re really sharpening your music producer skills!
Key Commands
Keyboard Shortcuts
General |
|
|---|---|
Shift-P |
Selects notes (Piano Roll) or regions (Tracks view) on the same subposition |
Option- |
Trims a region to fill the space within the locators |
Command-J |
Joins the selection into one region |
Shift-F |
Selects all following |
T |
Opens the Tool menu |
T |
Reverts to the Pointer tool (when the Tool menu is open) |
|
|
Tracks view |
|
Control-Option-Command-M |
Converts Pattern or Drummer region to MIDI |
Control-B |
Opens the Bounce in Place dialog |
Control-Shift-Return |
Creates a new track assigned to the same channel strip |
|
|
Piano Roll |
|
Option-O |
Toggles the MIDI Out button |
A |
Toggles the automation area |
|
Keyboard Shortcuts |
|
Step Sequencer |
|
’ (apostrophe) |
Turns the selected step on or off |
Option-Shift-B |
Opens or closes the Pattern Browser |
Option-Command-L |
Toggles the Learn mode |
Command-Delete |
Deletes the selected row |
Control-Shift-Command-Delete |
Clears the current pattern |