
Lesson 10. Mixing
Lesson Files: Logic Book Projects > 10 Lights On
Time: This lesson takes approximately 90 minutes to complete.
Goals: Adjust volume levels and pan positions
Filter frequencies with an equalizer plug-in
Add depth with delay and reverberation plug-ins
Use compressor and limiter plug-ins
Draw automation curves offline
Record live automation
Export the mix as a stereo audio file
Mixing is the art of blending all the instruments and sounds into a sound field. A good mix can make the difference between an amateur demo track and a professional production. Mixing should carefully balance two goals: combining all the elements into a cohesive whole and, at the same time, keeping them sufficiently defined so that listeners can distinguish among them. In other words, make the musicians sound as if they are playing in the same room, while ensuring that they don’t mask one another and muddy the mix. A good mix is like a completed puzzle in which all the pieces (all the instruments) fill their proper places in the sound field without overlapping.
When mixing, it’s also fundamental to be faithful to the genre of the song. In Lesson 9, you worked with a song, “Moments,” that had a larger-than-life polished sound because the dance music genre is often mixed for large public address (PA) systems and nightclubs in mind.
In this lesson, you will work with an indie-folk song in the context of a modern pop production that combines many layered instruments and vocal tracks to achieve a more realistic and intimate sound while still being big and full of energy.
Organizing Windows and Tracks
A little organization can go a long way toward making your mixing session more productive. It can save time by minimizing the need to constantly open and close panes, or zoom and scroll the workspace to locate tracks or navigate the song. The more you streamline your workflow, the easier it will be for you to focus on finding a place in the mix for each specific sound or instrument.
Using Track Stacks to Create Submixes
As you build an arrangement, you may find yourself layering multiple instrument and vocal tracks to get a fuller sound. Modern pop productions often use short sound effects in strategic positions in the arrangement to keep renewing the excitement throughout the song. All those elements add up and increase the track count. Without organization, the Tracks view can quickly become bloated and make trying to find the tracks you want to adjust frustrating.
In Logic, Track Stacks allow you to display a group of tracks as a single track in the Tracks area. The stack can be opened when you need to access individual tracks. In this lesson, you will be working with a song that contains many tracks that are submixed in groups of related tracks—such as all the microphones used to record a drum kit, all the guitar tracks, or all the sound effects peppering the mix with ear candy. Let’s explore the song, and then create a new summing Track Stack to submix an ensemble of backup vocal tracks that you will later process as a group.
Open Logic Book Projects > 10 Lights On.
Look at the track number on the last track at the bottom of the Tracks view (Ami falsetto). This project contains 86 tracks! Some of the tracks are grouped in Track Stacks, recognizable by the disclosure triangle next to the track icons: Live Drums (Track 1), Program Drums (Track 13), Guitars (Track 33), Keys (Track 48), and FX (Track 58).
Note ▶
To work with a manageable number of tracks in this lesson, some of the tracks in this project were bounced into single audio files (for example, the backup vocals on Track 79). The original Logic project contained over 150 tracks. Although that may seem like a lot of tracks, in modern pop music production, it’s not unusual to work with such large track counts.
On the Live Drums track (Track 1), click the disclosure triangle next to the icon (or press Control-Command-Right Arrow).

The Track Stack opens. You see 11 subtracks for all the microphones used to record this drum kit.
Click the triangle again (or press Control-Command-Left Arrow) to close the Track Stack.
Let’s open all the Track Stacks to see all 86 tracks.
On any Track Stack, Option-click the disclosure triangle next to the icon.
All five Track Stacks open.
In the Tracks view menu bar, to the right, click the Vertical Auto Zoom button.

Even at this low vertical zoom level, you may not see all 86 tracks at once. Feel free to scroll down to see all the tracks. Let’s close the Track Stacks.
On any Track Stack, Option-click the triangle to close all the Track Stacks.
In the Tracks view menu bar, click the Vertical Auto Zoom button to turn it off.
Listen to the song. The mix sounds good, but a few instruments need work. Feel free to open Track Stacks, and use Solo mode to focus on individual tracks or groups of tracks. The Lead Vocal (Track 78) is raw, and you will process it with EQ, compression, delay, and reverb. In the Pre 2 section, you will automate a track in the FX stack to make it ramp up in volume throughout that pre-chorus. In the Break section, you will automate the pan of the vocal chops inside the FX stack to make them move on either side of the stereo field. Later, you’ll give your entire mix a quick mastering treatment to add excitement, thicken the sound, and optimize the loudness.
Let’s create a Track Stack for the green and blue backup vocal tracks at the bottom of the workspace.
Click the Duvid disto track header (Track 80).
Shift-click the Ami falsetto track header (Track 86).

Choose Track > Create Track Stack (or press Shift-Command-D).
In the Track Stack dialog, make sure Summing Stack is selected, and click Create (or press Return).
All the selected backup vocal tracks are packed into a Track Stack. You will later use this summing Track Stack to process all the backup vocals together. Let’s name the Track Stack and choose an icon.
Rename the track Heys.
On the Heys track header, Control-click the icon and choose an icon appropriate for backup vocals.
Click the triangle to close the Heys Track Stack.

The Tracks view is streamlined, which will make it easier to find your way around the tracks. Now that you have fewer visible tracks, you can zoom in a bit vertically.
Click an empty area in the workspace (or press Shift-D) to deselect all regions.
Press Z.
The tracks are zoomed in vertically to fill the workspace.
When working with high track counts, consider creating summing Track Stacks for groups of instruments (such as drums, guitars, keyboards, and vocals) to streamline your workspace and to make it easy to process and mix ensembles of related tracks.
Using Screensets to Switch Between the Tracks Area and the Mixer
When mixing projects with many tracks, navigating the Tracks view can be a challenge when the Mixer pane is open at the bottom of the workspace. In this lesson, you will use two screensets to save different window layouts. One screenset will display your main window, and the other will include your Mixer. As you work on the mix, you can recall each of these screensets using key commands.
Let’s create the two screensets and study their behaviors.
At the top of your screen, look at the main menu bar.
The Screenset menu displays the number of the current screenset (1).
Click the Screenset menu to open it.
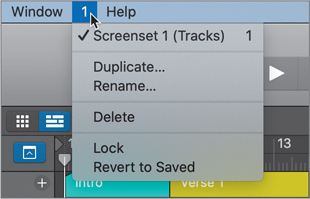
The menu lists only one screenset, with a default name in parentheses, Screenset 1 (Tracks). To create a new screenset, you only have to press a number key.
Close the Screenset menu.
Press 2.
Note ▶
If you use an extended keyboard with a numeric keypad, make sure that you press the 2 key on the alphanumeric keypad. You can use the numerical keypad to go to the markers in the Marker track.
A new screenset is created with a main window of a different size and zoom level from screenset 1.
Choose Window > Open Mixer (or press Command-2).
A Mixer window opens on top of the main window. You won’t need the main window in screenset 2, so let’s close it.
Click the main window beneath the Mixer window to bring it to the front, and press Command-W to close it.
Let’s make the Mixer window bigger.
In the Mixer title bar at the left, Option-click the green window zoom button.

The Mixer window occupies the full width of the screen.

Click the Screenset menu.

The menu lists the two screensets with an appropriate default name for each.
From the Screenset menu, choose Screenset 1 (Tracks), or press 1.
Screenset 1 is recalled, and you can see the main window.
By default, screensets are unlocked. You can open multiple windows, adjust their sizes and positions, open the desired panes, choose different tools, and so on, and the screenset will memorize your layout.
Control-Option-drag around any region to zoom in on it.
Press 2 to recall screenset 2, and press 1 to recall screenset 1.
Screenset 1 is recalled with the zoom adjustments you made in step 10.
When you’re happy with the arrangement of a screenset, you can lock it to make sure that it always returns in that state. First, let’s zoom out.
Make sure no regions are selected and press Z.
In the workspace, you can see all your regions again.
From the Screenset menu, choose Lock.

A dot appears next to the Screenset menu to indicate that the current screenset is locked. Let’s observe the behavior of a locked screenset.
Zoom in on a region, change the tools in your tool menus, open some panes such as a browser and an editor, and open some windows from the Window menu.
Press 1 to recall screenset 1.
The screenset is recalled in the state it was when you locked it, and all the changes you made in step 13 are lost.
Press 2 to recall screenset 2.
From the Screenset menu, choose Lock to lock screenset 2.
You have adjusted the layout of two screensets to easily switch between the Main window and the Mixer using the number keys. To accomplish a task in your project, you’ll often zoom in, open panes and windows, or change tools. When you’re finished with the task, recalling a locked screenset with only the Tracks view open at a zoom level where you can see all the project’s regions and with your default tools selected saves a lot of time.
Customizing a Locked Screenset
In the previous exercise, you learned that locked screensets are always recalled in the state in which you locked them. When you want to customize a screenset that was previously locked, you can unlock it, apply the desired changes, and lock it again.
You will now customize the Mixer window in screenset 2 to display only the tools you need in this lesson.
Make sure you are in screenset 2 (the Mixer window), and from the Screenset menu, choose Unlock.
After making a decision during a mixing session, you will want to quickly locate the components you need on the correct channel strip in the Mixer. However, by default, the channel strips in the Mixer window show you nearly all the available channel strip components. Because you won’t need to access some of them, you can hide them.
In the Mixer window, choose View > Configure Channel Strip Components (or press Option-X).
In the shortcut menu, deselect Audio Device Controls, Setting Menu, MIDI Effects, Group, and Automation, and select Track Number.

The features you don’t need are now hidden, and track numbers are displayed at the bottom of channel strips, which makes them easier to identify.
Click outside the shortcut menu to close it.
Some of the track, plug-in, and output names are abbreviated to fit the narrow channel strips. For example, Track 79’s channel strip is displayed as “Back…ocals.” You can choose to view wide channel strips, which are easier on the eyes and avoid name abbreviations.
In the Mixer, click the Wide Channel Strips button.

The channel strips grow wider. The name on Track 79’s channel strip is now “Backup Vocals.”

To avoid any further changes to this screenset, let’s lock it again.
From the Screenset menu, choose Lock to lock screenset 2.
Press 1 to recall screenset 1.
You took the time to get rid of the clutter in the Mixer, which will reward you later when you have to quickly identify channel strip, see where they are routed, and adjust their settings.
Adjusting Volume, Pan, EQ, and Reverb
To give an instrument its place in the sound field, you can adjust four parameters: the instrument’s volume, its lateral position in the sound field, its depth or distance, and its frequency spectrum. Those parameters are interrelated, and changing one often means that you will need to readjust the others.
You will now mix the ensemble of backup vocals that you packed into a summing stack in a previous exercise. You will first adjust their volume balance, spread them out in different positions in the stereo field, EQ their submix, and send it to a bus to apply reverb.
Balancing Volume Levels
When you start producing, adjusting the volume of instruments seems like an obvious task that can easily be overlooked to spend time on more advanced challenges like EQ or compression. However, to achieve a professional mix, finding the right levels for each individual track is of paramount importance. A vocal mixed even slightly too low will make the listener strain to decipher the lyrics, and a snare that’s just a tad too loud can quickly become jarring and make the listener lose interest. To avoid those costly mistakes, make sure you take the time necessary to focus on the volume of each instrument.
You will first create a cycle area, and then you’ll open screenset 2 to see the Mixer and balance the Volume faders of the backup vocals channel strips.
On the Heys track (Track 80), click the first Heys region (at bar 58) to select it.

Choose Navigate > Set Locators by Selection and Enable Cycle (or press Command-U).
Cycle mode is turned on the cycle area that corresponds to the selected Heys region.
Make sure the Heys track (Track 80) is selected.
Press 2 to open screenset 2 and see the Mixer.
The Heys Track Stack’s channel strip is selected, making it easy to find it.
At the bottom of the Heys channel strip, click the disclosure triangle.

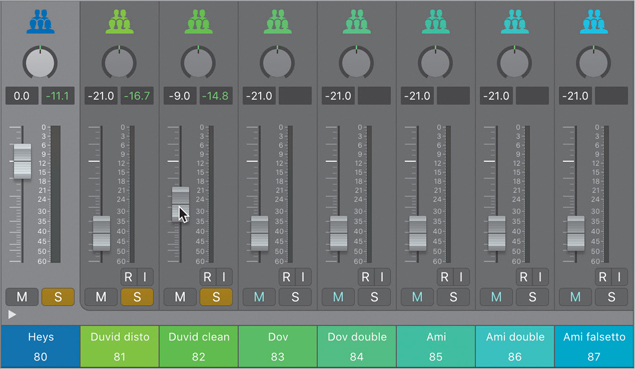
The Heys Track Stack opens, and you can see the subtrack channel strips. Look at the channel strip names. There are two tracks for Duvid, two for Dov, and three for Ami.
Click the S button on the Heys channel strip (or press S) to solo it.
Listen to the ensemble of backup vocals singing “hey, hey, hey….” Let’s start balancing Duvid’s two tracks so that they’re about the same level.
Click the S button on the Duvid disto and Duvid clean channel strips.
You hear mostly Duvid disto, but Duvid clean is too soft.
Drag the Volume fader on Duvid clean all the way up and all the way down.
Turning a track’s volume all the way up and then down allows you to clearly identify what that track sounds like within an ensemble of tracks, and it helps you find a good level to balance it with other tracks. You can also drag the Volume fader of Duvid clean all the way down, listen to only Duvid disto for a few seconds, and then slowly raise the volume of Duvid clean until it sounds like both tracks have the same loudness.
Drag the Duvid clean Volume fader to −9.0 dB.
To double-check that the two tracks are equally loud, you’ll make sure you don’t hear a jump in level when soloing one or the other during playback.
Option-click a Solo button on any of the soloed channel strips (or press Control-Option-Command-S) to clear all Solo buttons.
Click the Solo button on the Duvid disto channel strip.
Start playback and Option-click the Solo button on the Duvid disto and Duvid clean channel strips.
The Duvid disto track still sounds louder than the Duvid clean track.
Drag the Duvid clean Volume fader up to −7.0 dB.
The two tracks now have roughly the same perceived loudness.
Continue balancing the levels of the backup vocals in the Heys Track Stack, Option-clicking their Solo buttons one at a time, comparing their perceived loudness against the two Duvid tracks (and against each other). Different singers have different timbres, were recorded at different levels, and are processed with different audio effect plug-ins, so vastly different amounts of gain may need to be applied to them in order to be perceived at the same loudness.
Option-click the Solo button on the Heys channel strip (Track 80).

You can now hear a balanced submix of the seven voices. Every individual backup vocal can be heard clearly, which makes for a richer- and thicker-sounding vocal ensemble.
Panning in the Stereo Field
In real life, our brain determines the position of a sound source in space by comparing the sounds arriving in our left and right ears. We compare different parameters such as time, frequency spectrum, and level. In a mixer, we localize sounds in the horizontal plane by adjusting the relative levels sent to the left and right speakers.
When a mono channel strip’s Pan knob is centered, the mono signal is sent to both the left and the right speakers at equal levels, making that sound perceived as coming from the center of the stereo field, right in the middle of the left and right speakers. As you turn the Pan knob, for example to the left, the level sent to the right speaker is decreased, and we perceive the sound coming from the left side of the stereo field. When the pan is all the way to the left (which is known as panning “hard left”), no signal is sent to the right speaker. All the signal comes from only the left speaker, and we perceive the signal coming from that direction.
In the Heys Track Stack, the three singers sharing the backup vocal duties each have a couple of tracks. To spread them out, you’ll work with one singer at a time, panning their tracks on either side of the stereo field.
Solo the Duvid disto and Duvid clean tracks.
Duvid disto is heavily processed by a guitar amp plug-in and has a unique character, whereas Duvid clean sounds natural. To blend the two timbres together, you’ll keep them fairly centered but separate them slightly so that they’re on either side of the stereo field.
On the Duvid disto channel strip, drag the Pan knob down to −11.
On the Duvid clean channel strip, drag the Pan knob up to +13.

The two vocals are separated, and it’s already easier to tell them apart, which makes their mix wider and richer sounding.
Tip
When panning tracks, monitoring your mix with headphones helps clearly localize sounds even when using subtle amounts of panning. At the same time, headphones tend to exaggerate the width of your mix, whereas speaker monitors give you a more realistic image. For best results, alternate between monitoring with speakers and headphones.
You will pan the two Dov backup vocals hard left and hard right to give a lot of width to the ensemble.
Solo the Dov and Dov double tracks.
Pan Dov all the way to the left (−64) and Dov double all the way to the right (+63).

You will pan the Ami and Ami double tracks to fill the rest of the stereo field.
Solo the Ami and Ami double tracks.
Pan Ami to −31 and Ami double to +34.
Let’s listen to the ensemble.
Option-click one of the yellow Solo buttons (or press Control-Option-Command-S) to clear all Solo buttons.
Solo the Heys Track Stack.

On the Ami falsetto track, Ami sings one octave higher, which gives that track a unique character, and you will keep that track in the center of the mix. All the backup vocals are now nicely separated, and it sounds like a group of singers placed in different positions in front of you.
Click the Solo button on the Heys Track Stack (or press Control-Option-Command-S) to unsolo it.
At the bottom of the Heys channel strip, click the disclosure triangle to close the stack.
Press 1 to recall screenset 1.
Panning the vocal tracks in different positions across the stereo field gives width to the ensemble. Separating the singers in the horizontal plane allows the listener to better distinguish each individual performance, producing a richer, livelier mix.
Equalizing the Frequency Spectrum
The sound of an instrument consists of several frequencies mixed together in varying amounts. By applying an EQ plug-in to attenuate or boost certain ranges of frequency, you alter the timbre of the sound, much as you would change the sound of your music player by tweaking the bass or treble EQ settings.
EQ plug-ins help shape the frequency spectrum of your instruments, focusing them in a specific frequency range and helping each instrument cut through the mix. Equalizing (EQ’ing) an instrument can also decrease undesirable frequencies in its recording to make it sound better and keep it from masking other instruments in the same frequency range.
In the Heys section, the mix contains deep, low-frequency elements on nearly every track in the song. If you solo the tracks, you’ll hear a subkick on Track 13, the bass plays low notes on Track 30, the guitars play heavily distorted chords on Track 33, and the keyboards play ultra-deep dubstep wobbly sounds on Track 48. To allow the backup vocals to soar above this massive mix of low-frequency elements, you’ll cut off all low-frequency content from their submix. Make sure the Heys track (Track 80) is selected, and solo it.
In the inspector, on the Heys channel strip, click the thumbnail EQ display.

A Channel EQ plug-in is inserted in the first slot of the Audio FX area, and the plug-in window opens.

The Channel EQ plug-in allows you to adjust eight bands of EQ. You can toggle a band on and off by clicking the button at the top of that band. By default, the first and last bands are turned off, and all the other bands are turned on. Each band’s settings are shown below the graphic display in the EQ band fields. All the bands that are turned on by default have their Gain parameters set to 0.0 dB, and in the graphic display, the EQ curve is flat, which means that the Channel EQ is not currently affecting the audio signal on the channel strip.
The Analyzer button toggles the frequency analyzer, which displays the post-EQ frequency spectrum curve of the sound on the graphic display when the track is playing.
Click the Band 1 On/Off button to turn it on.

The first EQ band’s shape (a low-cut filter) appears on the graphic display. You can see that the low frequencies are slightly attenuated around 20 Hz.
You can use the Space bar to start playback so that you can hear the results of your adjustments in the Channel EQ plug-in.
In the EQ band field, drag the frequency up to around 1000 Hz.

A lot of low-frequency content is cut off and the backup vocals sound tiny. Let’s back up and cut off a more reasonable amount of low frequencies.
Drag the frequency to around 500 Hz.
The backup vocals sound fuller again, but without the muddy low frequencies. To make the low cut a little stronger while keeping the frequencies above 500 Hz, you can make the EQ curve’s slope steeper.
Below the frequency, drag the slope up to 24 dB/Octave.

Listen while toggling the Channel EQ off and on. You can also try unsoloing the Heys Track Stack to compare the backup vocals with the Channel EQ off and on within the context of the rest of the mix.
You’ve used the Channel EQ plug-in to change the frequency spectrum of the backup vocal Track Stack. Cutting off the low frequencies helps give this vocal ensemble its place in the frequency spectrum of the mix, leaving ample room for the low-frequency elements on the other tracks.
Adding Depth and Distance with Delay and Reverb
You will now use a couple of different delay plug-ins to position two of the vocals in different spaces: You’ll place one of Duvid’s vocals in an intimate space at a short perceived distance, and one of Ami’s vocals further away in a larger space to give depth to the mix. Then you’ll add reverb to the sum of the backup vocals to give dimension to the ensemble and make the group of vocals more coherent.
Press 2 to recall screenset 2.
At the bottom of the Heys channel strip, click the disclosure triangle to open the Track Stack.
Solo Duvid disto (Track 81).
In the Audio FX area, click a slot below the Guitar Amp Pro plug-in and choose Delay > Tape Delay.
By default, the plug-in creates a 1/4 note echo. Let’s dial in a shorter slapback echo effect and make it more subtle.
Click the Note pop-up menu and choose 1/16.

The singer sounds like he’s in a more intimate space. Let’s make the effect a little more subtle.
In the Tape Delay Output section, drag the Wet slider down to 13%.

On the Ami track, let’s add a longer delay effect.
Close the Tape Delay plug-in window (or press 2 to recall screenset 2).
On the Ami channel strip (Track 85), Option-click the Solo button.
In the Audio FX area, click the slot below the Compressor plug-in and choose Delay > Echo.
Click the Note pop-up menu and choose 1/8 Dotted.
Drag the Feedback knob down to 33%.
Drag the Wet slider down to 6%.

Ami sounds like he’s in a larger room.
Close the Echo plug-in window (or press 2 to recall screenset 2).
If you scroll to the right of the Mixer, you’ll see an Aux named Vocal Verb that has its input set to Bus 12. The Aux was set up to process vocal tracks in the song through a Space Designer reverb plug-in and a Channel EQ to cut off low frequency on the reverberated signal. To add reverb to the ensemble, you’ll send the main track of the Heys Track Stack to that Aux.
On the Heys channel strip, Option-click the Solo button.
In the Sends section, click the first Send slot and choose Bus 12 > Vocal Verb.
Drag the Send Level knob up all the way up, and then all the way down.
You can clearly hear the reverb effect added by dialing in the Bus 12 Send Level knob.
Drag the Send Level knob to around −25 dB.

Unsolo the Heys channel strip and close the Track Stack.
Press 1 to open screenset 1.
Click the cycle area (or press C) to turn off Cycle mode.
Listen to the song starting in the Break section a little before the Heys section (at around bar 53). The backup vocals need to come down in level within the mix.
In the inspector on the Heys channel strip, drag the Volume fader down to around −3.1 dB.
You’ve created different delay effects to place individual singers in virtual rooms of different sizes. The perception of having the backup singers in different spaces gives depth to the ensemble, and processing them all through the same reverb brings them together into a cohesive whole.
Processing Lead Vocals
In mainstream pop music as in many other genres where the song is the generic format, the lead vocals are the single most important element of the mix. A great deal of care must be taken to get the best possible sound for the singer. To achieve that goal, two fundamental plug-ins in your toolbox are an EQ and a compressor. An EQ helps carve the frequency spectrum to help the vocal cut through a mix that is already populated with many layered instruments and sound effects. The compressor gives the singer a consistent level to make sure that they don’t pop out of the mix (which can almost sound like they’re singing on top of an instrumental record played on another reproduction system) or that they don’t fall below the other instruments (which would make the listener strain to hear the lyrics).
EQ’ing to Shape the Frequency Spectrum
To shape the frequency spectrum of a vocal track, you will use the Channel EQ plug-in to attenuate some of its low rumbling, cut a metallic ringing frequency, and tame some of the higher frequencies.
Select and solo the Lead Vocals track (Track 78).
Choose Navigate > Set Locators by Selection and Enable Cycle (or press Command-U).
On the Lead Vocals channel strip in the inspector, click the EQ thumbnail display to insert and open a Channel EQ plug-in, and start playback.

A curve appears in the graphic display, showing the sound’s frequency spectrum in real time. Listen closely to the vocals as you watch the occasional movement in the very low range of frequencies (to the left). In certain places, you can hear some low-frequency content in the recording, especially at the beginning of verse 2 where Duvid sings, “You got to shatter the silence with your beautiful noise.” The very beginning of the word “you” has content just above 100 Hz that makes the attack of that word too boomy. The fricatives “b” and “f” in the word “beautiful” create some very low-frequency content (down to the 40 Hz area), which results in popping sounds that may be challenging to detect on smaller speaker monitors or for an untrained ear but that are clearly visible on the frequency curve.
You will filter out those undesirable low frequencies.
At the upper left, click the Band 1 On/Off button to turn on the low cut filter.
The first EQ band’s shape appears on the graphic display. You can see that the low frequencies are slightly attenuated around 20 Hz.
In the EQ band field, drag the Frequency parameter of the first band up to around 400 Hz.

The EQ band shape updates in the graphic display. In the frequency curve displayed by the Analyzer, you can watch the low-frequency content disappear from the vocal signal. You can hear the undesired low-frequency content disappear, and the vocal sound is focused in the mid-range.
Tip
To undo a plug-in parameter change, from the plug-in window’s Settings pop-up menu, choose Undo. Choose Include Plug-In Undo Steps in Project Undo History when you want to use Command-Z to undo plug-in parameter changes.
Now you will attenuate the nasal, metallic twang frequency that makes the vocal sound a bit too much like the vocalist is singing in a tin can. Instead of adjusting the numerical settings in the parameter section, you’ll drag the pointer in the graphic display to adjust the shape of individual bands.
Position the pointer over the upper half of the graphic display, and without pressing the mouse button, move the pointer from left to right.

As you move the pointer horizontally, the EQ band fields are shaded in different colors at the bottom of the Channel EQ to show you which EQ band is selected. You can shape the curve of the selected band by dragging in the graphic display:
To adjust the gain, drag vertically.
To adjust the frequency, drag horizontally.
To adjust the Q (or width, or resonance), vertically Option-Command-drag the pivot point (which appears at that band’s frequency).
You first need to adjust the band’s gain to see its shape on the graphic display.
Position the pointer to select the fifth band, which is currently set to a frequency of 1040 Hz.
You will use the classic seek-and-destroy EQ-ing approach: First, boost a narrow range of frequency, sweep the boost across the frequency spectrum to find the offending frequency, and then reduce the gain of the EQ band to attenuate that frequency.
Drag up so that the Gain parameter below reads +15.0 dB.

The shape of the selected EQ band appears on the graphic display, and the settings below are adjusted accordingly. Let’s narrow down the frequency boost.
In the EQ band field, drag the Q parameter to around 0.80.

Now, while listening to the vocal, you will sweep the frequency of the EQ band you are boosting. When dragging a band on the display, you can hold down Command to limit the dragging motion to a single direction, either horizontal (to adjust only the frequency) or vertical (to adjust only the gain).
Command-drag the band to the left and to the right, and settle on a frequency of 3260 Hz.

The metallic tin can–sounding frequencies are highly exaggerated, and you know you’ve found the right frequency to cut.
Command-drag the band down so that the Gain parameter reads −13 dB.

The vocal sounds less twangy. Remember to click that EQ band’s On/Off button to compare the vocal sound with and without that EQ band applied.
Now you can remove some of the high frequencies to help focus the lead vocal in the mid-range of the spectrum.
Click the On/Off button of the last frequency band to turn on the high-cut filter.

Turn the frequency down to 8400 Hz.

The vocal now sounds tighter, focused in the mid-range, which helps make the lead singer cut through this busy, layered mix. Let’s compare the sound of the vocal with and without the Channel EQ. To make up for the loss of volume after cutting the three bands of frequency, you can turn the gain up in the Channel EQ.
To the right of the EQ curve, drag the Gain slider up to +3.0 dB.

In the plug-in header, toggle the On/Off button a few times.
The level discrepancy between the dry and EQ’ed vocal is minimal so that you can focus on the difference in the frequency spectrum between the two. The EQ’ed vocal is more focused in the mid-range, which makes it tighter and punchier and will help it cut through the mix.
Close the Channel EQ plug-in window (or press 1 to recall screenset 1).
Unsolo the Lead Vocal track.
Feel free to compare the dry and EQ’ed vocal in the context of the mix. However, because the Lead Vocal track’s level is inconsistent throughout the song, you may have to raise its Volume fader a bit. You will level those volume inconsistencies with a compressor in the next exercise.
By applying an EQ plug-in to the vocal, you shaped its frequency spectrum to eliminate unwanted low-frequency noises and clarify the vocal, establishing its appropriate place in the frequency spectrum of the mix.
Compressing Vocals
When recording instruments, musicians rarely play all the notes at the exact same volume. Singers need more energy to reach higher pitches, and they relax to sing low pitches, resulting in uneven loudness throughout a melody line. This variation can become a challenge when mixing, because some of the notes stick out and others are buried in the mix.
A compressor attenuates a signal when its level goes above a specific threshold. You can use it to lower the volume of loud notes and then raise the overall level of the instrument to increase the volume of softer notes.
In this exercise, you will apply a compressor plug-in to even out the dynamic range of a vocal track, making sure that you can hear all the words at the same level. To focus on the balance of lead vocals against the rest of the mix, you’ll mute the backup vocal track.
On the Backup Vocal track (Track 79), click the Mute button.
If you’ve adjusted the level of the Lead Vocal track at the end of the previous exercise, you need to return it to its previous level for this exercise.
On the Lead Vocals channel strip (Track 78), make sure the Volume fader is set to −12.1 dB.
Listen to the mix (minus the backup vocals). The Lead Vocals start at a decent volume, but at some point in Chorus 1, they start getting completely drowned in the rest of the instruments in the mix. In the middle of verse 2 (at bars 30 and 31), they get really inconsistent, mostly weak, with some consonants shooting up in level. Let’s work on that section.
Click the cycle area (or press C) to turn off Cycle mode.
In the upper half of the ruler, drag a cycle area from bar 29 to bar 32.

Feel free to toggle playback on and off as needed throughout this exercise. A quick way to insert a compressor on a channel strip is to click the Gain Reduction meter above the EQ thumbnail display.
On the Lead Vocals channel strip, click the Gain Reduction meter.

A compressor plug-in is inserted below the Channel EQ and the Compressor plug-in window opens. In this window, the Gain Reduction meter shows by how many decibels the compressor is attenuating the audio signal. The movements of the needles on the meter indicates that different parts of the track get attenuated by 0 to 8 dB.
Above the Gain Reduction meter, you can choose from different models based on vintage hardware compressors. Except for Platinum, which is a transparent compressor, each circuit type adds its own color to the signal.
Click the Classic VCA button.

The compressor adopts the look of the dbx 160, an early voltage-controlled amplifier type compressor/limiter known for its simplicity and its punchy, aggressive vintage sound. On the Gain Reduction meter, note how some of the softest notes barely trigger the compressor (the needle stays close to 0), whereas the loudest words (“girls” and “boys”) get 5 or 6 dB of attenuation.
On the Lead Vocals track header, click the Solo button.
Although the Compressor plug-in has many parameters, you will adjust only the most important parameters, located below the Gain Reduction meter: the Threshold, Ratio, and Make Up knobs, and the Auto Gain buttons. The Make Up and Auto Gain parameters help compensate for the gain reduction by applying a constant gain at the output of the compressor. To focus on the gain reduction applied by the compressor, let’s make sure no positive gain is applied at the output.
Click the Auto Gain Off button.

The Lead Vocal level drops a little bit. Now the compressor can only turn the volume down when the vocals reach levels higher than the Threshold parameter. Remember to turn the compressor on and off as you adjust it to compare the sound of the vocal with and without the compression effect.
Lowering the threshold will make sure that the compressor is working a little more even on the weakest parts of the audio signal, imparting more of its character to the vocal sound
Drag the Threshold knob down to −30 dB.

The compressor works even harder on the loudest sound (the “g” of “girl”), reducing the dynamic further and making the level more consistent
You can adjust the amount of compression with the Ratio knob, which affects how much the signal that exceeds the threshold is reduced.
Drag the Ratio knob up to 3.1.

Look at the meter; the compressor is attenuating the level by up to around 10 to 13 dB. Let’s compensate for that loss of gain.
Drag the Make Up knob up to 12 dB.
Now let’s compare the difference in perceived loudness between the dry and the compressed vocals, while looking at the peak level display on the channel strip.
Turn the compressor off and look at the peak level display.

The level of the vocals isn’t consistent. Remember to click the peak level display to reset it. On the Lead Vocals channel strip, some consonants like the “g” of “girls” make the level meter shoot up, and the peak level display goes up to −13.3 dB.
Turn the compressor on.
The level is consistent throughout the performance, and the vocals sound louder and more present. On the channel strip, the level peaks at −13.0 dB, which is very close to the peak level of the uncompressed vocal. Let’s hear the work of the compressor in the context of the full mix.
Unsolo the Lead Vocal track and toggle the compressor off and on.
When the compressor is off, the vocals are soft and their level inconsistent. With the compressor on, it sounds like the vocals float effortlessly right on top of the rest of the mix, making it very comfortable to listen to them. Mission accomplished!
Close the Compressor plug-in window (or press 1 to recall screenset 1).
Unmute the Backup Vocal track (Track 79).
Click the cycle area (or press C) to turn off Cycle mode.
You’ve used a compressor plug-in to make the lead vocals in your song sound consistent in level, which allows you to make them perceive louder while keeping a similar peak level. Having your tracks consistent in level throughout the song makes it easier to dial in their Volume fader and have them stick to that level throughout the whole song.
Adding Depth and Reverb
Now that you’ve carved the frequency spectrum of the vocals to give them a tight focus in the mid-range and compressed them to make them punchy and consistent, you can use reverb effects to add ambiance and place them into a virtual room. To not lose the presence of the lead vocal, you will try to keep it up front and intimate, and you don’t want to place the singer in a huge reverberated room. To give the lead vocal ambiance its own unique character, you’ll first add a short reverb directly on its channel strip. Then you’ll send both the lead vocal and the backup vocals to the Vocal Verb Aux you used earlier for the Heys backup vocal ensemble.
On the Lead Vocals channel strip, click below the Compressor plug-in and choose Reverb > Space Designer.

In the Space Designer plug-in header, click the Setting pop-up menu, and choose Medium Spaces > Indoor Spaces > 1.2s Small Staircase.

That short reverb places the singer in a space without making the singer sound huge, which wouldn’t be appropriate for this mix. Still, there’s too much reverb and you need to bring the singer back closer.
In the lower right in the Space Designer window, drag the Wet slider down to −24 dB.

Close the Space Designer window.
To make it sound like the lead singer is in the same room as all the backup singers, you can send some of its signal to the same reverb bus.
Click the Send slot and choose Bus > Bus 12 > Vocal Verb.
To keep the lead singer up front, you’ll dial only a very subtle amount of reverb.
Drag the Send Level knob up to around −25 dB.

You’re done processing the Lead Vocals channel strip. To compare the original, dry vocals with the processed vocals, you can toggle all plug-ins and the send to Bus 12 on and off.
On the Lead Vocals channel strip, move the pointer to the On/Off button to the left in the first plug-in slot (Channel EQ).
Solo the Lead Vocals channel strip.
Drag down to turn off all plug-ins and the send to Bus 12.

You hear the original raw vocal recording. They sound just like what they are: a singer singing in a dead-sounding recording studio.
Move the pointer to the On/Off button on the Channel EQ and drag down to turn all plug-ins and the send back on.
The vocals have more punch and dimension, and they generally sound more commanding! Great work. Now that you’re happy with the lead vocal, let’s mix in a little more backup vocals.
Unsolo the Lead Vocals channel strip.
Select the Backup Vocals track (Track 79).
On the Backup Vocals channel strip, drag the Volume fader up to −7.8 dB.
You’ll dial in a little more reverb for the vocals to give them a larger dimension.
Click the Sends section and choose Bus 12 > Vocal Verb.
Drag the Send Level knob up to −16.4 dB.
You used Track Stacks to group related tracks and process them as an ensemble. You learned techniques to balance track levels and spread them in the stereo field, EQ’ed vocals to sculpt their frequency spectrum, and used delay and reverb plug-ins to place the singers in a virtual space. The Compressor plug-in allowed you to give consistency to audio recordings, making it easier for them to find their place in a busy mix. In the next few exercises, you’ll make mixer parameters evolve over time to adapt the sound of your instruments to different sections.
Automating Mixer Parameters
When multitrack recorders first appeared in recording studios, they forever changed the way artists produce music. The ability to have separate recordings of individual instruments opened the door for experimentation, and artists and producers played with the mixing board’s faders and knobs during the final mixdown—panning an instrument from left to right or riding a Volume fader to change the level of a track throughout a song. Soon enough, two or three pairs of hands weren’t enough to perform all the changes needed throughout a mix, and a solution was needed.
Eventually, mixing consoles were designed with faders that also generated a data stream. By recording those data streams onto a separate track of the multitrack tape, the console could automatically re-create those fader movements during playback. This started the era of automated consoles. Today, professional computerized mixing boards and digital audio workstations are fully automated.
In Logic, you can automate almost all the controls on a channel strip, including volume, pan, and plug-in parameters. In this lesson, you will draw and edit offline automation to make a sound effect rise in volume during a pre-chorus, and record live automation to pan a sound effect left and right during a break.
Drawing Offline Automation
In Logic, the techniques used to create and edit track-based automation closely resemble those you used to create Pitch Bend automation in the Piano Roll in Lesson 7. Track automation lets you automate almost any channel strip controls independent of the regions on the track.
Drawing automation graphically is also known as offline automation, because it is drawn graphically while Logic is stopped.
Click the disclosure triangle to open the FX Track Stack (Track 58).
Select and solo the Guitar Scratch FX track (Track 70).

The Guitar Scratch FX region (at bar 34) is selected.
Press U (Set Rounded Locators by Selection and Enable Cycle).
Listen to the Guitar Scratch FX. The region contains a reverberated and distorted rhythmic guitar scratch that has a constant level and is panned in the center. You will apply volume automation to make the sound effect slowly ramp up in volume throughout the Pre 2 section and rapidly fade out at the beginning of Chorus 2.
In the Tracks view menu bar, click the Show Automation On/Off button (or press A).

In the Tracks area, tracks must be tall enough to display their automation curves, so the Tracks area is automatically zoomed in vertically. On the track headers, the Automation button, Automation Mode pop-up menu, and Automation Parameter pop-up menu appear. Some of the tracks already have existing automation curves.
Tip
When an automation track is shown, you can edit regions (move, copy, resize, and so on) in the thin lane containing the region names.
On the Guitar Scratch FX track header, position the pointer over the Automation button, and click the On/Off button that appears.

The automation is turned on for that track, and you can see an empty volume automation curve on the track.
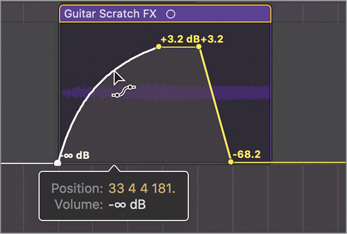
Click anywhere on the automation curve.

A control point is created at the beginning of the project (bar 1) at the current Volume fader value, 0.0 dB, and the automation curve is yellow to indicate that some automation data is now present. In the track header, the Automation Mode pop-up menu displays the Read mode in solid green to indicate that the automation curve will be read upon playback.
Drag the automation point at bar 1 all the way down to −∞.

To make it more comfortable to create the volume automation curve, feel free to zoom in on the Guitar Scratch FX region.
To create automation points, you can click the automation curve or double-click an empty area on the automation track. Don’t worry about creating the points in precise positions for now; you can always drag them to move them later.
Click the automation curve at the beginning of the region.

Double-click toward the top of the automation track, a little before the end of the Pre 2 section.

Click the automation curve at the end of the Pre 2 section.
Tip
To raise or lower a portion of an automation curve, select the portion with the Marquee tool and then drag the selection up or down with the Pointer tool.
Double-click the automation track a little after the beginning of Chorus 2 (around bar 39).

To make the volume ramp up a little faster at the beginning, you can bend the automation curve.
Control-Shift-drag up the slanted line in the automation curve at the beginning of the region.
The pointer turns into an automation curve tool and the line gets a convex shape. You can also create S shapes by dragging a slanted line horizontally.
Note ▶
You can bend only slanted lines in between two automation points of different values; you cannot bend horizontal lines between two automation points of the same values.
Control-Shift-drag the slanted line at the end of the Pre 2 section toward the left, then toward the right.

Dragging the line left or right lets you adjust the shape of the S curve.
Tip
To revert a bent line to a straight line, Control-Shift-click the line.
Click the Solo button on the Guitar Scratch FX track header to turn it off.
Continue adjusting the automation curve while listening to the Pre 2 section until you get the desired volume automation curve for the Guitar Scratch FX region.
In the Tracks view menu bar, click the Show Automation On/Off button (or press A) to hide the automation tracks.
The automation tracks are hidden, but the Guitar Scratch FX is still in Read mode. Listen to the section in the cycle area. In the Guitar Scratch FX track header (and in the channel strip in the inspector), you see the Volume fader ramp up slowly, then rapidly fade out at the beginning of the chorus.
Click the cycle area (or press C) to turn off Cycle mode.
You’ve created an automation curve for a sound effect by creating automation points and bending the lines in between points. The volume automation curve makes the sound effect ramp up at the beginning of the pre-chorus, and then rapidly fade out when the chorus starts, producing a mysterious vibe that is sure to perk up the listener’s ears in this calm section before the storm.
Recording Live Automation
Drawing automation curves offline as you did in the previous exercise is a good option when you know in advance the automation movements that you want to achieve, but sometimes you want to hear the song playing as you adjust channel strip or plug-in controls in real time.
To record live automation, you choose a live automation mode for the track(s) that you want to automate, start playback, and then tweak the desired plug-in or channel strip controls.
In this exercise, you will record live Pan knob automation to make a sound effect move to various positions in the stereo field to add a surprise element to the break section.
Select and solo the Bollywood Vocal Chop track (Track 66).
Press U (Set Rounded Locators by Selection and Enable Cycle).
Listen to the Bollywood Vocal Chop track. You can hear the stuttering gated vocal samples, not unlike the type of vocal chops you produced with Quick Sampler in Lesson 5. The sound comes from the center of the stereo field.
To record automation, there’s no need to show the automation tracks or to go into record mode. You choose an automation mode for the track; start playback; and move a knob, button, or slider—and the movements are recorded on the automation track. You will later display the automation track to see the automation curve you’re going to record now.
In the inspector, on the Bollywood Vocal Chop track channel strip, click the Automation Mode pop-up menu, and choose Touch.

Press the Space bar to start playback.
On the Bollywood Vocal Chop channel strip, drag the Pan knob up or down only during the first pass of the cycle area.

Tip
You can use Logic Remote (or a MIDI controller knob assigned to a Smart Control knob) to control Mixer or plug-in parameters while recording automation.
When the playhead jumps back to play the cycle area a second time, the Pan knob movements you performed during the first pass are re-created. Let’s have a look under the hood.
In the Tracks view menu bar, click the Show Automation On/Off button (or press A).
On the Bollywood Vocal Chop track header, click the Automation Parameter pop-up menu and choose Pan.

You can see the Pan automation curve you just recorded.

Let’s delete the automation and try again, this time looking at the automation curve being created as you record it.
Stop playback.
Choose Mix > Delete Automation > Delete Visible Automation on Selected Track (or press Control-Command-Delete).
On the automation track, the Pan automation curve is deleted.
Start playback and drag the Pan knob up or down.

On the automation track, you see the Pan knob movements recorded as a Pan automation curve. You can continue adjusting the automation curve during subsequent passes of the cycle area. While you’re in Touch mode, any existing automation on the track is read, as if Logic were in Read mode. As soon as you hold down the mouse button on a knob or slider, Logic starts recording the new values. When you release the mouse button, Touch mode behaves like Read mode again, and the automation curve returns to its original value or reproduces any existing automation on the track.
Note ▶
Latch mode works similarly to Touch mode, except that when you release the mouse button, the automation continues to record and the parameter stays at the current value. If automation is already present for that parameter on that track, the automation is overwritten until you stop playback.
Unsolo the Bollywood Vocal Chop track.
You’re done automating the Bollywood Vocal Chop. To avoid recording more automation by mistake later, make sure you revert the automation mode to Read.
On the Bollywood Vocal Chop track header, click the Automation Mode pop-up menu and choose Read.

Press 1 to recall screenset 1.
Close the FX Track Stack (Track 58).
Click the cycle area (or press C) to turn Cycle mode off.
Using automation, you have added motion to your mix. You made a distorted guitar noise effect creep in during a pre-chorus to increase tension just before a chorus, and you panned vocal chops in various positions of the stereo field to create a surprise during a break. You drew offline automation on the track, and recorded live automation while adjusting a knob. Let your imagination run wild, and think of other applications to automate your own projects. For some truly creative effects, try automating instrument or audio effect plug-in parameters!
Quick Mastering
On a professional project, you would usually send your final mix to a mastering engineer, who would put a final polish on the audio file using subtle amounts of EQ, compression, reverb, or any other processing needed to make the mix reveal its true potential.
When you don’t have the budget to hire a mastering engineer, you can master your own mix by inserting plug-ins on the Stereo Out channel strip, as described in this exercise. You will start by using a compressor to make the mix level more consistent throughout the song, and then apply a limiter to raise the perceived loudness without clipping the Stereo Out channel strip audio.
Start playback at the beginning of the song.
Click the Live Drums (Track 1) track header to select it.
In the inspector, at the top of the Stereo Out channel strip (on the right), click the Gain Reduction meter.

A compressor plug-in is inserted in the Audio FX area. This time you will use a preset designed to emulate the soft compression of analog tape recorders.
In the compressor, from the Setting menu, choose 05 Compressor Tools > Platinum Analog Tape.
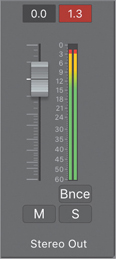
The volume jumps up. However, in sections where all the instruments join in, the Stereo Out channel strip is clipping, as indicated by the red peak level display. In the Compressor window, the gain reduction shows a few decibels of gain reduction, but the Auto Gain parameter applies enough make-up gain to make the mix clip.
In the Compressor window, click the Auto Gain Off button.

The peak level displays the maximum peak value since you last started the playback. You need to reset it to determine if the new compressor setting still clips the mix.
On the Stereo Out channel strip, click the peak level display to reset it. The mix is no longer clipping.

As a rule of thumb, at this stage of the audio signal flow, the compressor shouldn’t be attenuating more than 4 to 5 dB. You’re just trying to get the mix a little more consistent overall so that you can then push it a little further in the limiter you’re going to insert next. If you toggle the compressor off and on in different parts of the mix, the difference is subtle. However, with the compressor off, stronger sections like Chorus 3 are clipping the Stereo Out (the peak level display turns red), whereas with the compressor on, the entire mix stays below 0 dBFS.
You will now insert a limiter to maximize the loudness without clipping the output. A limiter works similarly to a compressor, but it attenuates the signal so that the output signal never exceeds a specific volume level.
On the Stereo Out channel strip, click below the compressor, and choose Dynamics > Adaptive Limiter.
To optimize the loudness of the mix while making sure it doesn’t clip the Stereo Out, you’ll work on the loudest section of the song, Chorus 3.
Drag the Chorus 3 marker (at bar 65) up into the ruler, and listen to that section.

On the Stereo Out channel strip, the peak detector doesn’t go past 0 dBFS, but it turns red, indicating your mix is clipping. To avoid this issue, you’ll use True Peak Detection.
In the Adaptive Limiter plug-in, turn on True Peak Detection.

On the Stereo Out channel strip, click the peak level display to reset it.
The peak level display is no longer red, indicating the mix is no longer clipping. You can now use the Adaptive Limiter to optimize the perceived loudness of your mix without fear of clipping the Stereo Out.
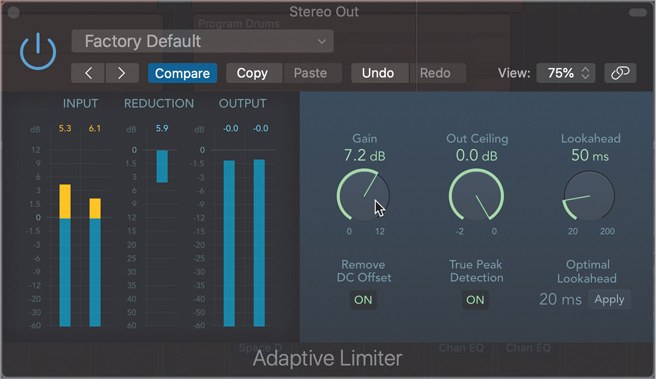
In the Adaptive Limiter, the Input meters display the signal level at the input of the plug-in, the Reduction meters display the amount of gain attenuation applied by the limiter, and the Output meters display the signal level at the output of the plug-in. The Out Ceiling knob is set to 0.0 dB, ensuring that the audio signal will never go over 0 dBFS on the Stereo Out channel strip.
To adjust the Adaptive Limiter, dial the Gain knob to your taste. The more gain you apply, the louder it will sound, but also the more distortion will be generated by the limiter. Deciding on the right balance between loudness and acceptable distortion can be influenced by many factors, like the music genre (jazz or pop?) or how the music will be distributed (movie theater or internet streaming?). Beware of the temptation to use too much gain. If you abuse the limiter, you’ll round off all the transients in your mix. You mix will lose punch and sound dull and squashed.
Drag the gain all the way up to 12.0 dB.
The mix sounds very loud; however, it is so squashed that it sounds completely distorted. You need to settle on a more reasonable amount of gain.
Drag the gain down to around 6.0 dB.
Click the cycle area (or press C) to turn off Cycle mode.
Keep playing the song, and make sure you don’t hear any unwanted distortion.
Tip
At the top of the Input meters, you can click the orange warnings to reset them.
On the Stereo Out channel strip, drag down on the two On/Off buttons on the Compressor and Adaptive Limiter plug-ins to quickly toggle both plug-ins.
The Compressor plug-in helps glue the instruments together and makes your mix sound more consistent. The Adaptive Limiter makes the whole mix louder while ensuring that no clipping occurs at the output.
You’ve used the Compressor plug-in with the Platinum Analog Tape preset and dialed in more gain in the Adaptive Limiter to perform a quick mastering of your song, giving it coherence and a welcomed loudness bump. You’re now ready to export your song to share or distribute it.
Exporting the Mix to a Stereo Audio File
In Lesson 1, you exported a finished mix to an MP3 file. To come full circle, in this final lesson, you will bounce your automated mix at the highest quality available: a raw uncompressed pulse-code modulation (PCM) file.
In the workspace, the last regions end at bar 84. When you are not sure of the exact end of a song, play the final few bars. Sometimes effect plug-ins such as reverberation and delay still produce sound after the end of the song. Here, you’ll give yourself an extra bar and end the bounce at bar 85.
Choose File > Bounce (or press Command-B) to open the Bounce dialog.
In the Destination column, ensure that PCM is selected, and type 85 in the End field.

Whereas Realtime mode lets you hear your song bouncing in real time, Offline mode takes advantage of your CPU to complete the operation as fast as your Mac can process it, which can save a lot of time.
Leave Mode set to Offline.
The Normalize function automatically adjusts the level of the file so that it peaks at or below 0 dBFS. If you have used mastering plug-ins to ensure that the Output peak meter peaks at 0 dBFS, you do not need Normalize.
Set Normalize to Off.

The File Format choices—AIFF, Wave, and CAF—all produce the same sound quality. The file format you choose depends mostly on which format is needed for further processing, such as mastering.
Click the File Format pop-up menu and choose Wave.
A bit depth resolution of 24 bits gives you a larger file but yields the best audio quality.
Set the Resolution pop-up menu to 24 Bit.
Sample Rate is set by default to the project sample rate. You should change this only if you want to convert the bounced file to a new sample rate.
The file type is Interleaved, which is the most common file type used.
Dithering can make a subtle difference in very quiet sections of a song, or when a song is fading in or out.
Leave Sample Rate set to 44100 Hz, File Type to Interleaved, and Dithering to None.

Click OK (or press Return).
A Bounce Output 1-2 dialog opens, and you can choose a filename and a location for the bounced file.
Name the file Lights On (the name of the song), press Command-D to save it to the desktop, and click Bounce.

A progress window appears, and in the Tracks area, you can see the playhead move faster than real time as the bounced file is created.
Tip
To interrupt a bounce in progress, press Command-. (period).
When the progress window disappears, your bounced file is ready.
Press Command-Tab to go to the Finder.
In the Finder, choose Finder > Hide Others (or press Command-Option-H).
On your desktop, click Lights On.wav, and press the Space bar to play the final version of the song.
You finished your mix using effect plug-ins and adjusting the four main parameters of the instrument sounds (volume levels, pan position, frequency, and distance) to give each sound its own place in the stereo sound field. You used compressors and limiters to make levels more consistent and to optimize the loudness of your mix, and you automated Mixer parameters to create some motion in your mix. Finally, you bounced your project to export an uncompressed stereo PCM WAV file of your mix that you can share with your record label or upload to music distribution service websites.
Tip
To upload a song to SoundCloud, share it by email or by using AirDrop, or other options, choose File > Share and choose the desired option.
Using a Few Tips and Tricks
As with any other art, mixing requires a combination of skill, experience, and talent. It takes practice to learn how to apply mixing techniques efficiently, and even more practice to learn to listen. Here are a few tips and tricks that will help you perfect your craft and become better at mixing your projects.
Take a Break
After you mix for a while, listening to the same song for the hundredth time, you can lose your objectivity and experience ear fatigue. Take frequent short breaks while mixing, and return to the mix with rested ears. You will be able to better judge your results.
Listen to Your Mix Outside the Studio
When you feel that your mix is pretty advanced and you are happy with the way it sounds in your studio, copy it to a portable music player and listen to it in another room or, even better, in your car while driving. You will probably hear things you didn’t notice in your studio and miss things you could hear clearly in your studio. You can take notes and return to your studio to rework the mix. Obviously, the mix will never sound the same in the studio and in the car, but it’s the mixing engineer’s job to make sure that all the instruments can be heard in most situations.
Compare Your Mix with Commercial Mixes
Compare your mix with commercial mixes you like. Build a small library of good-sounding mixes in the same genre of music as the songs you are mixing. You can open a new Logic project, and place your mix on one track and a professional mix on another track so that you can solo and compare them.
Key Commands
Keyboard Shortcuts
General |
|
|---|---|
Control-Option-Command-S |
Clears or recalls all Solo buttons |
Option-click Solo button |
Solos the track or channel strip while clearing other Solo buttons |
A |
Toggles automation view |
|
|
Mixer |
|
Option-X |
Opens a shortcut menu to configure the Mixer |