Chapter 3. Configuring and Managing DNS Policies
This chapter covers the following subjects:
![]() DHCP options, DHCP name protection: DHCP options on a DHCP server deliver the information DHCP clients must use. If you want to implement the new Windows Server 2016 DNS Policy feature, it is important to know how clients get their correct DNS server IP address with preconfigured DNS Policies.
DHCP options, DHCP name protection: DHCP options on a DHCP server deliver the information DHCP clients must use. If you want to implement the new Windows Server 2016 DNS Policy feature, it is important to know how clients get their correct DNS server IP address with preconfigured DNS Policies.
![]() Managing DNS client and server settings with PowerShell: Windows Server 2016 delivers many new PowerShell cmdlets to manage DNS client and DNS server settings. The exam requires knowledge about the most important.
Managing DNS client and server settings with PowerShell: Windows Server 2016 delivers many new PowerShell cmdlets to manage DNS client and DNS server settings. The exam requires knowledge about the most important.
![]() Network troubleshooting with PowerShell: DNS Policies are an important new Windows Server 2016 feature. Name resolution is only one little piece of the networking components cosmos. DNS Policies are dependent on the underlying network configurations, such as IPv4 or IPv6 TCP/IP settings. Therefore, you must be familiar with the most important network troubleshooting PowerShell cmdlets to get the toolbox for solving such network problems and to be prepared for questions in the 70-741 Microsoft exam.
Network troubleshooting with PowerShell: DNS Policies are an important new Windows Server 2016 feature. Name resolution is only one little piece of the networking components cosmos. DNS Policies are dependent on the underlying network configurations, such as IPv4 or IPv6 TCP/IP settings. Therefore, you must be familiar with the most important network troubleshooting PowerShell cmdlets to get the toolbox for solving such network problems and to be prepared for questions in the 70-741 Microsoft exam.
![]() Understanding routing: To prepare for questions on DNS Policy, it is also important to know the most common commands for troubleshooting routing problems. If you do not get the correct gateway to reach the DNS server configured with DNS Policies, this can have a negative impact on your DNS Policy–based name resolution solution.
Understanding routing: To prepare for questions on DNS Policy, it is also important to know the most common commands for troubleshooting routing problems. If you do not get the correct gateway to reach the DNS server configured with DNS Policies, this can have a negative impact on your DNS Policy–based name resolution solution.
![]() Split DNS: You should be familiar with Split DNS. This chapter covers various Split DNS scenarios and purposes. You also see how NRPT settings and Split DNS relate, which influences your DNS Policy planning and configuration.
Split DNS: You should be familiar with Split DNS. This chapter covers various Split DNS scenarios and purposes. You also see how NRPT settings and Split DNS relate, which influences your DNS Policy planning and configuration.
![]() DNS Policies: DNS Policies are useful for DNS traffic management, application high availability, split-brain configuration, filtering, and forensics. You explore DNS Policy usage scenarios and learn about the purposes of DNS Policies, and you see how to implement DNS Policies with different requirements. This chapter also covers the elements of a DNS Policy and the different types of DNS Policies. Through many practical exercises, you learn when to use DNS Policies and how to configure them with new PowerShell cmdlets. You deepen your knowledge with exercises on configuring DNS Policies based on location (domain and/or subnet) and time of the day. You also use zone- and server-level DNS transfer policies to control which secondary DNS servers get transferred with zone data. You see how to block or allow queries based on different criteria, and you learn how to configure DNS query resolution policies overall.
DNS Policies: DNS Policies are useful for DNS traffic management, application high availability, split-brain configuration, filtering, and forensics. You explore DNS Policy usage scenarios and learn about the purposes of DNS Policies, and you see how to implement DNS Policies with different requirements. This chapter also covers the elements of a DNS Policy and the different types of DNS Policies. Through many practical exercises, you learn when to use DNS Policies and how to configure them with new PowerShell cmdlets. You deepen your knowledge with exercises on configuring DNS Policies based on location (domain and/or subnet) and time of the day. You also use zone- and server-level DNS transfer policies to control which secondary DNS servers get transferred with zone data. You see how to block or allow queries based on different criteria, and you learn how to configure DNS query resolution policies overall.
This chapter takes a look at the purpose of the new Windows Server 2016 DNS Policy feature and its capabilities. First you get coverage of DHCP options, DHCP name protection, PowerShell cmdlets for managing DNS client and server settings, and fundamental considerations about network troubleshooting and routing. Then you explore the practical use of Split DNS and other important DNS features to get you ready for the 70-741 Microsoft exam and prepare you for dealing with DNS Policies.
DNS Policies are the main topic of this chapter. You investigate the possibilities of the new Windows Server 2016 DNS feature and explore its usage scenarios. This chapter also covers DNS Policy types, elements, and parameters, along with multiple query resolution DNS Policies, DNS Policies based on location, and DNS Policies used for split-brain configuration. In addition, you learn how selective recursion control through DNS recursion policies works and how to configure it.
In practical exercises, you learn how to block DNS queries based on domain names using DNS query resolution policies and how to configure server- and zone-level zone transfer policies with DNS transfer policies. You see how to block or allow queries based on criteria such as domain names, subnet, or time of the day. You also explore how to configure a DNS Policy scenario based on the time of the day by using a Microsoft Azure application server.
DNS Policies on a Windows Server 2016 DNS can be configured only through PowerShell cmdlets, not through the graphical DNS manager interface. Therefore, this chapter introduces many new PowerShell cmdlets that are relevant to the 70-741 Microsoft exam.
“Do I Know This Already?” Quiz
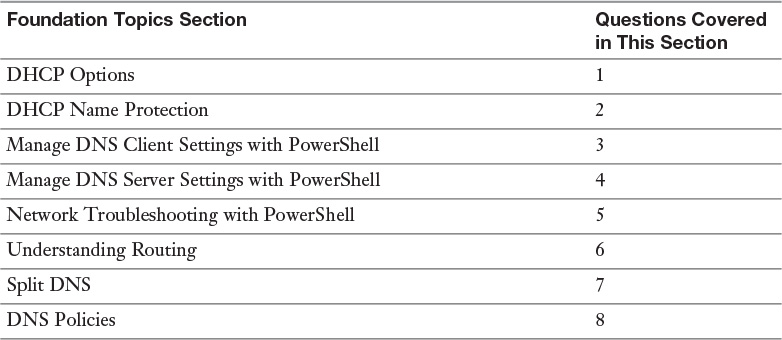
The “Do I Know This Already?” quiz enables you to assess whether you should read this entire chapter or simply jump to the “Exam Preparation Tasks” section for review. If you are in doubt, read the entire chapter. Table 3-1 outlines the major headings in this chapter and the corresponding “Do I Know This Already?” quiz questions. You can find the answers in Appendix A, “Answers to the ‘Do I Know This Already?’ Quizzes and End-of-Chapter Review Questions.”
Caution
The goal of self-assessment is to gauge your mastery of the topics in this chapter. If you do not know the answer to a question or are only partially sure of the answer, you should mark that question as wrong for purposes of the self-assessment. Giving yourself credit for an answer you correctly guess skews your self-assessment results and might provide you with a false sense of security.
1. You have configured your Windows Server 2016 DHCP server with a scope of 10.0.0.0/16 and the two scope options Option 003: 10.0.0.10 and Option 006: 10.0.0.20. Some of your DHCP clients get a DNS server of 10.0.0.100 and a default gateway of 10.0.0.200 from that DHCP server. What is a possible cause?
a. DHCP failover
b. DHCP Policy
c. DNS Policy
d. DNSSEC
2. You use a DHCP server to automatically register client resource records on a DNS server. Which feature should you enable on your DHCP server to protect your environment from name squatting attacks?
a. DHCP server policies
b. DNS Policies
c. Name Protection
d. DNSSEC
3. Which PowerShell cmdlet can you use to configure the DNS server’s IP address on a DNS client?
a. Set-DnsClientServerAddress
b. Set-NetIPInterface
c. Set-NetIPAddress
d. Set-DnsClient
4. You want to synchronize DNS zone data and root hint data for a zone to the persistent storage of a Windows Server 2016 Nano Server DNS server. Which PowerShell command can you use for that?
a. Start-DnsServerZoneTransfer
b. Sync-DnsServerZone
c. Add-DnsServerZoneTransferPolicy
d. Set-DnsServerZoneTransferPolicy
5. You are responsible for the DNS zone named pearson.com. Some clients of the subnet named Paris cannot reach resources on your partner company pearsonucertify.com through hostnames. However, they can reach the resources through IP addresses without problems. Clients from other internal networks have no problems accessing such resources. Which network components should you verify? (Choose four.)
a. DHCP Policy
b. DNS server options
c. DNS server zone transfer policy settings
d. DNS server zone scope settings
e. DNS server client subnet settings
f. DNS server recursion policy settings
6. You have established a P2S connection to your Azure VNet. You want to verify the gateway IP address through which the P2S network traffic flows. Which command can you use?
a. Get-AzureVNetGateway
b. Get-NetRoute
c. Get-NetIPInterface
d. Get-VpnConnection
7. You have configured your Windows 10 laptops as DirectAccess clients. Your employee starts his laptop at the airport and will remain there while waiting for a flight. He will use the airport’s WLAN connection to connect through a Windows Server 2016 Direct Access Server (Azure VM) to Azure VNet resources. Which source delivers the DNS server resolving internal hostnames?
a. Airport DHCP server
b. Company DHCP server
c. TCP/IP settings of network interface
d. Name Resolution Policy Table
8. You want to configure selective recursion control on your Windows Server 2016 DNS server in your DMZ to configure different recursion settings for internal and external clients. Which of the following PowerShell commands can you use? (Choose three.)
a. Add-DnsServerResourceRecord
b. Set-DnsServerRecursionScope
c. Add-DnsServerRecursionScope
d. Add-DnsServerQueryResolutionPolicy
e. Add-DnsServerClientSubnet
Foundation Topics
DHCP Options
Clients can obtain their IP address settings from a DHCP server and can also obtain the information about which Domain Name System (DNS) server(s) they must use. DHCP servers can provide information about network resources such as DNS servers and the default gateway. DHCP options are values for common configuration data that apply to the server, scopes, reservations, and class options. You can apply DHCP options at the server, scope, class, and reservation levels on a DHCP server. An option code identifies the DHCP options, and most option codes come from the RFC documentation found on the Internet Engineering Task Force (IETF) website.
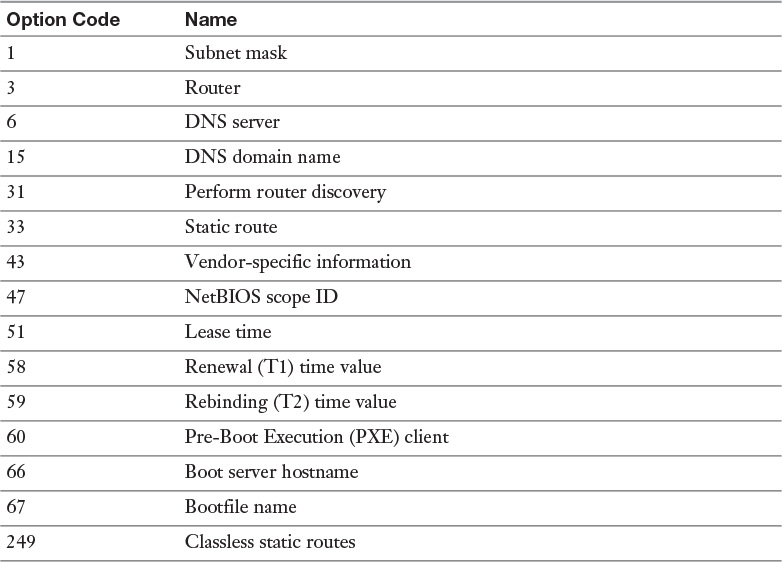
Table 3-2 lists the common option codes for Windows-based DHCP client requests.
The priority for option settings follows:
reservation > scope policy > server policy > scope level > server level
DHCP Name Protection
During dynamic IP address allocation, the DHCP server automatically creates DNS resource records for DHCP clients in the DNS database.
You should protect the names DHCP registers on DNS servers on behalf of other computers or systems, from being overwritten by non-Windows operating systems that use the same names. You also should protect the names from being overwritten by systems that use static addresses that conflict with DHCP-assigned addresses when they use unsecure DNS and do not have DHCP configured for conflict detections.
As an example, a UNIX-based system named Computer1 could potentially overwrite the DNS address that DHCP assigned and registered on behalf of a Windows-based system that is also named Computer1. DHCP name protection addresses this issue.
The term name squatting describes the conflict that occurs when one client registers a name with DNS that another client is already using. This problem makes the original machine inaccessible. It typically occurs with systems that have the same names as Windows operating systems.
DHCP name protection addresses this by using a resource record known as a Dynamic Host Configuration Protocol Identifier (DHCID) to track which machines originally requested which names. The DHCP server provides the DHCID record, which is stored in DNS. When the DHCP server receives a request from a machine with an existing name for an IP address, the DHCP server can refer to the DHCID in DNS to verify that the machine requesting the name is the original machine that used the name. If it is not the same machine, the DNS resource record is not updated.
You can implement name protection for both IPv4 and IPv6. In addition, you can configure DHCP name protection at both the server level and the scope level. To enable DHCP name protection for an IPv4 or IPv6 node, you perform the tasks outlined in the following lists.
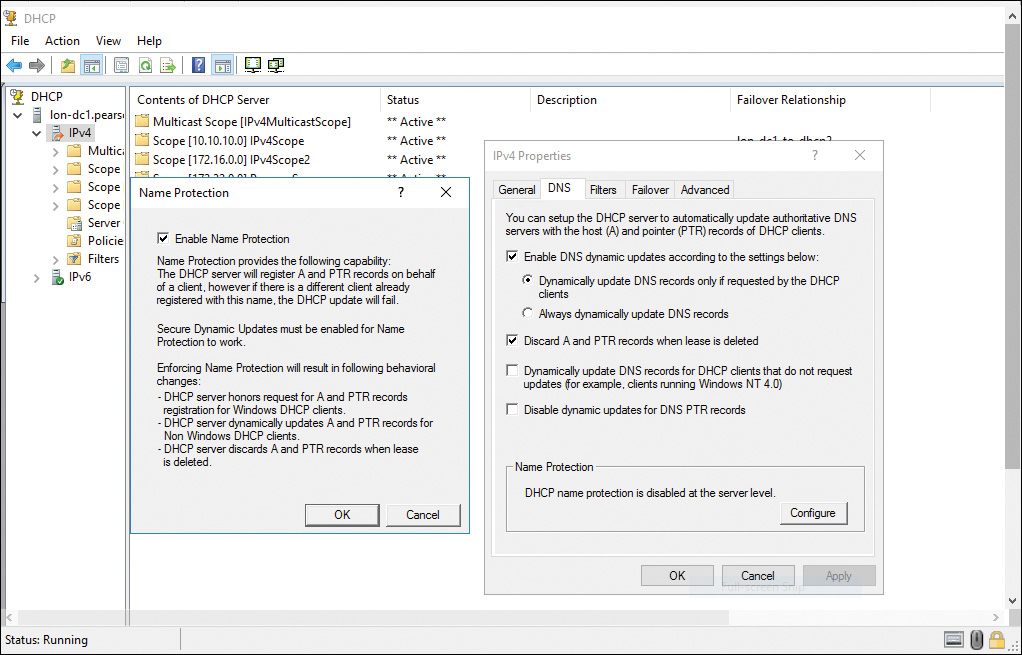
To enable name protection at the IPv4 or IPv6 node level, follow these steps:
Step 1. Open the DHCP Microsoft Management Console (MMC) snap-in.
Step 2. In the console tree, double-click the DHCP server you want to configure, right-click IPv4 or IPv6, and then click Properties.
Step 3. Click DNS, click Advanced, and then check Enable Name Protection (see Figure 3-1).
To enable name protection at the scope level, follow these steps:
Step 1. Open the DHCP console.
Step 2. In the console tree, double-click the DHCP server you want to configure, double-click IPv4 or IPv6, right-click the scope you want, and then click Properties.
Step 3. Click DNS, click Configure, and then check Enable Name Protection.
Manage DNS Client Settings with PowerShell
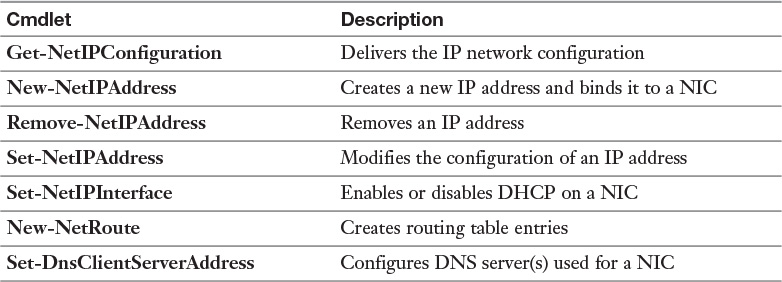
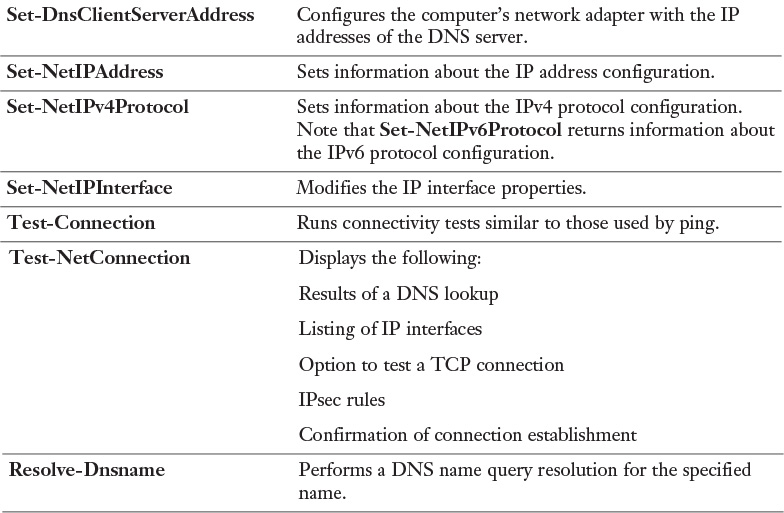
Windows Server 2016 includes some new PowerShell cmdlets to configure the local network interface and its TCP/IP configuration (see Table 3-3). It is important to know these before implementing the new Windows Server 2016 DNS server policies feature because you also need to configure the DNS client settings correctly.
The following code is an example of how to configure the interface named Ethernet with the following parameters:
![]() Static IP address: 172.16.0.100
Static IP address: 172.16.0.100
![]() Subnet mask: 255.255.255.0
Subnet mask: 255.255.255.0
![]() Default gateway: 172.16.0.1
Default gateway: 172.16.0.1
![]() DNS servers: 172.16.0.200, 172.16.0.201
DNS servers: 172.16.0.200, 172.16.0.201
New-NetIPAddress -InterfaceAlias "Ethernet" -IPAddress 172.16.0.200
-PrefixLength 24 -DefaultGateway 172.16.0.1
Set-DNSClientServerAddress -InterfaceAlias "Ethernet"
-ServerAddresses 172.16.0.200, 172.16.0.201
The following code shows how to configure the interface named Ethernet so that a client can obtain its IP address dynamically through a DHCP server:
Set-NetIPInterface -InterfaceAlias "Ethernet" -Dhcp Enabled
Restart-NetAdapter -Name "Ethernet"
Manage DNS Server Settings with PowerShell
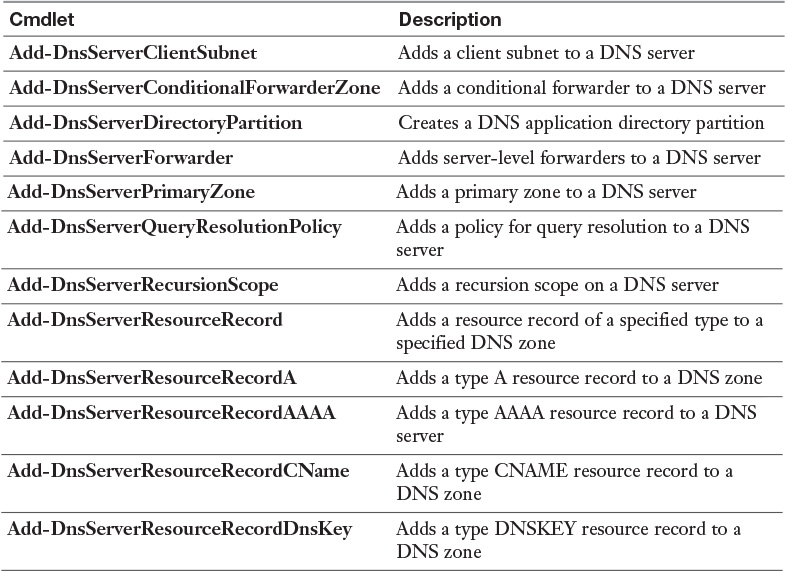
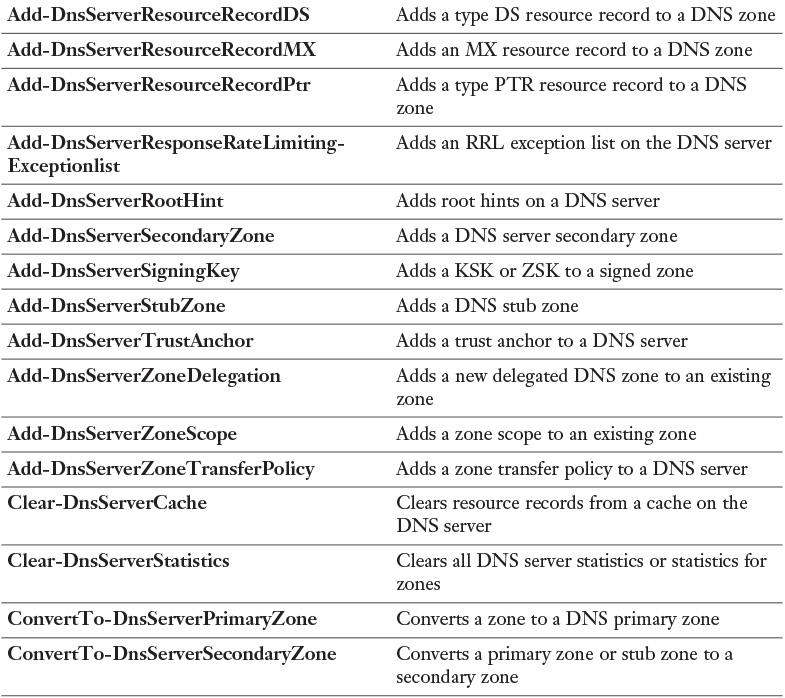
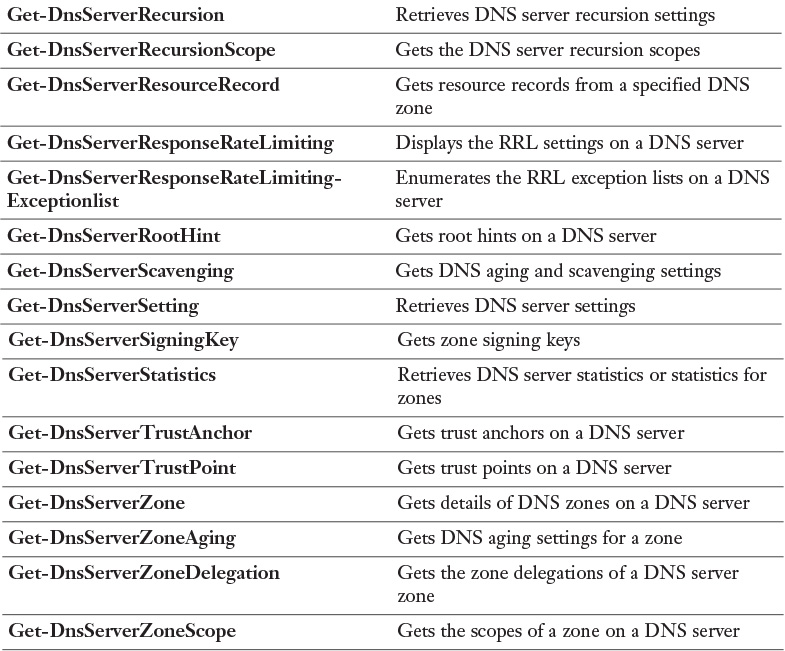
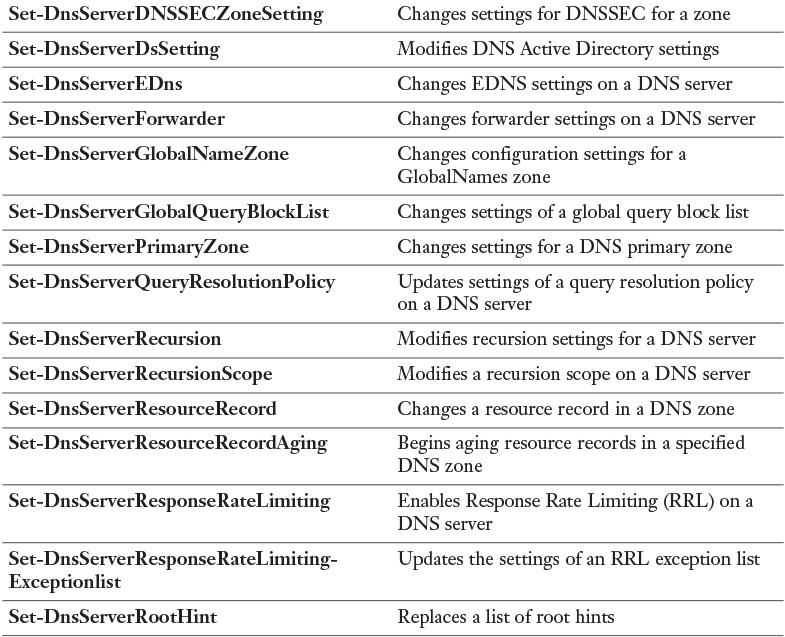
Table 3-4 lists all available Windows Server 2016 DNS PowerShell cmdlets. You should know all of them for the exam.
Visit https://technet.microsoft.com/en-us/library/jj649850.aspx and work through the examples for every PowerShell cmdlet. Windows Server 2016 introduces some new ones, including all cmdlets about DNS Policies (Add-DnsServerQueryResolutionPolicy, Add-DnsServerZoneTransfer Policy, Disable-DnsServerPolicy, Enable-DnsServerPolicy, Get-DnsServerQueryResolutionPolicy, Get-DnsServerZoneTransferPolicy, Remove-DnsServerQueryResolutionPolicy, and so on). You should also take a look at the ones related to the Response Rate Limiting (RRL) feature. At the very minimum, work through all documentation and examples for highlighted DNS server PowerShell cmdlets in the table.


Network Troubleshooting with PowerShell
Name resolution sometimes requires troubleshooting. Issues can occur when the DNS server, its zones, and its resource records are not configured properly. When resource records are causing issues, identifying the issue sometimes is difficult because configuration problems are not always obvious. Several tools are available to configure, manage, and troubleshoot DNS server and name resolution issues. The exam includes questions about name resolution issues, so you must know the most common tools to troubleshoot such problems:
![]() Nslookup: Use this tool to query DNS information. Nslookup is flexible and can provide valuable information about DNS server status. You also can use it to look up resource records and validate their configuration. Additionally, you can test zone transfers, security options, and MX record resolution.
Nslookup: Use this tool to query DNS information. Nslookup is flexible and can provide valuable information about DNS server status. You also can use it to look up resource records and validate their configuration. Additionally, you can test zone transfers, security options, and MX record resolution.
![]() DNSCmd: Use this command-line tool to manage the DNS server role. DNSCmd is useful in scripting batch files to help automate routine DNS management tasks or to perform simple unattended setup and configuration of new DNS servers on your network.
DNSCmd: Use this command-line tool to manage the DNS server role. DNSCmd is useful in scripting batch files to help automate routine DNS management tasks or to perform simple unattended setup and configuration of new DNS servers on your network.
![]() DNSlint: Use this tool to diagnose common DNS issues. DNSlint quickly diagnoses configuration issues in DNS and generates a report in HTML format regarding the status of the domain that you are testing. With DNSlint, you can generate reports across more DNS servers simultaneously.
DNSlint: Use this tool to diagnose common DNS issues. DNSlint quickly diagnoses configuration issues in DNS and generates a report in HTML format regarding the status of the domain that you are testing. With DNSlint, you can generate reports across more DNS servers simultaneously.
When you troubleshoot name resolution problems, mostly it is because someone cannot reach a remote host, a server, or another device. You must verify the DNS resolver cache on the client experiencing the problem. You can do that with ipconfig /flushdns or Clear-DNSClientCache. Try to ping the remote host with its IP address instead of the hostname. This helps identify whether the issue is related to name resolution. If the ping works with the IP address but fails with the hostname, the problem is related to name resolution. Suppose you cannot reach a host named pearson-dc1.pearson.com. Try nslookup.exe -d pearson-dc1.pearson.com > C:filename.txt and examine the content of the textfile to identify the failed stage in name resolution.
Table 3-5 lists some of the Windows PowerShell cmdlets you can use to troubleshoot network problems.

Understanding Routing
If you plan your DNS server environment to include the new DNS server policies, you should understand how routers and routing tables correlate with that. Routers send traffic to destination networks based on a set of data called routing tables. Routing tables contain the following:
![]() All routes of which the router is aware
All routes of which the router is aware
![]() Information on which connections lead to different IP address ranges
Information on which connections lead to different IP address ranges
![]() Priorities for connections to be used
Priorities for connections to be used
![]() Rules for handling both typical and special cases of network traffic
Rules for handling both typical and special cases of network traffic
Data stored in routing tables typically is dynamic. This means the data is updated through routing protocols such as Routing Information Protocol (RIP), Open Shortest Path First (OSPF), and Border Gateway Protocol (BGP).
Routing tables contain the following information:
![]() Network destination
Network destination
![]() Network mask
Network mask
![]() Gateway
Gateway
![]() Interface
Interface
![]() Metric
Metric
For example, the entry in Table 3-6 in a routing table points any network traffic destined for the 10.10.0.0/16 network to the gateway at the IPv4 address of 172.16.0.1 with a hop of 1.

Routing with Windows Server 2016
As in older versions of Windows server, you can use a Windows Server 2016 server as a router between a local network and the DMZ or between the DMZ and the public Internet. Windows Server 2016 can be configured to act as a router by installing the Remote Access role with the Routing role service. In most real-world network environments, this is not the preferred solution; most companies use third-party routing solutions.
You can view and manipulate a routing table on a Windows Server 2016 server in the following ways.
You can view the routing table by typing the following PowerShell command:
Get-NetRoute -AddressFamily IPv4
To create a new routing table entry in the routing table, you can use the following PowerShell command:
New-NetRoute -InterfaceIndex 10 -DestinationPrefix 10.10.0.0/16
-NextHop 192.168.1.1
You can change route settings with the Set-NetRoute cmdlet. For example, you can change hop values for existing routing entries.
Tip
You cannot modify the DestinationPrefix or NextHop properties of an existing route by using Set-NetRoute.
You still can use the older route command for routing table modifications.
To view the routing table, type the following at the command line:
route print
This command delivers output similar to the PowerShell cmdlet Get-NetRoute.
To modify the routing table, you also can use the route command with either the Add, Delete, or Change commands. The following command adds a new routing entry to the routing table:
route add 10.0.0.0 netmask 255.255.0.0 192.168.1.1 metric 5
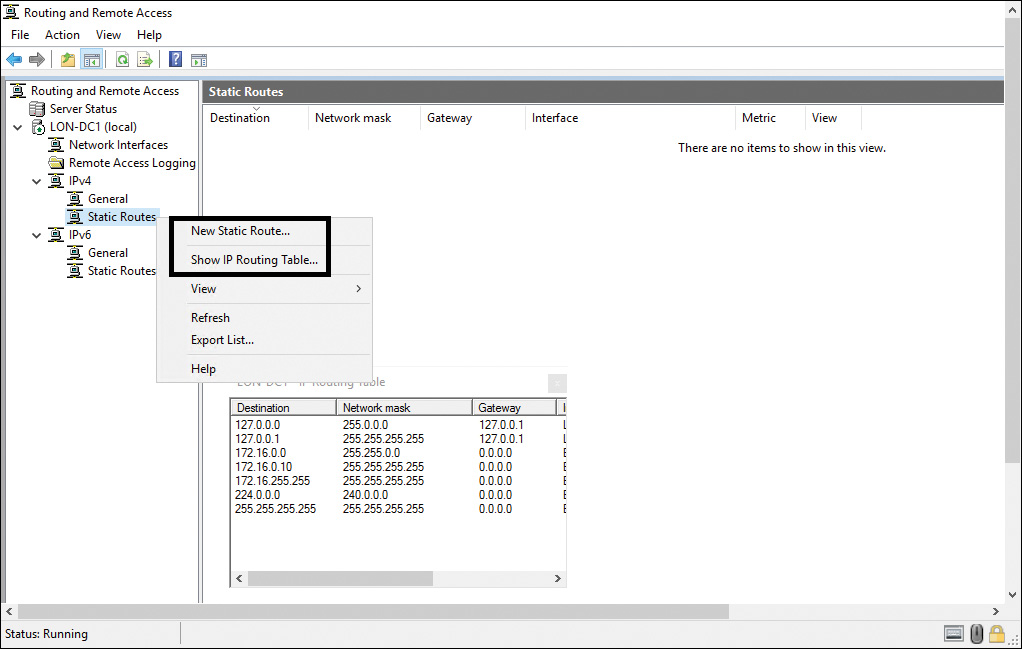
In addition, you can use the Routing and Remote Access console to add a static route entry to the routing table of a Windows Server 2016 router:
Step 1. Open the Routing and Remote Access console.
Step 2. Expand the local server and then expand IPv4.
Step 3. Right-click Static Routes and then select Show IP Routing Table.
Step 4. To add a new route, perform the following steps from within the Routing and Remote Access console:
![]() Under IPv4, right-click Static Routes, and then click New Static Route (see Figure 3-2).
Under IPv4, right-click Static Routes, and then click New Static Route (see Figure 3-2).
![]() Configure the static route with the appropriate interface, destination, network mask, and gateway.
Configure the static route with the appropriate interface, destination, network mask, and gateway.
Split DNS
Split DNS enables a hostname to resolve to one IP address on the internal network and another on the external network. In a Split DNS network configuration scenario, some important DNS data, such as SRV resource records of internal domain controllers, should be inaccessible from outside the firewall for unknown clients. At the same time, DNS records of servers and services hosting Internet-level resources such as web, mail, or proxy servers must remain accessible for some Internet clients.
Split DNS, also known as split-brain DNS, uses the same domain name for Internet and internal domain member resources. Normally, the DNS server role is assigned to separate DNS servers for that. In a Split DNS configuration, one or more DNS servers are used for internal name resolution and one or more DNS servers are for Internet name resolution. In such a configuration, internal DNS clients typically are configured with the IP address of internal DNS servers. If an internal DNS client resolves names from resources in the DMZ, this is solved through forwarding. All records at the Internet-facing DNS servers in the DMZ are created manually.
When a query comes from the Internet through the external firewall to the DMZ DNS server requesting a resolution on any domain-level resource (SRV records), the Internet-facing DNS server rejects the query.
Normally, you configure firewall rules on the DMZ inside the firewall to reject all DNS (UDP port 53) queries from the DMZ network to the internal network.
NRPT and Split DNS
Since Windows Server 2012, DirectAccess can connect clients automatically to the corporate network with an Internet connection.
When you use DirectAccess for portable clients, you should realize that when the client cannot locate the URL of the Network Location Server (NLS), the Direct-Access client assumes that it is not connected to the intranet and that it is located on the Internet.
The Name Resolution Policy Table (NRPT) is used for DirectAccess name resolution on a DirectAccess client. When a DirectAccess client cannot communicate with an NLS server in the company’s local network, it uses the DNS server listed in the NRPT for name resolution instead of using the DNS server on the TCP/IP settings on the network interface. You also have to know about the behavior of DirectAccess clients. Think about a DNS server in your DMZ. Suppose that you have configured DNS Policies there and you are wondering why these DNS Policies are not working for that DirectAccess client. The answer is that if that DMZ DNS server is not listed in the NRPT, the client will not contact that DNS server for name resolution. To ensure that DNS Policies on the DMZ DNS server will also work for a DirectAccess client that cannot communicate with the NLS server, you must add this DNS server to the NRPT. You do this using the DirectAccess server configuration tool, which transforms the performed NRPT settings into DirectAccess client Group Policy settings. The DirectAccess client must update its Group Policy settings to get the actual NRPT settings from an internal domain controller.
You also have to be careful when you have Split DNS configured because you need to add the FQDN of any Internet-level web server kept in the DMZ to the NRPT as a firewall exception rule.
![]() NRPT instead of TCP/IP settings on network interface: When the client cannot communicate with the NLS server, it uses the Name Resolution Policy Table (NRPT) for name resolution instead of using the TCP/IP settings on its network interface. The NRPT determines which DNS server should be used to resolve the names of resources they are accessing. If the DirectAccess client is internal, the client uses the TCP/IP DNS server settings of its network interface.
NRPT instead of TCP/IP settings on network interface: When the client cannot communicate with the NLS server, it uses the Name Resolution Policy Table (NRPT) for name resolution instead of using the TCP/IP settings on its network interface. The NRPT determines which DNS server should be used to resolve the names of resources they are accessing. If the DirectAccess client is internal, the client uses the TCP/IP DNS server settings of its network interface.
![]() NRPT and Split DNS: When you use DirectAccess for portable clients, be aware that when the client is deployed outside the internal network, it uses the NRPT for continued access to internal resources. This sends DNS name queries for internal resources to the Active Directory–integrated DNS servers. With Split DNS and DirectAccess clients, you need to add the FQDN of any Internet-level web servers kept in the perimeter network to the NRPT as a firewall exception rule.
NRPT and Split DNS: When you use DirectAccess for portable clients, be aware that when the client is deployed outside the internal network, it uses the NRPT for continued access to internal resources. This sends DNS name queries for internal resources to the Active Directory–integrated DNS servers. With Split DNS and DirectAccess clients, you need to add the FQDN of any Internet-level web servers kept in the perimeter network to the NRPT as a firewall exception rule.
DNS Policies
DNS Policies enable administrators to create rules that define how DNS servers respond to client queries based on different parameters (such as location, time of day, and transport protocol). This enables new traffic management scenarios, such as redirecting users to specific servers based on location, implementing split-brain DNS in a new way, blocking malicious domains, and ensuring that clients can resolve only specific names. The following list describes scenarios in which DNS Policies can be useful.

![]() Traffic management: Directs DNS clients to the closest datacenter or other datacenters based on the time of day
Traffic management: Directs DNS clients to the closest datacenter or other datacenters based on the time of day
![]() Application high availability: Redirects DNS clients to the best endpoint for the application
Application high availability: Redirects DNS clients to the best endpoint for the application
![]() Split-brain DNS: Gives DNS clients a response based on whether they are internal or external
Split-brain DNS: Gives DNS clients a response based on whether they are internal or external
![]() Filtering: Blocks a list of malicious IP addresses or FQDNs
Filtering: Blocks a list of malicious IP addresses or FQDNs
![]() Forensics: Redirects DNS clients to a sink hole instead of the destination computer they are trying to reach
Forensics: Redirects DNS clients to a sink hole instead of the destination computer they are trying to reach
DNS Policy Elements
To create DNS Policies, you must identify groups of records in a zone, groups of clients on a network, or other elements.
You can define policies that you apply based on the client subnet that generates the requests. For example, you might have a split-brain DNS scenario in which the name resolution request for www.pearson.com can be answered with an internal IP address for internal clients and a different IP address for external clients.
You also can use unique instances of a group of settings that control DNS server recursion, known as a recursion scope. The recursion scope holds a list of forwarders and specifies whether recursion is used. A DNS server can have multiple recursion scopes. You can use DNS server recursion policies to choose a recursion scope for a given set of queries. If the DNS server is not authoritative for certain queries, DNS server recursion policies let you control how to resolve those queries. In this case, you can specify which forwarders to use and whether to use recursion.
DNS zones can have multiple zone scopes, and each zone scope can contain its own set of DNS resource records. The same resource record can be present across multiple scopes, with different IP addresses depending on the scope. Additionally, zone transfers can be done at the zone scope level. This allows resource records from a zone scope in a primary zone to be transferred to the same zone scope in a secondary zone.
The following points summarize these DNS Policy elements:
![]() Client subnet: This is the IPv4 or IPv6 subnet from which queries are submitted to the DNS server.
Client subnet: This is the IPv4 or IPv6 subnet from which queries are submitted to the DNS server.
![]() Recursion scope: This specifies the list of forwarders and whether recursion is enabled.
Recursion scope: This specifies the list of forwarders and whether recursion is enabled.
![]() Zone scope: A DNS zone can have multiple zone scopes, which each scope containing their own set of DNS records. The same record can be present in multiple scopes, with different IP addresses.
Zone scope: A DNS zone can have multiple zone scopes, which each scope containing their own set of DNS records. The same record can be present in multiple scopes, with different IP addresses.
Types of DNS Policies and Differences
DNS Policies are divided by level and type. You can use query resolution policies to define how queries are handled and use zone transfer policies to define how zone transfers take place. Each policy type can be applied at the server level or the zone level. Recursion policies control how the DNS server performs recursion for a query. Recursion policies apply only when query processing reaches the recursion path. You can choose a value of DENY or IGNORE for recursion in a set of queries. Alternatively, you can choose a set of forwarders for a set of queries. You can use recursion policies to implement a split-brain DNS configuration. In this configuration, the DNS server performs recursion for a set of clients for a query but not for other clients for that query. Table 3-7 summarizes each type of DNS Policy.

DNS Policy Parameters
DNS Policies provide a strong mechanism for controlling the DNS responses based on the criteria parameters in Table 3-8.

These criteria can be combined with logical operators (AND/OR) to define policy expressions. When these expressions match, the policies are expected to perform one of the actions outlined in Table 3-9.

Tip
Server-level and zone transfer DNS Policies can have only the values Deny or Ignore as an action.
Tip
Recursion policies can be created only at the server level.
Tip
DNS zone transfer also transfers records added to a zone scope in a primary zone to the same zone scope in a secondary zone.
Tip
Don’t mix up the terms! DNS Policies are a new feature of Windows Server 2016 that has nothing to do with Active Directory or local Group Policies.
Multiple Query Resolution DNS Policies
Because you can create multiple query resolution policies at the same level (with different processing order), the DNS server processes incoming queries in the following way:
1. The incoming query looks for all server-level policies and matches them one by one in order of their processing order until it finds a match.
2. If a server-level policy is matched, it is applied.
3. If a server-level policy is not matched and the DNS server is authoritative for the query, the zone-level policies are viewed.
4. If a matching zone-level policy is found, it is applied.
5. If the DNS server is not authoritative for the query, the recursion policies are relevant.
6. If a matching recursion policy is matched, it is applied.
Using DNS Policies Based on Location
Consider the following example for DNS Policies based on location: You have a zone named pearson.com and two subnets named LondonNet (192.168.1.0/24) and ParisNet (192.168.2.0/24). When clients try to reach www.pearson.com, you want clients performing queries from LondonNet to get the IP address 192.168.1.10 and clients performing queries from ParisNet to get the IP address 192.168.2.10. Clients from the LondonNet subnet should get a different IP address (in this case, another web server for www.pearson.com) than clients from the ParisNet subnet.
You can use the new Windows Server 2016 DNS server policy feature to implement such a scenario (based on location), to redirect users to specific servers:
Step 1. Install the DNS Server with PowerShell:
Add-WindowsFeature -Name DNS -IncludeManagementTools
Step 2. Create a zone for testing with PowerShell:
Add-DnsServerPrimaryZone -Name pearson.com -ZoneFile
pearson.com.dns
Step 3. Configure two client subnets with PowerShell:
Add-DnsServerClientSubnet -Name LondonNet -Ipv4Subnet
192.168.1.0/24
Add-DnsServerClientSubnet -Name ParisNet -Ipv4Subnet
192.168.2.0/24
Step 4. List the client subnets:
Get-DnsServerClientSubnet
Step 5. Divide the zone pearson.com into two zone scopes so that queries from different client subnets can be answered using different DNS resource records:
Add-DnsServerZoneScope -ZoneName pearson.com -Name
LondonZoneScope
Add-DnsServerZoneScope -ZoneName pearson.com -Name ParisZoneScope
Step 6. Display the Zone Scopes with the following PowerShell command:
Get-DnsServerZoneScope -ZoneName pearson.com
Step 7. Add records to the zone scopes with the following PowerShell command:
Add-DnsServerResourceRecord -ZoneName pearson.com -A -name
www -Ipv4Address 192.168.1.10
-ZoneScope LondonZoneScope
Add-DnsServerResourceRecord -ZoneName pearson.com -A -name
www -Ipv4Address 192.168.2.10
-ZoneScope ParisZoneScope
Step 8. To make it possible for everyone to access the servers, add the records to the default zone scope:
Add-DnsServerResourceRecord -ZoneName pearson.com -A -name
www -Ipv4Address 192.168.1.10
Add-DnsServer ResourceRecord -ZoneName pearson.com -A -name
www -Ipv4Address 192.168.2.10
Step 9. List the records in each scope:
Get-DnsServerResourceRecord -ZoneName pearson.com -ZoneScope
ParisZoneScope
Get-DnsServer ResourceRecord -ZoneName pearson.com -ZoneScope
LondonZone Scope
Step 10. Create DNS server policies:
Add-DnsServerQueryResolutionPolicy -Name LondonPolicy
-Action ALLOW -ClientSubnet 'eq, LondonNet' -ZoneScope
'LondonZoneScope,1' -ZoneName pearson.com
Add-DnsServerQuery ResolutionPolicy -Name ParisPolicy -Action
ALLOW -ClientSubnet 'eq, ParisNet' -ZoneScope
'ParisZoneScope,1' -ZoneName pearson.com
DNS Policies become effective immediately; you do not have to restart the service or reboot. After that, configuration queries from Paris should resolve to 192.168.2.10 and queries from London should resolve to 192.168.1.10.
Step 11. To see the policies configured for zone pearson.com, use this command::
Get-DnsServerQueryResolutionPolicy pearson.com
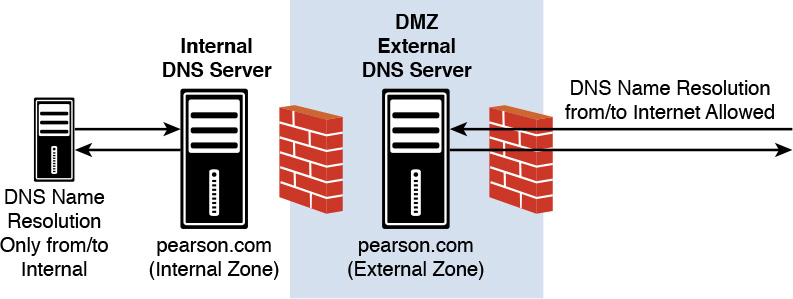
Using DNS Policies for Split-Brain
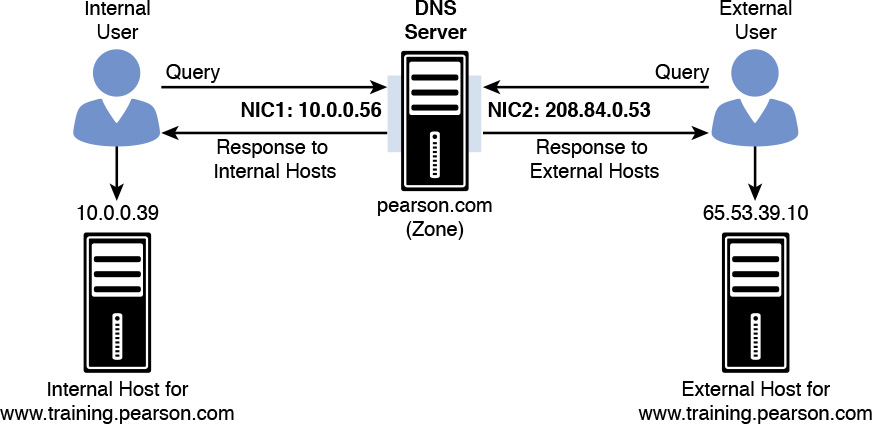
A known DNS deployment is deemed split-brain (or split-horizon) when two versions of the same single zone exist, one for internal name resolution and the other for external name resolution (see Figure 3-3). Distributing one zone through different DNS servers is done for security. External users can resolve names only for external resources (servers inside the DMZ network) and are not allowed to access DNS records from internal resources. Internal users can resolve internal resources (mail servers, SharePoint servers, and so on).
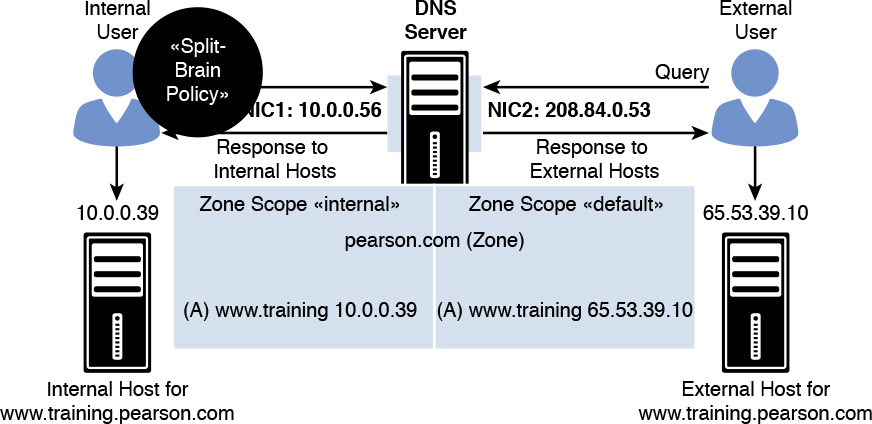
Using the new Windows Server 2016 DNS Policy feature, it is possible to configure the same scenario without using two DNS servers (see Figure 3-4).
If the DNS server responsible for the pearson.com zone listens on two network interfaces (one with a public IP address of 208.84.0.53 for external queries and another with a private IP address of 10.0.0.56 for internal queries), the administrator can follow these steps to achieve split-brain DNS deployment through DNS Policies:
Step 1. Create the scopes of the zone with PowerShell:
Add-DnsServerZoneScope -ZoneName "pearson.com" -Name "internal"
Step 2. Add records to the zone scopes with PowerShell:
Add-DnsServerResourceRecord -ZoneName "pearson.com" -A -Name
www.training -IPv4address "65.53.39.10"
Add-DnsServerResourceRecord -ZoneName "pearson.com" -A -Name
www.training -IPv4address "10.0.0.39 -ZoneScope "internal"
No -ZoneScope parameter is used for the first resource record because it is added to the default zone scope.
Step 3. Create the DNS Policies with PowerShell:
Add-DnsServerQueryResolutionPolicy -Name "SplitBrainZonePolicy"
-Action ALLOW -ServerInterface "eq, 10.0.0.56"
For mapping the default zone scope, no policy is required. When a request comes from an internal user, the DNS Policy SplitBrainZonePolicy allows the internal interface to receive the IP address 10.0.0.56 from the internal host. DNS queries received on the public network interface card of the DNS server get a response with the public IP address in the default zone scope (see Figure 3-5).
Selective Recursion Control with DNS Policies
In Figure 3-5, the same DNS server was used for both external and internal clients; it simply responded with different answers. Some deployments require the same DNS server to perform recursive name resolution for the internal clients, apart from acting as the authoritative name server for pearson.com.
For this, recursion should be enabled on the DNS server. But when the DNS server is also listening to external queries, the recursion is enabled for external clients as well and the DNS server becomes an open resolver. This makes the server vulnerable.
No reason exists for why the pearson.com DNS server should do recursive name resolution for external clients. The solution is to do selective recursion control through DNS recursion policies. Recursion should be allowed for internal clients and blocked for external clients.
To implement a scenario with selective recursion control through DNS Policies, you can perform the following steps:
Step 1. Create recursion scopes with PowerShell:
Set-DnsServerRecursionScope -Name -EnableRecursion $false
Add-DnsServerRecursionScope -Name "InternalClients"
-EnableRecusion $true
Step 2. Create recursion policies with PowerShell:
Add-DnsServerQueryResolutionPolicy -Name "SBRecursionPolicy"
-Action ALLOW
-ApplyOnRecursion -RecursionScope "InternalClients"
-ServerInterfaceIP "EQ, 10.0.0.39"
In Step 1, the default recursion setting was disabled; then a new recursion scope for internal clients was created and recursion was enabled for them. With Step 2, the DNS server recursion policy named SBRecursionPolicy was created for a set of queries matching certain criteria.
How Selective Recursion Control with DNS Policies Works
If the DNS server receives a query for which it is not authoritative (for example, www.nasa.org), the request is evaluated against the DNS server policies. If no query zone resolution policy exists for the request, the zone-level policies are not evaluated—instead, recursion policies are evaluated. The queries received on the private interface matching the SBRecursionPolicy criteria point to a recursion scope where recursion is enabled. Then the DNS server performs recursion (forwarding) to get the answer for www.nasa.org. If a query comes from the Internet to the external interface, default recursion settings are applied, preventing the server from acting as an open resolver for external clients.
Practice: Block Queries for a Domain with DNS Policies
You can block queries that come from a specific subnet. The following example creates a subnet for 172.16.0.0/16 and then creates a policy to ignore all queries from that subnet:
Add-DnsServerClientSubnet -Name "BlockedSubnet" -IPv4Subnet
172.16.0.0/16
Add-DnsServerQueryResolutionPolicy -Name "Blackhole Policy" -Action
IGNORE -ClientSubnet "EQ, BlockedSubnet"
Practice: Create a Server-Level Zone Transfer Policy
Allow zone transfer for any server on a specific subnet:
Add-DnsServerClientSubnet -Name "AllowedNet" -IPv4Subnet 172.16.0.0/16
Add-DnsServerZoneTransferPolicy -Name "SwissPolicy"
-Action IGNORE -ClientSubnet "ne, AllowedNet"
Practice: Create a Zone-Level Zone Transfer Policy
Ignore any zone transfer requests for pearson.com that come from a specific server interface (10.0.0.50):
Add-DnsServerZoneTransferPolicy -Name "IntTransfer" -Action IGNORE
-ServerInterfaceIP "ne,10.0.0.50" -PassThru -ZoneName "pearson.com"
Practice: Block Queries from a Domain
Block any query with the domain baddomain.com:
Add-DnsServerQueryResolutionPolicy -Name "BLPol" -Action IGNORE -FQDN
"EQ, *.baddomain.com" -PassThru
Practice: Allow Queries Only from a Domain
Allow only devices and computers in the domain pearson.com and child domains to query the DNS server:
Add-DnsServerQueryResolutionPolicy -Name "AllowListPolicyDomain"
-Action IGNORE -FQDN "NE, *.pearson.com" -PassThru
Responses Based on Time of Day
You can use DNS Policies based on the time of the day to distribute traffic across different geographic instances. Suppose that you want to direct your network traffic in one time zone to alternate application servers that are in another time zone. For that, you can load-balance traffic across application instances during peak time periods when your primary servers are overloaded.
The example in Figure 3-6 uses the fictional company Pearson Gift Services, which provides online gifting solutions across the globe through the website pearsongiftservices.com.
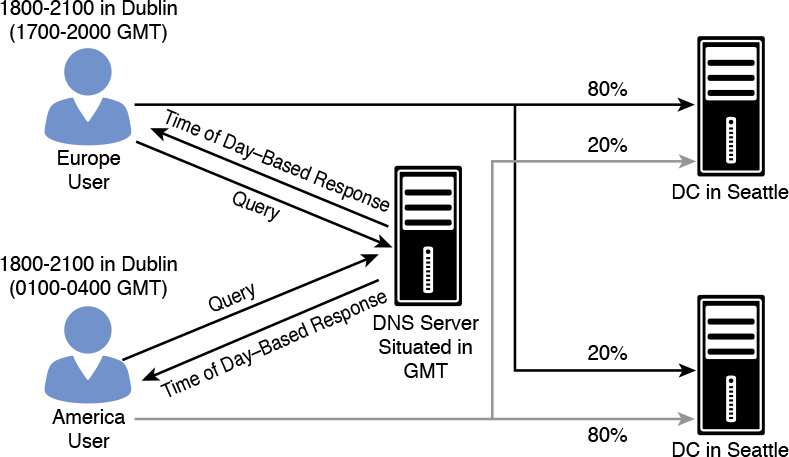
The website is in two datacenters: Dublin and Seattle. After performing site analysis, IT pros discover that, between 6 p.m. and 9 p.m. local time, the web servers experience increased traffic. Pearson Gift Services wants to redirect 20 percent of the Dublin traffic to Seattle application servers and 20 percent of the Seattle traffic to Dublin application servers, but only between 6 p.m. and 9 p.m. for both locations. When the DNS server is configured with time-of-day DNS Policies, then between 6 p.m. and 9 p.m. at each location, the DNS server should do the following:
![]() Answer the first four queries with the IP address of the web server in the local datacenter
Answer the first four queries with the IP address of the web server in the local datacenter
![]() Answer the fifth query with the IP address of the web server in the remote datacenter
Answer the fifth query with the IP address of the web server in the remote datacenter
For that, you should configure the following:
![]() Create the DNS client subnets
Create the DNS client subnets
![]() Create the zone scopes for Seattle and Dublin
Create the zone scopes for Seattle and Dublin
![]() Add the web server records to the zone scopes
Add the web server records to the zone scopes
![]() Create the DNS Policies, including processing order
Create the DNS Policies, including processing order
These are the configuration steps for the scenario:
Step 1. Create the DNS client subnets with PowerShell:
Add-DnsServerClientSubnet -Name "AmericaSubnet" -IPv4Subnet
"192.0.0.0/24, 182.0.0.0/24"
Add-DnsServerClientSubnet -Name "EuropeSubnet" -IPv4Subnet
"141.1.0.0/24, 151.1.0.0/24"
Step 2. Create the zone scopes with PowerShell:
Add-DnsServerZoneScope -ZoneName "pearsongiftservices.com" -Name
"SeattleScope"
Add-DnsServerZoneScope -ZoneName "pearsongiftservices.com" -Name
"DublinScope"
Step 3. Add records to the zone scopes with PowerShell:
Add-DnsServerResourceRecord -ZoneName "pearsongiftservices.com"
-A
-Name "www" -IPv4Address "192.0.0.1" -ZoneScope "SeattleScope
Add-DnsServerResourceRecord -ZoneName "pearsongiftservices.com"
-A
-Name "www" -IPv4Address "141.1.0.3" -ZoneScope "DublinScope"
Step 4. Create the DNS Policies with PowerShell:
Add-DnsServerQueryResolutionPolicy -Name "USA6To9Policy" -Action
ALLOW -ClientSubnet "eq,
AmericaSubnet" -ZoneScope "SeattleScope,4; DublinScope,1"
-TimeOfDay "EQ,01:00-04:00"
-ZoneName "pearsongift services.com" -ProcessingOrder 1
Add-DnsServerQueryResolutionPolicy -Name "EU6To9Policy" -Action
ALLOW -ClientSubnet "eq, EuropeSubnet"
-ZoneScope "SeattleZScope,1; DublinScope,4" -TimeOfDay
"EQ,17:00-20:00" -ZoneName "pearsongift services.com"
-ProcessingOrder 2
Add-DnsServerQueryResolutionPolicy -Name "USAPolicy"
-Action ALLOW -ClientSubnet "eq, America Subnet" -ZoneScope
"SeattleScope,1" -ZoneName "pearson giftservices.com"
-ProcessingOrder 3
Add-DnsServerQueryResolutionPolicy -Name "EUPolicy"
-Action ALLOW -ClientSubnet "eq, EuropeSubnet" -ZoneScope
"DublinScope,1" -ZoneName "pearsongiftservices.com"
-ProcessingOrder 4
Add-DnsServerQueryResolutionPolicy -Name "RestOfWorldPolicy"
-Action ALLOW --ZoneScope
"DublinScope, 1; SeattleScope,1" -ZoneName
"pearsongiftservices.com" -ProcessingOrder 5
Time-of-Day Responses with Azure App Server
You can use DNS Policies based on the time of the day to distribute application traffic across different geographical instances. You can direct traffic in one time zone to alternative application servers in another time zone. The alternative application servers also can be on an Azure virtual machine.
The example in Figure 3-7 again uses the fictional company Pearson Gift Services, which provides online gifting solutions across the globe through the website pearsongiftservices.com.

The website and the DNS server are hosted on a single on-premises datacenter in Seattle with a public IP address of 192.68.30.2. During a site analysis, IT professionals discover that, every evening between 6 p.m. and 9 p.m. local time, traffic increases to the Seattle web server. To ensure that pearsongiftservices.com customers get a responsive experience between 6 p.m. and 9 p.m., they rented an Azure virtual machine with an additional web server. The public IP address for this web server is 192.68.31.44. This web server is automatically turned on at 6 p.m. and off at 9 p.m. through Azure automation.
The DNS server should be configured with zone scopes and DNS Policies so that, between 6 p.m. and 9 p.m. every day, 30 percent of the queries are sent to the instance of the web server that is running in Azure.
These are the configuration steps for this scenario:
Step 1. Create the scopes of the zone with PowerShell:
Add-DnsServerZoneScope -ZoneName "pearsongiftservices.com" -Name
"AzureZoneScope"
Step 2. Add records to the zone scopes with PowerShell:
Add-DnsServerResourceRecord -ZoneName "pearsongiftservices.com"
-A
-Name "www" -IPv4address "192.68.31.44"
-ZoneScope "SeattleZoneScope"-TimeToLive 600
Add-DnsServerResourceRecord -ZoneName "pearsongiftservices.com"
-A
-Name "www" -IPv4address "192.68.30.2"
No -ZoneScope parameter is used for the second resource record because it is added to the default zone scope.
After the zone scopes are created, you can create DNS Policies that distribute the incoming queries across these scopes so that the following occurs:
![]() From 6 p.m. to 9 p.m. daily, 30 percent of clients receive the IP address of the web server in the Azure datacenter in the DNS response, while 70 percent of clients receive the IP address of the Seattle on-premise web server.
From 6 p.m. to 9 p.m. daily, 30 percent of clients receive the IP address of the web server in the Azure datacenter in the DNS response, while 70 percent of clients receive the IP address of the Seattle on-premise web server.
![]() At all other times, all the clients receive the IP address of the Seattle on-premise web server.
At all other times, all the clients receive the IP address of the Seattle on-premise web server.
The time of the day should be expressed in local time of the DNS server.
Step 3. Create the DNS Policies with PowerShell:
Add-DnsServerQueryResolutionPolicy -Name "Pearson6to9Policy"
-Action ALLOW -ZoneScope
"pearsongiftservices.com,7; AzureZoneScope,3" -TimeOfDay
"EQ,18:00-21:00" -ZoneName
"pearsongiftservices.com" -ProcessingOrder 1
Explanation: -ZoneScope “pearsongiftservices.com,7; AzureZoneScope,3” -TimeOfDay “EQ,18:00-21:00” configures the DNS server with a ZoneScope and weight combination that instructs the DNS server to send the IP address of the Seattle web server 70 percent of the time and send the IP address of the Azure web server 30 percent of the time.
Exam Preparation Tasks
Review All the Key Topics
Review the most important topics in the chapter, noted with the Key Topics icon in the outer margin of the page. Table 3-10 lists these key topics and the page numbers where each is found.

Table 3-10 Key Topics for Chapter 3
Complete the Tables and Lists from Memory
Print a copy of Appendix B, “Memory Tables” (on the book’s website), or at least the section for this chapter, and complete the tables and lists from memory. Appendix C, “Memory Tables Answer Key,” also on the website, includes completed tables and lists to check your work.
Definition of Key Terms
Define the following key terms from this chapter and check your answers in the Glossary:
NRPT
DHCP options
DHCP name protection
transfer policies
server-level zone transfer policy
End-of-Chapter Review Questions
1. You are the administrator of the Pearson Corporation. You are responsible for your name resolution environment.

Subnets 172.16.3.0/24 and 172.16.6.0/24 are identified as being infected with malware. You want to block name resolution through DNS server policy. Which PowerShell cmdlet should you use to accomplish this?
a. Add-DnsServerQuery ResolutionPolicy -Name MalwarePolicy -Action DENY -ClientSubnet ‘EQ, CHSubnet1’ -Disable $false
b. Add-DnsServerQuery ResolutionPolicy -Name MalwarePolicy -Action DENY -ClientSubnet ‘EQ, NYSubnet2’ -Disable $false
c. Add-DnsServerQuery ResolutionPolicy -Name MalwarePolicy -Action IGNORE -ClientSubnet ‘EQ, CHSubnet1’ -Disable $false
d. Set-DnsServerQuery ResolutionPolicy -Name NYPolicy -Action IGNORE -ClientSubnet ‘EQ, NYSubnet2’ -Disable $true
2. You want to allow DNS queries only from clients from the subnet AllowedNET (172.16.0.0/16). You create a DNS server query resolution policy with the following command: Add-DnsServer QueryResolutionPolicy -Name “AllowSubnetPolicy”-Action IGNORE -ClientSubnet “NE, AllowedNET” -PassThru. However, clients from all subnets still successfully can send queries to your DNS server. What additional PowerShell cmdlet should you use to solve that problem?
a. Add-DnsServerClientSubnet
b. Remove-DnsServerClientSubnet
c. Add-DnsServerResourceRecord
d. Add-DnsServerZoneScope
3. You have a DNS server named DNS1 (10.0.0.10) with an AD-integrated DNS zone for pearson.com, and you have configured three secondary DNS servers named DNS2 (10.0.0.49), DNS3 (10.0.0.50), and DNS4 (10.0.0.51) as secondary DNS servers. You want to restrict zone transfer from DNS1 only to DNS3 through DNS server zone transfer policies. Which command can you use?
a. Add-DnsServerZoneTransferPolicy -Name “IntTransfer” -Action IGNORE -ServerInterfaceIP “ne,10.0.0.10” -PassThru -ZoneName “pearson.com”
b. Add-DnsServerZoneTransferPolicy -Name “IntTransfer” -Action IGNORE -ServerInterfaceIP “ne,10.0.0.50” -PassThru -ZoneName “pearson.com”
c. Add-DnsServerZoneTransferPolicy -Name “IntTransfer” -Action ALLOW -ServerInterfaceIP “ne,10.0.0.49” -PassThru -ZoneName “pearson.com”
d. Add-DnsServerZoneTransferPolicy -Name “IntTransfer” -Action ALLOW -ServerInterfaceIP “ne,10.0.0.51” -PassThru -ZoneName “pearson.com”