Chapter 8. Managing DNS and DHCP Using Windows Server 2016 IPAM
This chapter covers the following subjects:
![]() Managing DHCP server properties using IPAM: IP Address Management (IPAM) in Windows Server 2016 enables you to centrally configure DHCP server properties for managed DHCP servers. Using the IPAM configuration console, you can display DHCP servers and perform DHCP server-specific tasks such as enabling DHCP audit logging and enabling or disabling DNS dynamic update. This chapter covers the most important DHCP server properties and how to configure them using IPAM.
Managing DHCP server properties using IPAM: IP Address Management (IPAM) in Windows Server 2016 enables you to centrally configure DHCP server properties for managed DHCP servers. Using the IPAM configuration console, you can display DHCP servers and perform DHCP server-specific tasks such as enabling DHCP audit logging and enabling or disabling DNS dynamic update. This chapter covers the most important DHCP server properties and how to configure them using IPAM.
![]() Configuring DHCP scopes and options using IPAM: Here you learn how to configure predefined DHCP options and values. Configuration examples illustrate DHCP options using IPAM, and you explore the configuration of DHCP scopes using IPAM and some configuration restrictions.
Configuring DHCP scopes and options using IPAM: Here you learn how to configure predefined DHCP options and values. Configuration examples illustrate DHCP options using IPAM, and you explore the configuration of DHCP scopes using IPAM and some configuration restrictions.
![]() Configuring DHCP Policies and failover using IPAM: You can use IPAM to activate or deactivate DHCP Policies. This chapter covers how to edit, enable, disable, or move the processing order of DHCP Policies for single or multiple DHCP servers.
Configuring DHCP Policies and failover using IPAM: You can use IPAM to activate or deactivate DHCP Policies. This chapter covers how to edit, enable, disable, or move the processing order of DHCP Policies for single or multiple DHCP servers.
![]() Managing DNS server properties using IPAM: In Windows Server 2016, you have some enhanced options for managing DNS server and zones using IPAM. You learn how to manage DNS server properties using IPAM or DNS Manager, as well as how to create and edit DNS zones and DNS conditional forwarders.
Managing DNS server properties using IPAM: In Windows Server 2016, you have some enhanced options for managing DNS server and zones using IPAM. You learn how to manage DNS server properties using IPAM or DNS Manager, as well as how to create and edit DNS zones and DNS conditional forwarders.
![]() Managing DNS zones and records using IPAM: This chapter covers enhanced Windows Server 2016 IPAM DNS possibilities. It details how to manage DNS zone settings using IPAM and how to manage subdomains through the IPAM configuration console and DNS Manager.
Managing DNS zones and records using IPAM: This chapter covers enhanced Windows Server 2016 IPAM DNS possibilities. It details how to manage DNS zone settings using IPAM and how to manage subdomains through the IPAM configuration console and DNS Manager.
![]() Managing DNS and DHCP servers in multiple Active Directory forests using IPAM: Windows Server 2016 IPAM offers the new feature to manage DHCP, DNS, or NPS servers distributed through different forests. This chapter covers how to implement an IPAM multiple forest management environment.
Managing DNS and DHCP servers in multiple Active Directory forests using IPAM: Windows Server 2016 IPAM offers the new feature to manage DHCP, DNS, or NPS servers distributed through different forests. This chapter covers how to implement an IPAM multiple forest management environment.
![]() Using RBAC to delegate DNS and DHCP server administration using IPAM: This section covers DNS and DHCP delegated administration in IPAM using the RBAC feature. It explains how to use IPAM user roles, access scopes, and access policies to restrict administrative permissions and implement a least privilege–based security design for IPAM administration.
Using RBAC to delegate DNS and DHCP server administration using IPAM: This section covers DNS and DHCP delegated administration in IPAM using the RBAC feature. It explains how to use IPAM user roles, access scopes, and access policies to restrict administrative permissions and implement a least privilege–based security design for IPAM administration.
This chapter covers the configuration of DHCP server properties, options, and values using Windows Server 2016 IPAM tools and PowerShell. It explains all the DHCP server tasks and properties that you can perform through IPAM and compares the possibilities with older Windows Server versions. You also learn about some exclusions and DHCP server properties that cannot be configured through IPAM tools.
You investigate DHCP scope and option configuration using IPAM, as well as how to create and edit DHCP scopes in IPAM. Other important topics include DHCP Policies and the DHCP failover relationship configuration for single or multiple DHCP servers with IPAM. In addition, you learn where to find configuration settings in the IPAM configuration console and how to implement an example DHCP failover relationship scenario.
Windows Server 2016 IPAM offers some enhanced DNS server, zones, and resource record configuration possibilities. This chapter covers DNS server management, shows how to create and edit DNS zones and DNS conditional forwarders using IPAM, and details which PowerShell cmdlets are available for managing DNS zones and records using IPAM. DNS zone settings are explained in detail, along with coverage of subdomain management in the IPAM configuration console.
For larger companies with many forests, the new Windows Server 2016 IPAM capability of managing servers in different forests is an important improvement. This chapter covers this feature as well, including the prerequisites for a multiple-forest IPAM environment and its configuration using IPAM.
Windows Server 2016 IPAM offers RBAC possibilities so that you can restrict administrative privileges based on IPAM user roles, access scopes, and access policies. This chapter gives an example of delegating permissions to DHCP administrators so that only specific administrators can run predefined operations on IPAM.
Key topic selections, memory tables, key term definitions, and exam preparation questions give you some powerful tools to increase your knowledge about managing DNS and DHCP using Windows Server 2016 IPAM for the Microsoft 70-741 exam and your daily work.
“Do I Know This Already?” Quiz
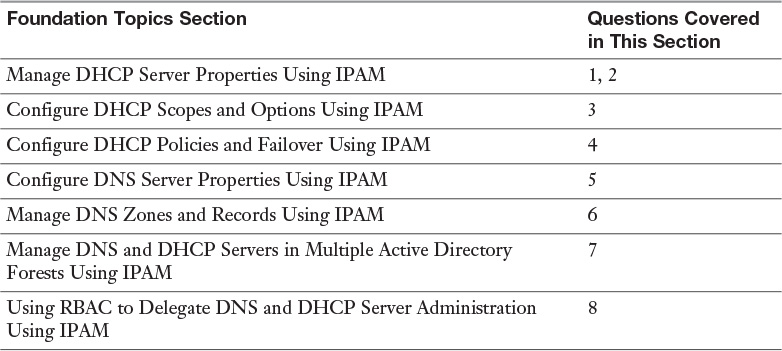
The “Do I Know This Already?” quiz enables you to assess whether you should read this entire chapter or simply jump to the “Exam Preparation Tasks” section for review. If you are in doubt, read the entire chapter. Table 8-1 outlines the major headings in this chapter and the corresponding “Do I Know This Already?” quiz questions. You can find the answers in Appendix A, “Answers to the ‘Do I Know This Already?’ Quizzes and End-of-Chapter Review Questions.”
Caution
The goal of self-assessment is to gauge your mastery of the topics in this chapter. If you do not know the answer to a question or are only partially sure of the answer, you should mark that question as wrong for purposes of the self-assessment. Giving yourself credit for an answer you correctly guess skews your self-assessment results and might provide you with a false sense of security.
1. You are responsible for your Windows Server 2016 IPAM server, IPAM1. IPAM1 is configured to manage DHCP servers in multiple forests; pearson.com and pucert.com are the two forests to manage. On IPAM1, you open the configuration console; then you select DNS and DHCP Servers, Server Type DHCP, and the Server Properties view. The following DHCP servers are listed:
![]() dhcp1.pearson.com
dhcp1.pearson.com
![]() dhcp2.pearson.com
dhcp2.pearson.com
![]() dhcp4.usa.pearson.com
dhcp4.usa.pearson.com
![]() dhcp1.pucert.com
dhcp1.pucert.com
![]() dhcp2.pucert.com
dhcp2.pucert.com
You want to enable the name protection feature for dhcp3.pearson.com and dhcp2.pucert.com through IPAM. Which is a possible way to do that?
a. Select dhcp3.pearson.com and dhcp2.pucert.com together and use Edit DHCP Server Properties in the IPAM configuration console.
b. Use the Set-DhcpServerv4DnsSetting PowerShell cmdlet with the NameProtection parameter.
c. Select dhcp3.pearson.com and select Edit DHCP Server Properties in the IPAM configuration console. Then select dhcp2.pucert.com and use Edit DHCP Server Properties in the IPAM configuration console.
d. Use the Get-IpamDhcpServer PowerShell cmdlet.
2. You have configured DNS Dynamic Update Credentials through your Windows Server 2016 IPAM server named IPAM1 for the three DHCP servers DHCP1, DHCP2, and DHCP3 in the forest pearson.com. Last Friday, a backup of all IPAM configuration data was started. You also have backed up all DHCP servers locally and Active Directory. You have to run a restore process for DHCP1. Which additional configuration should you do?
a. Select all three DHCP servers in the IPAM configuration console and configure new DNS Dynamic Update Credentials.
b. Select DHCP1 in the IPAM configuration console and configure new DNS Dynamic Update Credentials only for DHCP1.
c. Restore ipam.mdf and ipam_log.ldf, select all three DHCP servers in the IPAM configuration console, and configure new DNS Dynamic Update Credentials.
d. Use the Set-IpamDiscoveryDomain PowerShell cmdlet to discover the restored Active Directory Credentials from Active Directory.
3. You have two configured DHCP scopes named Scope1 and Scope2, and you want to disable dynamic updates for DNS PTR records for both scopes in IPAM. Which configuration process is a possible solution?
a. Select both DHCP scopes in the IPAM configuration console and use Edit Scope to disable dynamic updates for DNS PTR records for both scopes.
b. Use the Set-IpamDhcpScope PowerShell cmdlet to disable dynamic updates for DNS PTR records for both scopes.
c. Select both DHCP scopes in the IPAM configuration console and use Set Access Scope to disable dynamic updates for DNS PTR records for both scopes.
d. Remove Scope2. Select Scope1 and use Edit Scope to disable dynamic updates for DNS PTR records. Use Duplicate DHCP Scope and name the new scope Scope2.
4. You have a domain named pearson.com with two sites named Chicago and Denver. You also have a Windows Server 2016 IPAM server named IPAM1 that centrally manages all DNS and DHCP servers. Visitor devices must be automatically registered in visitors.pearson.com. The zone is created as an AD-integrated DNS zone with a forest-wide replication scope. You have four DHCP servers: DHCP1 and DHCP2 (Chicago), and DHCP3 and DHCP4 (Denver). You want to configure (with least administrative effort) visitor devices to be automatically registered in visitors.pearson.com with their IP address and hostname. You want to apply the configuration only to the following scopes: Scope2 (DHCP2): 10.10.0.0/24; Scope4 (DHCP4): 172.16.0.0/16. Which configuration is a valid solution for this scenario?
a. On IPAM1, configure a DHCP Policy for DHCP2 with the Register DHCP Clients Using a Different DNS Suffix setting enabled, and use the DHCP failover feature to replicate the policy to DHCP4.
b. On DHCP1, create a DHCP Policy with the Register DHCP Clients Using a Different DNS Suffix setting enabled, and use the DHCP failover feature to replicate the policy to DHCP4.
c. On IPAM1, create a DHCP Policy for DHCP2 with the Register DHCP Clients Using a Different DNS Suffix setting enabled, and import this DHCP Policy into DHCP4.
d. On IPAM1, select Scope2 and Scope4, and use Configure DHCP Policy. Enable the Register DHCP Clients Using a Different DNS Suffix setting and create the DHCP Policy.
5. You have a Windows Server 2016 IPAM server named IPAM1. You centrally manage 20 of your DNS servers through that IPAM server. You select DNS as the server type and Server Properties as the view. You see the list of your DNS servers. You want to configure Debug Logging on 10 of your DNS servers. The configuration has to be done through the IPAM configuration console. Which configuration is possible?
a. Select the 10 DNS servers and select Launch MMC. Configure Debug Logging once.
b. Select the first DNS server and select Launch MMC. Configure Debug Logging. Repeat these two steps for all other DNS servers.
c. Change to Server Inventory and select the 10 DNS servers. Select Edit Server and configure Debug Logging once.
d. Change to Server Groups and select the 10 DNS servers. Select Launch MMC and configure Debug Logging once.
6. You use the New Domain setting in the DNS Manager to create a subdomain named USA under the existing zone pearson.com. The subdomain is not displayed in the IPAM configuration console under Forward Lookup. The zone pearson.com is displayed with a green bullet. You also want to display the subdomain in the IPAM configuration console. What configuration do you need so that the subdomain usa.pearson.com is displayed in the IPAM configuration console under Forward Lookup?
a. Remove the subdomain and use New Delegation in the DNS Manager to create the usa.pearson.com zone.
b. Remove the subdomain, select the DNS server in the DNS and DHCP Servers list, and use Create DNS Zone to create the usa.pearson.com zone.
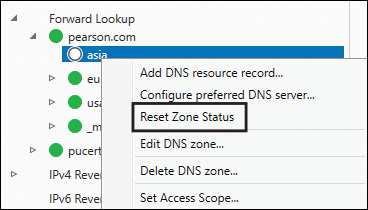
c. Select pearson.com, Reset Zone Status, and then Retrieve Server Data.
d. Remove the subdomain and create usa.pearson.com with the New Zone Wizard in the DNS Manager.
7. You are responsible for a forest named pearson.com and a Windows Server 2016 IPAM server named IPAM1. Now you want to manage the DHCP and DNS servers of an additional forest named pucert.com through IPAM1. You created DNS conditional forwarding between pearson.com and pucert.com in both directions. You also created a two-way forest trust. You clicked the Get Forests button in the IPAM configuration console and you added the pucert.com forest. Now you perform the InvokeGpoProvisioning PowerShell command on IPAM1 to deploy the necessary GPOs. The command fails. Which configuration do you do next?
a. Grant computer accounts of managed servers in pucert.com GPOApply permission.
b. Grant the administrative account of pearson.com the permission to create IPAM GPOs in pucert.com.
c. Add IPAM1 to the IPAMUG security group of pucert.com.
d. Add pucert.com managed servers to the pearsonIPAMUG security group.
8. You want to allow administrators to become members of the security group IPv6Admins to create, modify and delete only AAAA resource records in the DNS zones eu.pucert.com and usa.pucert.com. Which IPAM components do you use? (Choose all that apply.)
a. Create a new user role.
b. Use the default user role DNS Record Administrator Role.
c. Create a new access policy.
d. Create a new access scope.
e. Use the default access scope.
f. Used the default access policy.
g. Set the access scope.
Foundation Topics
Manage DHCP Server Properties Using IPAM
With Windows Server 2016 IPAM, you can configure DHCP server properties. Through the IPAM configuration console under DNS and DHCP Servers, you can select DHCP as the server type and choose the Server Properties view to display the available DHCP servers. By using the context menu of one or more DHCP servers, you can view DHCP server tasks. Figure 8-1 shows the possible DHCP server tasks in Windows Server 2012 R2 IPAM.

DHCP server tasks through Windows Server 2016 IPAM are about the same as with Windows Server 2012 R2.
Tip
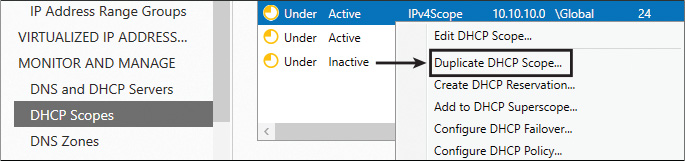
You cannot use the Create DHCP Scope configuration option on multiple DHCP servers. To duplicate a DHCP scope, create the scope on at least one DHCP server and then use the Duplicate DHCP Scope configuration option available in the DHCP Scopes view. Figure 8-2 shows the Duplicate DHCP Scope setting.
DHCP Server Properties
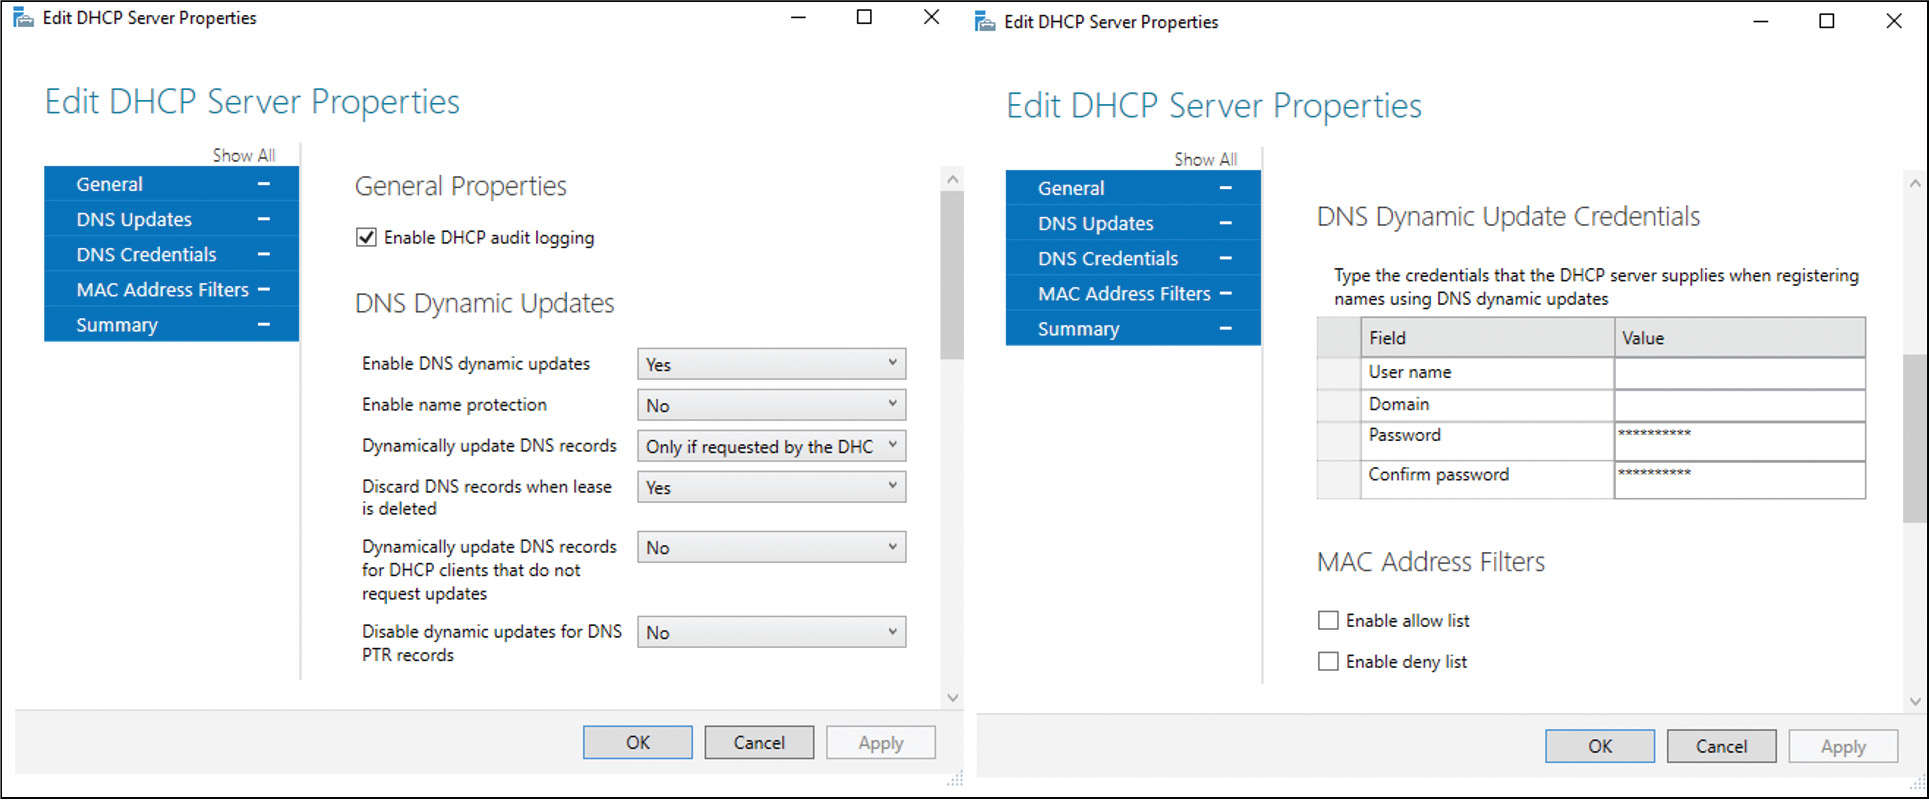
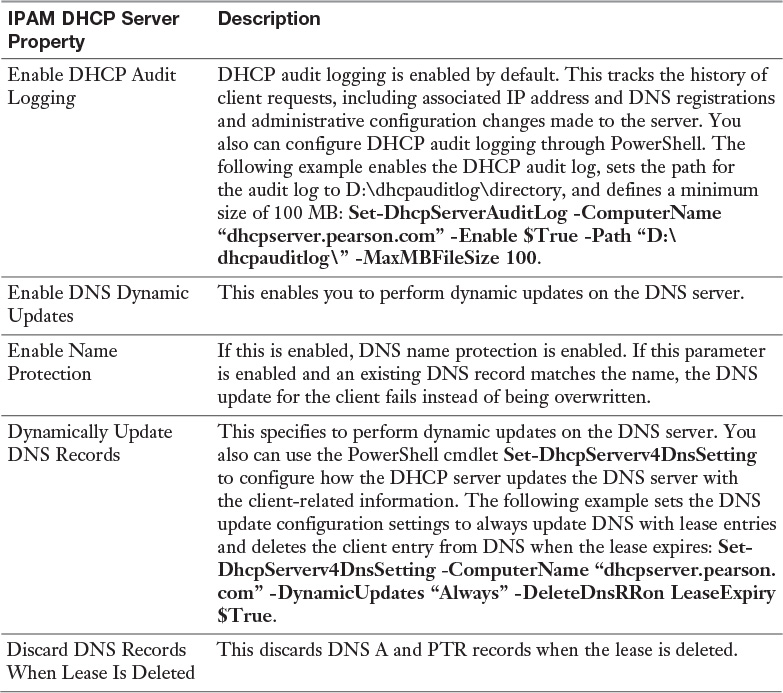
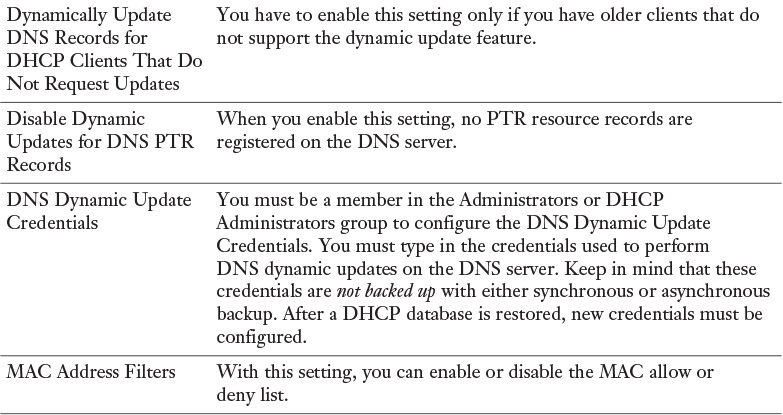
To configure DHCP server properties through IPAM, select Edit DHCP Server Properties in the IPAM configuration console. Figure 8-3 shows all possible DHCP server properties configuration options, and Table 8-2 describes them further.

Using the PowerShell command in Figure 8-4, you can list IPAM DHCP server properties.

No Set-IpamDhcpServer PowerShell cmdlet exists for configuring DHCP server properties through IPAM PowerShell.
Tip
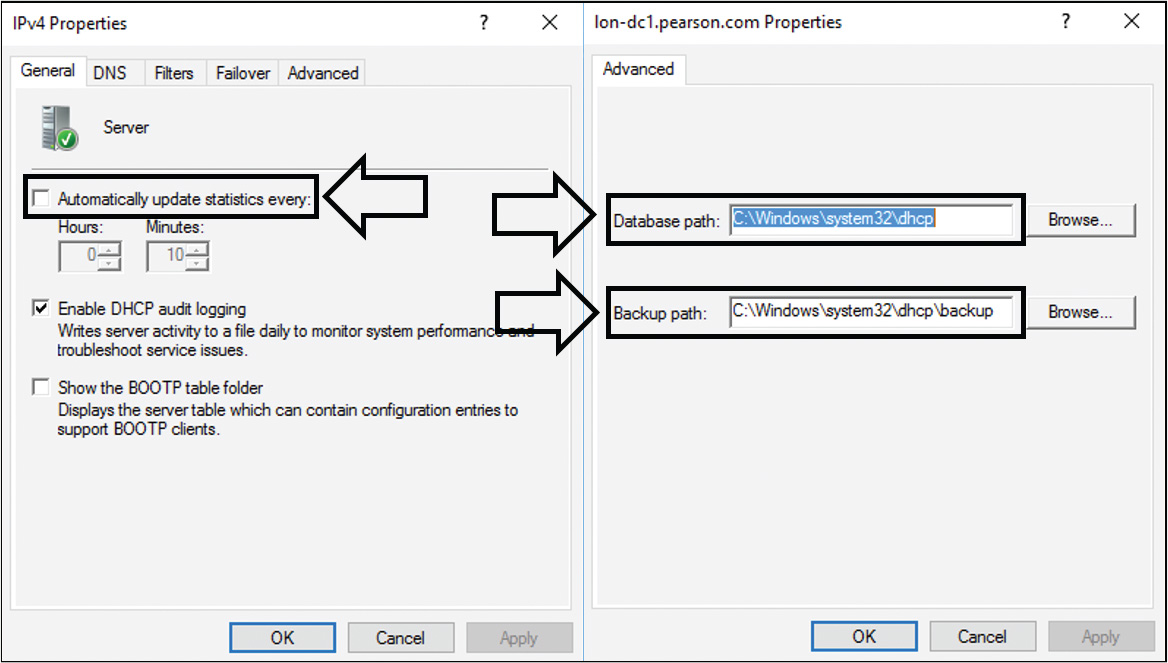
You cannot configure the DHCP server general setting Automatically Update Statistics in the IPAM configuration console in Server Manager. You also cannot configure the Database path and the Backup path through the IPAM configuration console. Figure 8-5 shows where to configure these settings in the local DHCP server management console.
DHCP Server Options
Through the IPAM configuration console, under DNS and DHCP Servers, you can select DHCP as the server type and use the Server Properties view to display the available DHCP servers. By using the context menu of one or more DHCP servers, you can select DHCP Server Options. Figure 8-6 shows an example of DHCP server options configured through Windows Server 2016 IPAM.

When you select multiple DHCP servers and you want to configure DHCP server options, you can choose among the following configuration actions:
![]() Add
Add
![]() Overwrite
Overwrite
![]() Find and replace
Find and replace
![]() Delete
Delete
Figure 8-7 shows the configuration actions in the DHCP Server Options window.
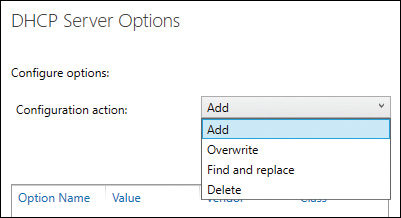
When you choose Overwrite for multiple DHCP servers and an option does not exist, it will be created. When you choose Add, this does not overwrite an option if it already exists. When you choose the Find and Replace configuration option, you get two additional fields (see Figure 8-8). You must type in the option value you want to replace with another value.

Configure DHCP Scopes and Options Using IPAM
A DHCP server also can deliver DHCP options to clients. The clients must get the DNS servers, the default gateway, or other additional options. DHCP options are values for common configuration data that apply to the server, scopes, reservations, and class options. You can apply DHCP options at the server, scope, class, and reservation levels. An option code identifies the DHCP options, and most option codes come from the RFC documentation found on the Internet Engineering Task Force (IETF) website.
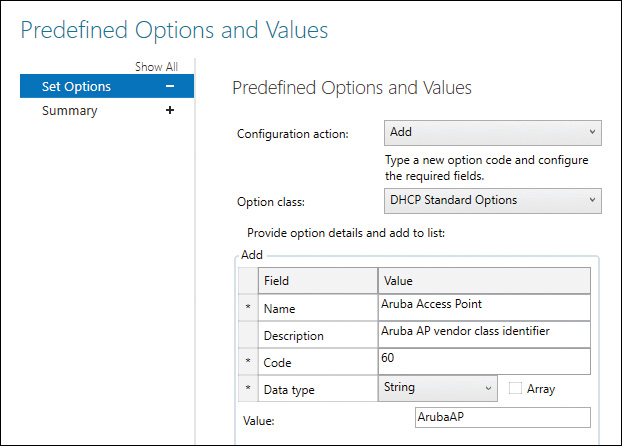
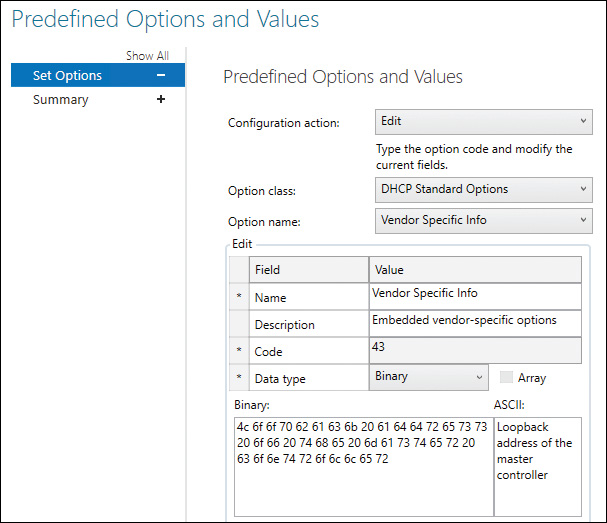
Configuring Predefined DHCP Options and Values
Through the IPAM configuration console under DNS and DHCP Servers, you can select DHCP as the server type and use the Server Properties view to display the available DHCP servers. By right-clicking one or multiple DHCP servers, you can configure predefined DHCP options and values for one or multiple DHCP servers. Figures 8-9 and 8-10 show an example of predefined DHCP options configured through the IPAM configuration console for multiple DHCP servers. In this example, DHCP option 060 will be added and option 043 will be edited so that an Aruba client can get the Aruba master controller IP address through these options.
Configuring DHCP Scopes Using IPAM
In the IPAM configuration console under DHCP Scopes, you can select one or multiple scopes, and you can configure scope settings through IPAM. Figure 8-11 shows which DHCP scope tasks are possible through IPAM; Table 8-3 explains all Windows Server 2016 IPAM server scope tasks.


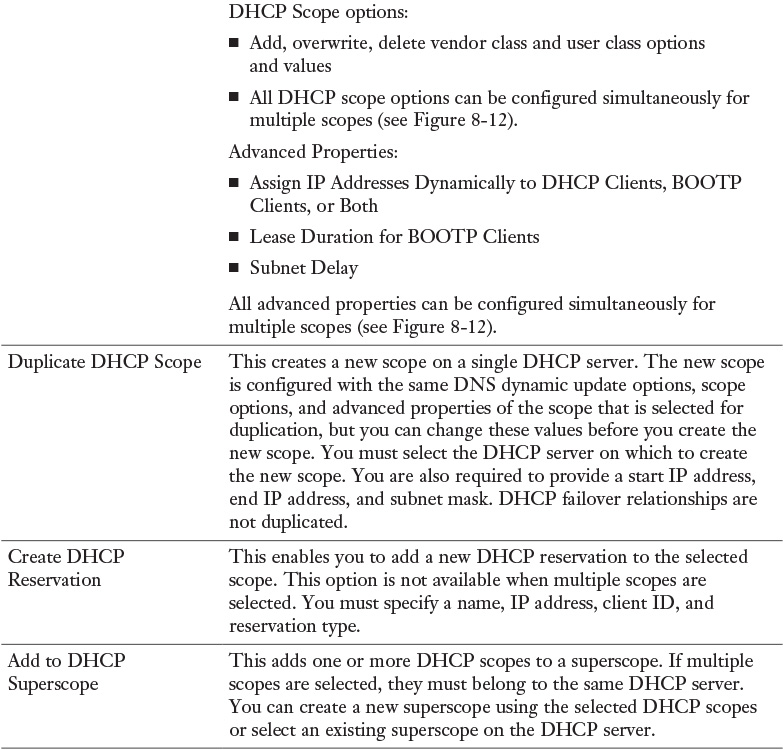
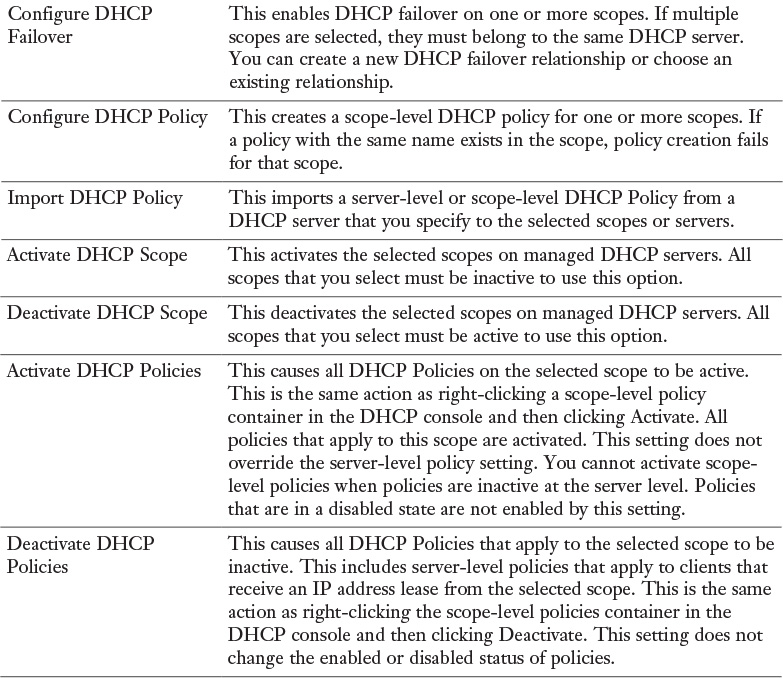
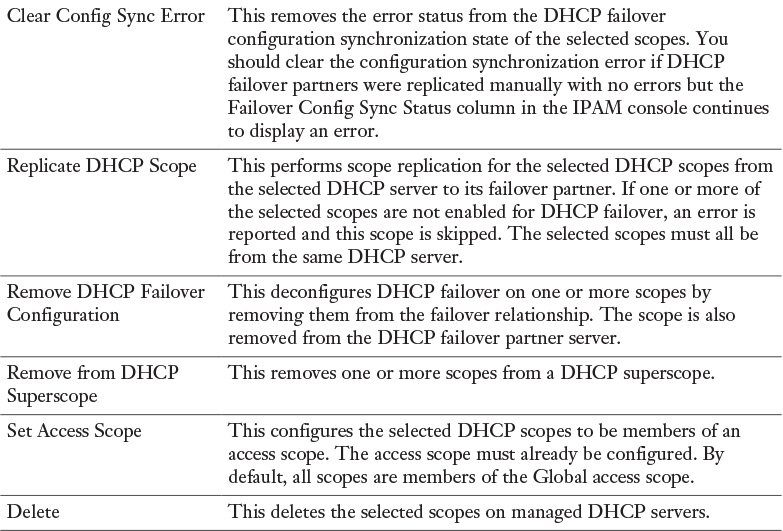
Figure 8-12 shows which IPAM DHCP server scope tasks can be done simultaneously through Edit DHCP Scope.

Configure DHCP Policies and Failover Using IPAM
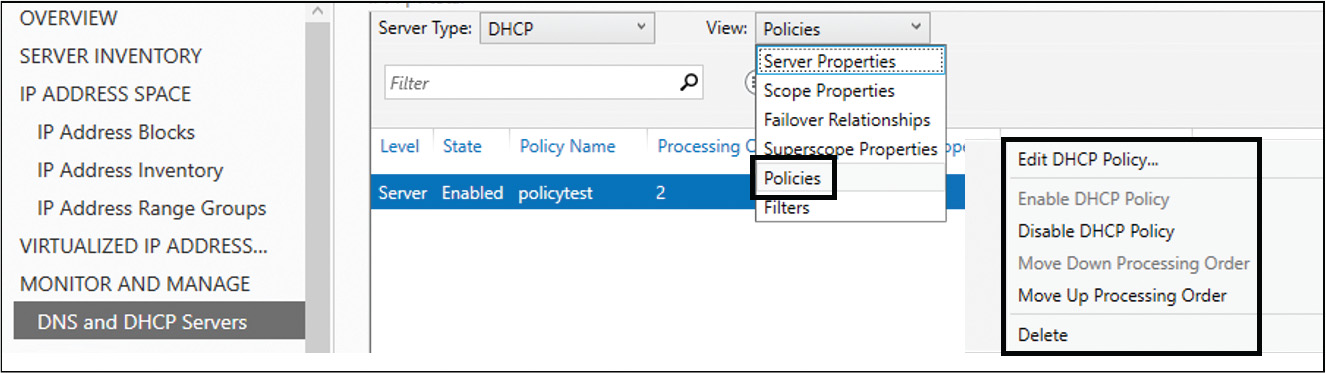
You can activate or deactivate DHCP Policies for one or multiple DHCP servers in the IPAM configuration console. If you want to edit, enable, disable, delete, or move the processing order of DHCP Policies, you have to change the view to Policies (see Figure 8-13).
Creating DHCP Policies for Multiple DHCP Servers Using IPAM
You can create a DHCP Policy on the IPAM server for multiple DHCP servers. Figure 8-14 shows the successful creation of a DHCP server policy in the IPAM configuration console.

Tip
You cannot delete DHCP Policies in the IPAM DHCP Server Properties view. Instead, you have to use the Policies view in the IPAM configuration console.
Configuring DHCP Failover Using IPAM
You can use the IPAM configuration console to configure the DHCP failover feature. You first choose the DHCP scope and then select Configure DHCP Failover Relationship. In the example in Figure 8-15, a DHCP failover relationship for DHCP scope 10.10.10.0/24 will be implemented for the DHCP servers lon-dc1.pearson.com and dhcp2.pearson.com with enabled message authentication, 1 hour value (default value) for MCLT, default settings for reserved addresses for the standby server (5%), and a default State Switchover interval of 60 minutes. Hot standby mode is chosen so that dhcp2.pearson.com works as a standby server for the active DHCP server lon-dc1.pearson.com. Figure 8-16 shows these settings and where you can change them.


The DHCP Failover Configuration summary displays a success message (see Figure 8-17).

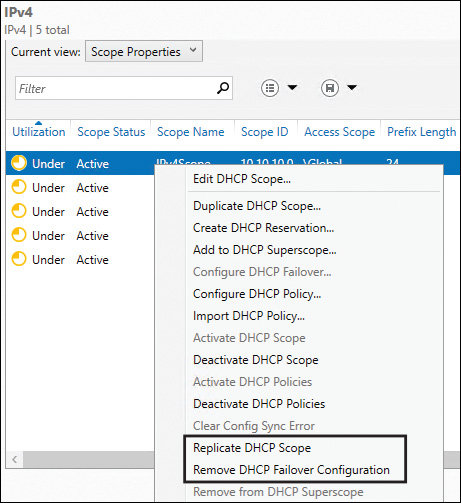
In the IPAM configuration console, you can replicate the DHCP scope, or you can remove the DHCP failover configuration. Figure 8-18 shows these two settings.
You can edit an existing DHCP Failover Relationship under DNS and DHCP Servers and also with the View: Failover Relationships setting (see Figure 8-19).

Configure DNS Server Properties Using IPAM
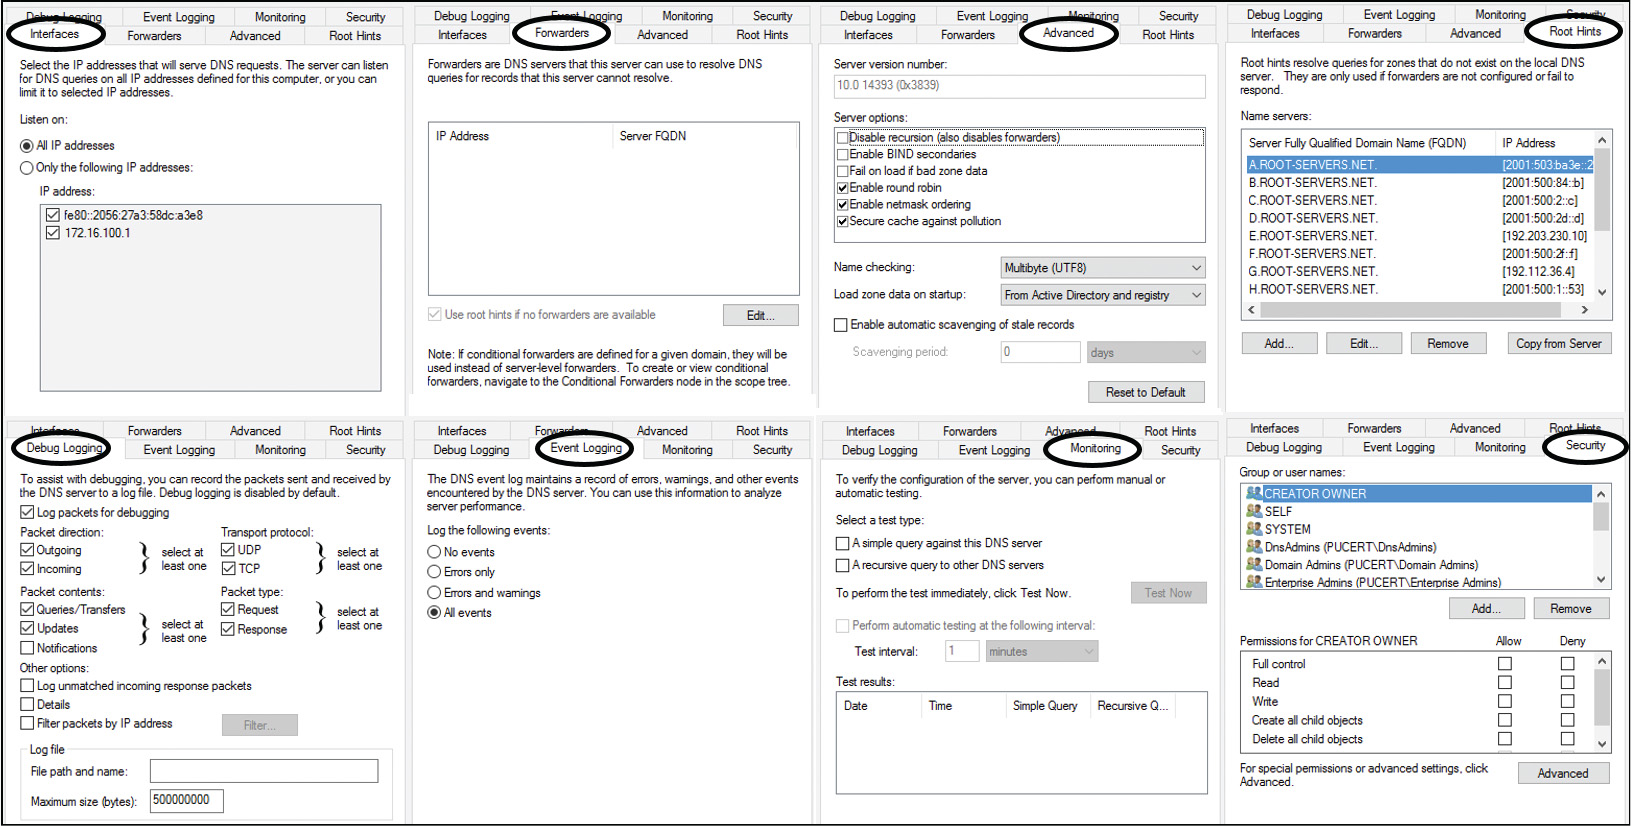
You cannot configure DNS server settings directly in the IPAM configuration console in the Server Manager. Instead, you have to switch to the DNS Manager. There you can configure settings such as Root Hints, Debug Logging, and Event Logging and Monitoring. Since Windows Server 2016, you can configure some DNS server settings through IPAM with IPAM DNS PowerShell cmdlets.
Managing DNS Server Properties Using IPAM
In the IPAM configuration console, you can configure the following DNS server tasks:
![]() Launch MMC: You need to launch the DNS Manager to configure the DNS server settings shown in Figure 8-20.
Launch MMC: You need to launch the DNS Manager to configure the DNS server settings shown in Figure 8-20.
![]() Create DNS Zone: Through the IPAM configuration console, you can create a new DNS zone (forward lookup zone, IPv4 reverse lookup zone, or IPv6 reverse lookup zone). You can choose a primary, secondary, or stub zone; opt for storage in Active Directory or a zone file; select an AD zone replication scope of domain, forest, legacy, or custom; and choose a dynamic update setting of Allow Only Secure Dynamic Updates, Allow Both Nonsecure and Secure Dynamic Updates, or Do Not Allow Dynamic Updates.
Create DNS Zone: Through the IPAM configuration console, you can create a new DNS zone (forward lookup zone, IPv4 reverse lookup zone, or IPv6 reverse lookup zone). You can choose a primary, secondary, or stub zone; opt for storage in Active Directory or a zone file; select an AD zone replication scope of domain, forest, legacy, or custom; and choose a dynamic update setting of Allow Only Secure Dynamic Updates, Allow Both Nonsecure and Secure Dynamic Updates, or Do Not Allow Dynamic Updates.
![]() Create DNS Conditional Forwarder: Through the IPAM configuration console, you can create a DNS conditional forwarder.
Create DNS Conditional Forwarder: Through the IPAM configuration console, you can create a DNS conditional forwarder.
![]() Set Access Scope: Through the IPAM configuration console, you can set the access scope and disable the Inherit Access Scope from Parent setting.
Set Access Scope: Through the IPAM configuration console, you can set the access scope and disable the Inherit Access Scope from Parent setting.
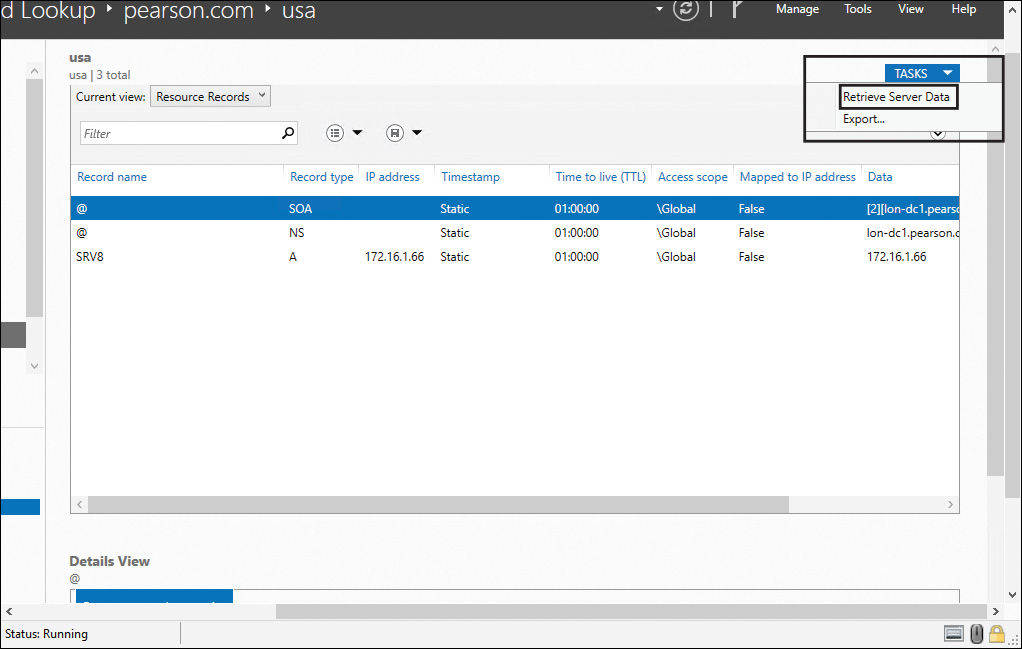
![]() Retrieve Server Data: Through the IPAM configuration console, you can retrieve server data to refresh DNS server settings on the IPAM server.
Retrieve Server Data: Through the IPAM configuration console, you can retrieve server data to refresh DNS server settings on the IPAM server.
Filtering the View of DNS Server Settings
To filter the view of DNS server settings in IPAM, you need to perform the following steps:
Step 1. In the Server Manager, click IPAM.
Step 2. In the navigation pane, in Monitor and Manage, click DNS Zones. The navigation pane divides into an upper navigation pane and a lower navigation pane.
Step 3. In the lower navigation pane, click Forward Lookup. All IPAM-managed DNS forward lookup zones are displayed in the display pane search results.
Step 4. Click the zone whose records you want to view and filter.
Step 5. In the display pane, click Current View and then click DNS Server.
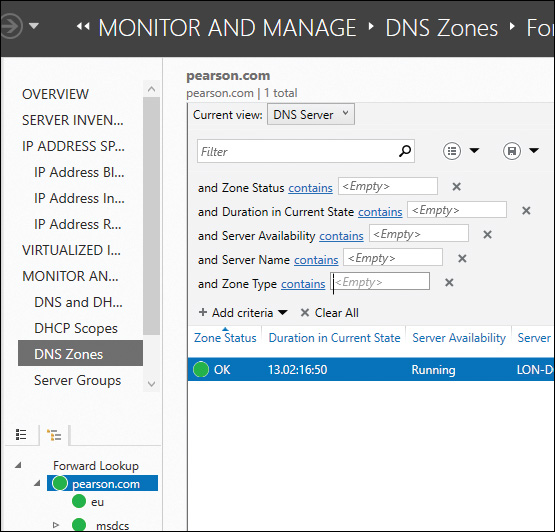
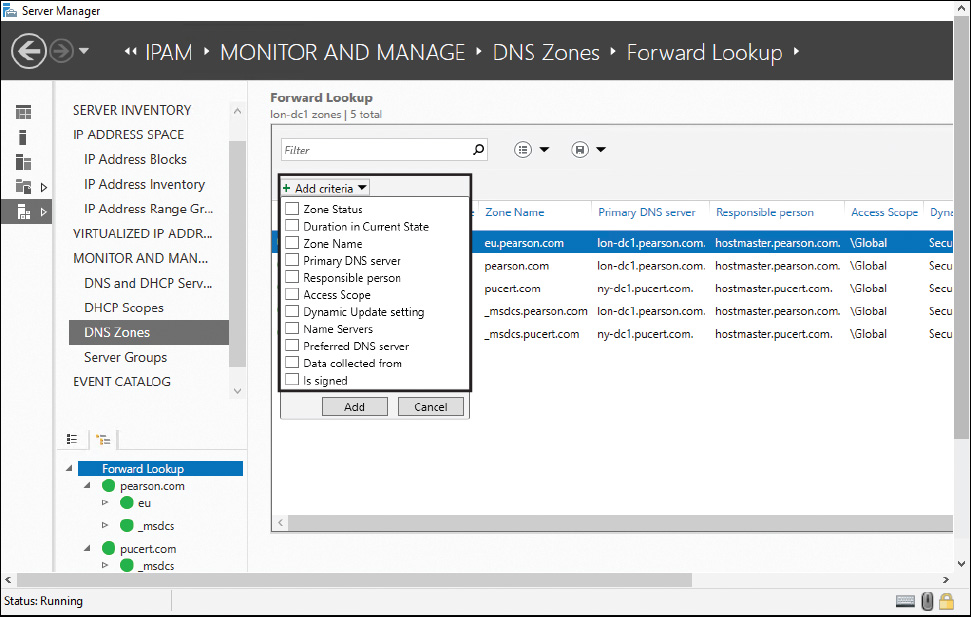
Step 6. In the display pane, click Add Criteria. Figure 8-21 shows the possible DNS Server criteria you can choose for filtering in this view.
Manage DNS Zones and Records Using IPAM
When you deploy Windows Server 2016 IPAM, you can perform server discovery to add DHCP and DNS servers to the IPAM server management console. The IPAM server then dynamically collects DNS data every six hours from the DNS servers that it is configured to manage. IPAM stores this DNS data in its IPAM database. IPAM provides you with notification of the day and time the server data was collected and tells you the next day and time data collection from DNS servers will occur.
Tip
Windows Server 2016 IPAM does not support third-party DNS servers and non-domain-joined servers.
Managing DNS Zones and Records with PowerShell
You can use the PowerShell cmdlets in Table 8-4 to manage DNS zones and records.

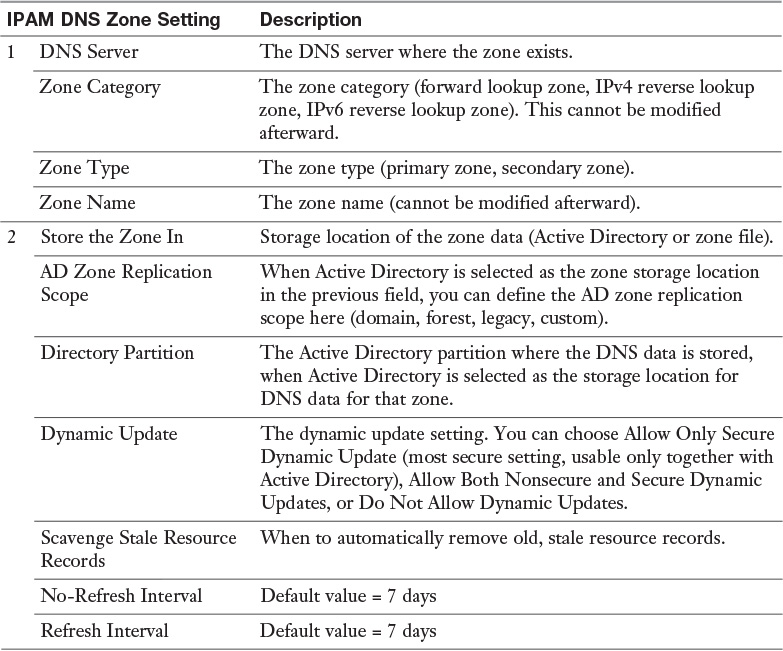
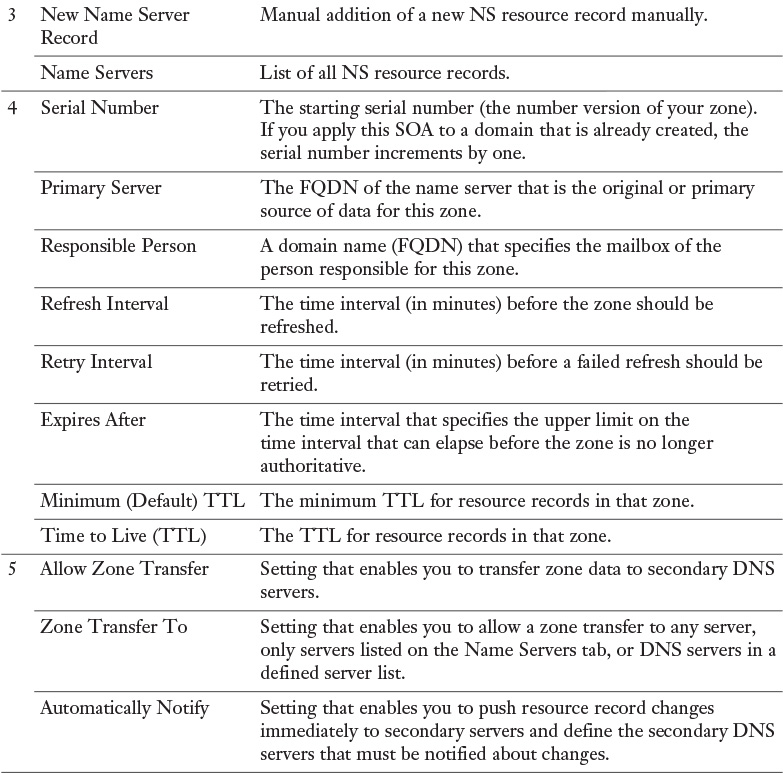
Managing DNS Zone Settings Through IPAM
You can edit DNS zone settings in the IPAM configuration console. Figure 8-22 shows all configurable settings, and Table 8-5 further describes them.

Managing Subdomains Through IPAM
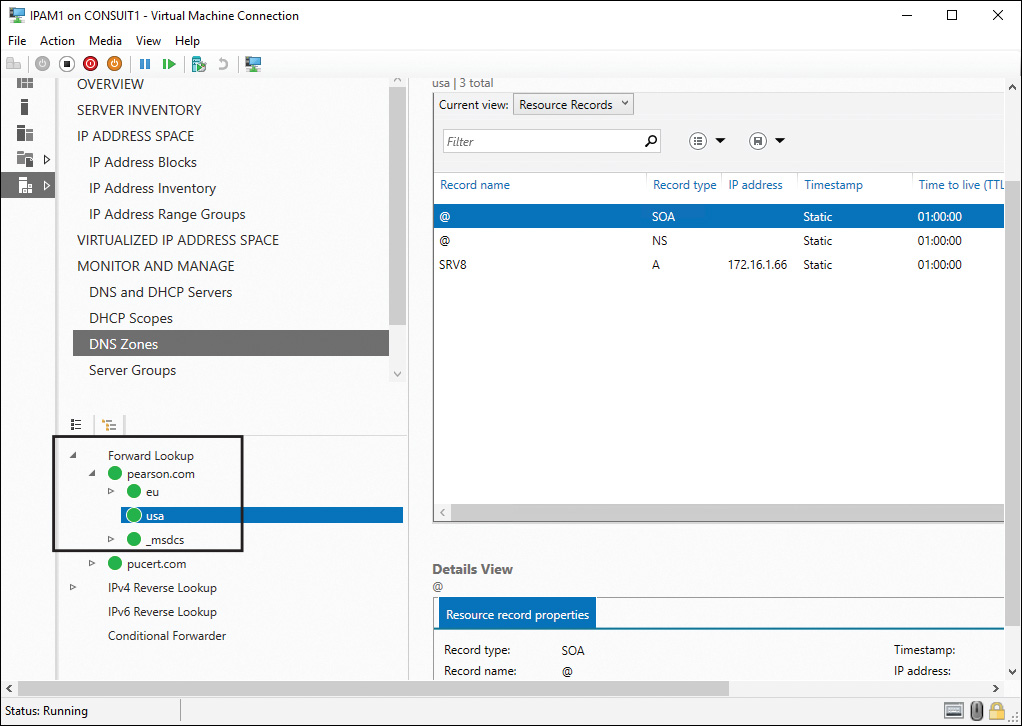
When you want to add a subzone, you can do so through the IPAM configuration console with Create DNS Zone. For example, you would type USA.pearson.com as the name for the subzone USA in the Create DNS Zone window. Another possibility for installing a subzone is to install a first child DC with DNS server for an Active Directory subdomain through the Active Directory Installation Wizard. This automatically generates a subdomain on the DNS server of that domain controller and a DNS delegation on the forest root DNS server. This subdomain (such as a subdomain created manually through the Create DNS Zone in the IPAM configuration console) then displays correctly (see Figure 8-23).
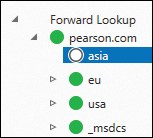
When the subzone displays with an empty white bullet under Forward Lookup (see Figure 8-24), it has no data, or the actual zone information was not retrieved from the DNS server. To refresh the information displayed, you must select Reset Zone Status and Retrieve Server Data, as in Figures 8-25 and 8-26.
When you add a subdomain in the DNS Manager (see Figure 8-27), the subdomain is not listed under Forward Lookup in the IPAM management console.

Managing DNS Resource Records Using IPAM
A Windows Server 2016 IPAM server can collect the following DNS resource record types:
![]() AFS database
AFS database
![]() ATM address
ATM address
![]() CNAME
CNAME
![]() DHCID
DHCID
![]() DNAME
DNAME
![]() Host A or AAAA
Host A or AAAA
![]() Host information
Host information
![]() ISDN
ISDN
![]() MX
MX
![]() Name servers
Name servers
![]() Pointer (PTR)
Pointer (PTR)
![]() Responsible person
Responsible person
![]() Route location
Route location
![]() Route through
Route through
![]() Service location
Service location
![]() SRV
SRV
![]() Text
Text
![]() Well-known services
Well-known services
![]() WINS
WINS
![]() WINS-R
WINS-R
![]() X.25
X.25
You can run the following DNS server inventory tasks through Windows Server 2016 IPAM:
![]() Automatically build an IP address inventory from DNS resource records
Automatically build an IP address inventory from DNS resource records
![]() Manually create an IP address inventory from DNS A and AAAA resource records
Manually create an IP address inventory from DNS A and AAAA resource records
![]() View DNS resource records for a specific DNS zone, and filter the records based on type, IP address, resource record data, and other filtering options
View DNS resource records for a specific DNS zone, and filter the records based on type, IP address, resource record data, and other filtering options
![]() Automatically create a mapping between IP address ranges and DNS reverse lookup zones
Automatically create a mapping between IP address ranges and DNS reverse lookup zones
![]() Create IP addresses for the PTR records that are present in the reverse lookup zone and that are included in that IP address range. You can also manually modify this mapping, if needed.
Create IP addresses for the PTR records that are present in the reverse lookup zone and that are included in that IP address range. You can also manually modify this mapping, if needed.
You can add a DNS resource record in the IPAM configuration console by following these steps:
Step 1. In Server Manager, click IPAM. The IPAM client console appears.
Step 2. In the navigation pane, in Monitor and Manage, click DNS Zones. The navigation pane divides into an upper navigation pane and a lower navigation pane.
Step 3. In the lower navigation pane, click Forward Lookup. All IPAM-managed DNS forward lookup zones appear in the display pane search results. Right-click the zone where you want to add a resource record, and then click Add DNS Resource Record.
You can delete a DNS resource record in the IPAM configuration console using the following steps:
Step 1. In Server Manager, click IPAM. The IPAM client console appears.
Step 2. In the navigation pane, in Monitor and Manage, click DNS Zones. The navigation pane divides into an upper navigation pane and a lower navigation pane.
Step 3. Click to expand Forward Lookup and the domain where the zone and resource records that you want to delete are located. Click the zone and, in the display pane, click Current View. Click Resource Records.
Step 4. In the display pane, locate and select the resource records you want to delete.
Step 5. Right-click the selected records and click Delete DNS Resource Record.
Filtering the View of DNS Resource Records
To filter the view of DNS resource records in IPAM, complete the following steps:
Step 1. In Server Manager, click IPAM.
Step 2. In the navigation pane, in Monitor and Manage, click DNS Zones. The navigation pane divides into an upper navigation pane and a lower navigation pane.
Step 3. In the lower navigation pane, click Forward Lookup. All IPAM-managed DNS forward lookup zones appear in the display pane search results.
Step 4. Click the zone whose records you want to view and filter.
Step 5. In the display pane, click Current View and then click Resource Records. The resource records for the zone are shown in the display pane.
Step 6. In the display pane, click Add Criteria (in Figure 8-28, the criteria Record Type with a value of A is selected to display all A resource records from the zone pearson.com).

Saving Views of IPAM DNS Zone Information
You can create saved views of your IPAM-managed DNS zones and resource records based on different criteria definitions. Figure 8-29 shows possible DNS zone criteria, and Figure 8-30 gives an example of saved DNS zone views.

Manage DNS and DHCP Servers in Multiple Active Directory Forests Using IPAM
You can now use IPAM to manage your DNS and DHCP servers across multiple AD DS forests. Microsoft will ask about that in the 70-741 exam! IPAM also can automate periodic service monitoring of DHCP and DNS servers across multiple forests in Windows Server 2016.
Prerequisites for Managing Multiple Active Directory Forests with IPAM
When you have to manage DHCP and DNS servers in different AD DS forests, you must fulfill some prerequisites before your IPAM server can collect data from these servers, or you can do central configuration for DHCP and DNS servers distributed across different forests:
![]() To manage DHCP, DNS, or NPS servers in other forests through Windows Server 2016 IPAM, you must build a two-way trust between the forests.
To manage DHCP, DNS, or NPS servers in other forests through Windows Server 2016 IPAM, you must build a two-way trust between the forests.
![]() Managed servers in other forests have to get Group Policy settings from IPAM GPOs in their forest. The administrative user account performing the GPO provisioning at the Windows Server 2016 IPAM server in forest1 needs permission to create Group Policies in forest2.
Managed servers in other forests have to get Group Policy settings from IPAM GPOs in their forest. The administrative user account performing the GPO provisioning at the Windows Server 2016 IPAM server in forest1 needs permission to create Group Policies in forest2.
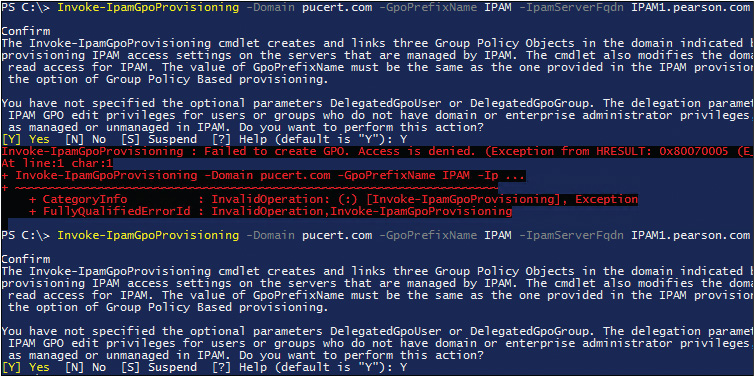
Figure 8-31 shows the execution of the Invoke-GpoProvisioning PowerShell command in the forest pearson.com on ipam1.pearson.com to create the IPAM GPOs on the forest pucert.com for managed servers in that forest. The first try failed because of the missing access to create GPOs in pucert.com. The administrative account of pearson.com then was added to the Administrators security group of pucert.com to grant access to create the IPAM GPOs in pucert.com. After that change, the forest-to-forest IPAM GPO provisioning process was successful.
Configuring Multiple-Forest IPAM Management
In the following example, DHCP and DNS servers in the two forests pearson.com and pucert.com have to be managed through an IPAM server named ipam1.pearson.com. Figure 8-32 shows that scenario.

The following steps are necessary to implement that IPAM multiple-forest environment scenario:
Step 1. To start the discovery process for the Active Directory forest pucert.com, open the Server Manager and click IPAM. In the IPAM client console, click Configure Server Discovery, and then click Get Forests. This initiates a background task that discovers trusted forests and domains (in this case, forest pucert.com).
Step 2. In the Configure Server Discovery dialog box, click Select the Forest, then choose pucert.com (the forest with the additional managed servers to integrate into IPAM), and click OK. Figure 8-33 shows the complete configured Configure Server Discovery dialog box.

Step 3. Add the Domain Admins security group of pearson.com to the Administrators security group of pucert.com to give the Administrator account of pearson.com permission to create the IPAM provisioning GPOs on the pucert.com forest.
Step 4. Perform the following PowerShell command on ipam1.pearson.com:
Invoke-GpoProvisioing -domain pucert.com -gpoprefix IPAM
-IpamServerFqdn ipam1.pearson.com
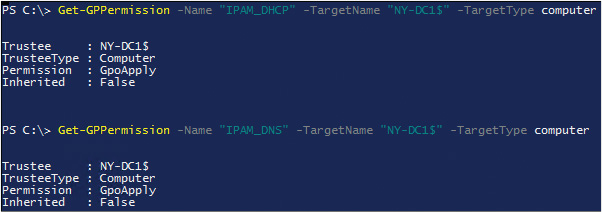
Step 5. In the GPMC tool on the domain controller of pucert.com, verify that the three IPAM GPOs were successfully created (IPAM_DHCP, IPAM_DNS, and IPAM_DC_NPS). Ensure that managed servers have permission to apply GPO settings. Figure 8-34 shows that DHCP/DNS server NY-DC1 has GPOApply permission for the IPAM_DHCP and IPAM_DNS Group Policy.
Step 6. Perform gpupdate /force on all managed servers in the pucert.com forest.
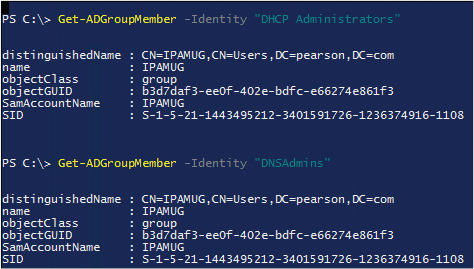
The IPAM server from pearson.com is a member of the pearsonIPAMUG security group. The pearsonIPAMUG security group is automatically added to the pucertDHCPAdmins and pucertDNS Admins security groups so that ipam1.pearson.com has the permission to manage DNS and DHCP servers in the other forest. Figure 8-35 shows the membership of the two security groups.
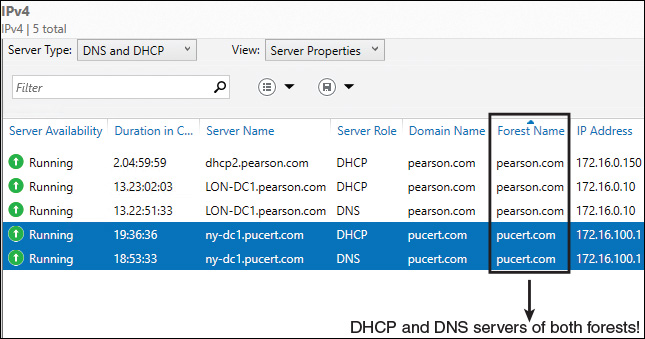
After that, you can configure the managed servers in both forests through the IPAM configuration console. Figure 8-36 shows that you now can manage DHCP and DNS servers from both forests.
Managing DNS Servers and Zones in a Multiple-Forest IPAM Environment
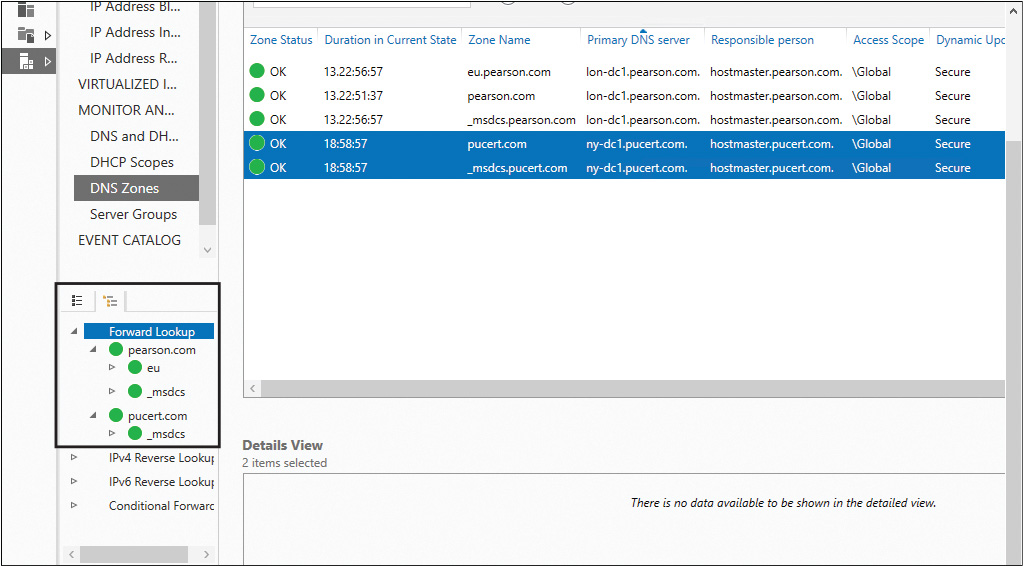
When IPAM is configured to manage DNS servers and zones in multiple forests, you can manage DNS zones centrally through the IPAM configuration console. To manage all forward lookup zones on DNS servers in multiple forests, select DNS Zones and Forward Lookup. Figure 8-37 shows example DNS zones for the forests pearson.com and pucert.com.
Tip
If you try to edit two zones on two different DNS servers in different forests (pearson.com and pucert.com) simultaneously through IPAM, you will get the error message “Selected zones do not have any server in common with same hosting type” (see Figure 8-38).

Creating a new DNS zone on two DNS servers in two different forests through the IPAM configuration console is not possible. Figure 8-39 shows the grayed-out Create DNS Zone setting. However, you can create and edit a DNS conditional forwarder (also stored in Active Directory) on DNS servers in different forests. Figure 8-40 shows where to edit or delete DNS conditional forwarders in the IPAM configuration console.
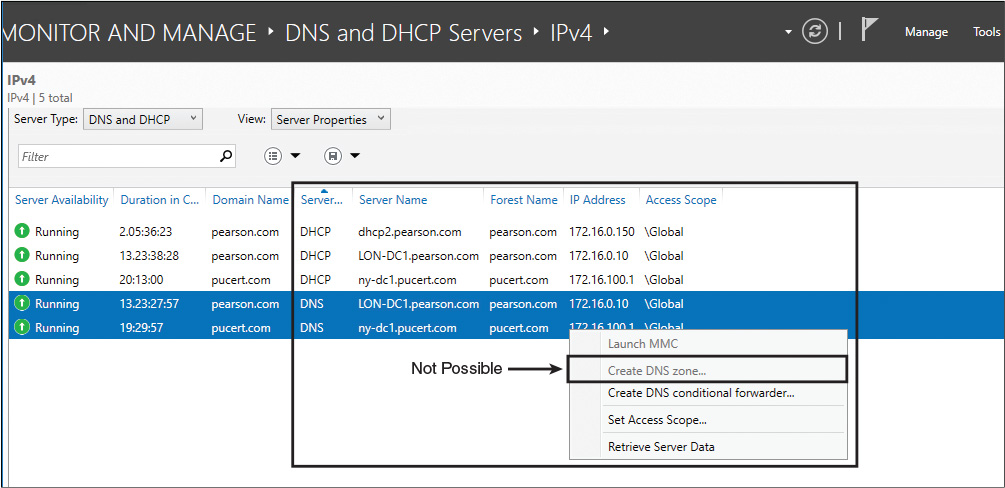

Figure 8-40 Edit or Delete DNS Conditional Forwarders on DNS Servers in Multiple Forests Through IPAM
Using RBAC to Delegate DNS and DHCP Server Administration Using IPAM
Role-based access control (RBAC) in Windows Server 2016 enables you to specify access at various levels (DNS server, DNS zone, and DNS resource records). Using RBAC, you can specify who has granular control over operations to create, edit, and delete different types of DNS resource records. You can configure access control so that users are restricted to the following permissions:
![]() Edit only specific DNS resource records
Edit only specific DNS resource records
![]() Edit DNS resource records of a specific type, such as PTR or MX
Edit DNS resource records of a specific type, such as PTR or MX
![]() Edit DNS resource records for specific zones
Edit DNS resource records for specific zones
For example, suppose you want to allow only members of the Active Directory security group DHCPFailoverAdmins to edit a single DHCP failover relationship for a DHCP scope and you do not want to allow other administrative tasks on IPAM for the members of that group. You also do not want to give them permissions to create other new DHCP failover relationships or to replicate or delete existing relationships. To implement that, you have to perform the following steps:
Step 1. Create the Active Directory security group DHCPFailoverAdmins and add selected user accounts to that group.
Step 2. Add a new IPAM user role named DHCPFailoverAdmin with the allowed operations in Figure 8-41.

Step 3. Create a new IPAM access scope named DHCPFailover (see Figure 8-42).

Step 4. Create a new IPAM access policy with a user alias of Pearson DHCPFailoverAdmins and the access scope DHCPFailover (see Figure 8-43).

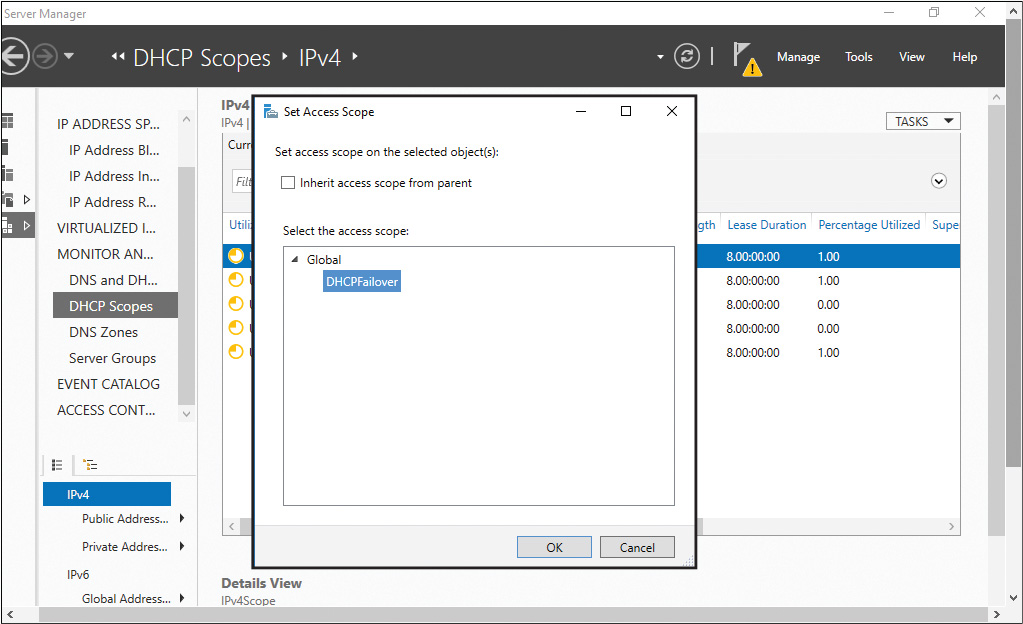
Step 5. Apply the Access Scope to the DHCP scope that is configured with a DHCP failover relationship (see Figure 8-44) and verify the applied access scope (Figure 8-45).

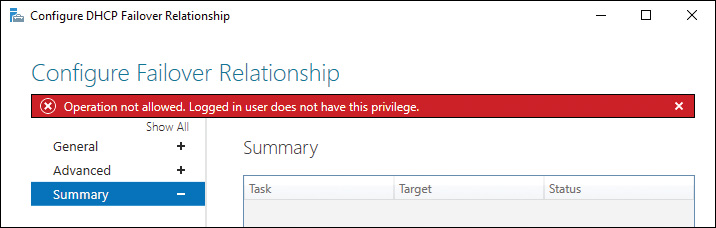
After this configuration, if users that are members of the Active Directory security group DHCPFailoverAdmins try to edit a DHCP failover relationship of another scope, they will get the error message in Figure 8-46.
If those users try to manually replicate the DHCP scope where the access scope DHCPFailover is applied, they will get the error message in Figure 8-47.
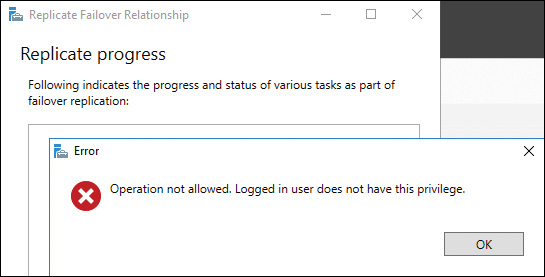
If those users try to remove a DHCP failover configuration, they will get the error message in Figure 8-48.

Exam Preparation Tasks
Review All the Key Topics
Review the most important topics in the chapter, noted with the Key Topics icon in the outer margin of the page. Table 8-6 lists these key topics and the page numbers where each is found.
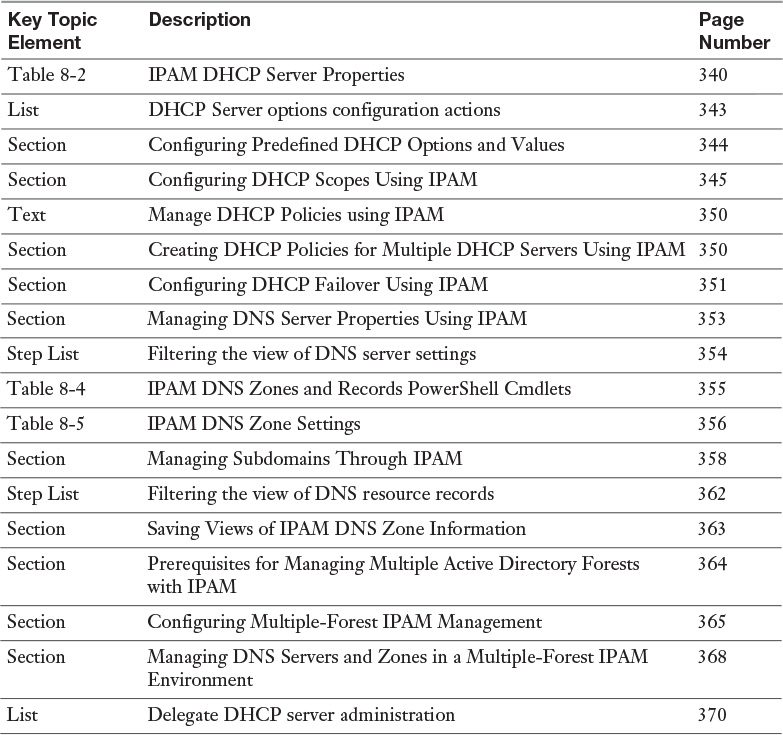
Table 8-6 Key Topics for Chapter 8
Complete the Tables and Lists from Memory
Print a copy of Appendix B, “Memory Tables” (on the book’s website), or at least the section for this chapter, and complete the tables and lists from memory. Appendix C, “Memory Tables Answer Key,” also on the website, includes completed tables and lists to check your work.
Definition of Key Terms
Define the following key terms from this chapter and check your answers in the glossary.
Create DHCP Scope
Edit DHCP Scope
Automatically Update Statistics
DHCP database path
DHCP backup path
DHCP server options
Remove DHCP Failover Configuration
DNS server properties
Get-IpamDnsResourceRecord
Get-IpamDnsZone
End-of-Chapter Review Questions
1. You are a member of the DHCP Administrators security group on all your DHCP servers, and you are responsible for your Windows Server 2016 IPAM server, IPAM1. IPAM1 is configured to manage DHCP servers in your domain of pearson.com. The DHCP servers have the following characteristics:
![]() DHCP1: This is the recovered DHCP server.
DHCP1: This is the recovered DHCP server.
![]() DHCP2: This DHCP server is running out of local disk space.
DHCP2: This DHCP server is running out of local disk space.
![]() DHCP3: This DHCP server has stale update statistics data.
DHCP3: This DHCP server has stale update statistics data.
![]() DHCP4: This DHCP server’s backup path needs to be changed.
DHCP4: This DHCP server’s backup path needs to be changed.
You want to configure some DHCP server properties through IPAM DHCP server properties in the IPAM configuration console. You must change the following settings:
![]() Enable DHCP Audit Log
Enable DHCP Audit Log
![]() Change the DNS Dynamic Update Credentials
Change the DNS Dynamic Update Credentials
![]() Change the Automatically Update Statistics Setting
Change the Automatically Update Statistics Setting
![]() Change the DHCP Backup Path
Change the DHCP Backup Path
Which settings can you configure through the IPAM server configuration console?
a. Change the DNS Dynamic Update Credentials on DHCP1
b. Change the DNS Dynamic Update Credentials on DHCP2
c. Change the DHCP Audit Log Path for DHCP2
d. Configure Automatically Update Statistics for DHCP3
e. Change the Backup Path for DHCP4
2. You are a member of the DHCP Administrators security group on all your DHCP servers, and you are responsible for your Windows Server 2016 IPAM server, IPAM1. You select multiple DHCP server IPv4 scopes, and you want to know which scope options you can configure in this way. Which scope options can you configure in one step for multiple scopes through the IPAM management console in Server Manager?
a. Scope name
b. Description
c. Start IP address
d. End IP address
e. Subnet mask
f. Lease duration
g. Exclusion range
3. You want to change the State Switchover Interval setting through your IPAM server, IPAM1. Where in the IPAM configuration console can you configure that?
a. Monitor and Manage > DNS and DHCP Servers > Edit DHCP Server Properties
b. Monitor and Manage > DHCP Scopes
c. Monitor and Manage > DNS and DHCP Servers > View: Failover Relationships > Edit DHCP Failover Relationship
d. IP Address Space > Server Groups
4. You want to enable automatic scavenging of stale records with a scavenging period of 1 day for five of your DNS servers. You want to do this through your IPAM server IPAM1; you do not want to use PowerShell for it because your administrators do not have PowerShell command knowledge. What is the preferred method?
a. Server Inventory
b. Server Groups
c. Launch MMC
d. DNS and DHCP Servers
5. You have installed a subdomain named usa.pearson.com, with the first domain controller of that domain as the authoritative DNS server for the subdomain. All your DNS servers have Windows Server 2016 installed and managed through your IPAM server, IPAM1. The subzone is displayed with an empty white bullet in the IPAM console. Which configuration options must you perform to get the subzone correctly displayed with a green bullet? (Choose two.)
a. Reset Zone Status
b. Configure Preferred DNS Servers
c. Retrieve Server Data