
In this chapter, you’ll learn about many of the options and features you use to customize and manage the appearance of notebook pages and the general OneNote workspace. You’ll learn about the steps you follow to create a OneNote notebook, which you can store on your own computer, in a network location such as a shared folder or a Microsoft SharePoint site, or on Windows Live SkyDrive. You’ll also learn about working with OneNote in Backstage view, which is a feature all Microsoft Office 2010 applications have in common.
Each page in a OneNote notebook can contain different elements—typewritten notes, handwritten notes, numbered and bulleted lists, tables, images, links to files, and more. Knowing how to move, resize, merge, and split note containers, which are the bounding boxes that enclose each note on a page, is an important aspect of managing page layout. You’ll learn how to combine note containers in this section and also how to collapse and expand paragraphs when you need to hide or show information in an outline or a list. In addition, you’ll see how to use an image as a page background and how to save a page as a template you can use repeatedly in a single notebook or in any other notebook you create.
You can drag one note container into another to combine the containers and merge their contents. You might do this to combine notes on a single topic, to add annotations to a picture or a drawing, to create a list or an outline, or to add items to a table.
To merge containers, click the Move handle at the top of the first container to select the container’s contents. Hold down the Shift key, and then drag the container to the container you want to combine it with. OneNote highlights the note as you drag it and then displays the borders of the combined container when the notes are merged.

One of the most effective uses of OneNote is to create outlines for reports, research papers, presentations, and other types of documents. To create an outline (or another type of hierarchical list), add a first-level heading, press Enter to start a new paragraph, and press Tab to indent items under higher-level entries as you complete the outline. (Press Shift+Tab to move back to the next higher level.) If you number the first item (and the option for OneNote to automatically number items in a list is enabled, which is the default setting), OneNote identifies different levels of entries as you work through the outline.
To view an outline at different levels of detail, you can collapse and expand paragraphs. Move the pointer to the left of a paragraph with subheadings under it. You’ll see the pointer appear as a four-headed arrow, and OneNote displays a small, similar-looking button next to the item. Double-click the button to collapse or expand the items in the paragraph.

You can also use key combinations to work with the paragraphs in an outline. The following table summarizes these keystrokes.
To do this | Press |
|---|---|
|
Show through Level 1. | Alt+Shift+1 |
|
Expand to Level 2. | Alt+Shift+2 |
|
Expand to Level 3. | Alt+Shift+3 |
|
Expand to Level 4. | Alt+Shift+4 |
|
Expand to Level 5. | Alt+Shift+5 |
|
Expand to Level 6. | Alt+Shift+6 |
|
Expand to Level 7. | Alt+Shift+7 |
|
Expand to Level 8. | Alt+Shift+8 |
|
Expand to Level 9. | Alt+Shift+9 |
|
Expand all levels. | Alt+Shift+0 |
|
Increase indent by one level. | Tab |
|
Decrease indent by one level. | Shift+Tab |
|
Expand a collapsed outline. | Alt+Shift+plus sign |
|
Collapse an expanded outline. | Alt+Shift+minus sign |
To collapse or expand paragraphs
Point to the left side of a paragraph with subheadings under it.
Double-click the four-headed arrow icon.
OneNote hides subheadings that are displayed or shows subheadings that were previously collapsed.
The background color of a OneNote page is white by default. You can set the background to a different color by using the Page Color option on the View menu. You can also use an image as a background.
Note
See Also For information about the Page Color option, see Setting Page Properties later in this chapter.
To set an image as a background, place the image along the top or in the upper-left corner of the page. Also, be sure the image is not placed within a note container. (To remove an image from a note container, select the picture, press Ctrl+X—or choose Cut in the Clipboard group on the Home tab—and then paste the image on the page.)
After you insert the image you want to use, right-click the image and choose Set Picture As Background.
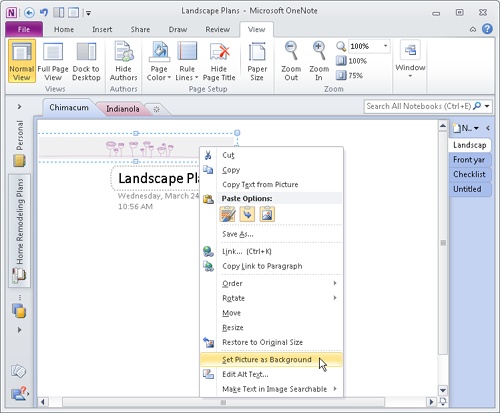
To remove this designation from the image, right-click and clear the Set Picture As Background option. You can then delete the image from the page.
Tip
You need to be selective about an image you use as a background so that the image does not obscure notes and other elements you add to a page. Use an image with prominent elements at the top or left and that fades to the right. Look over some of the page templates OneNote provides to see examples of the type of images you might use. For more information about page templates, see the next section.
To set an image as the page background
Insert the image you want to use. If necessary, cut and paste the image so that it is not enclosed in a note container.
Right-click the image and choose Set Picture As Background.
To clear a background image
Right-click the background image and then clear the Set Picture As Background option.
Delete the image.
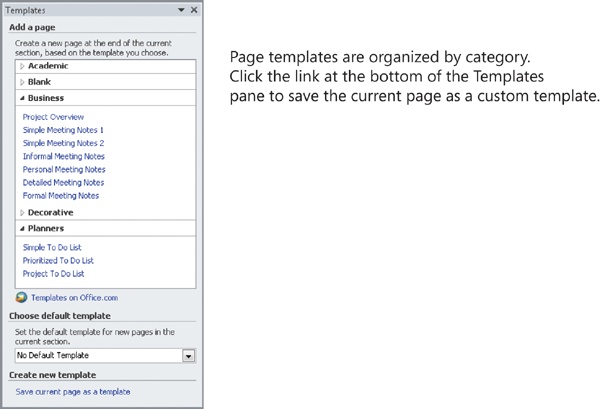
OneNote comes with a number of page templates. You can review these templates, which are organized under five default headings (Academic, Blank, Business, Decorative, and Planners), by clicking the down arrow beside New Page in the page tabs bar and then clicking Page Templates. OneNote displays the Templates pane.
Tip
You can use one of the standard OneNote templates or a page template you create as the default page template for the current section. Open the Templates pane (by clicking Page Templates in the page tabs bar), and then choose the template you want to use from the list under Choose Default Template.
The first step in creating your own page template is to set up the page with the text, images, or other elements you want to work with. If you examine a few of the built-in templates, you can see the types of elements they contain. For example, the Project Overview template, which is included in the Business category, has placeholders for information such as the project name, the project goals and team members, and the schedule.
Note
See Also For more information about editing content in OneNote, including how to insert and modify visual elements, see Chapter 4. For a list of best practices to use when you create OneNote templates, see the OneNote Help topic “Create a Template in Microsoft Office OneNote 2010.”
When the page is ready, open the Templates pane and then click Save Current Page As A Template at the bottom of the pane. In the Save As Template dialog box, type a name for the template. If you want to use this template as the basis for new pages in the current section, select the option to set the page as the default template.
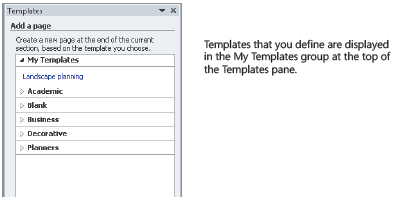
When you save your own page template, OneNote creates a new category, called My Templates, and displays the templates in this group at the top of the Templates pane.
To save the current page as a template
Set up the page with the elements you want the template to include. These elements might include a page color, an image, or note containers that act as placeholders for specific information.
On the page tabs bar, click the arrow next to New Page, and then click Page Templates.
In the Templates pane, click Save Current Page As A Template.
In the Save As Template dialog box, type a name for the template.
If you want to use this template as the default template for new pages in the current section, select that option and then click Save.
Backstage view is a feature in all Office 2010 programs. This view appears when you click the File tab on the ribbon. Backstage view contains commands such as Info, Open, Save, Save As, Print, and Options. In many Office 2010 applications, including OneNote, you can use the Info page in Backstage view to select settings and specify properties. In the two sections that follow, you’ll learn more about some of the ways you work with OneNote in Backstage view.
Among the notebook settings and properties you can configure are a notebook’s display name, the color of the icon it displays in the Navigation bar, its location, and whether the notebook is shared. On the Info page in Backstage view, you can view the current settings for a notebook and update settings and properties when you need to. The Info page lists each open notebook under the heading Notebook Information. The information includes the notebook’s display name, its location, and (for shared notebooks) its status. To manage a notebook’s settings and properties, you use the Settings button or the links OneNote provides. (The links let you perform some of the same operations available through the Settings button.)
Click the Settings button, and you’ll see several items—Share, Close, and Properties for notebooks stored on your computer, and Invite People, Sync, Close, and Properties for notebooks that are shared on the web or on a network.
Note
See Also For information about working with shared notebooks, including how to send invitations and how to synchronize notebooks, see Chapter 2.

If you select the Share option for a local notebook, OneNote switches to the Share page in Backstage view. There you can choose to share the notebook on the web in a Windows Live SkyDrive folder or on a location on your network. If you choose Web under Share On, you then need to sign in to SkyDrive (or sign up for this service if you are a new user).
To share a notebook on a network, click Network and then select one of the recent locations that OneNote lists, type a location in the text box under Network Location, or click Browse and select a network share in the Select Folder dialog box.
Note
See Also For more information about storing notebooks on the web or on a network location, see 1.3 Create OneNote Notebooks later in this chapter.
You can close a notebook by clicking Close on the Settings menu. When you choose this command, OneNote returns to the page you were working on in the current notebook. If you close the current notebook, OneNote displays the notebook that appears at the top of the Navigation bar.
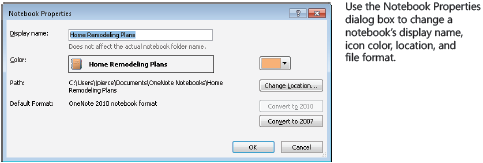
The Properties command opens the Notebook Properties dialog box. The first two options in this dialog box let you change a notebook’s display name and the color of the icon associated with the notebook. Click Change Location to open a dialog box, named Choose A Sync Location For This Remote Notebook, that you can use to specify a new location for the notebook.
Tip
You can move a notebook’s section files from one folder to another manually, but using the Change Location button in the Notebook Properties dialog box ensures that any sections of a shared notebook will be synchronized after you specify the new location.
Another operation you can perform in the Notebook Properties dialog box is to convert a notebook so that it uses the OneNote 2007 or the OneNote 2010 file format. If you need to share a notebook with someone who uses an earlier version of OneNote, or you want to be able to open a notebook on a computer on which an earlier version of the program is installed, you can use the Convert To 2007 button to save that notebook in the compatible file format. If you convert a notebook to the 2007 format, you can’t use all of the features available in OneNote 2010, and some of elements of the notebook will be affected. For example, the math equation feature in OneNote 2010 is not available in the 2007 format. You also cannot use linked notes, and subpages cannot be collapsed under their parent page in the page tabs bar. In addition, the content of a notebook’s recycle bin are cleared during conversion.
Note
See Also For more information about linked notes, see 4.1 Use Links and Linked Notes in Chapter 4. For information about the notebook recycle bin, see 3.3 Use History and Backups in OneNote in Chapter 3. Information about working with subpages is provided in “Use OneNote Notebook Organization Tools,” also in Chapter 3.
If you want to store a notebook on Windows Live SkyDrive (discussed in Creating a Notebook on Windows Live SkyDrive later in this chapter), you need to use the OneNote 2010 format.
To configure and set notebook properties
On the ribbon, click File, and then click Info.
Click the Settings button for the notebook you want to work with.
Click Properties.
In the Notebook Properties dialog box, do the following:
Use the Display Name box to make changes to the notebook’s display name.
Select a color for the icon that identifies the notebook in the Navigation bar.
Click Change Location to move the notebook’s file to a different location.
Click Convert To 2007 or Convert To 2010 to change the notebook’s file format.
Notebooks you have worked with recently (and that you recently closed) are listed in the Recently Closed Notebooks area on the Open page in Backstage view. You can open a notebook by double-clicking the notebook’s name.
Notebooks are arranged with the most recently closed notebook first in the list. To move a notebook to the top of the list so that you can find it and open it more quickly, click the pushpin icon. OneNote groups notebooks that you pin in their own group above the other recently closed notebooks.
To pin a notebook
Click File, Open.
Under Recently Closed Notebooks, click the pushpin icon for a notebook you want to pin to the list.
You create a notebook in Backstage view (on the New page) by providing information in three numbered areas. In the first area, you specify whether to store the notebook on the web, on a network location, or on your local computer. You’ll learn more about working with each of these options in the following sections. Next, you type a name for the notebook. OneNote uses this name as the display name for the notebook and for the name of the folder in which the notebook’s files are stored. You then specify a particular location—a folder on Windows Live SkyDrive, a network location such as a folder on a server or Microsoft SharePoint site, or a folder on your computer. Click Create Notebook to complete the process.
Tip
You can change the display name for a notebook by right-clicking it in the Navigation bar, clicking Rename (or Properties), and then entering the name in the Notebook Properties dialog box.
Windows Live SkyDrive is part of the services Microsoft provides through Windows Live. SkyDrive provides free online storage (up to 25 gigabytes) for documents and photos. You can create personal folders on SkyDrive that only you have access to or public folders that you invite others to share.
SkyDrive also lets you create and collaborate on Microsoft Office documents, including OneNote 2010 notebooks, by using Office Web Apps, which are online versions of Microsoft Word, Microsoft Excel, Microsoft PowerPoint, and OneNote. Storing a notebook in a SkyDrive folder is a good plan when you want to have access to it from any computer or you want to share the notebook.
If you have a Windows Live ID (a Hotmail or Live.com e-mail account, for example), you have access to SkyDrive. OneNote also provides a link you can use to sign up for SkyDrive if you want to store a notebook on the web.
Note
See Also You can learn more about Windows Live services, including SkyDrive, at www.live.com. For more information about Office Web Apps, go to www.office.microsoft.com/web-apps.
To begin, click File, New, and then select Web under Store Notebook On. Type a name for the notebook, and then, under Web Location, click Sign In (assuming you have a Windows Live ID).
In the dialog box that appears, type your user name and password and click Sign In. OneNote contacts the server that hosts Windows Live SkyDrive and then displays a list of personal and shared folders. You can create a new shared folder at this point or select one of the folders already defined. Use the Refresh Folder List button to see any updates you make to the group of folders.
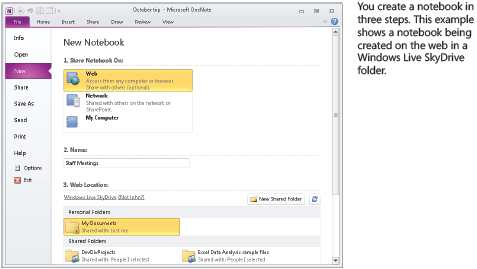
Click Create Notebook. After OneNote creates the notebook in the SkyDrive folder, it displays a message box that informs you the notebook is available to anyone who has permissions to access the SkyDrive folder you designated. The message box also prompts you to send a link via e-mail to people you want to invite to share the notebook.

To create a notebook on the web
Click File, New, and then select Web under Store Notebook On.
Type a name for the notebook.
Under Web Location, click Sign In, and then enter your user name and password for Windows Live SkyDrive.
Select a folder currently defined on Windows Live SkyDrive, or click New Shared Folder.
If you create a new shared folder, you need to sign in to Windows Live again, create the folder in your web browser, and then refresh the list of folders displayed in OneNote.
Click Create Notebook.
In the message box OneNote displays, click E-Mail A Link to invite others to share the notebook, or click No, Thanks to close the message box.
Storing a notebook on a network location lets you share the notebook with other people in your organization, with your workgroup, with family members—anyone who has permission that provides access to the location you select. Network locations include Microsoft SharePoint sites, so if you are using SharePoint to collaborate with others on a project, adding OneNote notebooks to document libraries on your team site can be an excellent tool for storing notes and compiling and tracking project information.
To create a notebook on a network location
Click File, New, and then select Network under Store Notebook On.
Type a name for the notebook.
Under Network Location, type the path to the network location, click Browse to select the location by using the Select Folder dialog box, or select a location you used recently from the list OneNote displays.
Click Create Notebook.
In the message box OneNote displays, click E-Mail A Link to invite others to share the notebook, or click No, Thanks to close the message box.
The My Computer option in the Store Notebook On list creates a notebook in the default location on your computer. Unless you change the default notebook location in the OneNote Options dialog box, this location is C:UsersUsernameDocumentsOneNote Notebooks (on Windows Vista or Windows 7). If you want to store the notebook you are creating in a different folder, click the Browse button and then use the Select Folder dialog box to designate the folder.
Tip
To change the default location for storing notebooks on your computer, click File, Options. In the OneNote Options dialog box, select the Save & Backup page. Under Save, select Default Notebook Location, click Modify, and then select the folder you want to use.
To create a notebook on your computer
Click File, New, and then select My Computer under Store Notebook On.
Type a name for the notebook.
Under Location, type the path where you want to store the notebook, or click Browse to use the Select Folder dialog box.
Click Create Notebook.
To personalize OneNote, you make settings in the OneNote Options dialog box, which you open by clicking the File tab and then clicking Options. The dialog box (as it does in other Microsoft Office applications) provides several pages on which you select and configure options that control, for example, which misspellings OneNote corrects automatically, how OneNote displays pages by default, and which language settings you use. OneNote also provides options for working in the Research pane and for specifying how it translates text.
Note
See Also For information about working in the Research pane, including how to translate text in OneNote, see Conducting Research in Chapter 4.
In the following sections, you’ll learn more about options for personalizing OneNote that are included in the OneNote Options dialog box.
On the General page of the OneNote Options dialog box, the Default Font area includes three settings. Use the Font list to select the font you want OneNote to display by default when you type a note. OneNote uses the font you select, but in a larger size, for page titles. The Size list controls the default font size for notes, and the Font Color list provides a palette of color choices. Click More Colors at the bottom of the color palette to open the Colors dialog box, where you can choose from additional colors or define a custom color.
A list of nine options appears on the Display page.
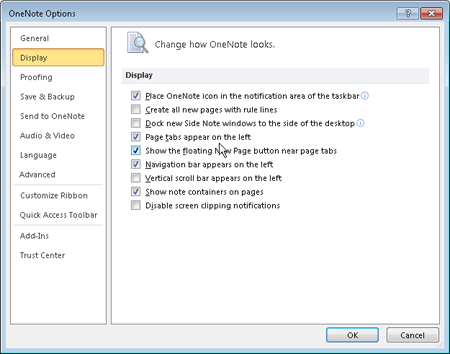
The following six options are selected by default:
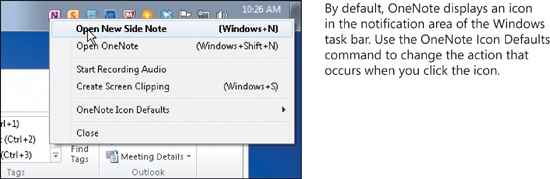
Place OneNote Icon In The Notification Area Of The Taskbar You can click this icon to create a side note (which you’ll learn more about in “Use OneNote Notebook Organization Tools” in Chapter 3), or right-click the icon and select from a menu of options, as shown.
Click OneNote Icon Defaults to change the action that occurs when you click the icon, which is to open a new side note by default. Other options you can choose from are to open OneNote, start an audio recording, or create a screen clipping.
Page Tabs Appear On The Left Clear this option to display the page tabs at the right side of the OneNote window.
Show The Floating New Page Button Near Page Tabs Clear this option to hide the floating New Page button.
Navigation Bar Appears On The Left Clear this setting to display the Navigation bar on the right.
Show Note Containers On Pages Clear this option to hide note containers when you select a note.
Disable Screen Clipping Notifications One of the elements you can add to a notebook is a clipping from a window open on your screen. You might create a screen clipping to add an image from a website to a notebook page, or to include a section of a Microsoft Word document or a drawing in Microsoft Visio. If you want OneNote to display a notification that describes the steps you follow to create a screen clipping, clear this option.
You can also set three other options on the Display page:
Create All New Pages With Rule Lines For more information about working with rule lines on pages, see Setting Page Properties later in this chapter.
Dock New Side Note Windows To The Side Of The Desktop By default, the side note window is a floating window. Select this option to dock the side note window to the desktop.
Vertical Scroll Bar Appears On The Left The vertical scroll bar you use to move up and down the current page appears on the right side of the page by default. Select this option to display it on the left.
The Proofing page in the OneNote options dialog box is divided into three areas. In the first of these, click the AutoCorrect Options button to open the AutoCorrect dialog box. In OneNote 2010, the AutoCorrect dialog box has two tabs: AutoCorrect and Math AutoCorrect. Use the AutoCorrect tab to specify whether OneNote should automatically correct two initial capital letters, for example, or always capitalize the names of days. You can also add to the built-in list of misspelled words and character combinations that OneNote replaces automatically with the correct spelling or a corresponding symbol.

Click the Exceptions button to open a dialog box in which you can define combinations of two capital letters that OneNote won’t correct (IDs is defined as an exception by default) as well as abbreviations that end in a period (such as Blvd.), after which OneNote won’t capitalize the next character.
On the Math AutoCorrect tab of the AutoCorrect dialog box, you can define character combinations that you type to produce mathematical symbols in equations. For example, if you type the character sequence eq (for “not equal”) within the field for an equation, OneNote inserts the symbol ≠.
In the other areas on the Proofing page, you can set options for how all Office programs correct spelling and whether OneNote checks spelling as you type and whether it hides spelling errors.
The Language page lets you specify language settings for all Office programs—in other words, any changes you make to this page affect not only OneNote but Word, Excel, PowerPoint, and the other Office applications you have installed. You can set up additional editing languages (the languages Office takes into account when it checks the spelling or the grammar in a notebook and when it sorts text). You can also choose the language Office uses for displaying the names of commands on the ribbon and in the Help files. (Click the link to Office.com to learn how to get additional display languages.) In this page’s third section, you can change the language used to display ScreenTips. You can choose the option to match the display language or choose an alternative from the list. Here again, you can click a link to a page on Office.com to learn how to obtain more ScreenTip languages.
Many of the options on the Advanced page of the OneNote Options dialog box are related to specific features that are described in more detail in other chapters of this book:
Linked Notes See 4.1 Use Links and Linked Notes in Chapter 4.
E-Mail Sent From OneNote See E-Mailing Pages in Shareable Formats in Chapter 2.
Tags See Configuring Tag Options in Chapter 3.
Passwords See Protecting Sections with a Password in Chapter 3.
Search See 3.2 Search OneNote in Chapter 3.
Pen See Using and Setting Pen Options in Chapter 4.
The options in the Editing section of the Advanced page are all selected by default. You can clear these options to do the following:
Hide the Paste Options button when you paste content
Not include a link to the source of content you paste into OneNote from the web
Turn off the automatic creation of numbered and bulleted lists
Turn off the automatic calculation of mathematical calculations
Turn off the creation of links that you create by typing double brackets ([[ ]]) around a phrase.
To specify settings in the OneNote Options dialog box
On the ribbon, click File, and then click Options.
In the OneNote Options dialog box, click the category for the options you want to set.
Select check boxes for the options you want to enable, or clear the check boxes for options you want to turn off.
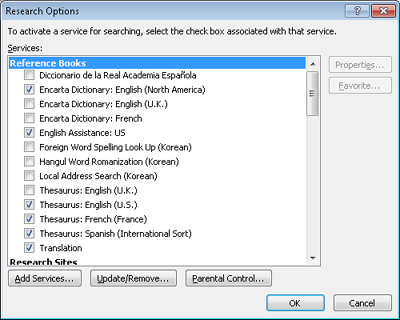
The Research command and the Translate command appear on the OneNote ribbon’s Review tab. Click Research to open the Research pane (which is available also in other Office applications). The Research pane provides a search box you can use to find information in reference books, via research sites such as Bing, and on business and financial websites. You can add to the sources OneNote uses, remove or update these sources, and set parental controls (if necessary) in the Research Options dialog box, which OneNote displays when you click the Research Options link at the bottom of the Research pane.
Tip
If you click Parental Control in the Research Options dialog box, you are likely to see a message box that indicates you do not have permission to change these settings. If you need to work with parental controls in OneNote, close the program, and then navigate on your computer to the folder Program FilesMicrosoft OfficeOffice 14. Locate the file Onenote.exe, right-click the file, and choose Run As Administrator. Enter administrator account credentials if needed. Return to the Research Options dialog box to set options for parental controls.
When you click Translate, Choose Translation Language, OneNote displays the Translation Language Options dialog box. Use this dialog box to select the language OneNote and other Office applications use when you run the mini translator to translate text.

Note
See Also You’ll learn the details of how to translate text in Conducting Research in Chapter 4.
To set research options
On the Review tab, click Research.
At the bottom of the Research pane, click Research Options.
Use the Research Options dialog box to update services, add or remove services, and make settings for parental controls.
To set translation options
On the Review tab, click Choose Translation Language.
In the Translation Language Options dialog box, choose the language you want to use.
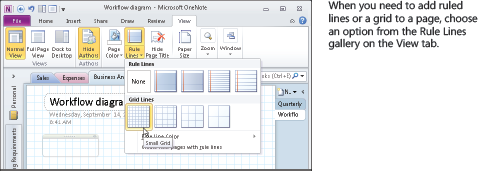
You can change how pages are set up in OneNote to assist you in the work you are doing. For example, use a blank page with no background color for sketches and drawings, or apply a different page color to identify the pages in a section. If you are taking notes by using a pen, you can set up a page with ruled lines, or you can display a grid pattern to help create floor plans or other types of drawings that need to show precise proportions and scale.
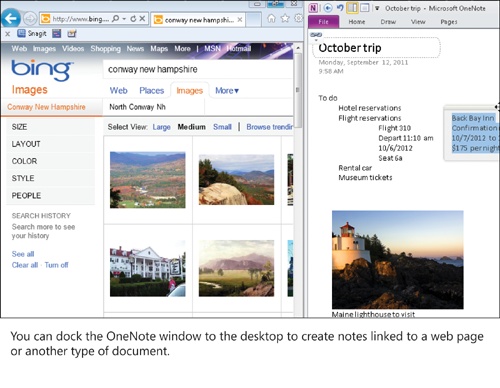
OneNote also provides options for how to view pages. In Normal view, you see the Navigation bar and the page tabs bar. In Full Page view, OneNote hides these navigational components so that you see more of the page. If you want to work with OneNote and another application simultaneously, you can dock the OneNote window to the desktop. By choosing the command to dock the OneNote window, you also enable linked notes, which you’ll learn about in detail in Chapter 4.
The Page Setup group on the View tab includes four commands you can use to set page properties:
Page Color Click Page Color and then select one of the 16 options for a colored background. Click No Color to use the default white background.
Rule Lines The Rule Lines command provides options for adding ruled lines or a grid to pages. You can choose from four styles of ruled lines (narrow, college, standard, and wide) or from four options for a grid (small, medium, large, and very large). Choose None to use an unlined page.
Ruled lines appear in light blue by default. To choose a different color, click Rule Lines, Rule Line Color, and then select one of the options from the list. If you want to include ruled lines on new pages, select that option on the Rule Lines menu. Clear the option to create unlined pages.
Hide Page Title Use the Hide Page Title command to specify whether OneNote displays the page title in the upper-left corner of a page.
Paper Size Click the Paper Size command to display a task pane in which you can select a standard paper size (or return to the Auto option that OneNote uses by default), set the width and height of the paper size, choose an orientation (portrait or landscape), and specify settings for margins along the top and bottom and the left and right sides of the page. OneNote applies the settings for margins when you print a page. Choose the Custom option at the bottom of the Size list to define a paper size of your own.

Note
See Also The Paper Size task pane also includes the link Save Current Page As A Template. For information about saving a page as a template, see Saving the Current Page as a Template earlier in this chapter.
On the ribbon, click the View tab.
In the Page Setup group, click Hide Page Title.
If OneNote displays a message box prompting you to confirm this action, click Yes.
To show the page title again, click Hide Page Title.
To specify a page size
In the Views group on the OneNote ribbon’s View tab, you can switch from Normal view to Full Page view. In Full Page view, OneNote does not display the Navigation bar or the page tabs bar. You still see the tab names across the top of the ribbon, but OneNote collapses the ribbon when you first switch to Full Page view. To expose the ribbon, click the Expand The Ribbon button (the heart-shaped icon) near the end of the ribbon on the right.

The Dock To Desktop command anchors the OneNote window to the desktop, along the right side of the screen by default. You can drag the docked window to the left side or the top of the screen. When you choose Dock To Desktop, you also enable linked notes, which is indicated by the linked-chain icon OneNote displays in the top-left corner of the window. Click Stop Taking Linked Notes to turn off this feature, or click Linked Notes Options to open the area of the OneNote Options dialog box where you set options for using the feature.
Note
See Also You’ll learn about the details of linked notes in 4.1 Use Links and Linked Notes in Chapter 4.
Tip
In the Window group on the View tab, OneNote includes the New Docked Window command. Click this command to display the current page in a separate window (and enable linked notes).
Note
See Also To learn more about the Hide Authors command on the View tab, see Hiding Author Initials in Chapter 2.
Before finishing this chapter, be sure you have mastered the following skills: